If you need to make a quick sewing repair to clothing or camp equipment, the yucca plant provides a needle with thread already attached. Pictured below: Yucca plant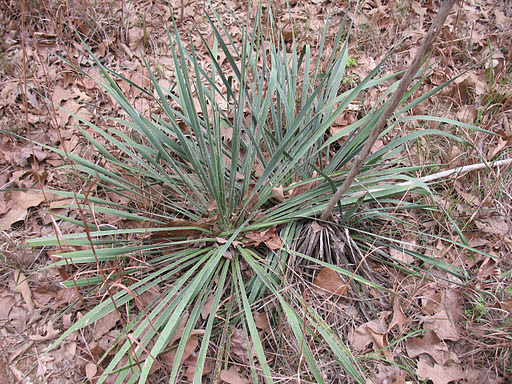
Locate a yucca plant and cut a long leaf from the plant.
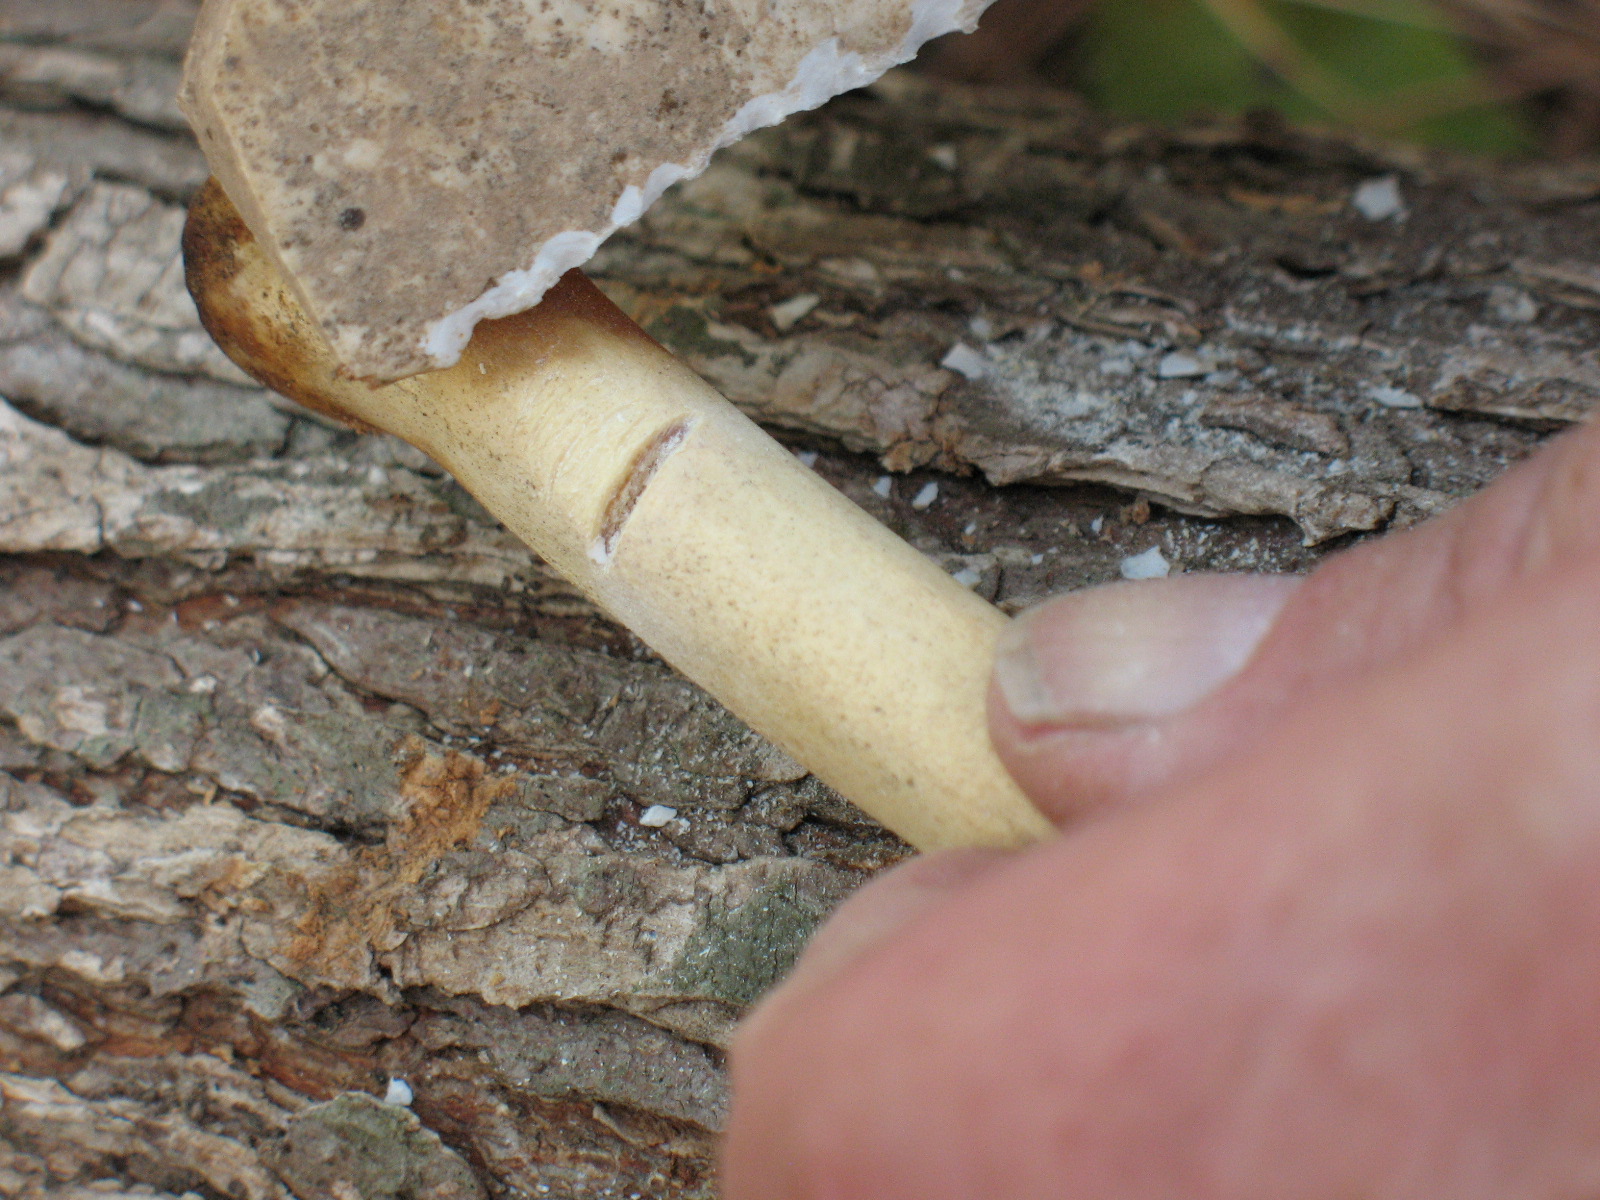
The sharp spine on the end of the leaf will be your needle. Use you knife and start a small cut down each side of the needle leaving a strip of yucca leaf that is about a quarter inch wide. Pictured below: splitting fibers from the sides of the needle with a knife. 
Use your fingers to strip off the fibers on the outside edges of the leaf. Pictured below: Stripping of the outside fibers.
Use your knife and starting about an inch-and-a-half below the needle scrape off the waxy outer layer of the leaf. Pictured below: Scraping of the waxy outer layer.
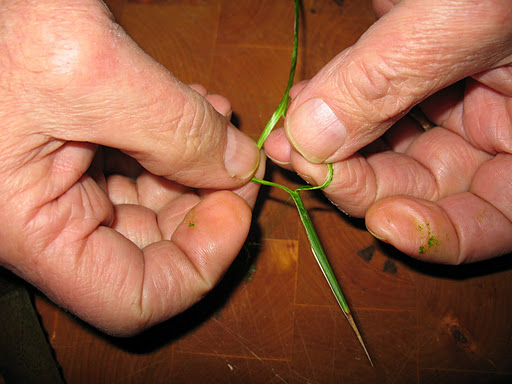
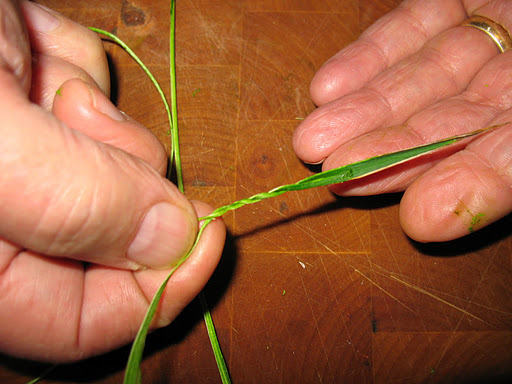
Starting about an inch and a half below the point of the needle, split the exposed yucca fibers into two strand and twist these strands together to form your thread. Pictured below: top, Splitting the fibers with a knife; middle, separating the fibers into two strands with the fingers; bottom, Twisting the strands into thread.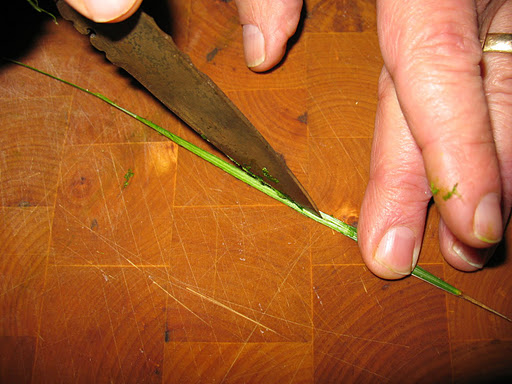
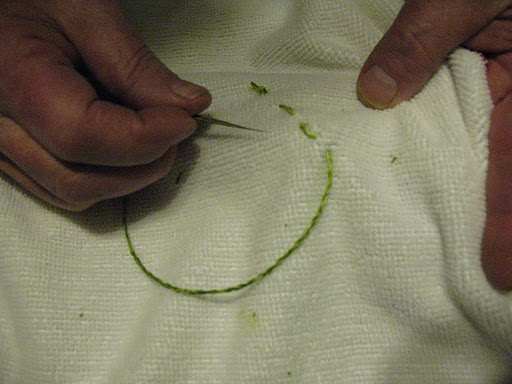
You should now have about a foot to foot and a half long thread with a needle attached to it. The needle will easily penetrate cloth. If you are going to sew leather or canvas you will probably have to use an awl to punch holes in the material first. Pictured below: top, Finished needle and thread; bottom, sewing cloth with the yucca needle and thread. 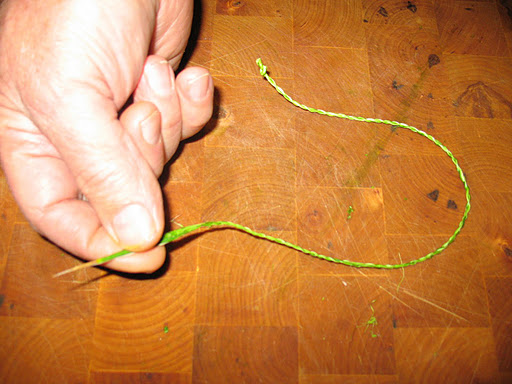
Yes, there is yet another reason to keep duct tape around. You can actually make some pretty descent arrow fletchings out of duct tape. I was reading a survival chat the other day and someone wrote in asking about if you could fletch arrows with duct tape. Several responders were quick to deride the questioner. Obviously these guys practice most of there wilderness survival skills with a keyboard because I have been fletching survival arrows with duct tape for years. It’s not pretty, but if it will put meat in the pot, who cares about pretty?
It’s so simple to do that the pictures alone would probably show you how to make these fletchings, but just in case I will include a brief how-to description. I’m using dark red tape in the demonstration below because it’s easier to see against the background; but, of course, you can use any color that you have available. As far as that goes, you can use about any kind of tape that you have available as long as it is wide enough.
First, cut two strips of duct tape about five inches long.
Second, lay one of the pieces of tape down with the sticky side facing up.
Third, press your arrow shaft down onto the tape.
Fourth, lay the other piece of duct tape down on top of the arrow shaft
Fifth, stick the point of the arrow into the ground and use your fingers to pinch the two pieces of duct tape together. 
Sixth, trim the fletching to the desired shape.
That’s all there is to it. Here’s your finished arrow with a surprisingly durable fletching.
The purpose of putting a fletching on the back of an arrow is to create drag on the back end of the arrow. If the back of the arrow wants to move slower than the front of the arrow, the arrow will fly straight. Anything that will cause the back of the arrow to come into friction with the surrounding air will create the necessary drag to make the arrow fly straight. I have made survival arrows that are fletched with leaves, duct tape, paper, small whole feathers, and all sorts of other weird things. Of course the traditional fletching for arrows is a split feather, called a vane, which is glued and or tied to the arrow shaft. Almost any feather will do if it is large enough. Native Americans used the feathers of eagles, hawks, owls, and turkeys. The English preferred goose feathers. These days, most primitive archers use turkey feathers for fletchings. Eagle, hawk, and owl feathers can get you into serious trouble with the law, so stick with turkey feathers.
This is the procedure that you follow in order to turn a turkey feather into a usable fletching.
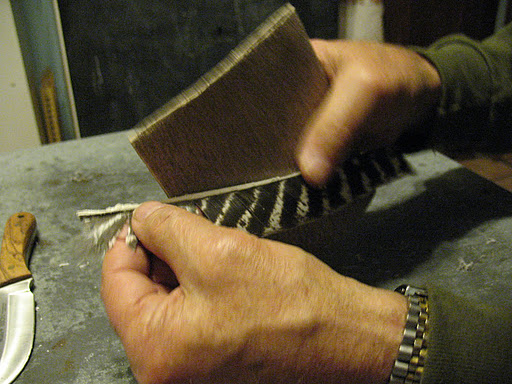
First take a look at the feather, especially the quill in the center of the feather. On the front of the feather the quill is rounded. On the back of the feather the quill has a groove down the center. Pictured below: top, front of turkey feather; bottom, back of turkey feather showing the groove down the center.

Now turn the feather so that the front is laying face up. Use one hand to hold the feather in place, and use a sharp knife, blade held ninety degrees to the quill, and begin gently scraping of the rounded crown of the quill. Scrape all the way down the quill. As you scrape the dark outer surface away, you will begin to see the underlying white pith. Stop scrapping before you get into the actual feathers themselves. Pictured below: scraping the crown off of the quill.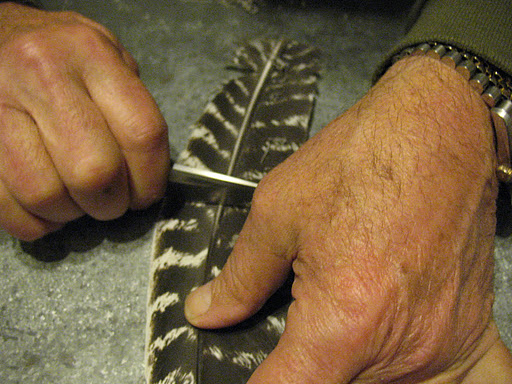
Now take the butt of your knife handle and gently tap along the entire length of the quill. Turn the quill over and tap along the entire length of the back side. The quill should begin to separate down the middle where the groove is located on the back. Pictured below: tapping the quill with knife butt.
You may have to take your knife point to the base of the quill and help it start splitting apart. Pictured below: Using the knife to start a split in the base of the quill.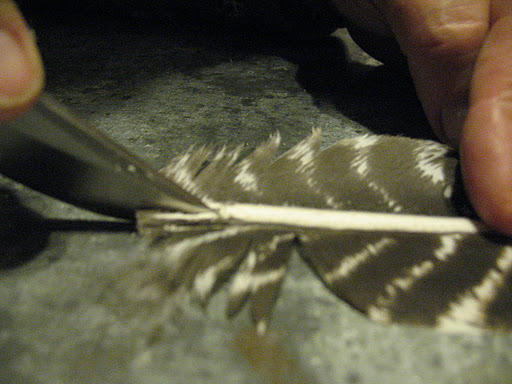
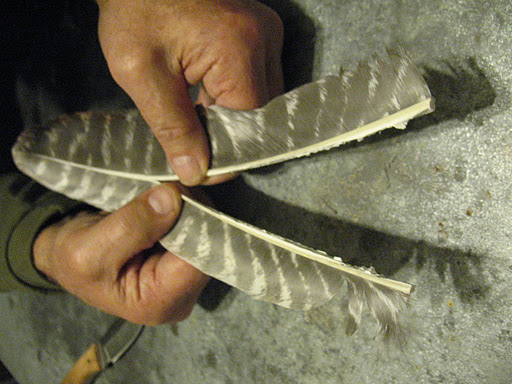
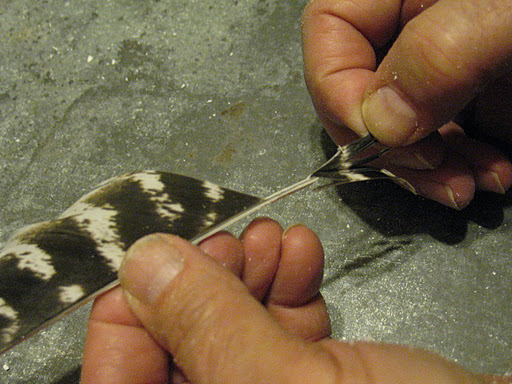
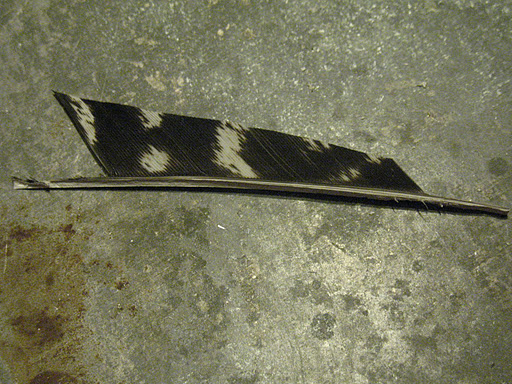
Once the quill starts to split you can use your fingers to gently seperat the two halves. You should now have two separate vanes that can be used for fletchings. Pictured below: top and middle, splitting the quill; bottom, separated vanes. 
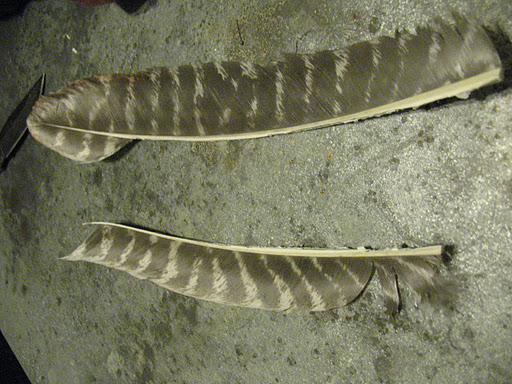
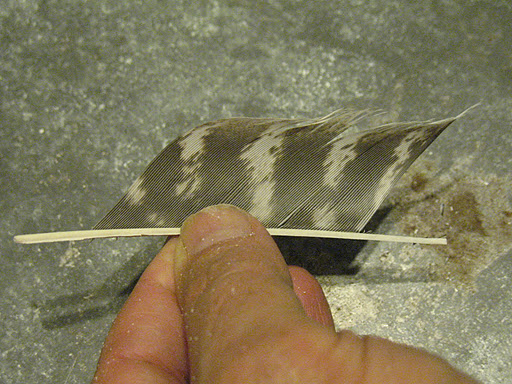
The quill part of the fletching will probably be thicker than you want. Fix this by scrapping with your knife or rubbing gently with sandpaper. Pictured below: top, scraping the quill with a knife; bottom, sanding the quill.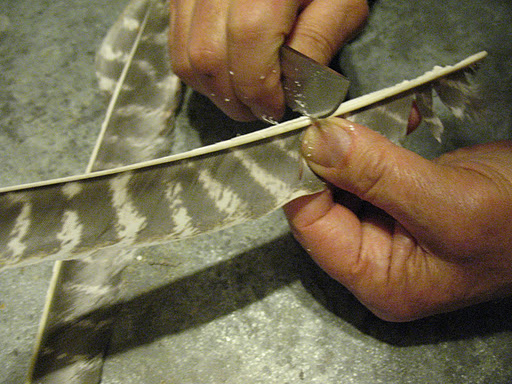
I usually make my finished fletchings about four inches long. Since I tie the fletching on with deer sinew, there needs to be about three-quarters of an inch of bare quill on the front and back ends of the fletching. So, I cut may fletchings about five and a half inches long and then strip of three-quarters of an inch of feather on each end. Pictured below: top, cutting the vane to length; middle, stripping feathers from the vane; bottom, vane ready to trim or attach to arrow shaft.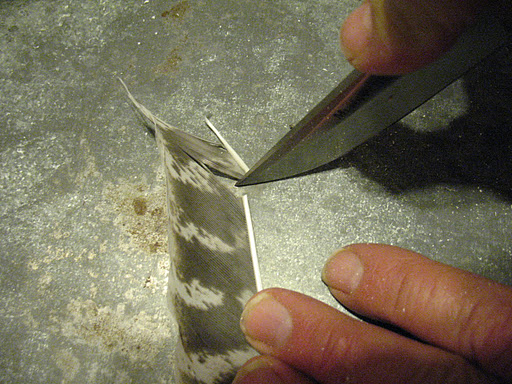
The fletching can be trimmed to shape before attachment to the shaft, but I find the it is easier and that the results are more consistent if I trim the final shape after the fletchings are attached to the arrow shaft. Pictured below: top, trimming vane; bottom,trimmed vane.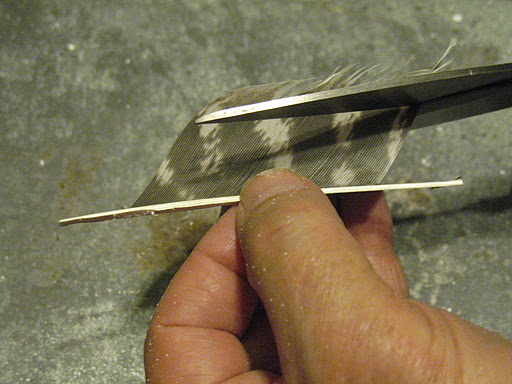
Rawhide glue has many uses. It can be used to hold arrow points or spear points in place while you lash on sinew, it can be applied over the sinew wrappings on arrow fletching to hold then in place better, and it can be used to glue down a sinew backing on a bow. Raw hide glue is not hard to make although it is pretty time consuming. The easiest way to make rawhide glue is to take rawhide scrapings and boil them in a pot of water. If you are brain tanning animal hides you will have a lot of scrapings on hand. Instead of throwing these away, why not make them into glue? If you’re not tanning hides you can still take a rawhide and scrape it down into shavings and use them. Some people just cut the rawhide into small chunks and boil these, but this takes a longer. Picture below: Rawhide chips ready to be turned into glue.

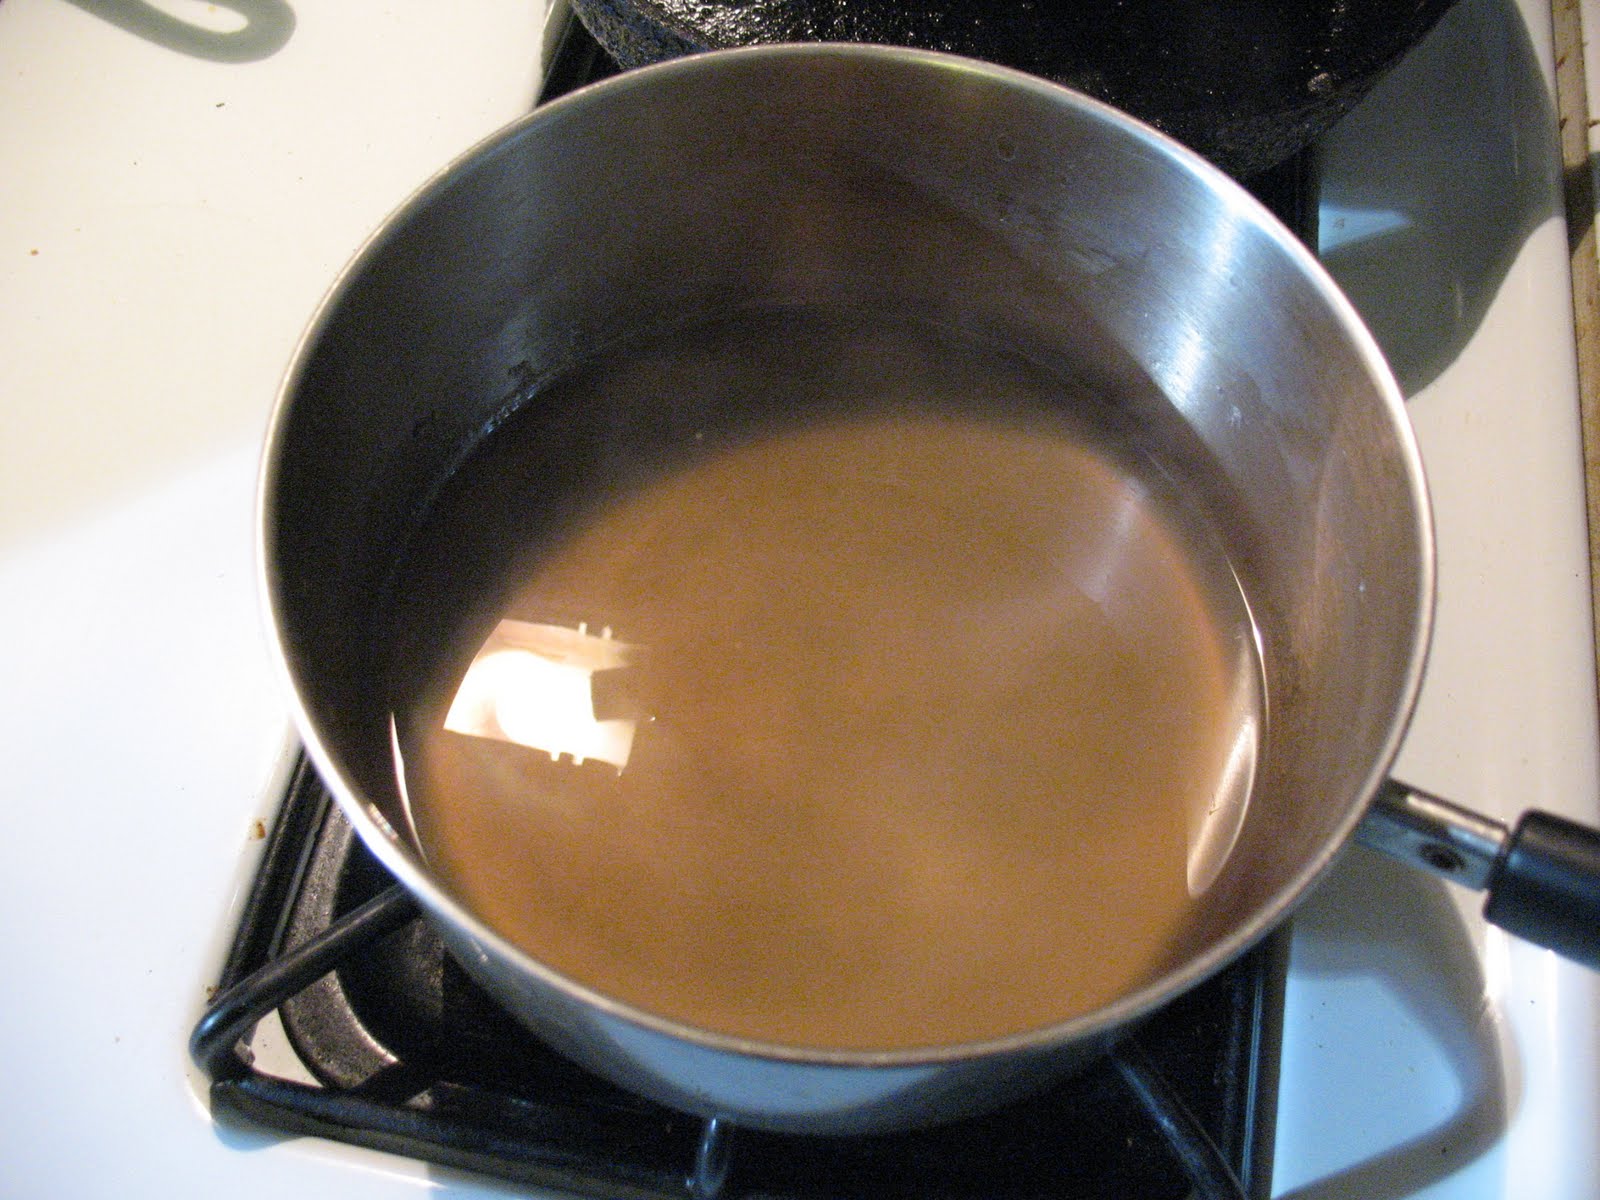
Here’s how you do it. Bring a gallon of water to a rolling boil. After the water comes to a good boil, reduce the heat so that the water is just simmering. Take a double handful of rawhide shavings and drop them into the water. Stir the shavings around a little then set back and let them simmer. Keep an eye on the water and don’t let it all boil away. If it gets down below an inch add some more water. The shavings will eventually begin to dissolve. When they are completely dissolved, let the water boil down until you have about an inch in the pot. Pictured below: Rawhide glue after about twenty hours at a low simmer. The water had to be topped up about six times.
You can pour this liquid off into a container and let it cool. As it cools it will become thicker. This is your glue. If the glue is still pretty liquid it will grow bacteria on it if left out, so you need to store it in the refrigerator. Pictured below: Container of rawhide glue that has just been removed from the refrigerator.

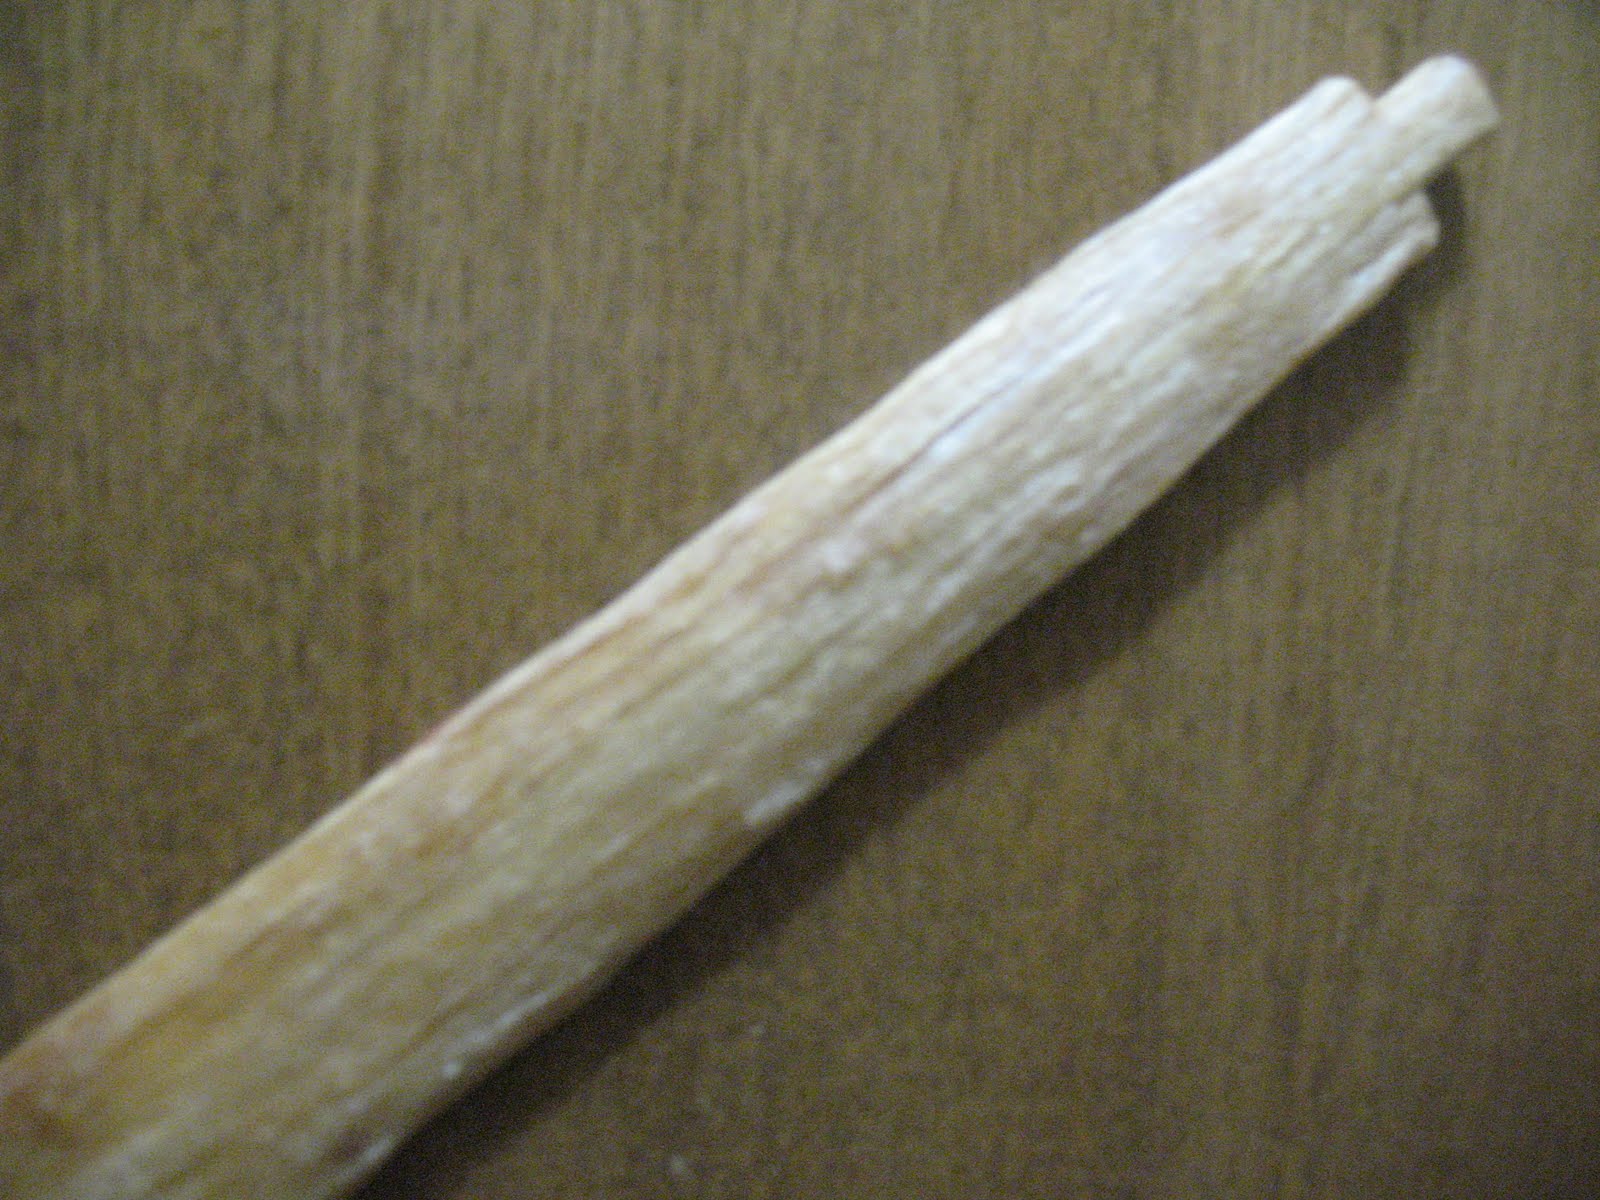
If you leave the glue on the stove longer, until most of the water is boiled away, it will become very hard and brittle. In this condition the glue will keep for years without refrigeration. You can take very thick rawhide glue and before it cools dip a small stick into. Swirl the stick around a little to get a good glob of glue on it, then stick the stick into the ground in an upright position and let the glue dry. You’ve just made a Stone Age glue stick. Native Americans often carried a glue stick like this to make repairs to arrow point bindings or fletchings. Just lick the glue stick or put it in your mouth for a moment and it will soften up for use. Pictured below: Rawhide glue stick.

If you don’t want to go to the trouble of making your own rawhide glue you can order some on the internet, or you can buy some un-flavored gelatin at the grocery store. Yes, gelatin. Gelatin is made from boiled beef hides. Don’t tell your kids or they will never eat Jello again. To make glue out of the gelatin just bring a little water to a boil, turn it down to low, add the gelatin, and stir until it dissolves. Make your glue mixture thicker than the directions for gelatin. The resulting glue is used the same way as rawhide glue made from boiled deer hides. Pictured below: Unflavored gelatin.

Word of caution: if you are trying to sinew back a bow, don’t try and use carpenter’s hide glue as a replacement for rawhide glue. The carpenters glue has added chemicals that affect the way it hardens, and it will not work well with sinew. Pictured below: top, Dipping a sinew bundle in rawhide glue; bottom, Sinew bow backing applied with rawhide glue.

Pine pitch glue is the Super Glue of wilderness survival. It can be used to help secure arrowheads, spear points, or knife blades, it can be used to water-proof the inside of a basket, it can be used to seal the seams of a bark container, or to water-proof the seams of a birch bark canoe.
Pine pitch glue is not hard to make because nature has already done most of the work for you. To make pine pitch glue you will need the following:
• some dried pine sap
• some softwood charcoal
• a round rock and a flat rock
• a campfire
• a pot or container to warm the pitch in
• a stick to stir the mixture
Just about any walk in the woods can provide you with pine sap. Keep your eyes open for a pine tree that has had the bark damaged. When a pine tree is injured it oozes pine sap to seal the wound. This pine sap will dry into a hard, amber colored substance that can be easily picked off of the tree. Pictured below: Pine sap on the tree and in my hand.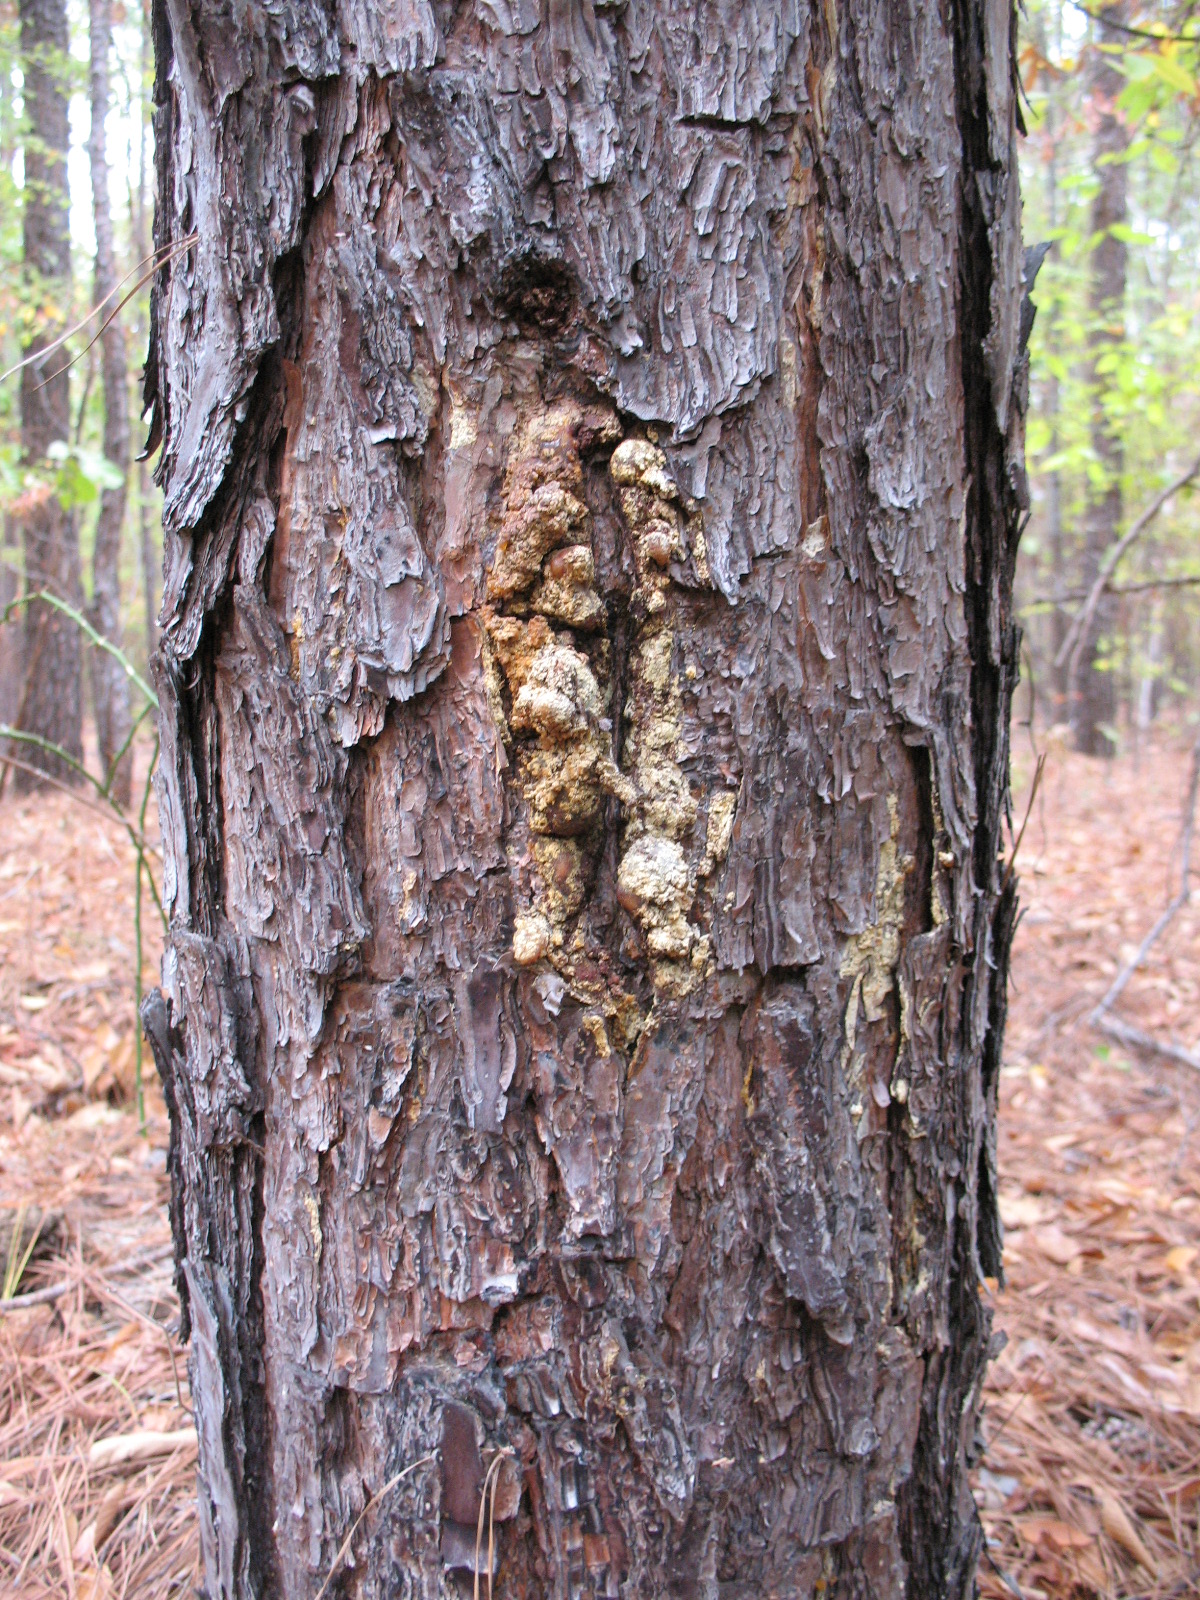

Softwood charcoal can be gathered from a campfire where pine has been burned. The charcoal needs to be ground into a fine powder before you use it, so take your two rocks and using them like a mano and metate grind down the charcoal. Pictured below: top, softwood charcoal; middle, grinding the charcoal into powder; bottom, charcoal powder in a small clay pot.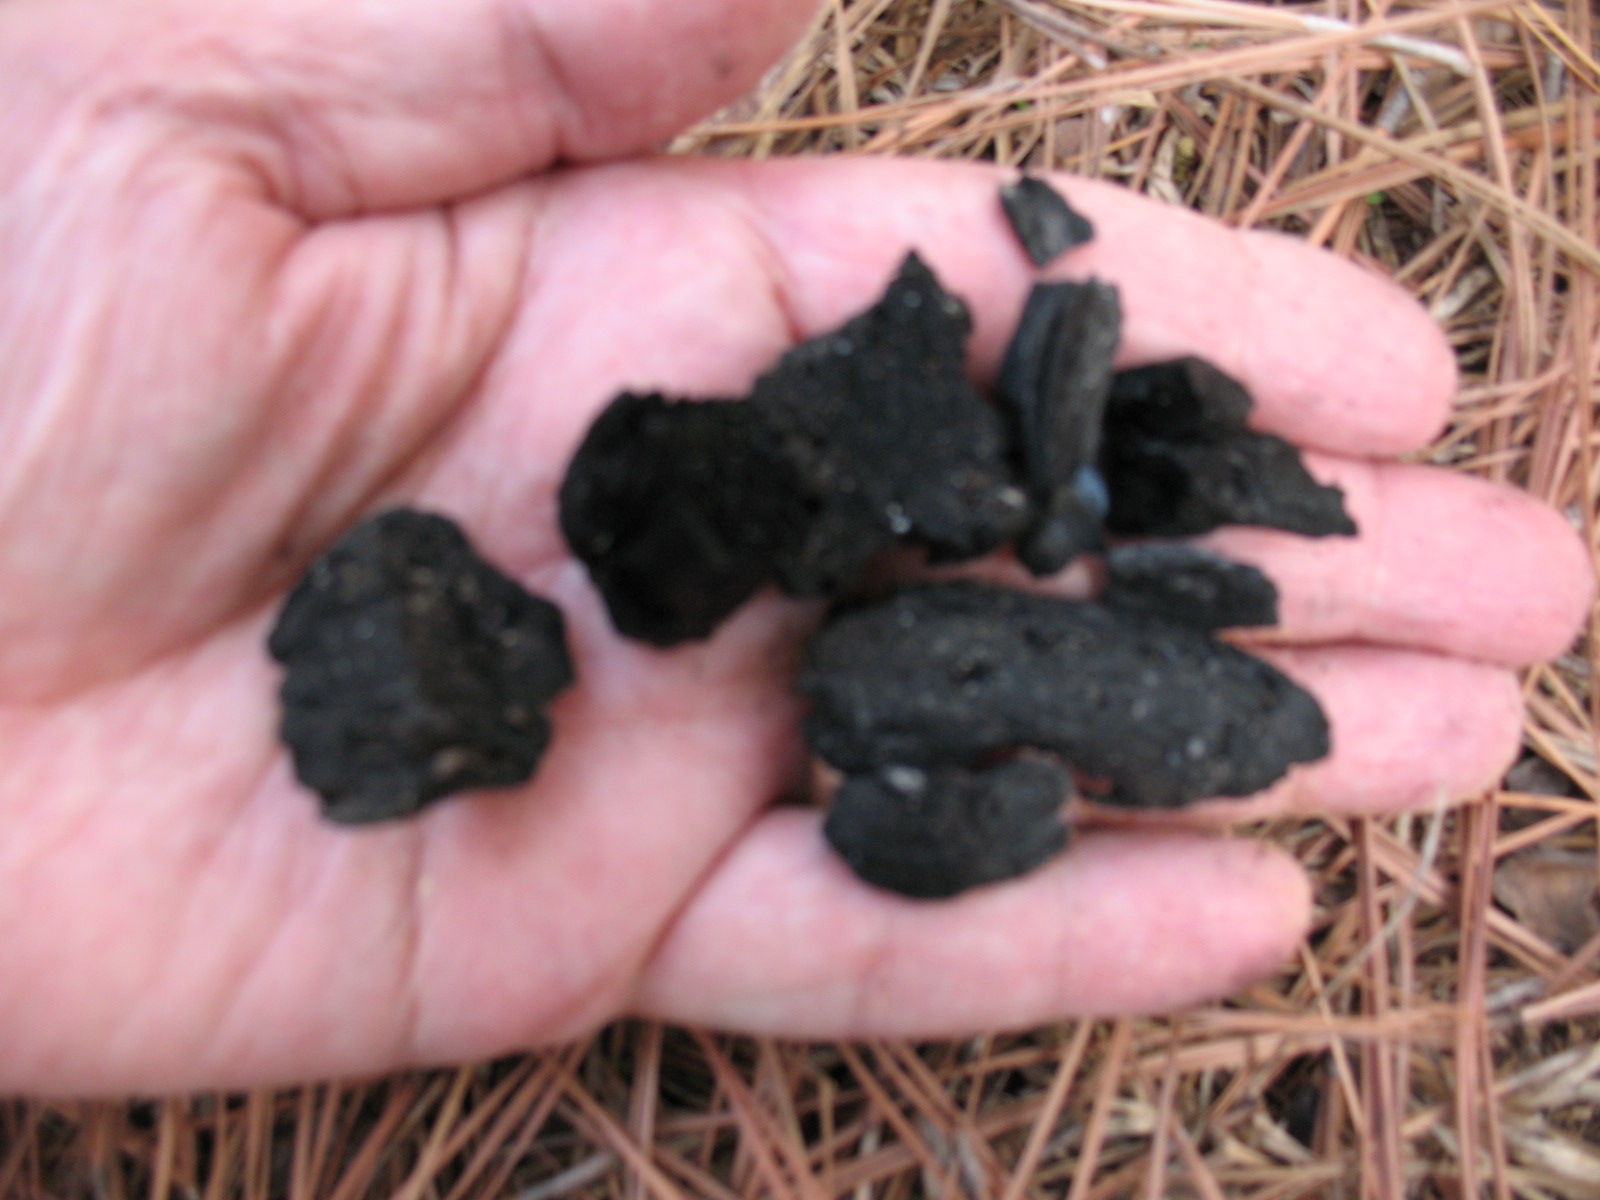


To turn the two ingredients in to pitch glue, place the chunks of dried pine sap in your warming pot and place over very low heat. Pine sap is very flammable so if you do this over a campfire you should let the fire burn down to coals first and then set the pot near the fire rather than directly on it. If you don’t have a pot, you can use a stone with a slight depression in it, or you can use a mussel shell as I have in the pictures below. 

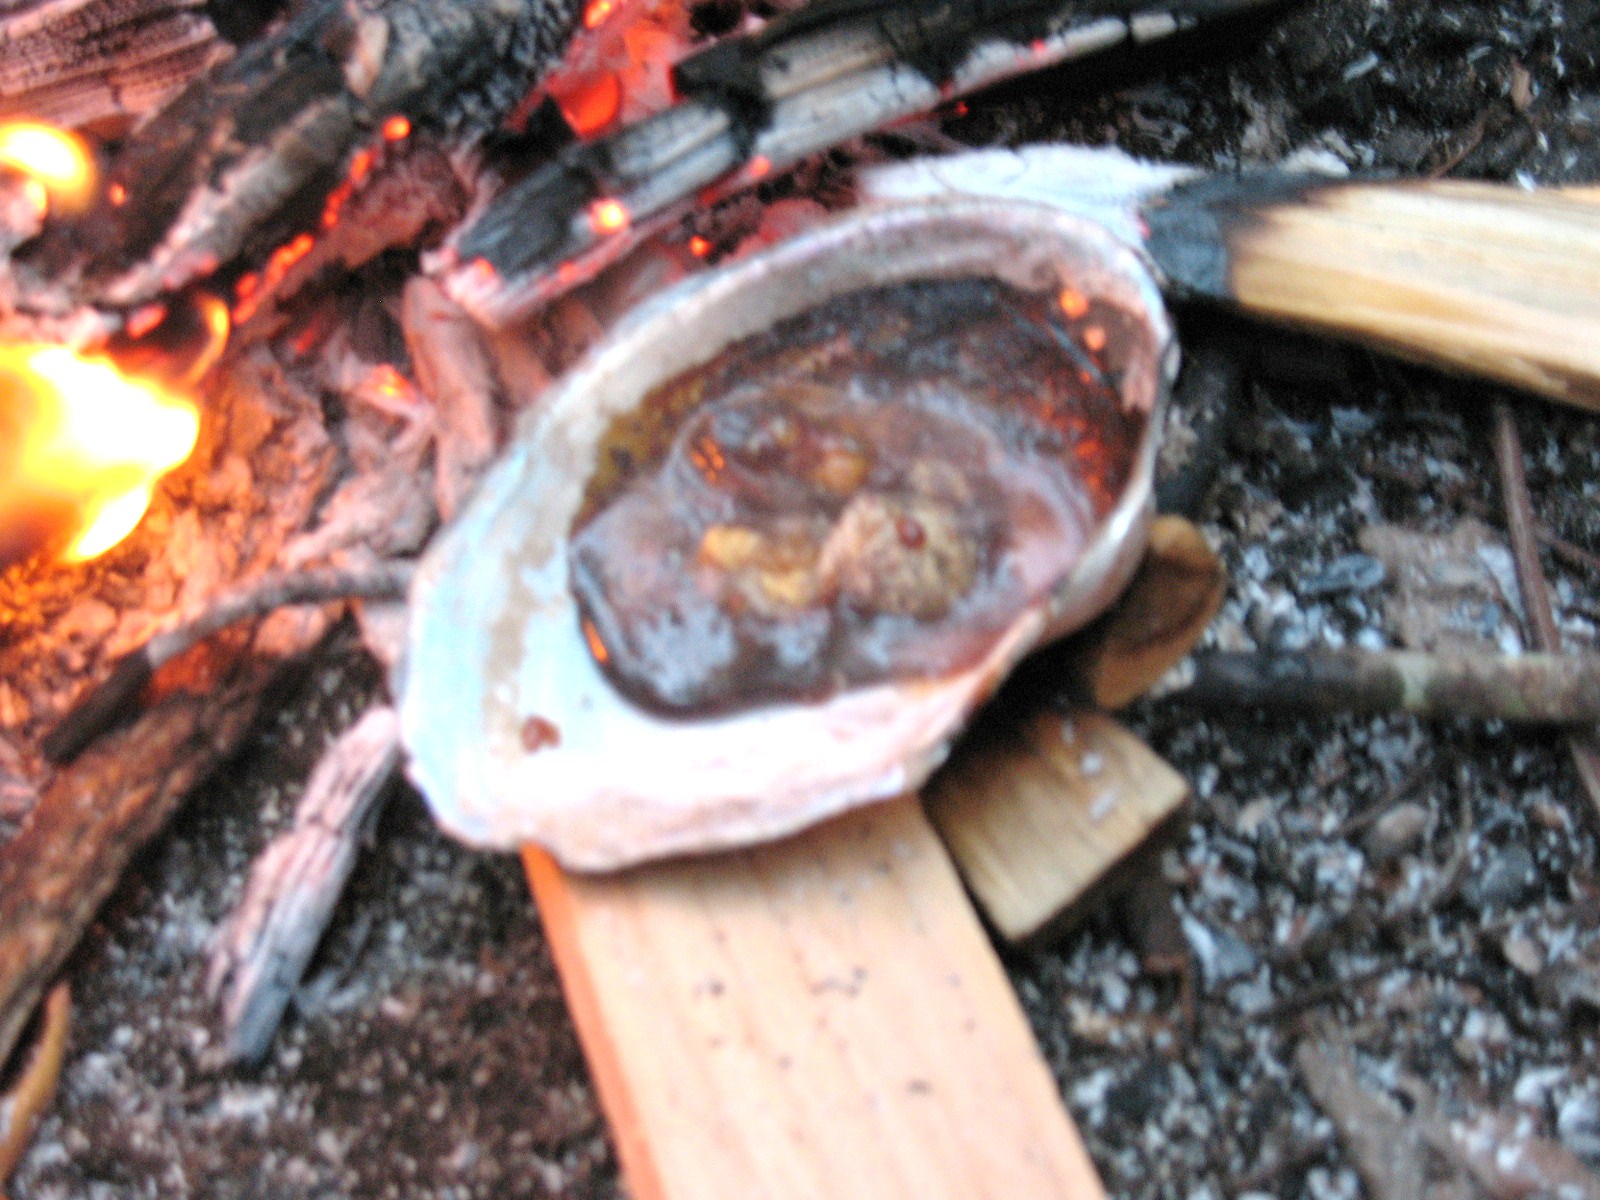
As the sap heats it will begin to melt. When all of the sap has been reduced to a liquid, pour in the ground charcoal. You will have to experiment on the proportions but five parts sap to one part charcoal is a good place to start. Take your stick and stir the mixture until the charcoal is evenly distributed throughout the sap. Pictured below: top, adding charcoal powder to the melted pine sap; bottom, sap and charcoal ready to stir together.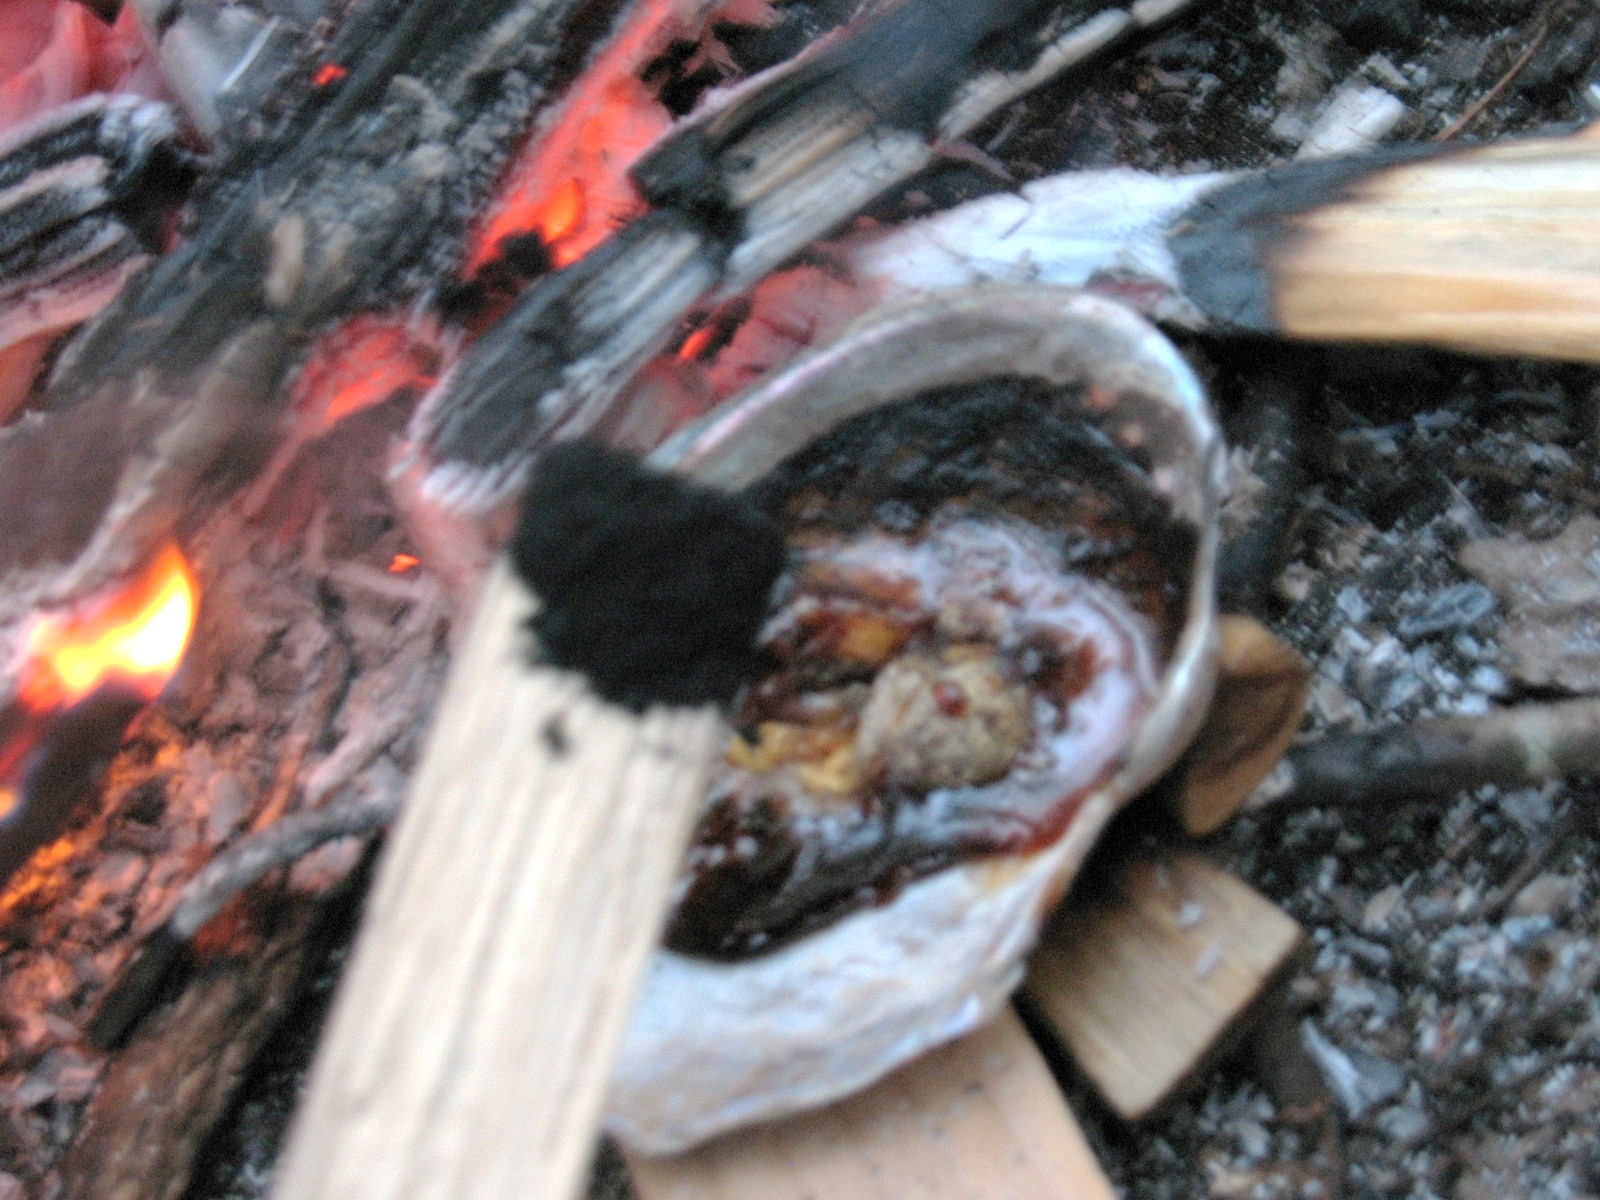

You can now remove the pot from the fire and let your pitch cool. If you got the proportions right, the pitch should still be a little soft and elastic after it cools. If you like, you can swirl a small stick in the warm pitch and build up a little glob on the end. These glue sticks are a convenient way to store and transport pitch. Pictured below: pine pitch glue stick.
To use the pitch you can re-warm it slightly to soften it. This can be done by pinching off a small piece of pitch and placing it on a rock beside your campfire.
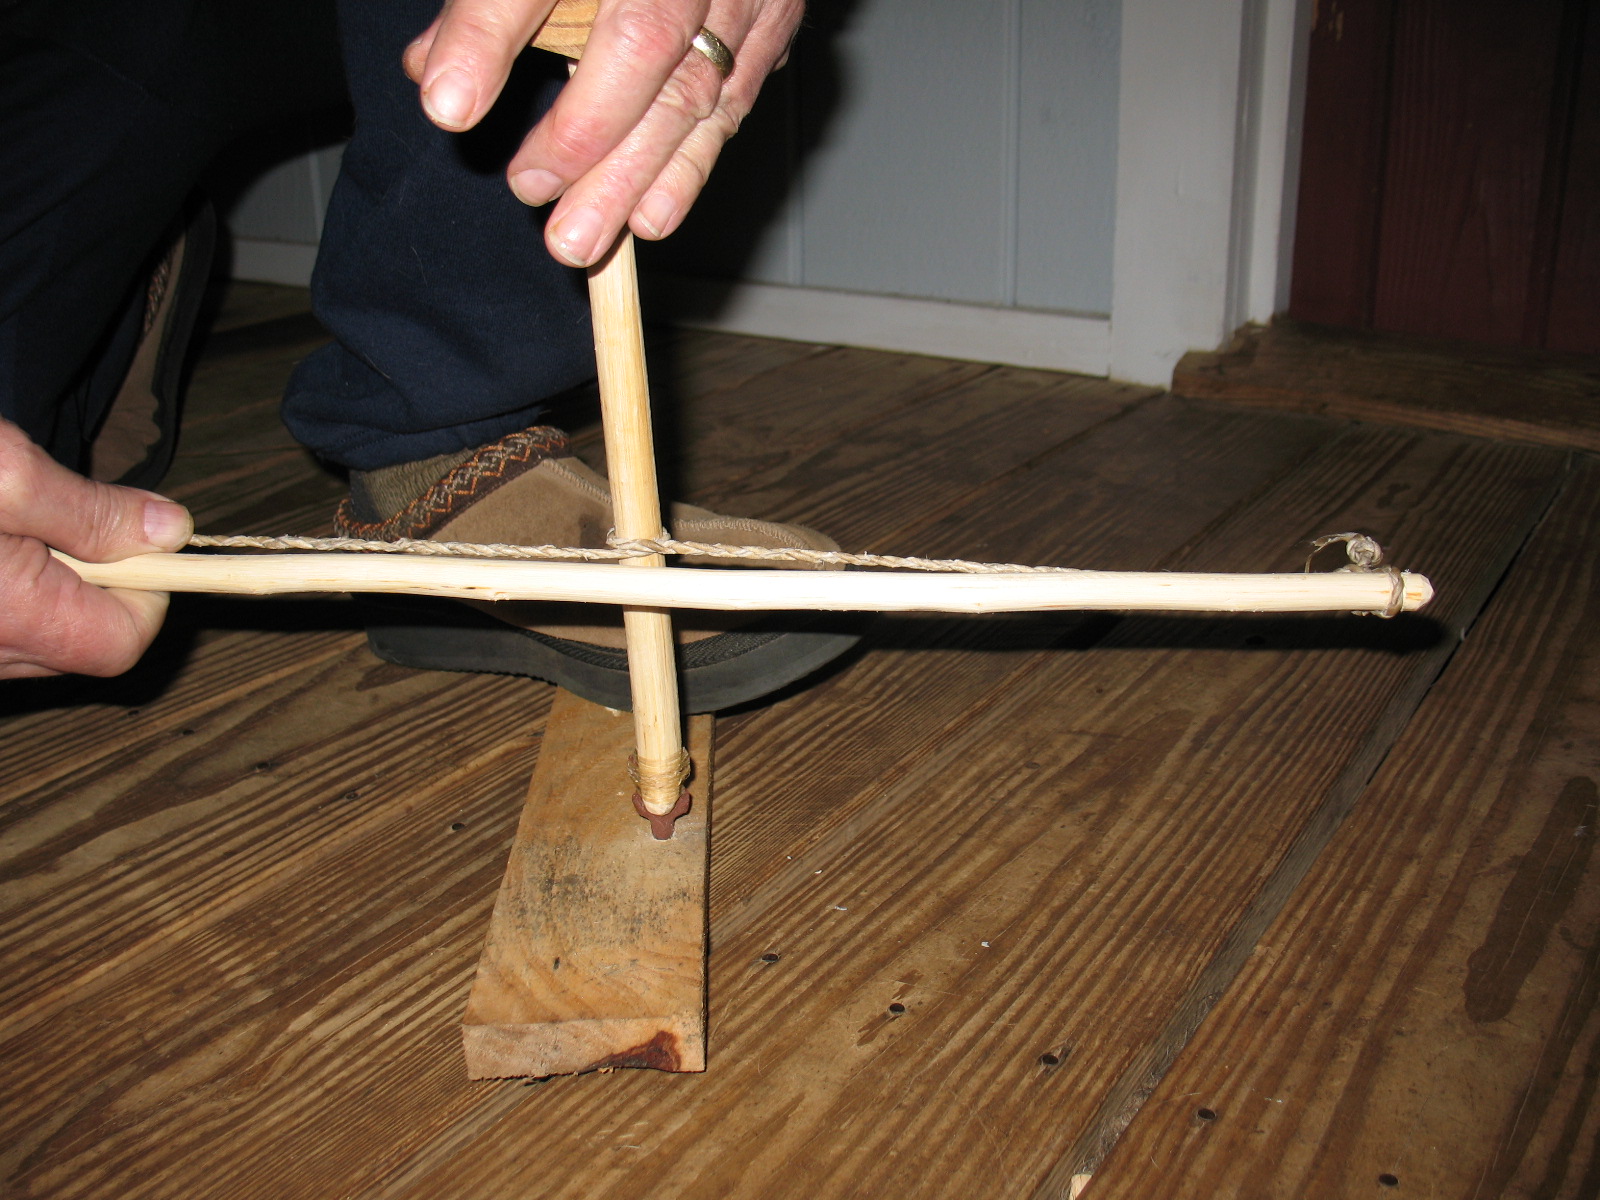
You can expand your Stone Age tool kit by making a bow drill. The bow drill can be used to drill holes in wood or bone. To make a bow drill you will have to have mastered a couple of other skills first. You will need to be able to knap flint which was covered in my post on Making Glass Arrowheads Parts 1 and 2 on February 1 and February 8, 2011. You will also need to know how to make some cordage out of rawhide. Cordage making and the reverse wrap technique is covered in my post Primitive Bow Making Part 5 on February 24, 2009.
So, the first thing that we need to do is make a drill bit. Making a drill bit is pretty much like making an arrowhead except the shape is a little different. The actual drill part of the bit (the thin part that sticks down) can be whatever size you choose to make it. Just don’t make the bit too thin or it will crumble. Bits should be made from hard flint, not from glass or obsidian. Pictured below: Flint drill bit.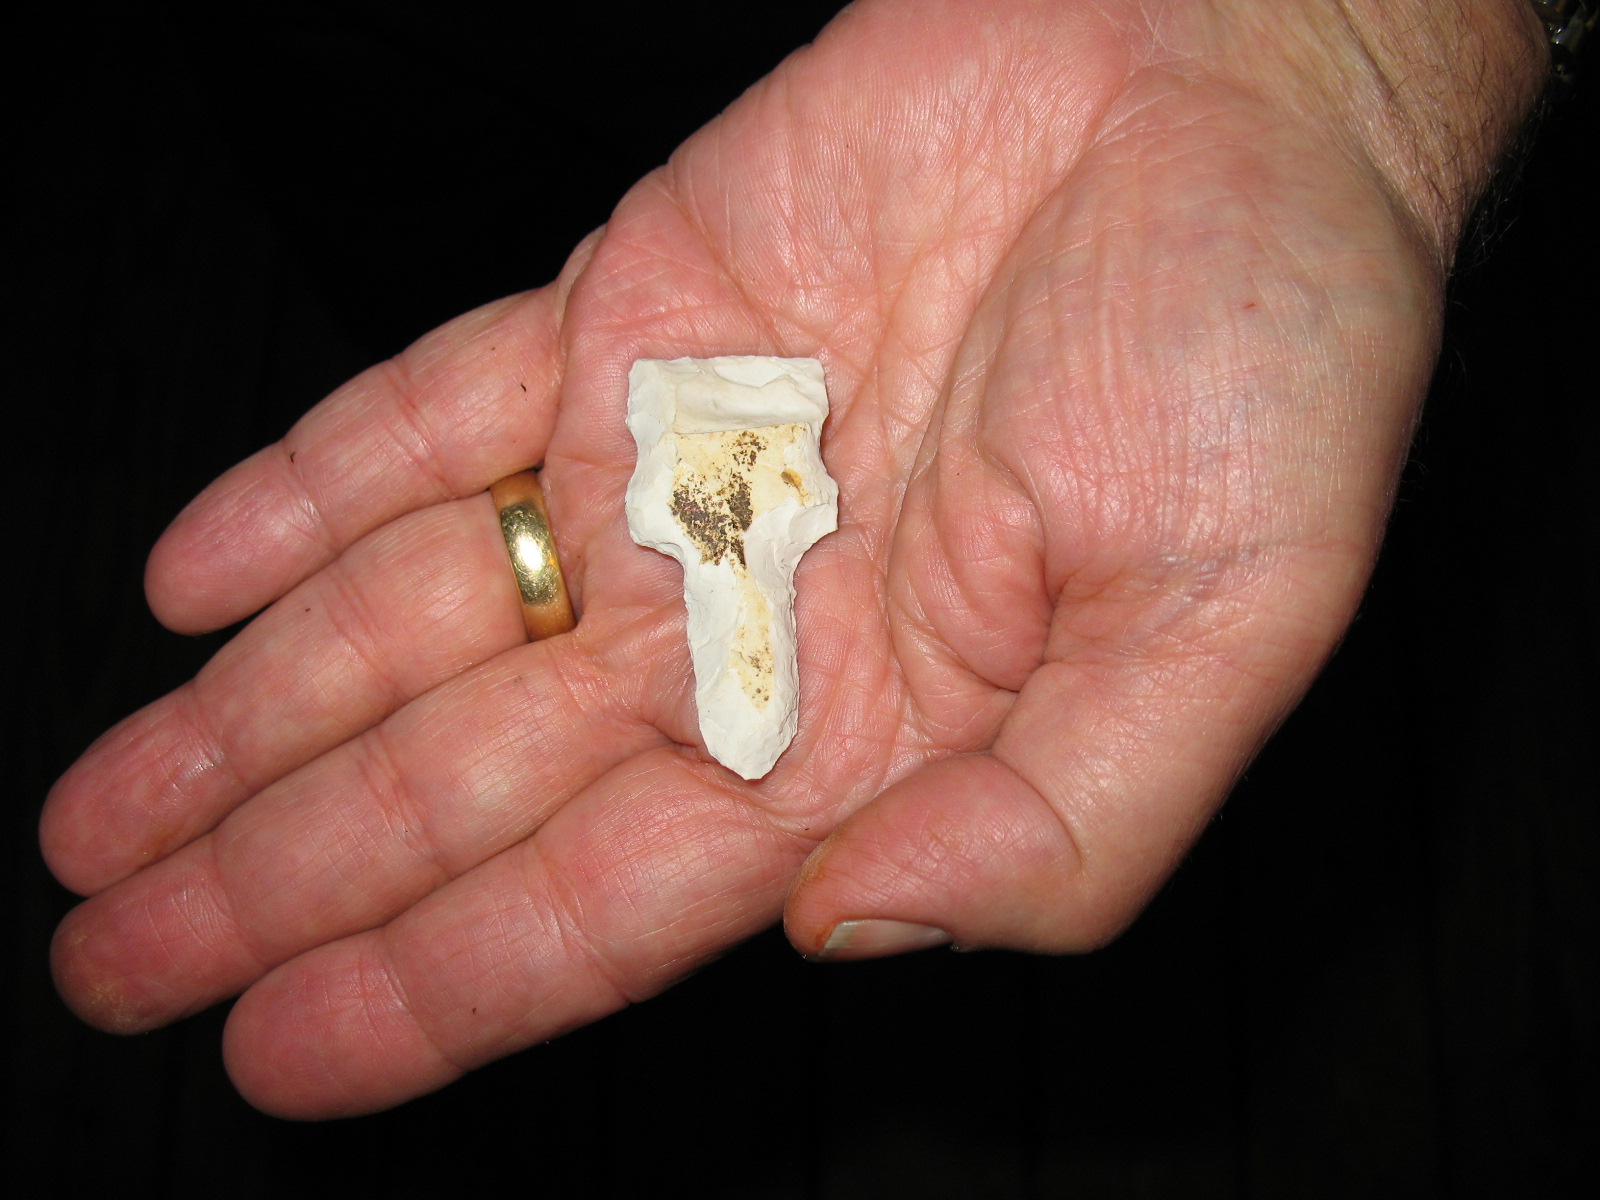
In addition to the actual drill bit you will need a spindle, a hand hold, and a bow. If you have already made a fire-bow set you will have the hand hold and the bow and they will work fine for this project. If you don’t already have these parts you will need to make them. This is what you will need:
A hardwood spindle – needs to be about a foot long and a three-eights to three-quarters inch in diameter depending of the size of your drill bit. The spindle needs to be smooth and rounded on the top so it will fit into the handhold and turn freely. Pictured below: Two different size spindles with bits already attached.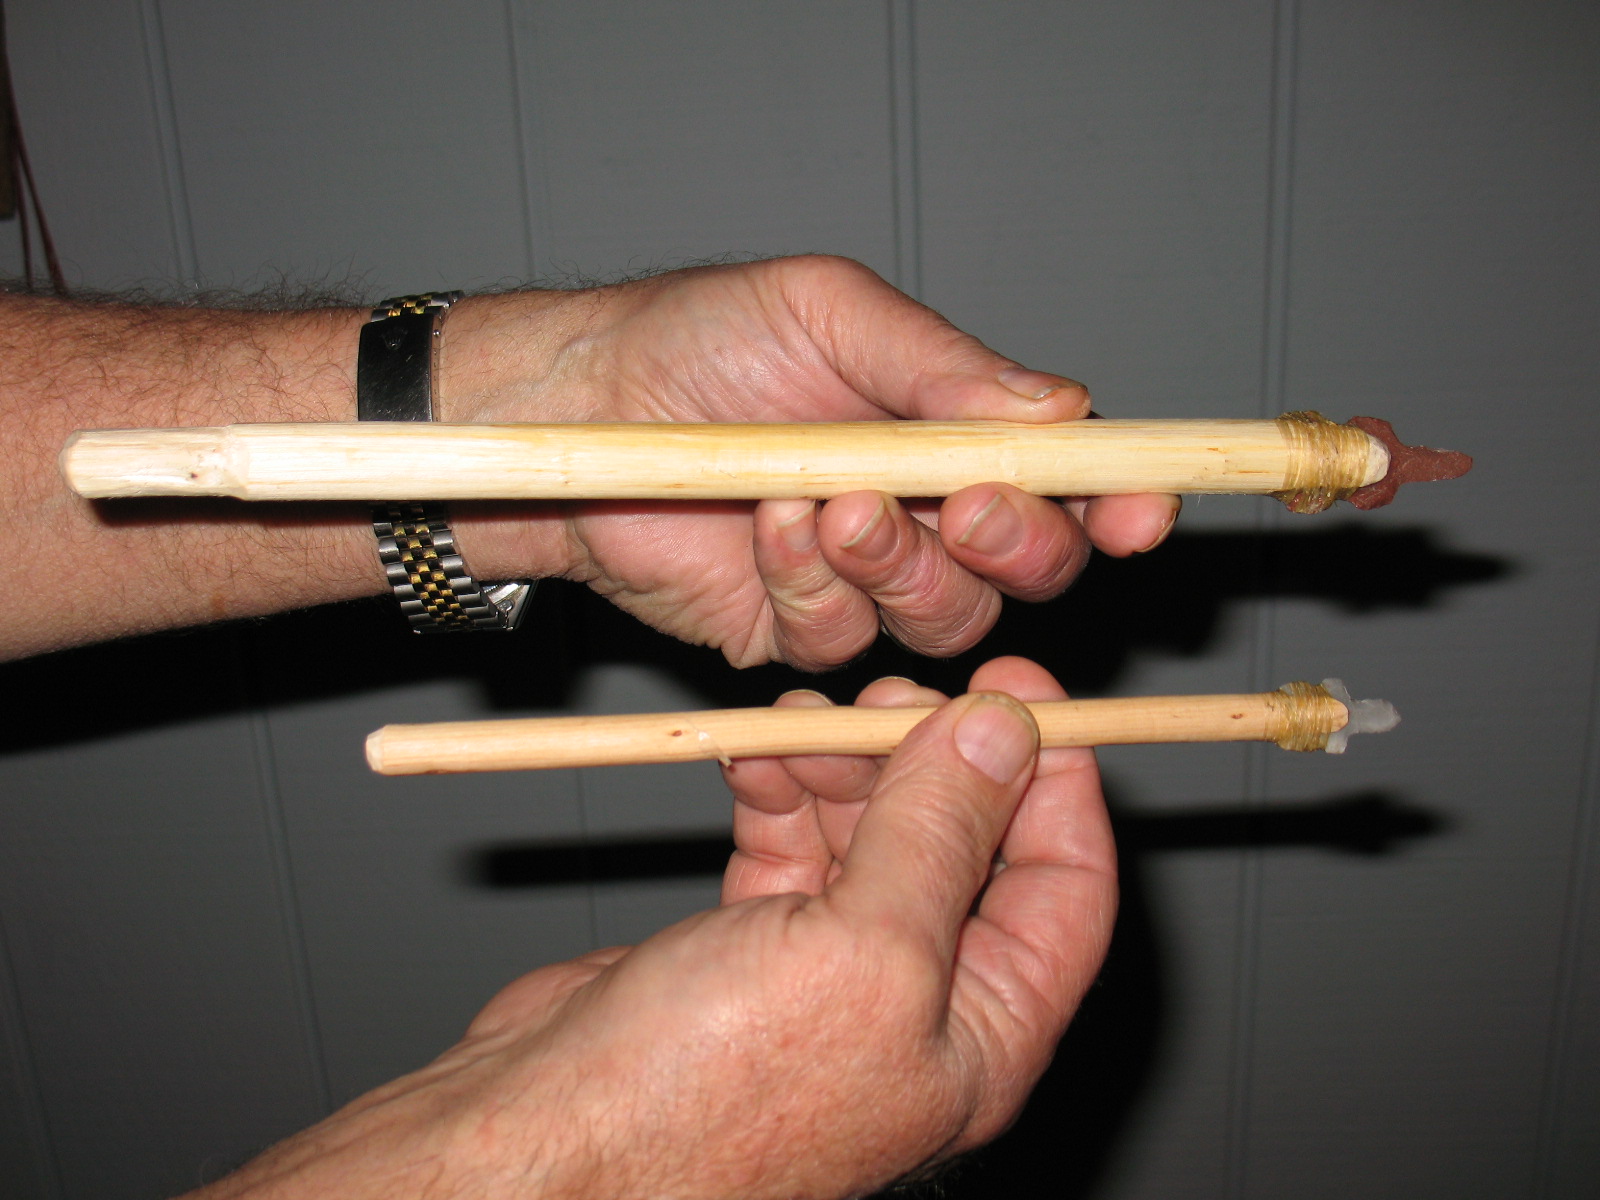
A hand hold – made of hardwood, stone, or bone. This has a shallow hole in it that will fit over the top of the spindle and allow it to turn freely. Pictured below: Hardwood handhold with spindle ready to be inserted in the hole.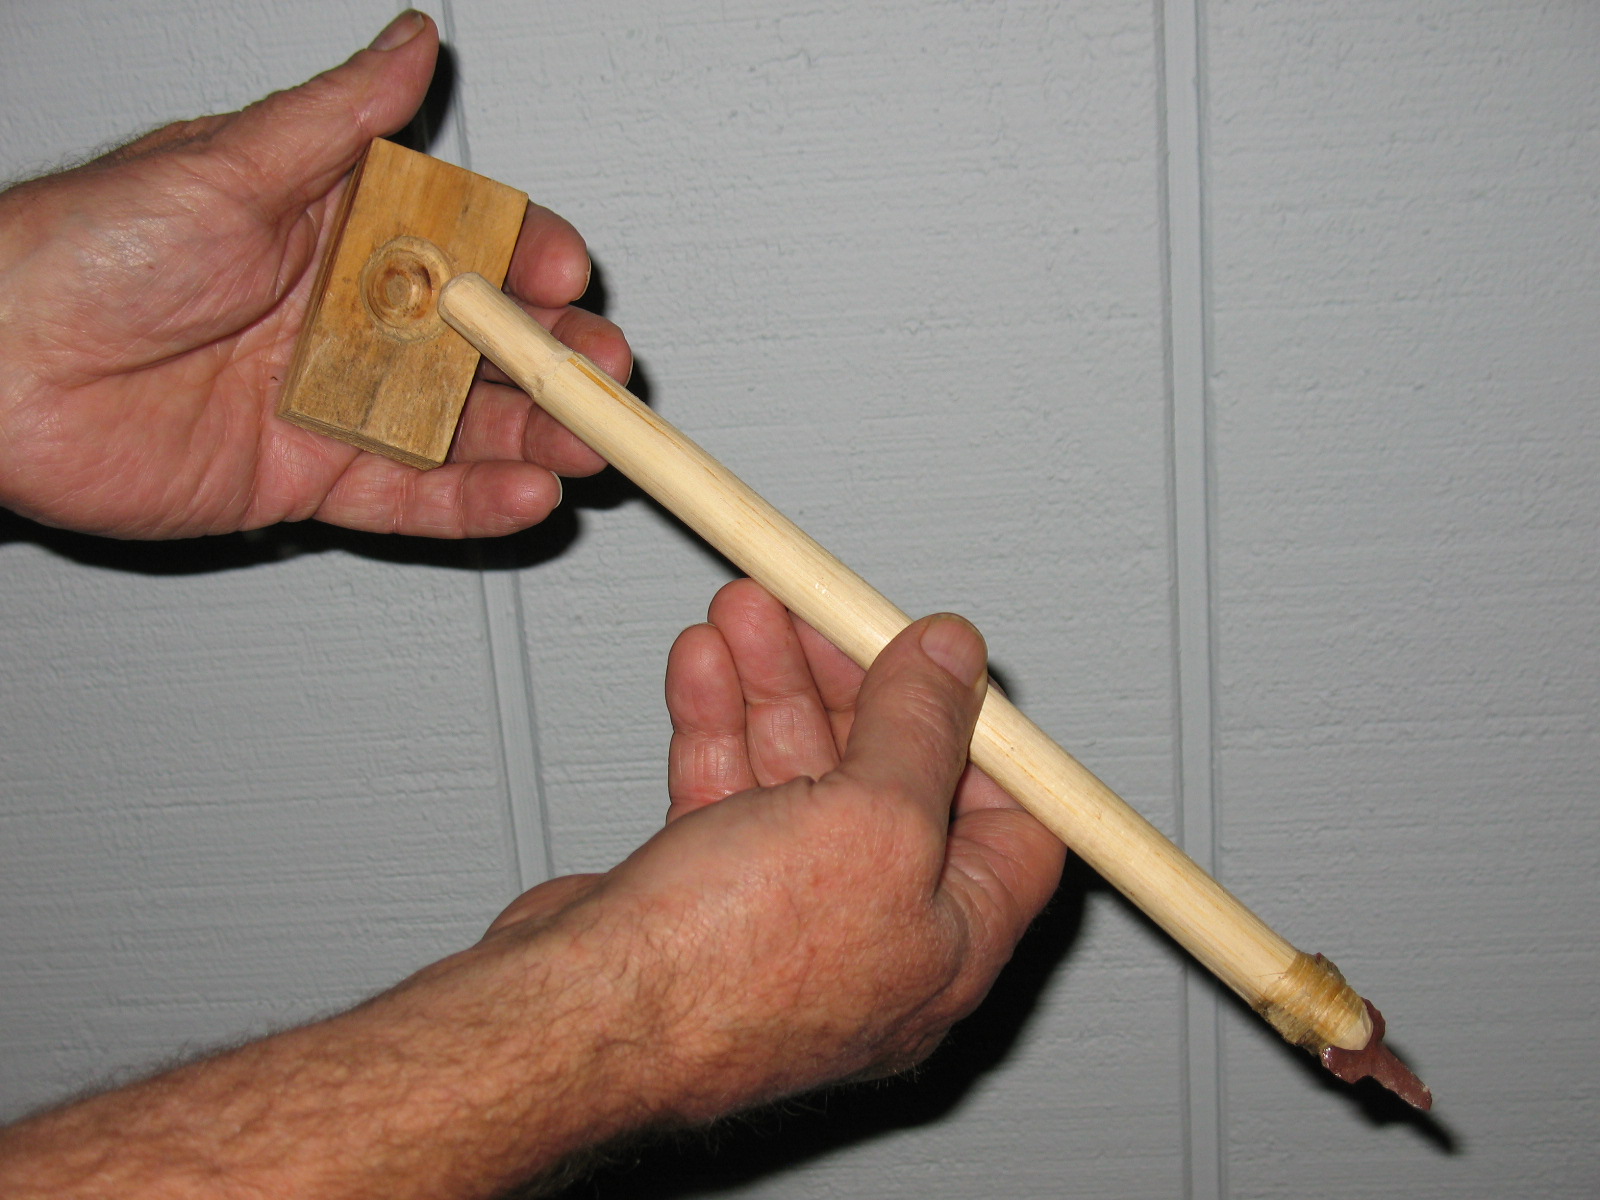
A small bow – about two feet long, and one-half inch in diameter
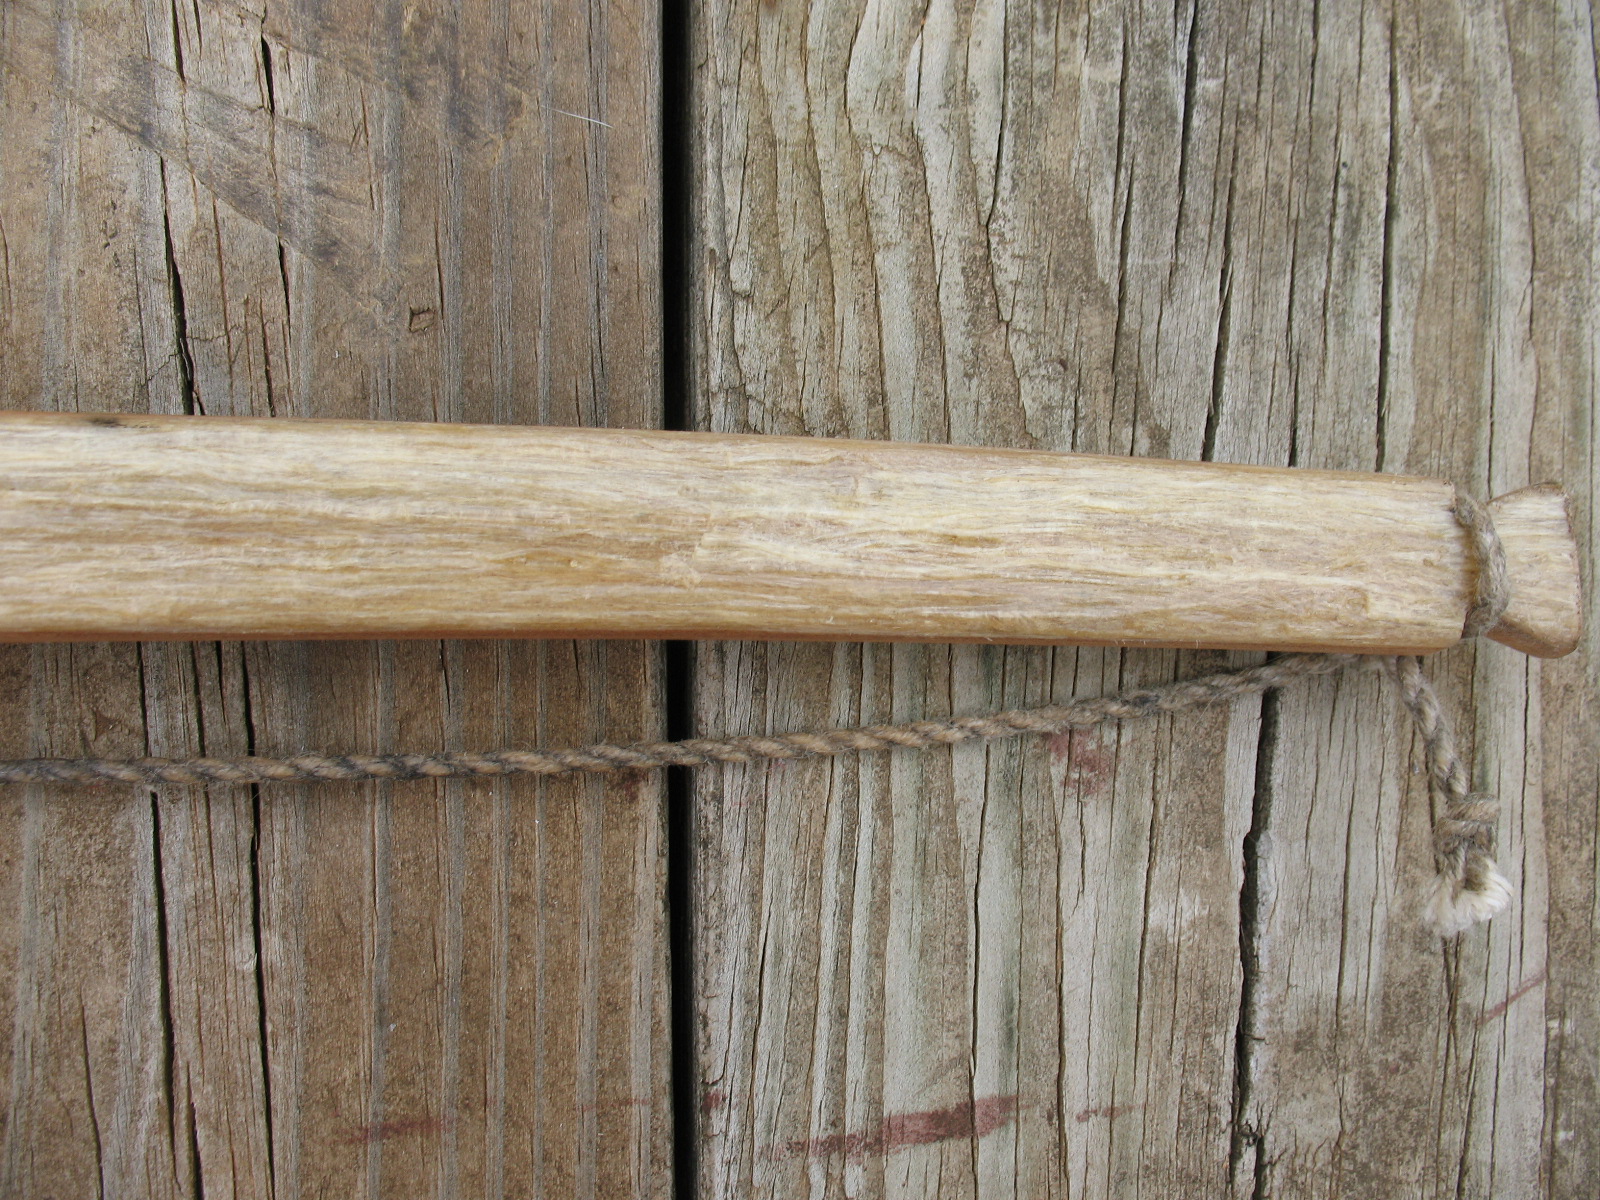
A bow string – needs to be rawhide or braided nylon. Vegetable fiber cordage will probably not work. Vegetable fiber cordage will fray and come apart under usage. Pictured below: Small bow with rawhide bowstring.
Some pine pitch or rawhide glue – to help hold the drill bit into the spindle
Some wet rawhide or sinew – to help keep the drill bit in place on the spindle
Now let’s put it all together.
1. Cut a notch in the bottom of the spindle that your drill bit will fit into.
2. Put some melted pine sap into the notch and push the drill bit down into the soft sap. Adjust the bit so that it lines up with the spindle. If it is cocked off to one side it will wobble when you spin the spindle, and this will result in either making a bigger hole than you wanted or breaking the drill bit.
3. When the sap has hardened, wrap wet rawhide or sinew around the drill bit and spindle to firmly hold the bit in place. Let the rawhide or sinew dry.
4. Saw notches in the bow and tie on your bow string. Don’t make it real tight. The string is going to wrap around the spindle and this will tighten it up.
5. Wrap the bowstring around the spindle.
6. Place the drill point on the material to be drilled.
7. Hold the hand hold on top of the spindle with one hand.
8. Use your other hand to pump the bow back and forth and turn the spindle.
Pictured below: top, Flint drill bit attached to spindle with rawhide glue and deer sinew; and bottom, Drill outfit assembled and ready for use.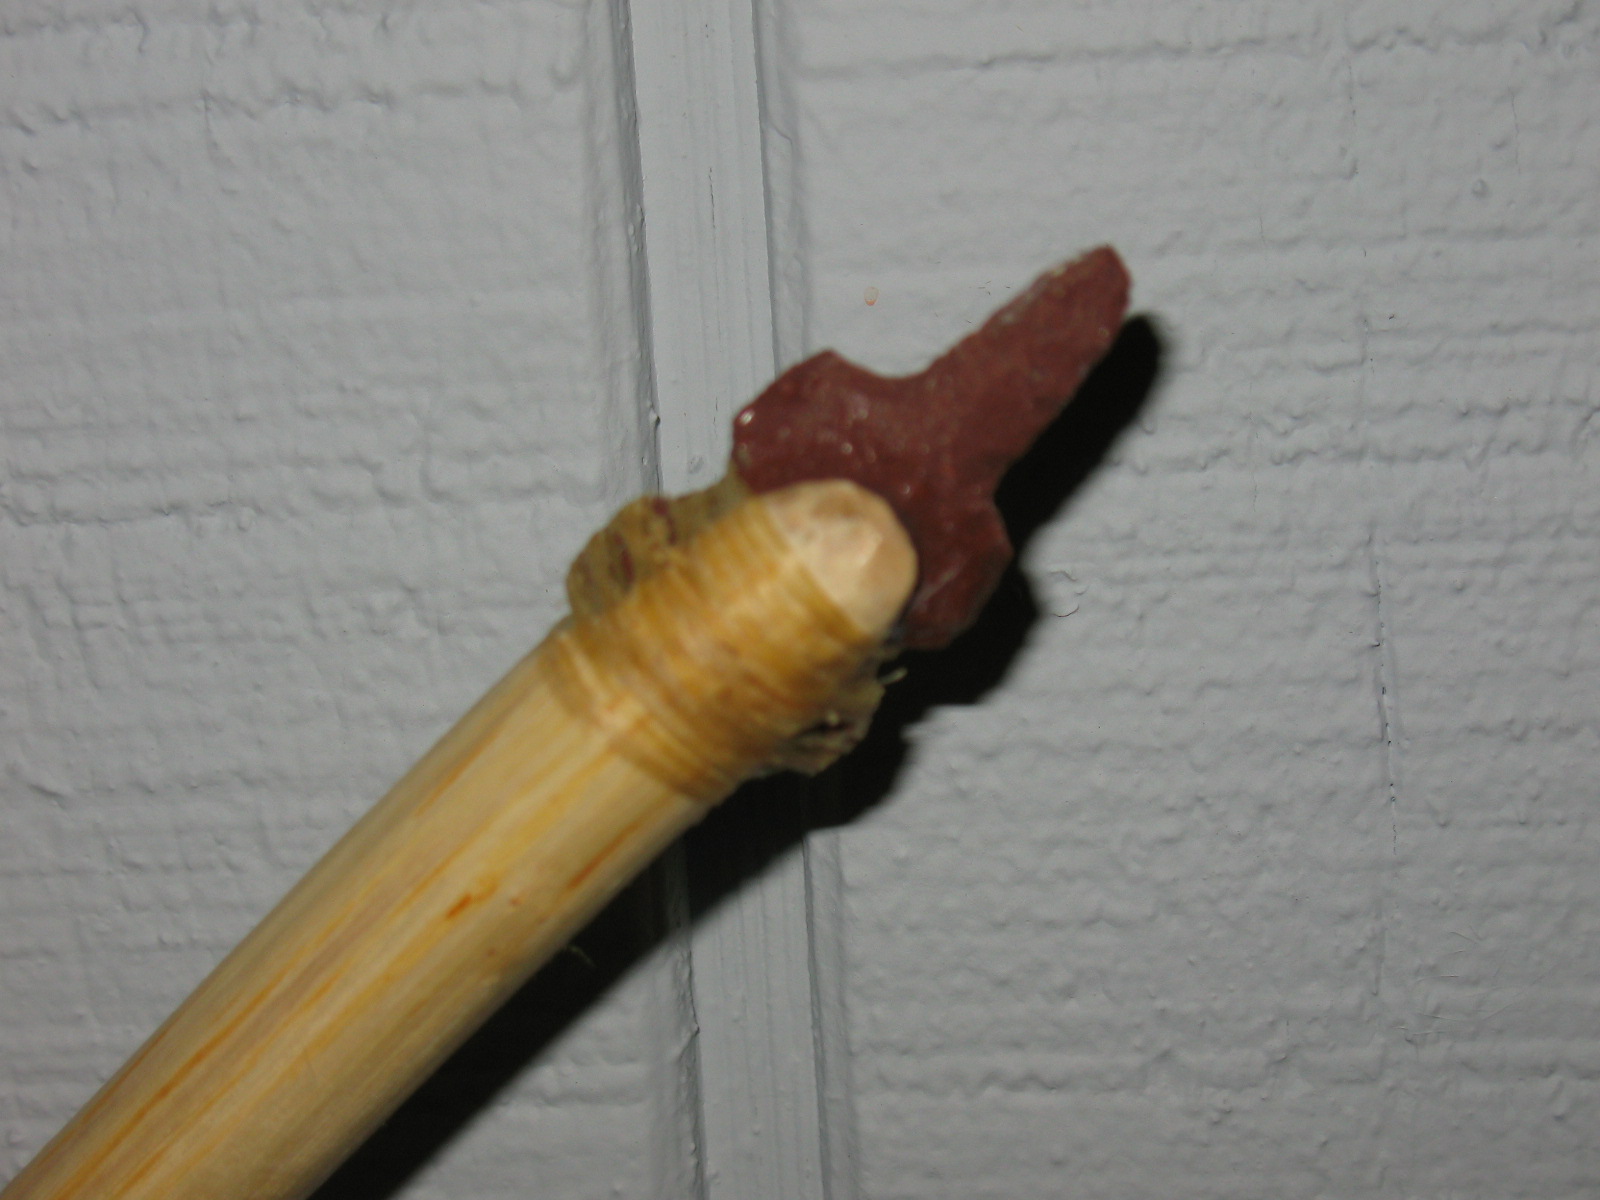
If everything is put together right you should be drilling away. A drill like this, with a stone bit, will not drill through something two or three inches thick. It will only drill the depth of the bit. If you want to drill deeper, you will have to make a longer bit; but a stone bit is fairly fragile, and sooner or later you will break a long bit or a short one for that matter). Pictured below: Freshly drilled hole in a pine board.
You can use just a hardwood spindle without a bit. This will smoke like crazy and wear down pretty fast, but it will drill/burn a hole.
If you have a piece of iron like an old nail, you can hammer the end of it flat, drive it into the bottom of your spindle and it will make an excellent drill bit.
To make many of the more advanced tools and weapons associated with wilderness survival you will need two animal products, sinew and rawhide. What sinew is, how to obtain it, and how to process it is the subject of this post.
What is Sinew?
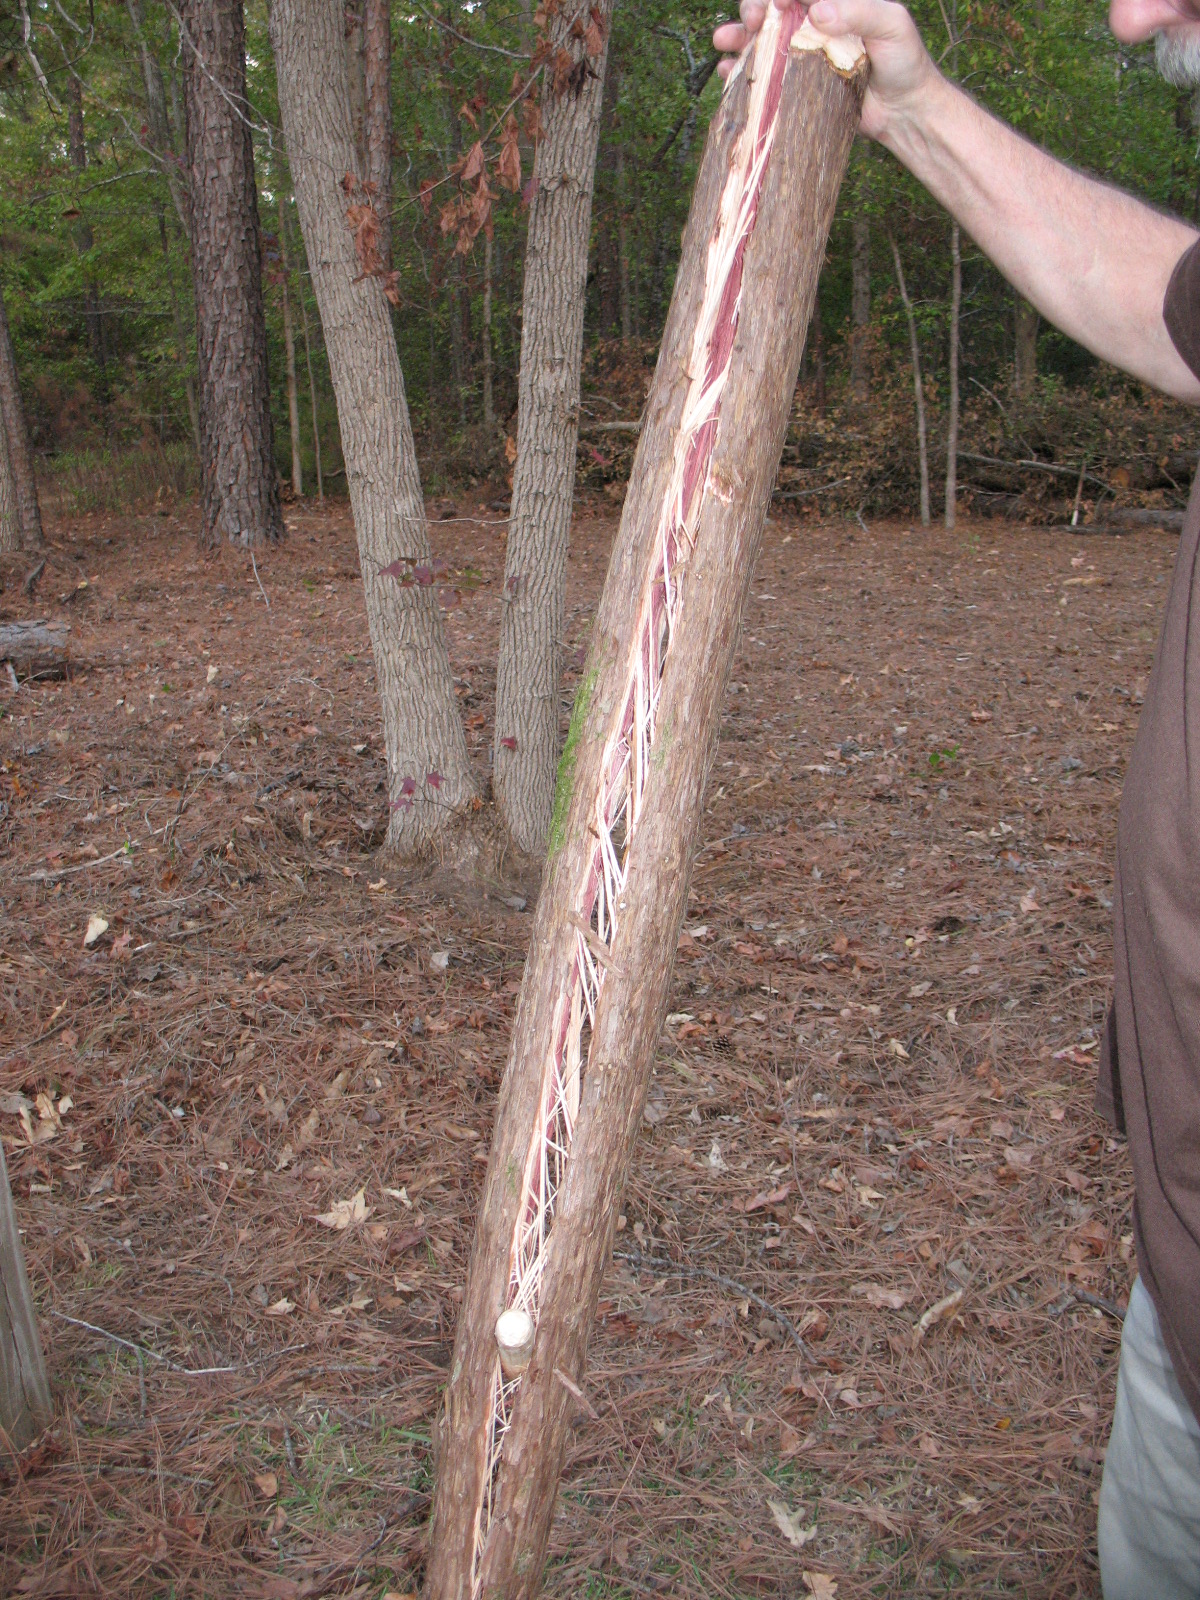
Sinew can be obtained from the tendons of any mammal. Tendons are the tough stringy things that attach muscles to bones. When these tendons are processed into sinew they provide a wonderful material that can be used to make super strong cordage, good sewing thread, and they can be used as a binding twine to attach arrowheads, arrow fletchings, knife blades, spear points, drill points and etc. Sinew is as tough as nylon, and it is impregnated with its own natural glue that can be activated with a little moisture. Sinew shrinks a little when it dries so that is binds things together tightly. Sinew will last for hundreds of years if it is protected from moisture. In short, sinew is a super material that has no modern equivalent. The only down-side to sinew is that it must be kept dry. If you get it wet it will soften and stretch, and whatever you have bound together with it will come apart. If you think that any sinew that you have used may be exposed to moisture, you must coat it with pine sap or some other agent that will waterproof it.
How do You Obtain Sinew?
One of the most widely available sources of sinew is from the deer, although elk or buffalo will work just as well. The most useful sinews are located in the lower legs and along the upper back lying over the back straps. If you hunt deer you can remove both the leg and back sinews when you are butchering. If you have friends that hunt you can ask them to bring you the lower legs when they butcher. The lower legs have no usable meat on them and most people just cut them off and throw them away. Hunters will usually be glad to give you this part of their kill even if they do think you’re a little strange for wanting it. You can even go to most packing houses during deer season and they are often glad to get rid of any legs that they have. All of my friends know that I want deer legs and I usually get anywhere from twenty to fifty a year just for the asking. Pictured below: deer leg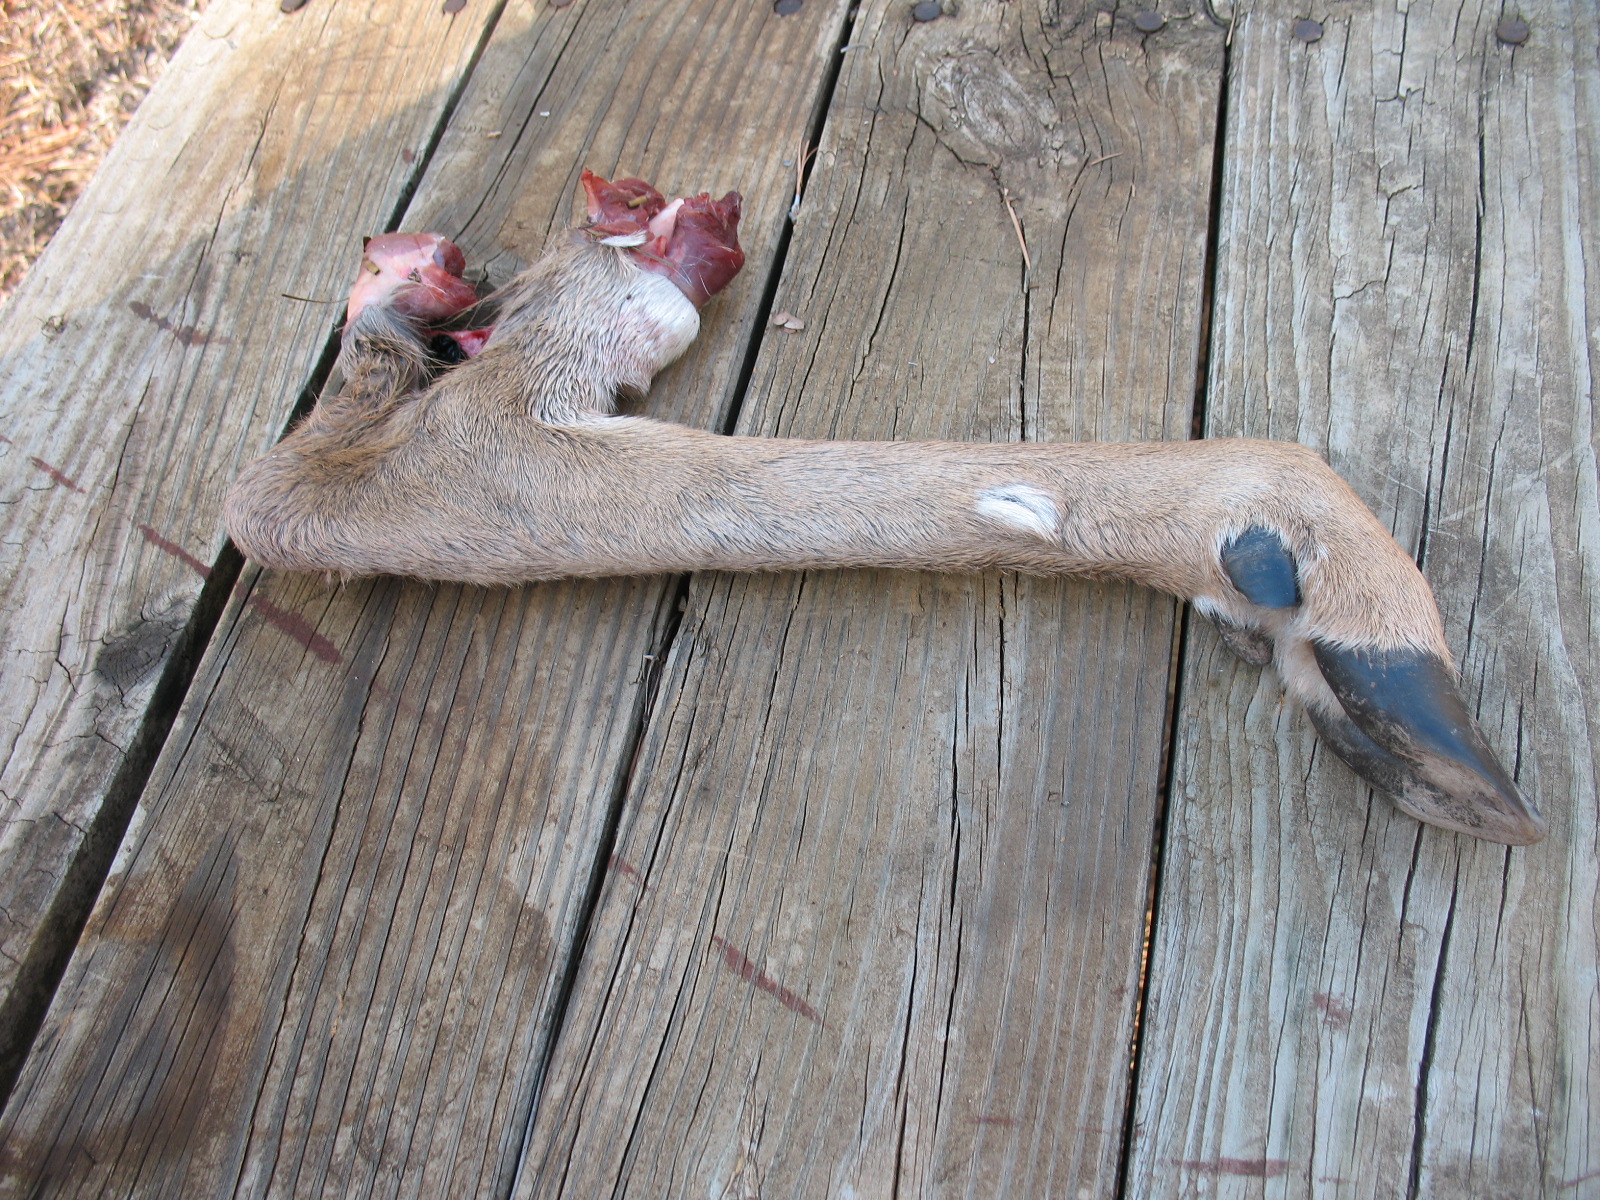
How do You Process Sinew?
To remove the sinews, you need a sharp knife or a good sharp flake of flint. Slice down the back of the leg from knee joint to just above the dew claws and peel the skin back. Lying just below the skin is a white membrane. This membrane encases the tendon which lies in a shallow groove down the back of the leg bone. 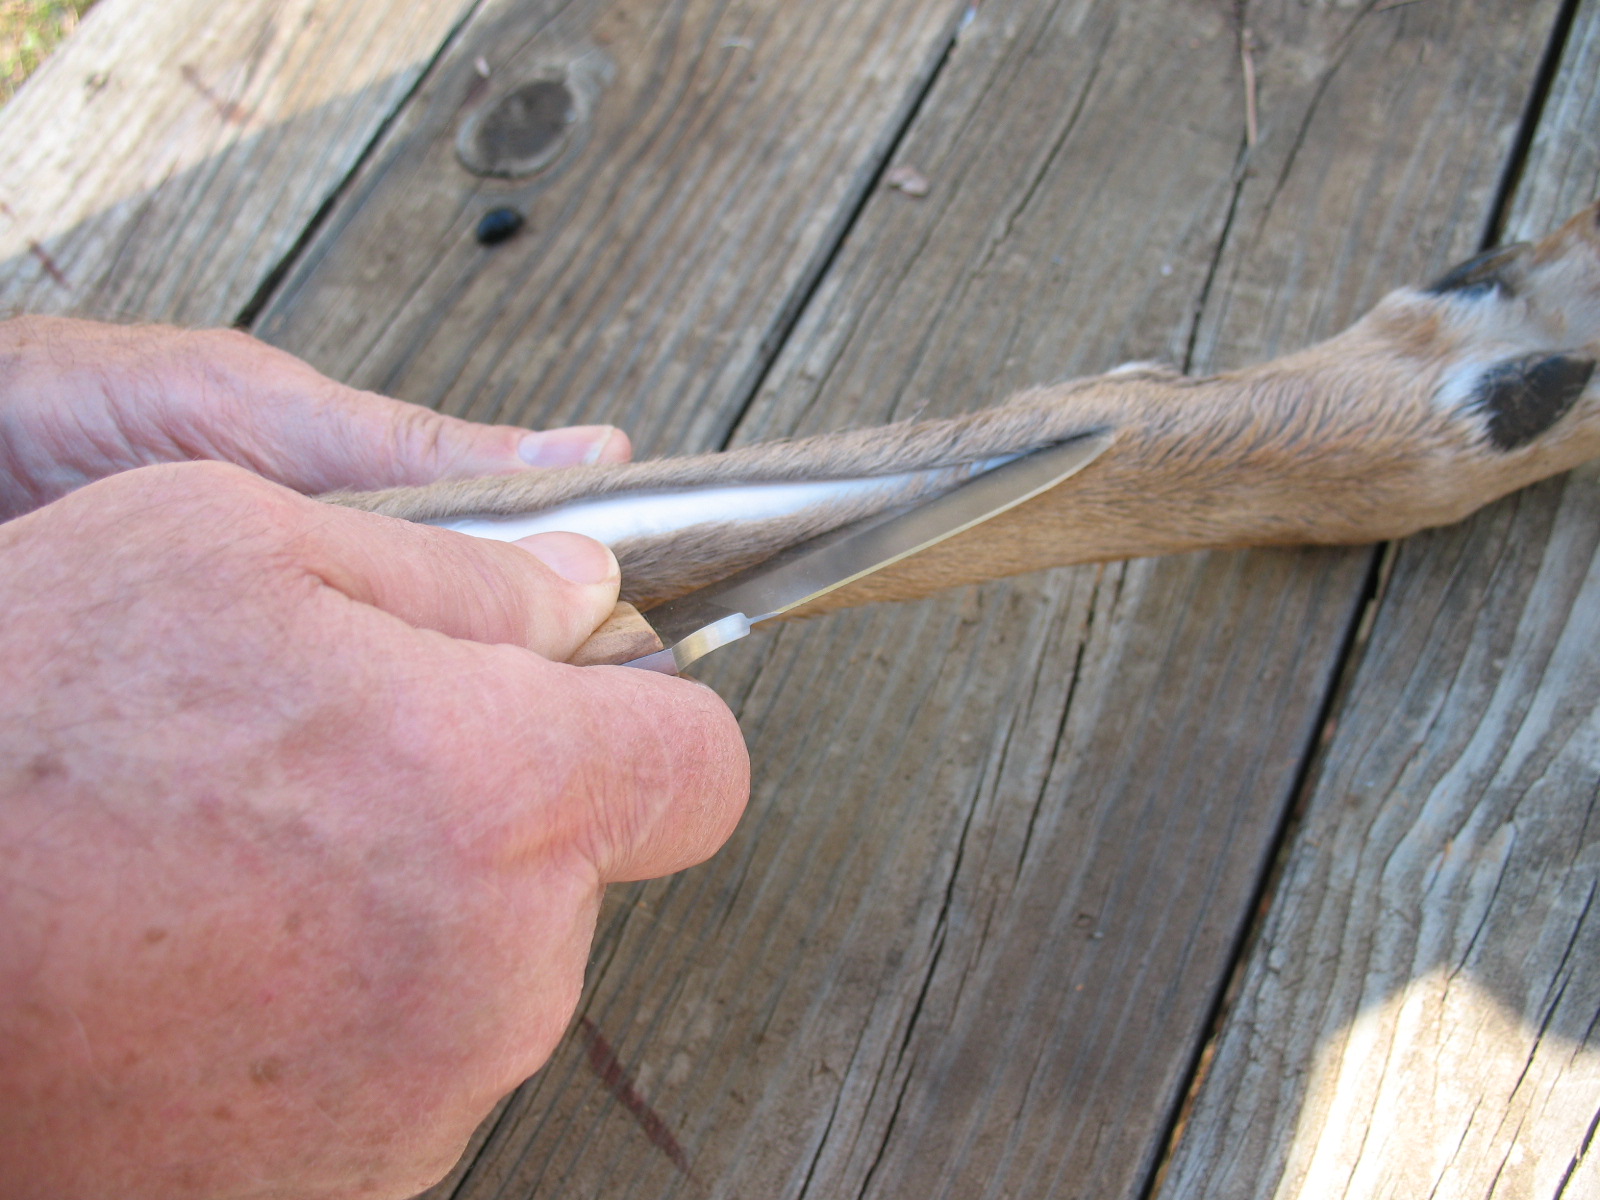
Split open the membrane and you will see a milky white cord looking thing. This is the tendon. 
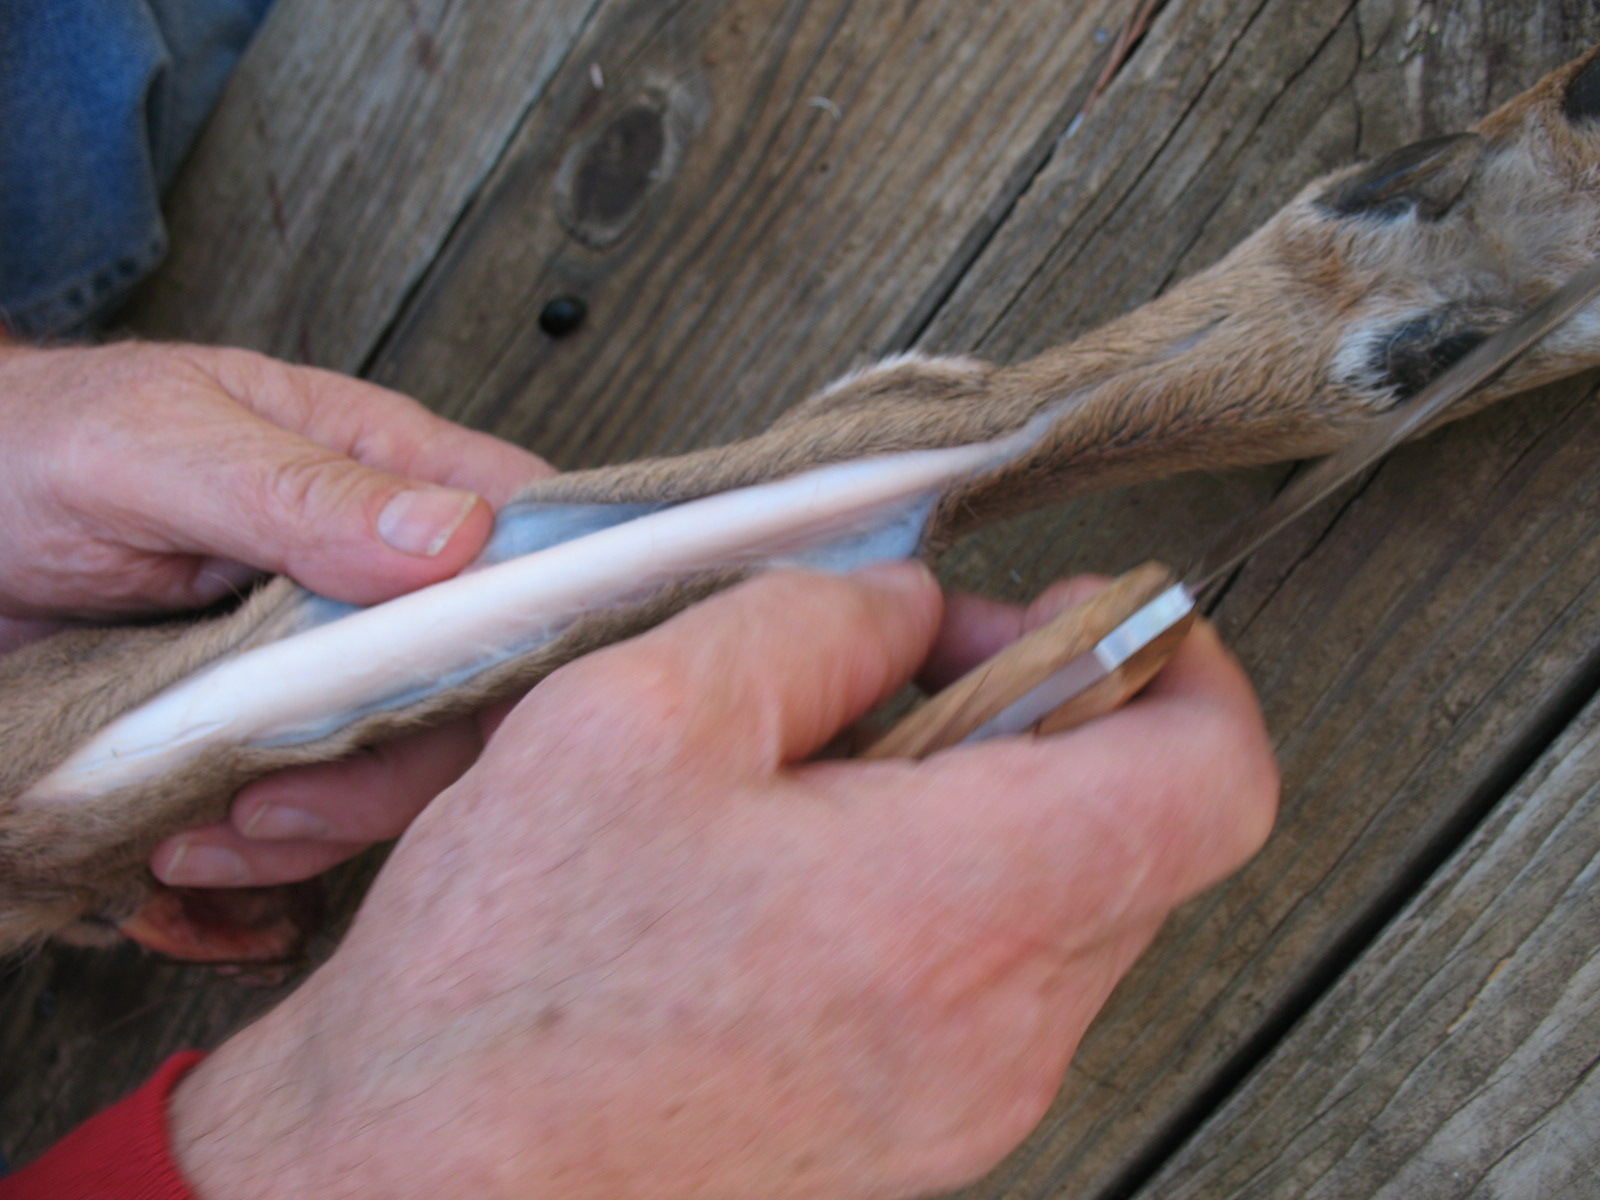
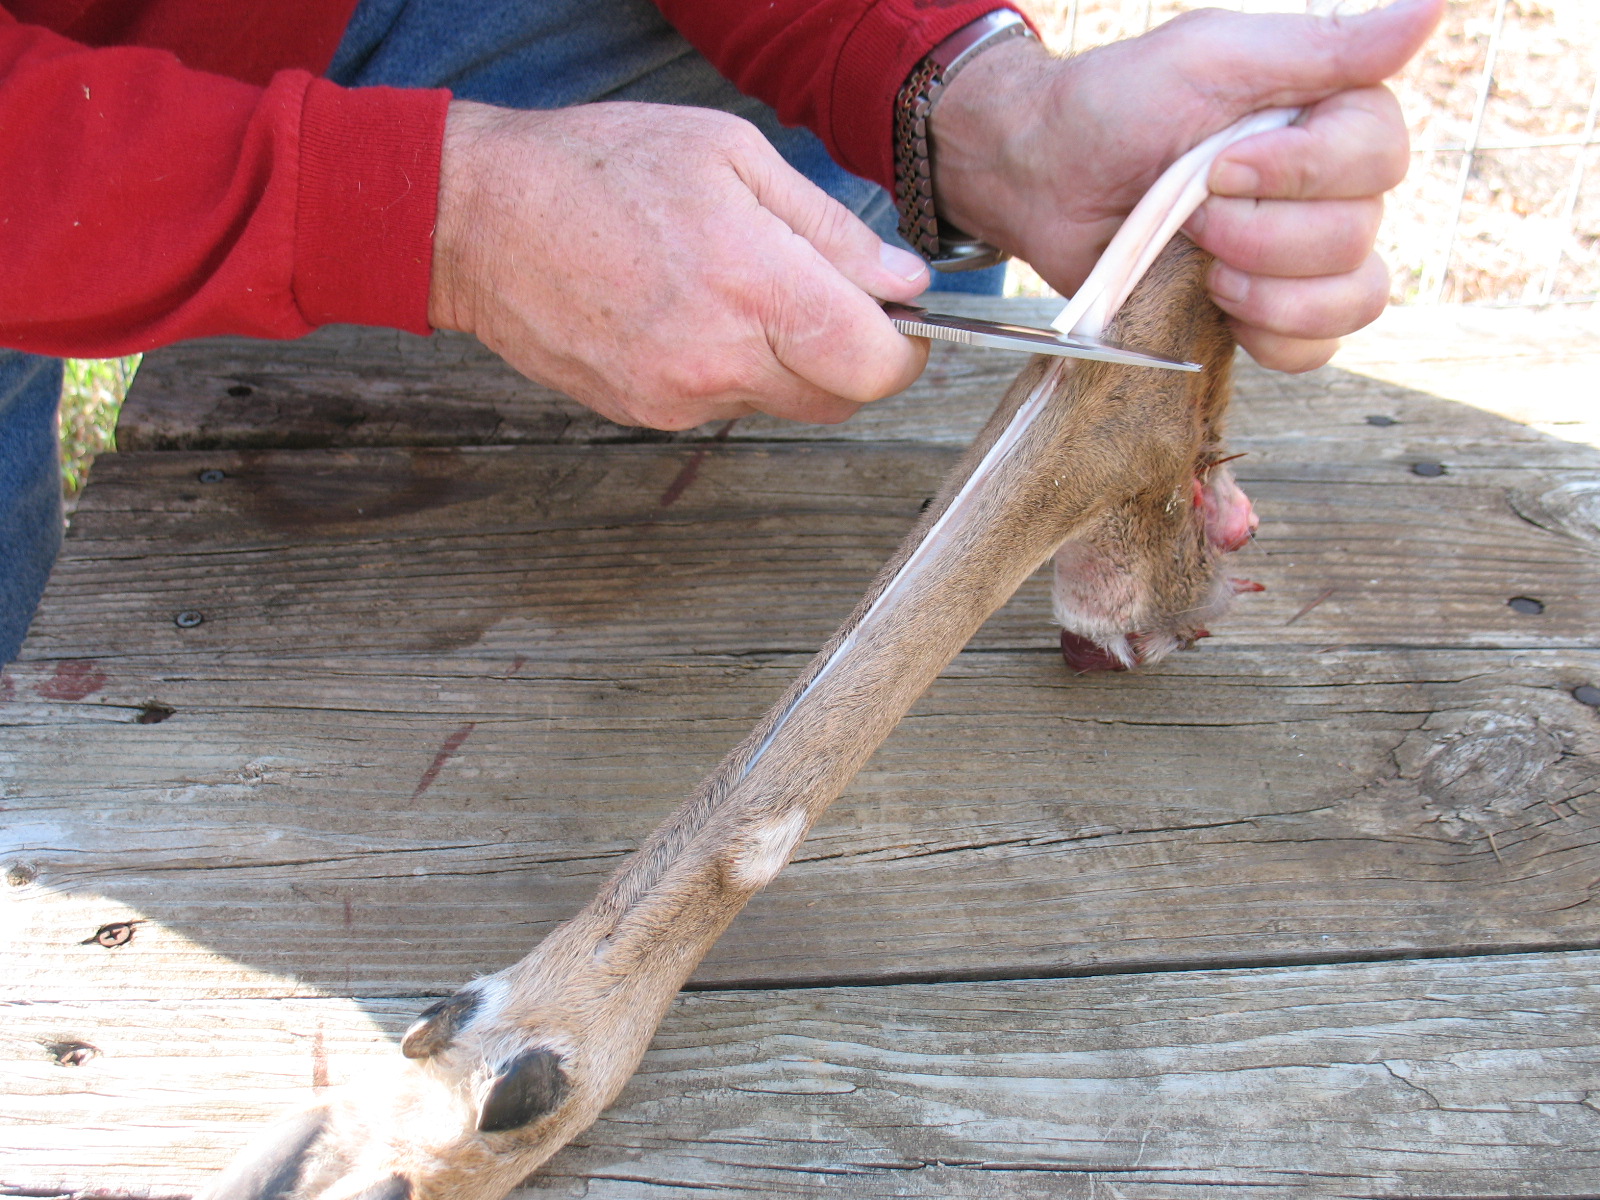
You can usually slip your finger under the edge of the tendon and lift it up out of the bone a little. When you get the tendon up out of the groove, run your knife up and down to loosen the tendon even more. 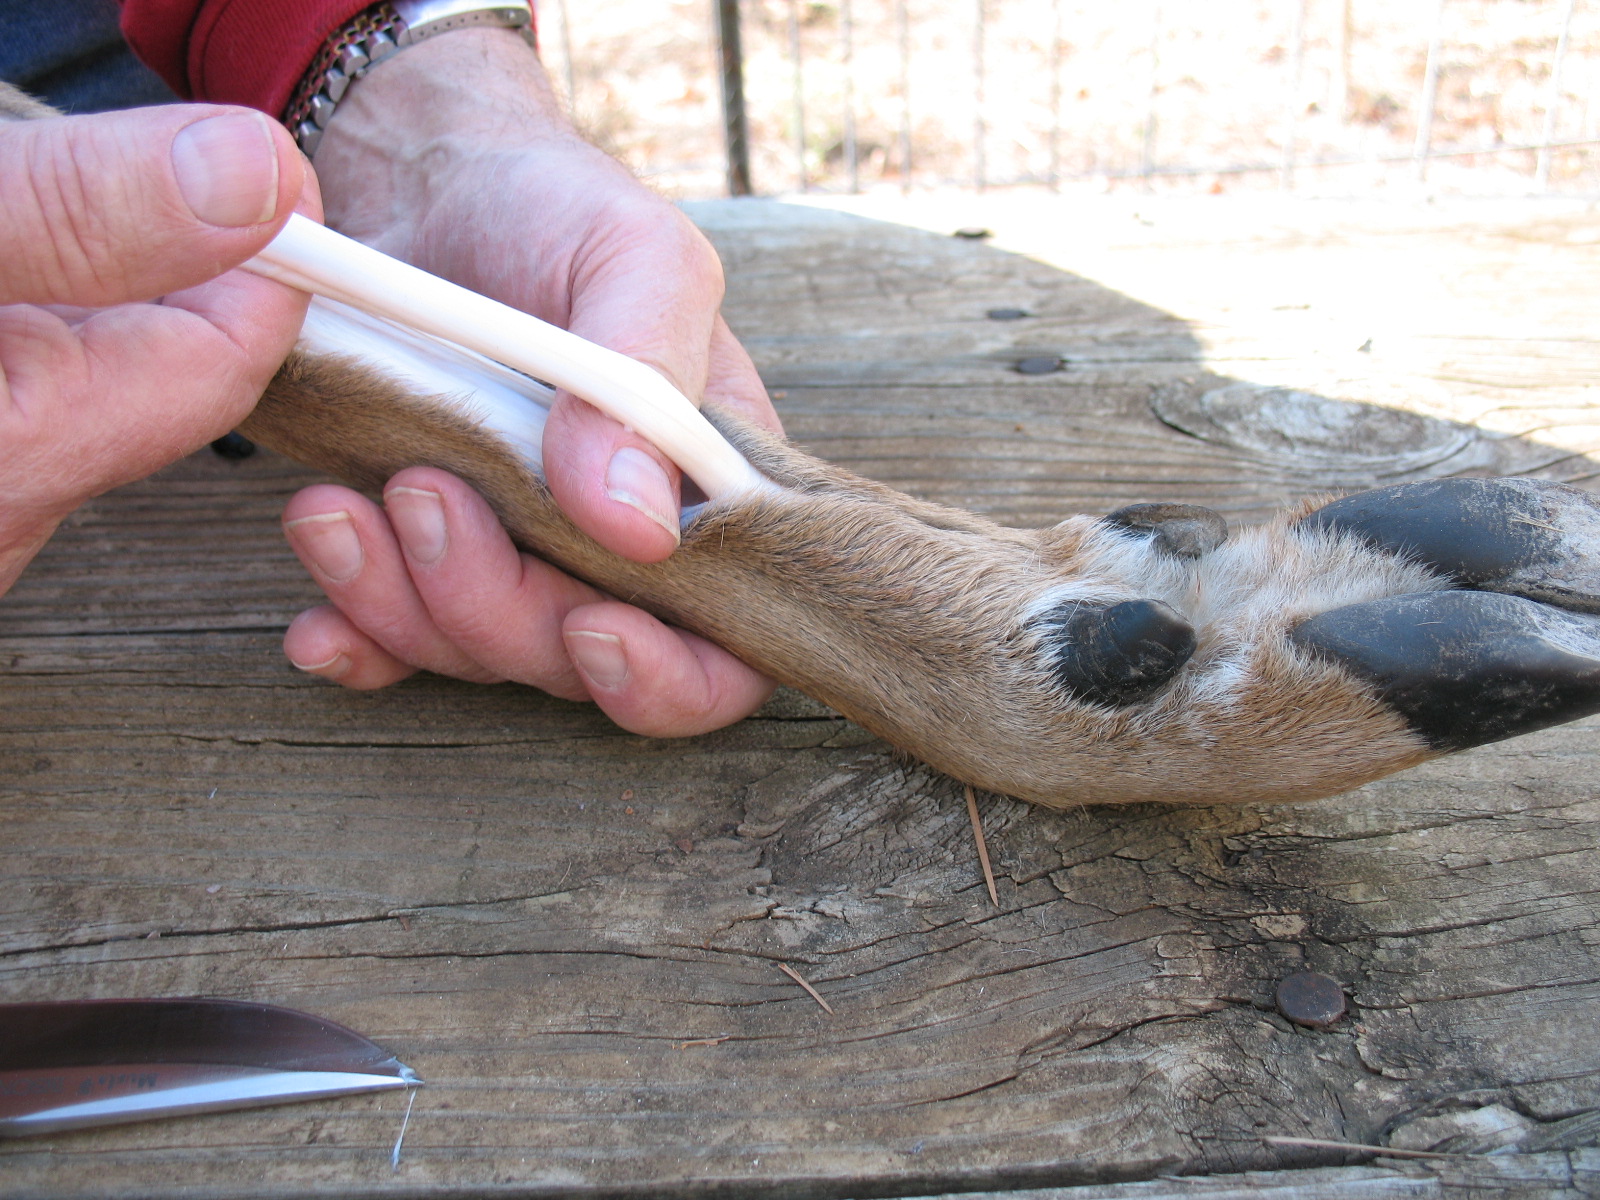
I usually run my knife down toward the hoof, and when I can’t go any farther, I turn the blade up and slice through the tendon freeing that end. You can then grab the tendon with you hand and peel it out down toward the knee joint. When you pull up as much of the tendon as you can get, cut that end off with your knife. 
There may be some membrane left sticking to the tendon (kind of a slimy case) and if you can remove this it will be helpful although it’s not vitally necessary.When you have a white floppy tendon in your hand, the hard part is done. 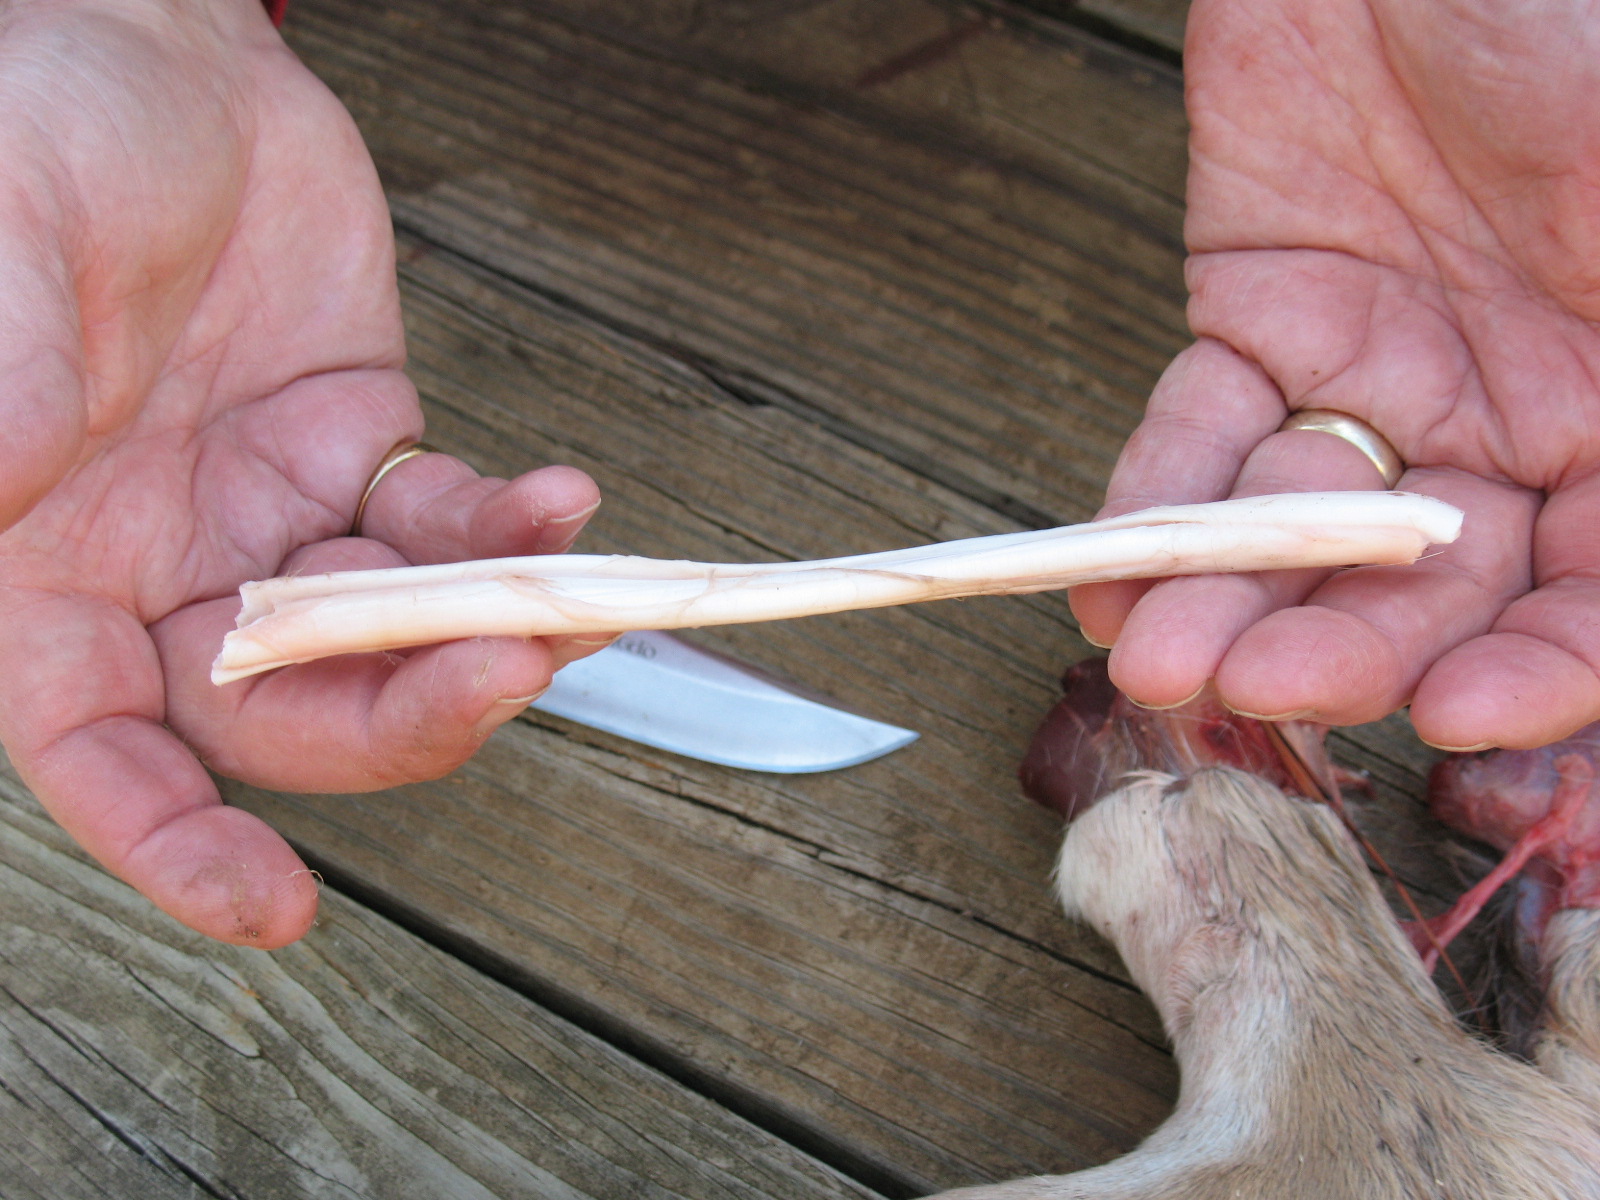
Just set the tendon out in the sun or on the kitchen drain board if your spouse is out of town. In less than twenty-four hours the soft wet tendon will be hard, dry, and kind of a translucent yellow color. It looks a lot like plastic. 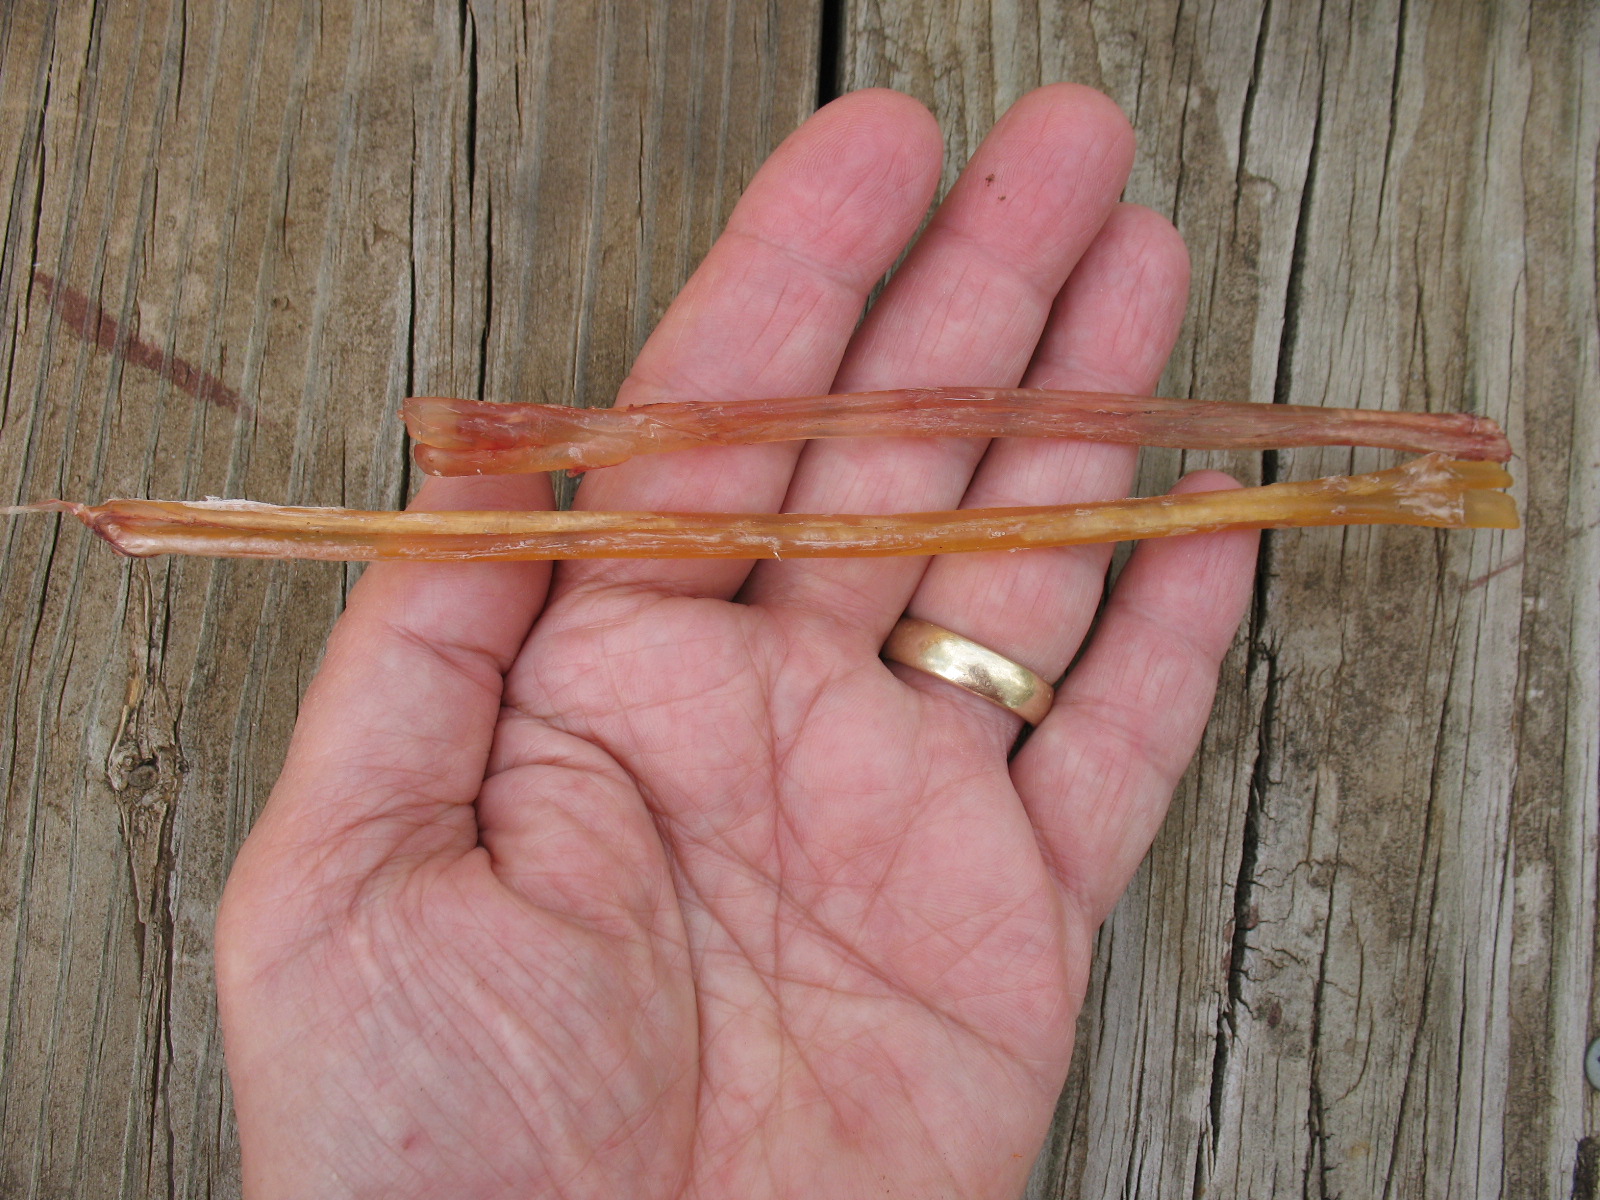
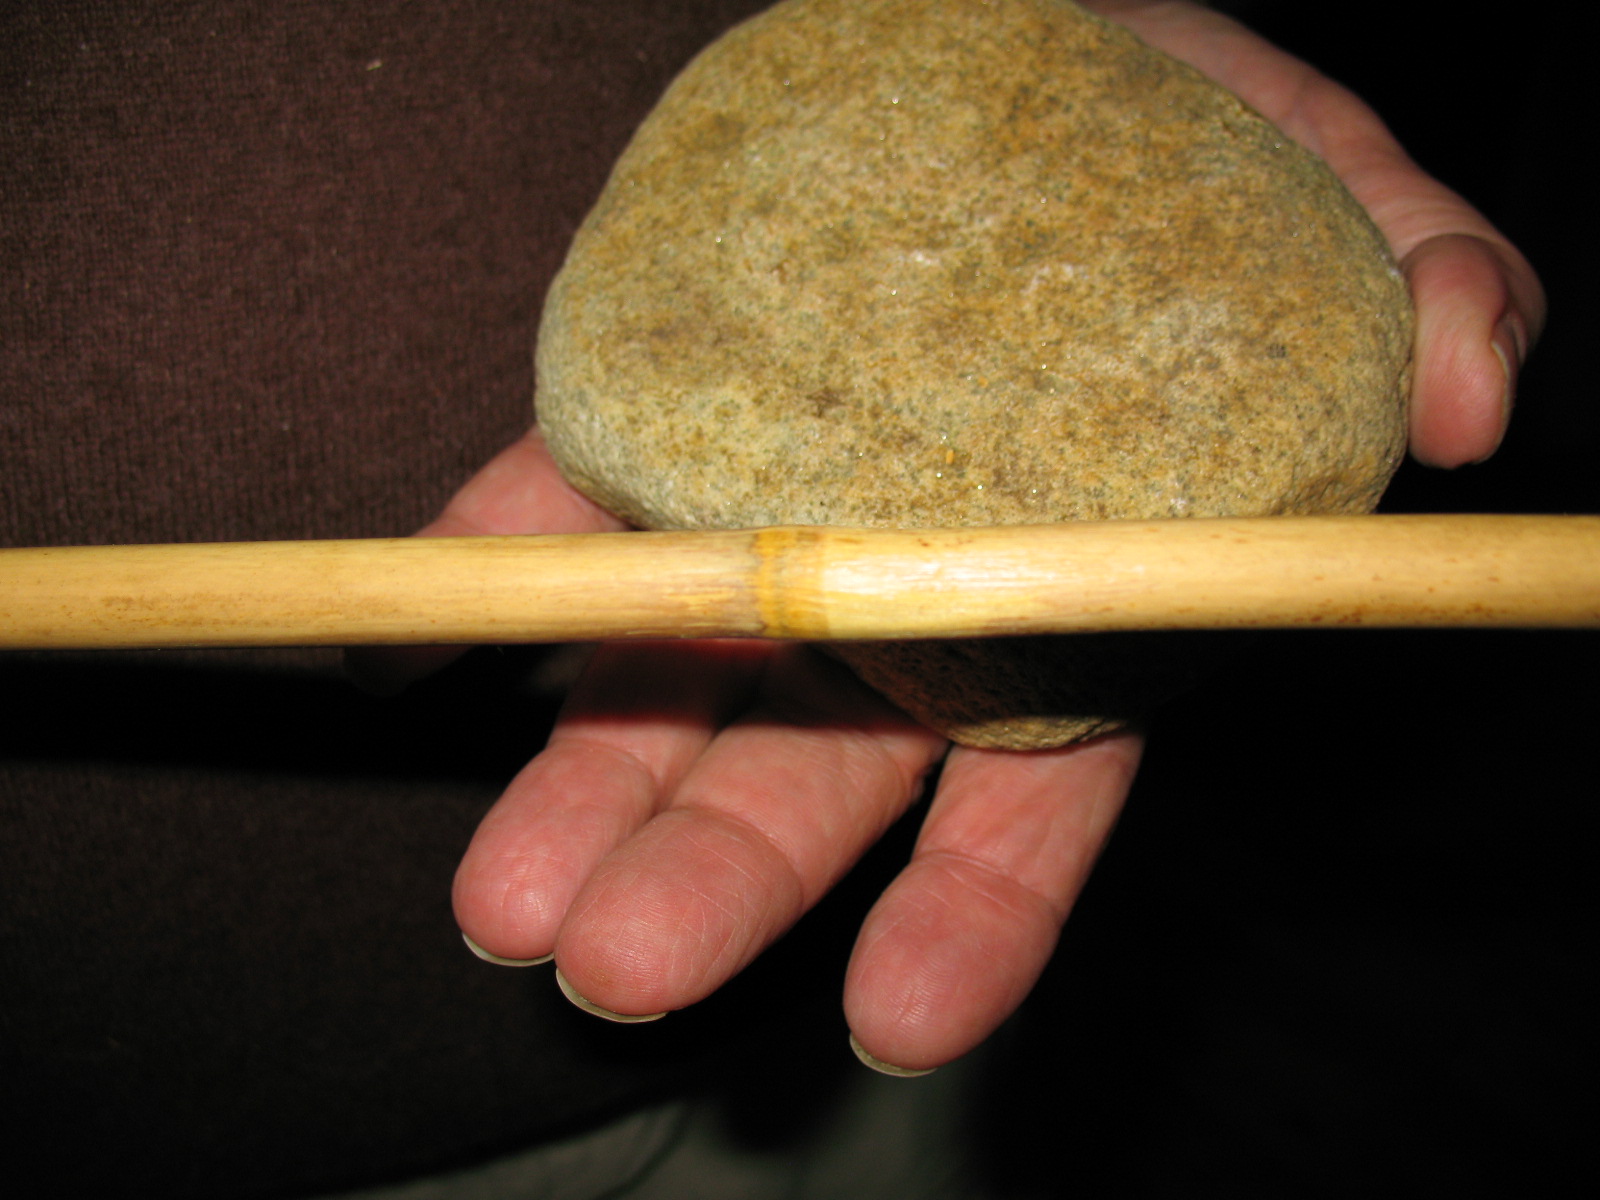
Now take the dried tendon and use a smooth round rock or the round end of a ball peen hammer and start pounding. What ever you pound with, it needs to be rounded. Flat edges, like the flat of a hammer or axe, will cut the fibers in the sinew. 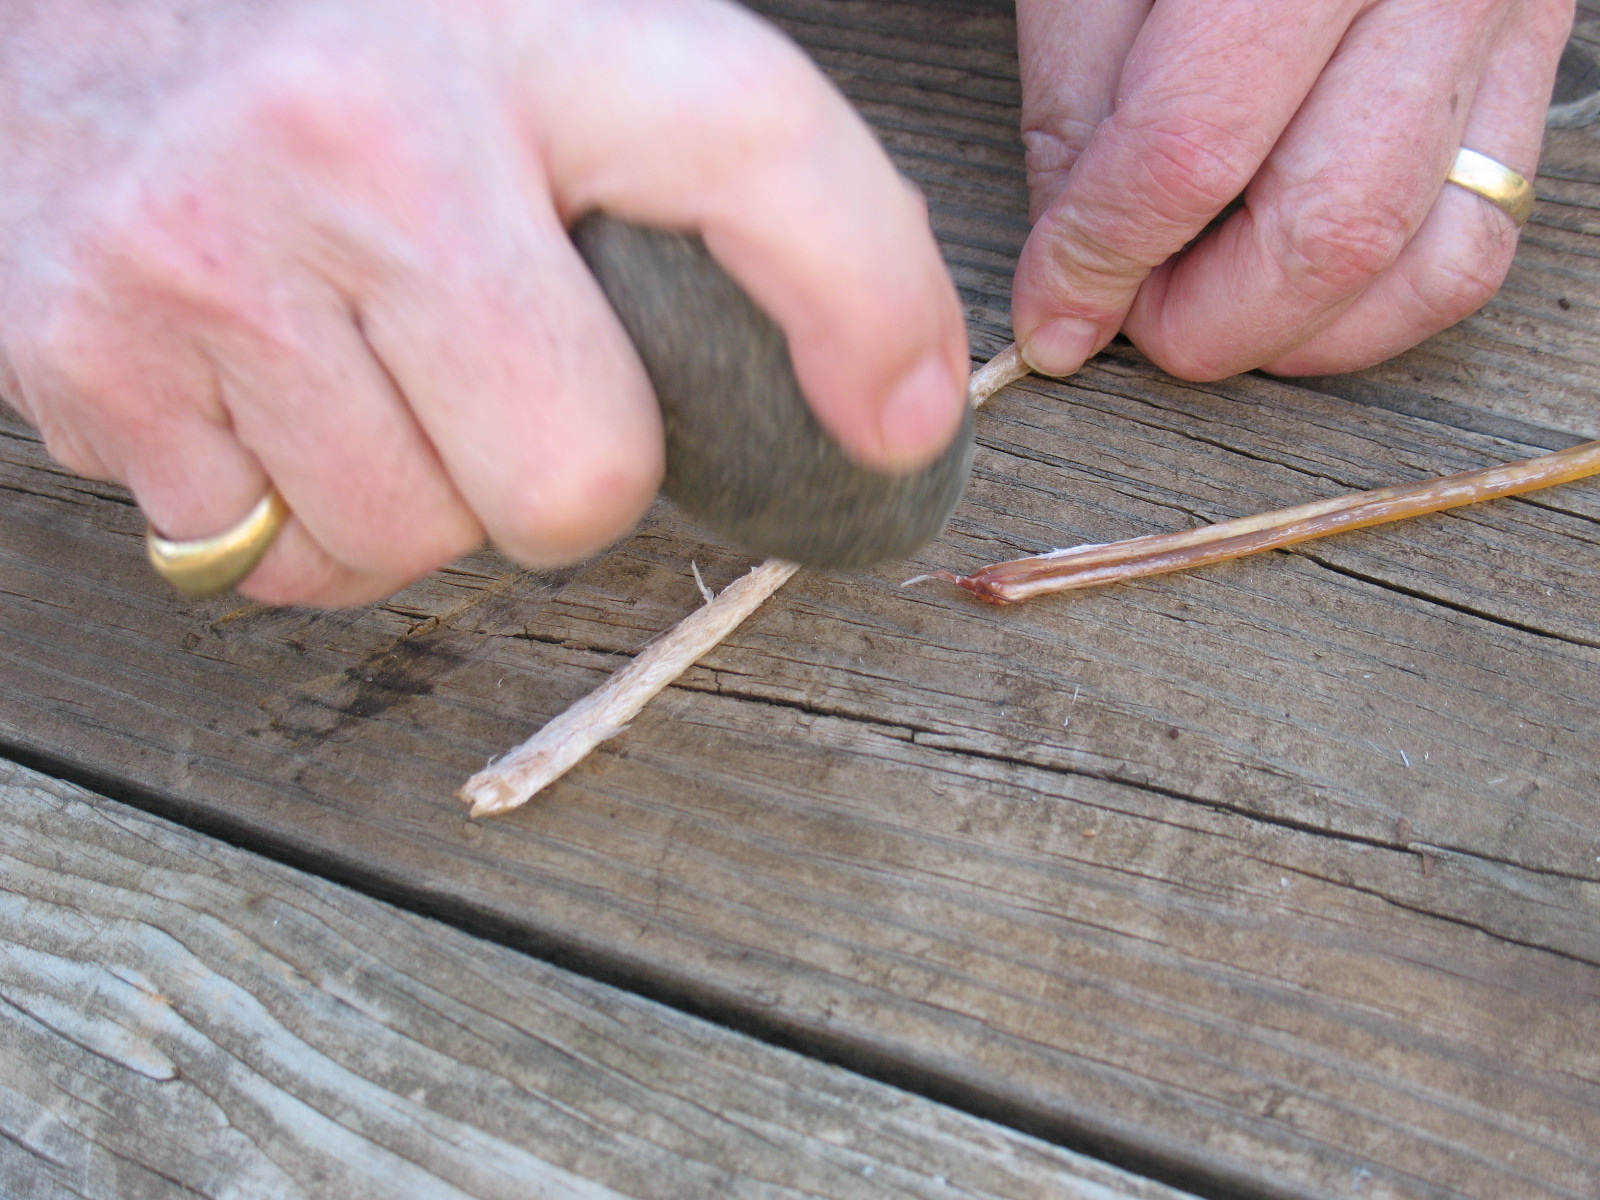
As you pound, the sinew will start to turn white, and it will begin to separate into fluffy white fibers. You can now take you fingers and pull apart the fibers is small bundles about the thickness of a pencil lead or smaller. 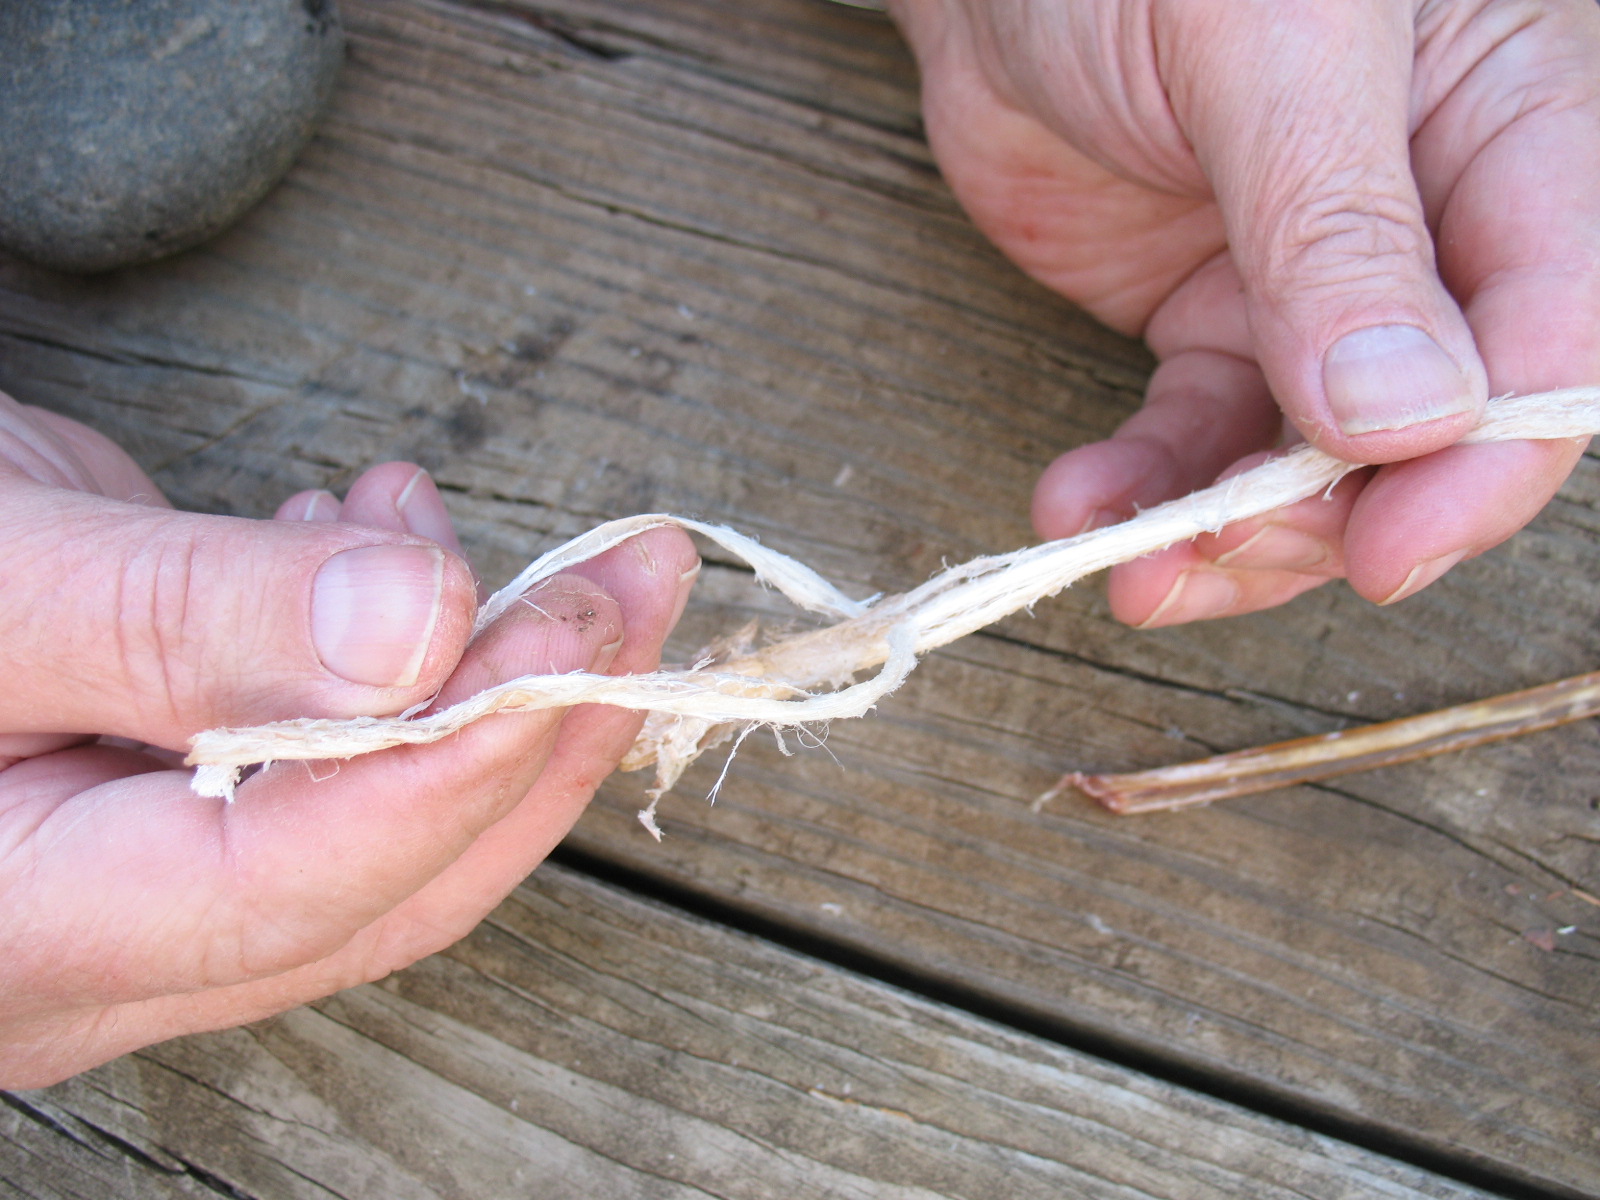
These little fiber bundles are what you’re looking for. You can use them to back a bow, make a bow string, sew leather together, tie on arrowheads etc.
To use the sinew to, for example, tie on an arrow head; all you have to do is pop a piece in your mouth and chew on it a little. Don’t be squeamish. It’s no different than chewing on a piece of deer jerky. The saliva in your mouth and the gentle chewing will soften the sinew in seconds. Don’t chew too long or you will wash all of the glue out of the sinew.
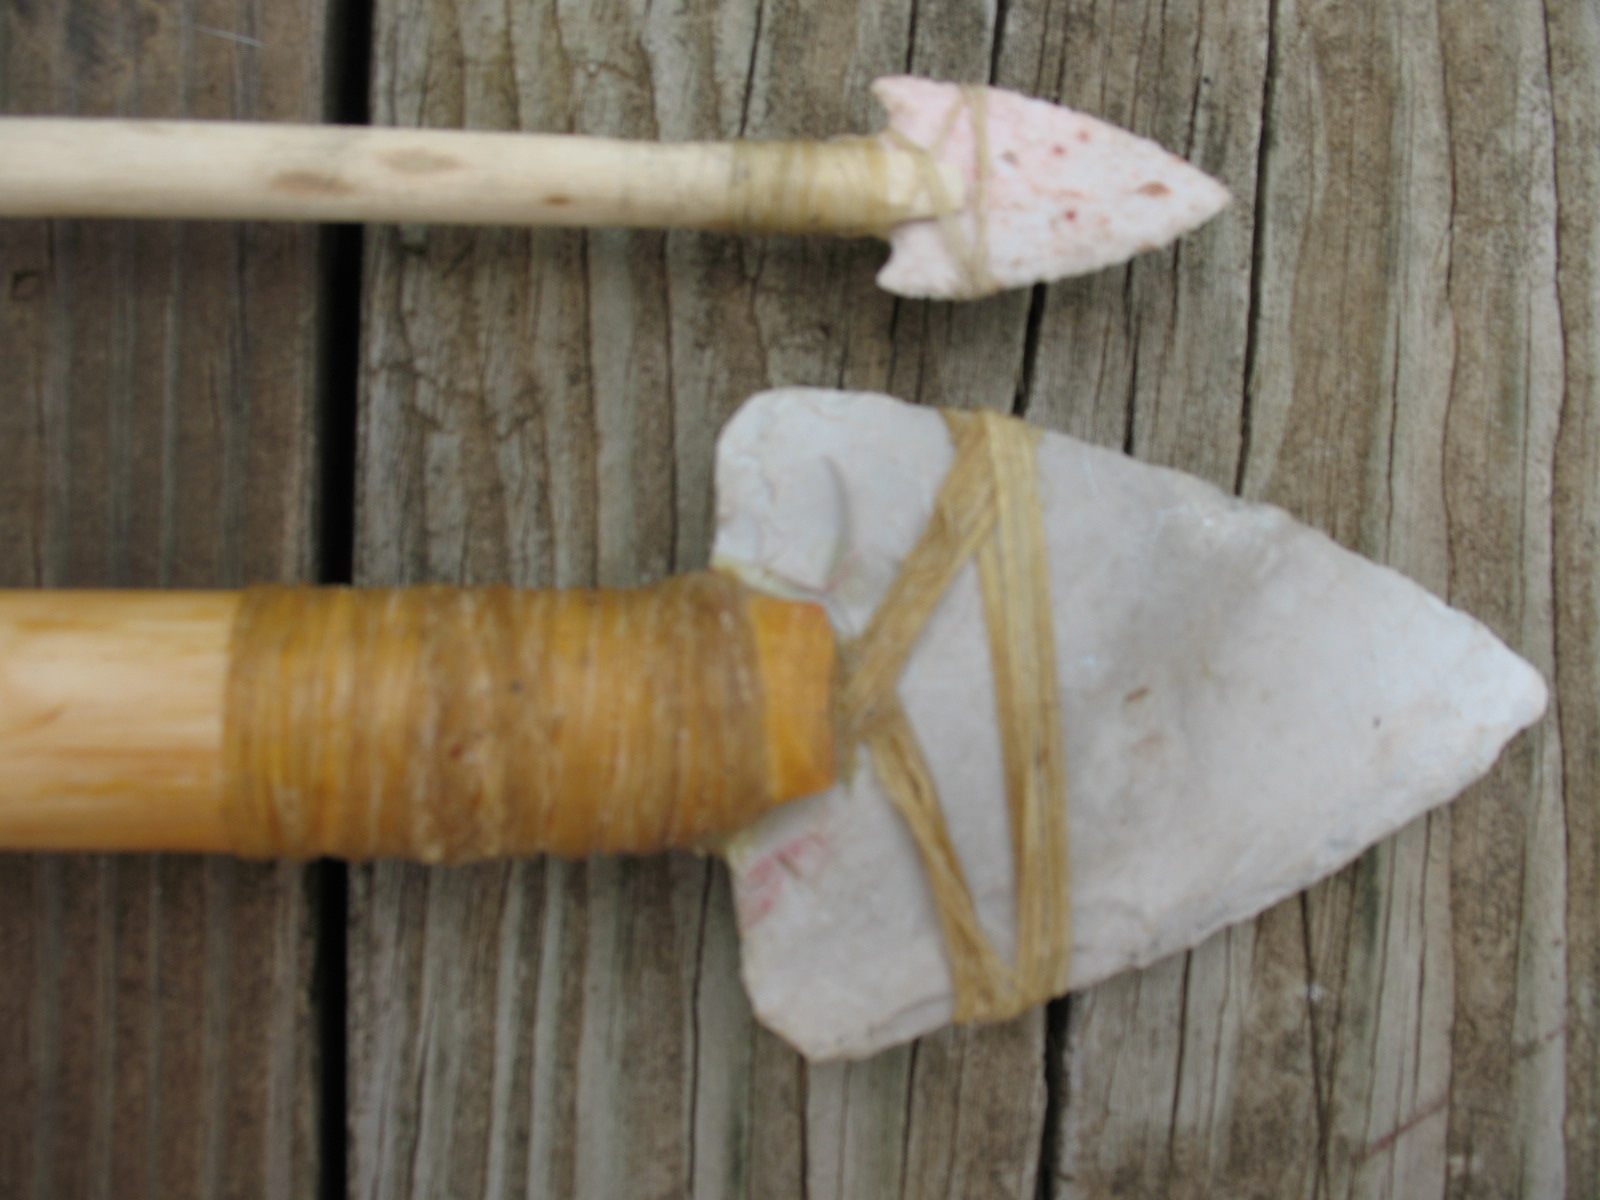
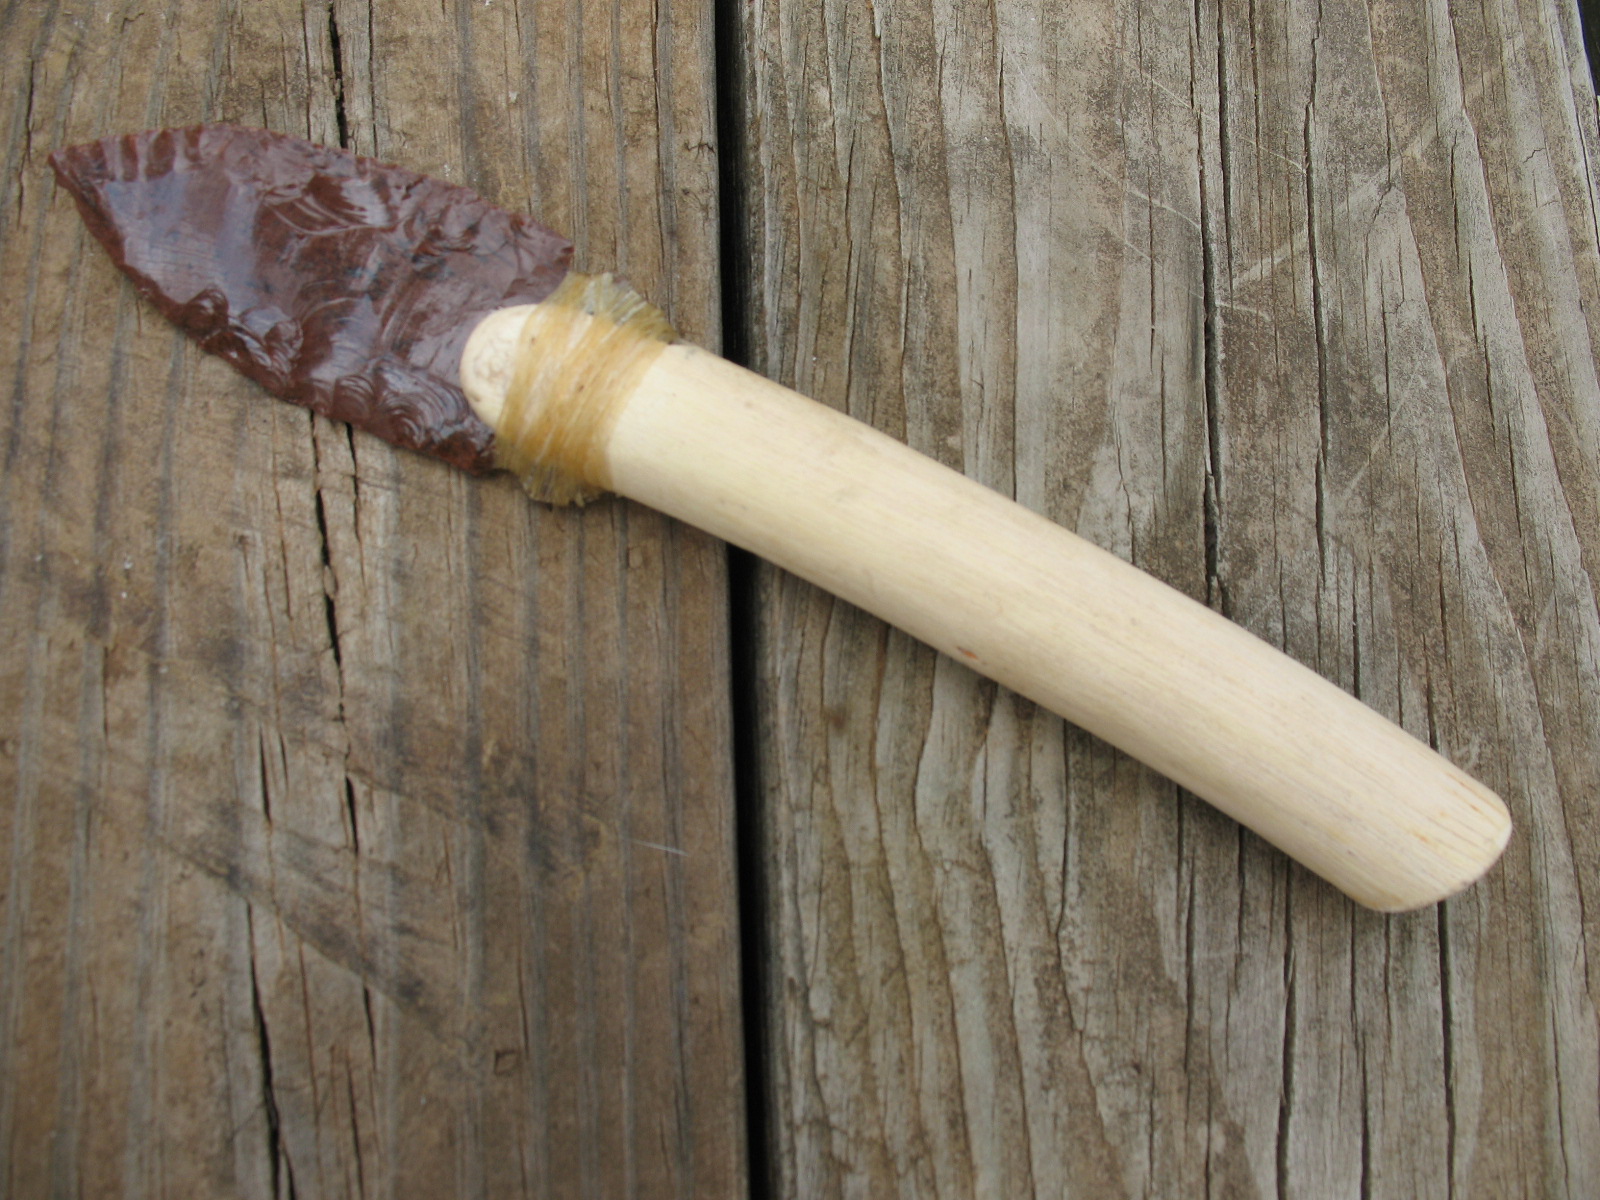
When the sinew is soft remove it from your mouth and wrap it around your arrowhead. You don’t have to tie it off because the sinew will stick to itself. Set it in the sun for twenty or thirty minutes and it will dry hard and tight. Coat the sinew with melted pine sap or carpenter’s glue and let it dry. Pictured below: sinew bow string, arrowhead, spearhead, and knife blade all attached with sinew; and sinew backing on an elm wood bow.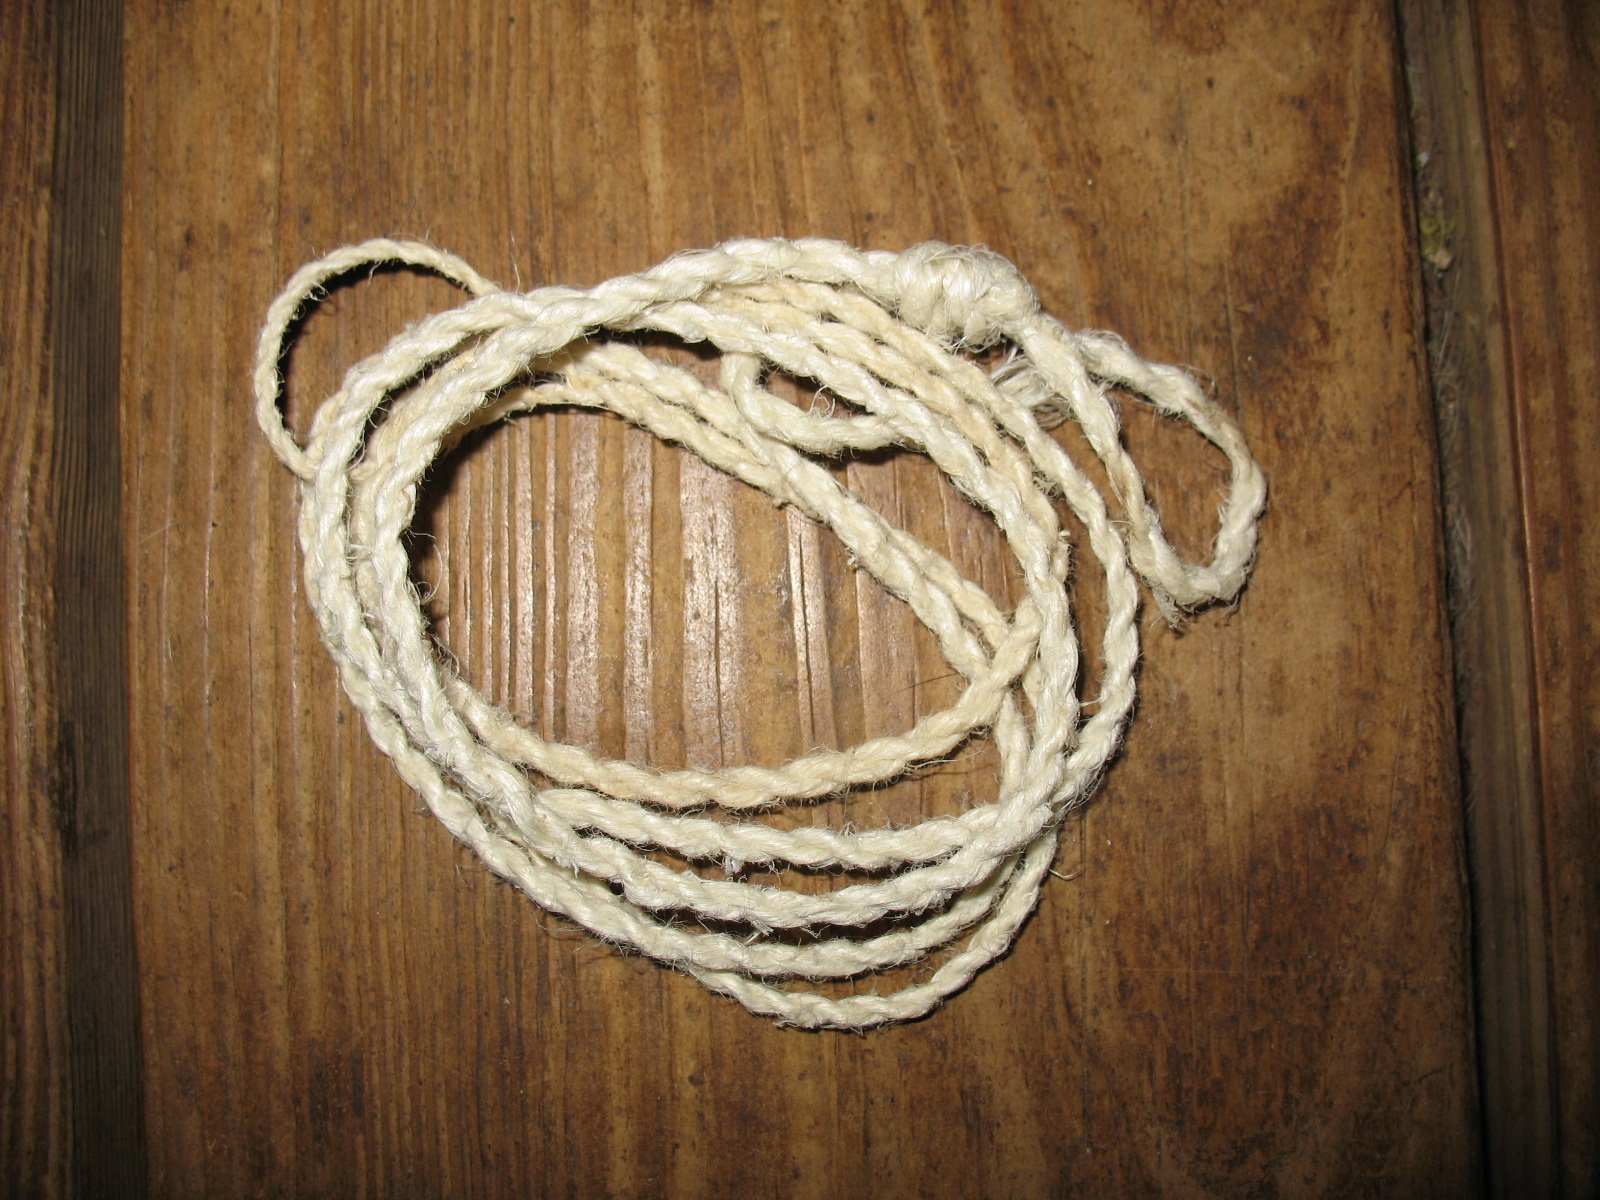
That’s all there is to it. Amazing isn’t it!
If you have followed through on making the tools in the last five posts, you now have a good basic Stone Age tool kit. To review; we have made flake knives, a hand axe, scrapers, a stone hand saw, and gathered grinding stones and a burnishing bone. You can use these simple tools to make many camp items, or you can use the simple tools to make more complex tools.
A couple of tools that would be very helpful to us are a maul and some wedges. These can be used for splitting materials to make things like a good bow or the hearth board for a fire making set.
A maul is the primitive equivalent of a hammer. It is really more like a club. If you can find a good solid hardwood stick that is about a foot and a half long and about as thick as your wrist, you can use it for a maul; but I think that you will find that most of the dead hardwood that you find is pretty rotten already. The alternative is use you hand axe to cut down a small tree, and then you can shape your own maul out of it. If you take this route you can make the striking end of the maul bigger and the handle end smaller. With a maul like this you can apply more force. If I was going to cut down a tree to make a maul, I would look for a good, straight hickory that is about three inches in diameter. This way you could make a maul from the bottom portion of the tree, and use the left-over to make a good bow. Pictured below: a hickory maul made with the hand axe.
Wedges are used for splitting wood with the grain of the material being split. To use a wedge you tap it into the end of a piece of wood and then hammer on the wedge with your maul. As the split opens up you can use more wedges to keep the split running on down the wood. This technique works well with straight grained woods like oak, hickory, cedar, or bois d’arc. It does not work well on woods with a twisted grain. Elm makes a good bow, but it is the devil to split.
Wedges can be made of wood. If you are going to make wooden wedges I recommend dogwood. Shape the wedges from green dogwood and let them dry. Dry dogwood wedges are almost as hard as iron. Pictured below: Dogwood wedges made with the hand axe.
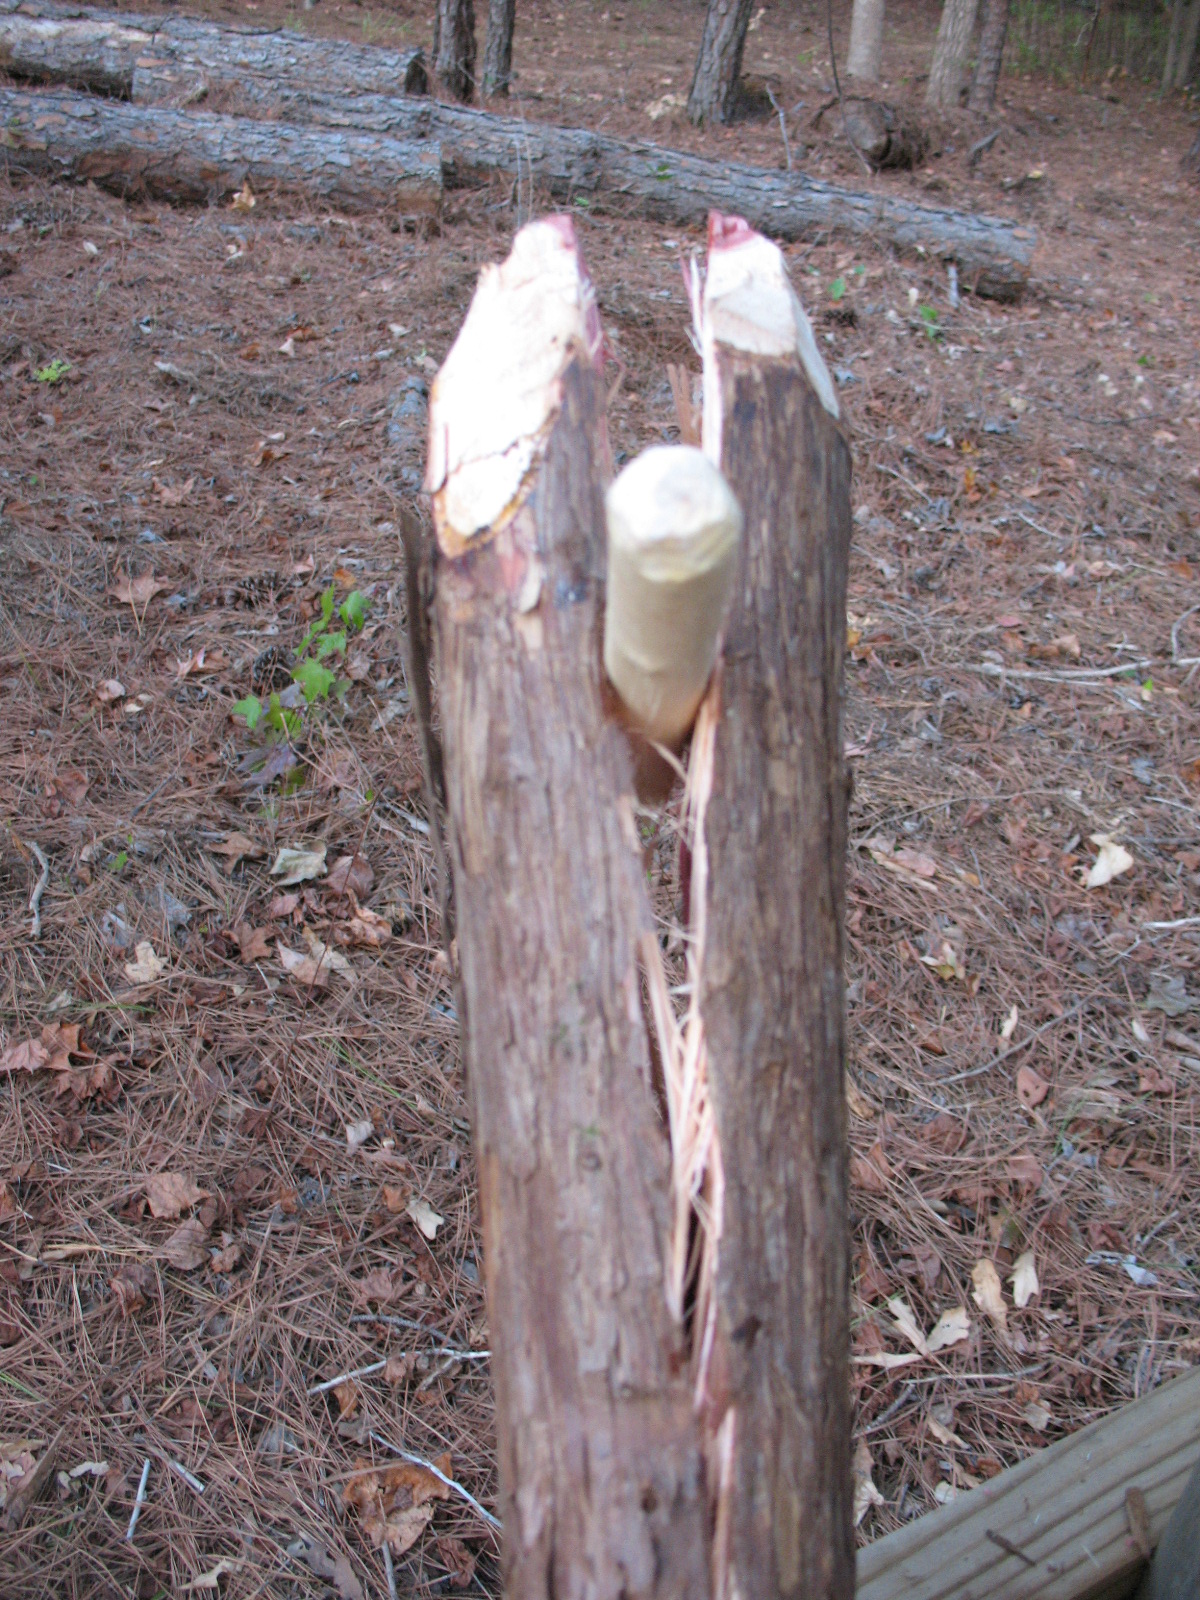
Once you have a good maul and three or four wedges, you can go to work making a bow. Pictured below: Series of pictures showing how to split out a cedar (juniperus virgiana) bow stave with the maul and wedges. Start a small crease with the hand axe and maul (don’t hit hard or you will shatter the hand axe) then dive in a wedge and hop scotch the wedges down the log until it is split in half.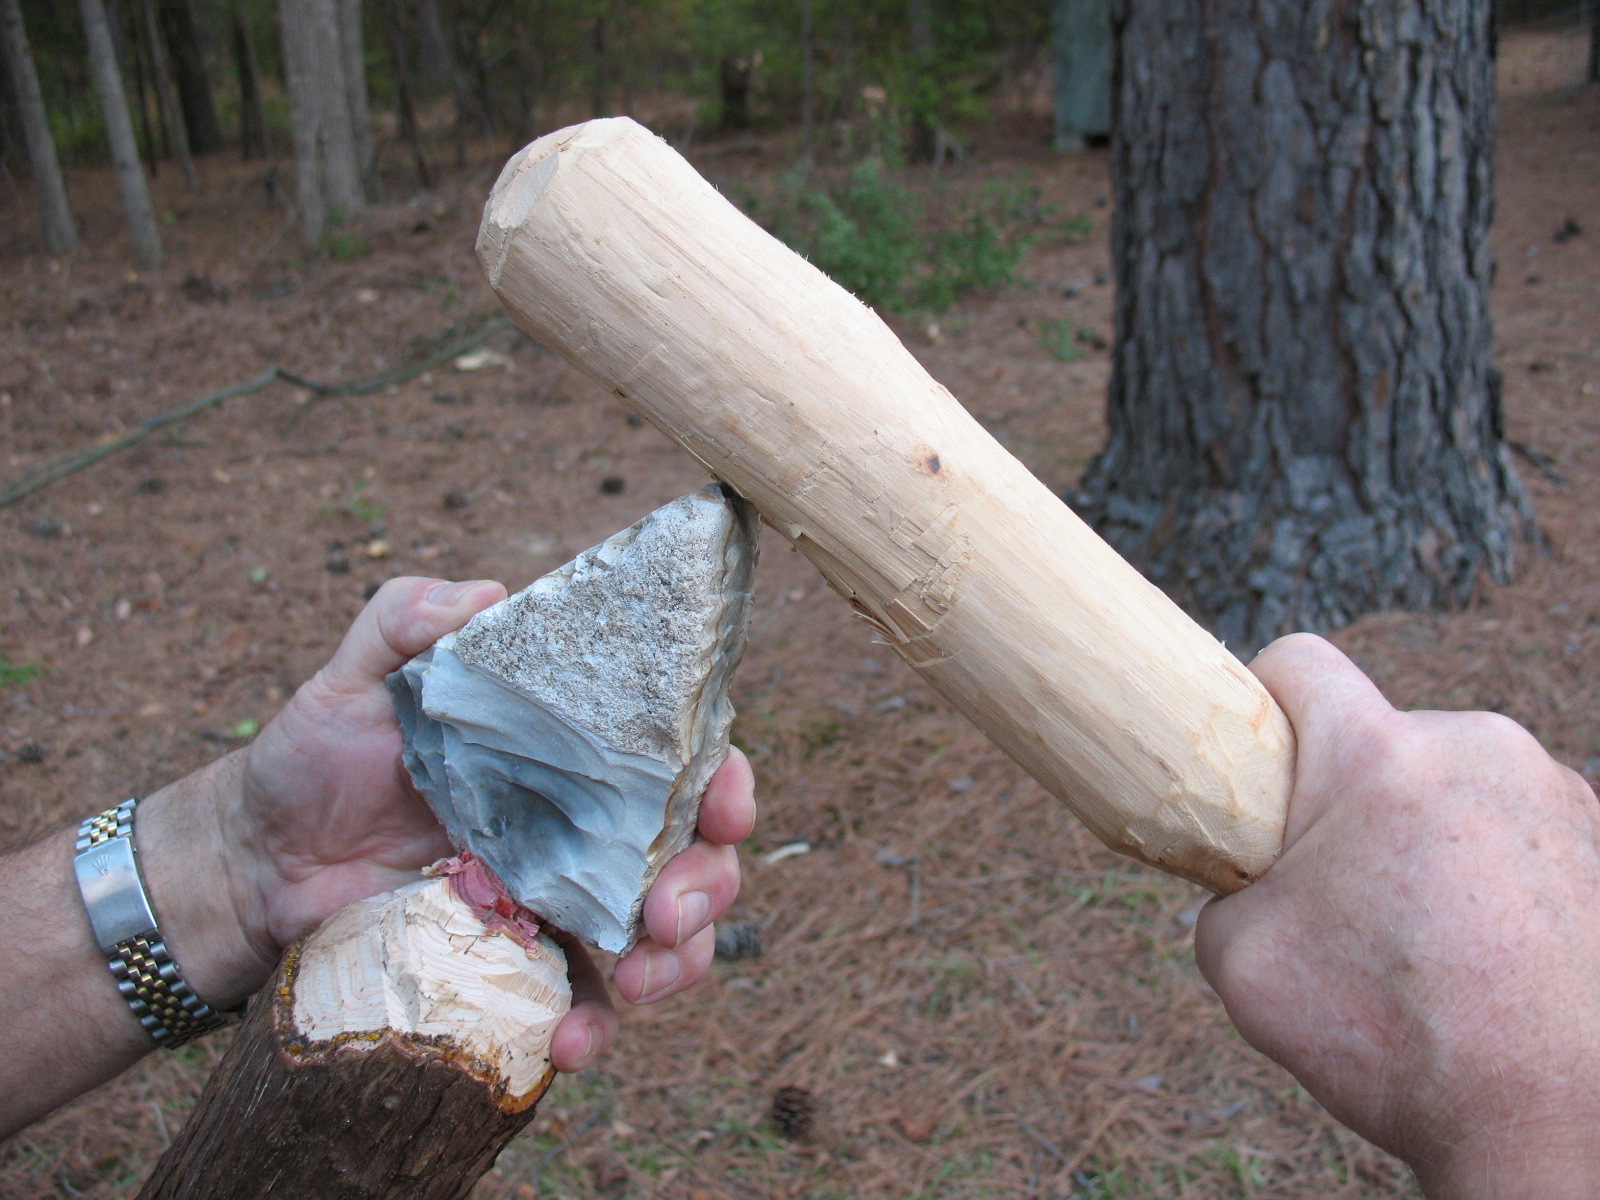


There are occasions when you may need to smooth out a surface and a scraper won’t do the job. You might, for example, be trying to remove the joint ridges from a cane arrow shaft. If you use a scraper to do this you will find that the scraper wants to remove material from the area between the joints as well as from the joint ridges. If you use a sandinging stone you will be able to sand the ridges down so that they are even with the surrounding material, and you will end up with a nice smooth arrow shaft. Pictured below: top, sanding stone and cane shaft with rough joint; middle, using sanding stone on joint; bottom, sanding stone and smoothed out cane joint.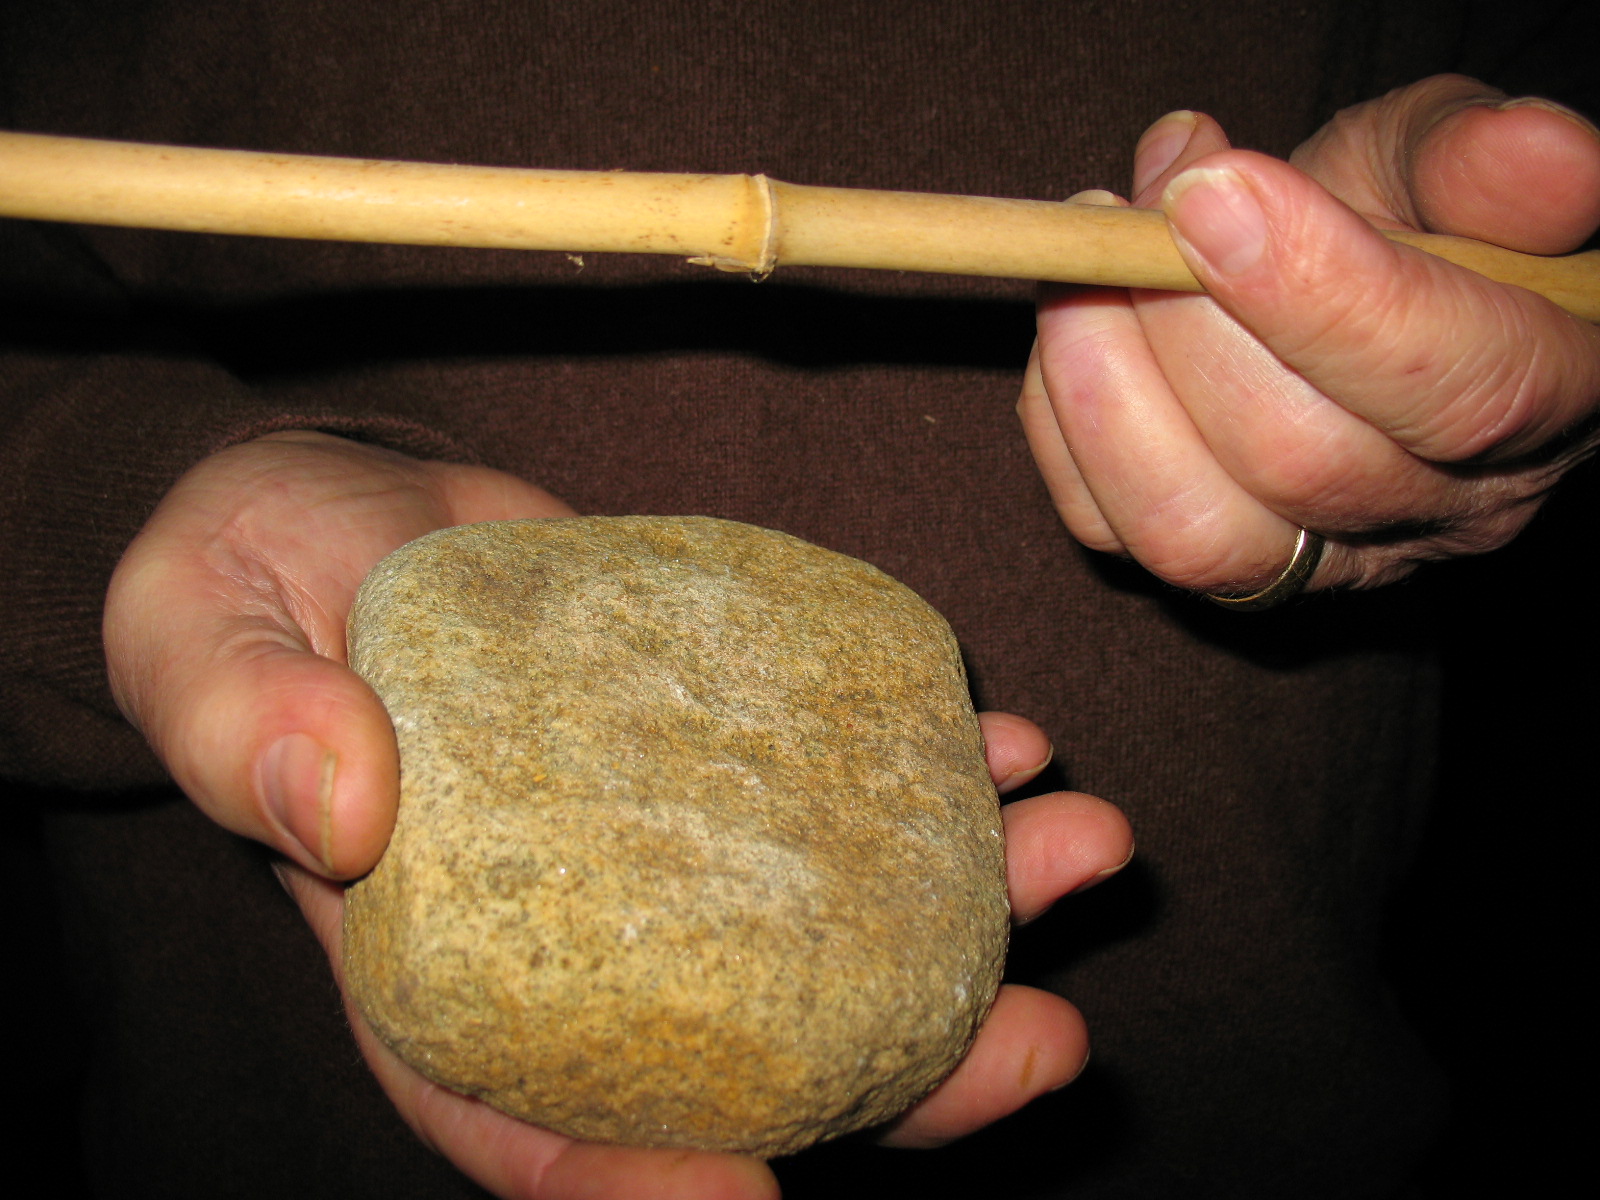

You really don’t have to make any kind of modifications in order to “make” a sanding stone; you just have to carefully select the right stone for the job. If you can find some river rocks you will probably find several that will make good sanding stones. Select several stones that are hard and have a fairly flat surface on one side. Look for various different degrees of coarseness in the stones. A coarse grade stone that will remove a lot of material can be used to rough out materials. Finer grades of stones will give you a smoother finish. If you can’t find hard river rocks like granite, or basalt; softer rocks, like sandstone will work but not as well. Sandstone will work on wood, but it will not work very well on bone. Pictured below, three different grades of sanding stones.
Sometimes you will want to give a very smooth and hard surface to something that you are making, like a hardwood arrow shaft. You can achieve this super smooth and hard finish by a process called “burnishing”. A piece of smooth bone is one of the best burnishing tools that you can use. If you can find a good deer leg bone, that’s all you will need. You don’t have to modify the bone in any way. Pictured below: Deer leg bone and hardwood shaft.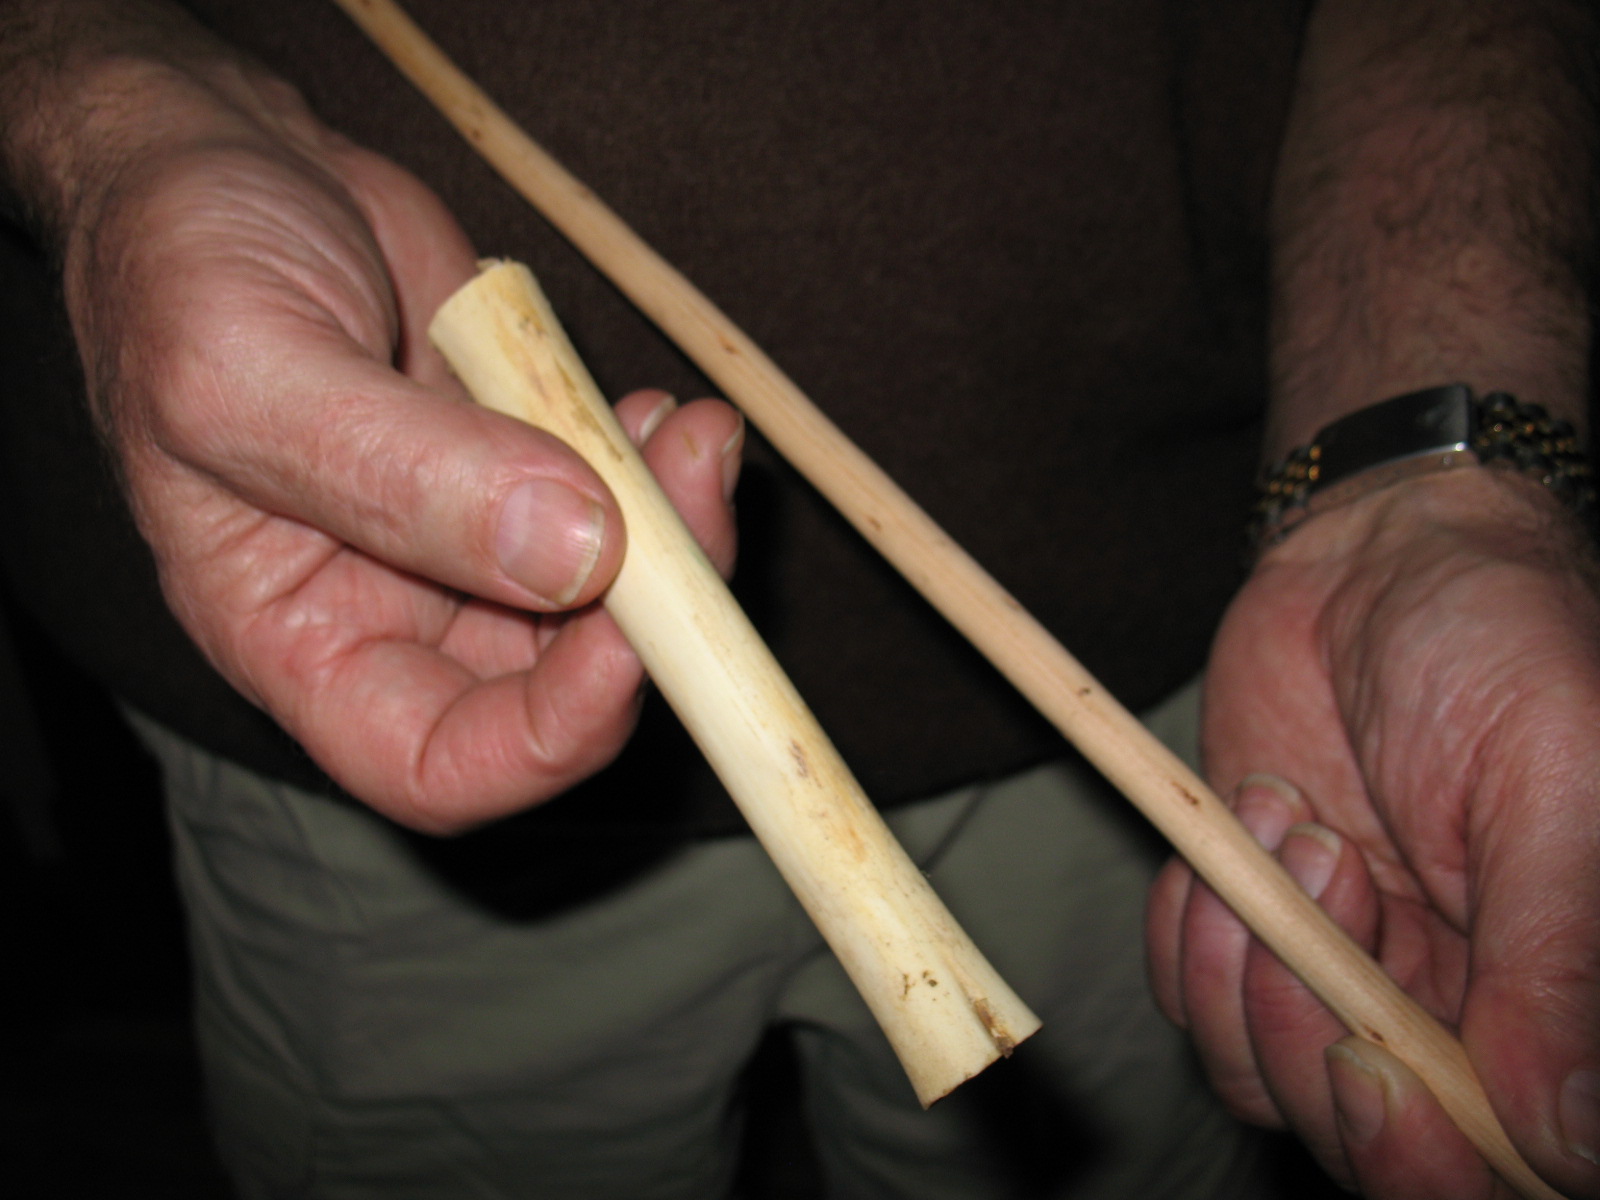
To burnish an arrow shaft you take the bone in hand, press it down hard on the wooden shaft, and rub. This will compress the wood fibers and give you a hard shiny surface on your arrow. This is important on an arrow because it creates a smooth surface to slide across your hand, and because the surface is harder it will be less vulnerable to nicks and scratches. Pictured below: Using bone to burnish hardwood shaft.
First of all when I say we are going to make a stone saw I’m not talking about a saw that we can cut lumber with. I am talking about a small hand held saw that can be used to cut off arrow shafts, cut a nock in an arrow, saw through a small bone, saw a notch in a fire board, etc.
To make a stone saw you will need a flake of flint or chert and a tool for removing some smaller flakes from the large flake. This flaking tool can be a piece of bone, a tine from a deer antler, an old nail, a screwdriver, a strong hardwood stick, or anything else that is harder than the flint and has a narrow point. Pictured below: top, front view of flake that will become a saw; middle, side view on the same flake showing how it tapers to a good edge; bottom, flint flake and deer antler flaking tool.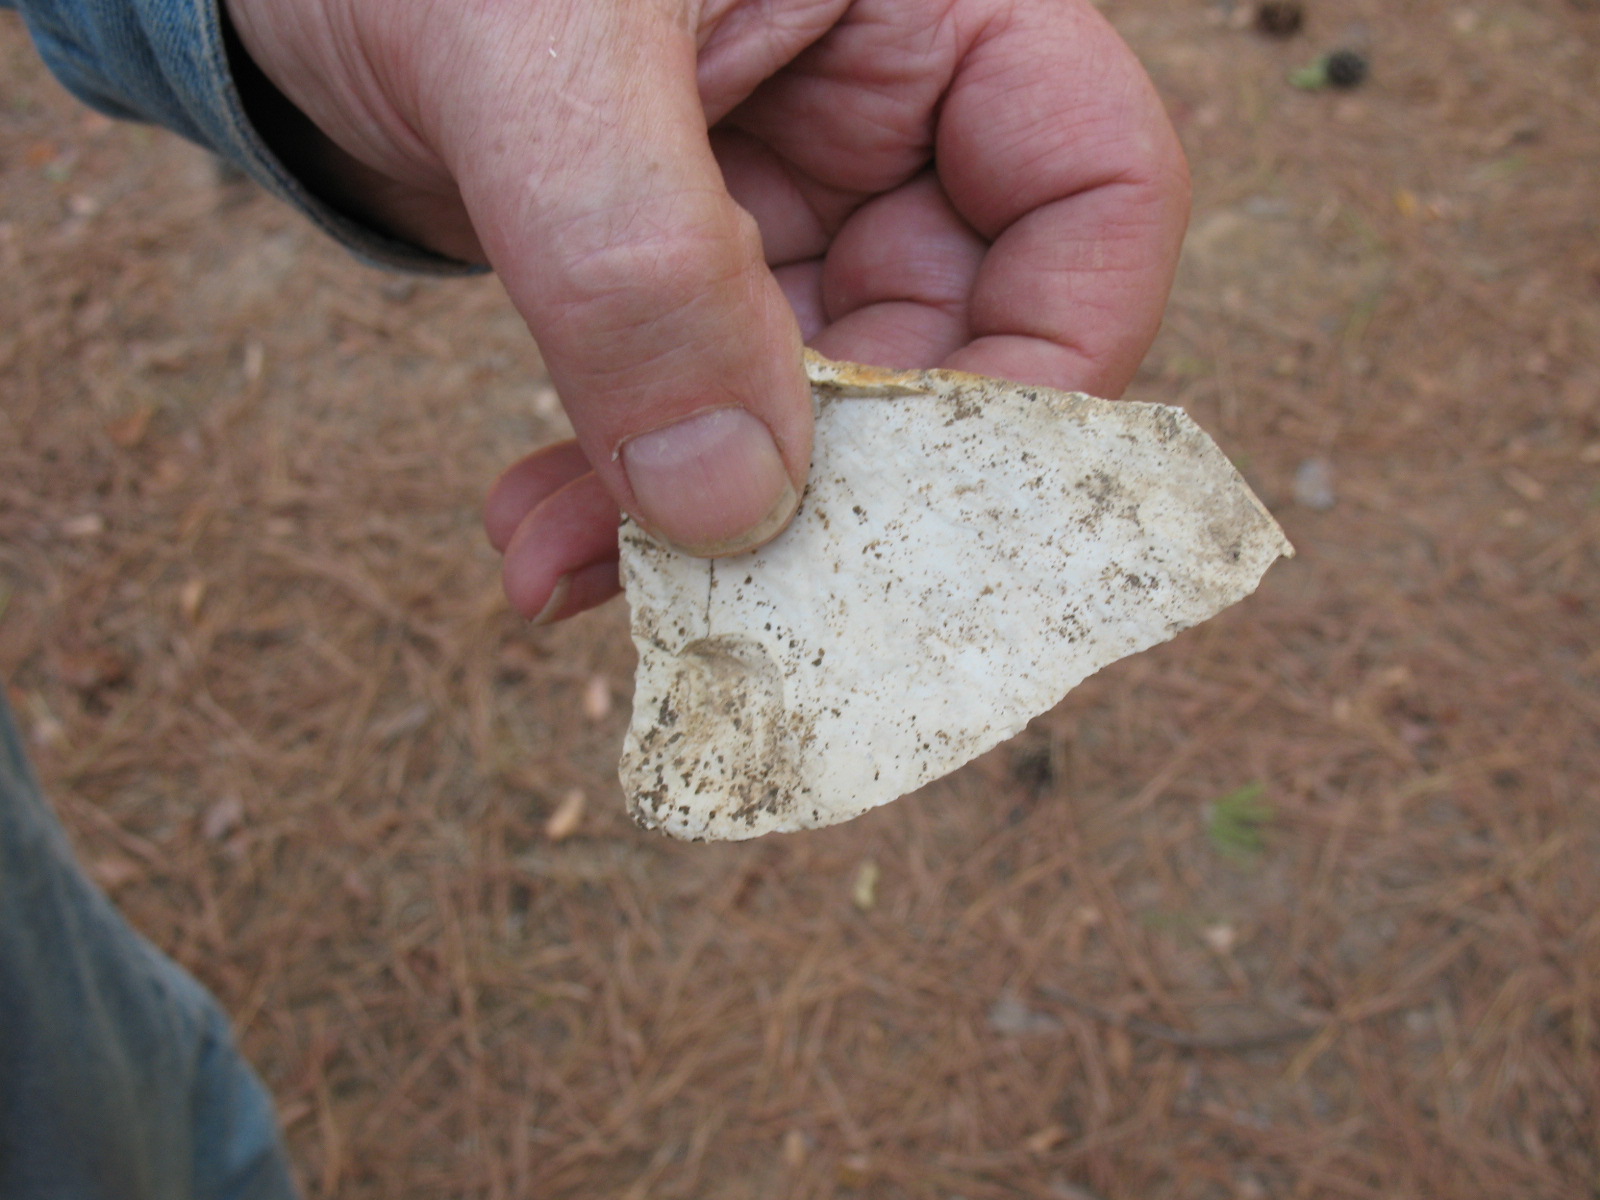
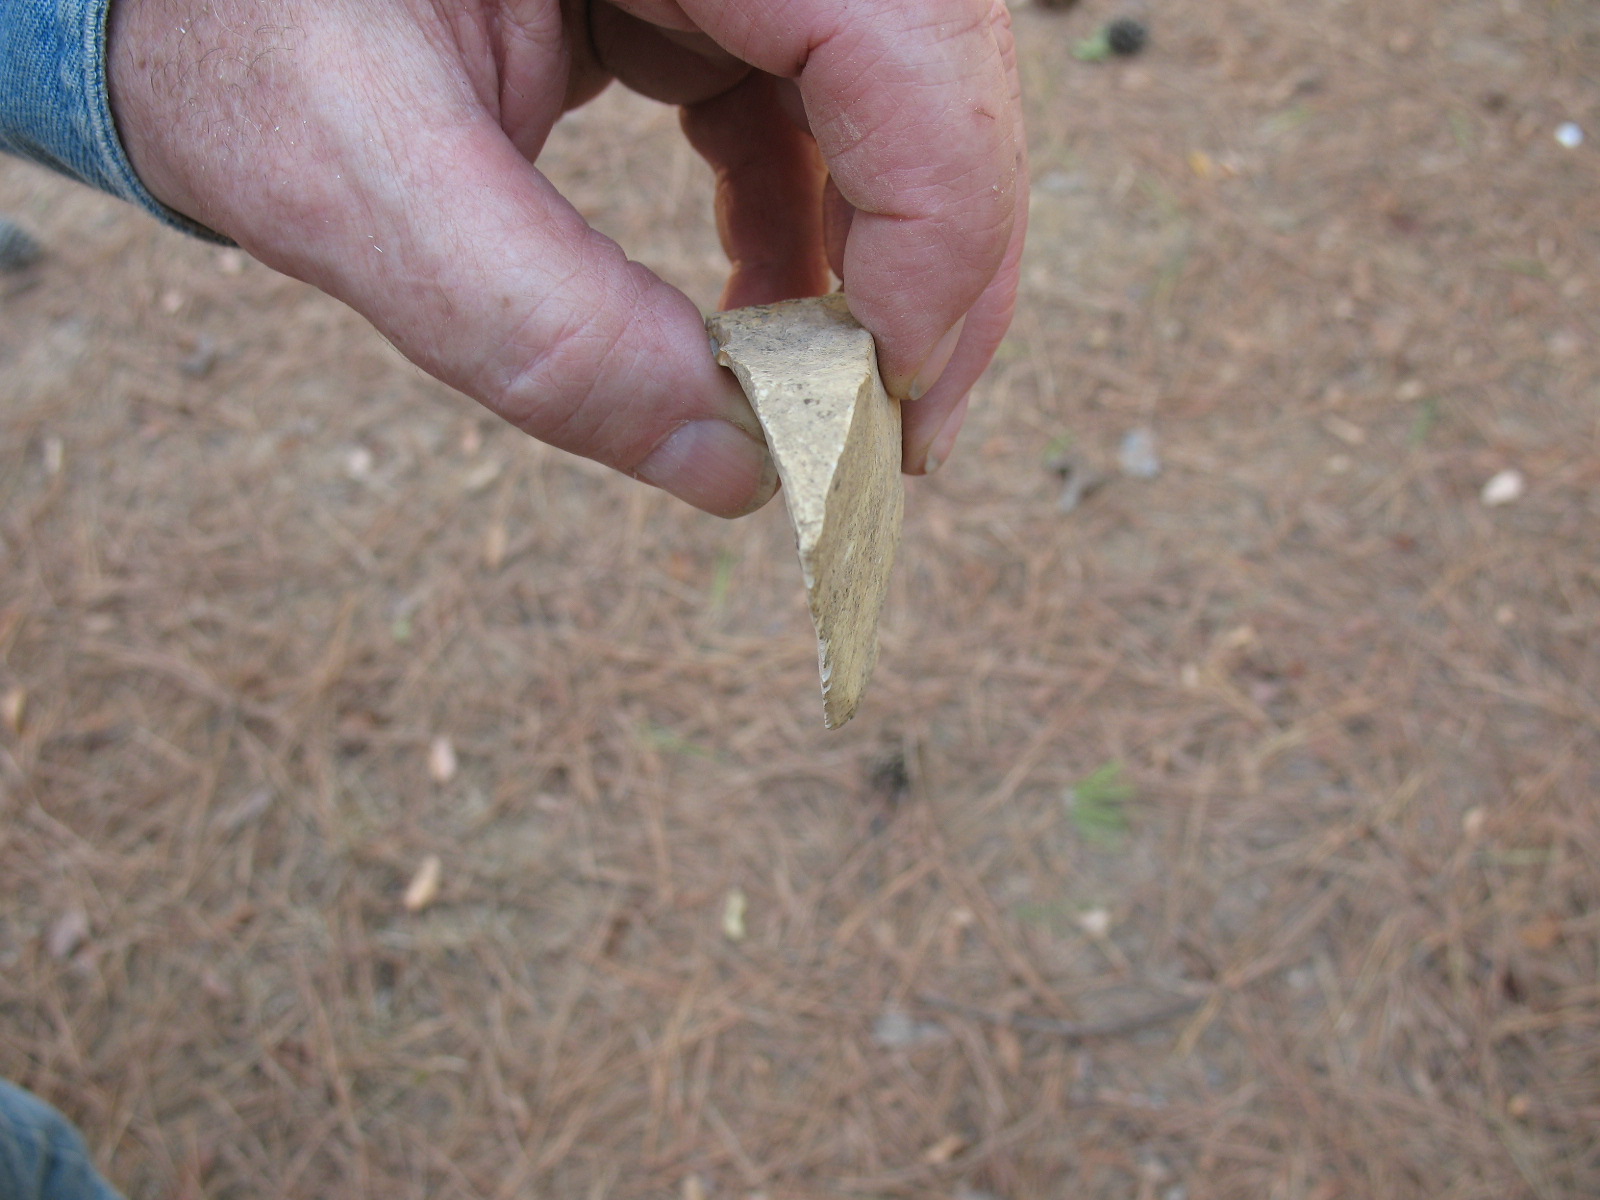
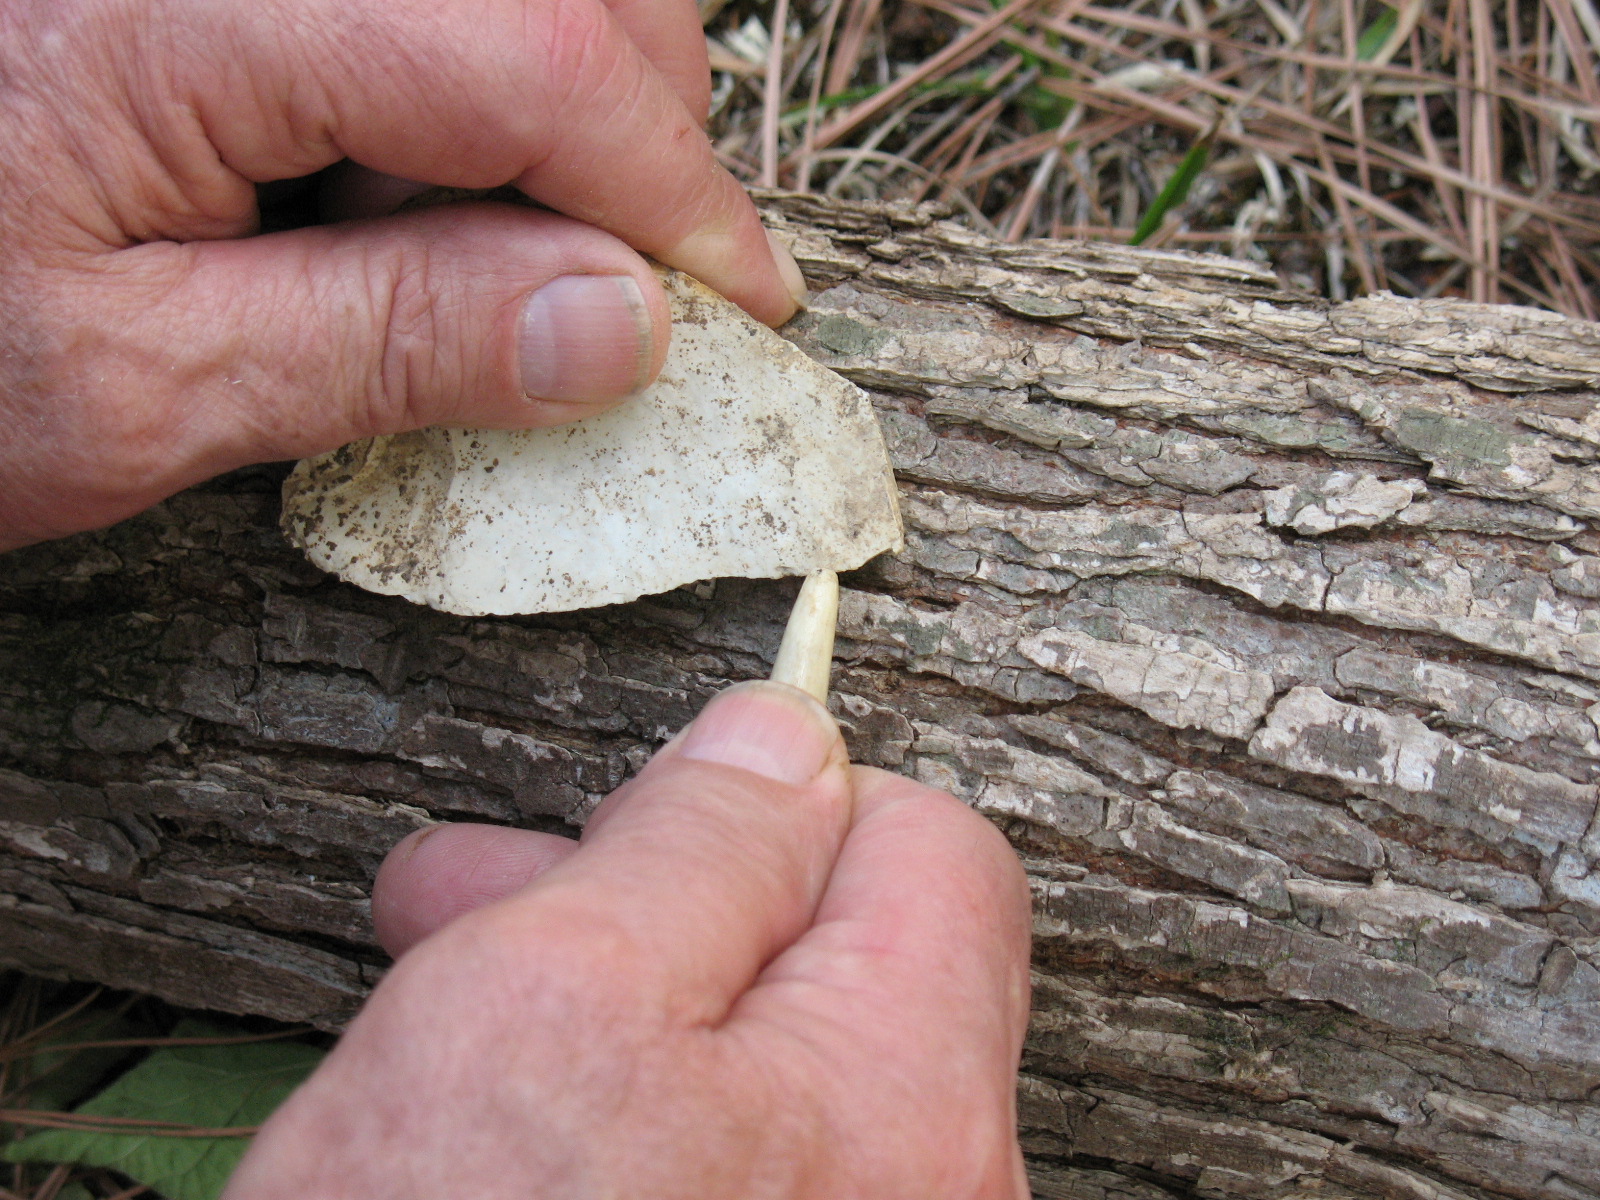
Most flint knapping is done by holding the flake to be knapped in a leather pad in the hand. Since you are unlikely to have a leather palm pad in a survival situation, you can lay the flake down on a log and hold it in place with your fingers while removing flakes. When you have the flake positioned so that you can work on it, take your knapping tool and remove a series of small flakes from the edge of the large flake. You want to skip a little space between each small flake so that you leave a series of jagged points on the edge of the large flake. These jagged points will be the teeth of your saw. Pictured below: top, removing a series of small flakes from the edge; bottom, finished hand saw showing the jagged teeth on the edge. 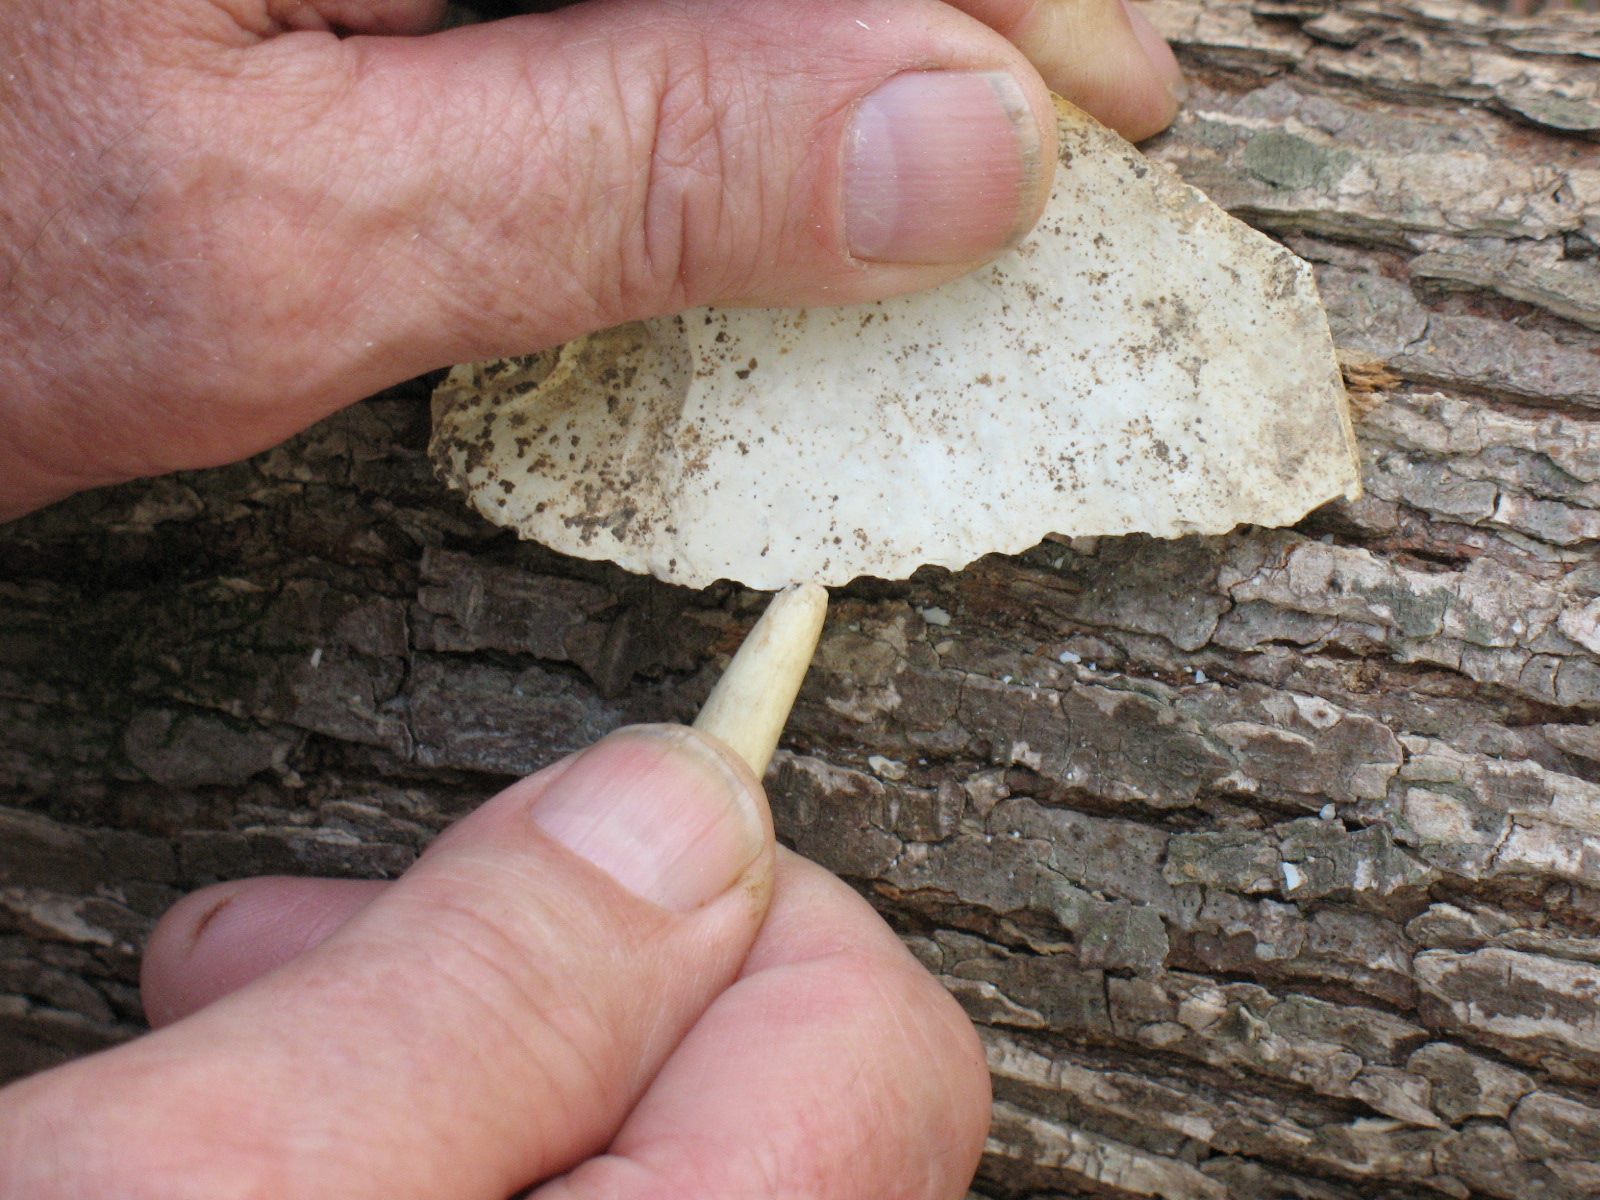

That’s it. You’ve just made a hand saw. Pictured below: series of pictures showing how the hand saw can be used to cut through a turkey wing bone.