I’m not sure when the continuous loop bowstring came into being. If I had to guess, I’d say it was in the 1960’s when modern longbows were in their prime. If you buy a longbow today it will probably be equipped with a continuous loop bowstring. What are the advantages of a continuous loop bowstring? For one thing they are extremely strong. They are just one continuous loop of string; no splices. The loops are not spliced in as on a reverse-wrap bowstring, and you have the same type of loop on both ends of the string. The continuous loop bowstring is also one of the quickest and simplest bowstrings to make, probably why they were so popular with mass producers of bows.
It takes a couple of pieces of equipment to make a continuous loop bowstring, so if you only need one bowstring you are probably better off to just buy one. I’ve seen them in stores that carry traditional archery supplies for around $15.00 US. If you make a lot of bowstrings, it is far cheaper to make the two simple pieces of equipment and make your own strings. This post is a tutorial on how to make one of the two pieces of equipment that you will need. In the next post I will show you how to make the other piece of equipment, and in the third post we will go over how to make the actual string.
The first piece of equipment you will need is a serving dispenser as pictured below.

Serving is a small cordage that is wrapped around the loops to strengthen them and hold them closed.

Serving is also wrapped around the center portion of the string to prevent wear at the point where arrows are nocked. You can buy a serving dispenser, but if you have a few simple tools it is super easy to make one. All that you need is a small strip of light gauge metal, some tin snips, a drill and drill bit, a bolt and wing-nut, and four washers. I used a scrap of metal and some odds-and-ends from my shop to build mine for zero dollars.
The first thing you will need to do is buy a spool of serving thread so you can build the dispenser to the proper dimensions. I bought my serving at Academy. I’m sure that other stores carry serving, and you can also order it on line.

My serving spool is two inches long.

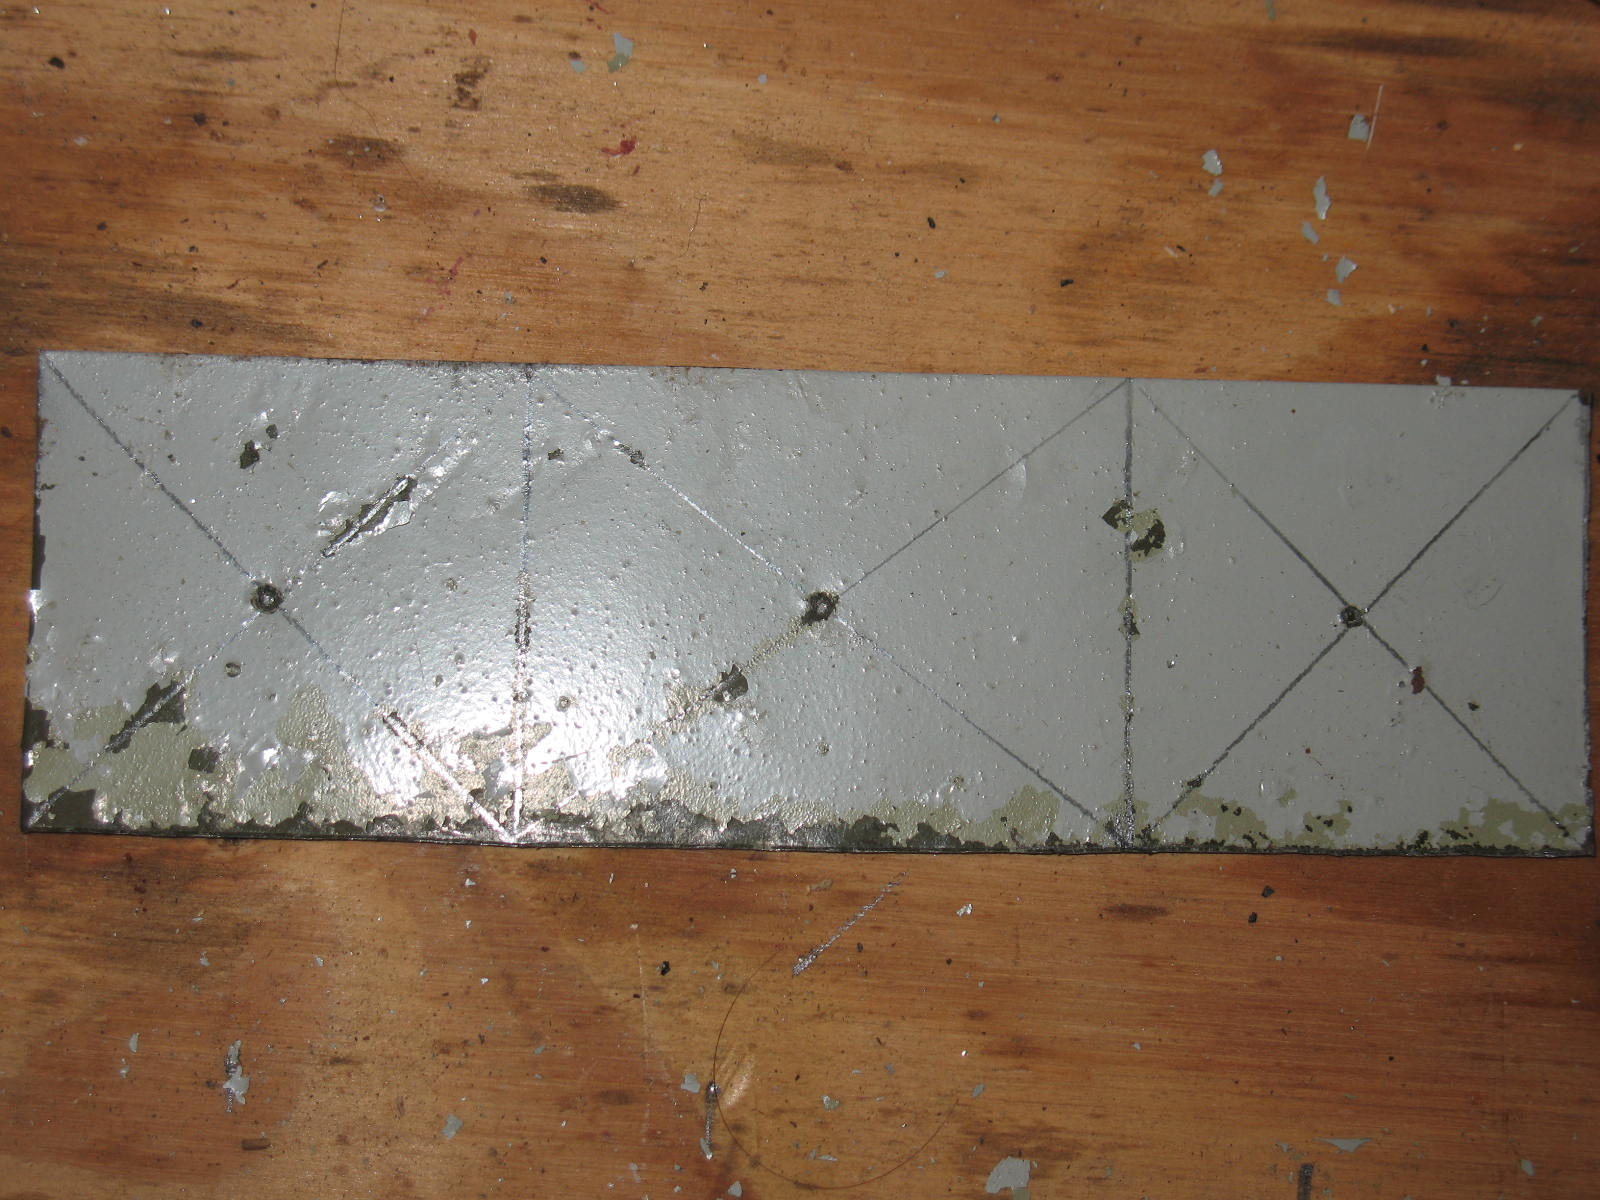
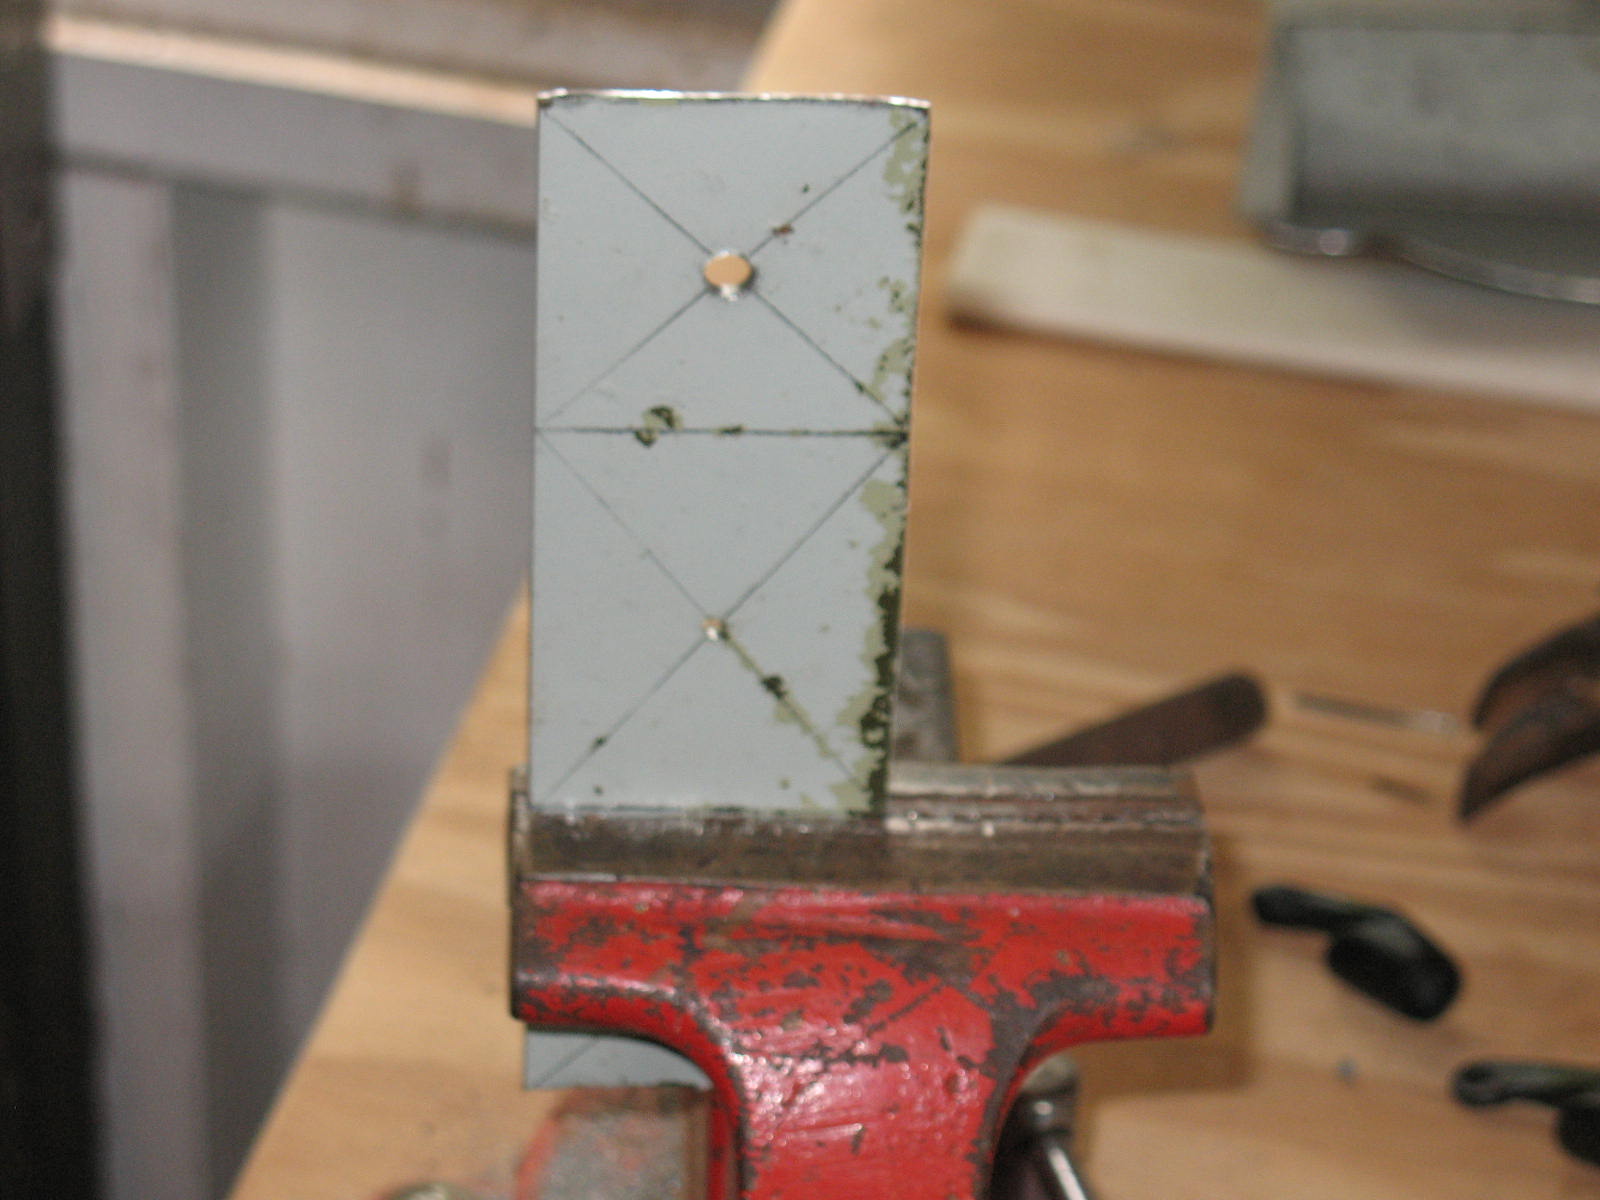
The dispenser will have to accommodate the length of the spool plus about an eighth of an inch of play on each end. In addition I will need to turn the metal up about an inch and three-quarters on each end to hold the spool. With these dimensions in mind, I cut a strip of metal 5 ¾ inches long by 1 ¾ inches wide.


I used a ruler and laid out the strip into three sections; 1 ¾” on each end and 2 ¼” in the middle.


I drew an X in each section to find the center.

Then I used a hammer and punch to make a pilot dent in the center of each X.
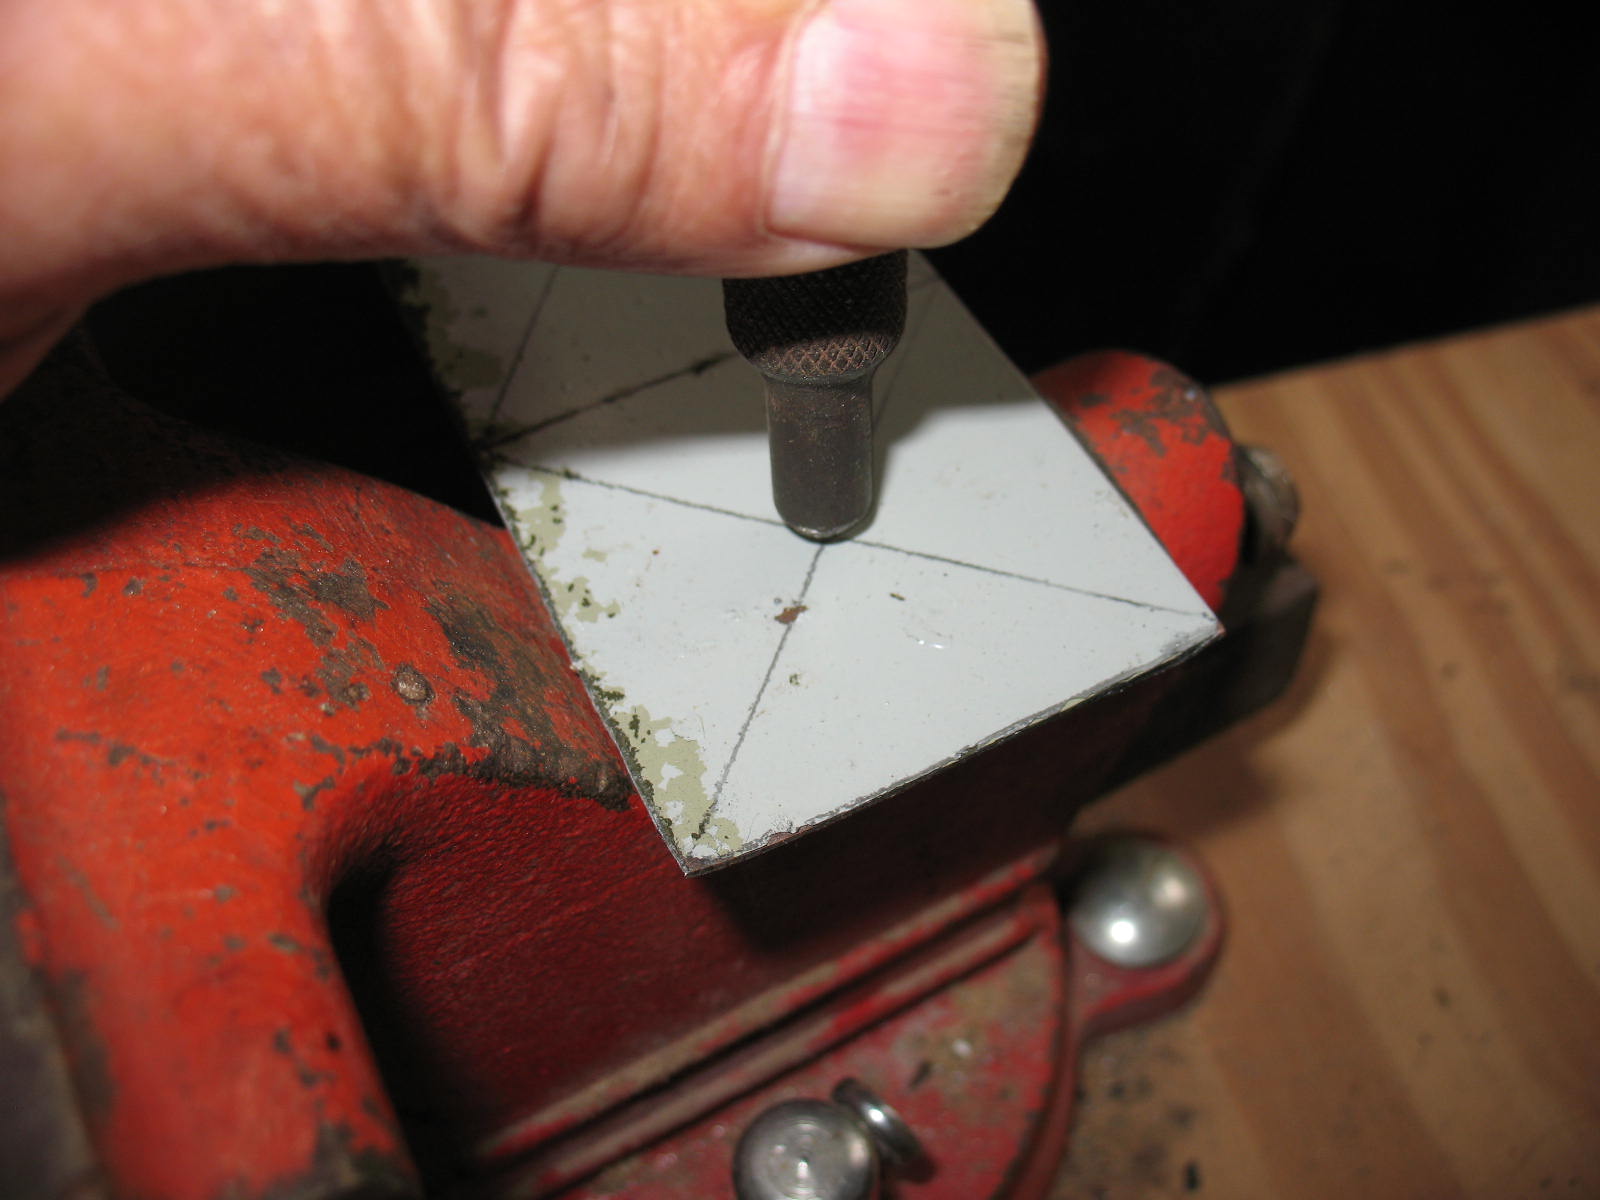
Now we are going to drill some holes in the strip, but first we need to get our other hardware together so that we can make sure that the holes are the right size. You will need a bolt that is long enough to go through the length of the spool plus about a half inch. The bolt also needs to be small enough in diameter to fit through the spool without binding.
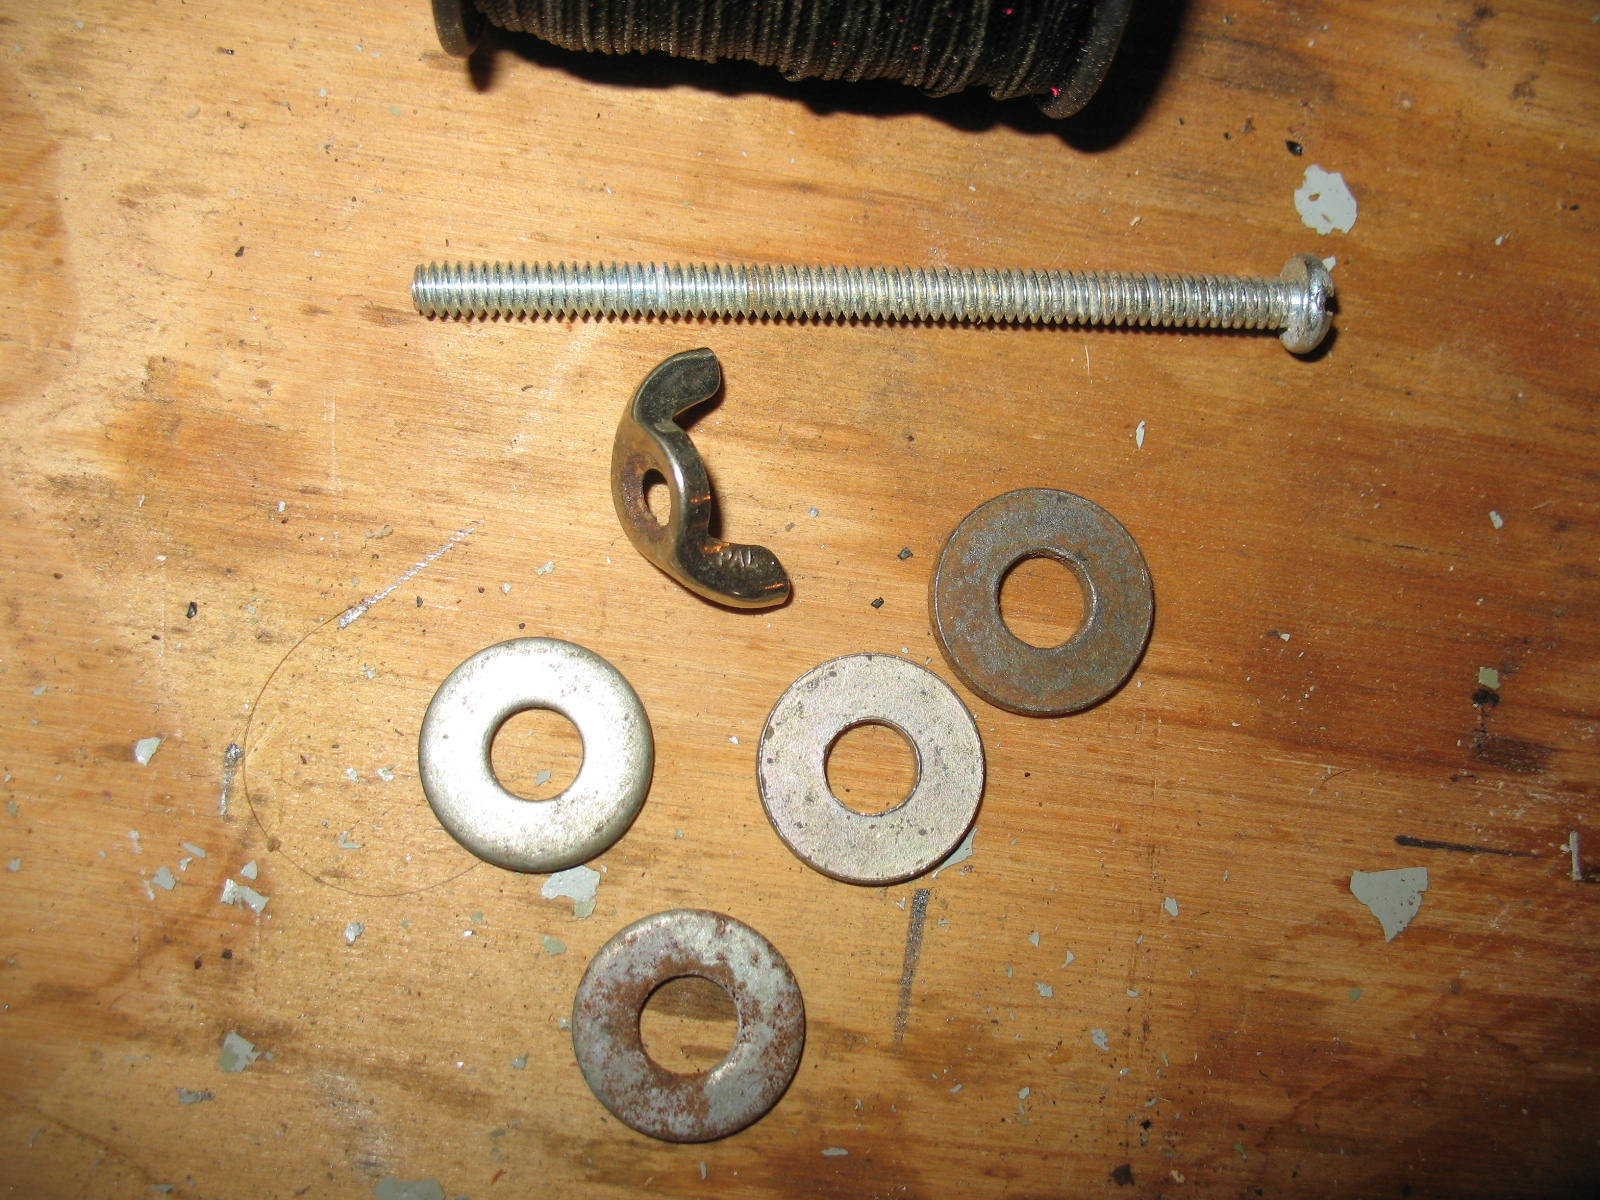

When you find, or buy, the right size bolt, nut, and washers; you will need a drill bit that is just a little larger in diameter than the bolt.

Use this bit to drill a hole in each of the two end sections, and drill a smaller hole in the center section.

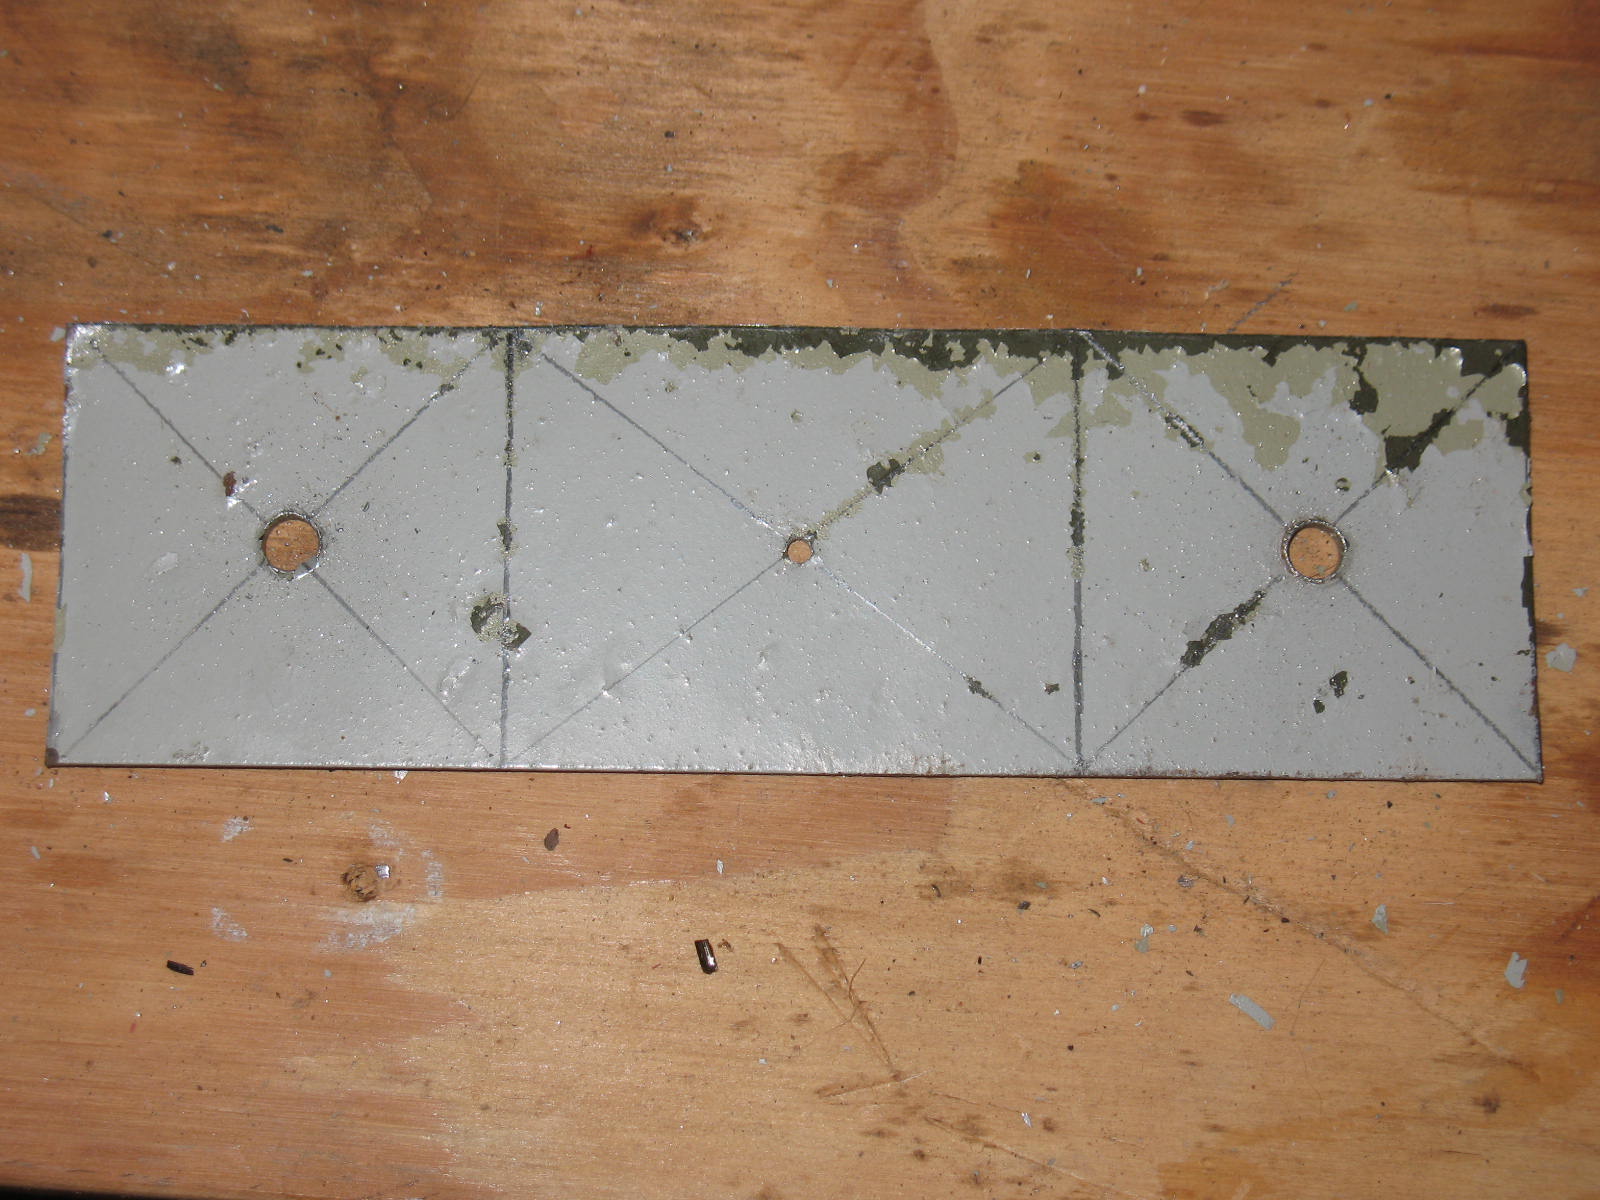
The next step is to put the metal strip in a vice and bend the end sections up at a 90 degree angle. Actually, I bent them a little past 90 degrees, and then bent the tops out a little by hand. This gives the ends a slight bow so that the center of the ends will contact the spool better.
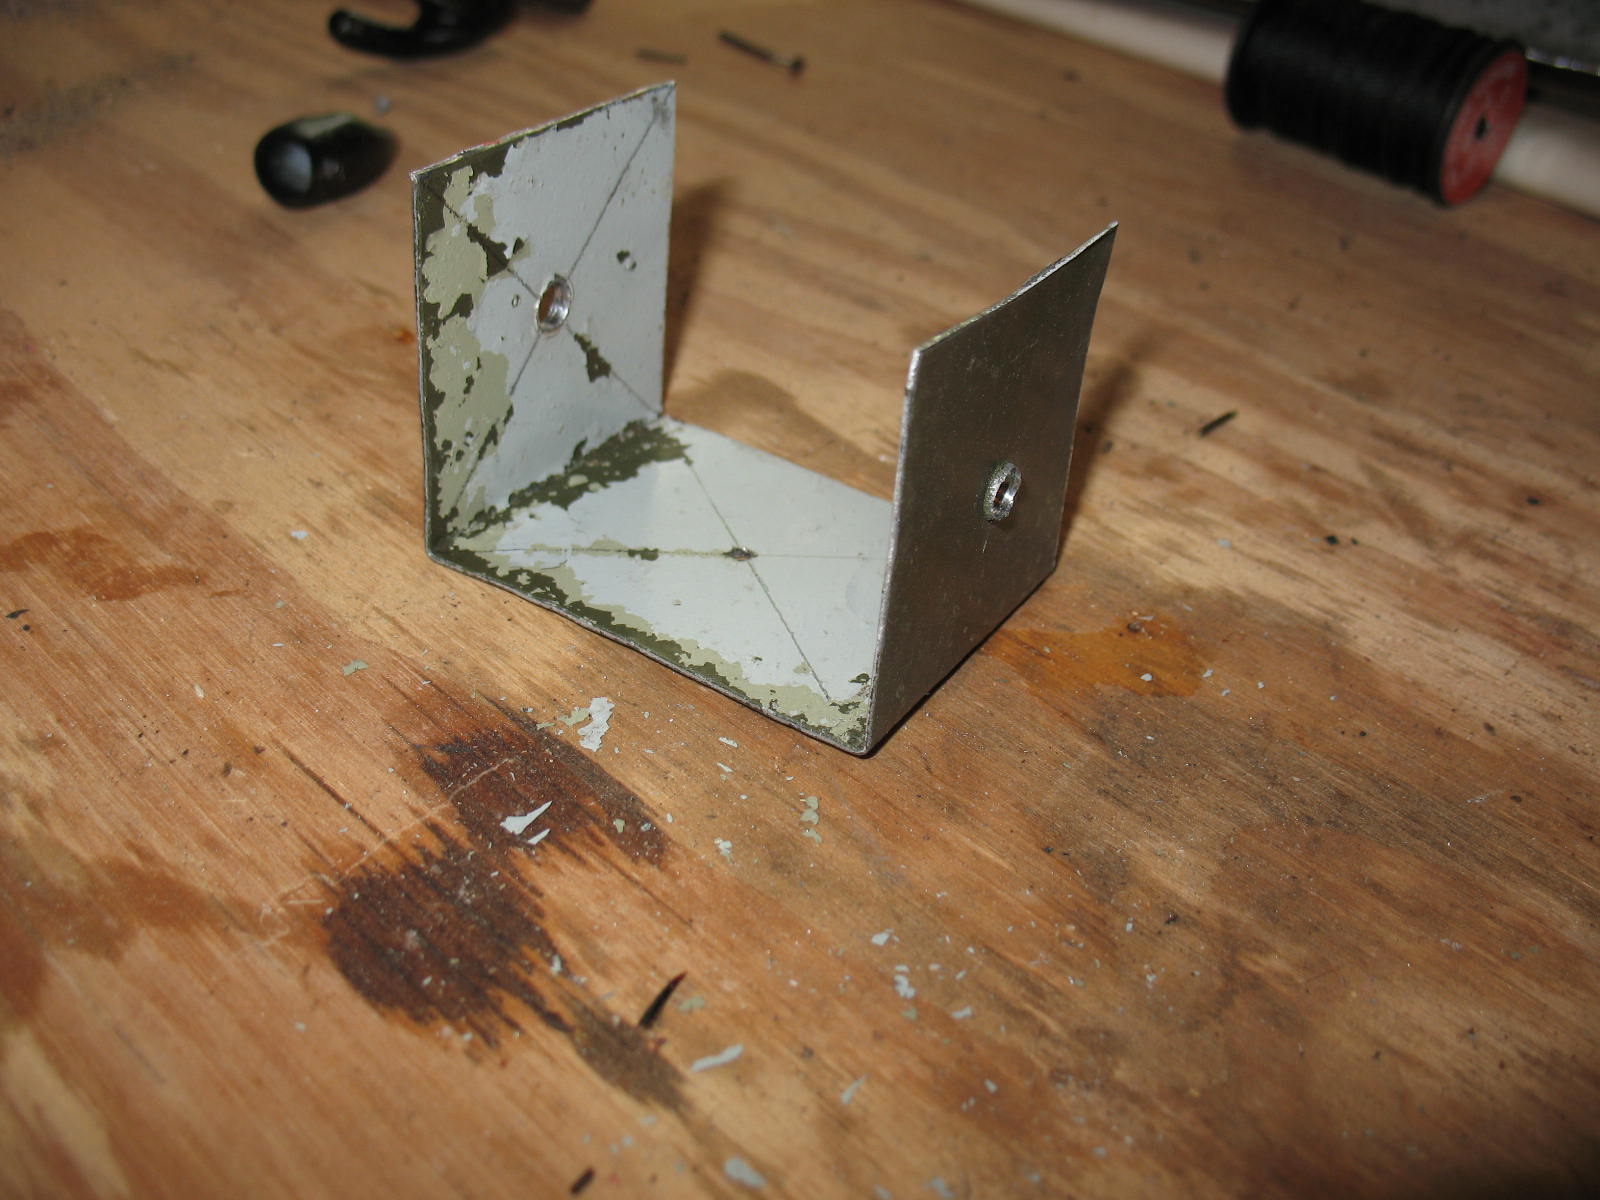

Use a file and/or sand paper to smooth out the holes and remove any burrs. I gave my dispenser a coat of silver spray paint, but this is not really necessary.

Now you’re ready to assemble the whole thing. First run your serving thread through the hole in the center section.

Then use the wing-nut, bolt, and washers to mount the spool. Put a washer on the inside and outside of each end section.

Use the wing-nut to adjust the tension on the spool. The tension is right when a slight tug will pull thread off of the spool; but when the dispenser is held up by the thread, more thread will not slip off on its own.

In the next post we will build an adjustable string jig. Super simple. It takes about 15 minutes.
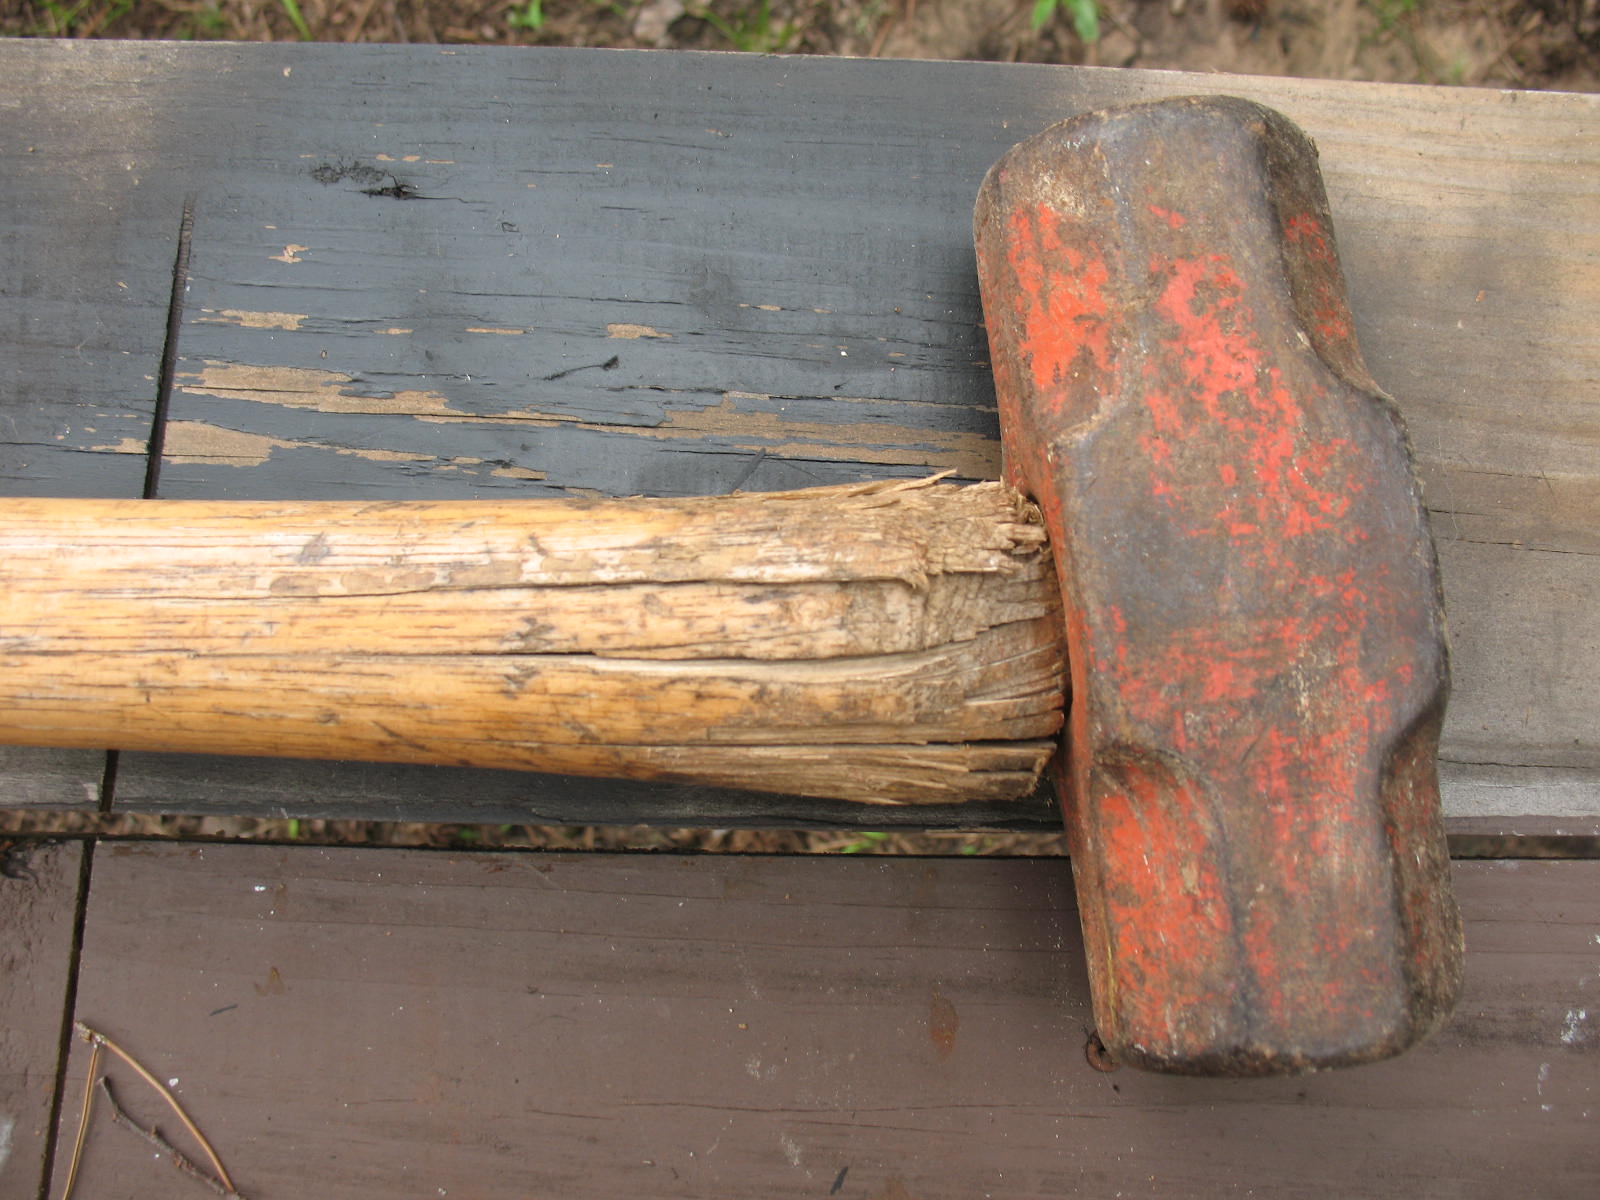
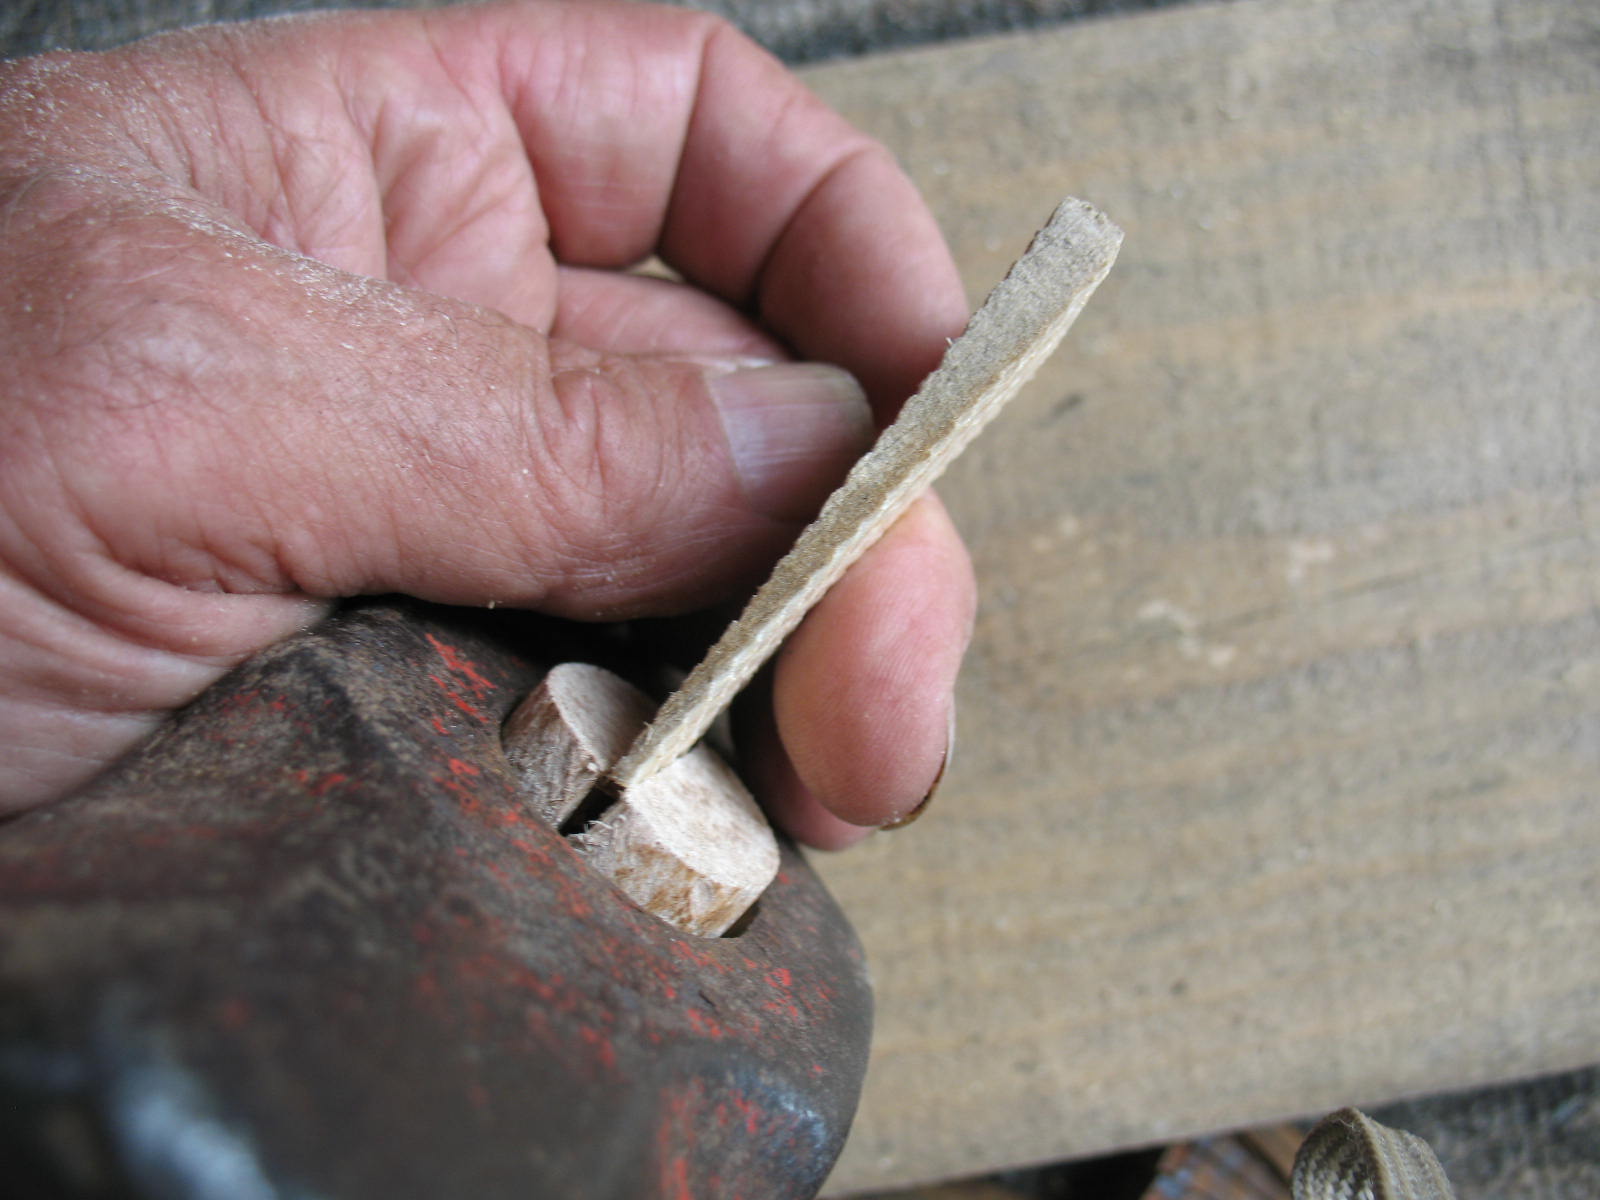
I use a sledge hammer for a lot of things on my farm. I drive t-posts with it, I bust up rocks with it, I split fence rails with it, but mostly I use it and a couple of wedges to make the first split on large blocks of oak that I am turning into firewood. Maybe you have better hand-to-eye coordination than I do; but every five years or so, my sledge handle ends up looking like this:
So, I find myself needing to put a new handle on it. The process outlined below is the same method used for replacing handles on axes, hatchets, and hammers.
Before you start you will need a new handle. You can make the handle, or you can buy the handle. Making a handle is considerable work. You must have the right kind of wood, usually ash or hickory, and you must have the wood already seasoned. I make or re-purpose handles for rakes, hoes, hatchets, hammers, and etc., but I prefer to buy handles for axes and sledges. The hardware store prices are way too high for me, so I always keep my eyes open at flea markets and garage sales for tool handles. If you buy handles this way you must know what you are looking for. You only want the ones that have straight grain, no cross-grain, no knots, and no cracks. Most of those guys at flea markets are selling factory seconds, so you really have to be choosey. I went to a flea market a couple of years ago and one of the sellers had barrels of tool handles. I must have looked at 200 tool handles, and I came away with two axe handles and three sledge handles.
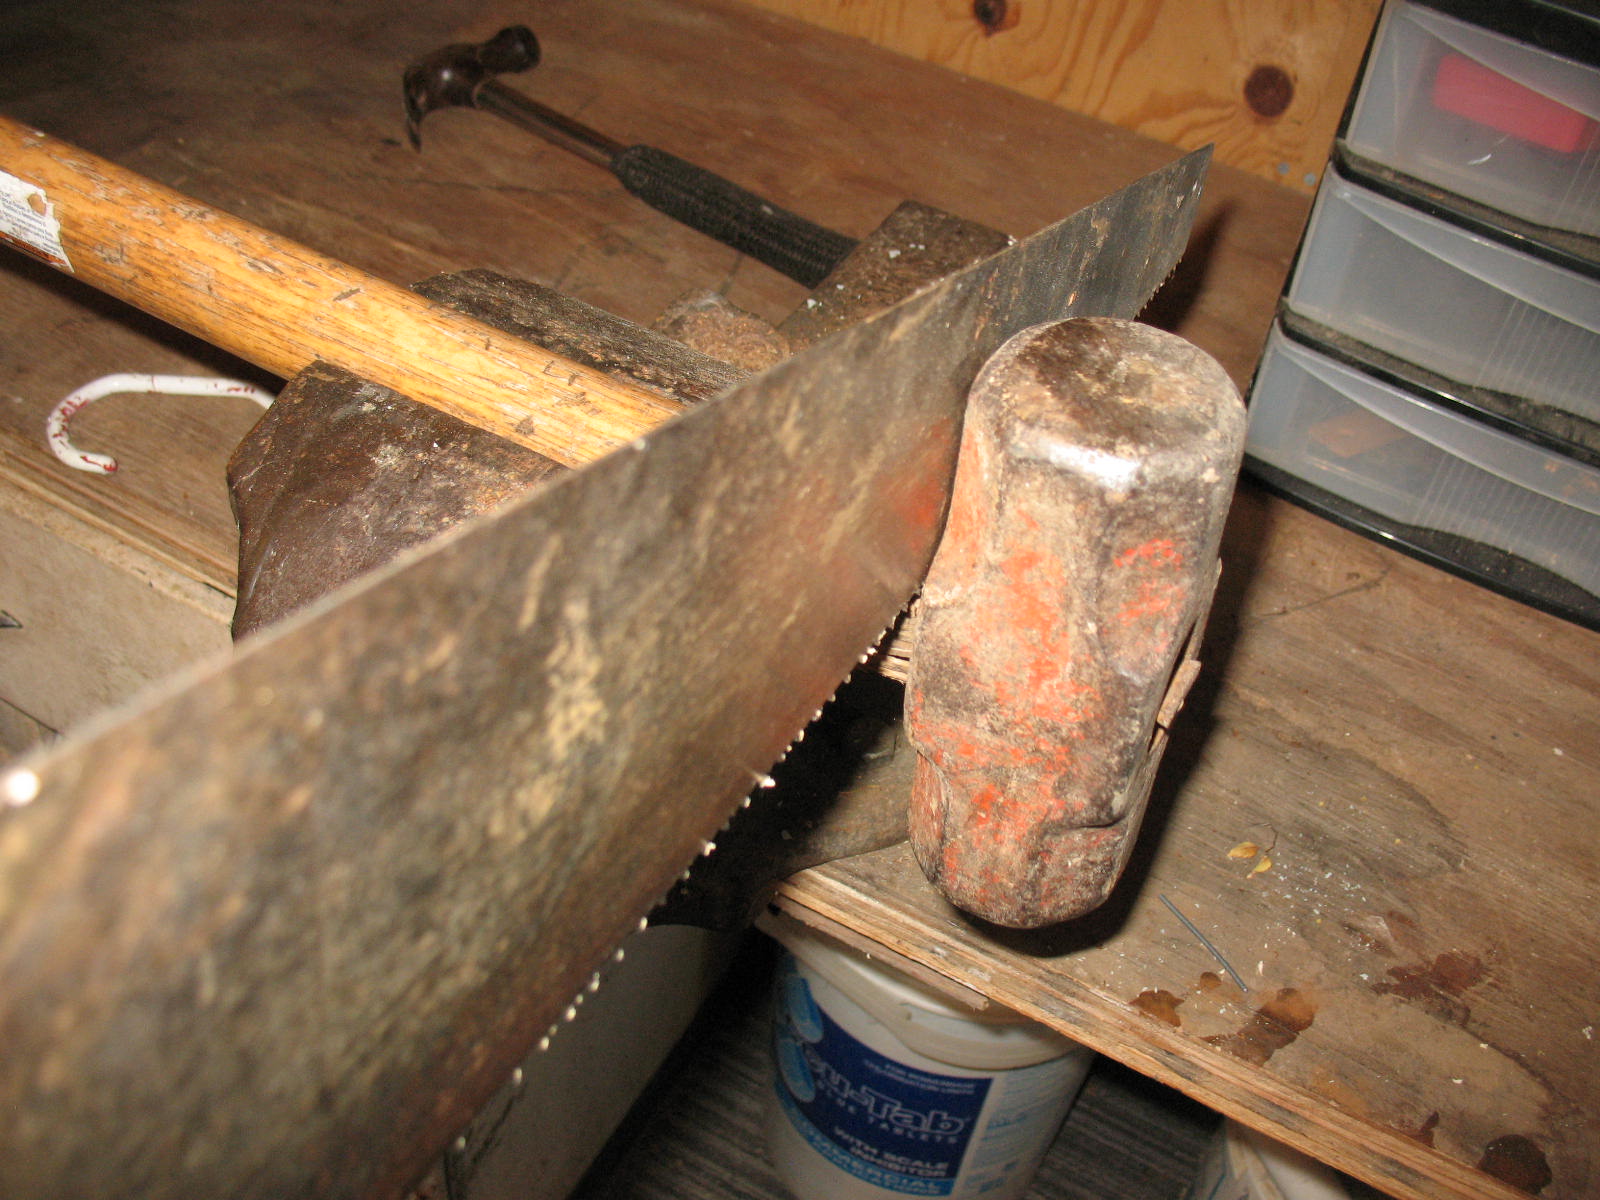
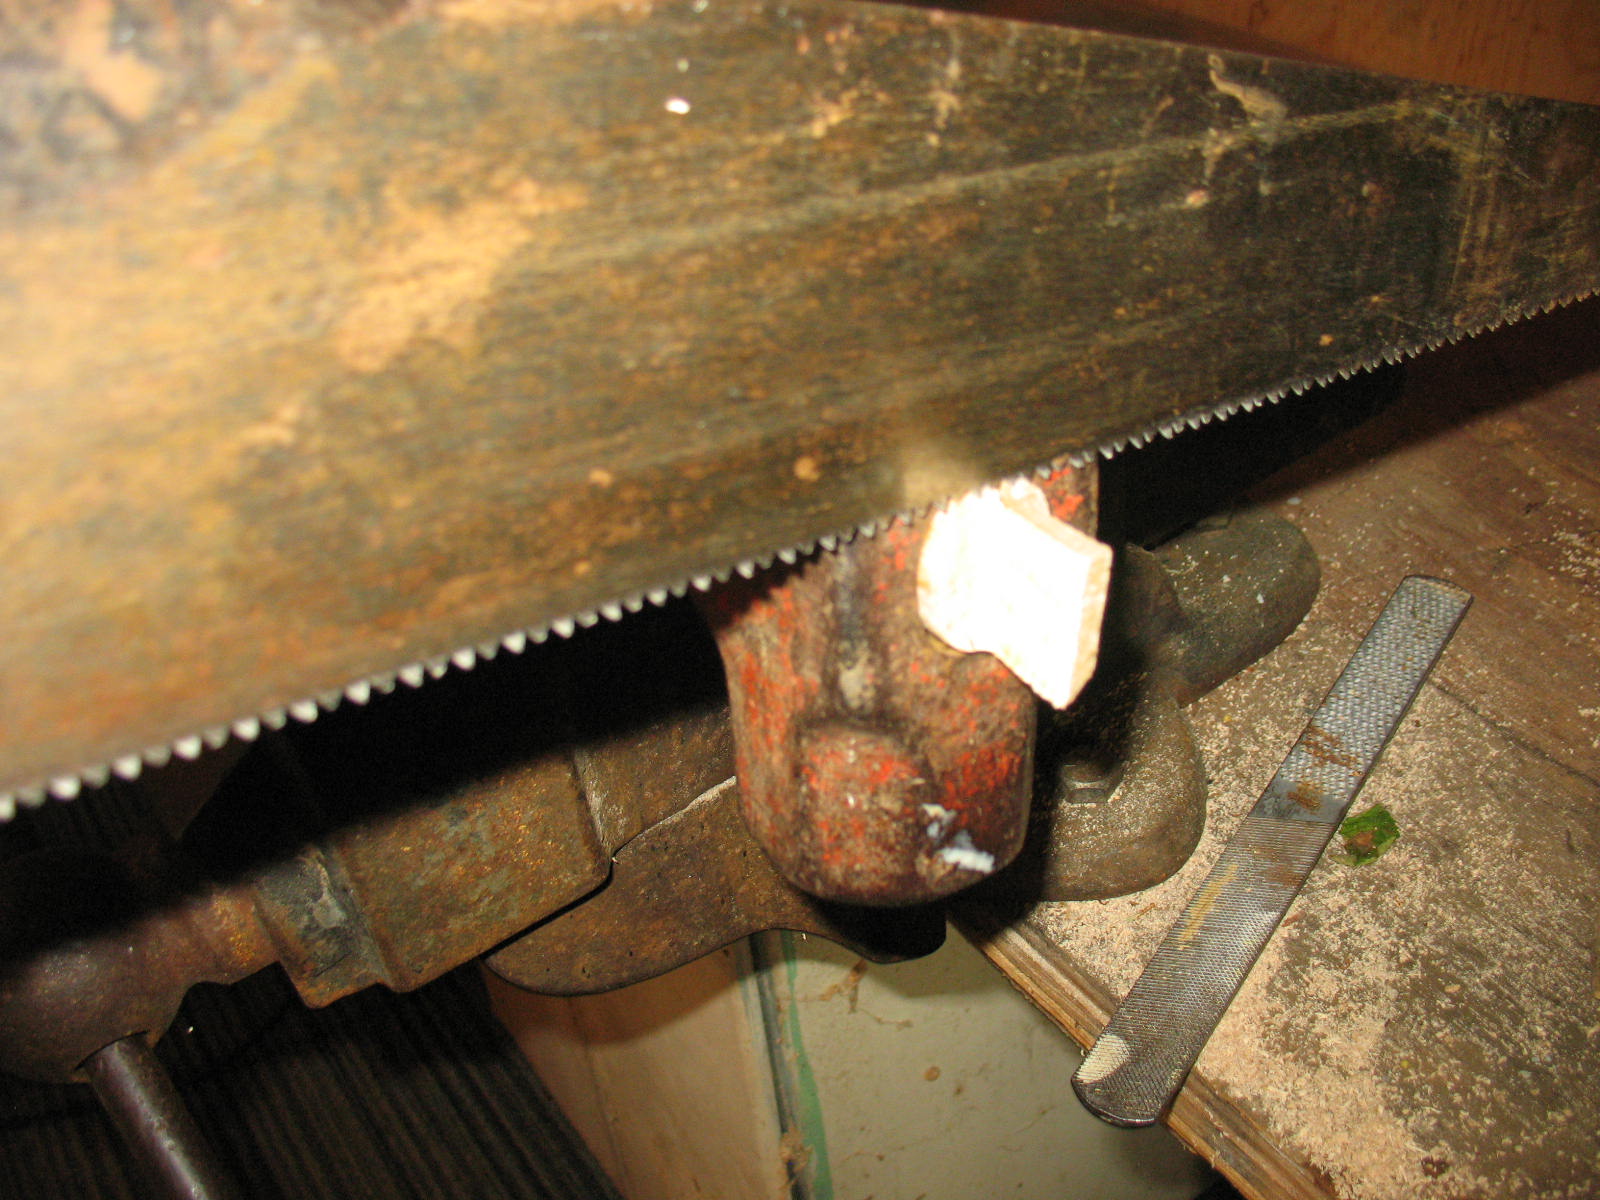
So now you have your new handle. First thing to do is remove the old handle. I clamp the sledge in a vise and use a hand saw to cut the handle off right at the base of the head.

Then I set the head on top of two boards, top down, and use a hammer and a drift bar to drive the old handle out.

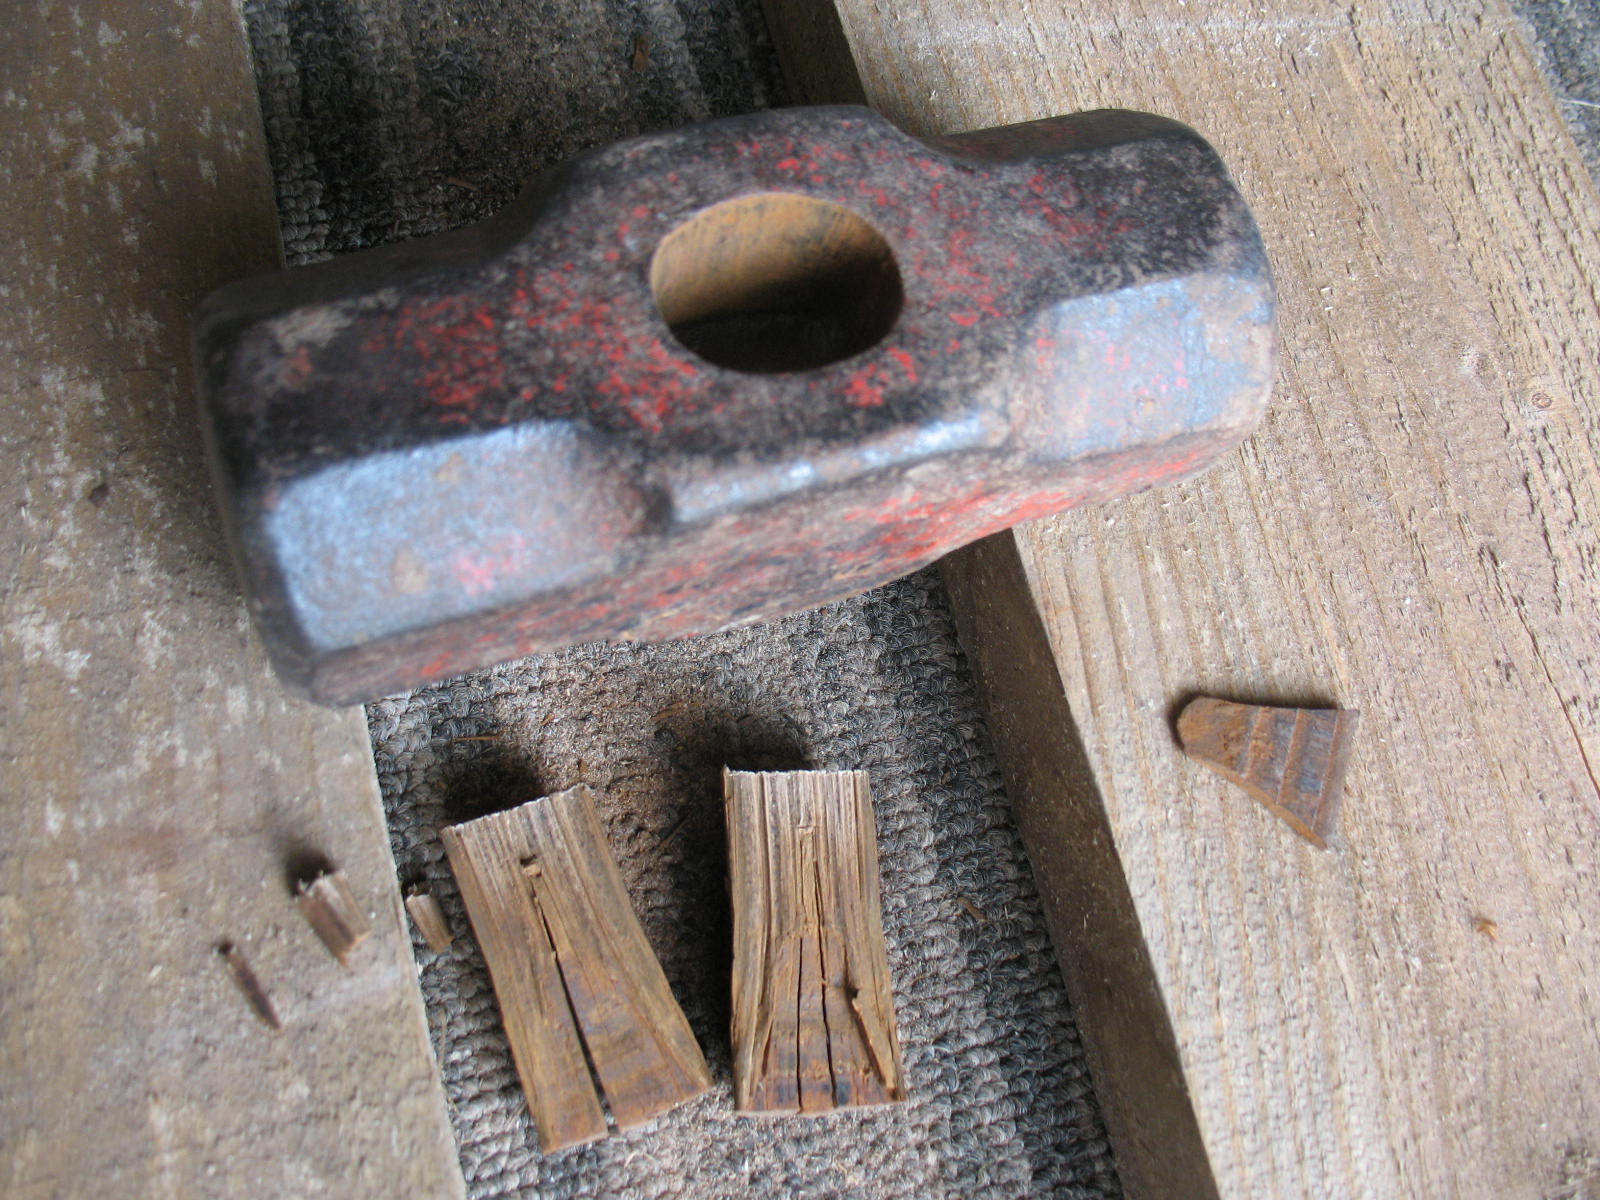
Be sure and save the little steel wedge that is in the top of the handle. You are going to use it again.

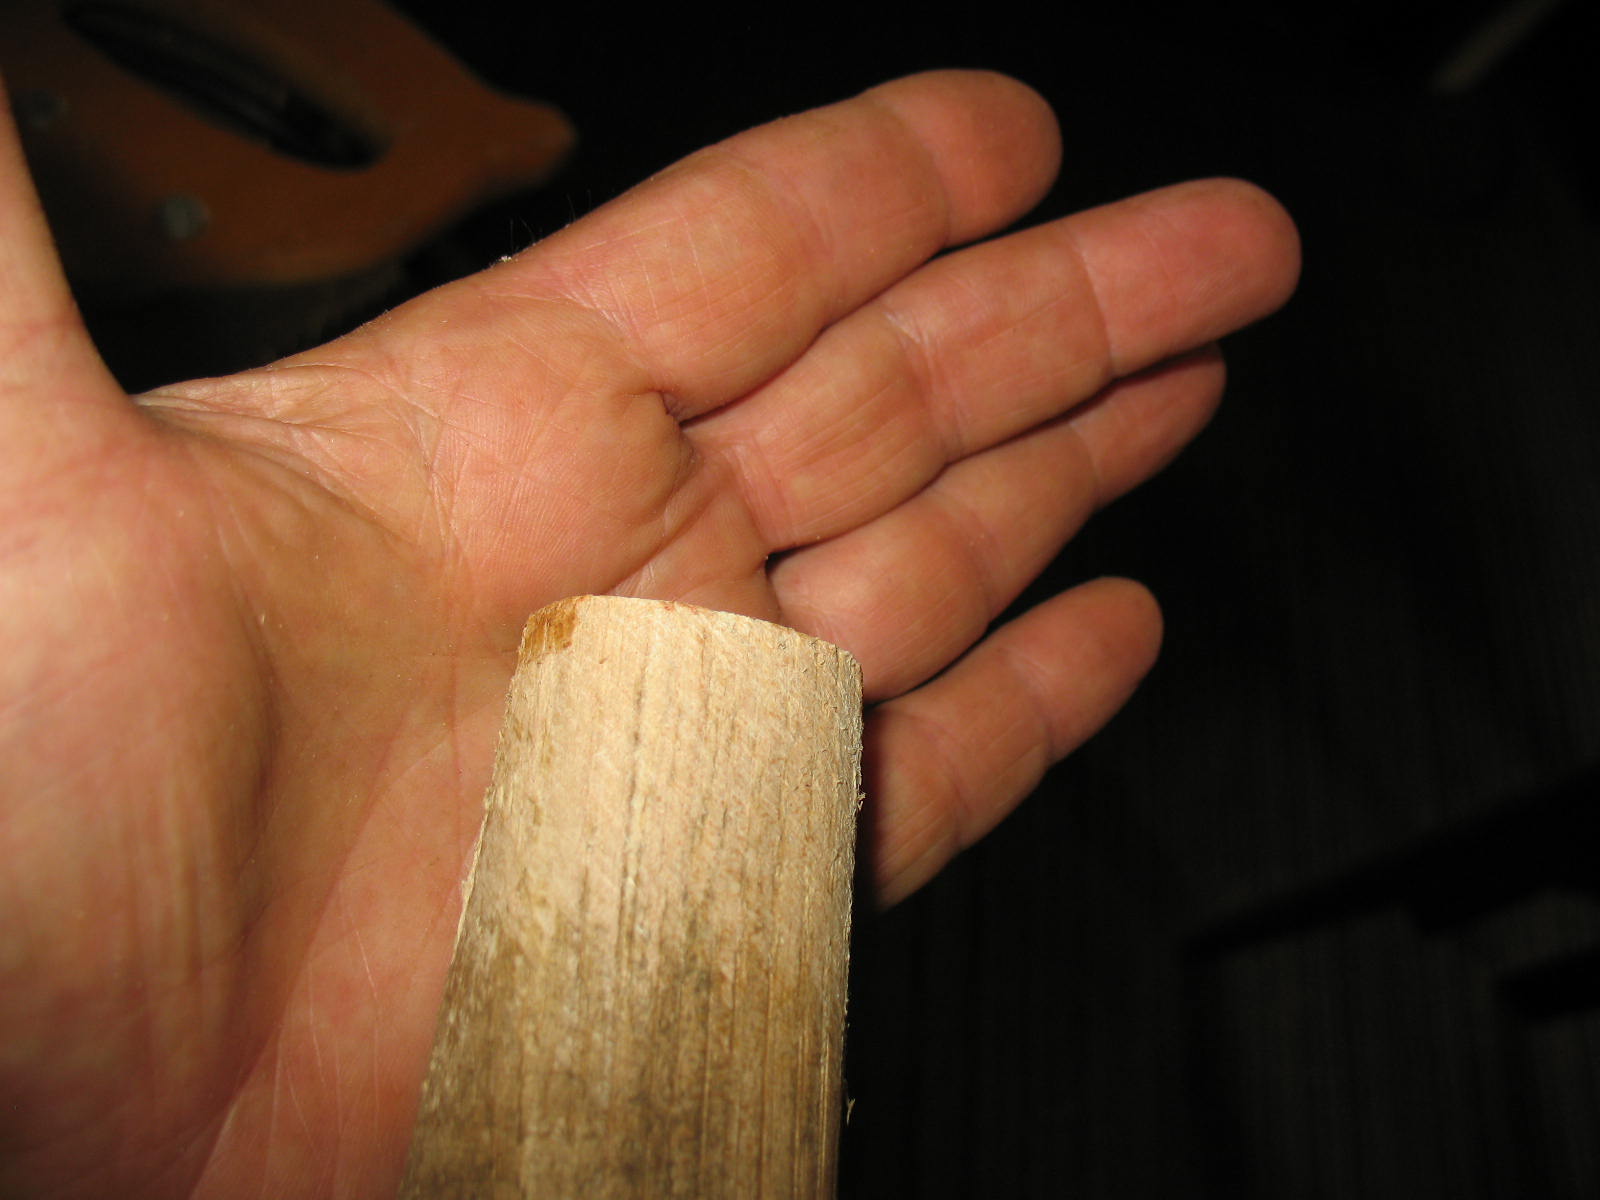
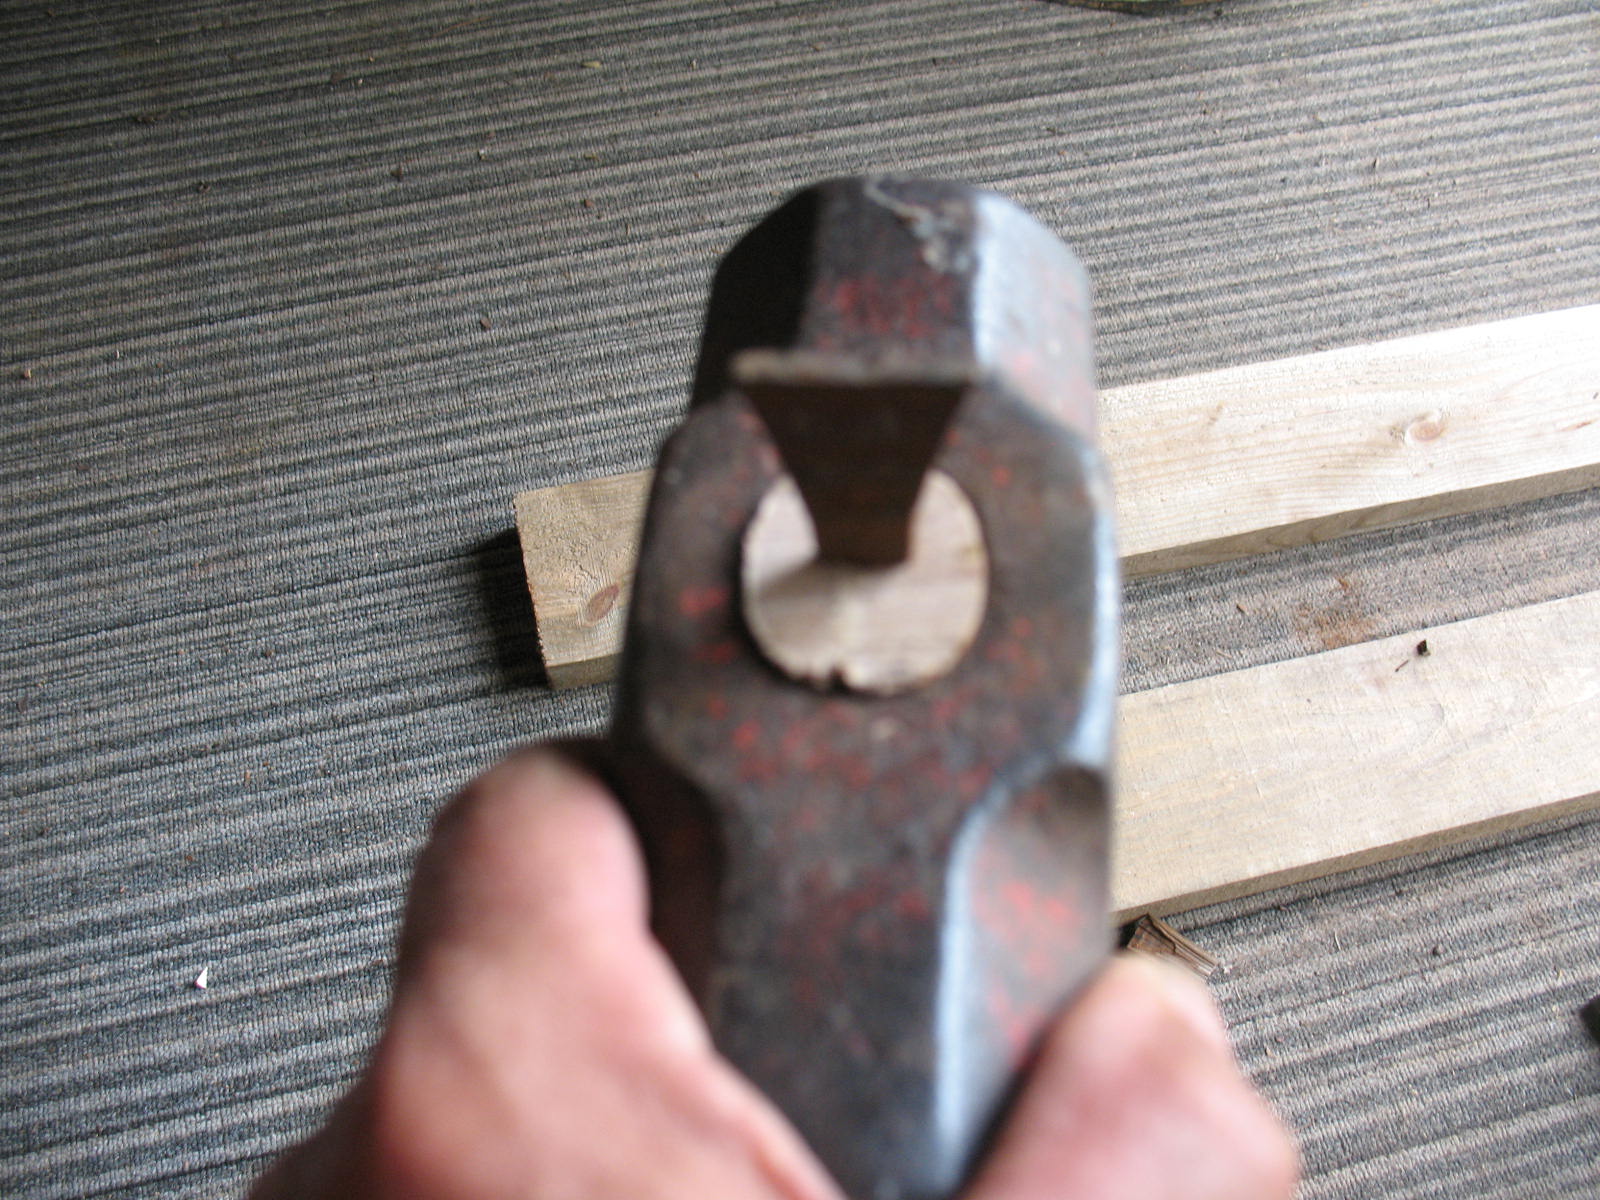
Your new handle will not fit into your sledge. It will be too long and too big around. You will have to shape it to fit. I lay the head down on the handle where I want it to sit at the bottom and then I mark the top for cutting. I always add a quarter inch to the length. You may need that quarter inch, and if you don’t you can cut it off later.


When you have sawed the top off of the handle, look at the slot that your wedge goes down into. It may now be too short. You want this slot to be about half the depth of you head, or a little more. If it’s too short, take your trusty hand saw and make it a little deeper.

Now comes the slow part; sizing the handle to fit into the hole in the head. The best way that I have found is to clamp the handle in your vise and use a wood rasp to slowly work the handle down. I rasp on about the top half-inch of the handle until the head will just barely fit on.
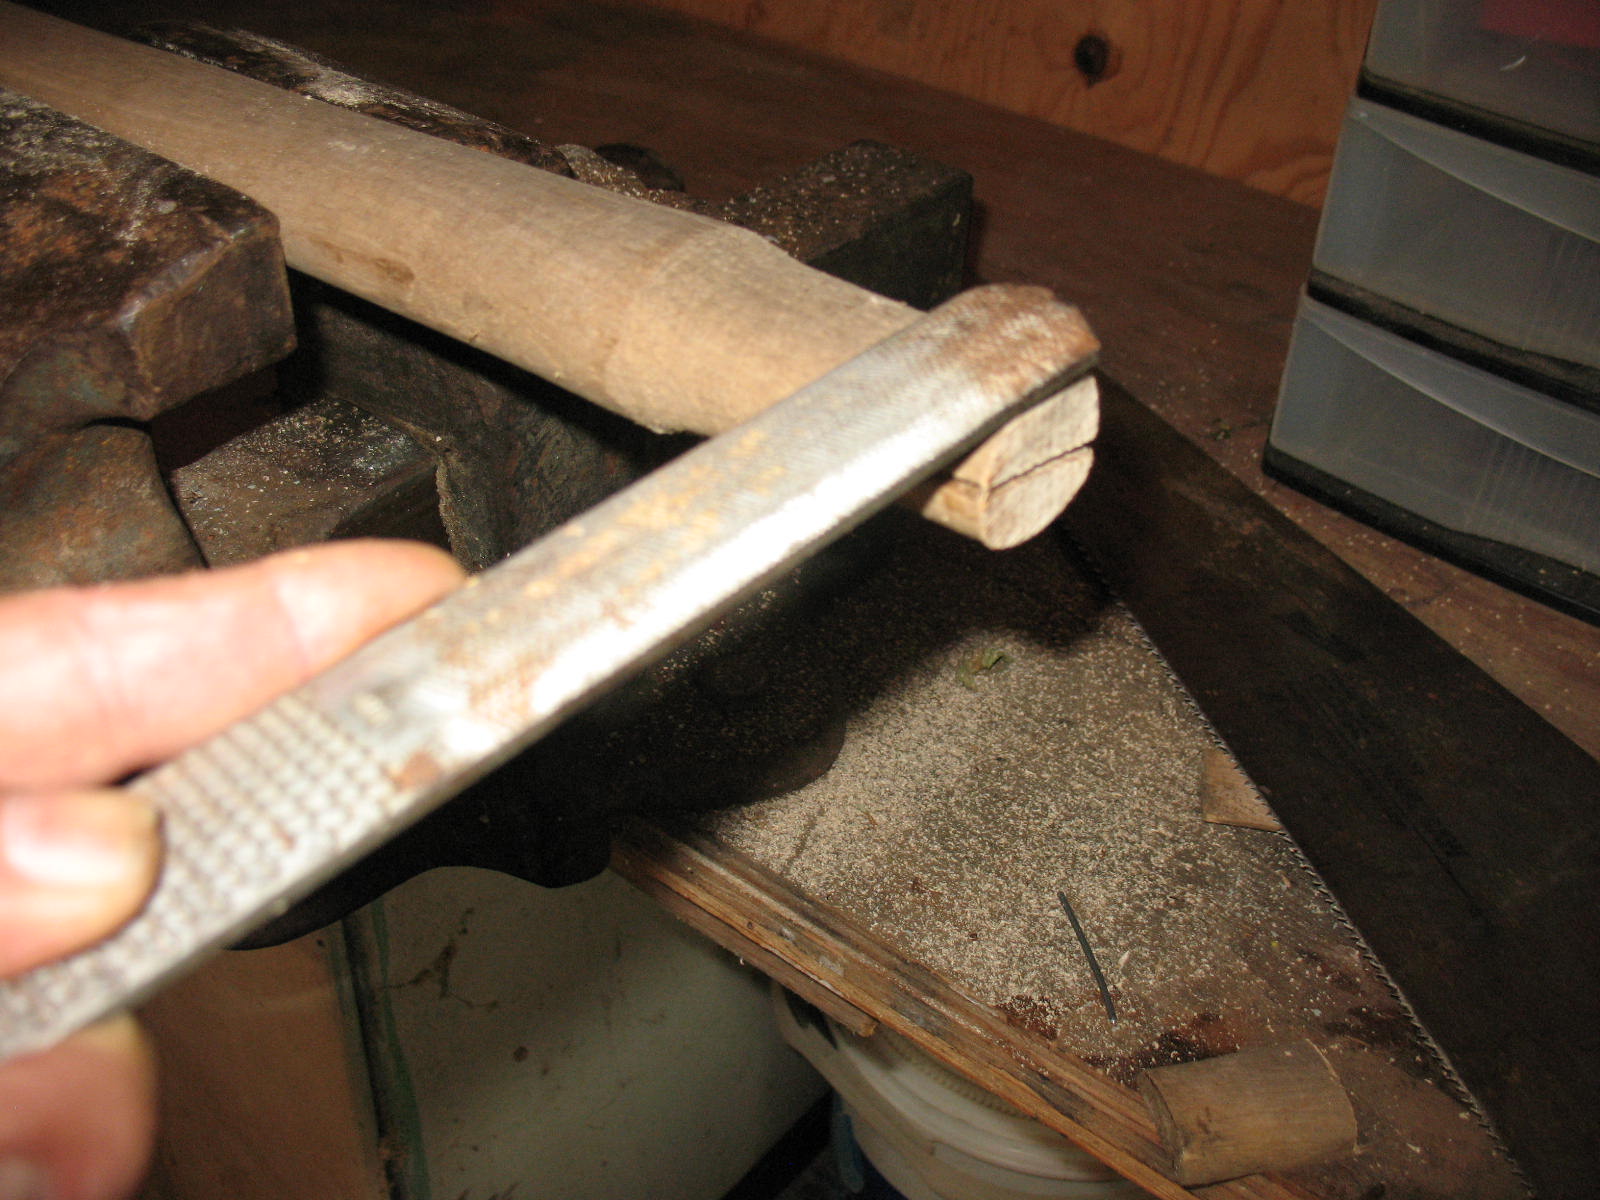


Then I take a hammer and drive the head on a little bit, and then pull it off. You will see darker spots where the wood has been compressed when driving the head on. Rasp very lightly on these areas and then continue rasping down another half-inch. Drive the head on, pull it off, rasp a little more, etc, etc, etc. It takes a while, but it will insure that you have a good tight fit.

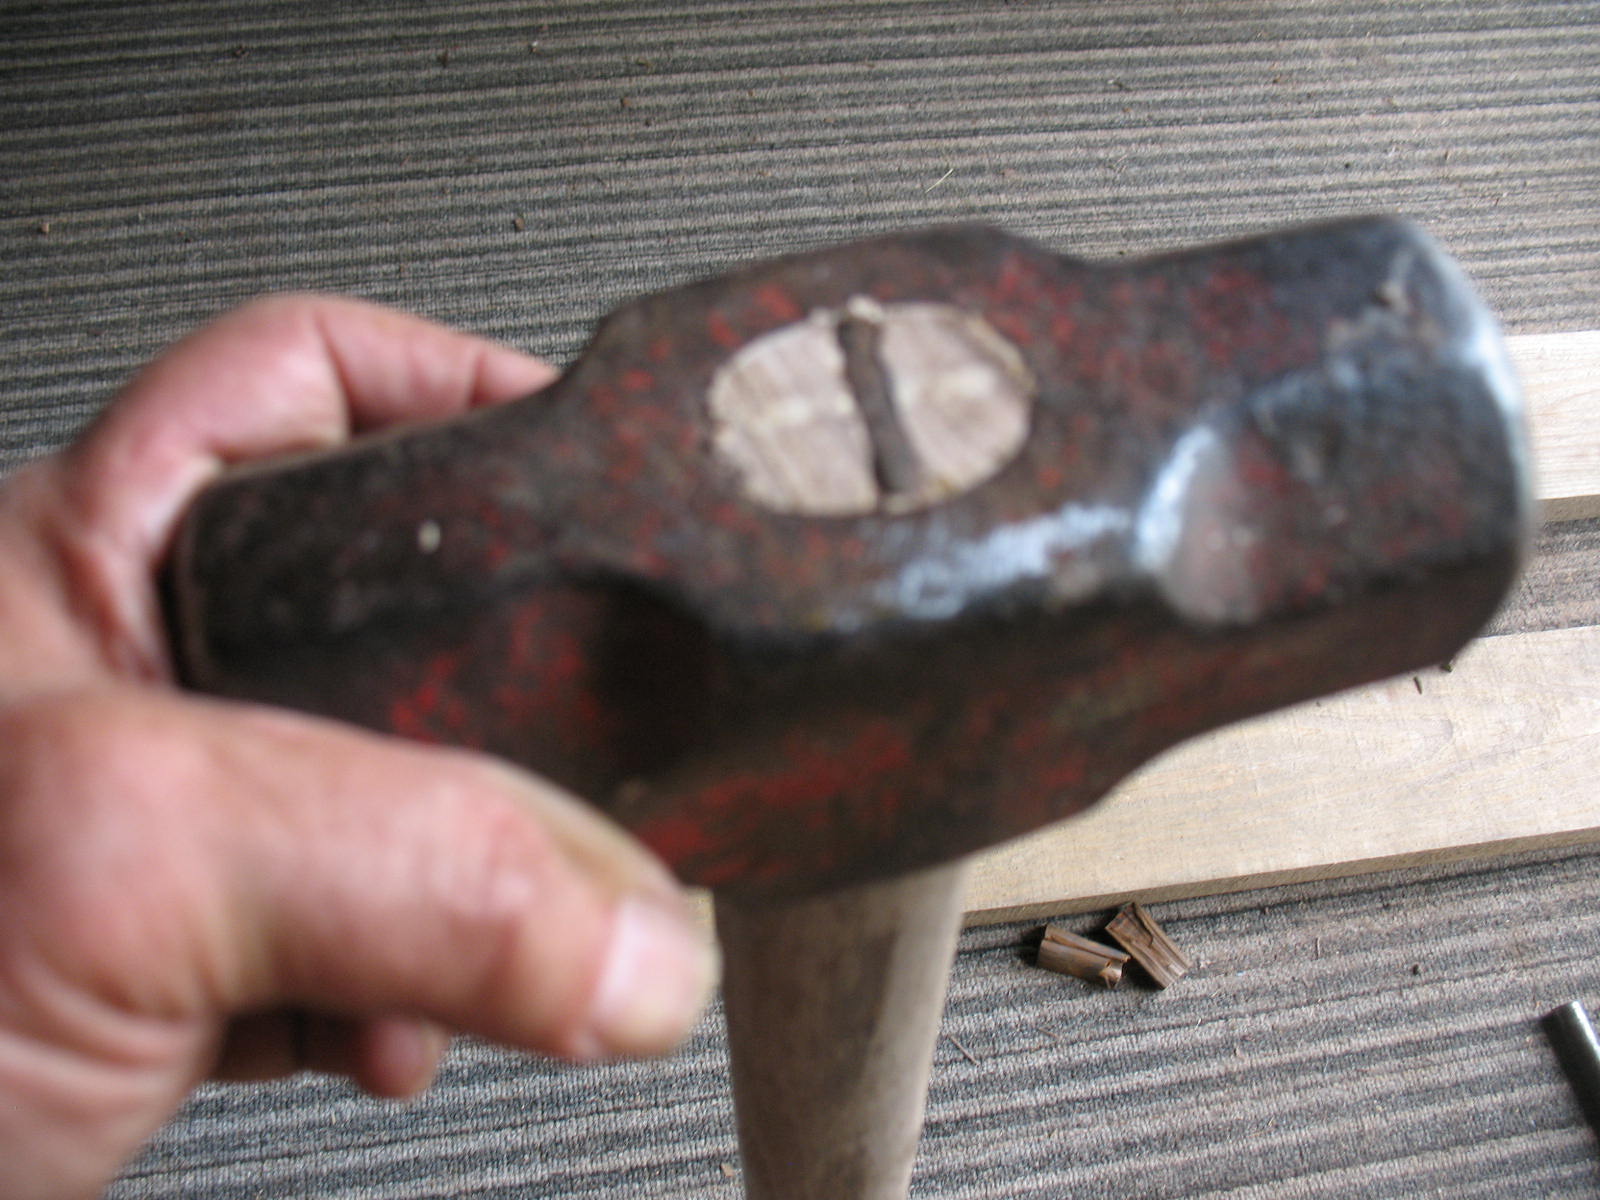
When you have the head seated down tightly on the handle, it is time to cut a wedge to drive into the slot. Hickory is best for this. You may be able to use the portion that you cut off of the top of the handle to make a wedge. If not you can use oak or even pine. When cutting the wedge make sure that it has a smooth taper and is not too wide at the top. You want the wedge to contact the sides of the slot all the way down. If the wedge is too wide, and tapers down too quickly; it will only be touching the slot at the top, and it will pop out during use.
I like to coat my wedges with carpenter’s wood glue before I drive them in.

When you drive the wedge in, place a small board on top of it and use your hammer on the board. If you hammer directly on the wedge it will likely split.

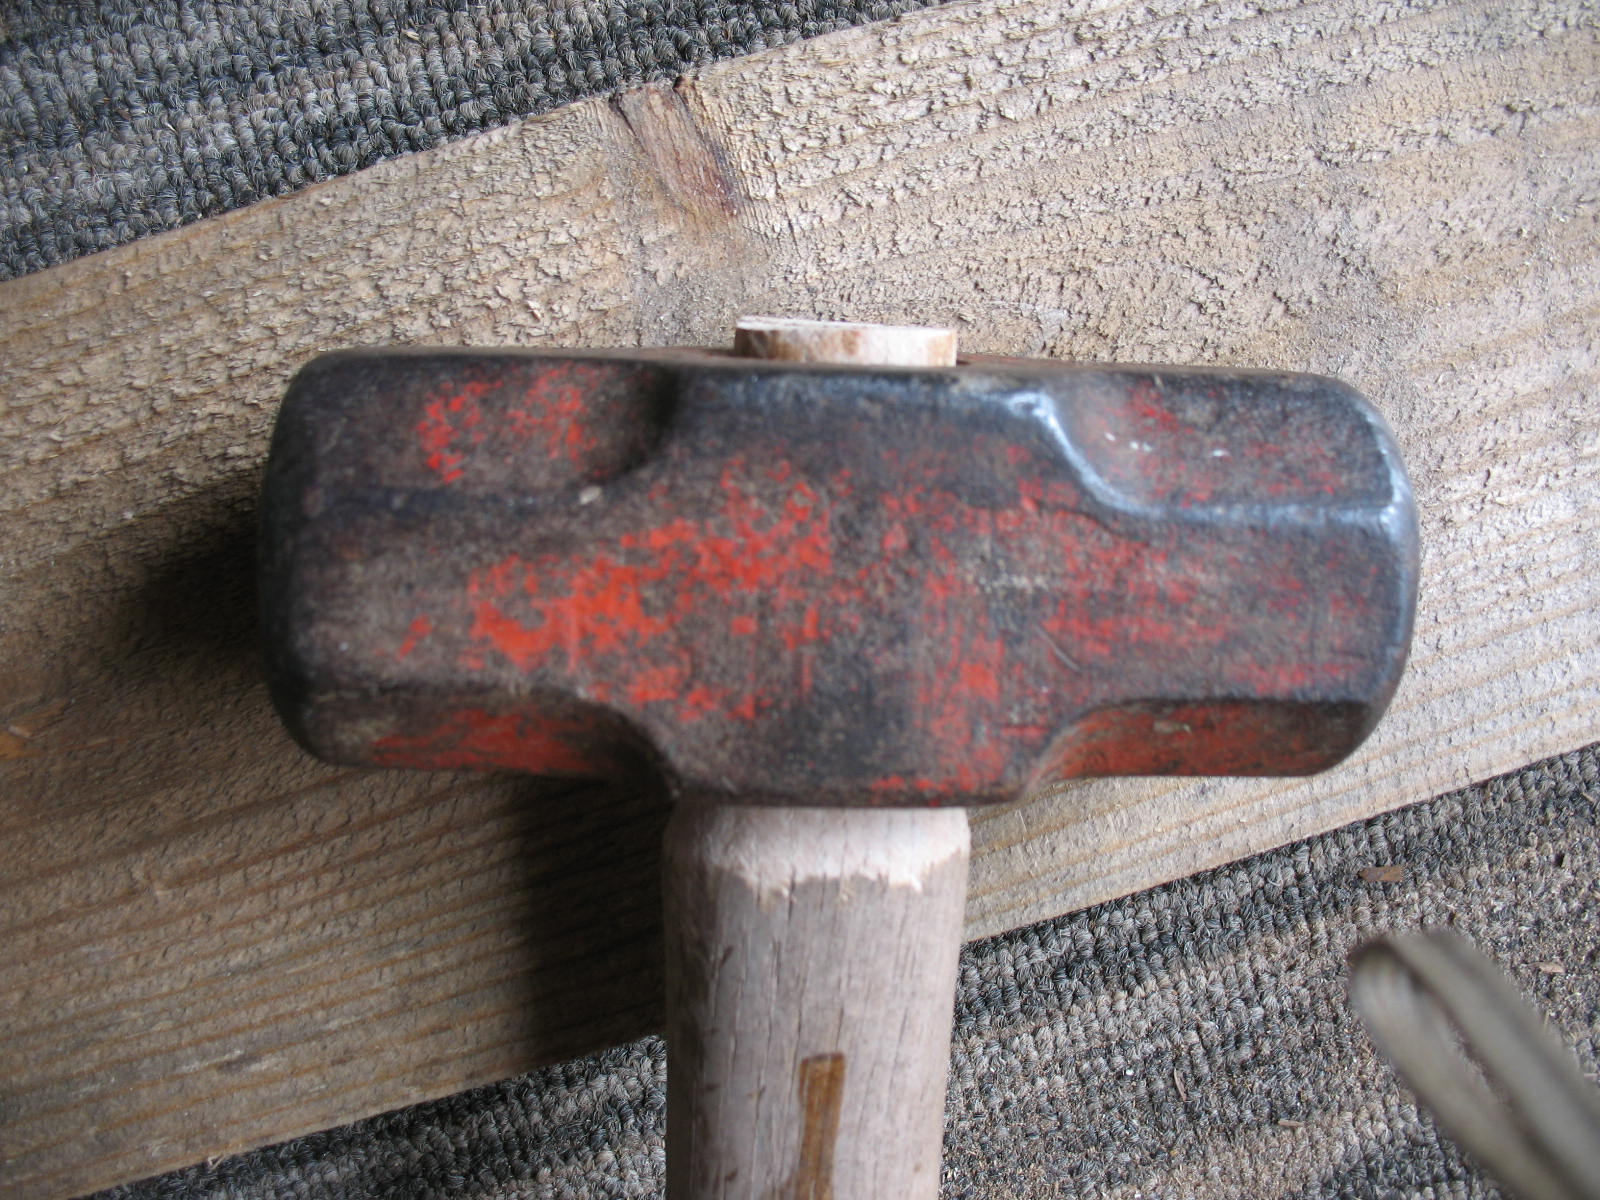
When you have the wedge firmly seated you can cut off the excess wedge and handle so they are flush with the top of the head.
The last step is to drive the little steel wedge into the top of the handle. It should be in the center of the handle and perpendicular to the wooden wedge.
Set the sledge aside for a day so that the glue on the wedge can dry thoroughly and you should be good to go for a few more years. Oh, and be sure too keep that old handle. At some point in the future you can cut it down and use it on something else that breaks.

If you drink coffee, tea, or herb tea; the French coffee press is the most prepper friendly device for preparing it. I used to think that a French press was something that was just for coffee snobs, but then my wife, who is kind of a coffee snob, brought one home. I immediately saw how wrong I had been. The French press is such simple and effective tool that I went out and bought another one to put in my back-up supplies.

How does a French press work? It’s basically just a glass cylinder with a lid on it. In the middle of the lid is a hole. Coming up out of the hole is a plunger, and on the bottom of the plunger is a fine mesh screen that fits down inside of the cylinder. That’s it. Only one moving part, no electricity required, and no coffee filters. What could be better for a prepper?

Here’s how you use it.
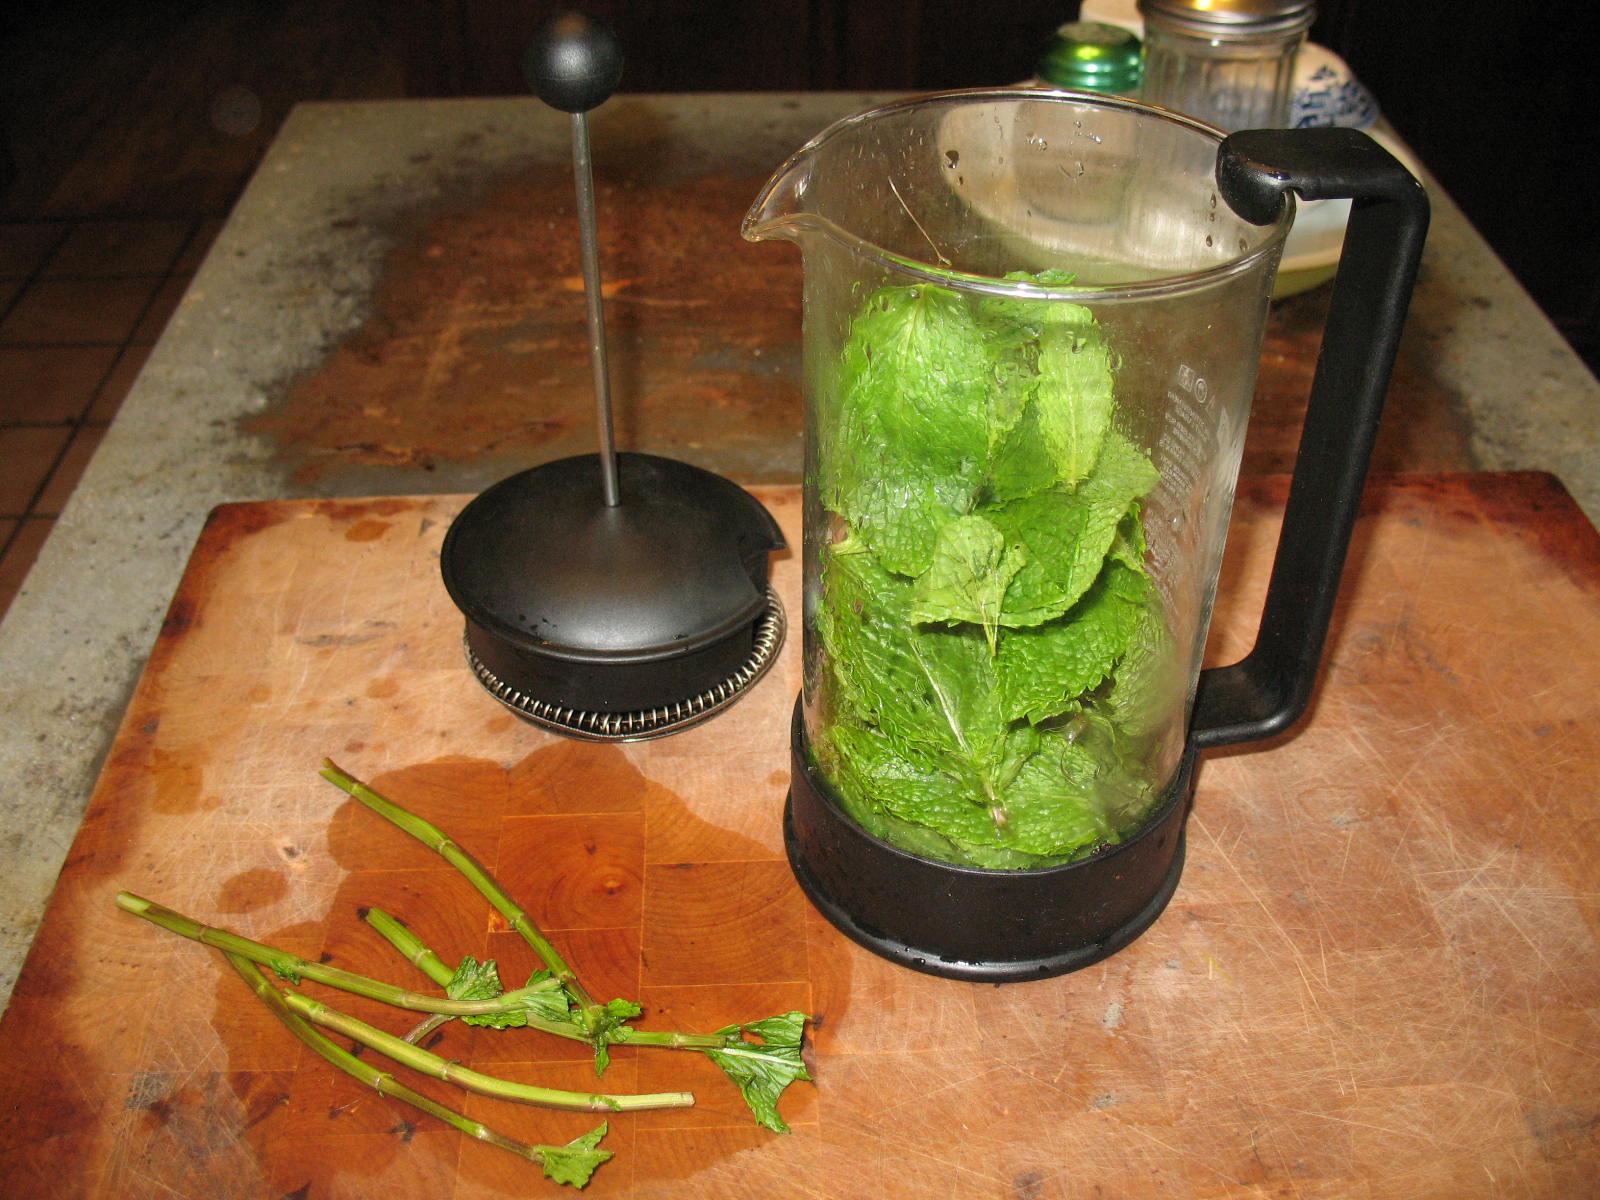
Take the lid off and pour your ground coffee into the cylinder. I use three heaping tablespoons to make about a quart of coffee.

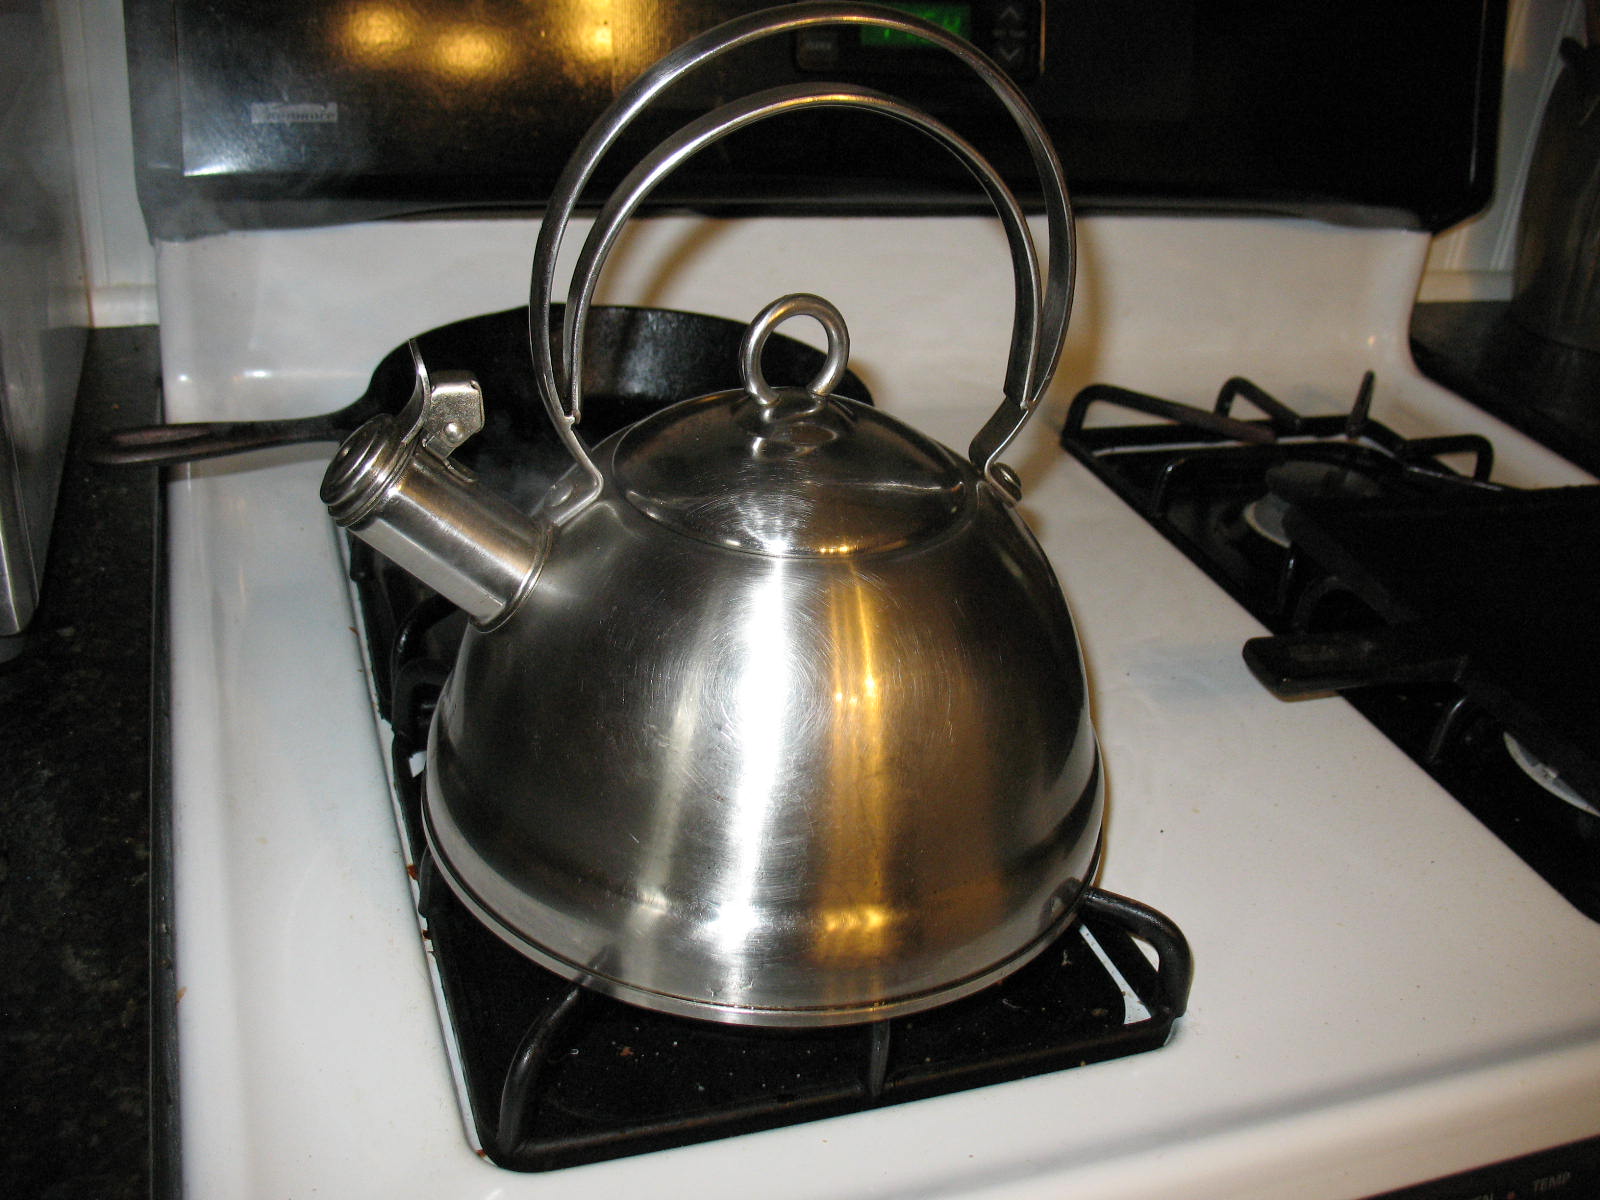
Put your kettle on the stove or campfire and get the water boiling.
Pour the boiling water into the cylinder, filling it to about an inch-and-a-half from the top.

Stir the coffee grounds a little to get them distributed evenly in the water.

Pull the plunger on the lid all the way up and put the lid on the cylinder.

Now the hard part, let the coffee steep for four or five minutes.
After five minutes push the plunger down. The screen will push all of the coffee grounds to the bottom of the cylinder and hold them there.

Pour yourself a cup of hot coffee.

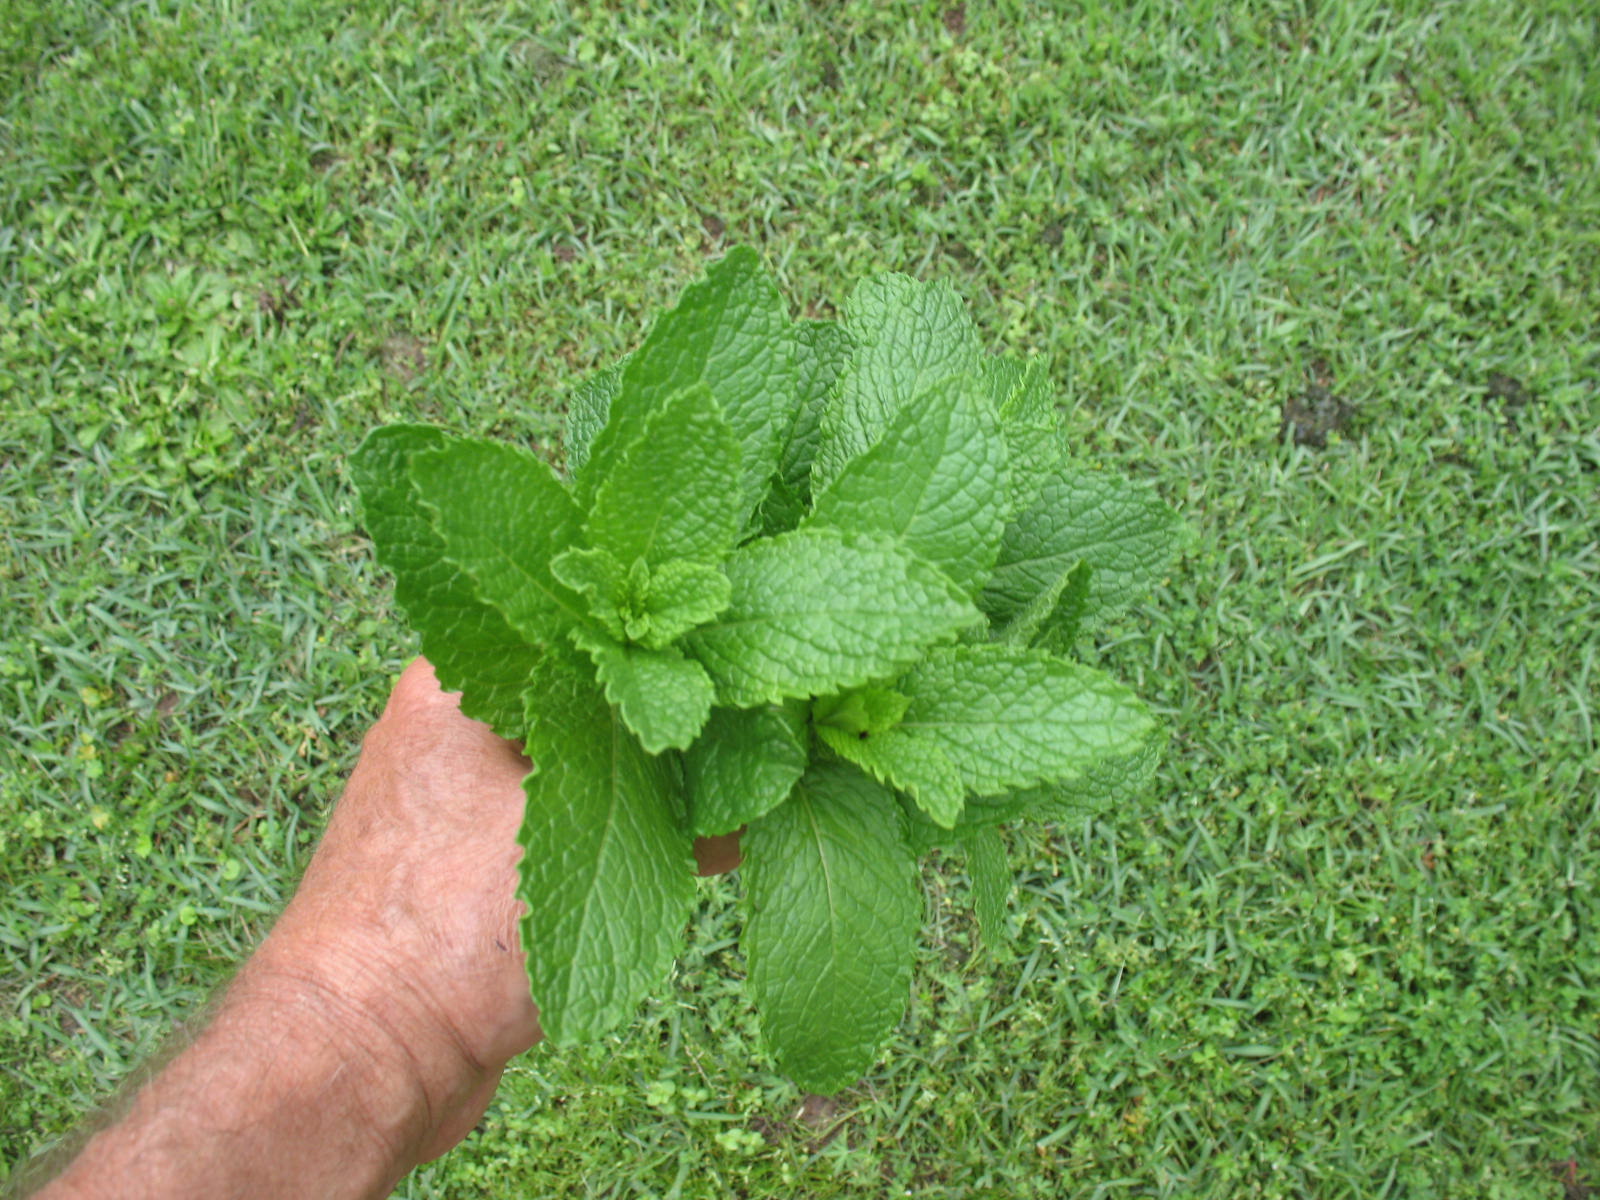
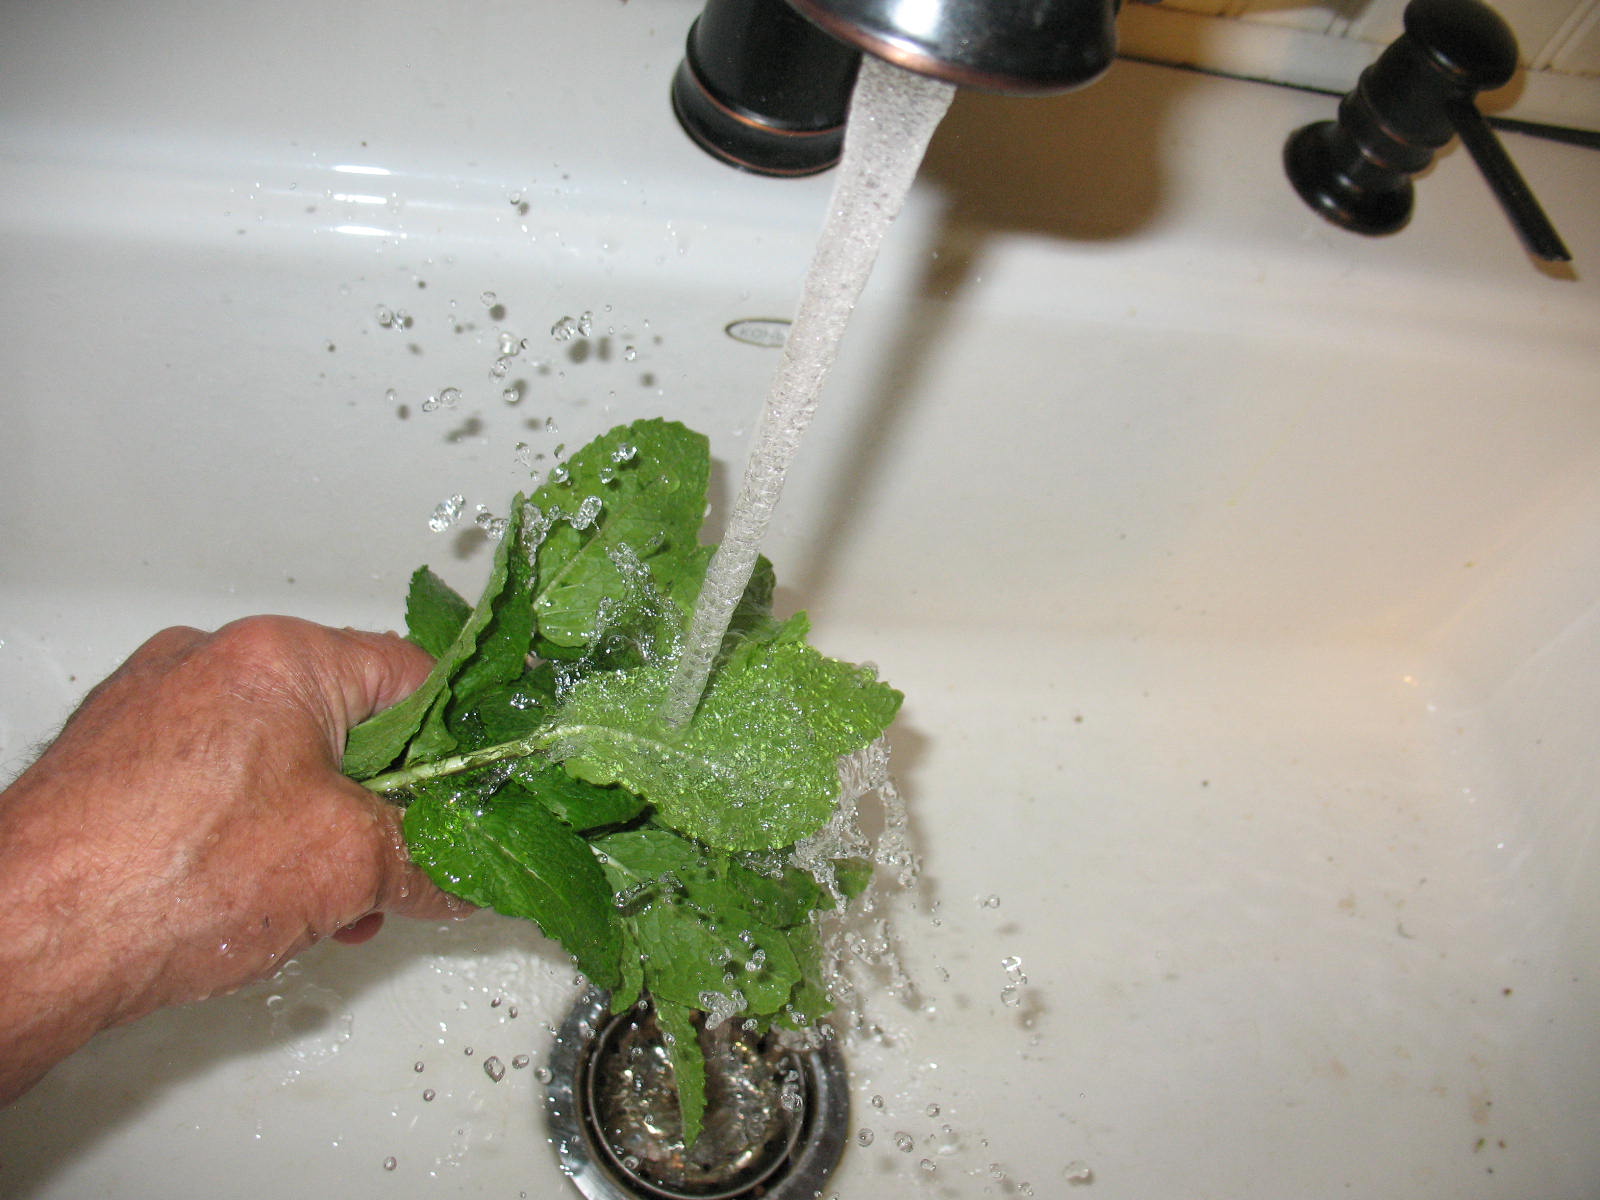
It’s just as easy to make herb teas with the French press. In the pictures below I’m using some fresh mint from my mint bed to make a quart of nice, clean, mint tea.


If you don’t have a French press, get one. In fact get two of them. There may come a day when you wish that you had one.
When I was working as a teacher it was easy to keep up with my garden. I planted in the spring and harvested when things were ready. I didn’t plant anything in the summer or fall because I wouldn’t have time to deal with it after school started back. Simple.
Now that I’m retired I garden year-round and it gets kind of confusing as to what varieties I’ve planted, when I’ve planted them, when I’ve started seed pots, etc, etc, etc. So, to help me keep up with it all; I decided to start a garden journal. It’s nothing fancy, just a three-ring binder with a spiral notebook inside.
I have four sections in the notebook.
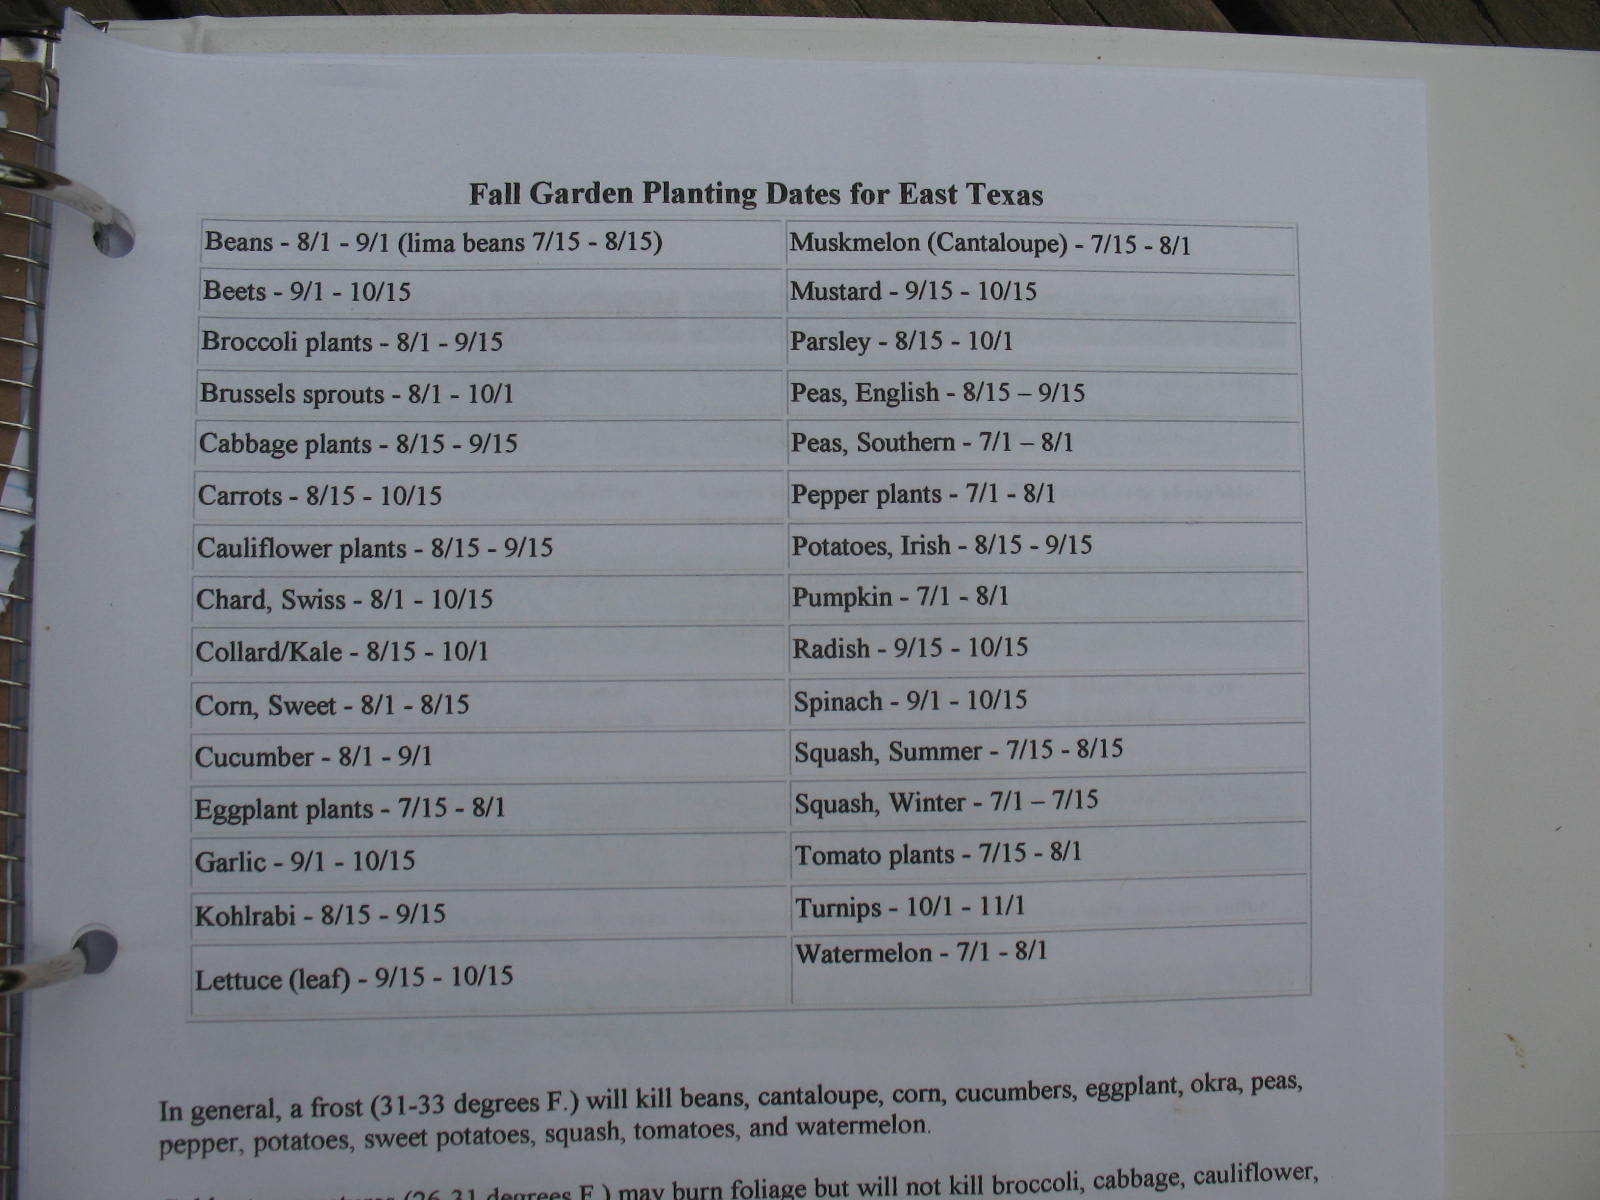
In one of the inside pockets I keep my planting guides. I have three of them. One is from the agricultural extension service, one is from the local garden club, and one is from a local feed store. You would be surprised at how much variation there is in planting dates. I actually took the information from all of them and then made up my own chart where I tried to hit the sweet spot by averaging the dates on the three others.
In the other pocket I keep print-outs from the extension service on how to care for plants that I have not planted before. For example; in the last year I have planted asparagus, strawberries, blueberries, blackberries, figs, and almonds. I have sheets on all of these telling me when to prune, when to fertilize, when to harvest, etc.

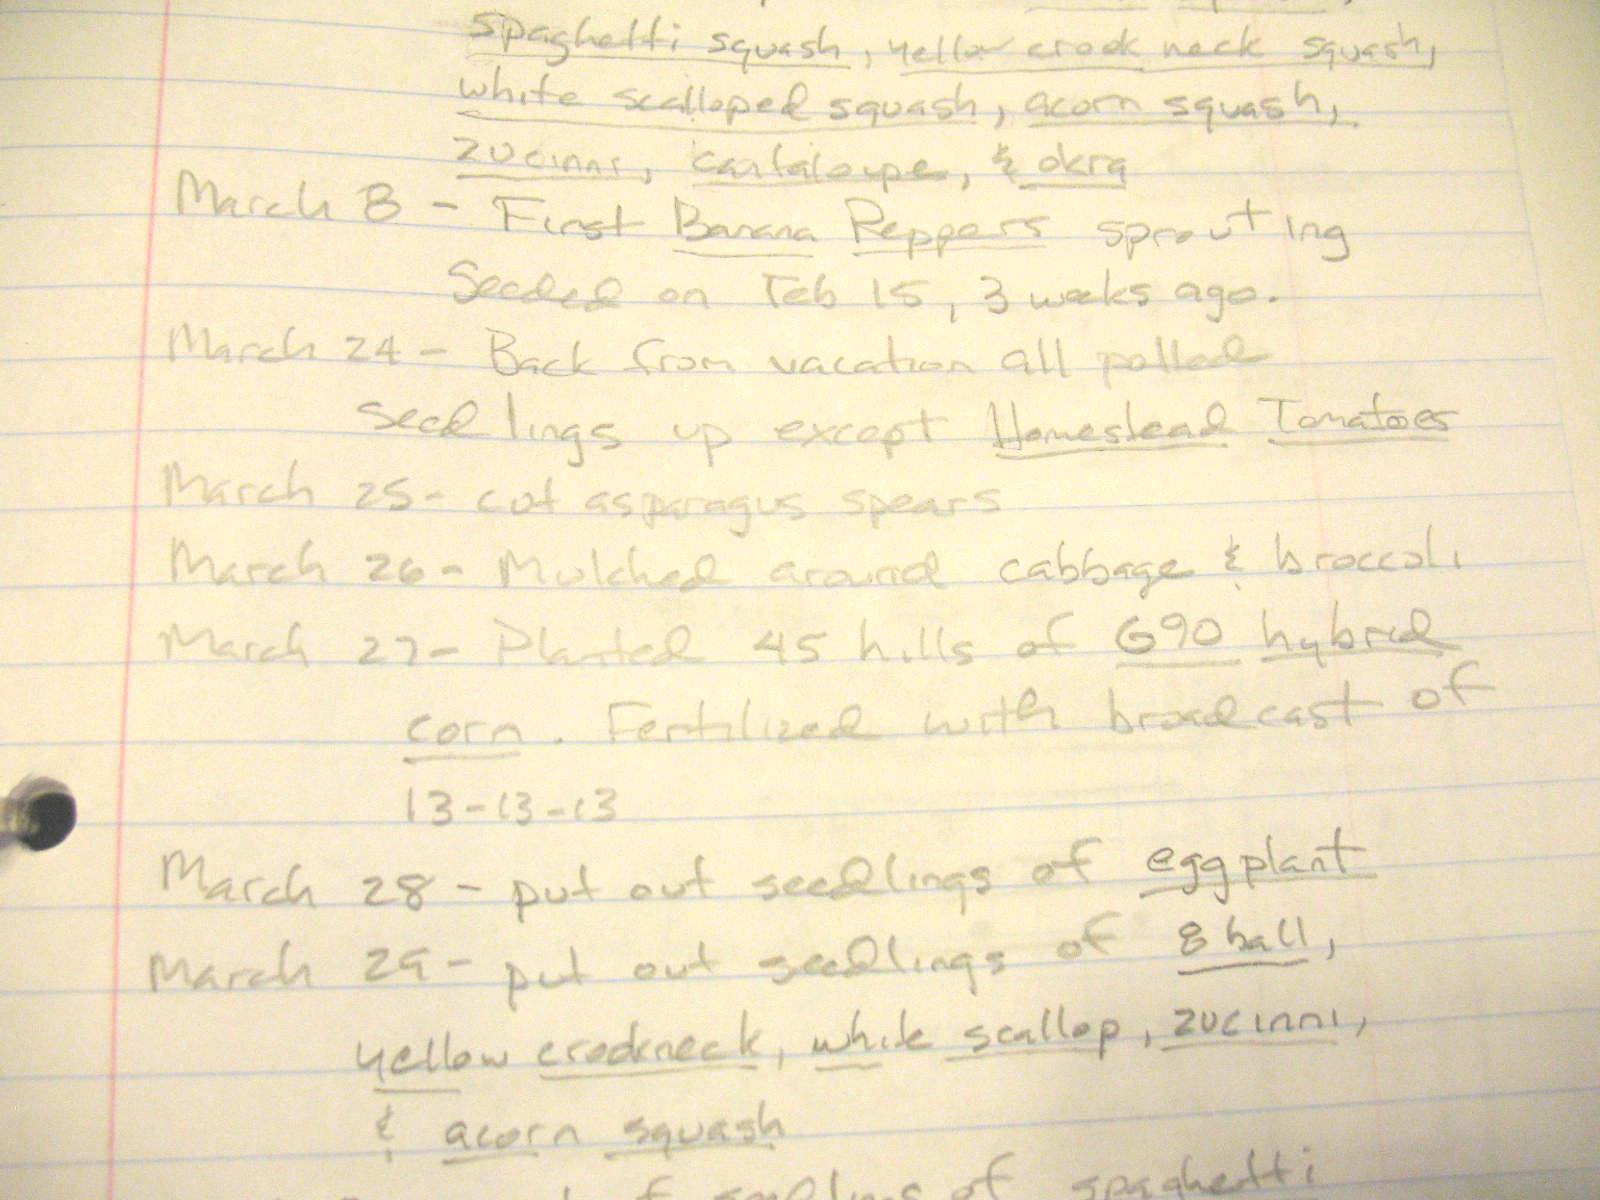
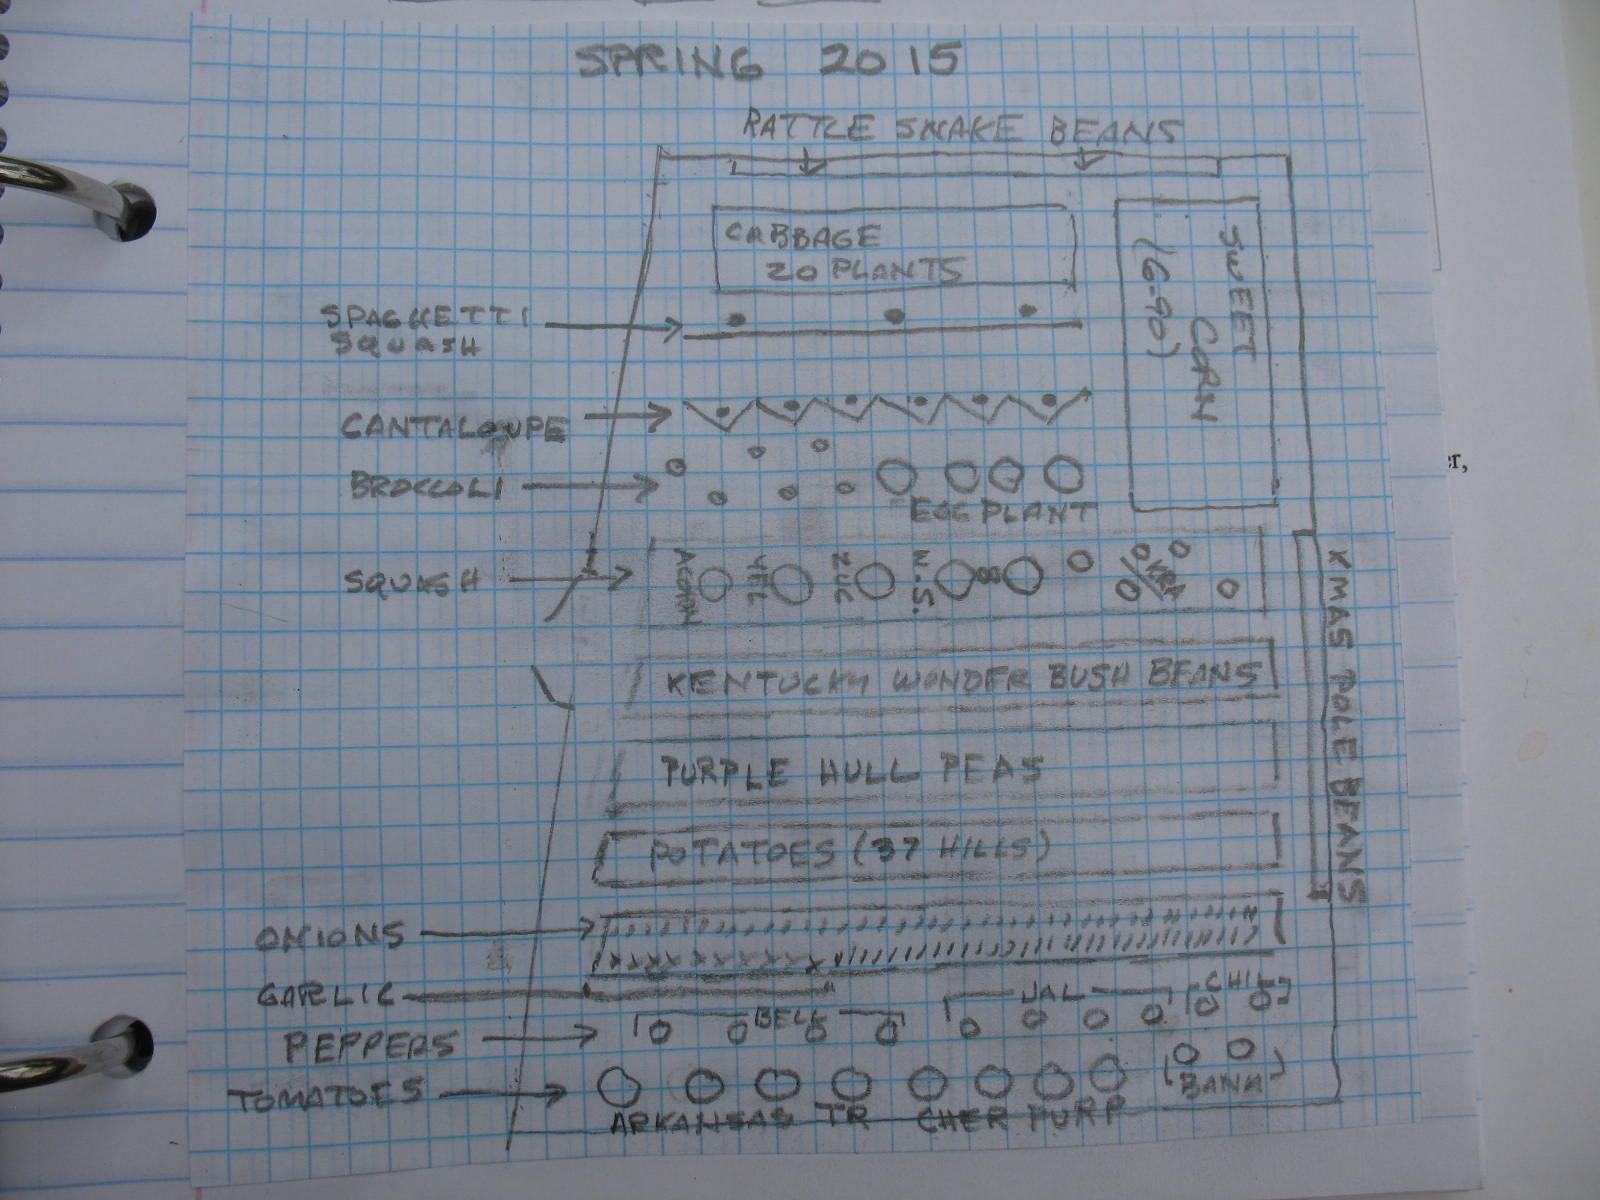
In the spiral notebook I keep a day to day record of what varieties I have planted, when I planted them, when they sprouted, etc. I also include a scale drawing of my garden and where everything is planted. This helps me rotate crops, and plan my companion planting. I will update the garden diagram in mid-summer and fall as I replant.
The final thing I keep (or will keep, since I haven’t started harvesting yet) Is a detailed list of the yields that I get from the garden. It should be a simple matter to drop each basket of produce on my scale and jot it down on the list. I will be very interested to see exactly how much I harvest of each crop.
Special Note: After several years of writing all of the posts on this blog (over 220) I have decided to start accepting guest posts from readers. I will accept articles that are on topic; wilderness survival, gardening, food storage, prepping, primitive skills, primitive weapons, modern weapons, etc. I will not accept articles that focus on politics, race, gender, religion, or illegal activities, and if an article is posted I reserve the right to edit it for length and/or content. Please make sure that your submission is your own work and that it is based on your own experience and not just a second-hand account of how to do something. If you wish to submit an article you can e-mail it to sensiblesurvival@gmail.com. If you are going to include photos, which is a definite plus, please send them in jpeg format. Your article will be credited to you; and, if published, will be received by a wide audience. This blog has had over 950,000 views throughout the world and is currently receiving from 25,000 to 30,000 hits per month. Thanks, and hope to hear from you, Hank
The following article is a guest post from Sam. It is a good explanation of the different types of gardening seeds that are available today. You can visit Sam’s blog at http://www.organiclesson.com/
The Difference Between Heirloom Seeds, Hybrid Seeds, and GMO Seeds
Are you confused by the variety of seeds available in the market these days? You are not alone. Many gardening newbies have trouble understanding the differences between heirloom, hybrid, and GMO seeds. Although GMO seeds are not available for home gardeners, it is still important to understand the role of these seeds and how they could affect the future of gardening.
So what exactly does heirloom refer to? Heirloom plants are considered those that breed true. This means they pass on the same characteristics from the parent plant to the child plant. This is extremely useful and efficient for gardeners and farmers who are looking to harvest the same type of plant from season to season. One confusing concept that is most often associated with heirloom is the time when it was introduced. Some gardeners would say they that heirloom varieties were introduced before the 1920s, while others would state that they were introduced before 1951. In the end, the time when they were introduced would probably not have a significant impact on your choice of seeds. However, it is still important to understand the historical importance of heirloom seeds in general since heirloom does refer to the heritage of a plant.
So how exactly do heirlooms differ from hybrid seeds? Well, hybrid seeds can form from both natural and human-induced processes. For example, some heirloom plants appear after cross-pollination occurs between two varieties of plants. This can offer certain benefits and advantages. For example, if plant A has a natural pest-resistant trait and plant B has a trait of producing beautiful colors, the plant that results from the cross-pollination of plant A and B could get the beneficial trait from each parent plant. However, the degree of how much trait a child plant receives from each parent plant is not always consistent. Therefore, there is always that problem of reproducing the same type of hybrid plant from year-to-year.
Aside from being able to breed true, heirloom plants offer a number of other great benefits. For example, heirloom vegetables and fruits are known to have more flavor and taste. They may not look as appealing in terms of appearance, but such concerns will be blown away once you take a bite out of most heirloom fruits, vegetables, and even herbs. Another benefit is the nutrients. Some heirloom varieties are known to contain more nutrients than their hybrid counterparts. Last but not least, heirloom plants play an important part in preserving the genetic diversity of plants. Without heirloom plants, there wouldn’t even be hybrid plants on this planet. It is important to preserve the original species of plants in order to maintain the beautiful selection of fruits, vegetables, herbs, and other types of plants that exist in front of us today.
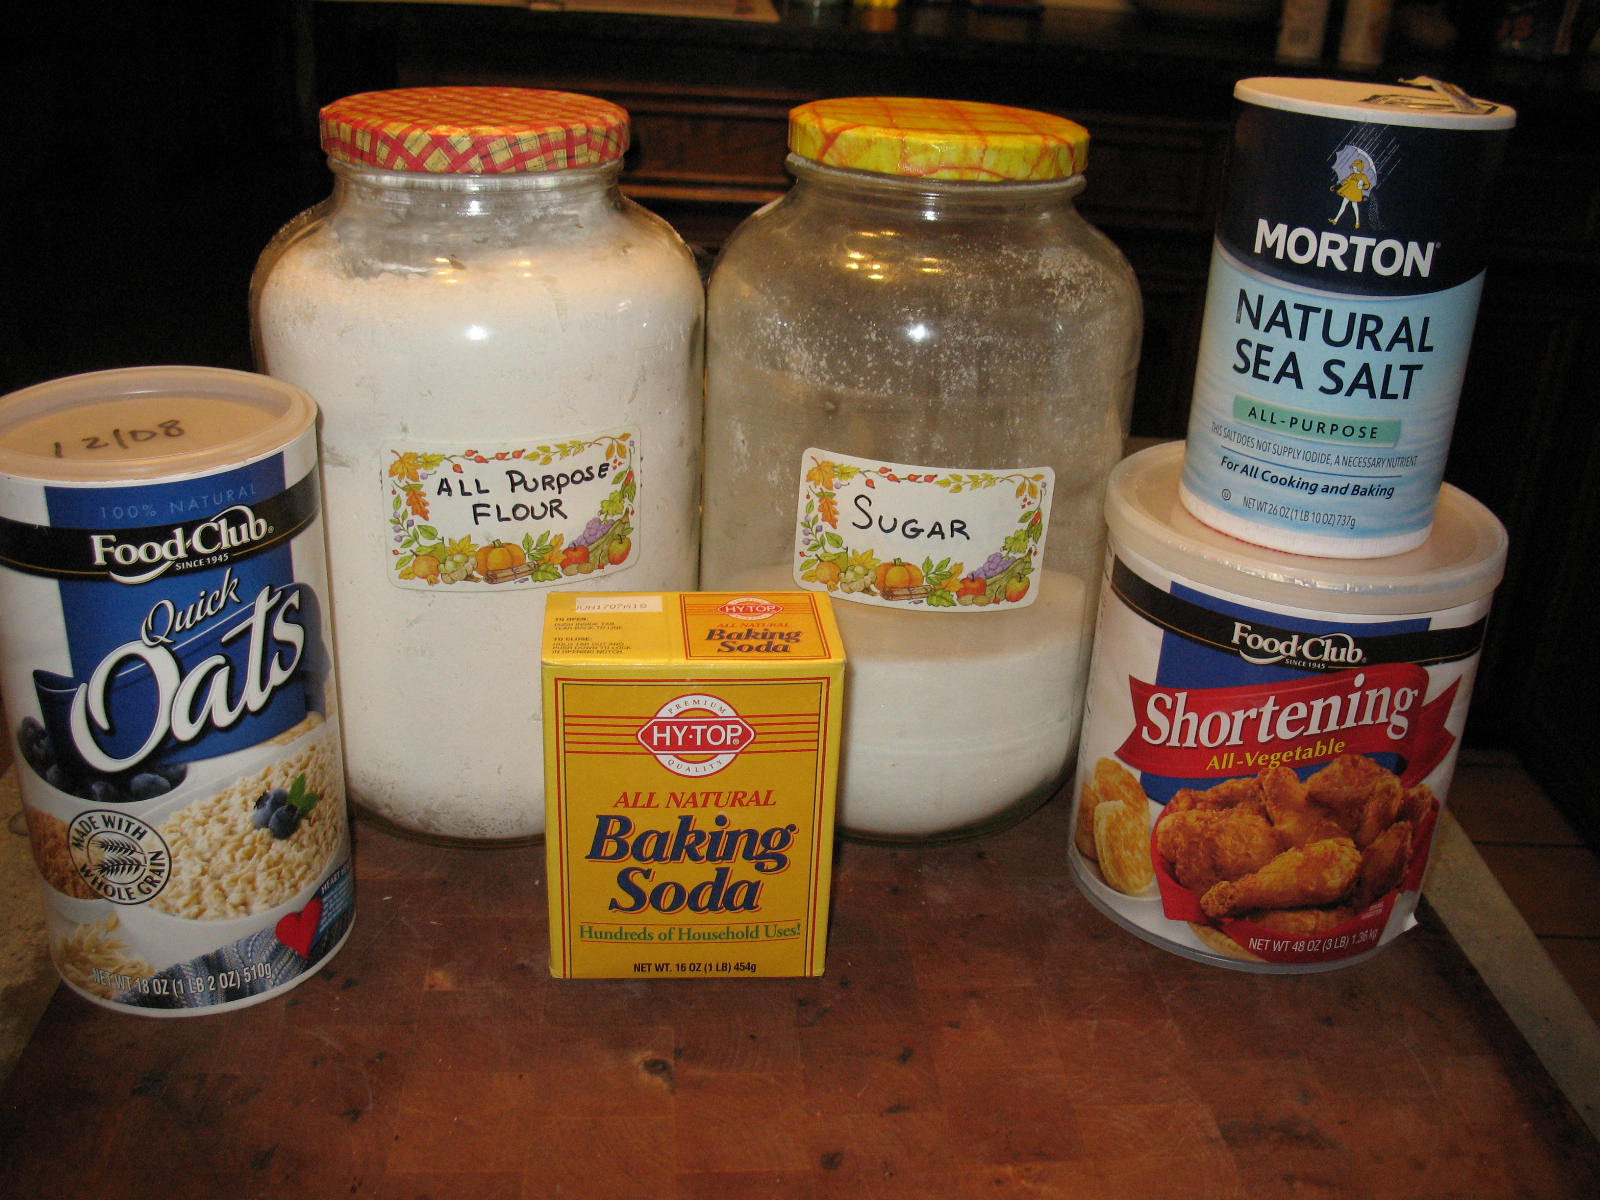
Hardtack is one of the survival foods of the American frontier. Movies and television often portray hardtack as being a bad-tasting, tooth breaking assault on the taste buds, but this is not at all true. This being said, traditional hardtack is nothing to write home about taste-wise. It is basically made of flour, salt, and water; mixed into a dough, rolled out, and baked. Simple to make, full of carbs, but not very tasty. The recipe that I am giving you here adds just four simple ingredients that make a world of difference in the taste of the final product. It’s so good, that if I lived in Beverly Hills, I’d call these handmade artisan-bread crackers; but, I live in the backwoods of East Texas so I guess I’ll just call it hardtack. Here’s the recipe:
Ingredients
1 ½ cups of all-purpose or whole wheat flour
1 cup quick oats oatmeal (not instant)
1 teaspoon of salt
¾ teaspoon of baking soda
¼ cup of sugar
1/3 cup of vegetable shortening, lard, or oil
¾ cup of warm water
Preparation
In a mixing bowl combine the flour, oats, salt baking soda, and sugar and mix thoroughly
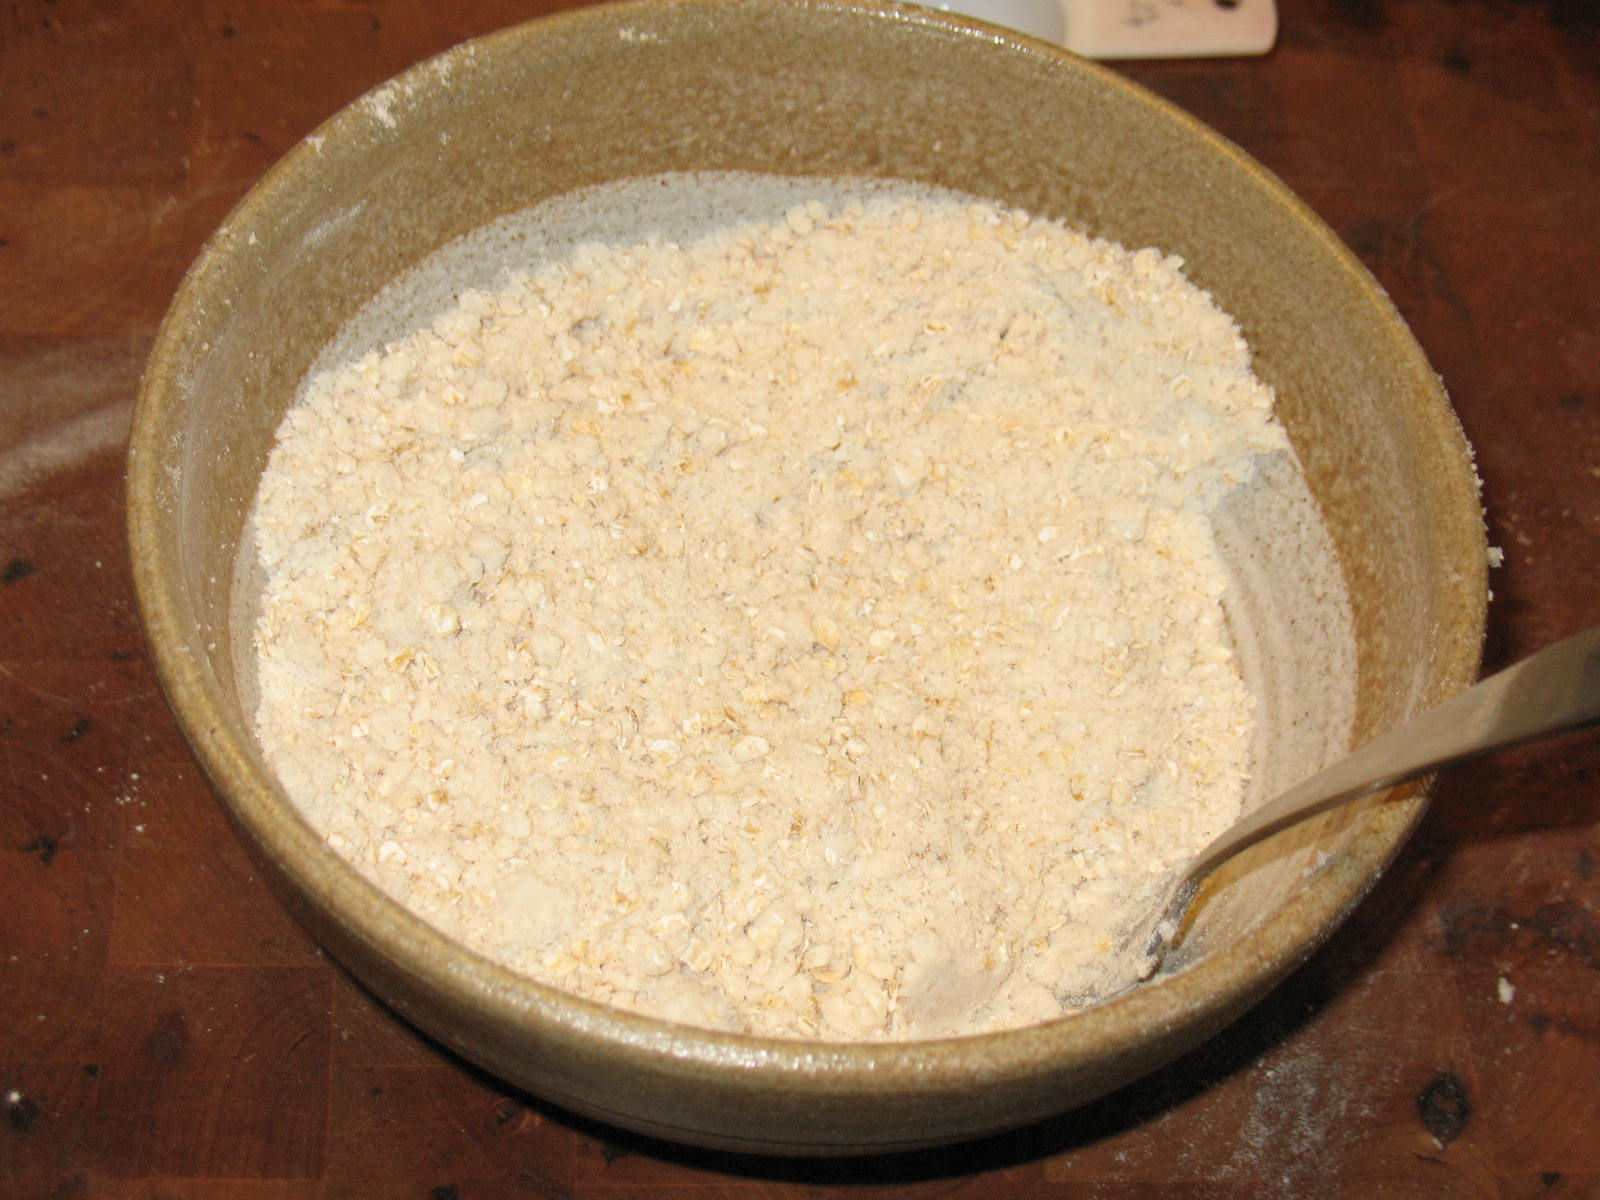
Add the shortening and cut it into the dry ingredients

Add the warm water and stir the mixture until you have a uniform dough.
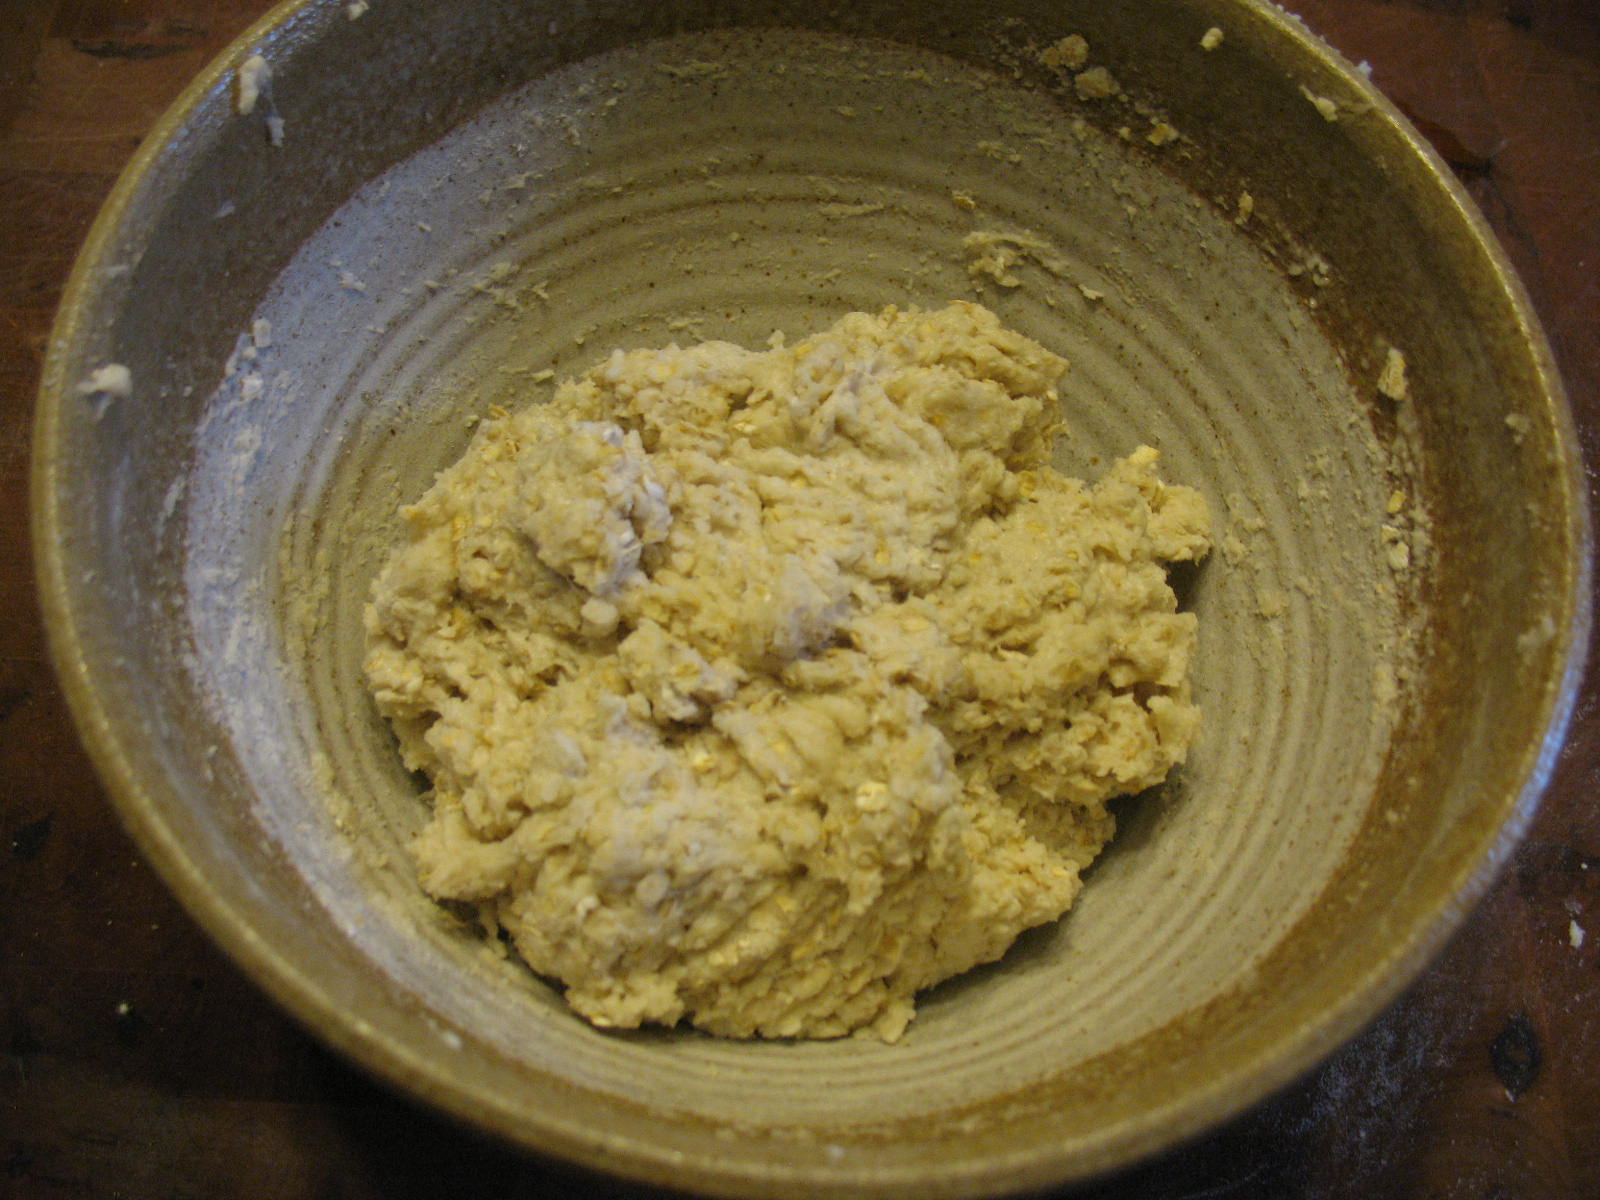
The dough will probably be pretty sticky at this point. Sprinkle it with small amounts of flour as you kneed the dough. Keep adding flour until the dough no longer sticks to your fingers.
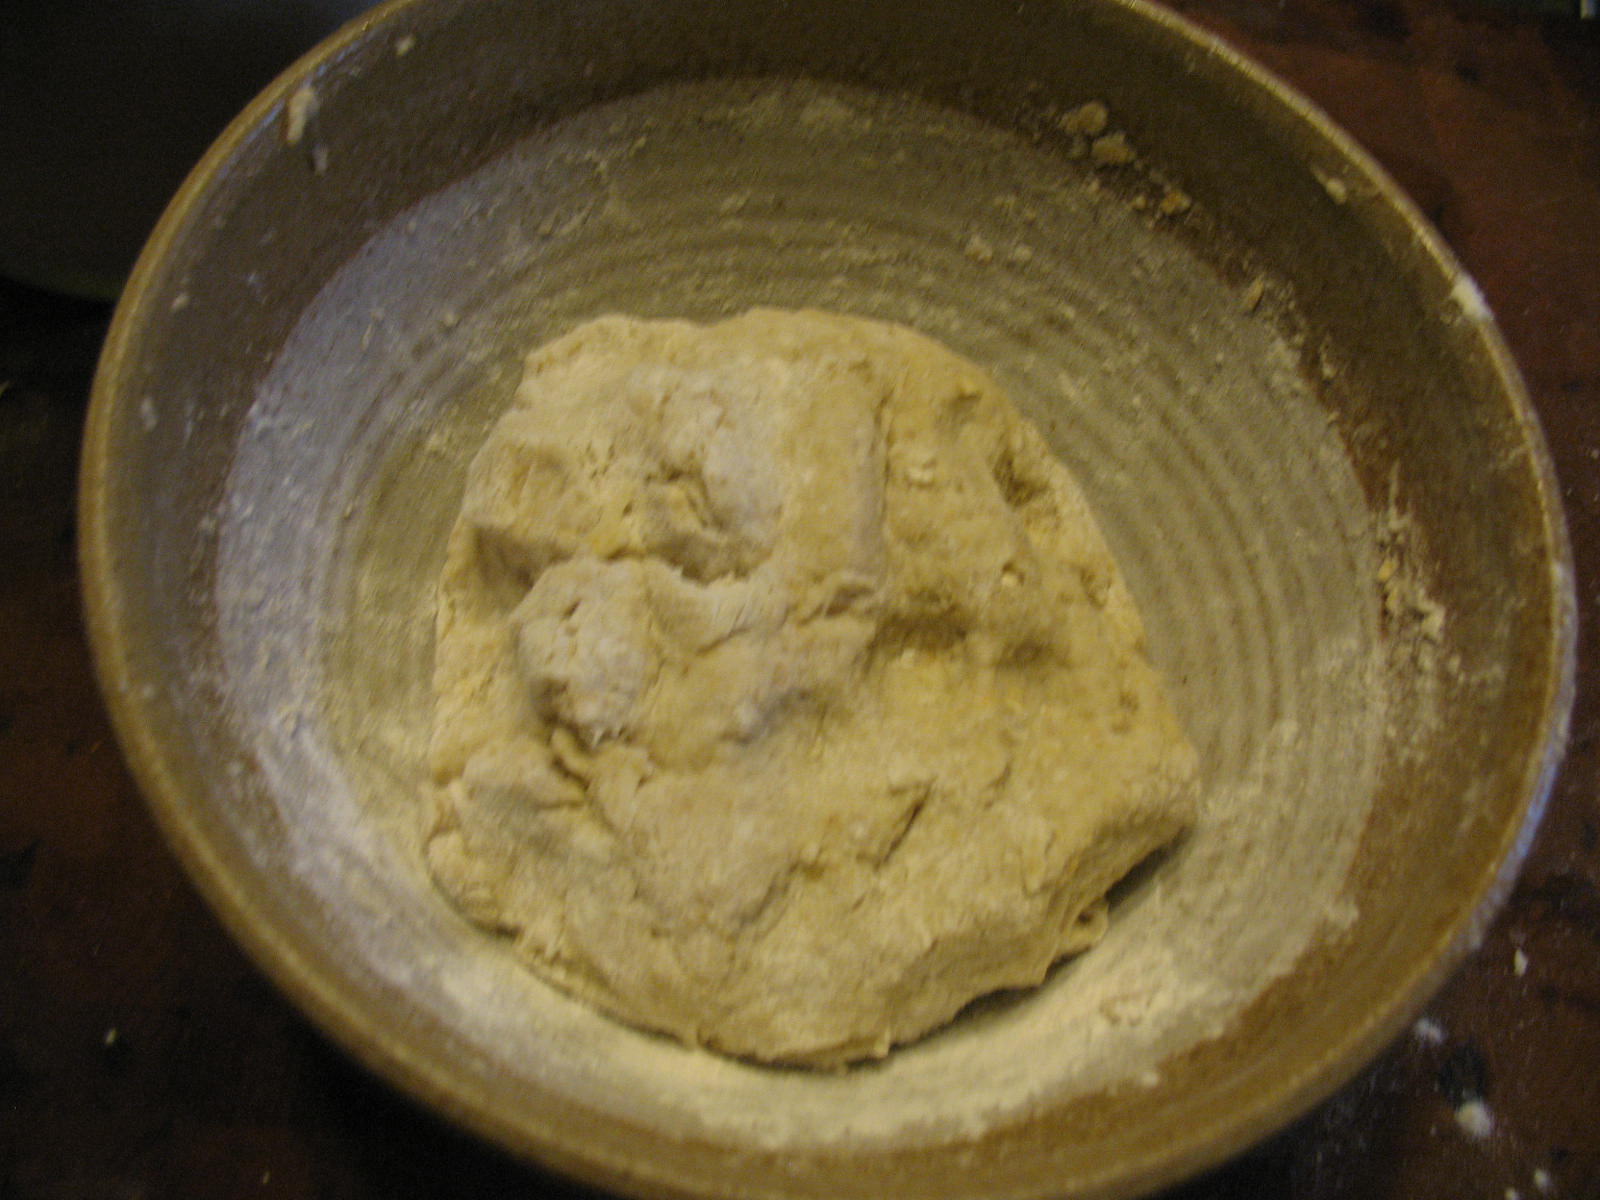
Divide the dough into two balls and set it aside.
Sprinkle your cutting board with flour and rub flour on your rolling pin.
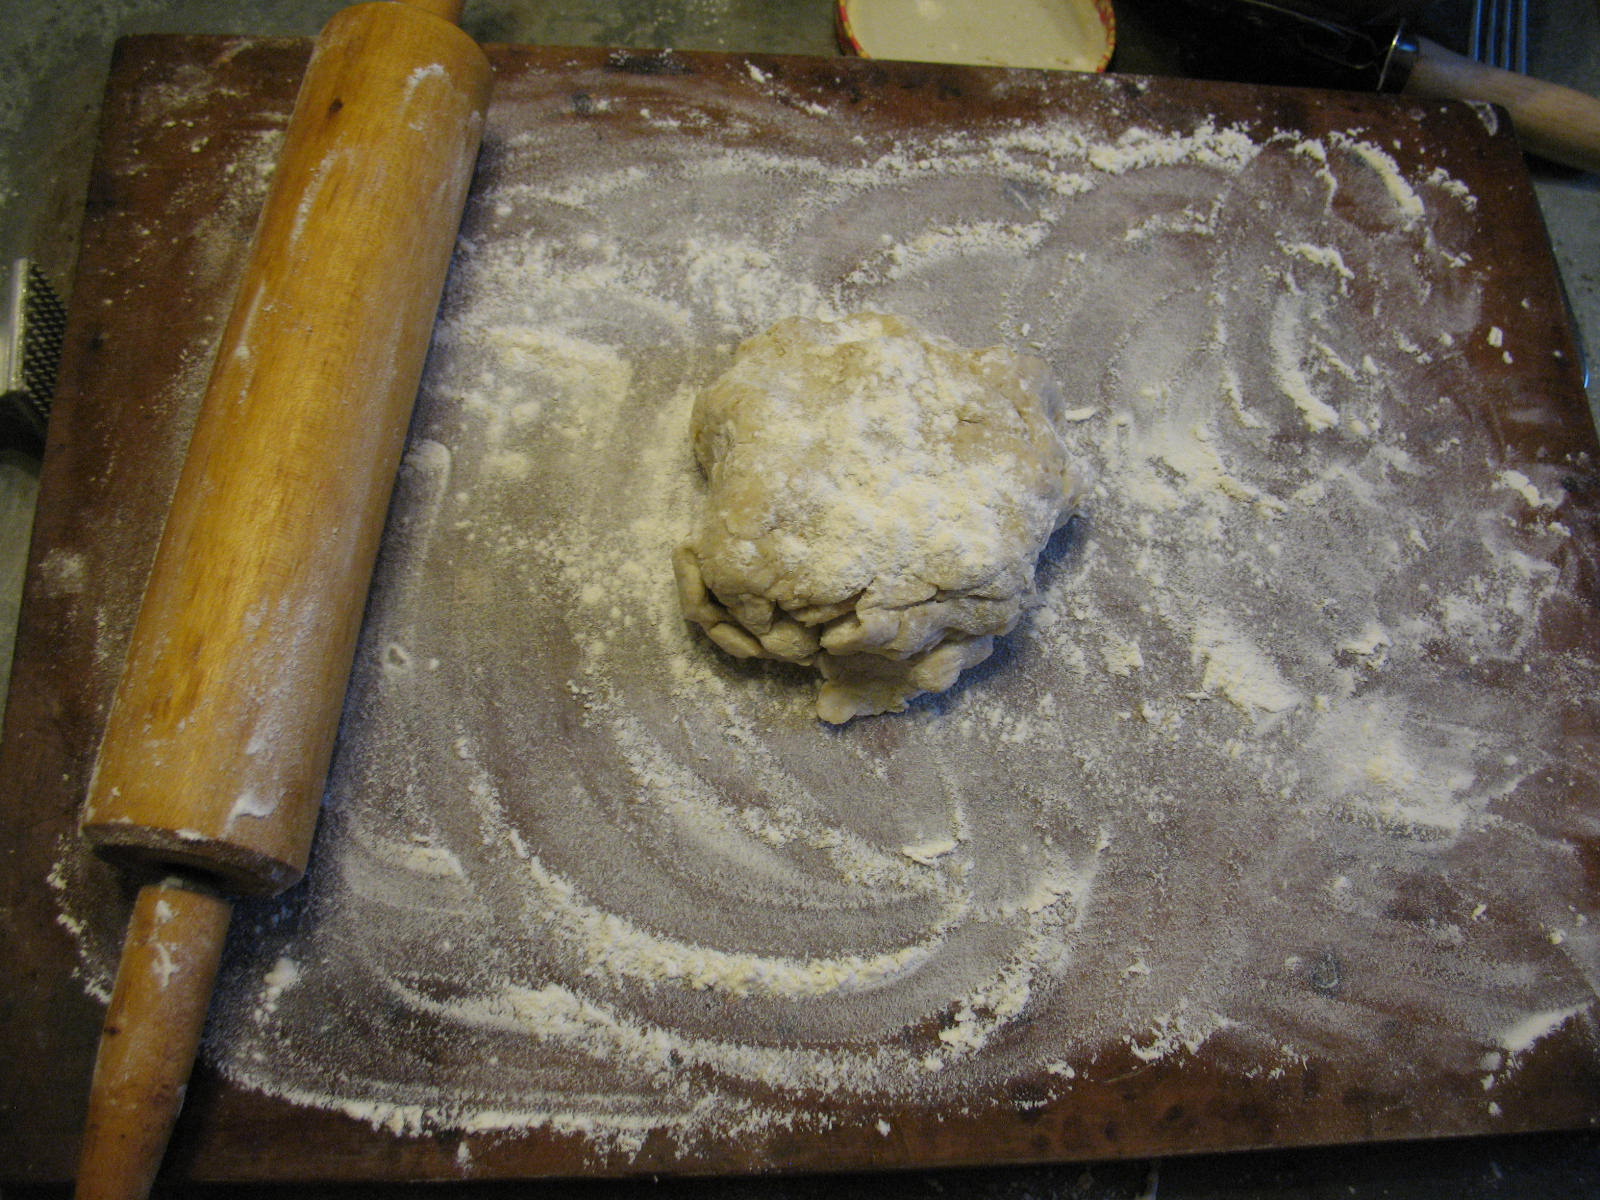
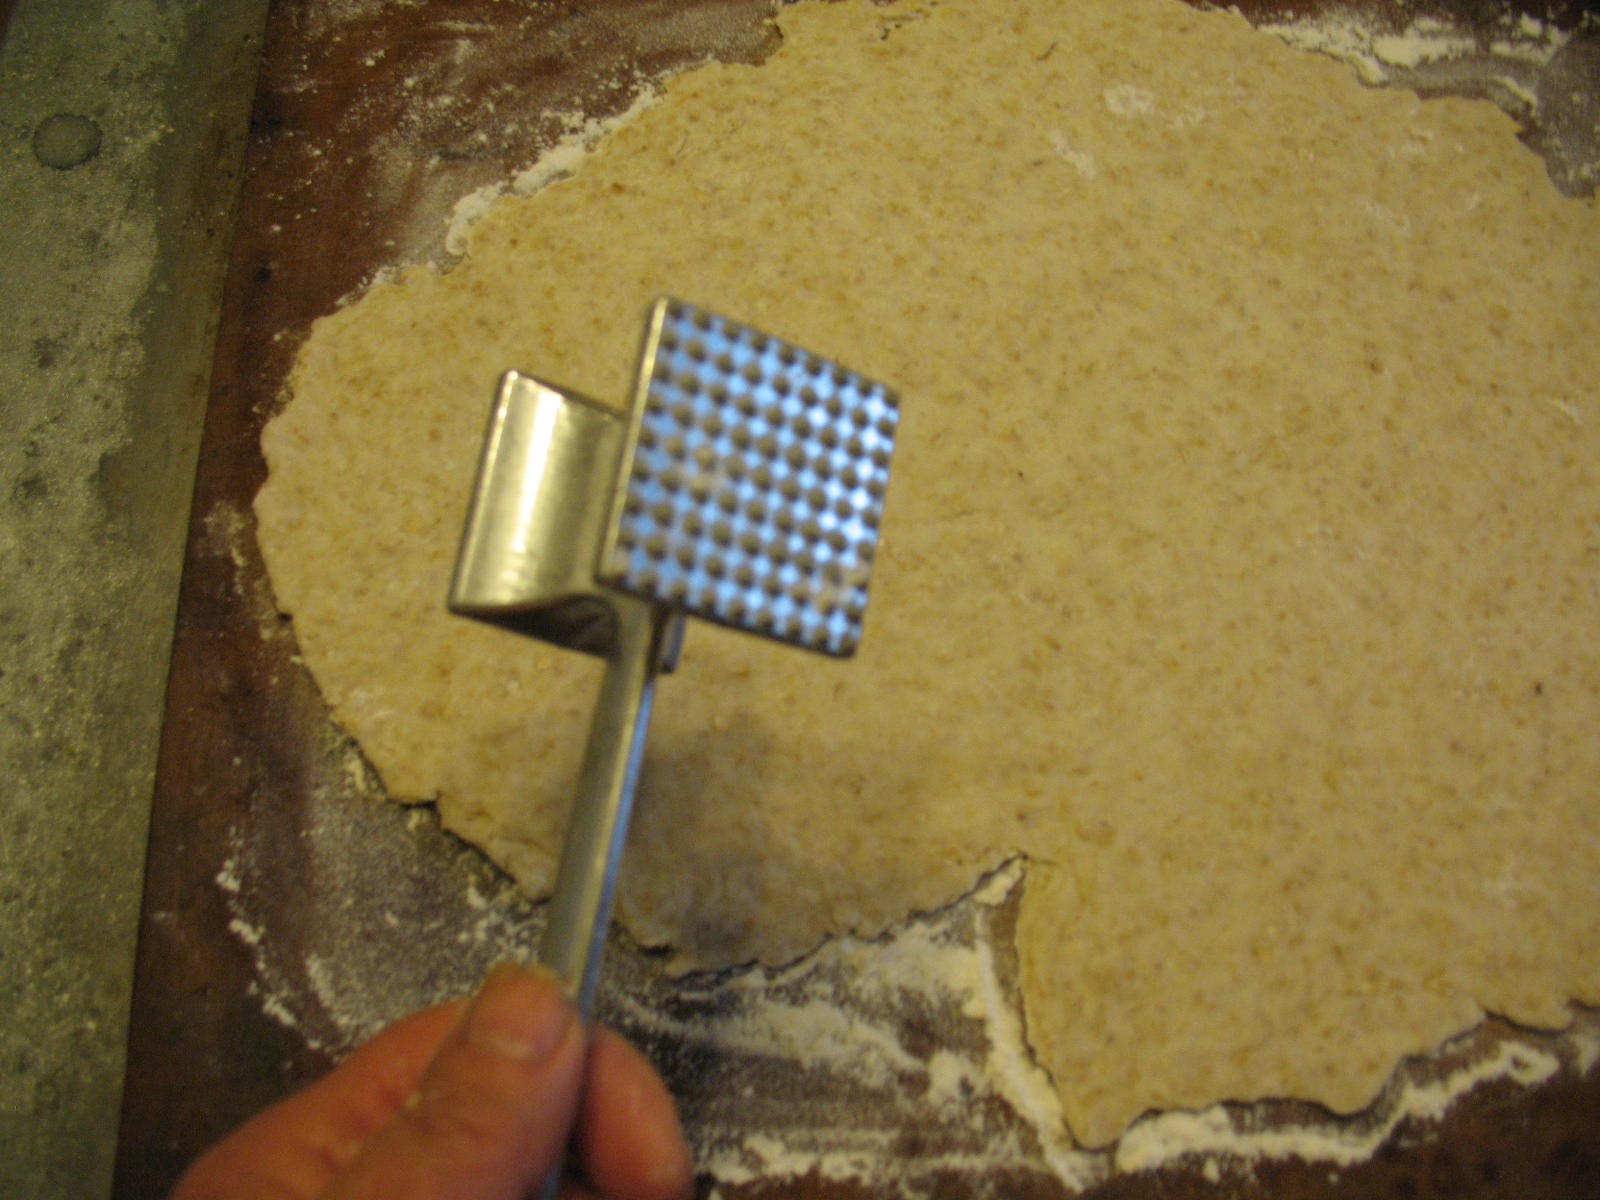
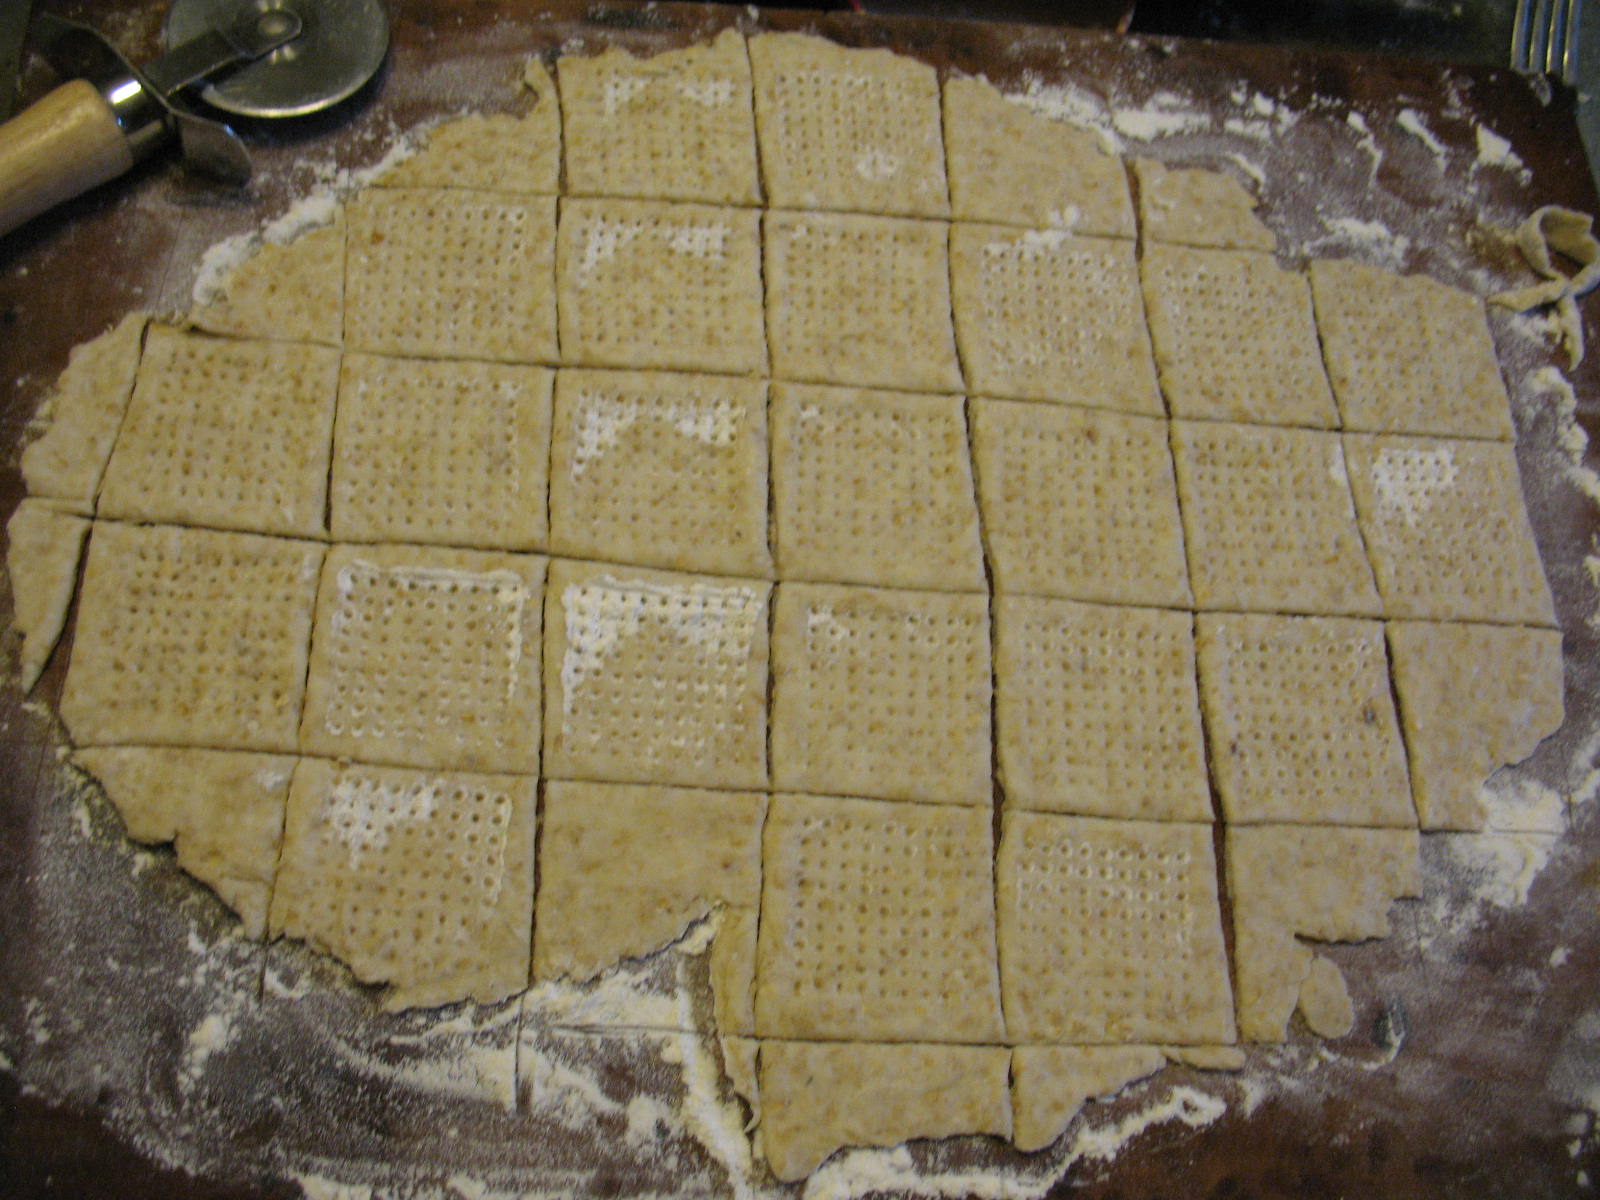
Place one ball of dough on the cutting board, sprinkle flour on top of it, and roll the dough out thin; about an eighth of and inch thick.

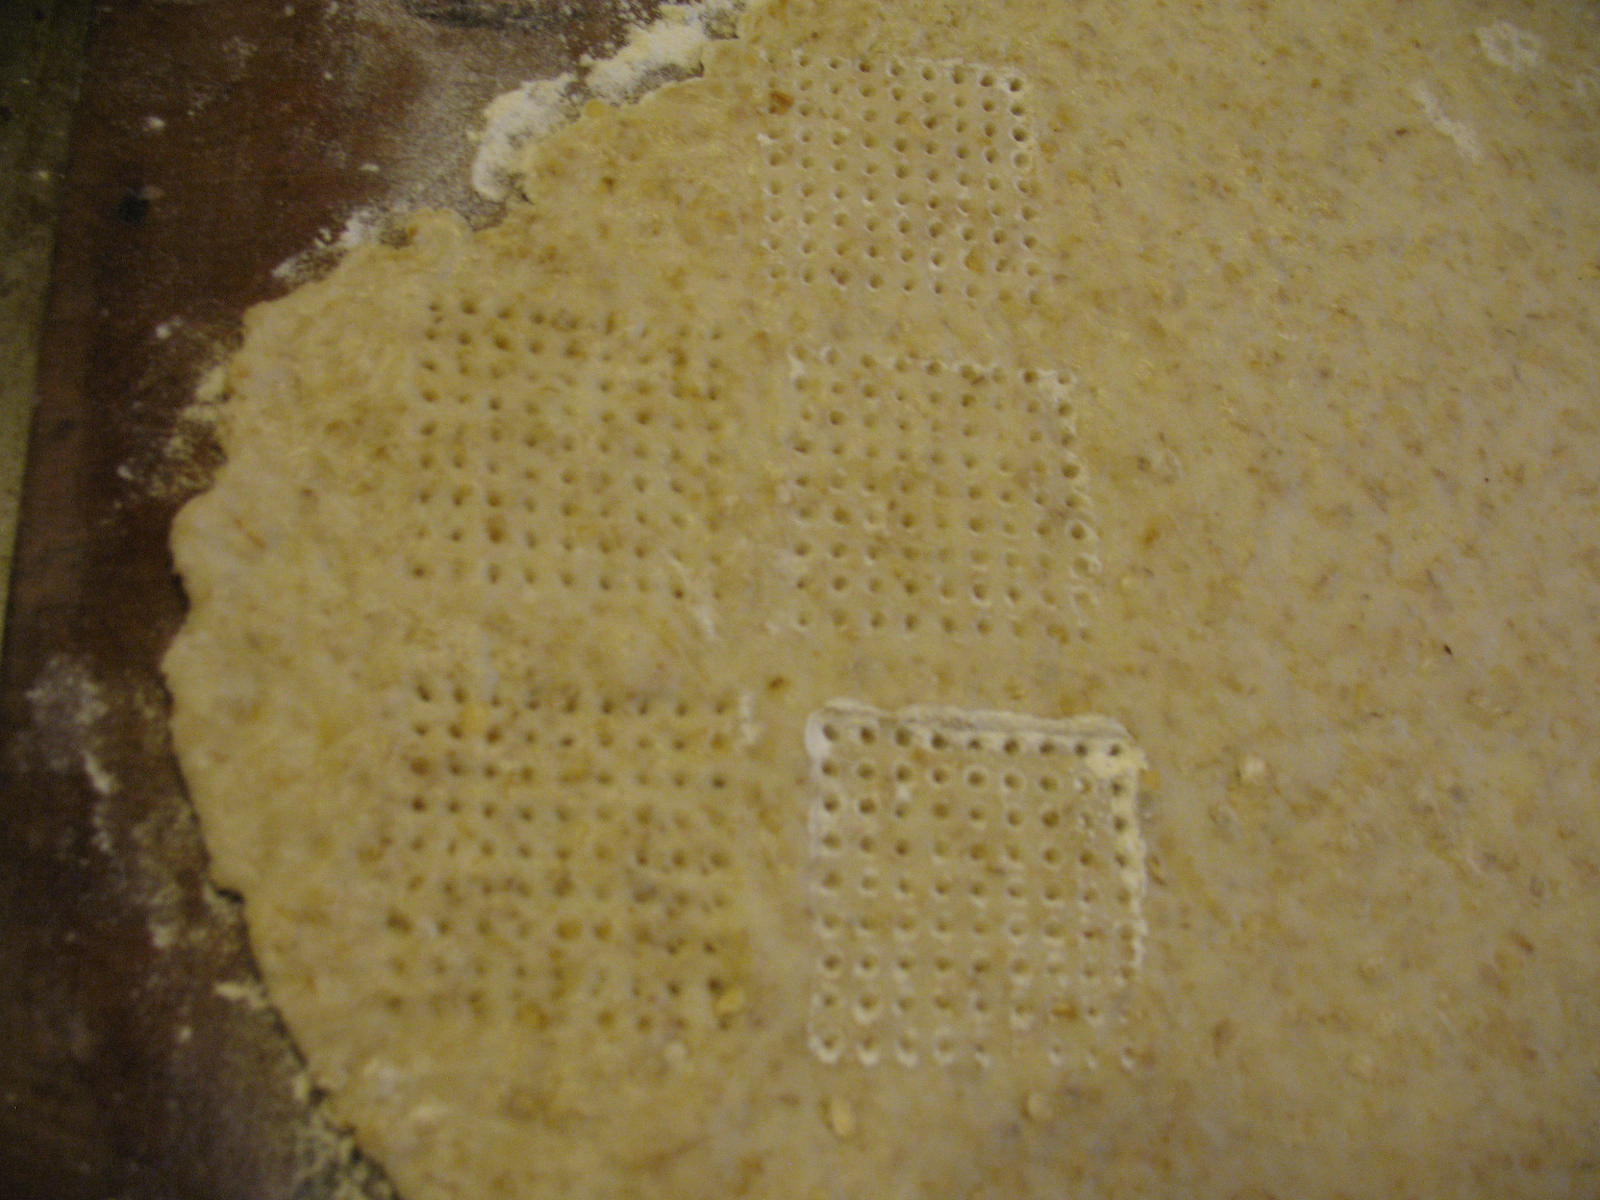
Use the bumpy side of a meat tenderizing mallet to press indentions into the dough. If you dip the head of the mallet into flour after every third of fourth use, it will keep the head of the mallet from sticking to the dough. If you don’t have a mallet, use a fork to poke indentions into the dough. These aren’t just for looks. They help the cracker cook evenly inside and out.
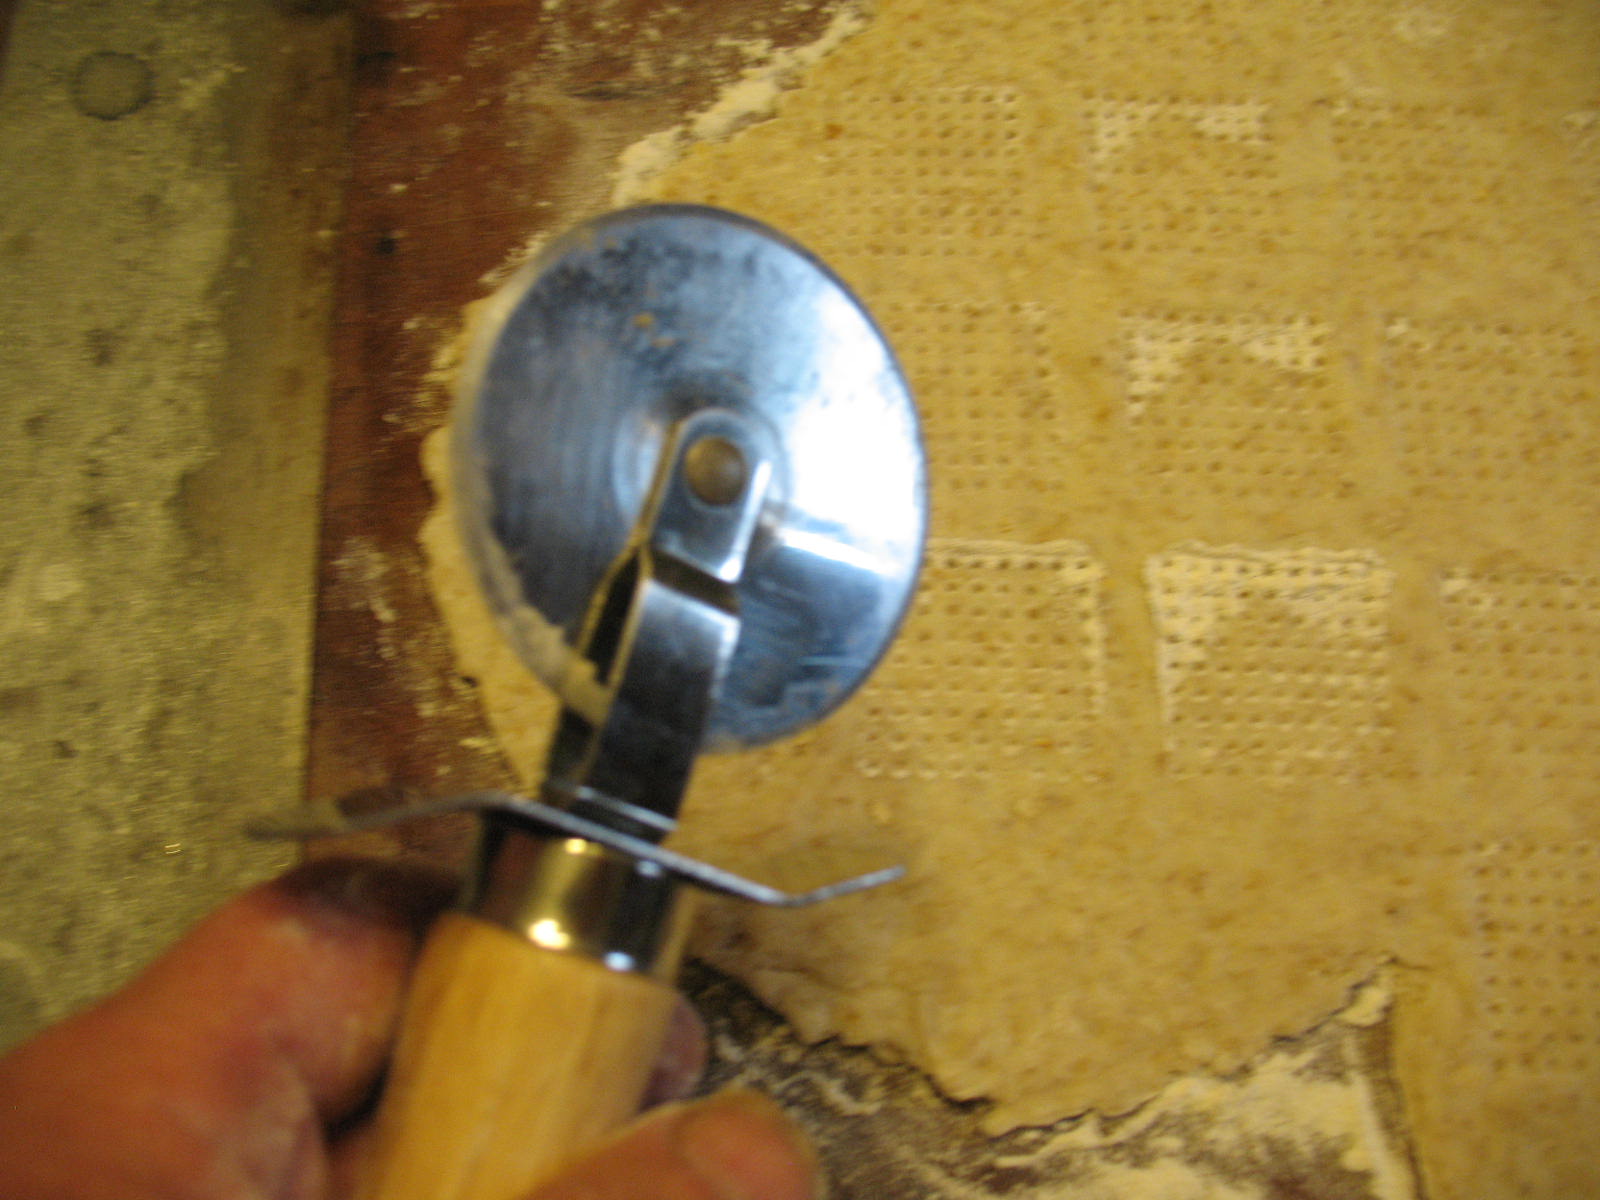
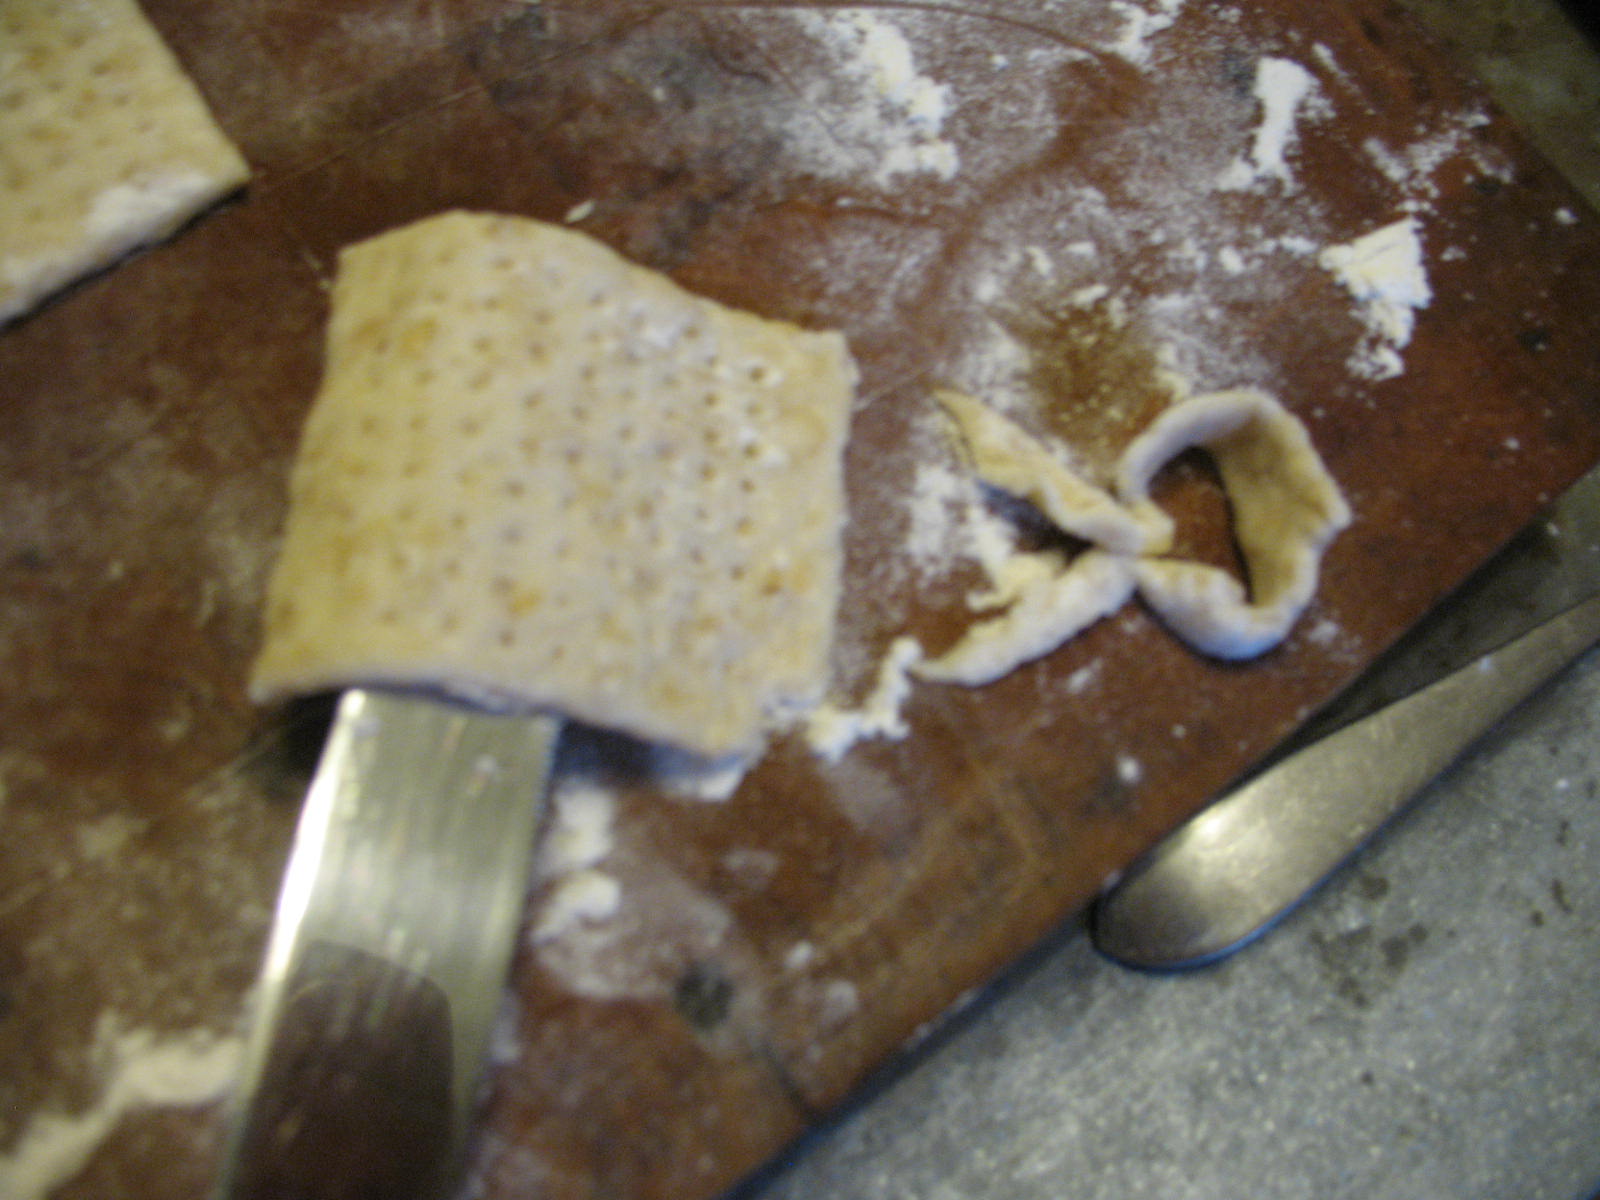
Now take a pizza cutter, or just a regular knife, and cut out your crackers. I make mine about two inches square.
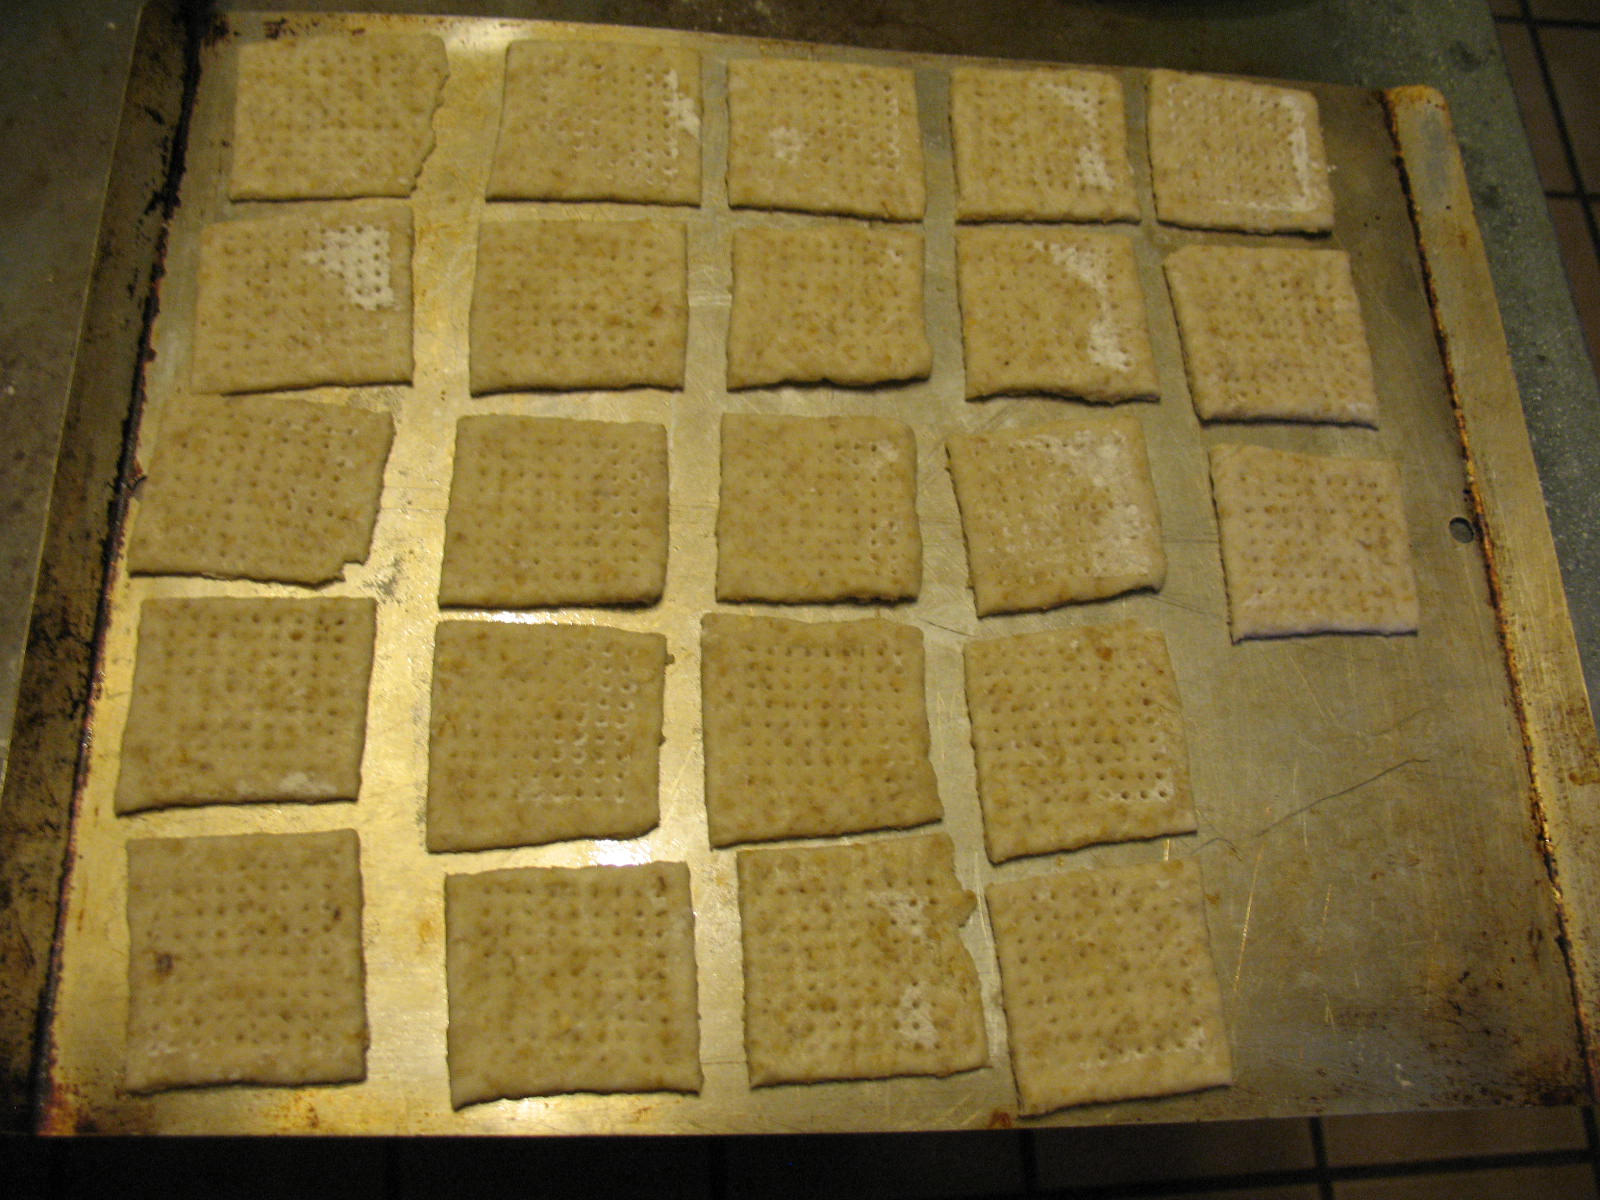
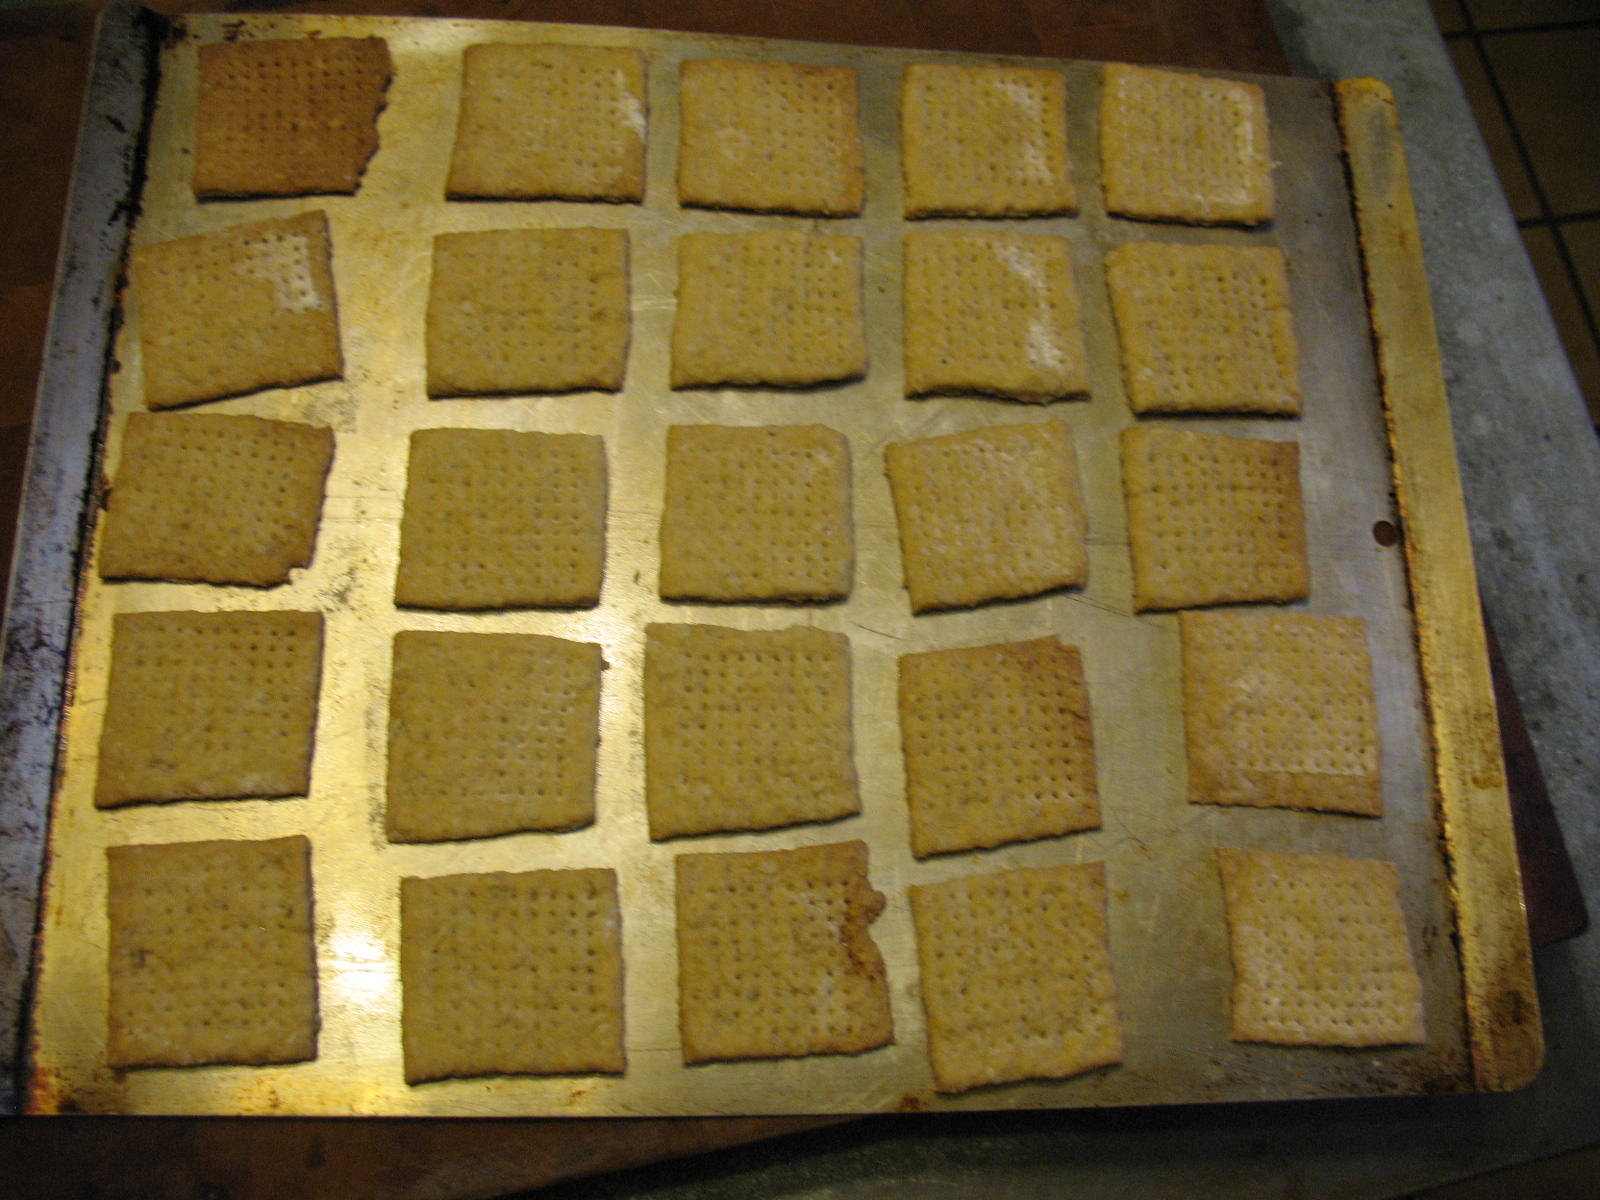
Place the squares of dough on a lightly greased baking sheet and bake at 375 degrees F. until the crackers are golden brown. On my old stove this is 18 minutes, but I’d start checking at 15 minutes if I were you. Meanwhile you can roll out and prepare the other ball of dough for baking.
Take the hardtack out of the oven and let it cool.
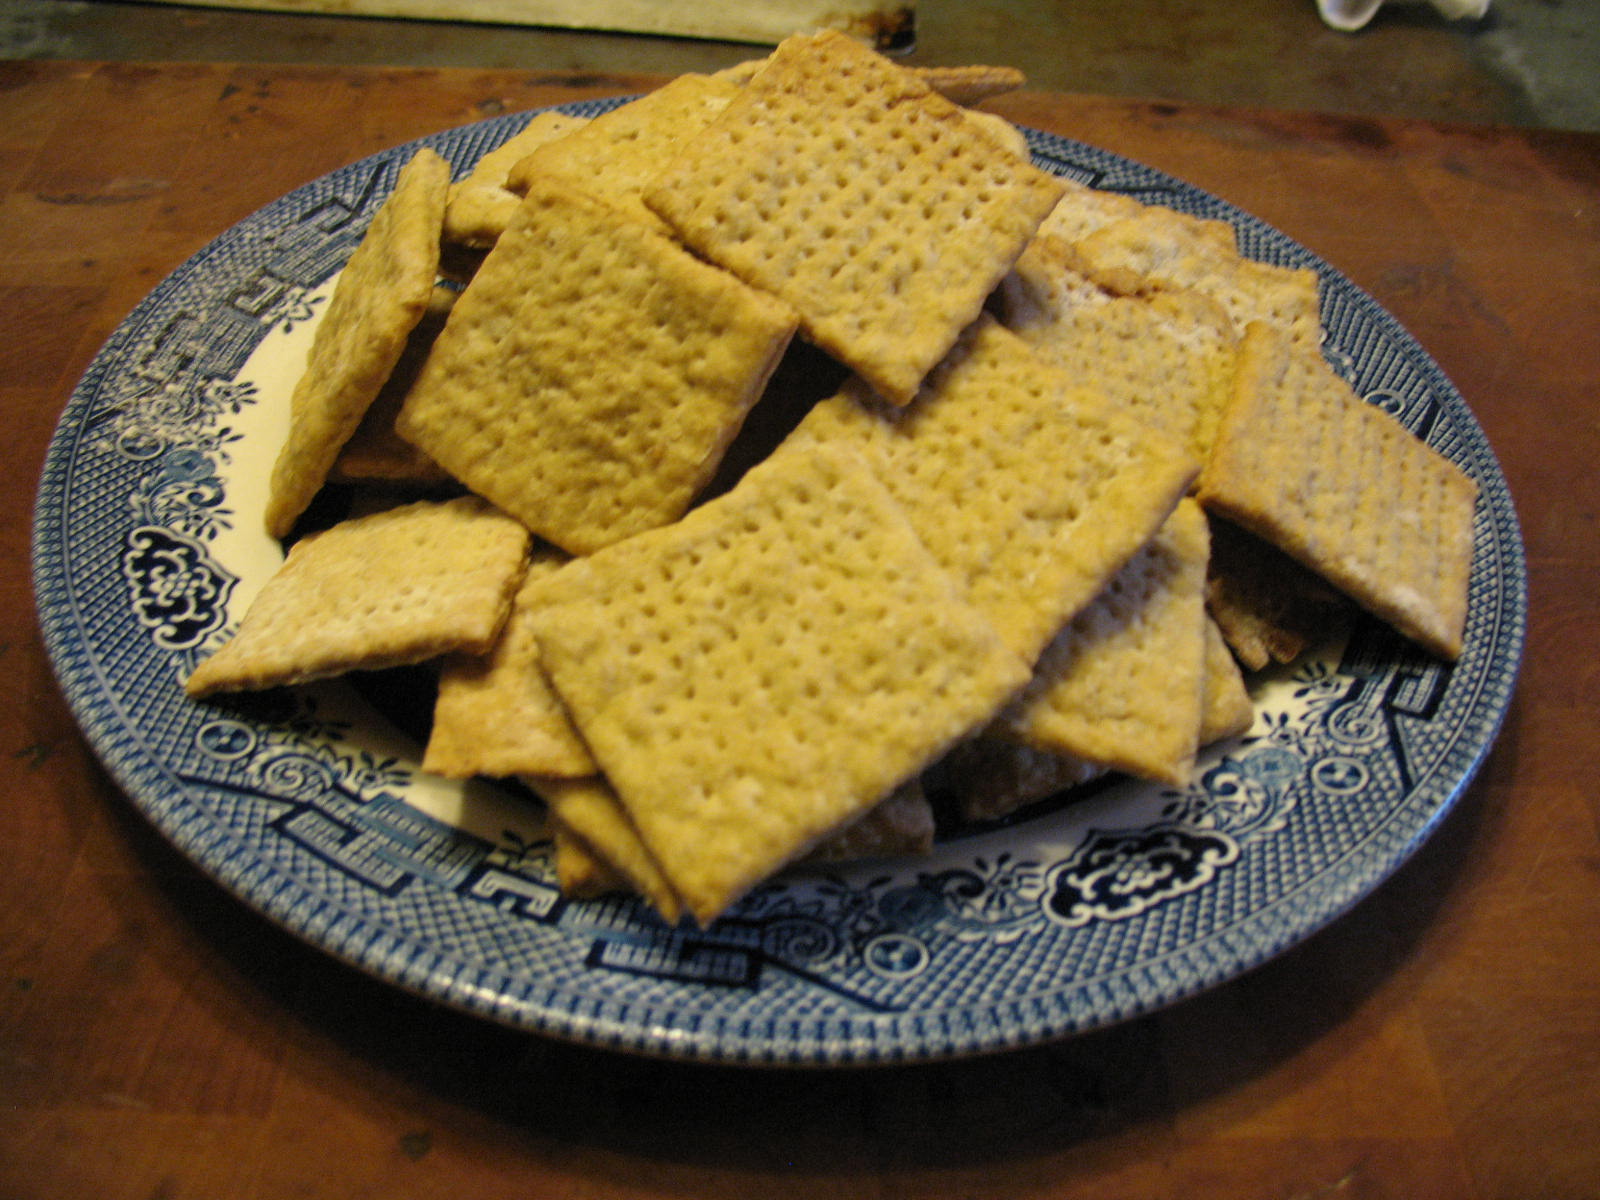
You’re now ready to bag it up and hit the trail, or if you’re in Beverly Hills, you’re ready to grate some sweet onion and break out the Beluga caviar. So happy trails or bon appetite, whichever is appropriate.
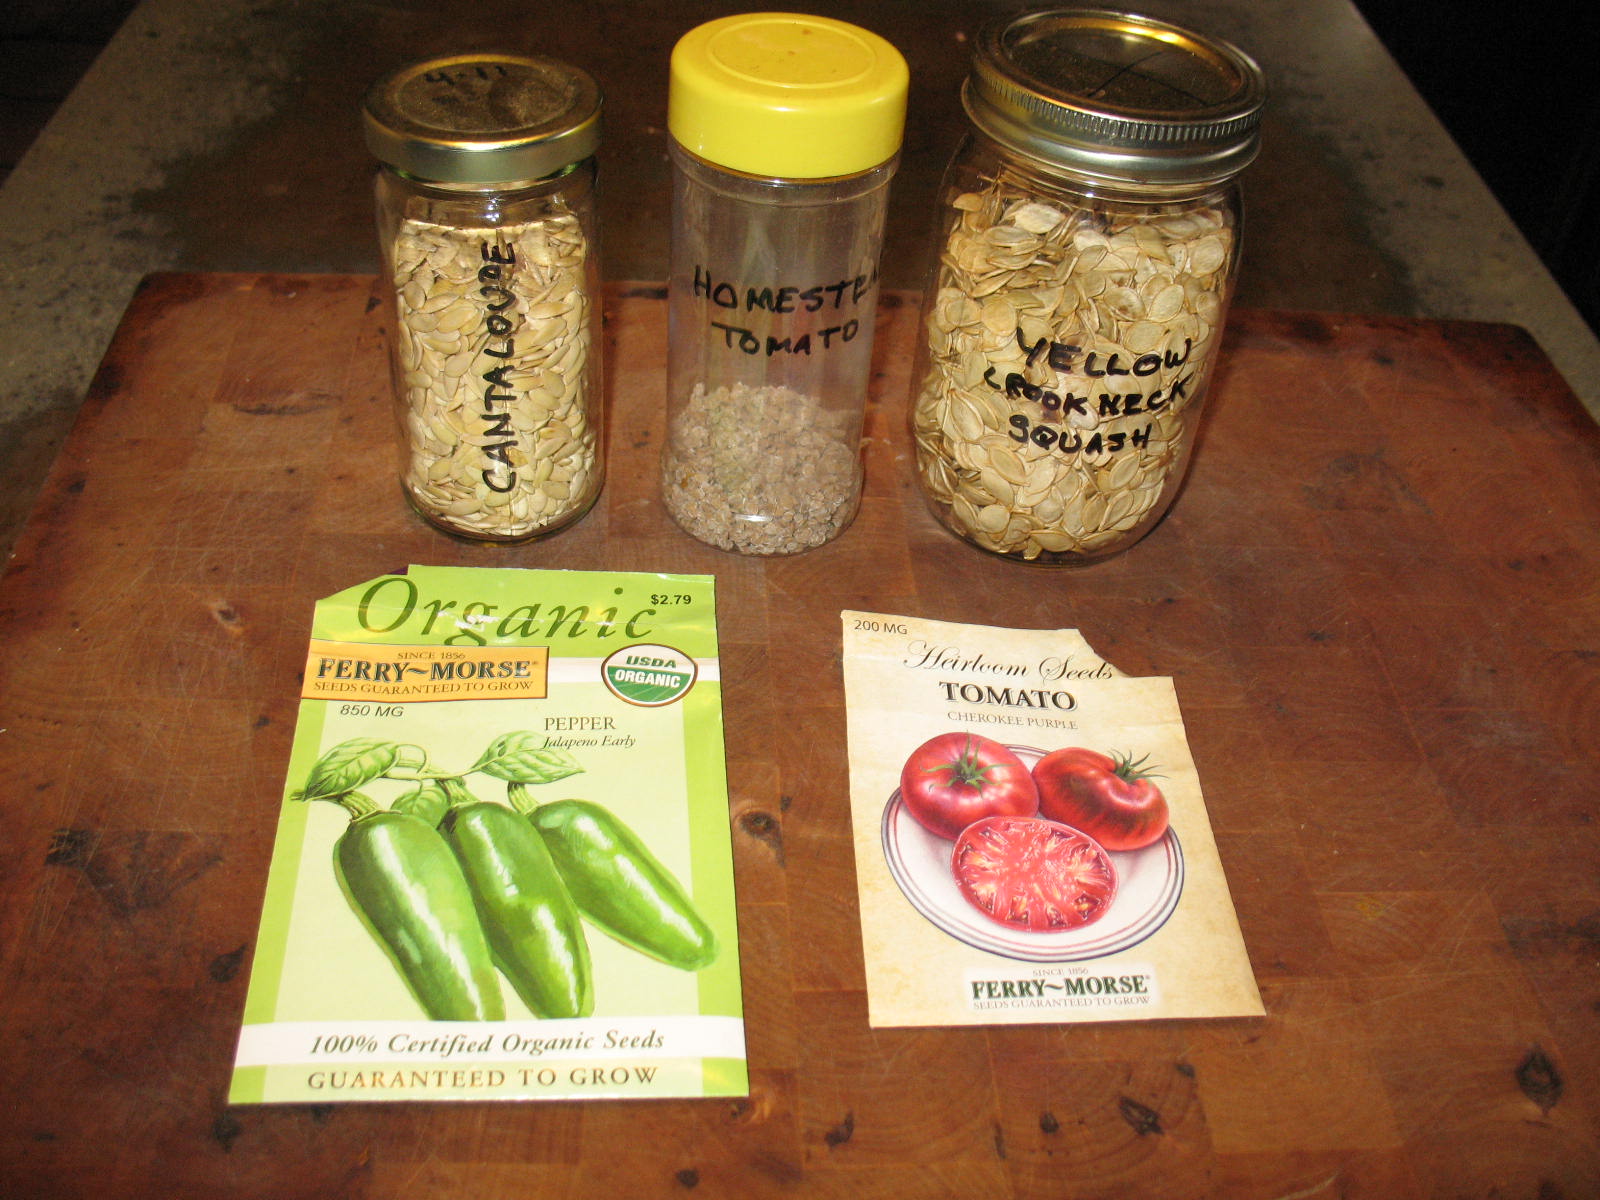
Most beginning gardeners and many old pros buy tomato plants, pepper plants, and other vegetable plants at the nursery or feed store to set out in their gardens. This is a real time saver and bedding plants are not super expensive, so it’s an easy way to get a garden going. But, if you get deeply involved in gardening, and especially if you save your own heirloom seeds; you are going to eventually want to learn how to germinate your on plants in seed pots. There are several advantages to doing this. It is a little cheaper than buying plants (as long as you don’t factor in your labor), it enables you to start plants from seeds that you have saved, it allows you to raise varieties of plants that are not readily available at most stores, it’s good practice for post meltdown survival gardening, and it’s fun. Following is a brief tutorial on how I start plants for my garden. Please note that this is not the last word on starting plants. There are many different ways to do this, one being just as good as the other. This is just the method that happens to work for me. To know when to start your seeds just look up the outdoor planting date in your area and start your seeds six to eight weeks before this date. So, let’s get started.
First you will need seed. This can be seed that you have saved or seed that you have bought. If it is seed that you have saved it must be non-hybrid. If you are buying the seed, it can be any kind; although I always recommend non-hybrid, heirloom seed so that you can save seed for the next growing season.
You will need pots to start the seeds in. There are many different kinds of pots to choose from. You can use peat pots, ceramic pots, terracotta pots, plastic pots, or little plastic multi-pot seed trays. I have even seen people who make their own origami pots out of old newspaper. The only thing that I would recommend about pots is that you use the smallest ones possible. A one or two inch pot is plenty big enough and it will make your potting soil go a lot farther.


You can make your own potting soil but I usually buy mine. A thirty pound bag of potting soil will last me three or four years and the cost is negligible, just make sure that you buy good quality potting soil. Cheap potting soil will be full of uncomposted bark and sticks the size of firewood. I buy Miracle Grow potting soil which is pretty fine and seems to work well. As soon as I open a bag of potting soil, I transfer the contents to a lidded five-gallon bucket. This keeps the potting soil from drying out and it is easier to use than digging around in a semi-torn up plastic bag.
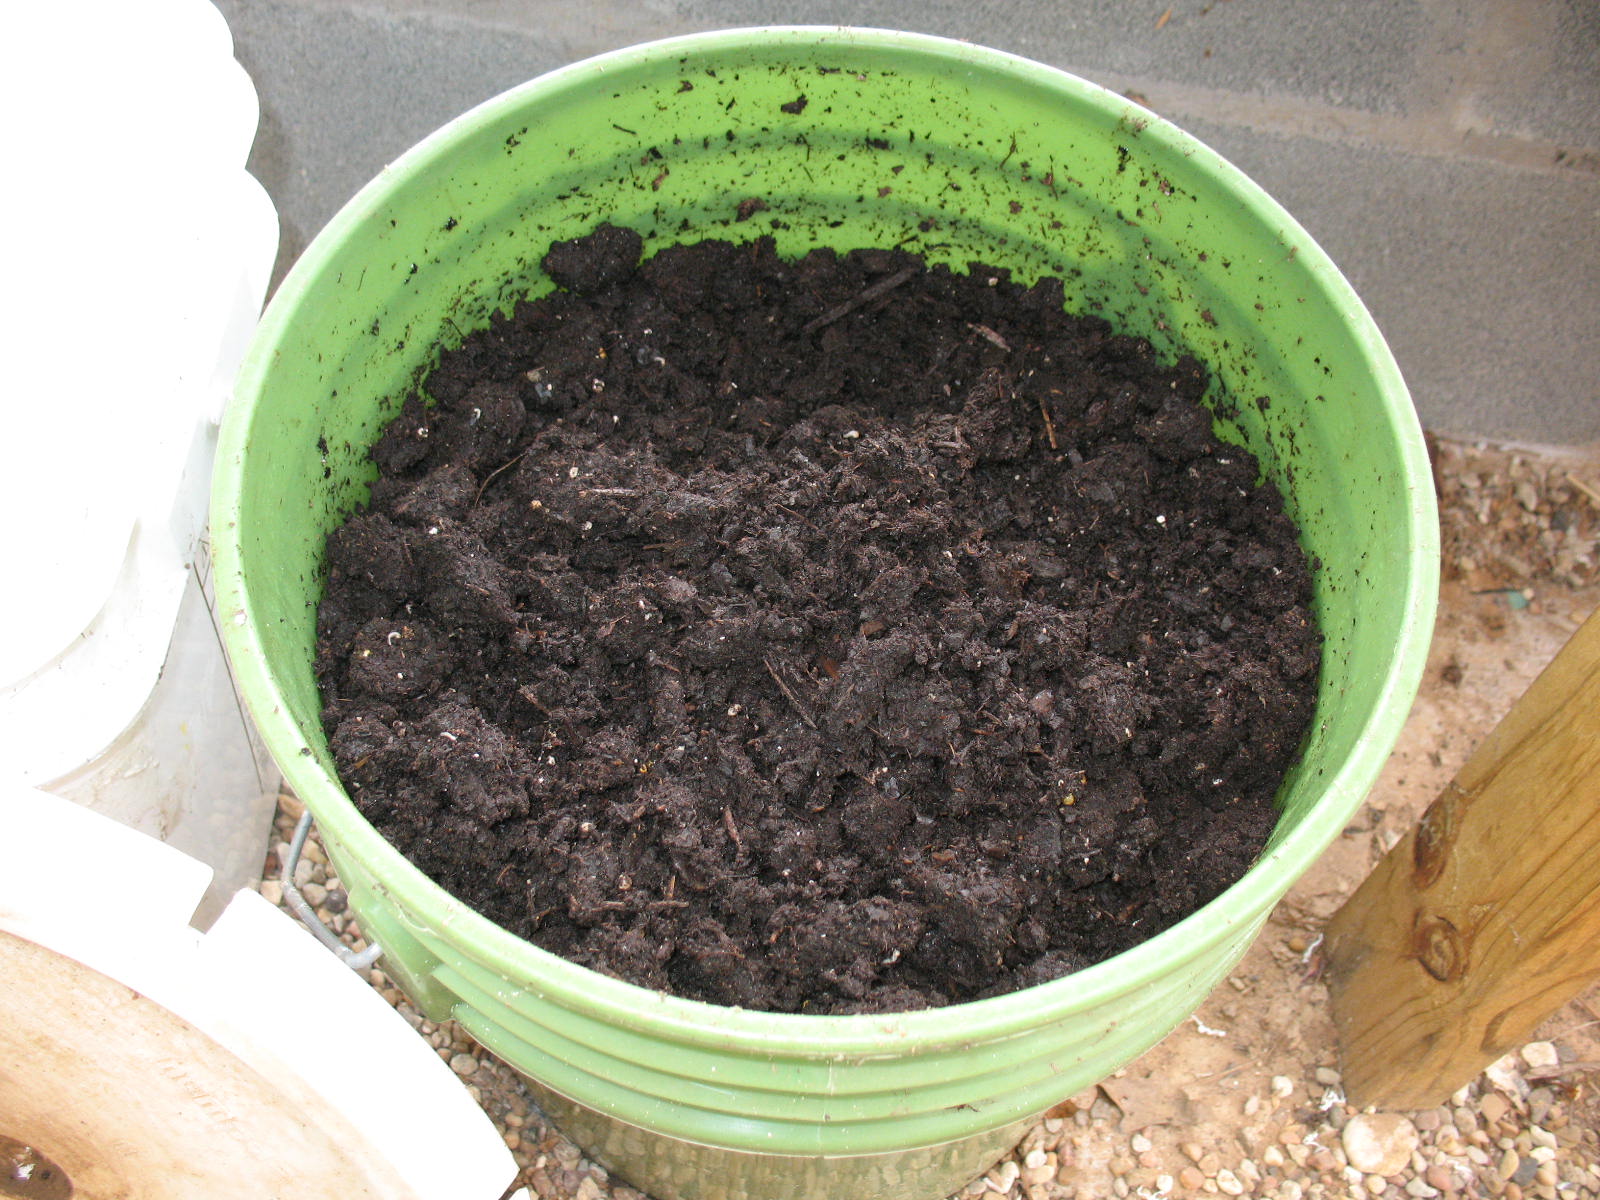
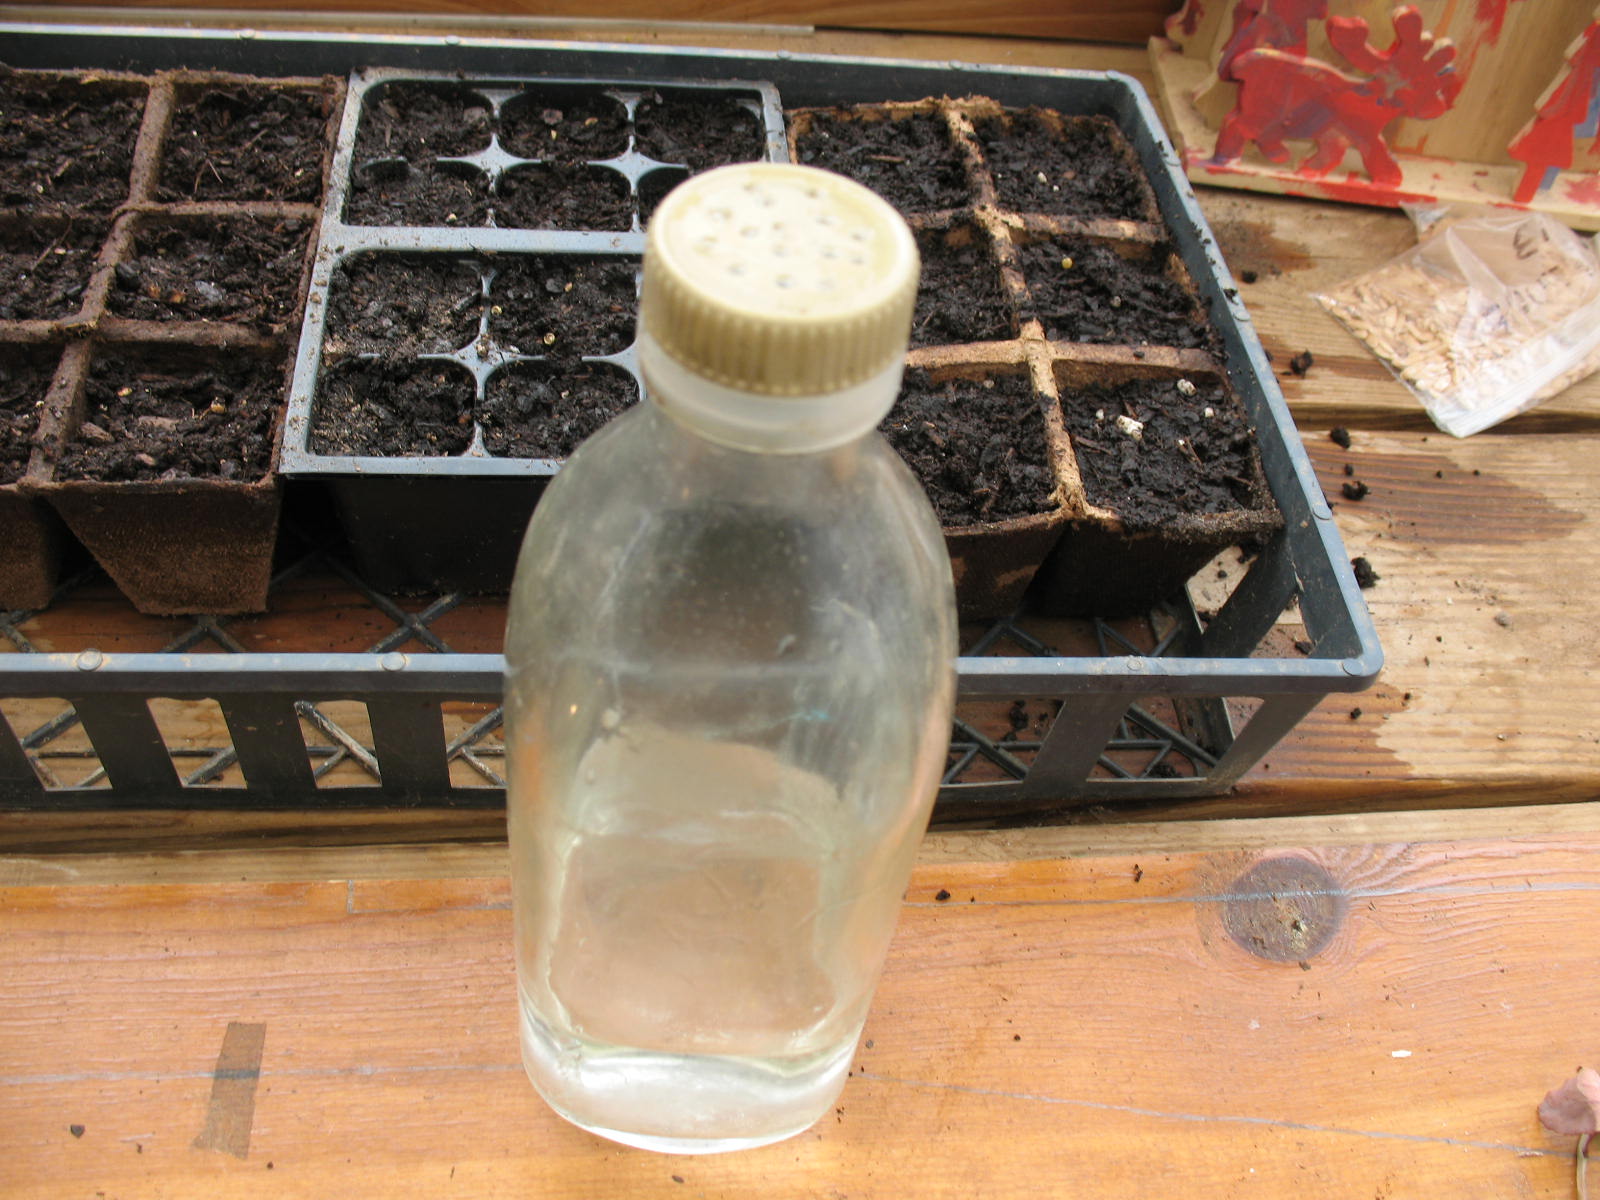
Start preparing your pots for planting a day or two before you seed them. Fill each pot with potting soil and press it down firmly, then top it off with some more potting soil and press that down.
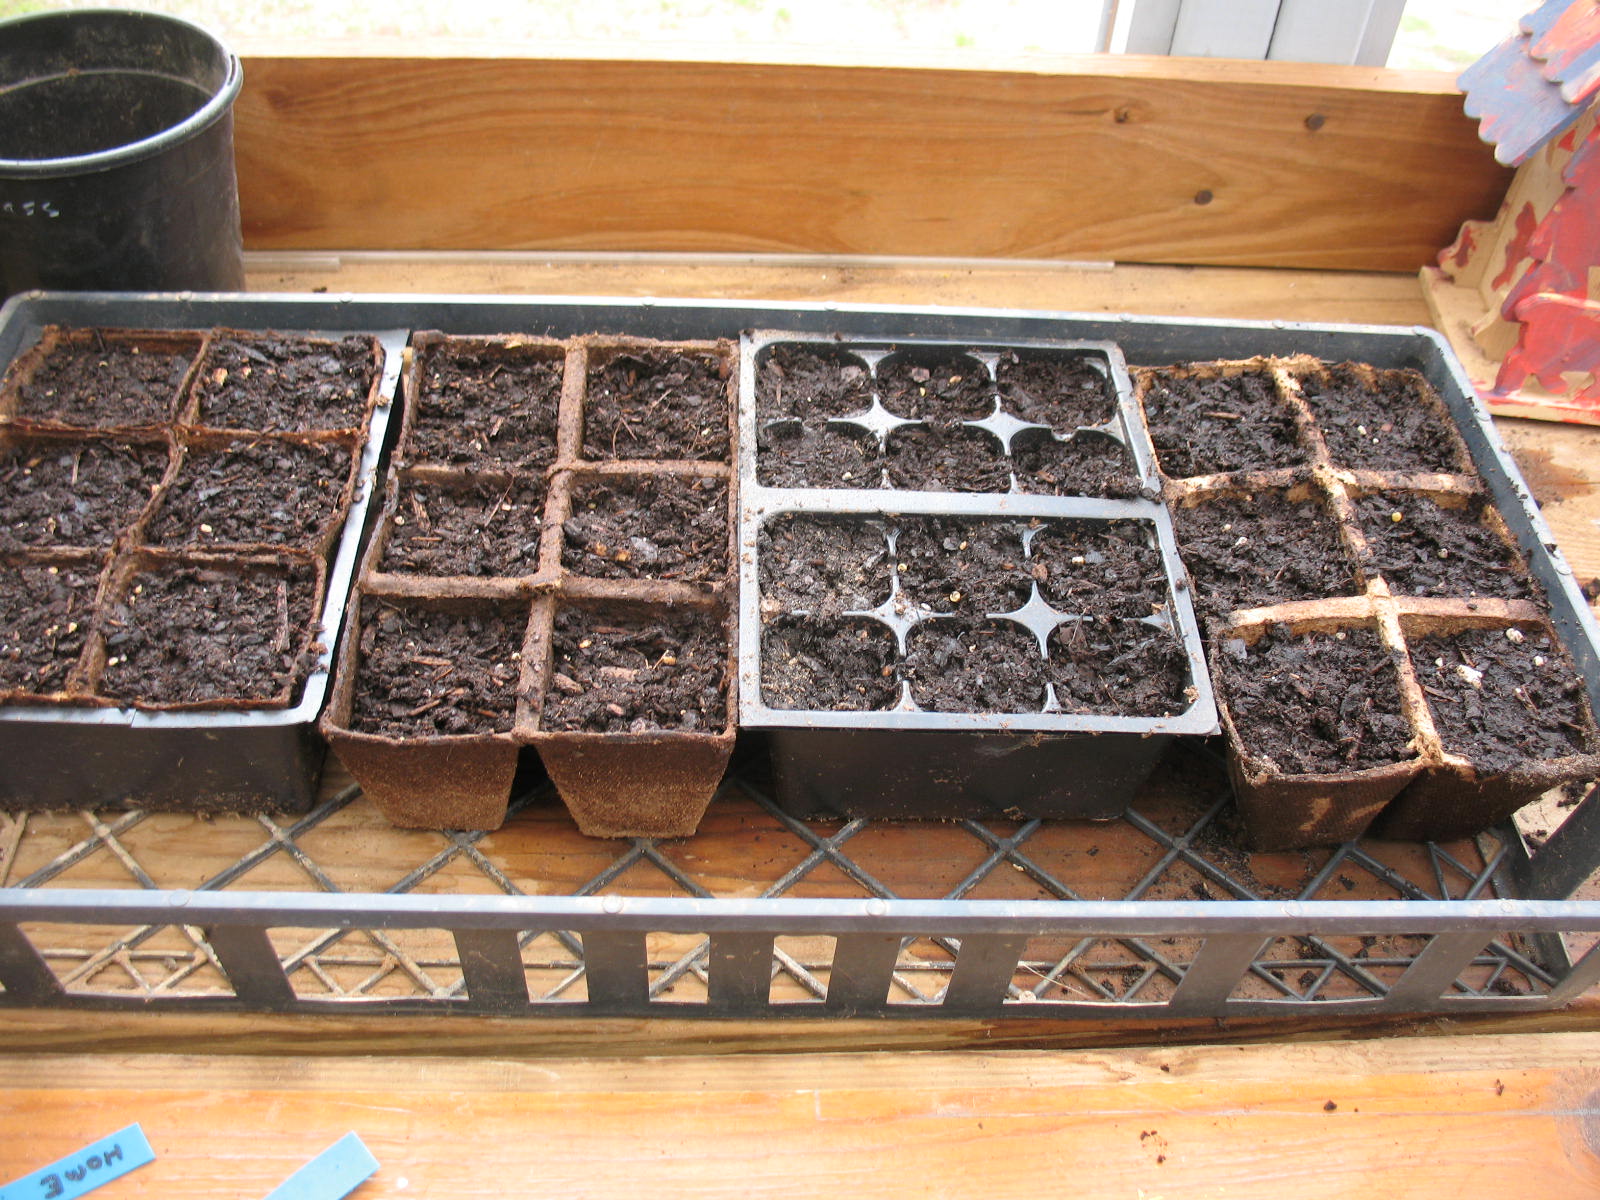
When your pots are all full, water them gently but thoroughly and allow to sit over night. I use an old vegetable oil bottle with holes punched in the top for watering. This tends to trickle the water onto the soil so that you don’t wash your seeds up after you’ve planted them.
The next day you can plant your seeds. I use a short piece of ¼” dowel rod to poke the holes. I make two or three holes, about a quarter inch deep in each pot.

I drop one seed in each hole.
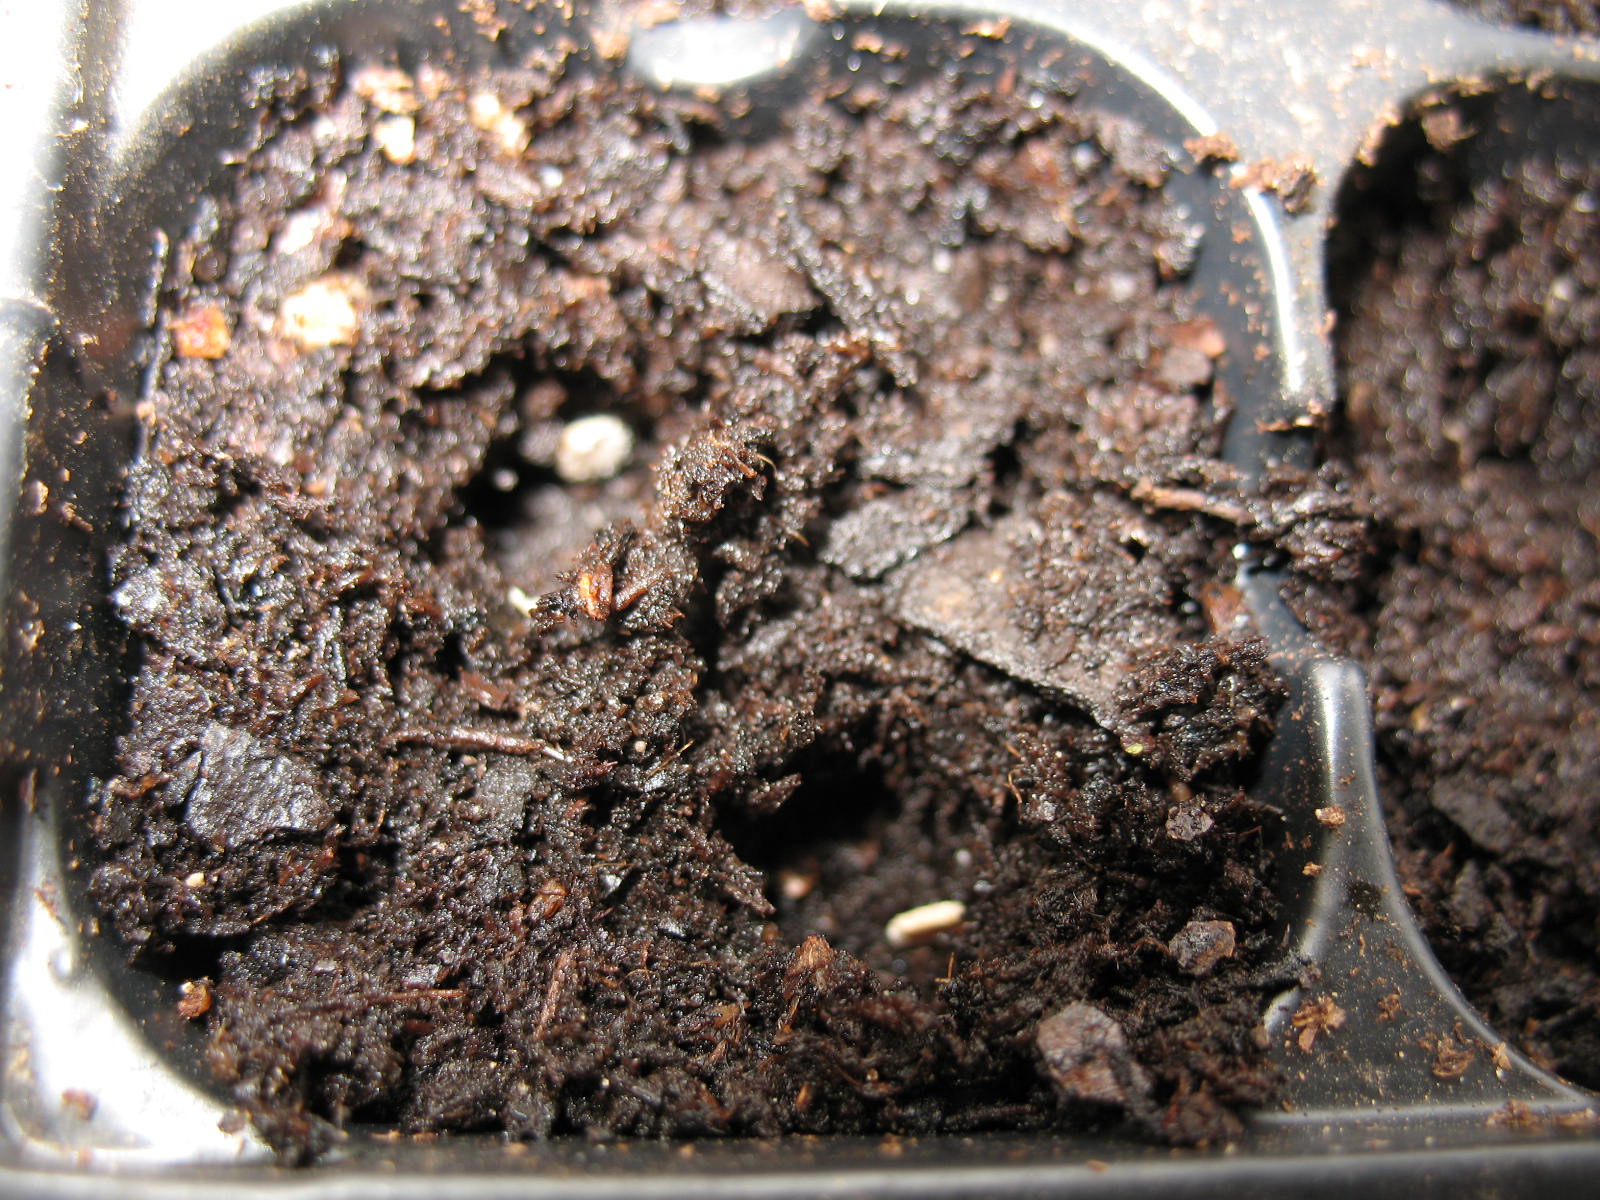
Then I carefully push the soil in on top of each seed and press the soil down gently with my finger tip.
Here’s a friendly piece of advice: make all the holes and put seeds in all of them before you start covering any of the seeds up. If you try and cover the seeds as you go, and if you are anything like me, you will end up double planting one pot and leaving another pot empty. I speak from experience on this.
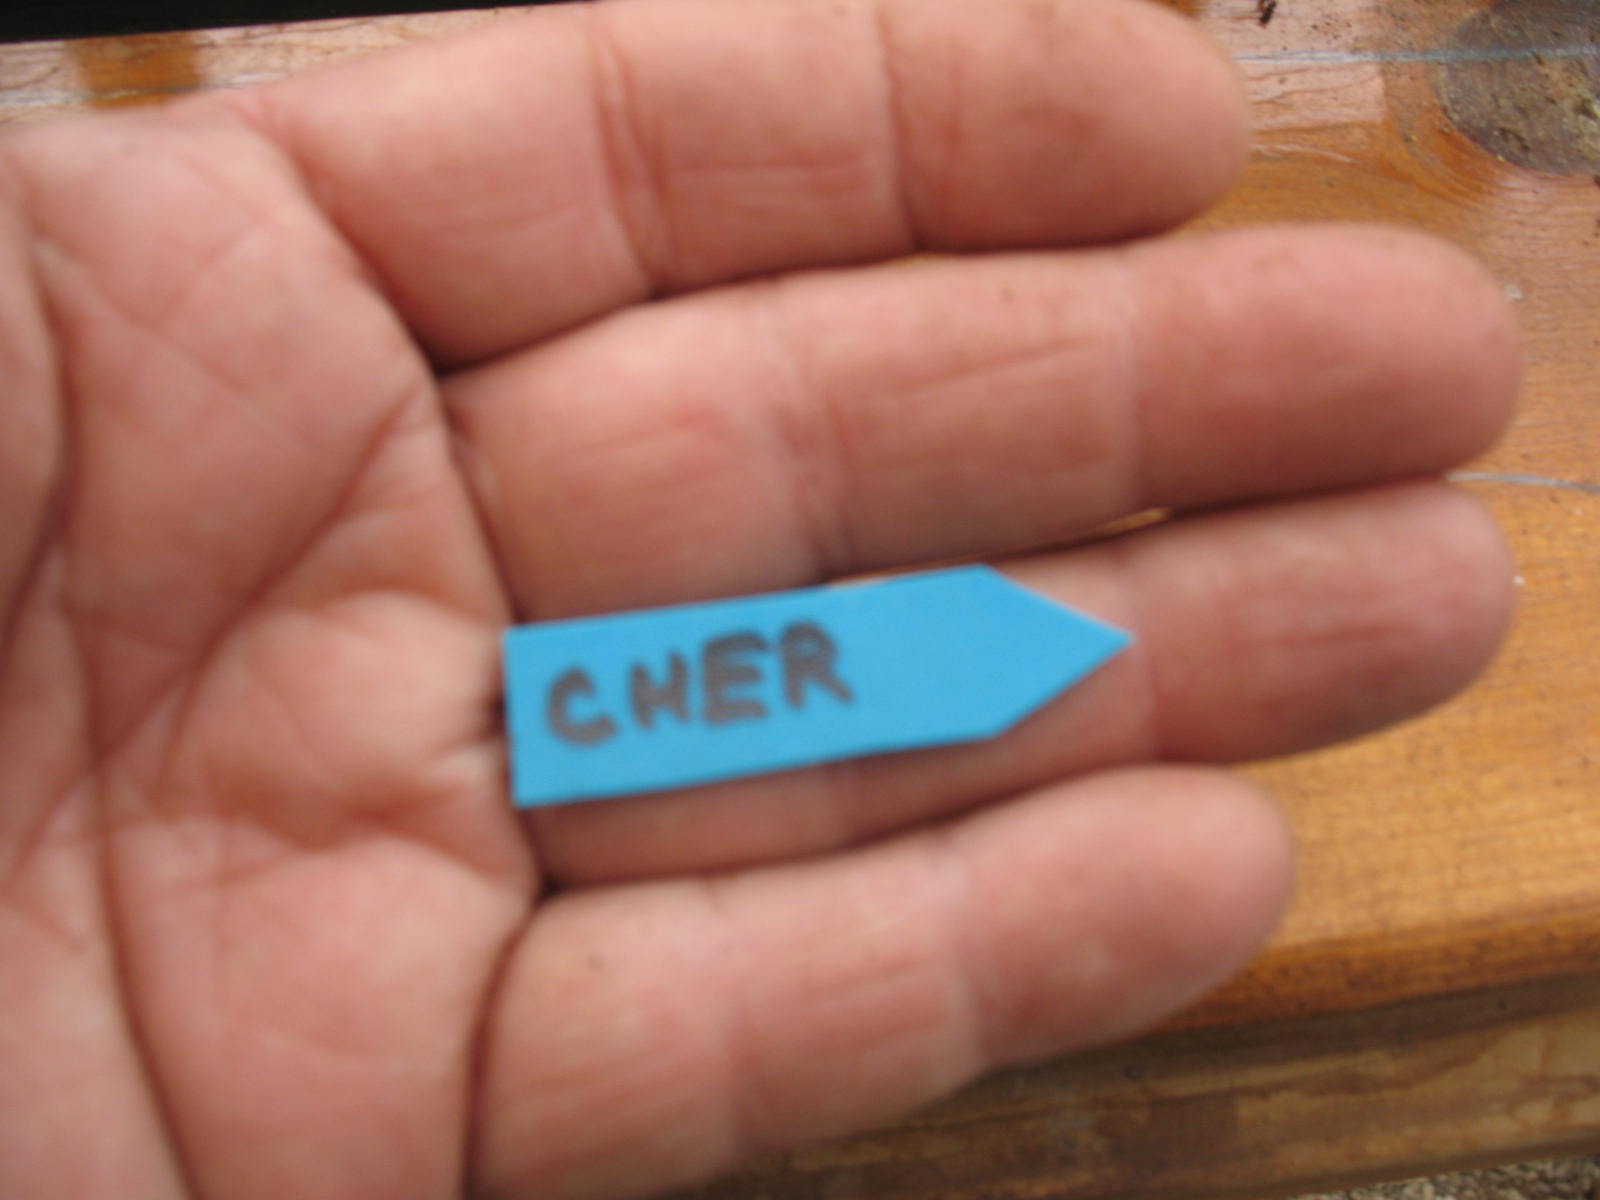
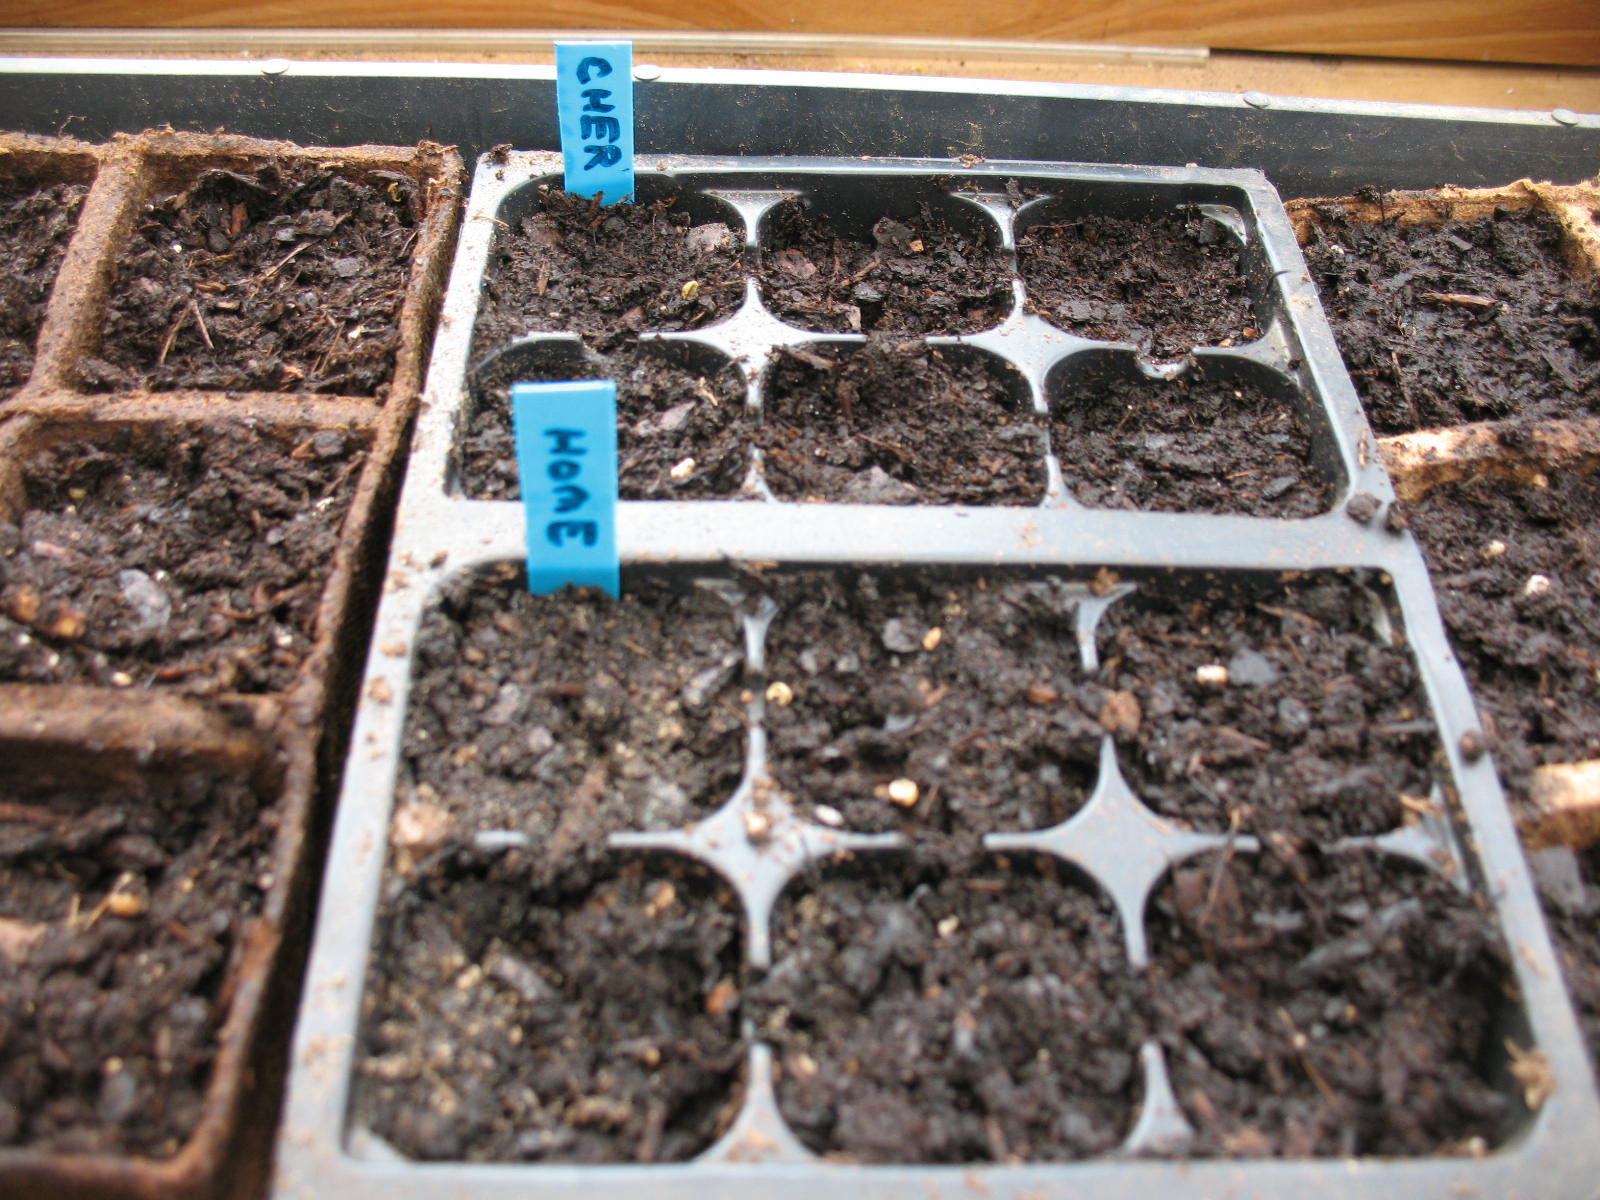
As soon as you have a set of pots planted, put a small marker in one of the pots to show what you planted. I use little plastic markers that I cut from an old loose-leaf binder and write the name on it with permanent marker so that it won’t wash off when I water. Don’t skip this step. You will forget what you have planted. Again, I speak from experience on this.
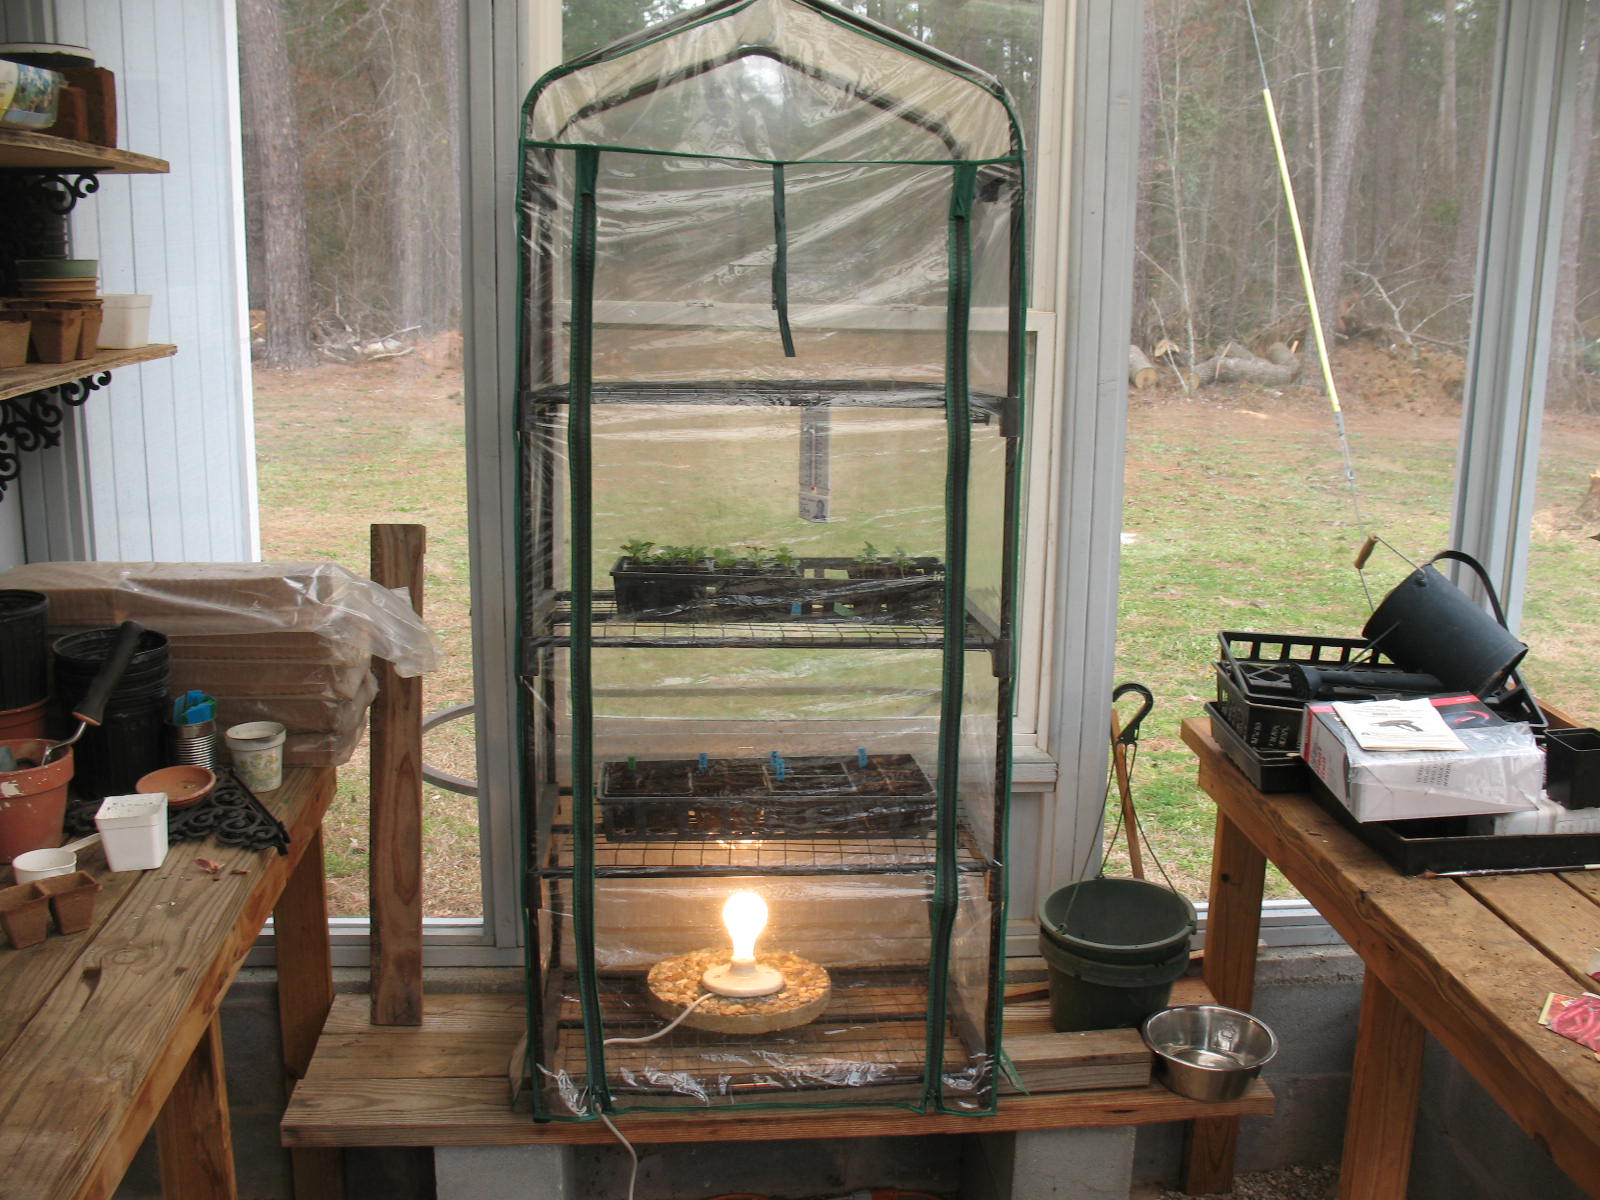
Now it’s time to start germinating. I am told that the ideal temperature for seed germination is around 80 degrees F. If the temperature is lower the seeds will still germinate, it will just take longer. As long as you keep them from freezing at night, you will be ok. You can set your pots outside if the day is warm, and bring them in and set them in a window if the weather is cold. You will definitely need to bring them in at night if the weather is cold.
I have an attached greenhouse but I never heat the whole greenhouse. Instead I use a small germinating tent inside of the greenhouse that I can heat at night with one light bulb. The tent consists of a metal framework with four shelves and a clear plastic tent that slips over the framework. It has a zipper front for easy access. I bought it on Amazon for thirty-five or forty dollars. One light bulb will keep it from freezing even when the outside temperatures are in the upper twenties. Colder than that and I bring the plants inside.
You need to check your seed pots daily and keep them moist. Don’t drown them; just trickle a little water in to keep them from drying out. Keep an extra close eye on peat pots as they seem to wick the water away faster than plastic pots.
Your seeds will usually sprout in about five to seven days, but don’t freak out if it takes a little longer. After the seeds sprout you will want to give them a little plant food about once a week. Some people mix slow release fertilizer in with their potting soil to avoid this, but I prefer to mix up a little Miracle Grow and water it in once a week. I know, this isn’t sustainable gardening; but one tablespoon of Miracle Grow mixes with a gallon of water, and I’ve been using the same little box on Miracle Grow for about five years now, so it’s pretty close to sustainable for me. I’m sure that there is an organic alternative to Miracle Grow if you want to go that route.
When your seedlings are about an inch tall you will need to remove the two weakest ones from the pot (this is assuming that you planted three seeds and that they all germinated).
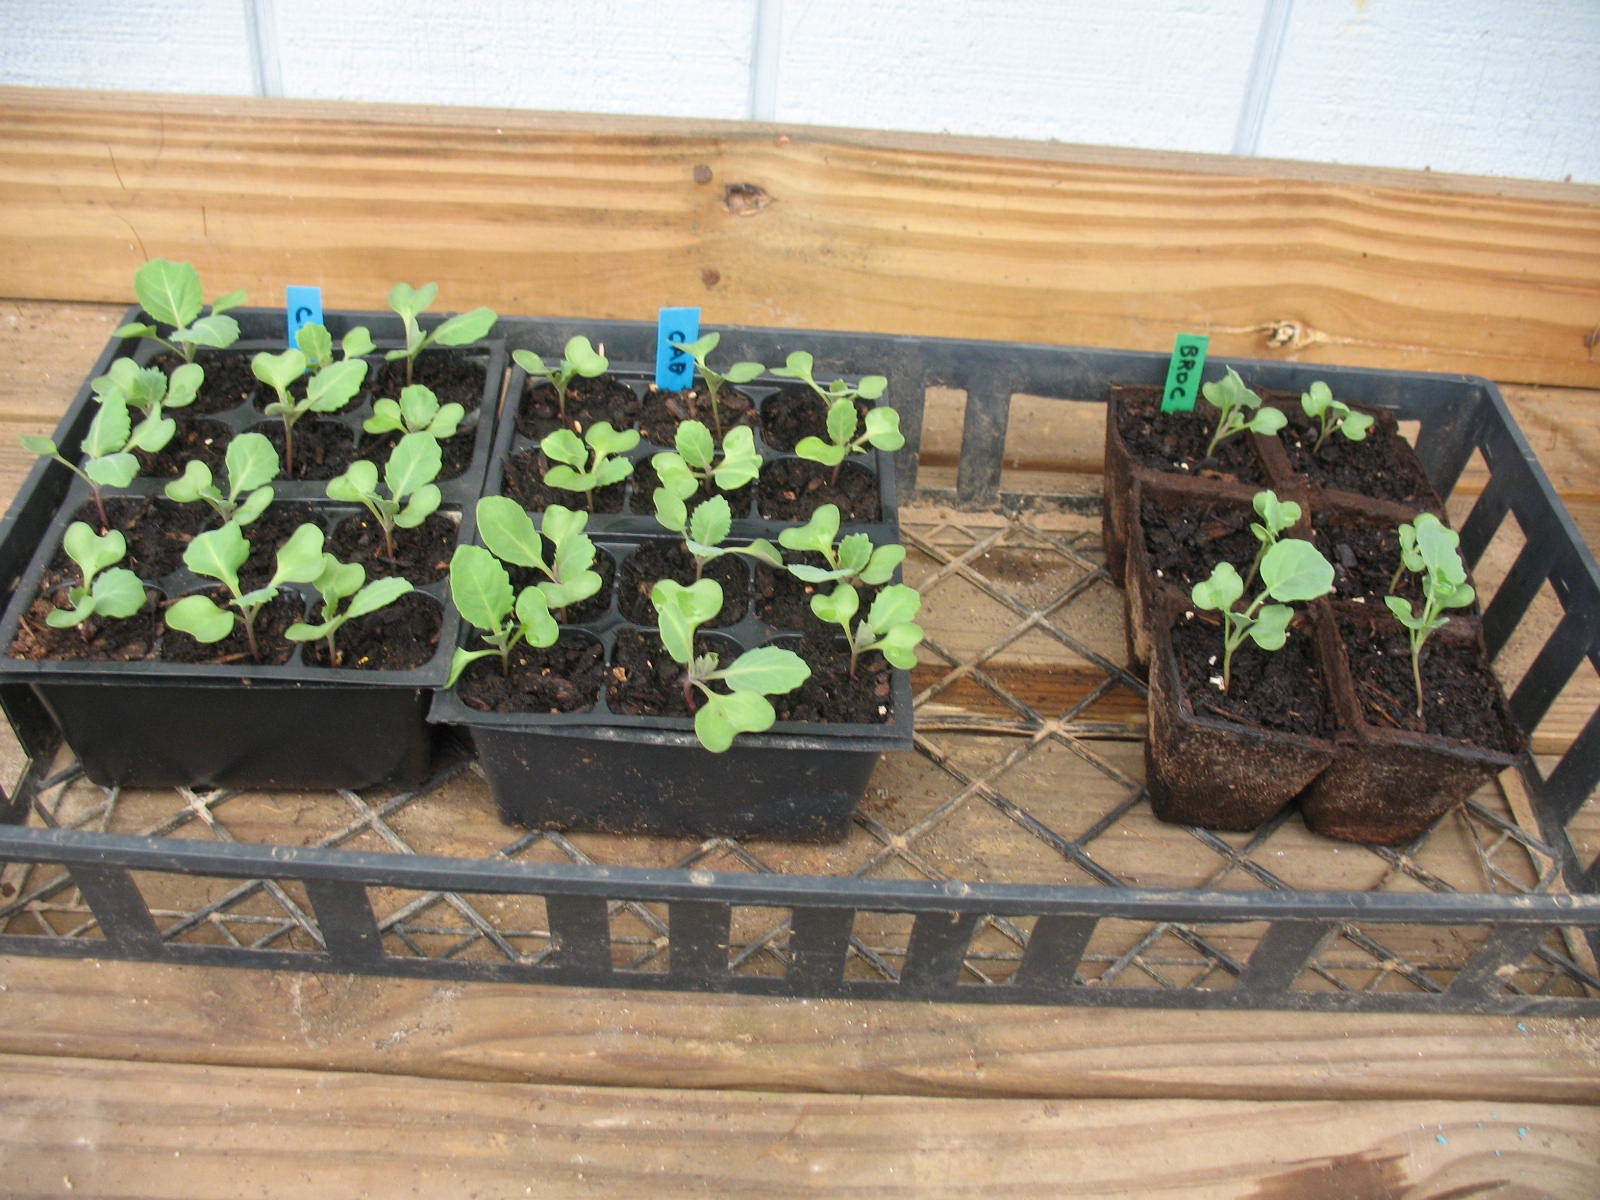
When the plants are six to eight weeks old they can be planted in the garden. I usually take the seedlings out of the germinating tent and leave them in the unheated greenhouse for a couple of days to harden them off a little. I try to plant them in the morning so that they will have the benefit of a day in the sunshine to get used to their new climate.
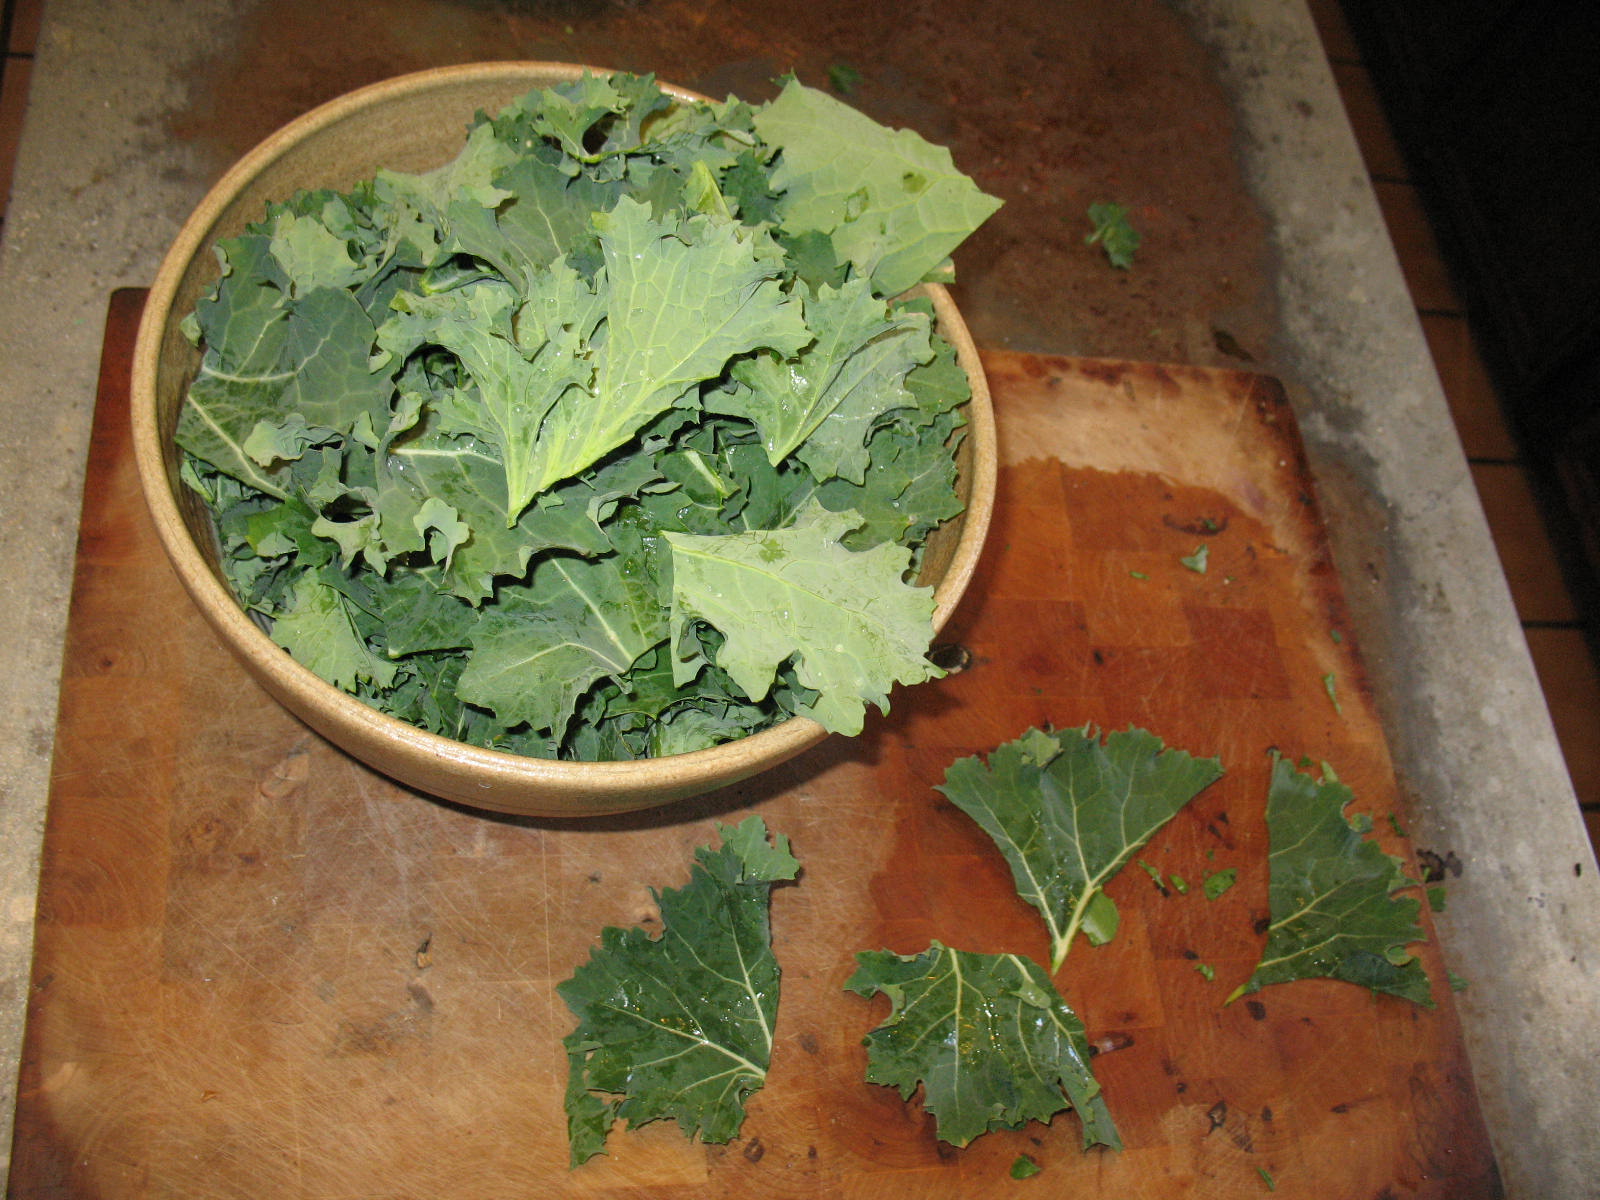
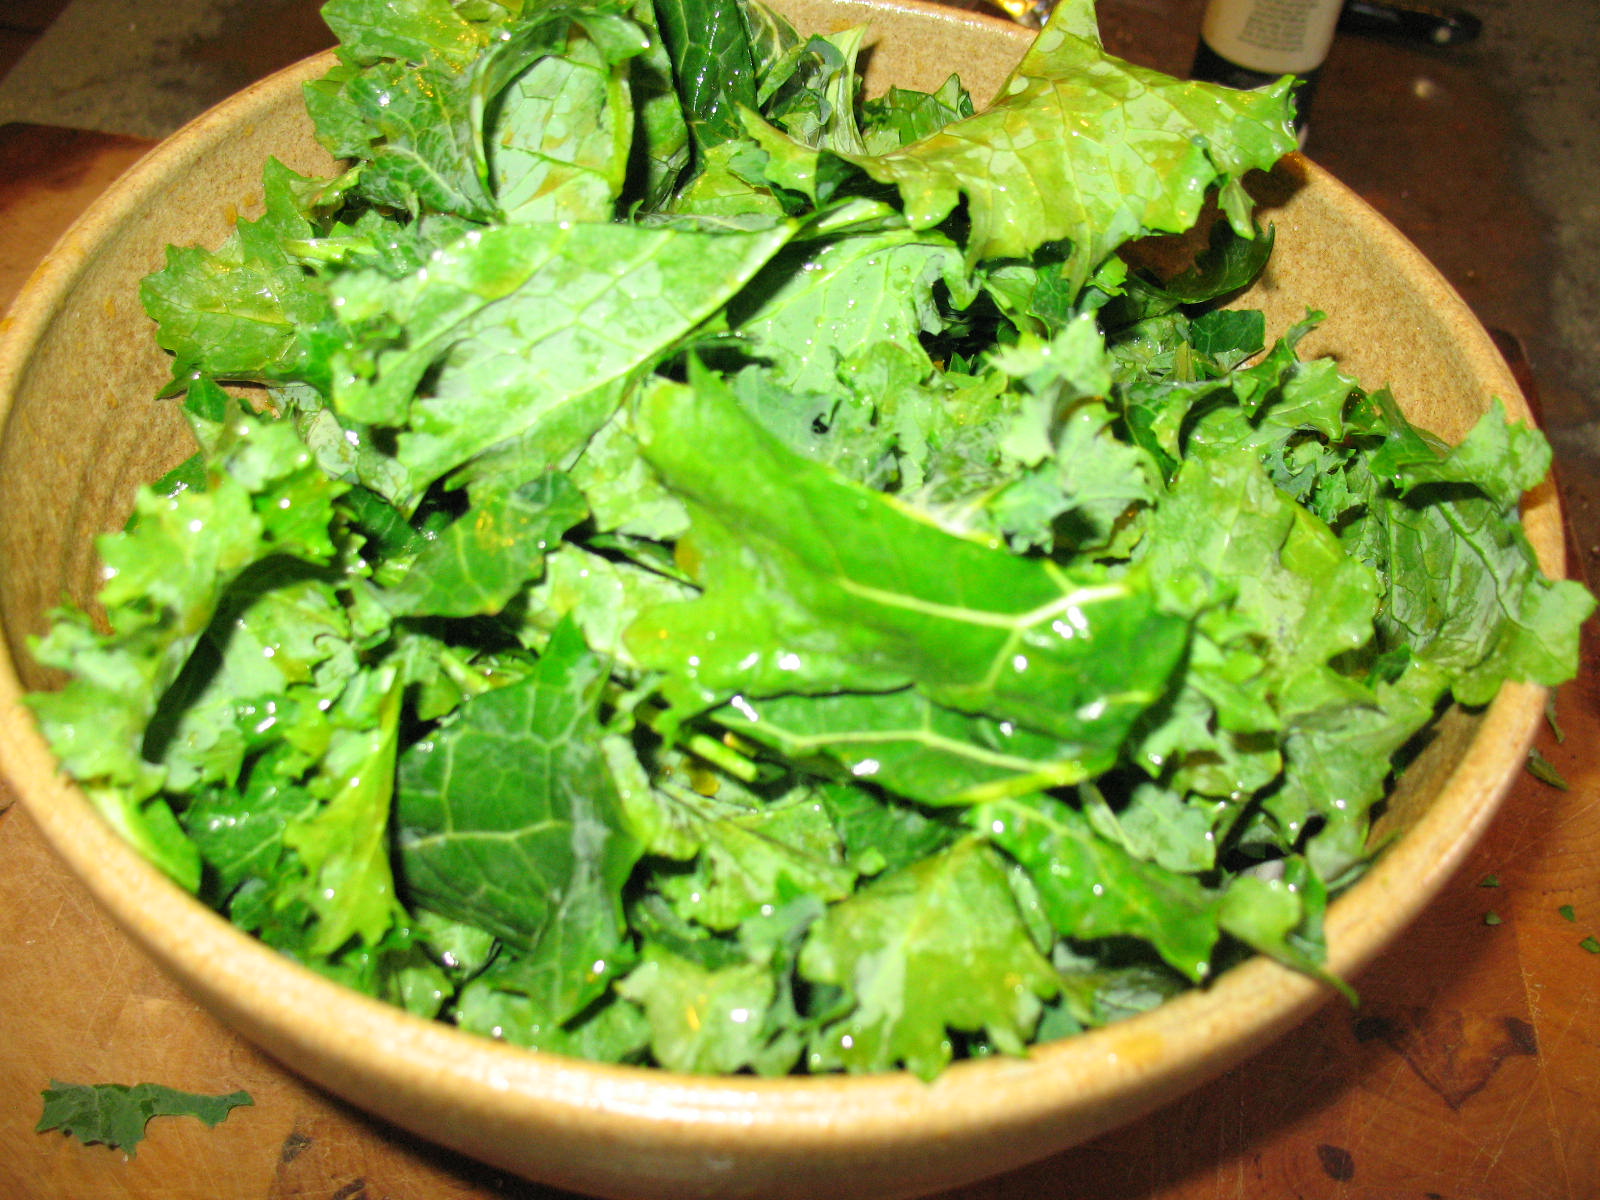
These days, many people are looking for healthier alternatives to some of the snack foods that we have been eating for years. I have found kale chips to be a great substitute for the potato chips and corn chips that I used to eat with my lunch. Kale is an amazing plant. In my part of the world (East Texas) it will grow year round. Kale is very low in calories, has just a tiny bit of fat, and no cholesterol. It is loaded with vitamin A and vitamin C, and it supplies a good amount of vitamin B12, calcium, iron, and magnesium. Kale is a little pricey at the grocery store, but if you have a little space, it is easy to grow. It’s such an attractive plant that you could grow it in your flower beds, and even the snootiest neighbors wouldn’t complain.

To turn your kale into tasty chips is simplicity itself:
First cut and wash a bunch of kale. Then cut the kale into chunks and place it in a bowl.
I season my kale with soy sauce and garlic. I use a quarter cup of soy sauce and three-quarters cup of water, and mix in a teaspoon of garlic powder.


Pour this mixture into your bowl of kale, and then hand toss the kale until it is evenly coated with the mixture.
Load your dehydrator with the kale (I use a Nesco counter top dehydrator) and turn it on. If you don’t have a dehydrator your can use your oven. Just set it very low; less than 200 degrees F. and prop the oven door open.
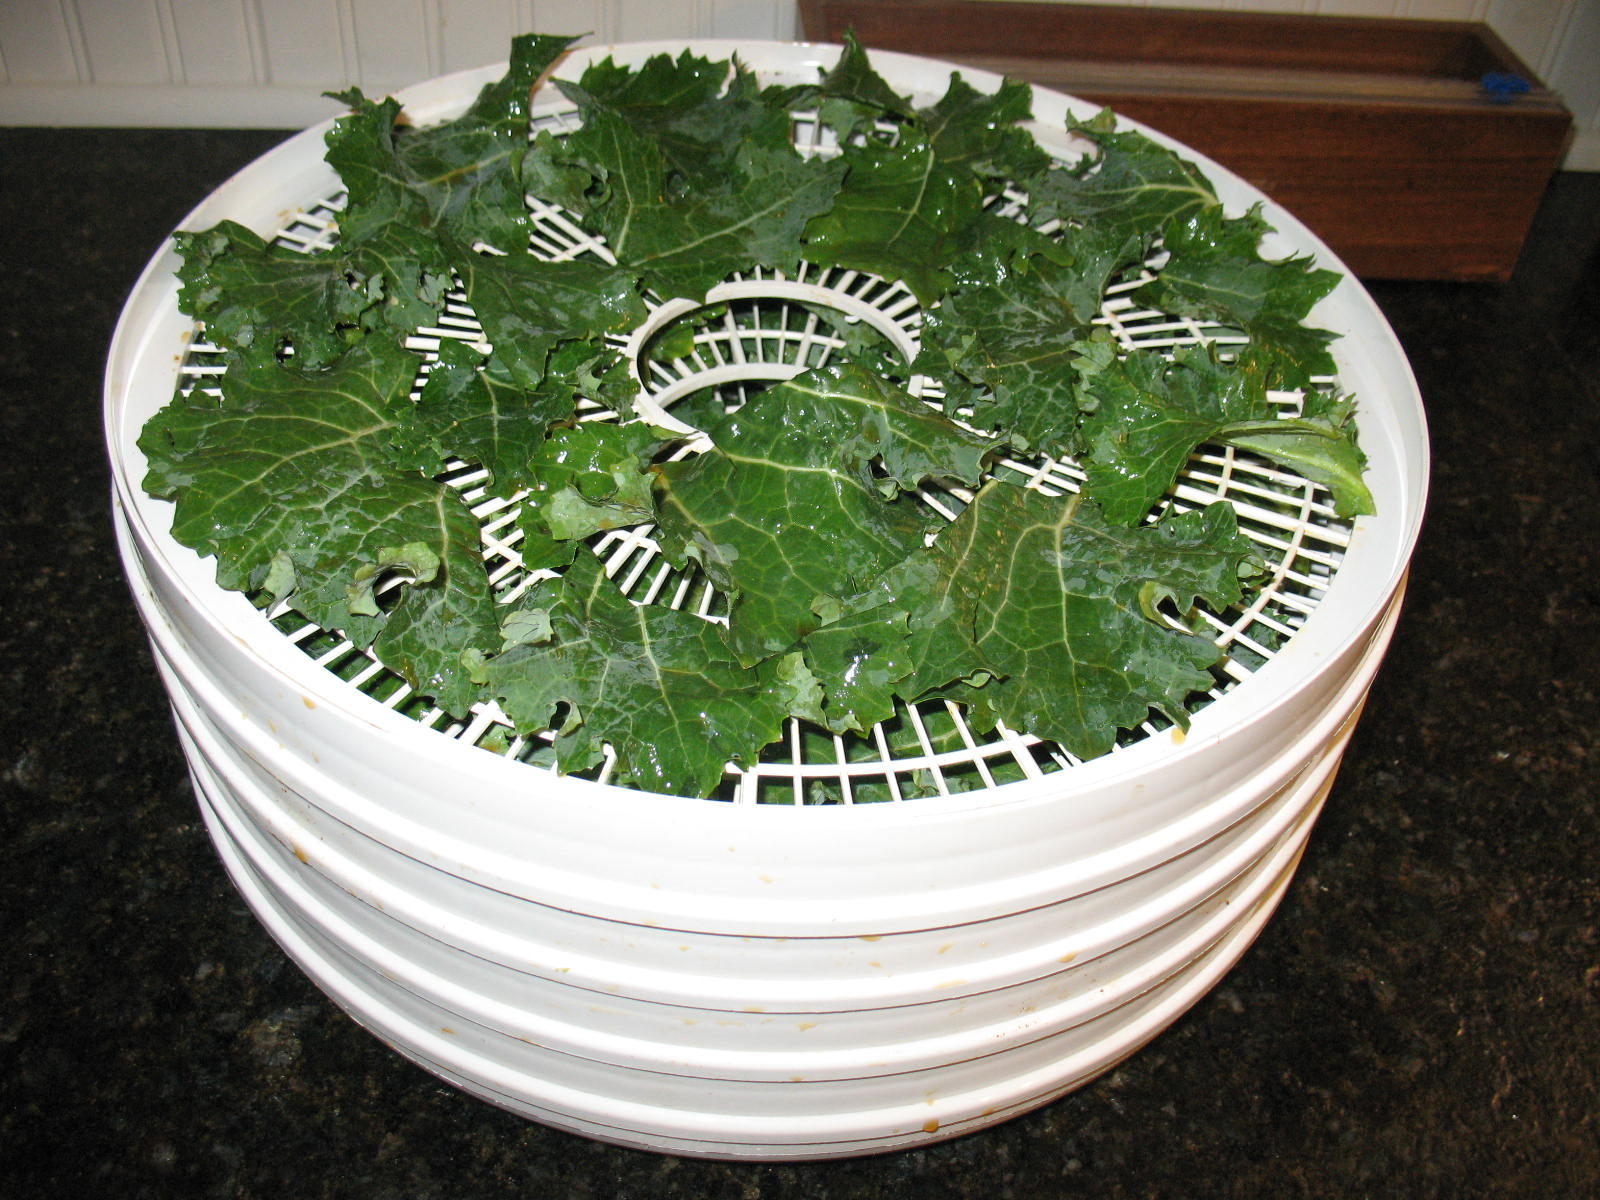

Keep an eye on the kale as it will dry quickly. My dehydrator takes about an hour and a half.

When the kale is crispy-dry, turn off your dehydrator and let the kale cool. Place it in an airtight plastic bag and start snacking.

I, like most people I know, plant my onions from sets that I buy at the feed store. You can start onions from seed, but it’s much easier to buy the small bunches of onions that are about five or six inches tall and just stick them in the ground. Here in East Texas we plant onion sets around mid-February. My dad always planted onions and potatoes on Valentines Day. The problem is that onion sets are already in at the feed store, but it won’t be time to plant them for about three weeks. The onions will still be at the feed store three weeks from now, but they will be pretty dried out and not nearly as prime as they are now. So, what I do is go ahead and buy my onion sets while they are good and fresh; and then I heel them in until it is time to plant.

“Heeling in” is a temporary planting so that the plants will be able to draw nutrients and moisture from the soil while they await a final planting location. The heeling in process is very simple and only takes a few minutes. All you have to do is go out to your garden and dig a shallow hole. For onions I dig down about two inches.

Then you place the still bundled onions all together in the hole. Just stick the bulb portion underground and leave the greens sticking up.

Drop dirt around and in between the bundles and firm it down gently.
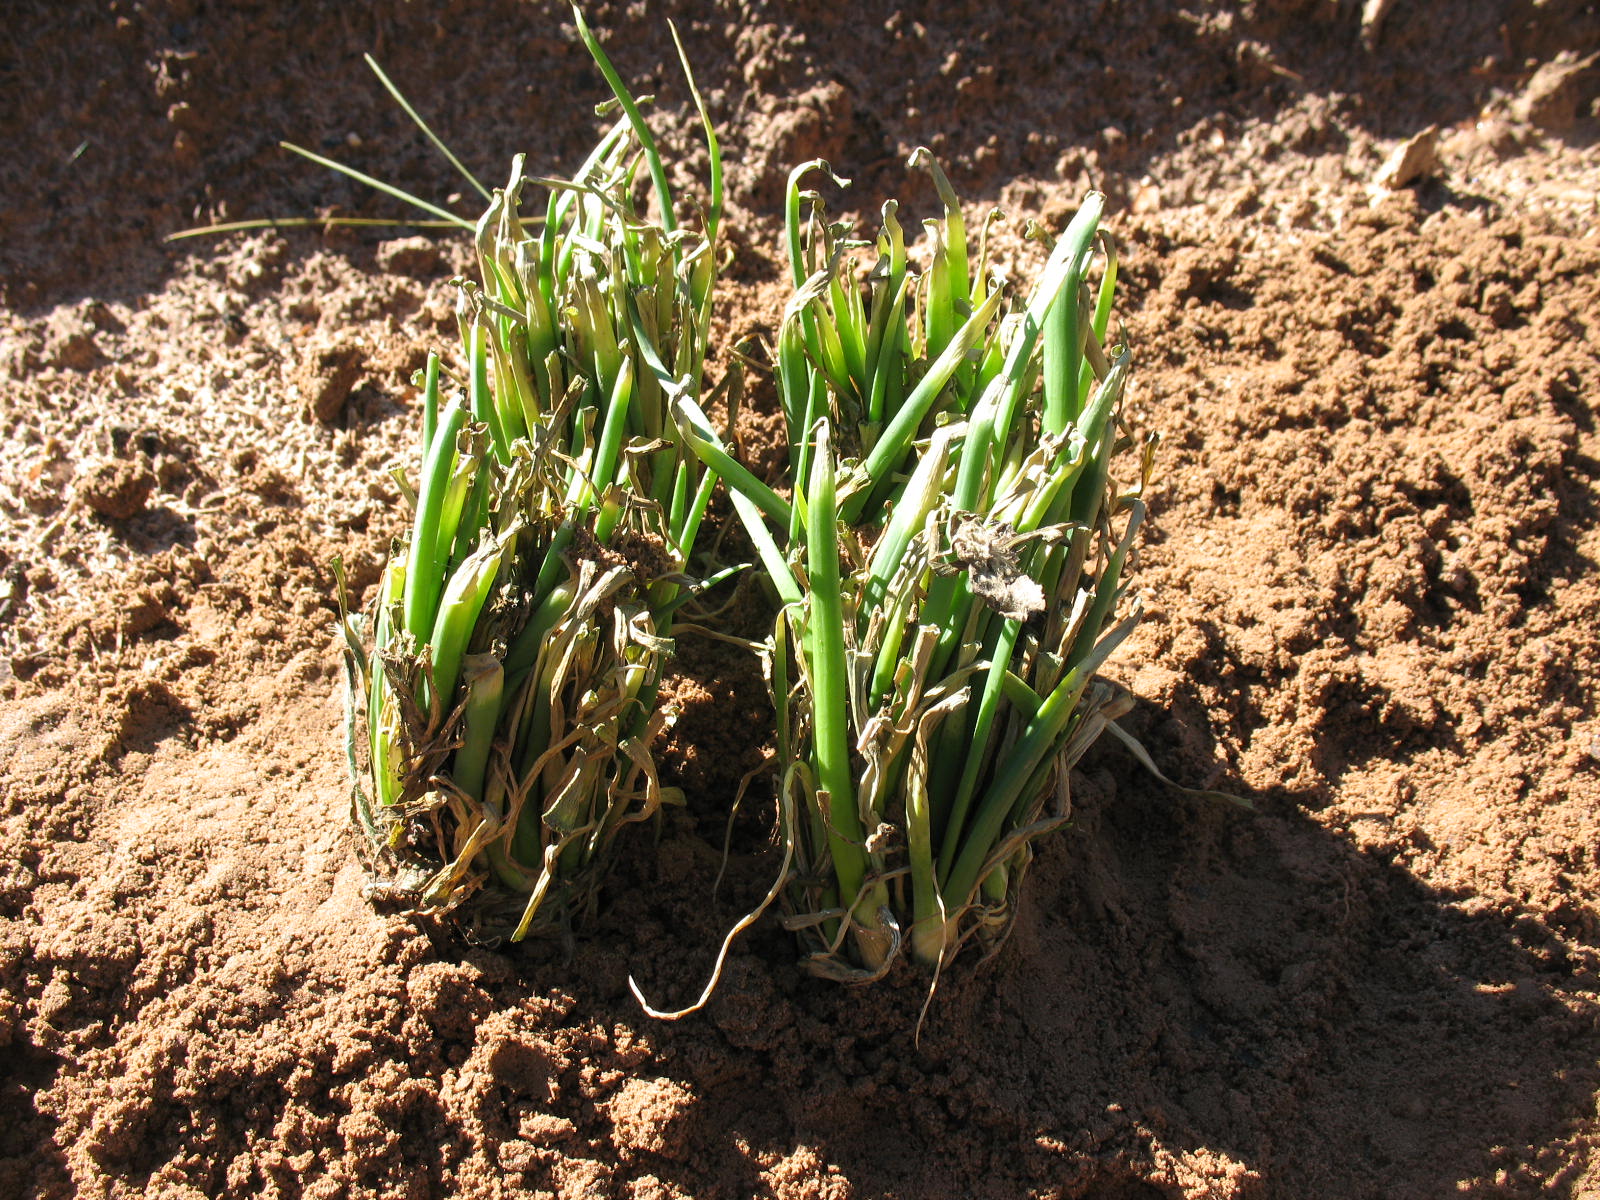
Water lightly, and you are all heeled in.
“Well Hank,” you say, “If you’re going to do that why don’t you just go ahead and plant the onions?” Good question; and I have a good answer. You see, I don’t want my onions to be caught by a hard freeze. Onions are pretty frost tolerant, but if they catch a hard freeze the tops may die back. The bulb will sprout again but you’ll end up with that little dead ring in the middle from the killed top; and that dead ring can be the beginning of a rotten onion if you are trying to store them for a few months.
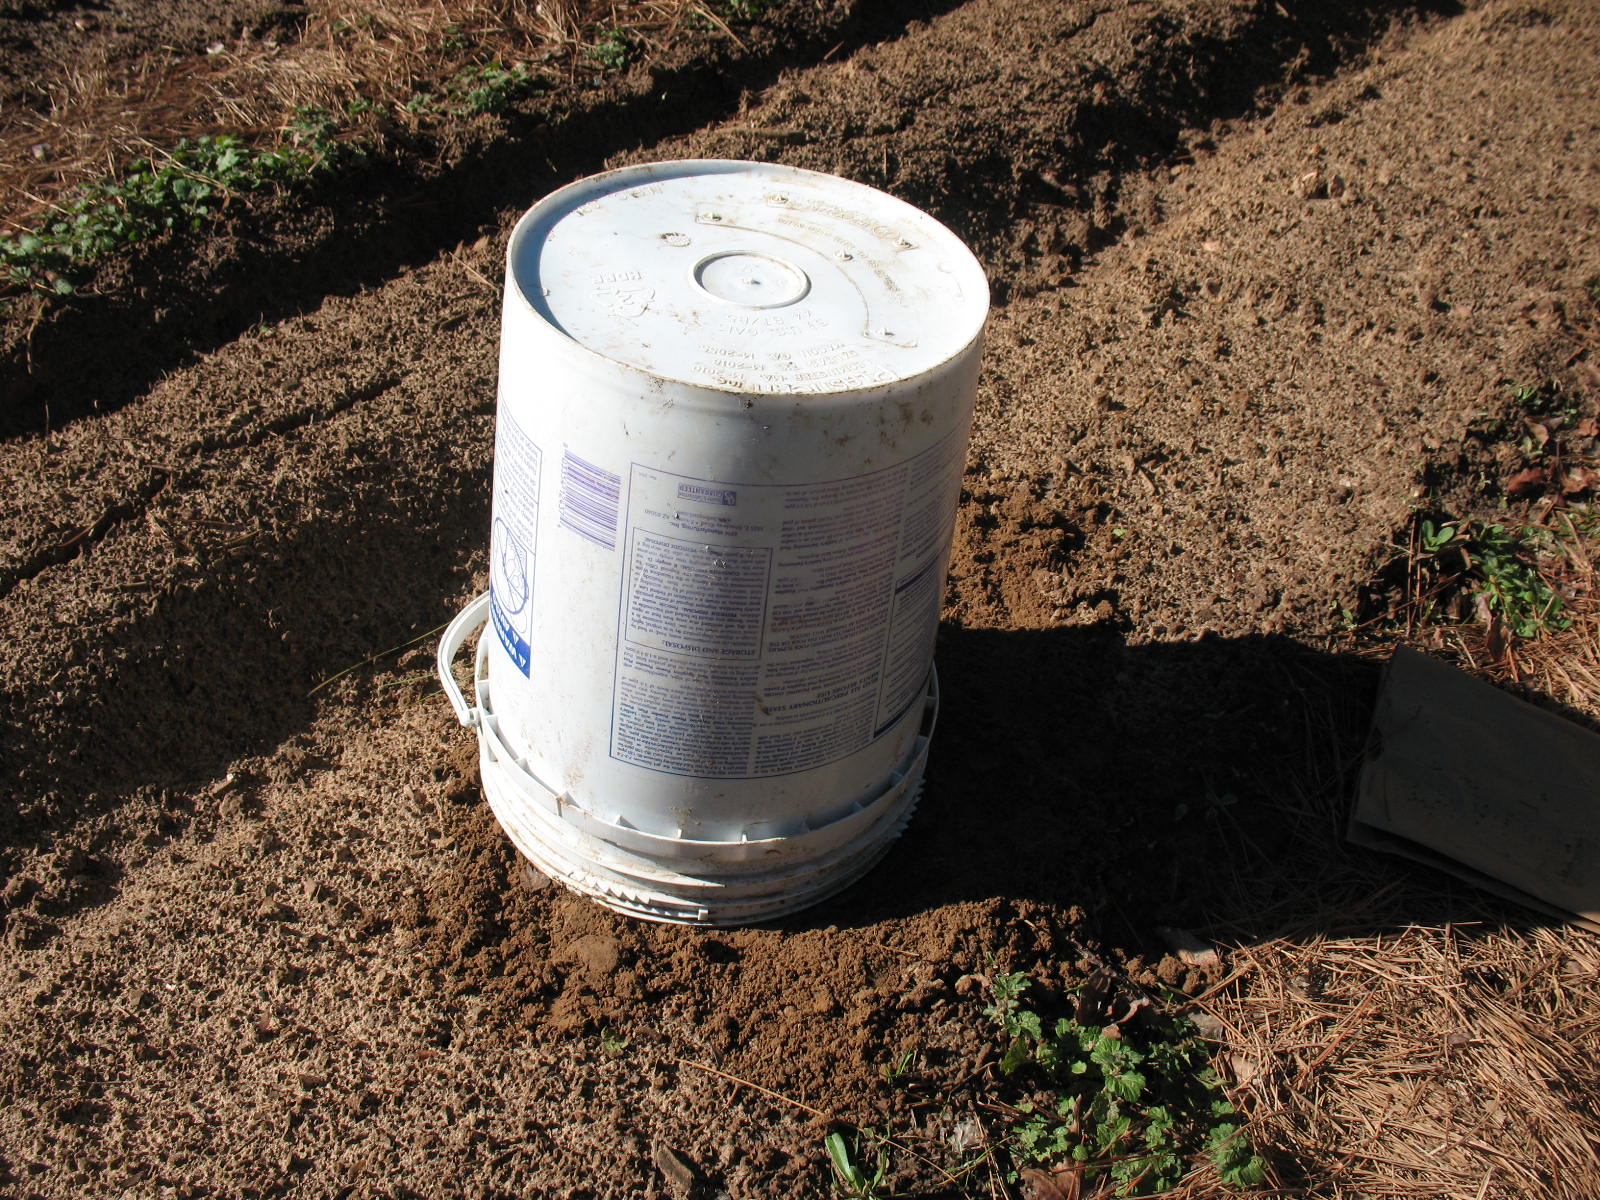
Now I know that those people going through a blizzard up in Boston may have trouble believing it, but winter is almost over here in East Texas. We might get a hard freeze in the next three weeks, but by mid-February the wild plum trees, what we call hog plums, will be blooming. After that time we generally don’t get a hard freeze, and by the second week of March we’ve usually had our last frost. So all I have to do is get my onion sets through about three weeks and then I can plant them. By heeling them in all together in one location, I can throw a little pine straw on top of them and cover them with a five gallon bucket if we do have a freeze. This is the method I use to cover my outdoor faucets during a freeze, and they have weathered temperatures in the teens with no problem. The freezing temperatures rarely last more than a day or two, and the ambient heat from the ground, along with the heat produced by the decaying pine needles, will keep my onion sets (and faucets) from freezing.
 On Valentine’s Day I’ll pull my nice fresh, healthy onion sets; separate the bundles, and give them a semi-permanent home in my garden.
I was straightening up my shop the other day when it occurred that I had made a major omission in my long-term survival preparations. I had never given much thought to nails, screws and other fasteners. Anyone who lives in the country probably has a pretty good collection of fasteners. It’s really kind of a necessity.
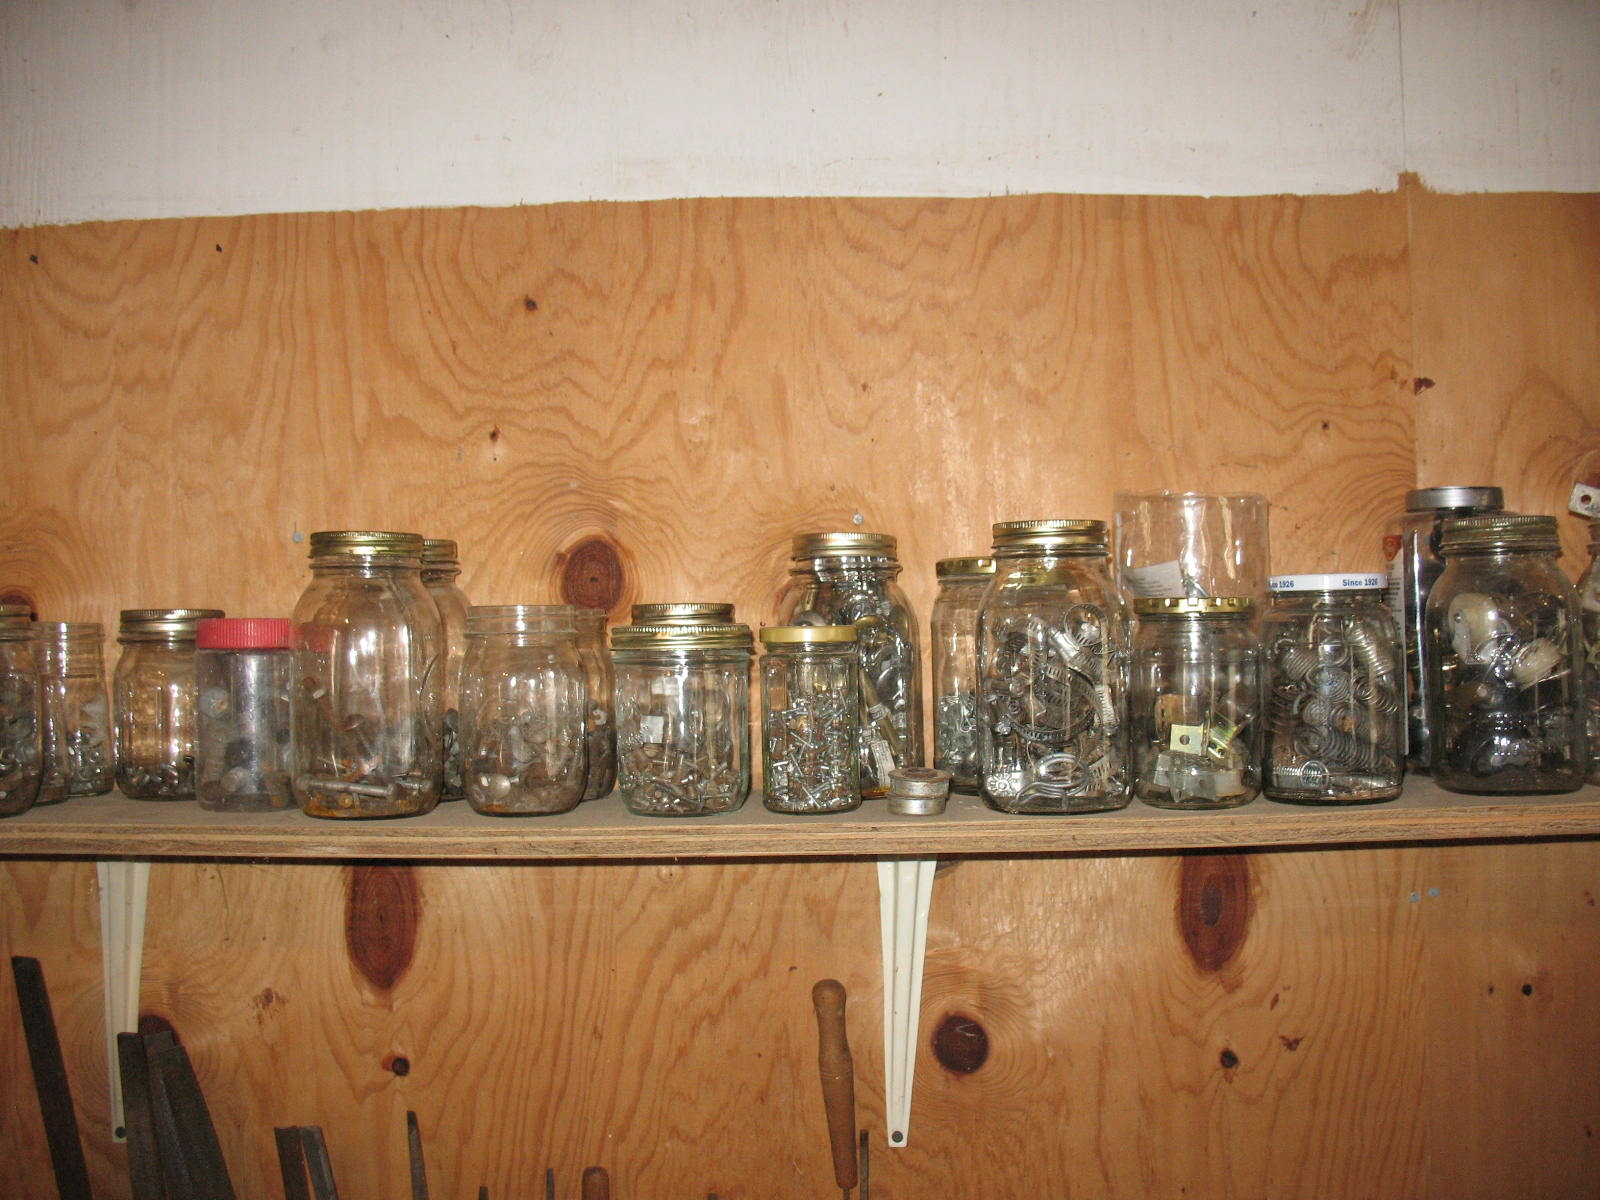

On a farm, things are always getting built or repaired, and nothing is more frustrating than to be in the middle of a project and to have to stop and drive 10 miles to town to buy 89 cents worth of screws. So it’s natural for country people to keep a collection of odds and ends that they may need. On my farm, nothing ever gets thrown away without first removing the screws or nuts and bolts and putting them in a jar. I know that this can save me time and gasoline in the future. But think about a world where there’s no hardware store to drive to. Think about having to build a shed or make a repair on your house without any nails. It can be done, but boy is it a lot of work.
In the 1700’s and on up into the 1800,s the most expensive items used in building the average home were window glass and nails. Nails were handmade by a blacksmith and when you pulled one out of a board, you sure didn’t throw it away. You straightened it out and put it is a can or a jar for later use. Today, we’ve all gotten spoiled by the cheap prices of manufactured items like nails. We don’t think about the amount of work that goes into producing nails if they have to be made by hand. So, do yourself a favor and lay in twenty pounds of nails in various sizes. They don’t cost much now, but they could be worth their weight in silver if things go bad.
