Most of us today have rigidly entrenched habits of personal hygiene that simply won’t be tenable in a post-apocalyptic world. Many of the personal hygiene products that we use will no longer be available, and to continue our current lavish use of hot water would be labor intensive in the extreme. That’s the bad news. The good news is that a lot of what passes for personal hygiene these days really has nothing to do with hygiene but is really just unnecessary beauty treatment. I’ve done some thinking about this and tried to imagine what would really constitute necessary hygiene under potentially adverse conditions. Some of the circumstances I envision are as follow. (1) You won’t be able to run to the drug store and buy personal hygiene products; (2) medical help will be anywhere from scarce to non-existent so disease and injury preventing hygiene will be very important; and (3) obtaining and heating water will be a lot of work. So let’s think about what we need to start doing, what we need to continue doing, what we need to do but not do as often, and what we can do without.
Dental Hygiene
This will be an absolute necessity. An abscessed tooth that would be a 45 minute visit with the dentist today, could be a death sentence if no dental care is available. I don’t even want to think about having a tooth extracted without some sort of dental anesthesia. So brushing after every meal and flossing will be more important than ever. By the way, you can buy dental floss in bulk for way cheap. 200 yard rolls cost around $2.50.
Hand and Foot Care
First of all, hands and feet should be protected from injury. Closed toe shoes should be worn at all times, and steel toe work boots should be worn for nearly all outdoor tasks. No bare feet!! It may work okay for Cody Lundeen or Amazon tribesmen, but it is foolish for the rest of us to risk a cut that could become infected when all we have to do is put our shoes on. Feet should be washed daily and clean socks should be worn every day. Toenails should be kept trimmed straight across to avoid ingrown toenails.
Hands should be washed before every meal and immediately after handling any material that may cause bacterial infection. Work gloves should be worn when performing any task that could cause cuts or abrasions. Nitril gloves should be worn when processing game or handling any kind of decayed material or human or animal waste. The thing that we’re trying to avoid here is infection. The tiniest cut can become infected, and without antibiotics that could mean death. U.S. President Calvin Coolidge’s son died in 1924 from a blister that he got while playing tennis. The blister became infected, and since antibiotics had not yet been developed, he died. Enough said?
Bathing
The fact is that most people bath too often. Bathing too much washes away natural oils and friendly bacteria that help protect the skin. Most dermatologists agree that bathing once every two or three days is more healthy and better for the skin than bathing every day. Let’s face it, most of the time when we take a shower, it’s not because we’re dirty; it’s because we think we might smell bad, or because we feel a little sticky. The daily bath is one of those cultural phenomenon, kind of like Mother’s Day, that was created by an industry that reaps huge profits on the event. It’s like, “You smell bad and people won’t like you so you better take a bath, and your skin’s all dry now from bathing so you need to rub on some of our moisturizer, and your hair is oily so you need to wash it every day, and now your hair is all dried out so you need to use our conditioner.” Ka-ching, ka-ching, ka-ching $$$$.
So how often do you really need to bath? I’ve done some research on that, and I can’t come up with a definitive answer. Most of what I have read has a pretty strong bias toward the modern fear of the human smell, so it’s hard to tell what the bathing requirements are for actual good health. I’m going to have to fall back on my Dad’s childhood on an East Texas cotton farm in the early 1900’s. Besides his parents there were six kids in the family. They had to draw all of their water from a well and heat it on a wood stove. Grandma’s rule was you wash your feet every night before you go to bed, if something specific gets dirty you take a sponge bath, and once a week they would draw water and heat it for a tub bath. My Dad lived to be 90 and his brothers and sisters lived ranging from 88 to 100 years, so I guess that was healthy enough.
There is, of course, the smell factor. The human body has an odor. We have been taught that this odor is offensive, and so we try to either wash it away or cover it up. I imagine that washing it away, other than a cold water sponge bath, will probably be out due to the amount of work involved. I don’t think that covering up the human smell with deodorant or cologne will be very practical either. For one thing these products will not be available unless you stockpile them or manufacture them from natural sources. I suppose you could rub yourself with mint leaves or something of that nature, but there is a second and more important reason to avoid sweet smelling colognes. Mosquitoes. Sweet smells, especially fruit or flower smells, attract mosquitoes; and that is something that we certainly want to avoid. Over one million people per year die throughout the world from mosquito bourn illnesses, mainly malaria. We wouldn’t want to do anything to attract these little killers.
So I imagine that we all probably just have to smell a little bad. The good news is that everyone will smell bad, so it will quickly lose its social stigma. It has been my experience on long backpacking trips that everyone smells horrible for about the first three days; and then, all of a sudden, the smell seems to be gone. I think the current term, according to one T.V. commercial that I have seen, is nose-blind. You just get used to it and don’t notice it any more.
Hair
Over the years I have had hair of every possible length. At one time I wore my hair in a ponytail that fell to the bottom of my shoulder blades. A pain to wash, dry, brush, etc. Currently I have a shaved head. Once again a pain. You have to shave your entire head every couple of days to keep it slick. I imagine that in a post-apocalyptic scenario both of these would be out. I think that the most practical length would be as short as you could cut your hair with scissors. Here’s my thinking. The shorter your hair, the less likely that you will be troubled with critters like head lice. Short hair is easier to take care of. It looks neater, doesn’t get tangled up in stuff, and requires less soap or shampoo to clean it. Short hair makes it easier to treat head wounds. Now days if you go to the hospital with a head wound, the first thing that they are going to do is shave the immediate area so that it can be bandaged, stitched, or whatever. This is why the military wants combat troops to have short hair. Shaving your head would put you in needless danger of a cut becoming infected. So hair cut short, but without shaving, seems to be the most practical solution.
Shaving the face should probably be avoided for the same reason as shaving the head. A minor nick can become septic, and without antibiotics this could be deadly. Sorry girls, but I think the same logic will apply to armpits, legs, etc. So it will be short beards for men (currently very stylish) and hairy legs for women (not so stylish).
I don’t know if this is correct thinking or not, but it makes sense to me.
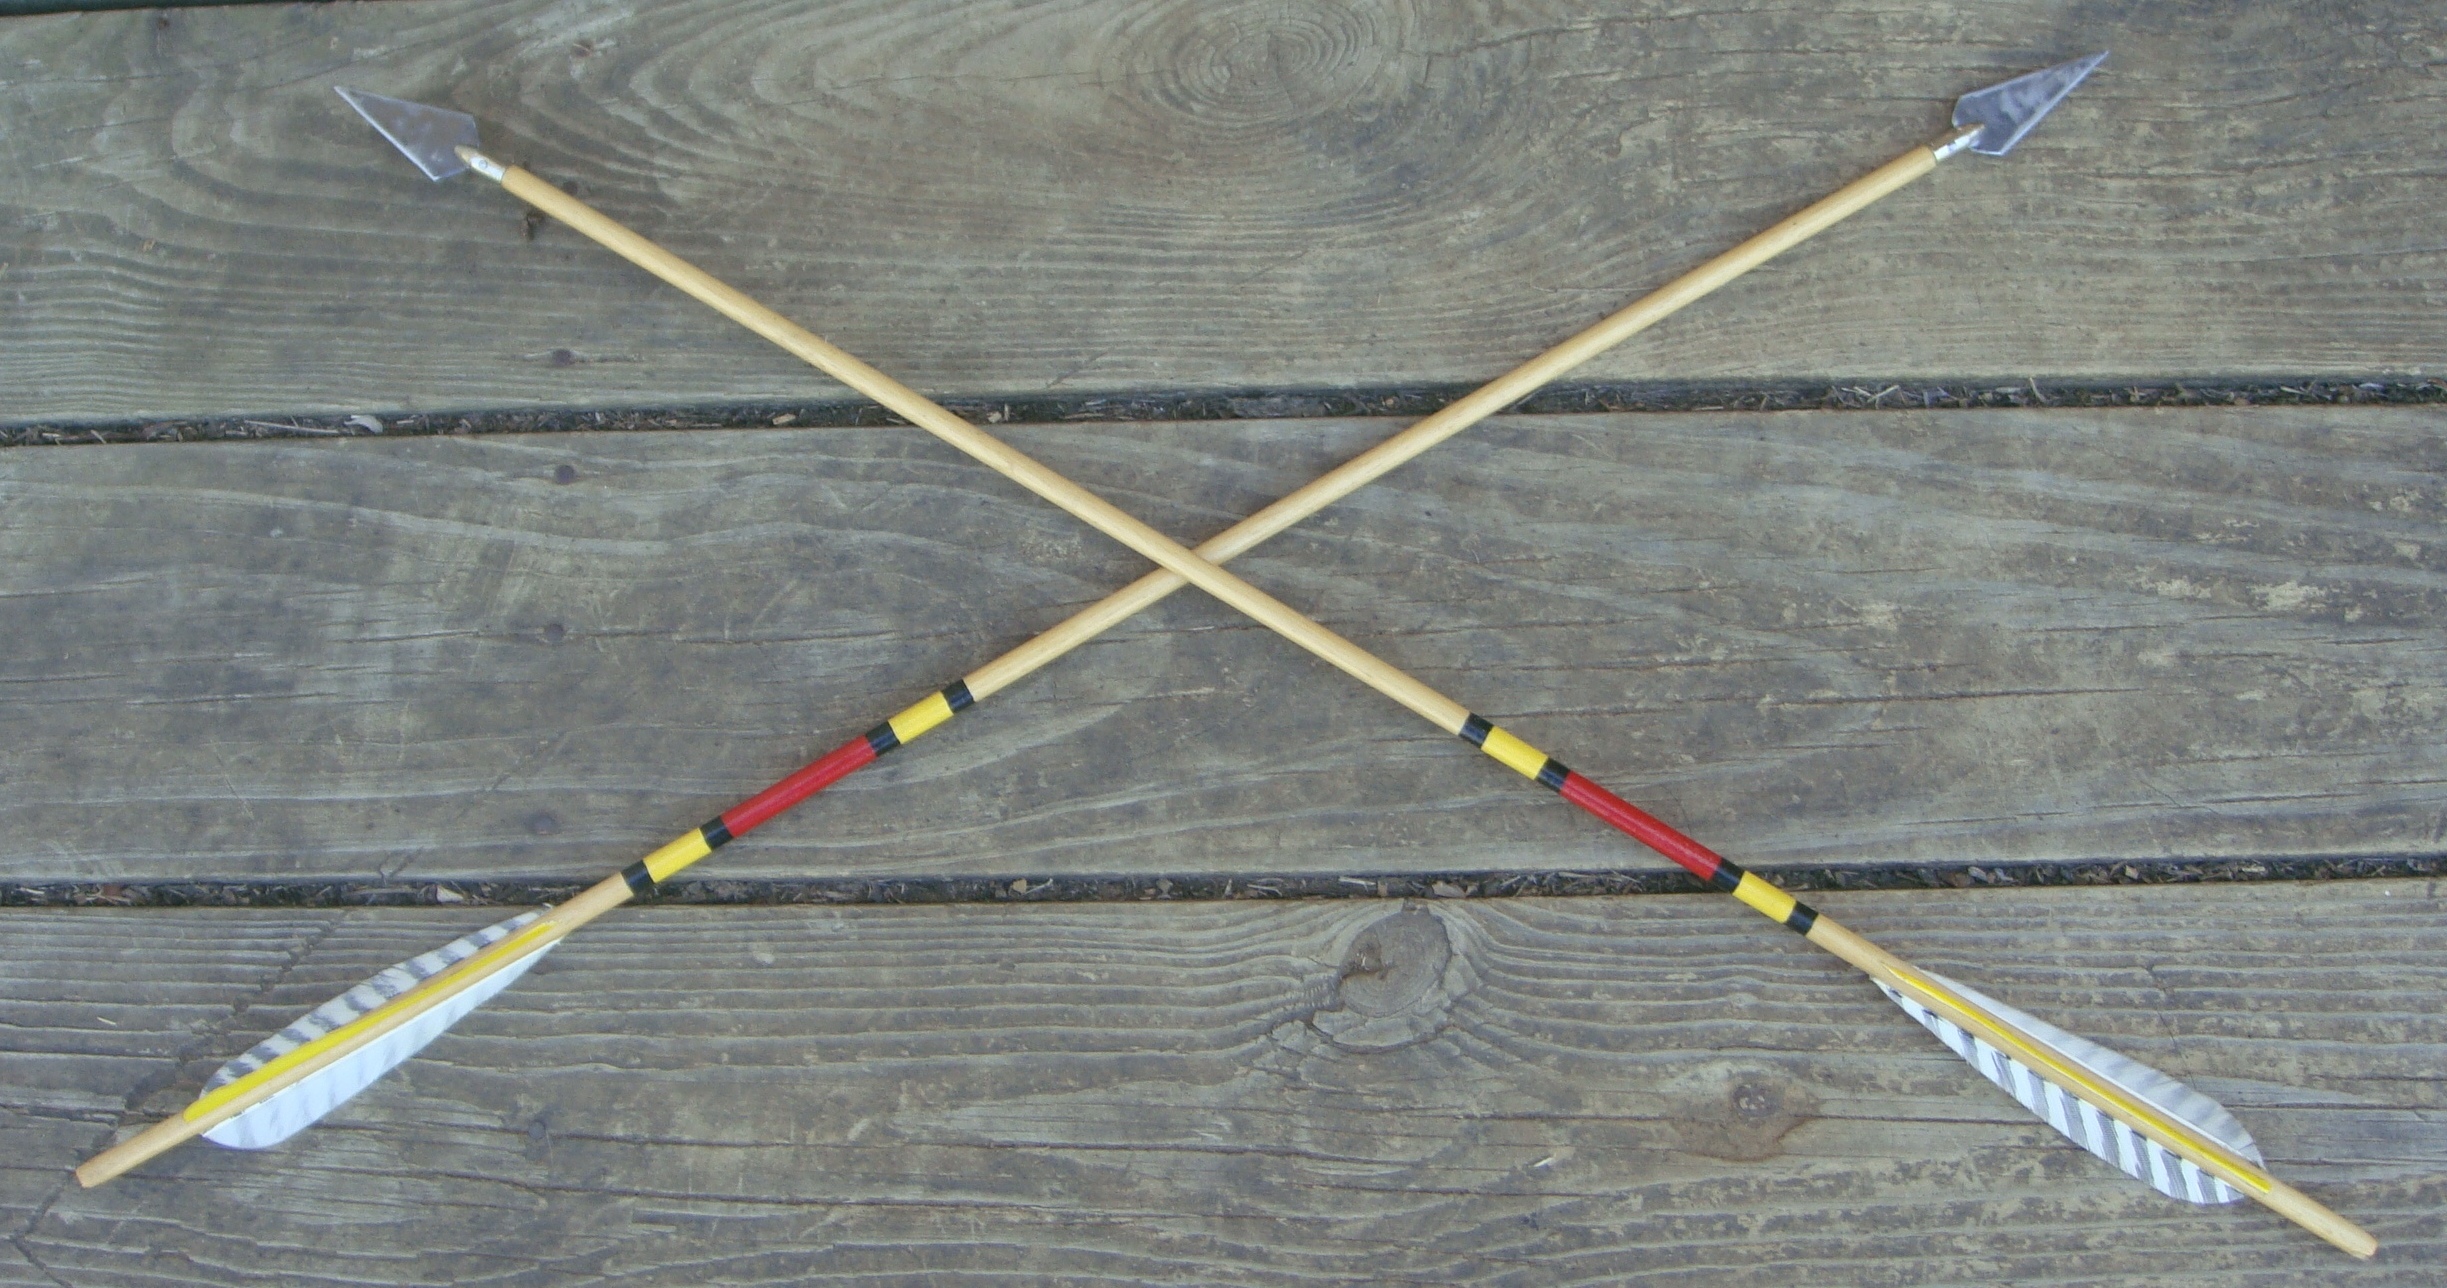
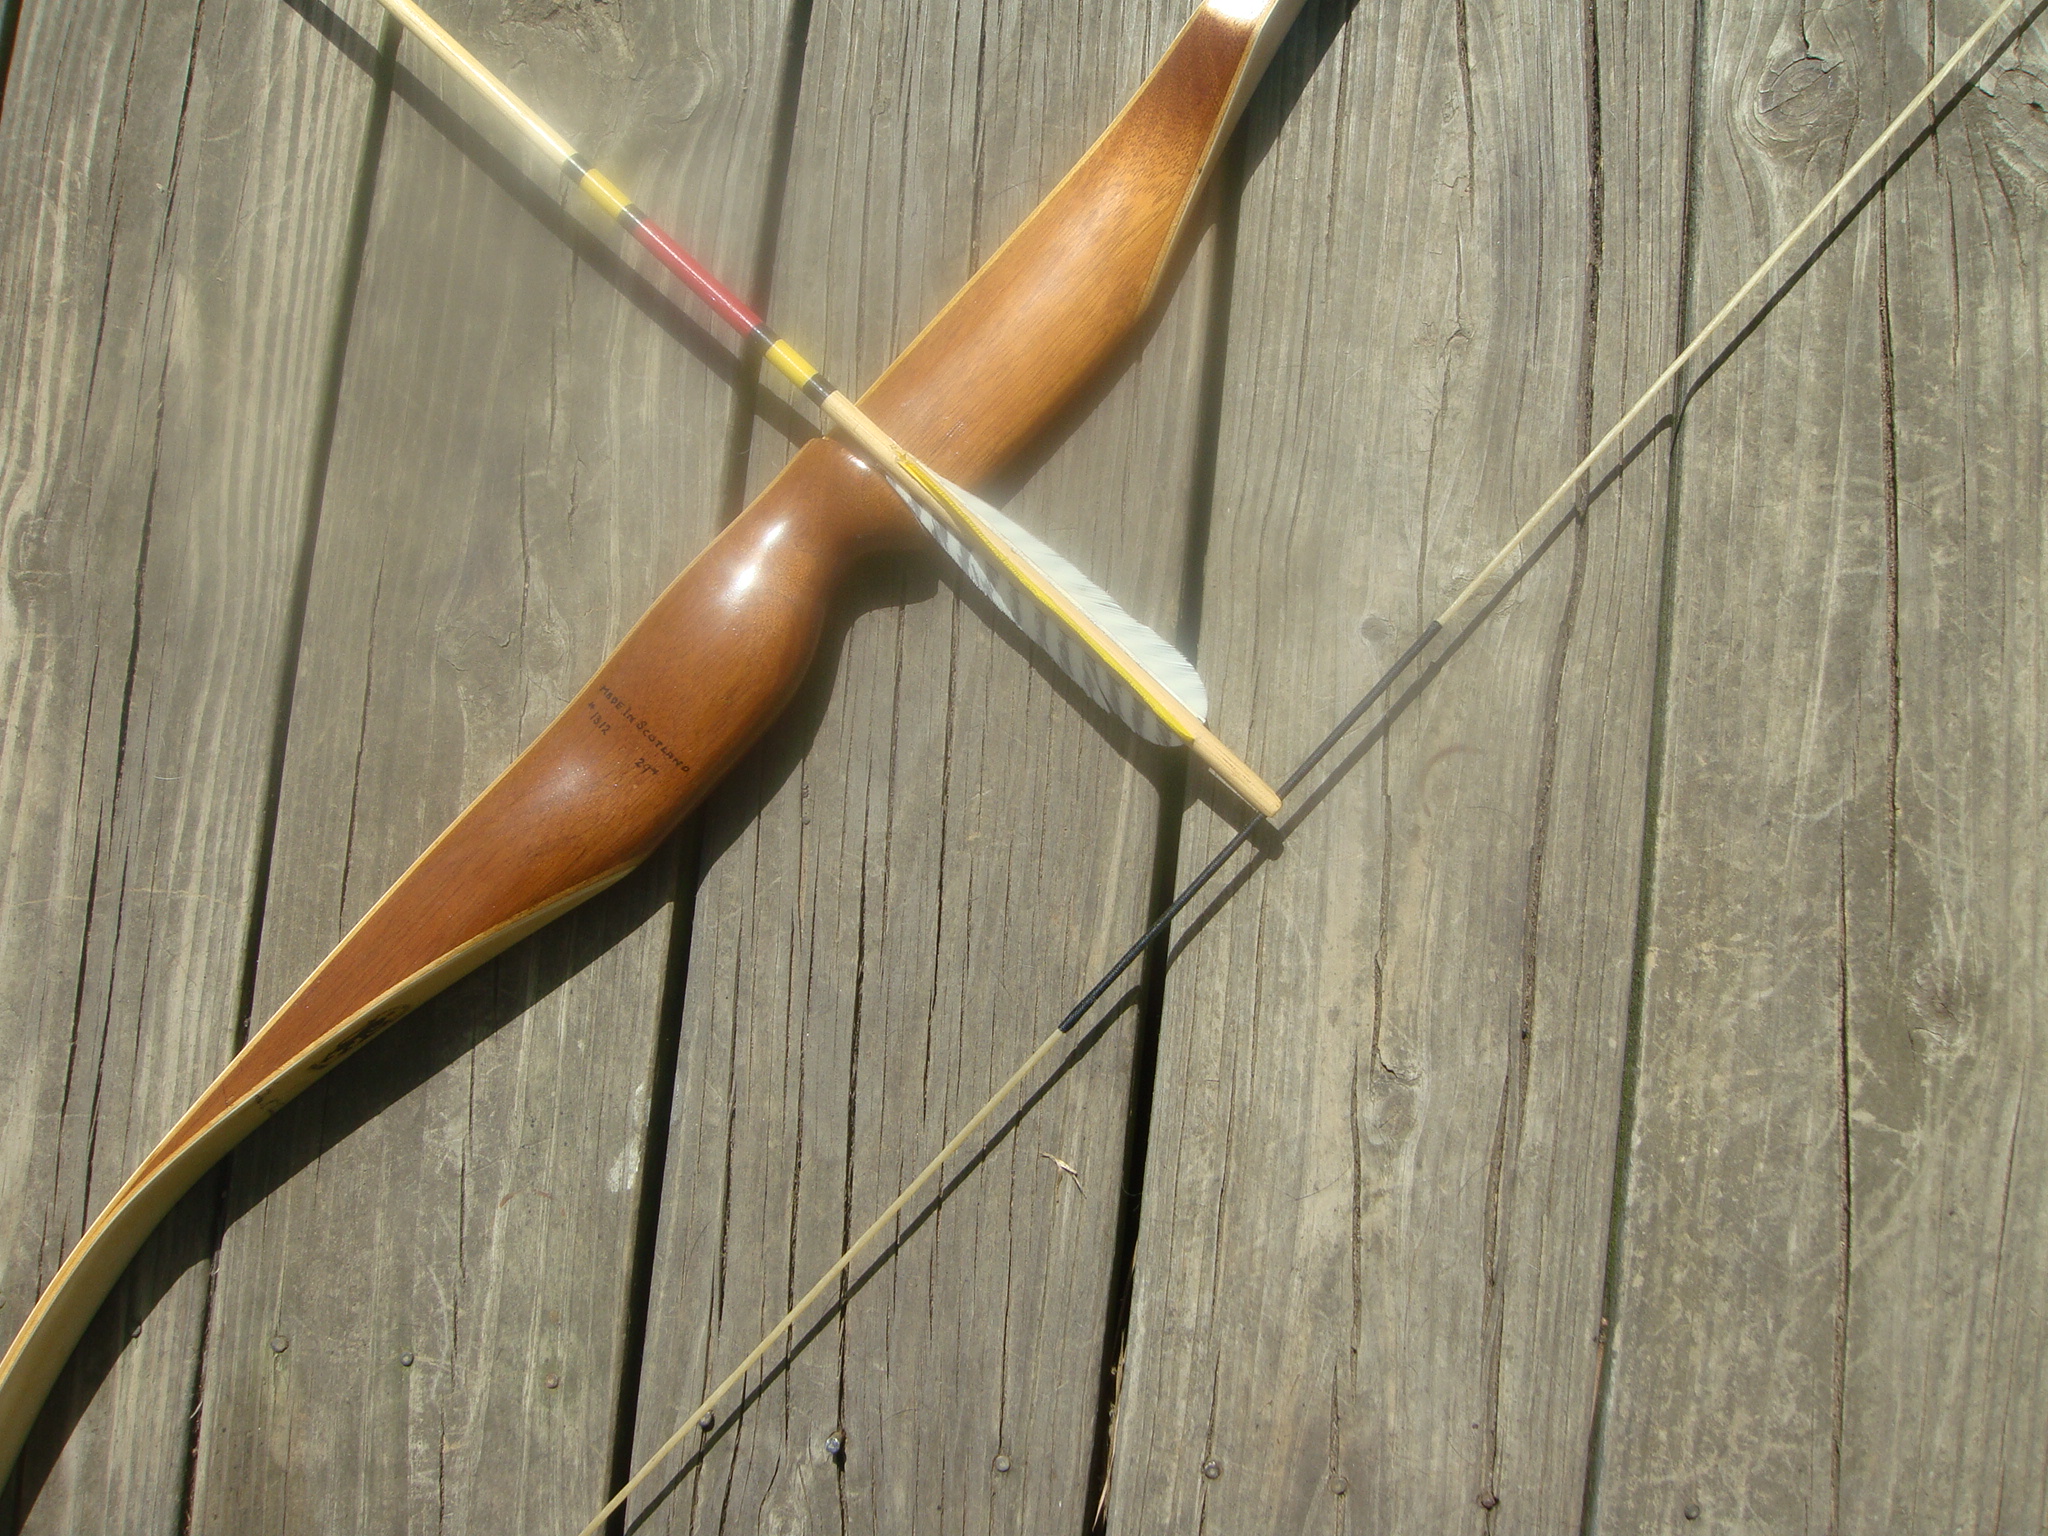
Flu-flu arrows are arrows that are designed to travel at regular speed for about thirty to forty yards and then to abruptly slow down and drop to the ground. Flu-flus are used in specific situations where you don’t want an arrow to go too far. A good example would be shooting at a squirrel in a tree. If you shot a regular arrow in this situation and missed the arrow might fly off a hundred-and-fifty yards into the woods, and would probably be lost. With a flu-flu arrow, the arrow would probably drop to the ground within thirty yards of you, making recovery much more likely. Flu-flu arrows have very different fletchings from regular arrows and require a different approach to fletching. This is how I use whole feathers bought at a big-chain craft store to make my flu-flu fletchings.
 The first step is to reduce the size of the quill. I start this process by scraping the quill with a sharp knife held perpendicular to the quill.

 Once the quill has been scraped down pretty close to the feather vanes, I use the butt of the knife handle and tap solidly along the length of the quill. This will start separating the feather into two sections.
 I complete the separation by cutting very carefully with a utility knife.

 Now I can continue shaving down the sides of the quill until it is as thin as I can get it without cutting into the feather vanes.
 To work down the bottom of the quill I use some 80 grit sandpaper wrapped around a large dowel and clamped into my small vise.
 I then drag both the sides and the bottom of the quill across this sanding block until the quill is extremely thin.


I test the thickness of the quill by wrapping it around a 5/16” dowel to see if it bends smoothly. If the quill is too thick it will snap, rendering it useless.
 When the quill is thinned down correctly, I assemble all of the materials to attach the fletchings to the arrow. Here I am using two fletchings; one yellow and one red. The fletchings will be attached with contact cement.
 I mark the area of the arrow that I want to cover with my fletchings.
 And then I use a throw-away foam brush to paint a coat of contact cement onto the arrow. I cover about a quarter inch above and below the area I will be working with.
 Next I paint the bottom of each quill.
Now I set everything aside to dry. The contact cement must be completely dry to the touch before you press the fletchings onto the shaft. And you have to be sure to put the fletchings exactly where you want them. Once the two painted surfaces touch, they’re stuck. No changing your mind.
When it’s time to attach the fletchings I use a push pin to hold the end in place.
And then spiral the first fletching on. I leave about an inch between the spirals so I will have room to go in between with my second fletching.
 The second fletching goes on the same way.
With both fletchings in place I separate the vans a little and fluff them out.
 I use a utility knife to trim off the excess quill at the front and back.
And put a drop of fletching glue on the front and back of each quill to help secure it more firmly.
Now I apply a coat of polyurethane to the shaft. I use a small artists brush to seal the area between the fletchings.
And here’s the finished product, ready to go out and irritate some squirrels.

For those of you who aren’t familiar with him, Saxton Pope is the fellow who re-introduced traditional archery to North America in the early 1900’s. He and Art Young (Pope and Young, get it) are basically the fathers of all that we do in the way of traditional archery today. Any how, I was reading his book, “Hunting with Bows and Arrows last week and came across an illustration of how he made his broadhead hunting points. I couldn’t believe it. He was making points nearly the same way that I started making them when I was twelve years old. Of course Pope was making broadheads this way because there was no archery tackle in those days. I was making them this way because I was twelve years old and there was no money in those days. So my archery buddies and I would buy wooden target arrows for thirty-nine cents and then use a little scrap metal and my dad’s shop to turn them into hunting arrows. I still make broadheads the same way today. I just think they look better than the three blade glue-on broadheads and, of course, the fact that they cost about a twenty-five cents apiece doesn’t hurt either.

Here’s how I make them:
First I make an arrow just like one of my target arrows except that I use five inch fletchings instead of four inch. I fit the head of the arrow with a target point attached with hot glue. I use Easton Scout target points that you can get on eBay pretty cheap.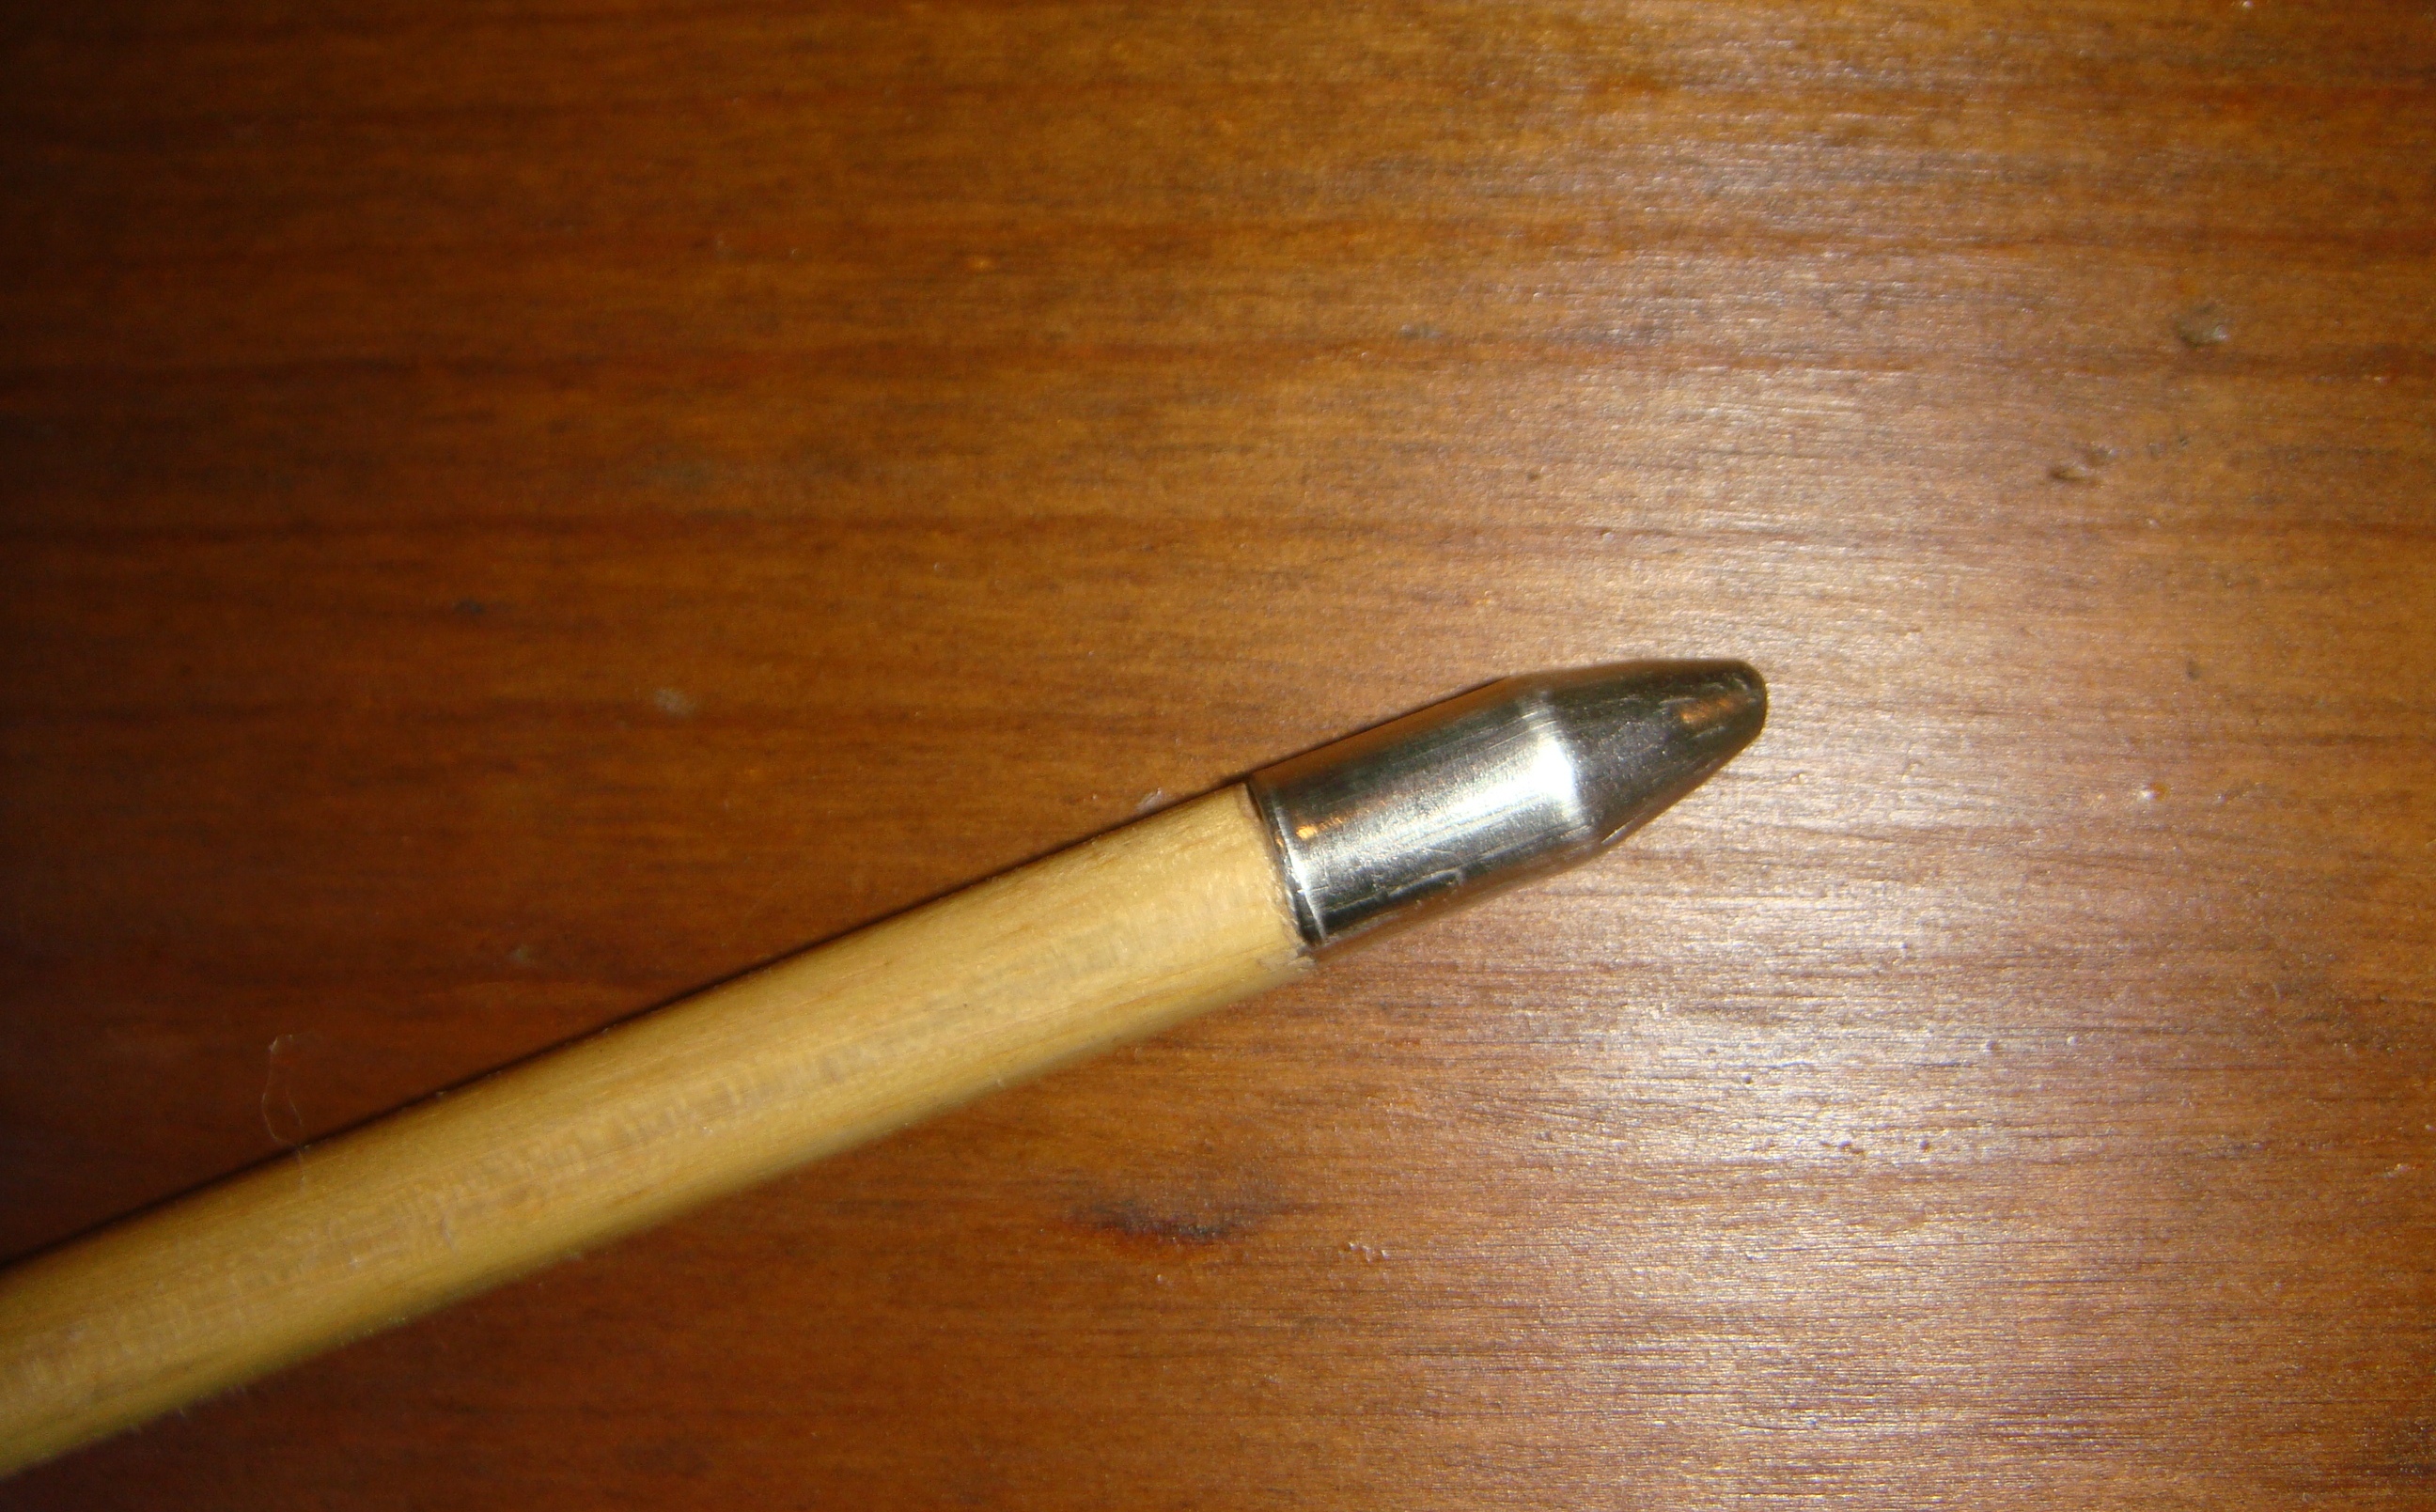
Next, I take a triangular file and file a small starter groove in the top of the point. You want to make sure that this groove is exactly parallel to the string nock on the back of the arrow.
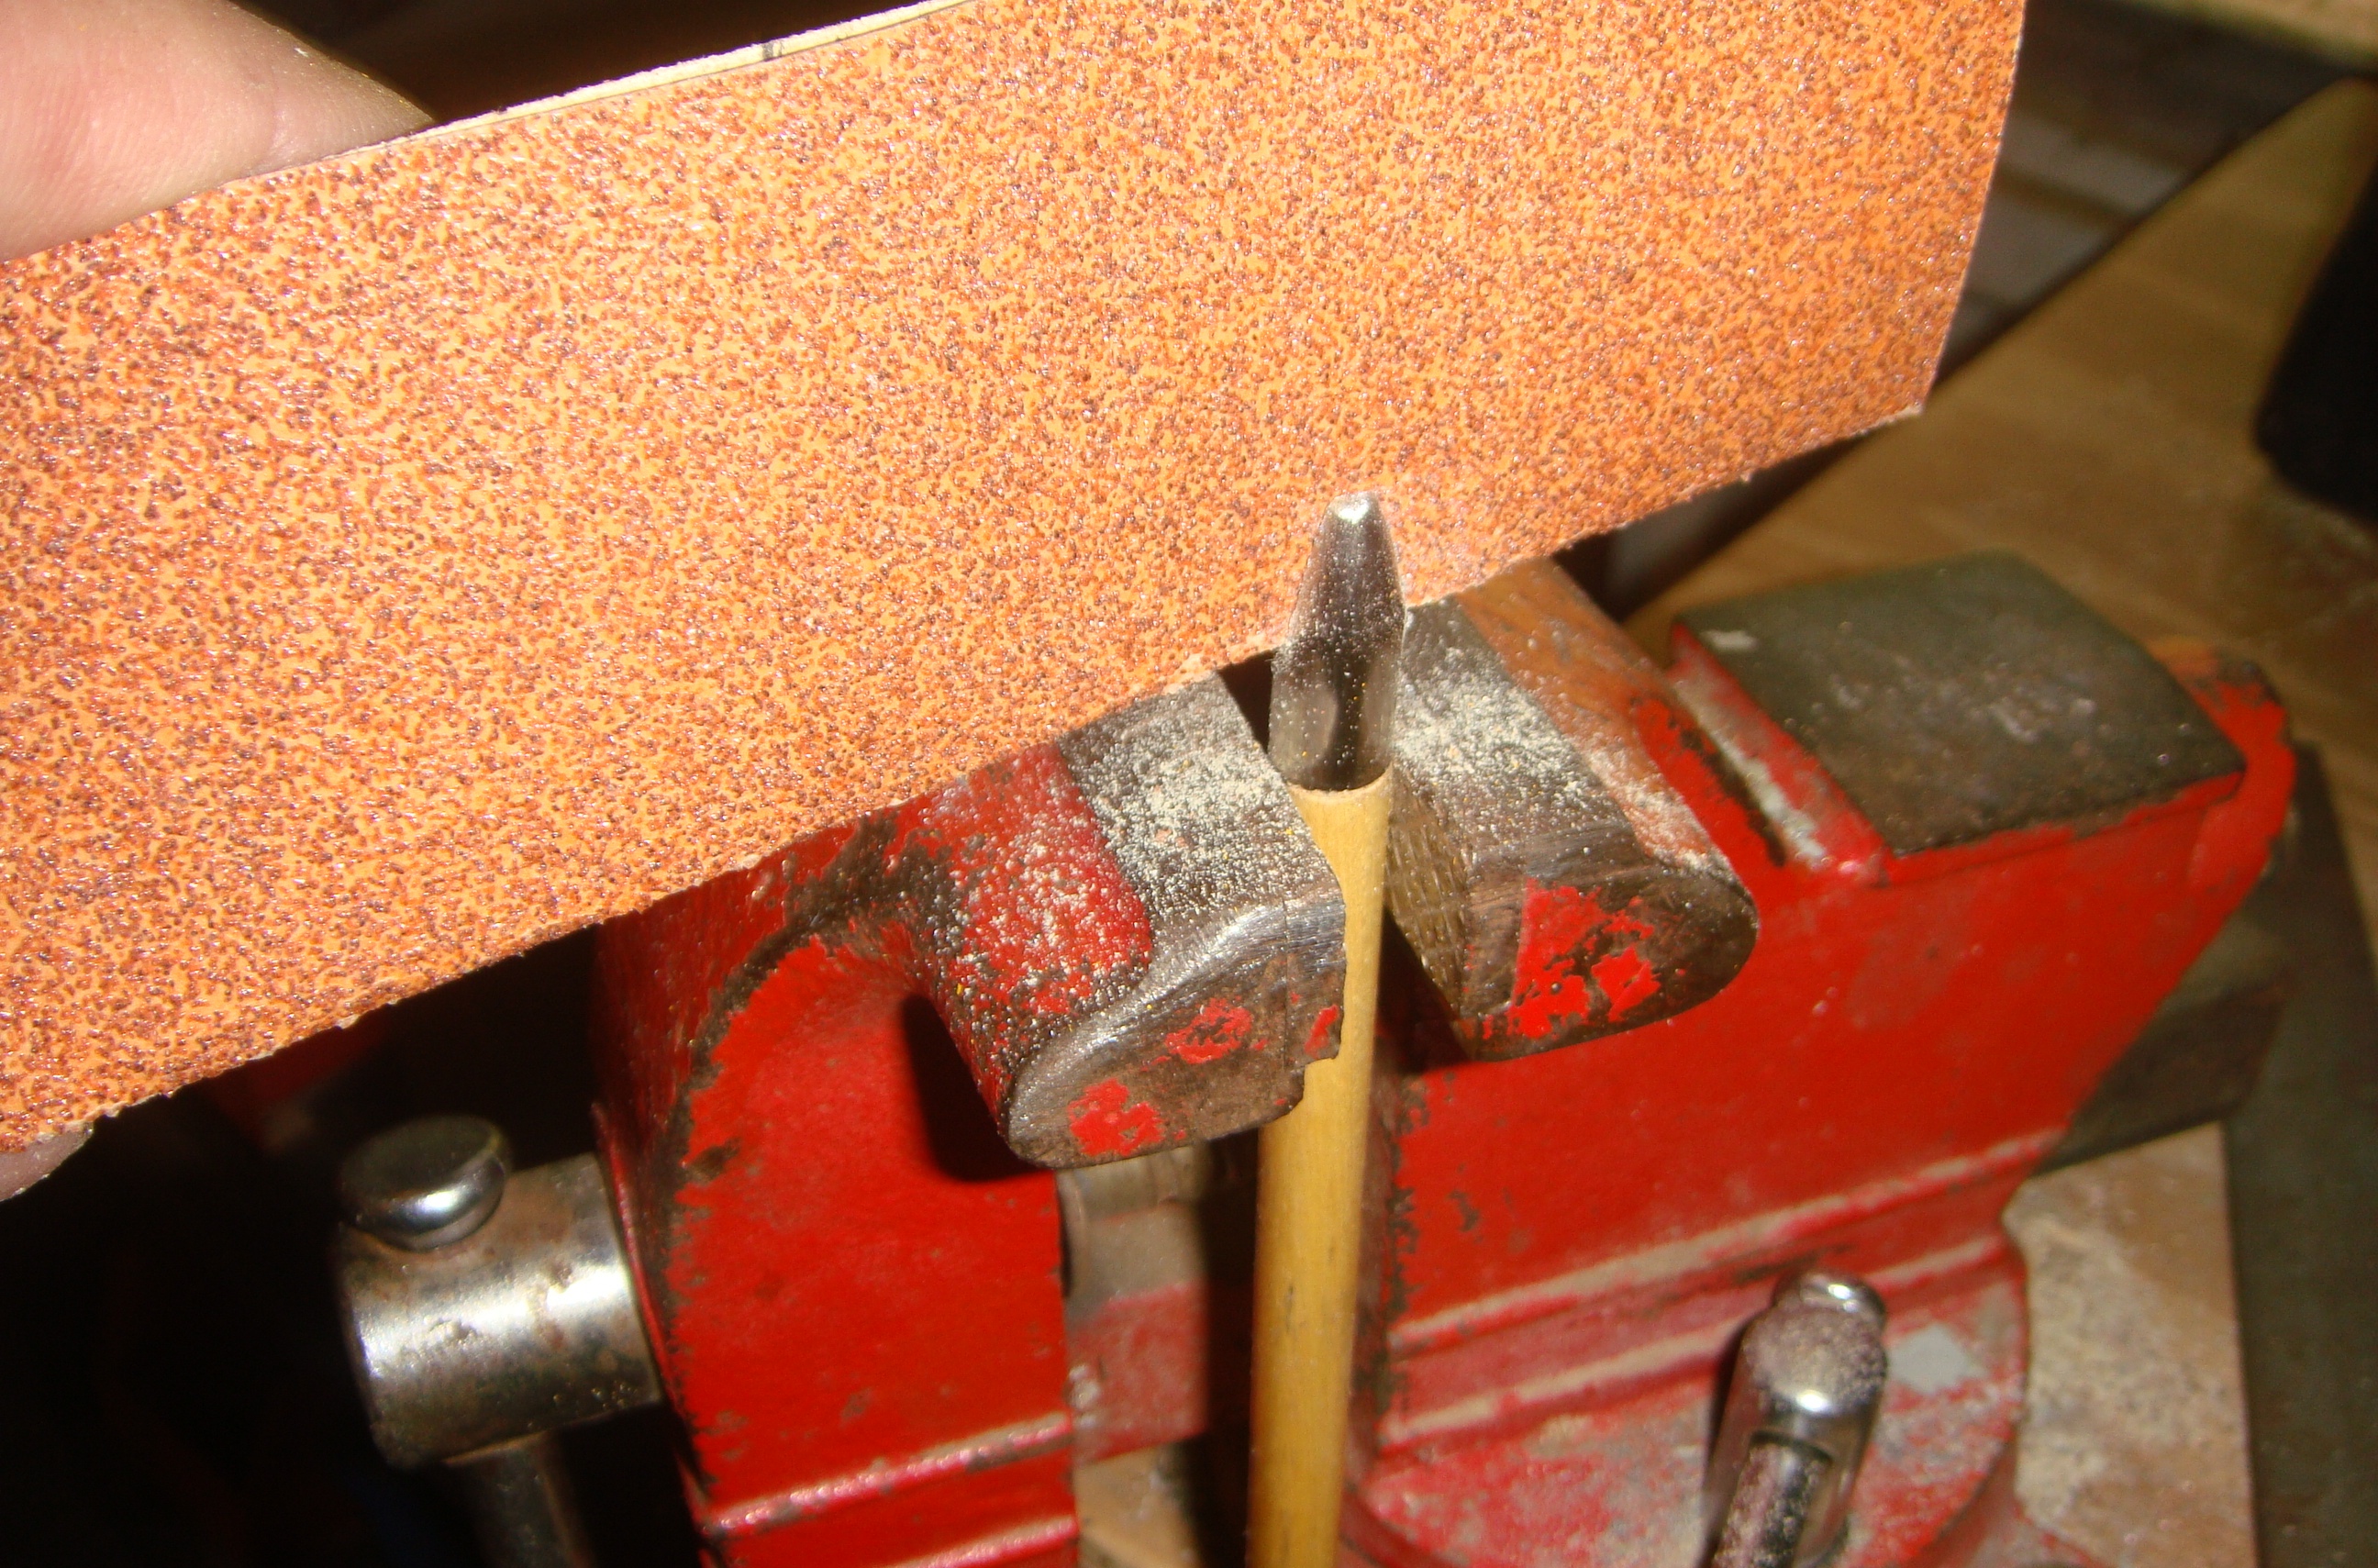
Using a hacksaw I cut down into the point to just below where the taper on the front of the point ends. I run a folded piece of 80 grit sandpaper through the cut to remove burrs.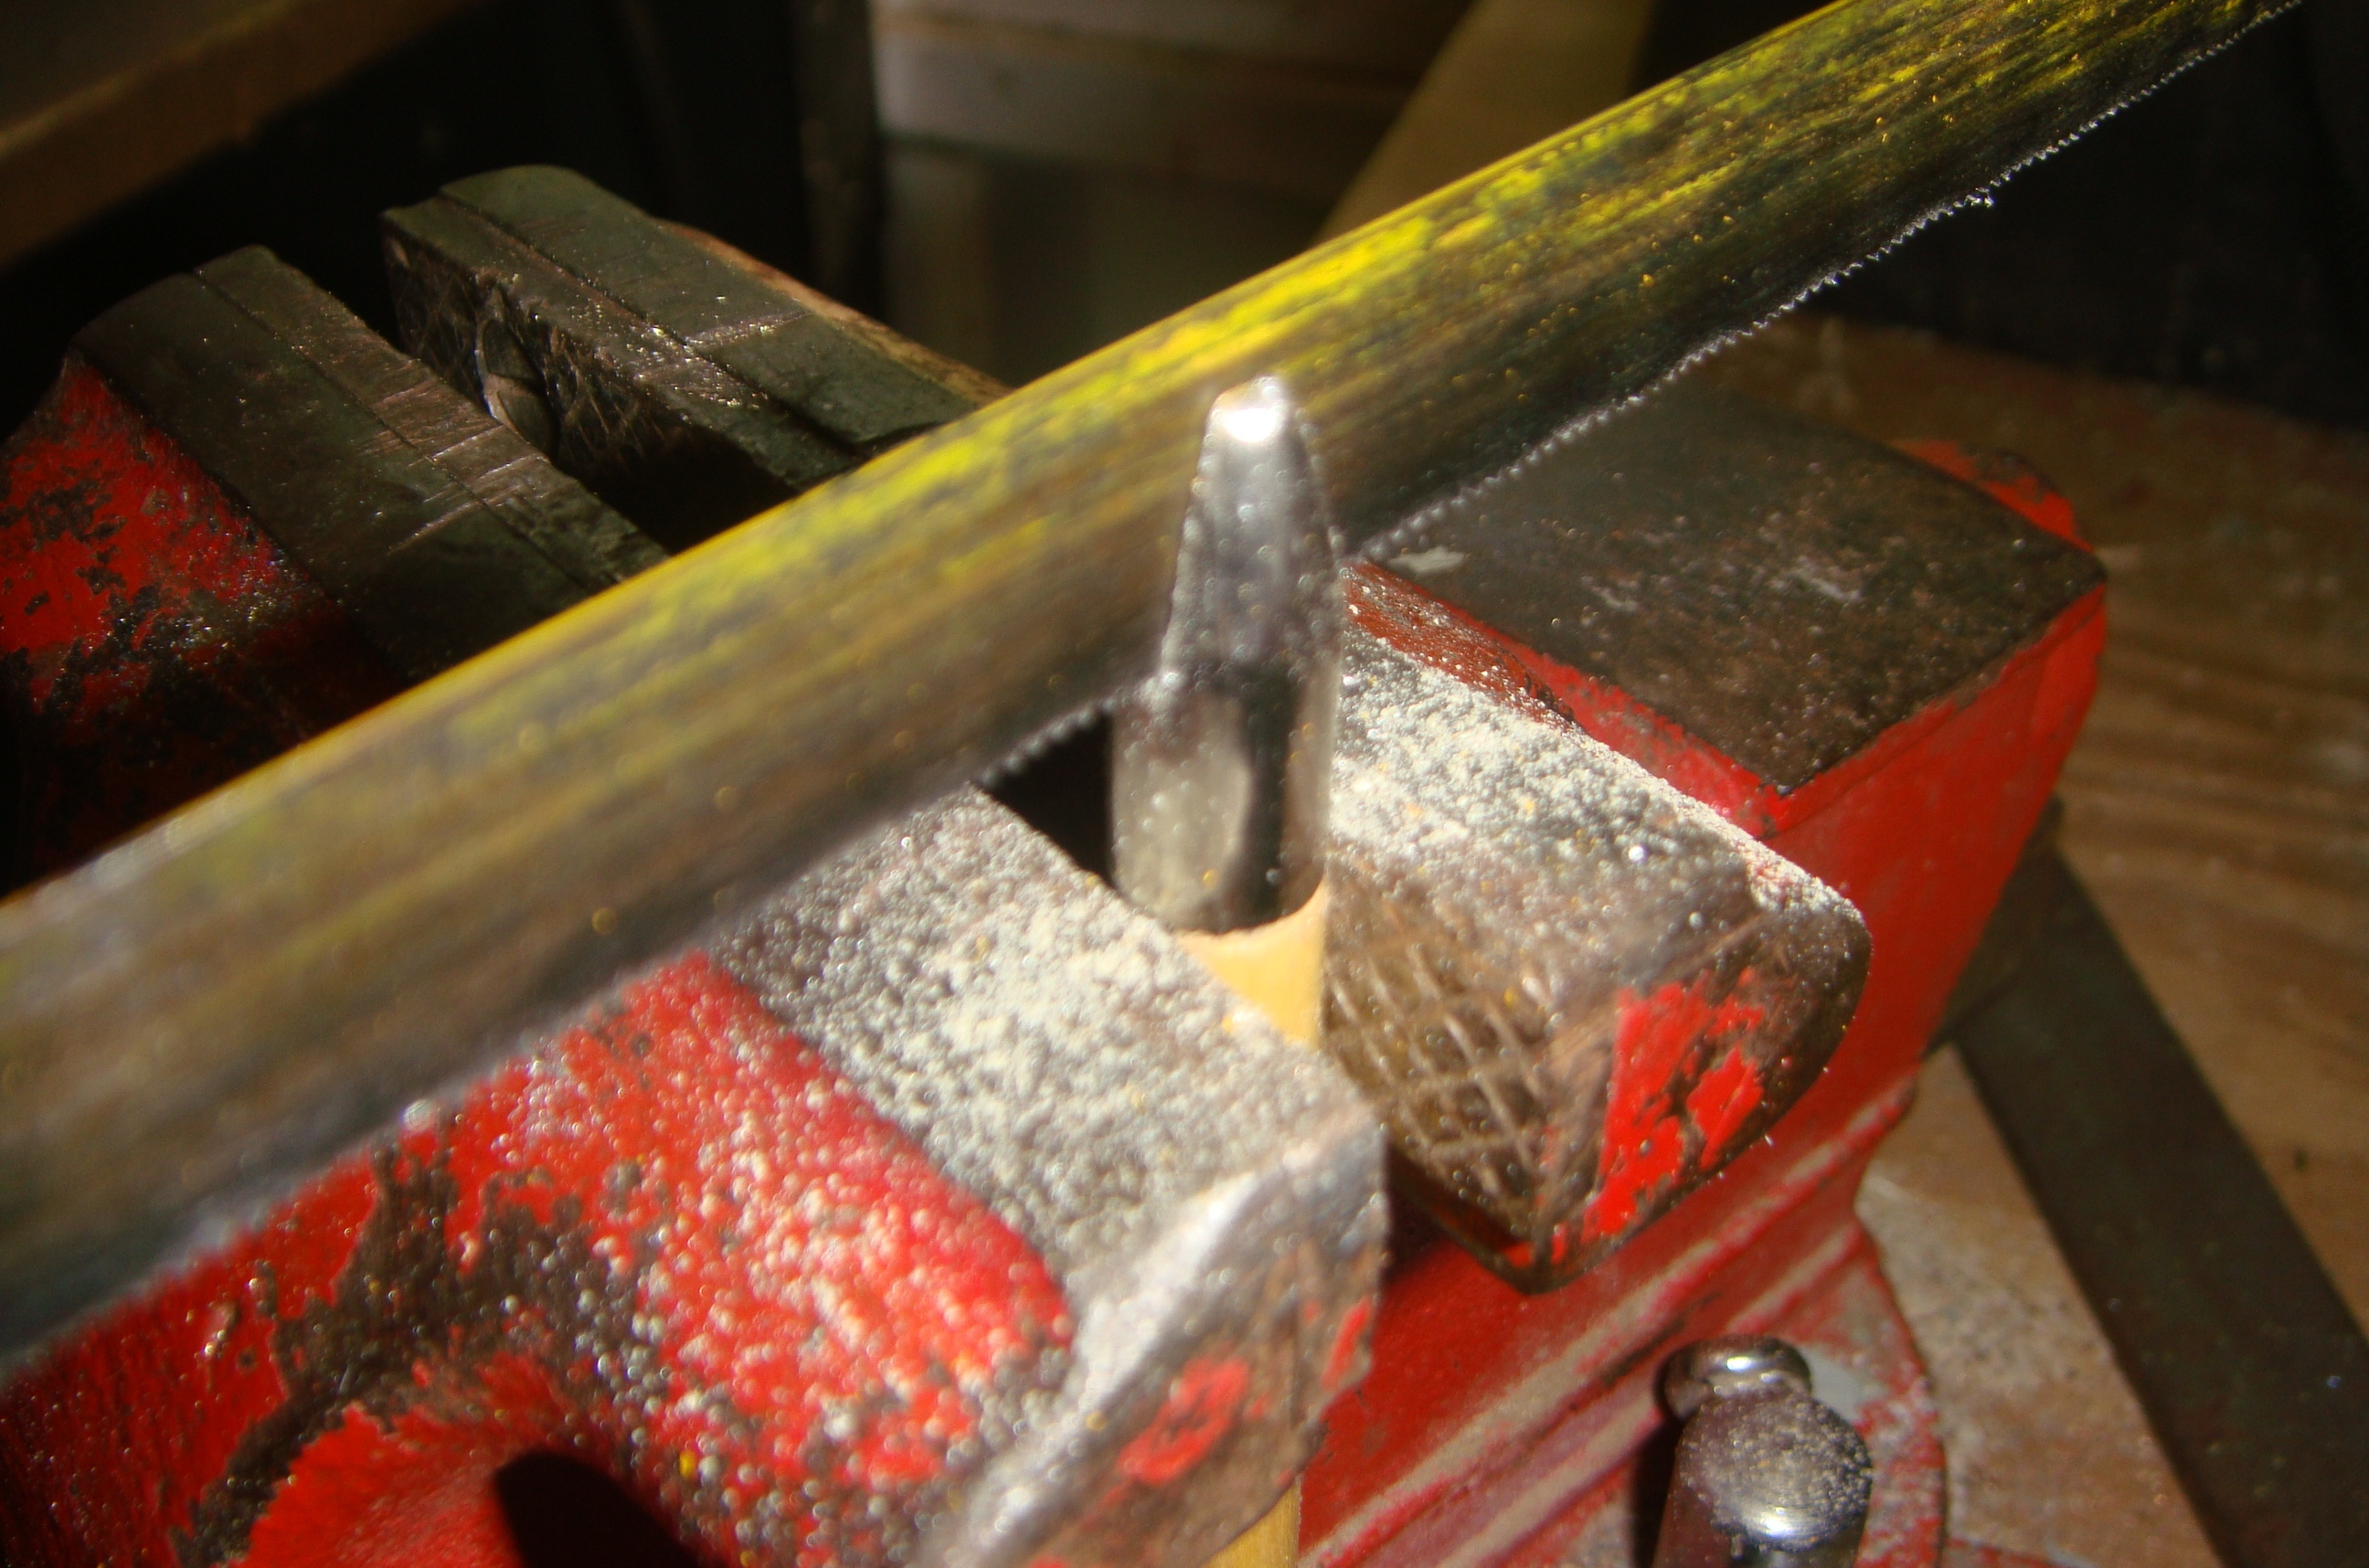

Now I use a heat gun to heat up the point and a pair of pliers to pull the point off.
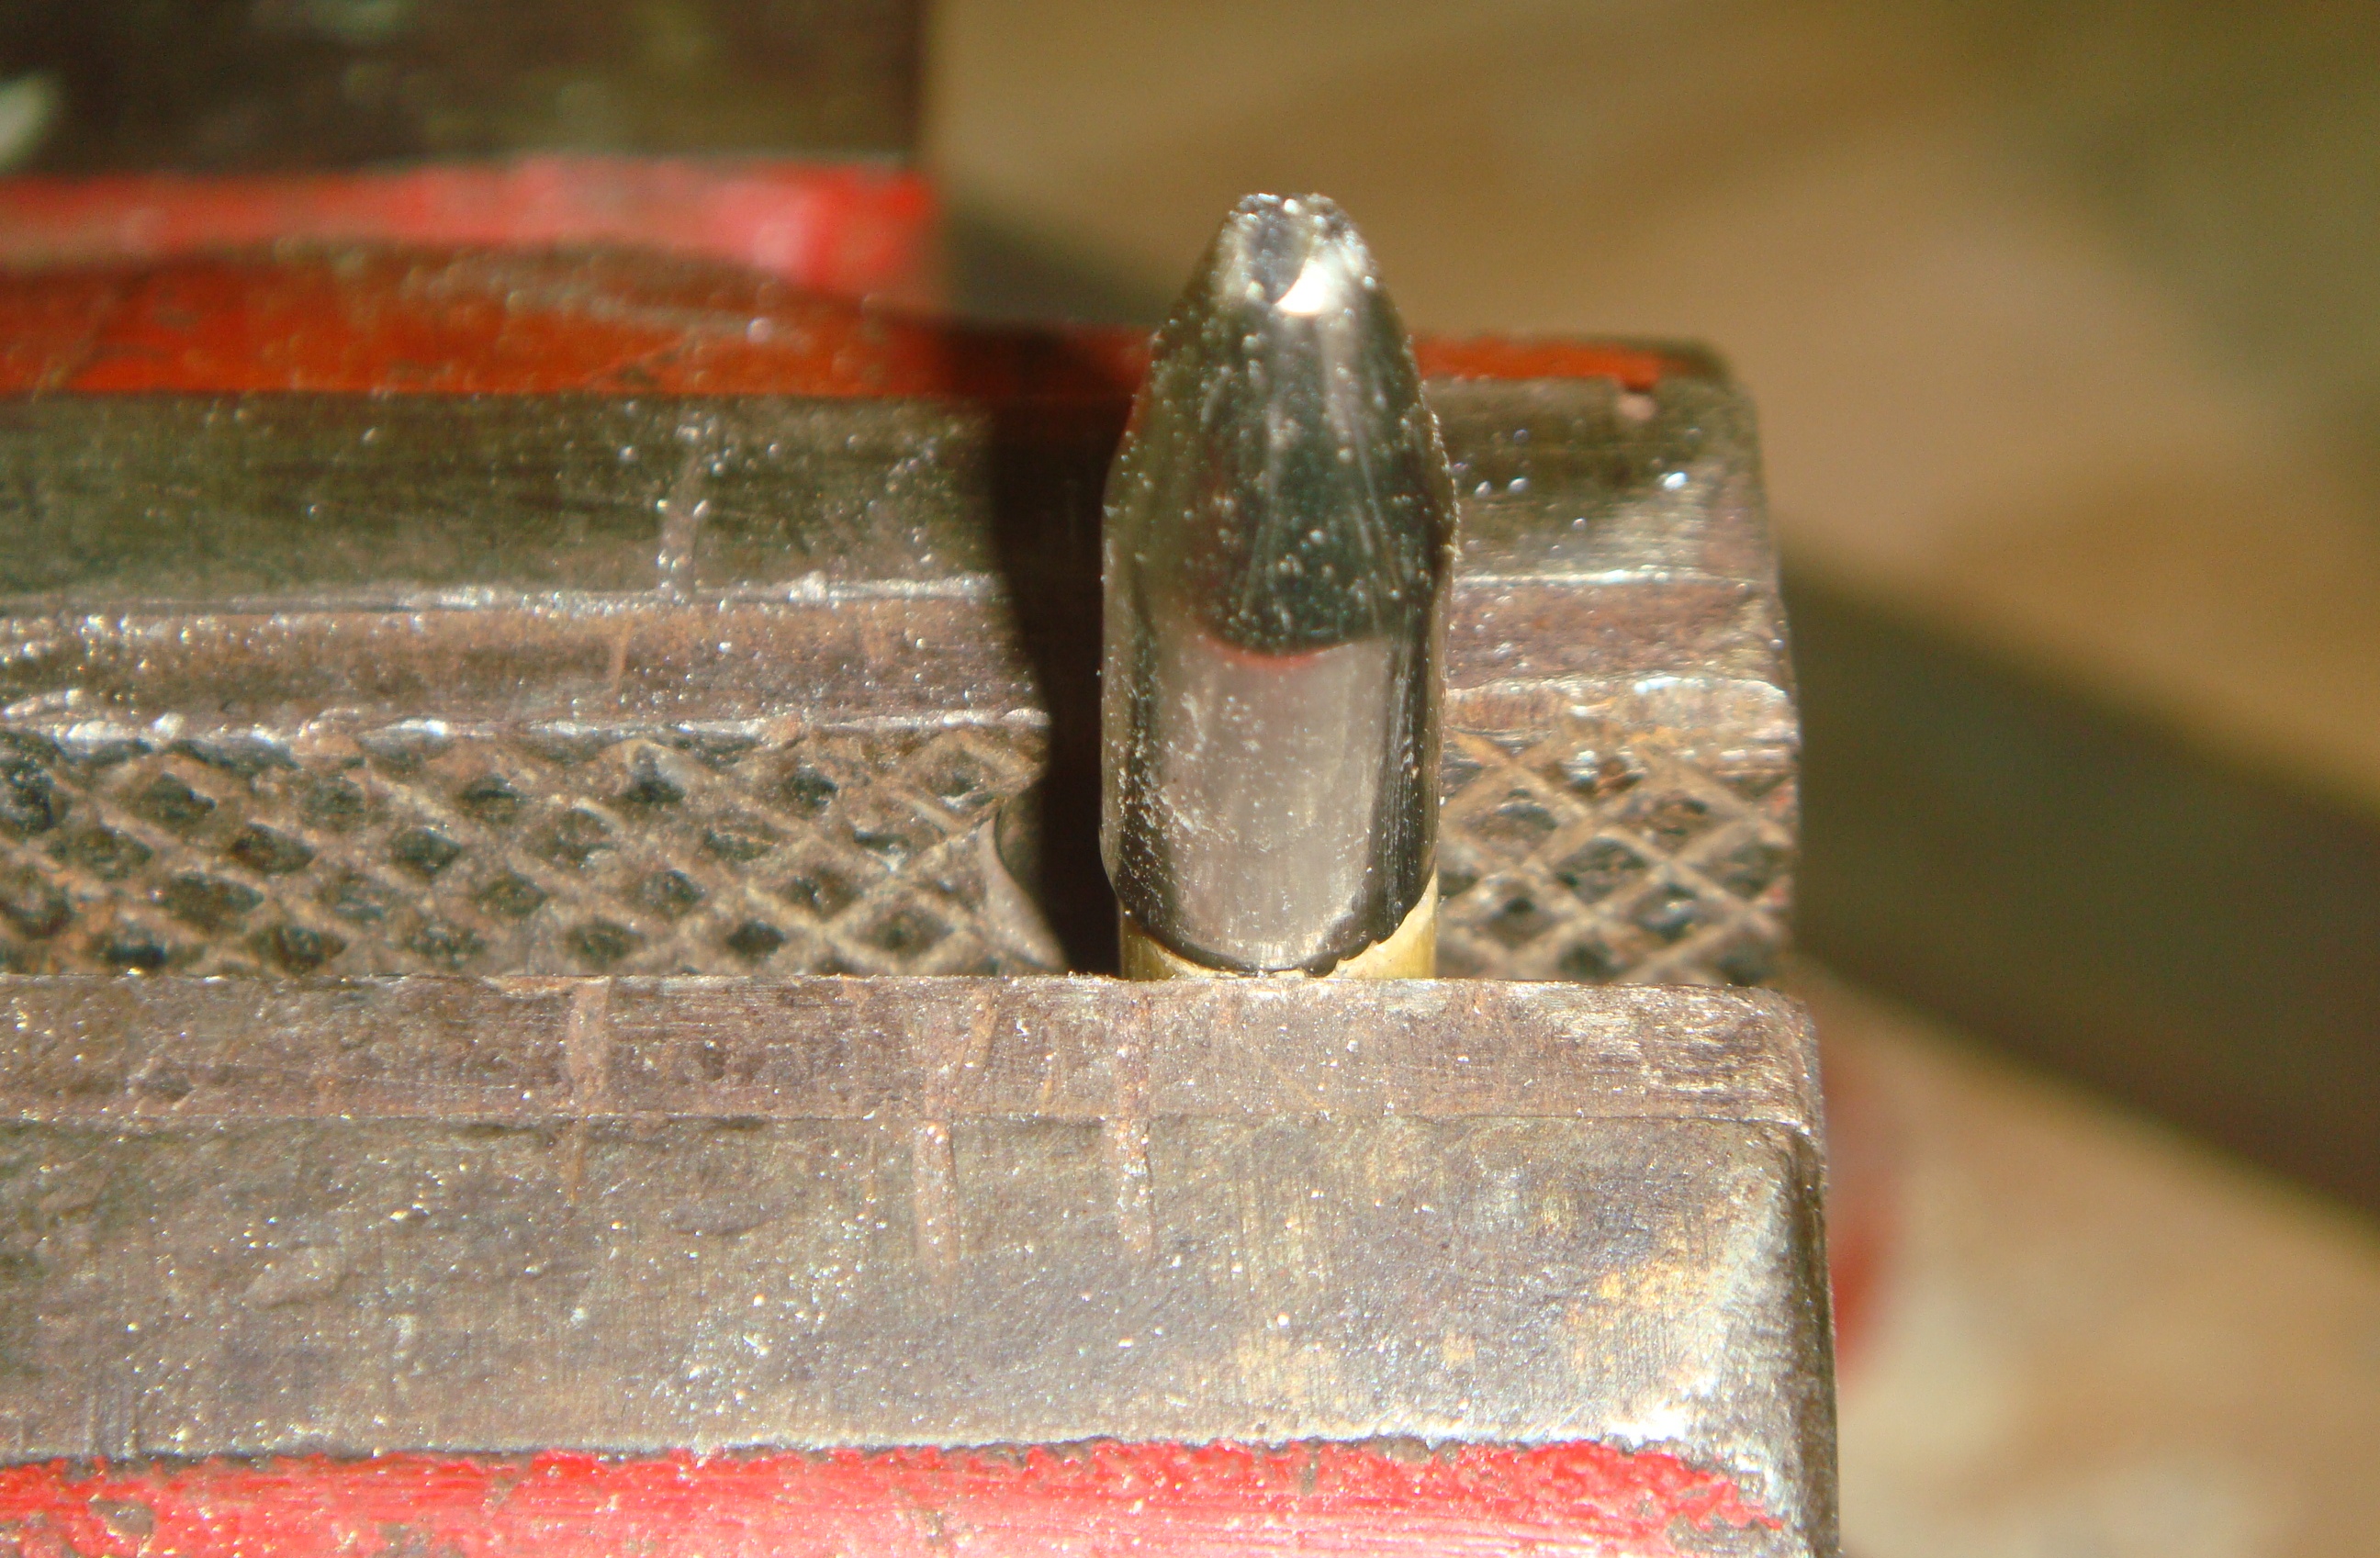
Then I take my hacksaw and continue cutting the slot in the shaft until it is almost down to where the bottom of the target point will come when I glue it back on.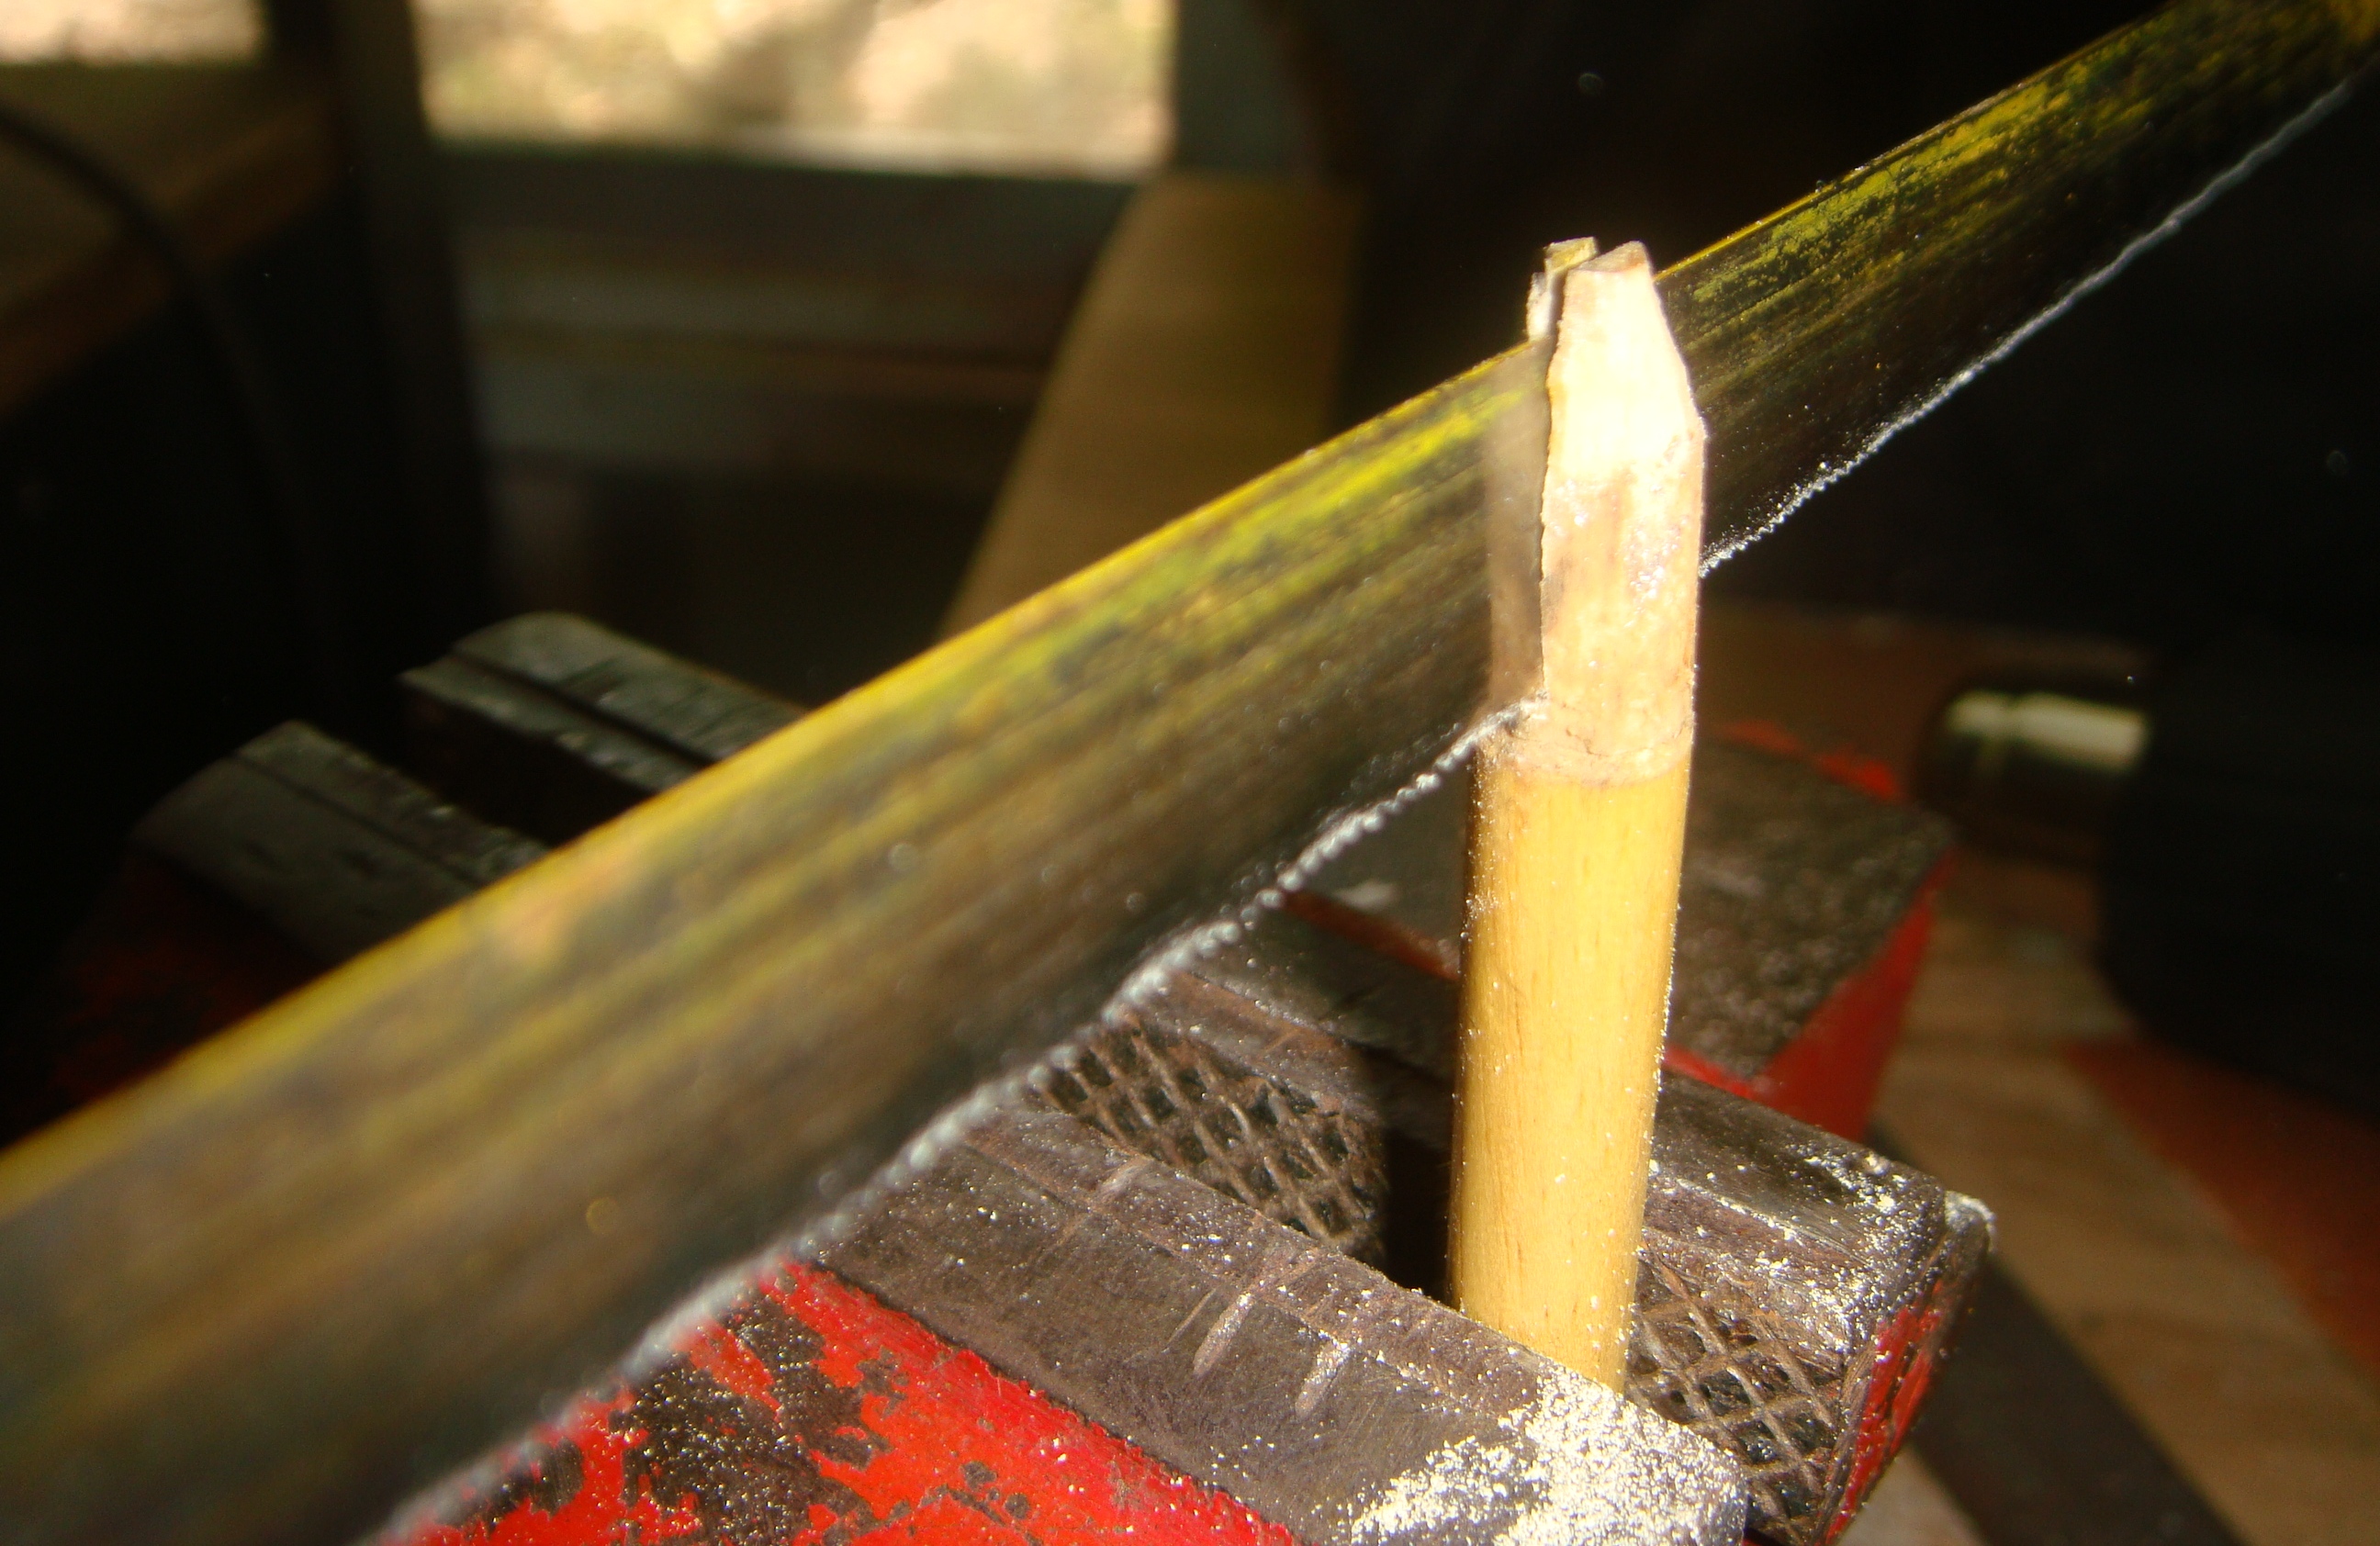
The broadhead blade is cut out of a piece of steel sheet that is a little less than one-sixteenth inch thick. It is about the thickest that I can cut using heave tin snips. Make sure that when you lay your pattern out that the blade will be wide enough to comply with local hunting regulations. In Texas the finished blade will need to be a minimum of 7/8 inch. Yours may be different.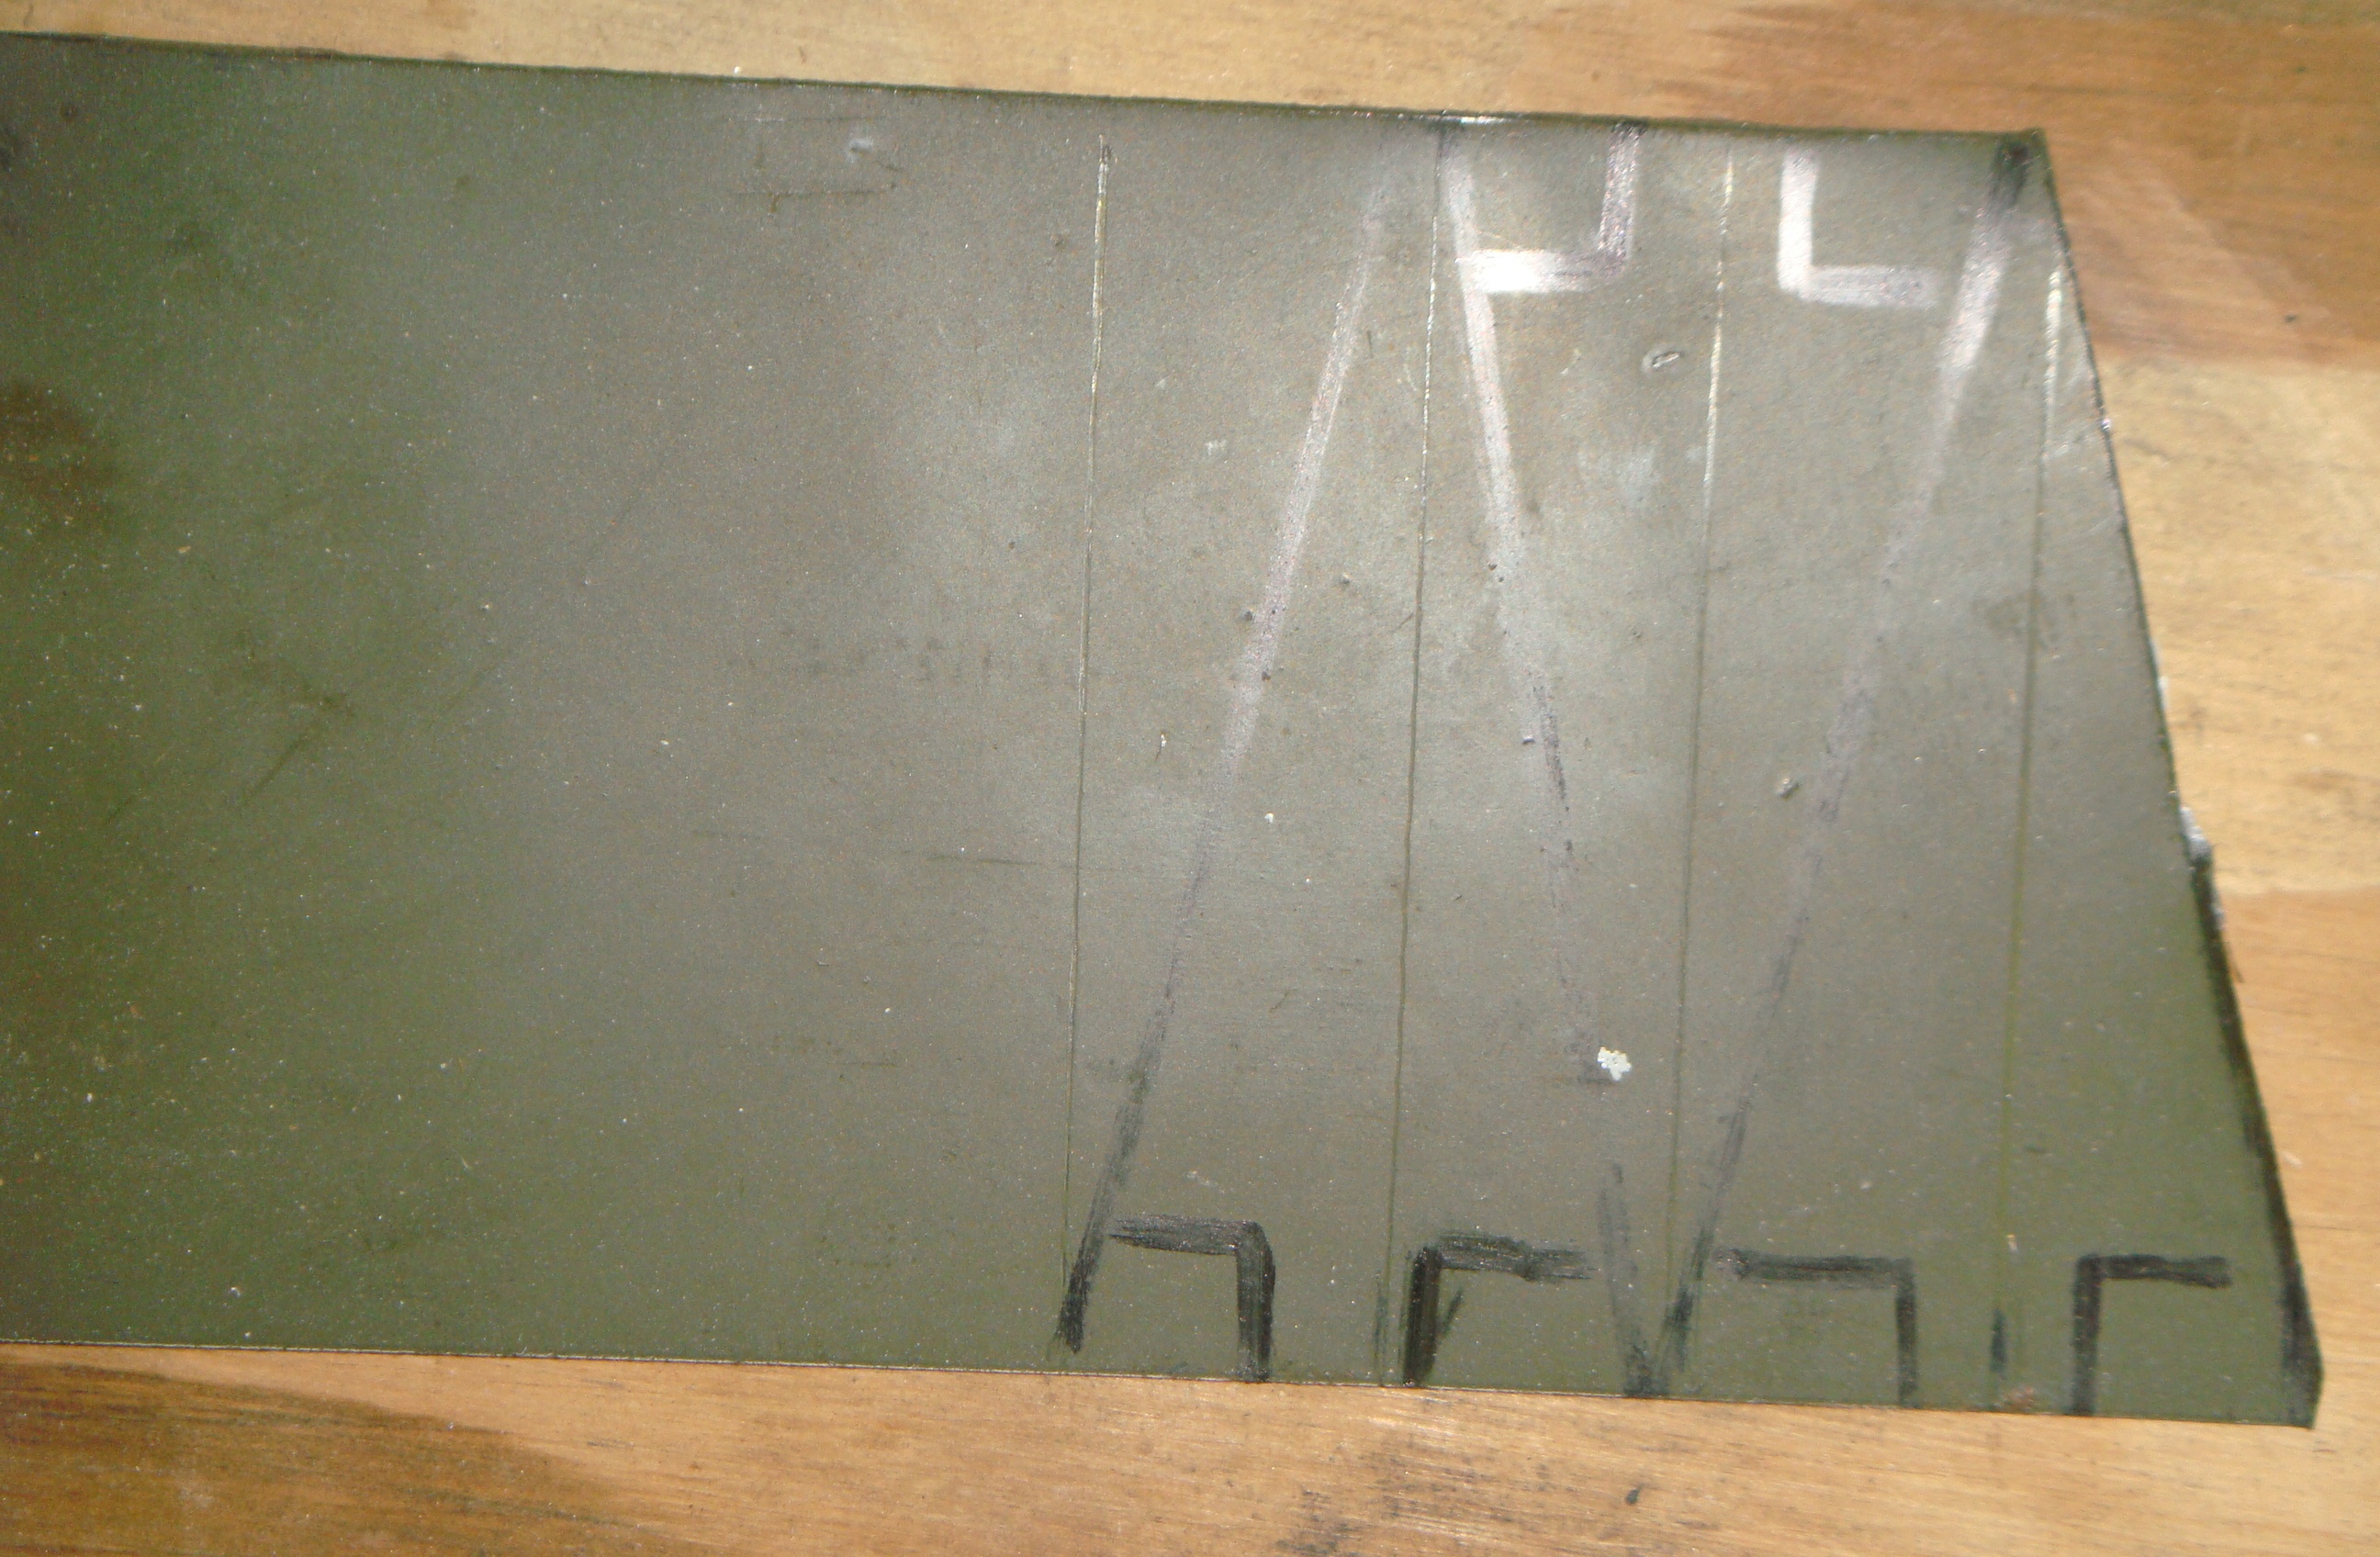
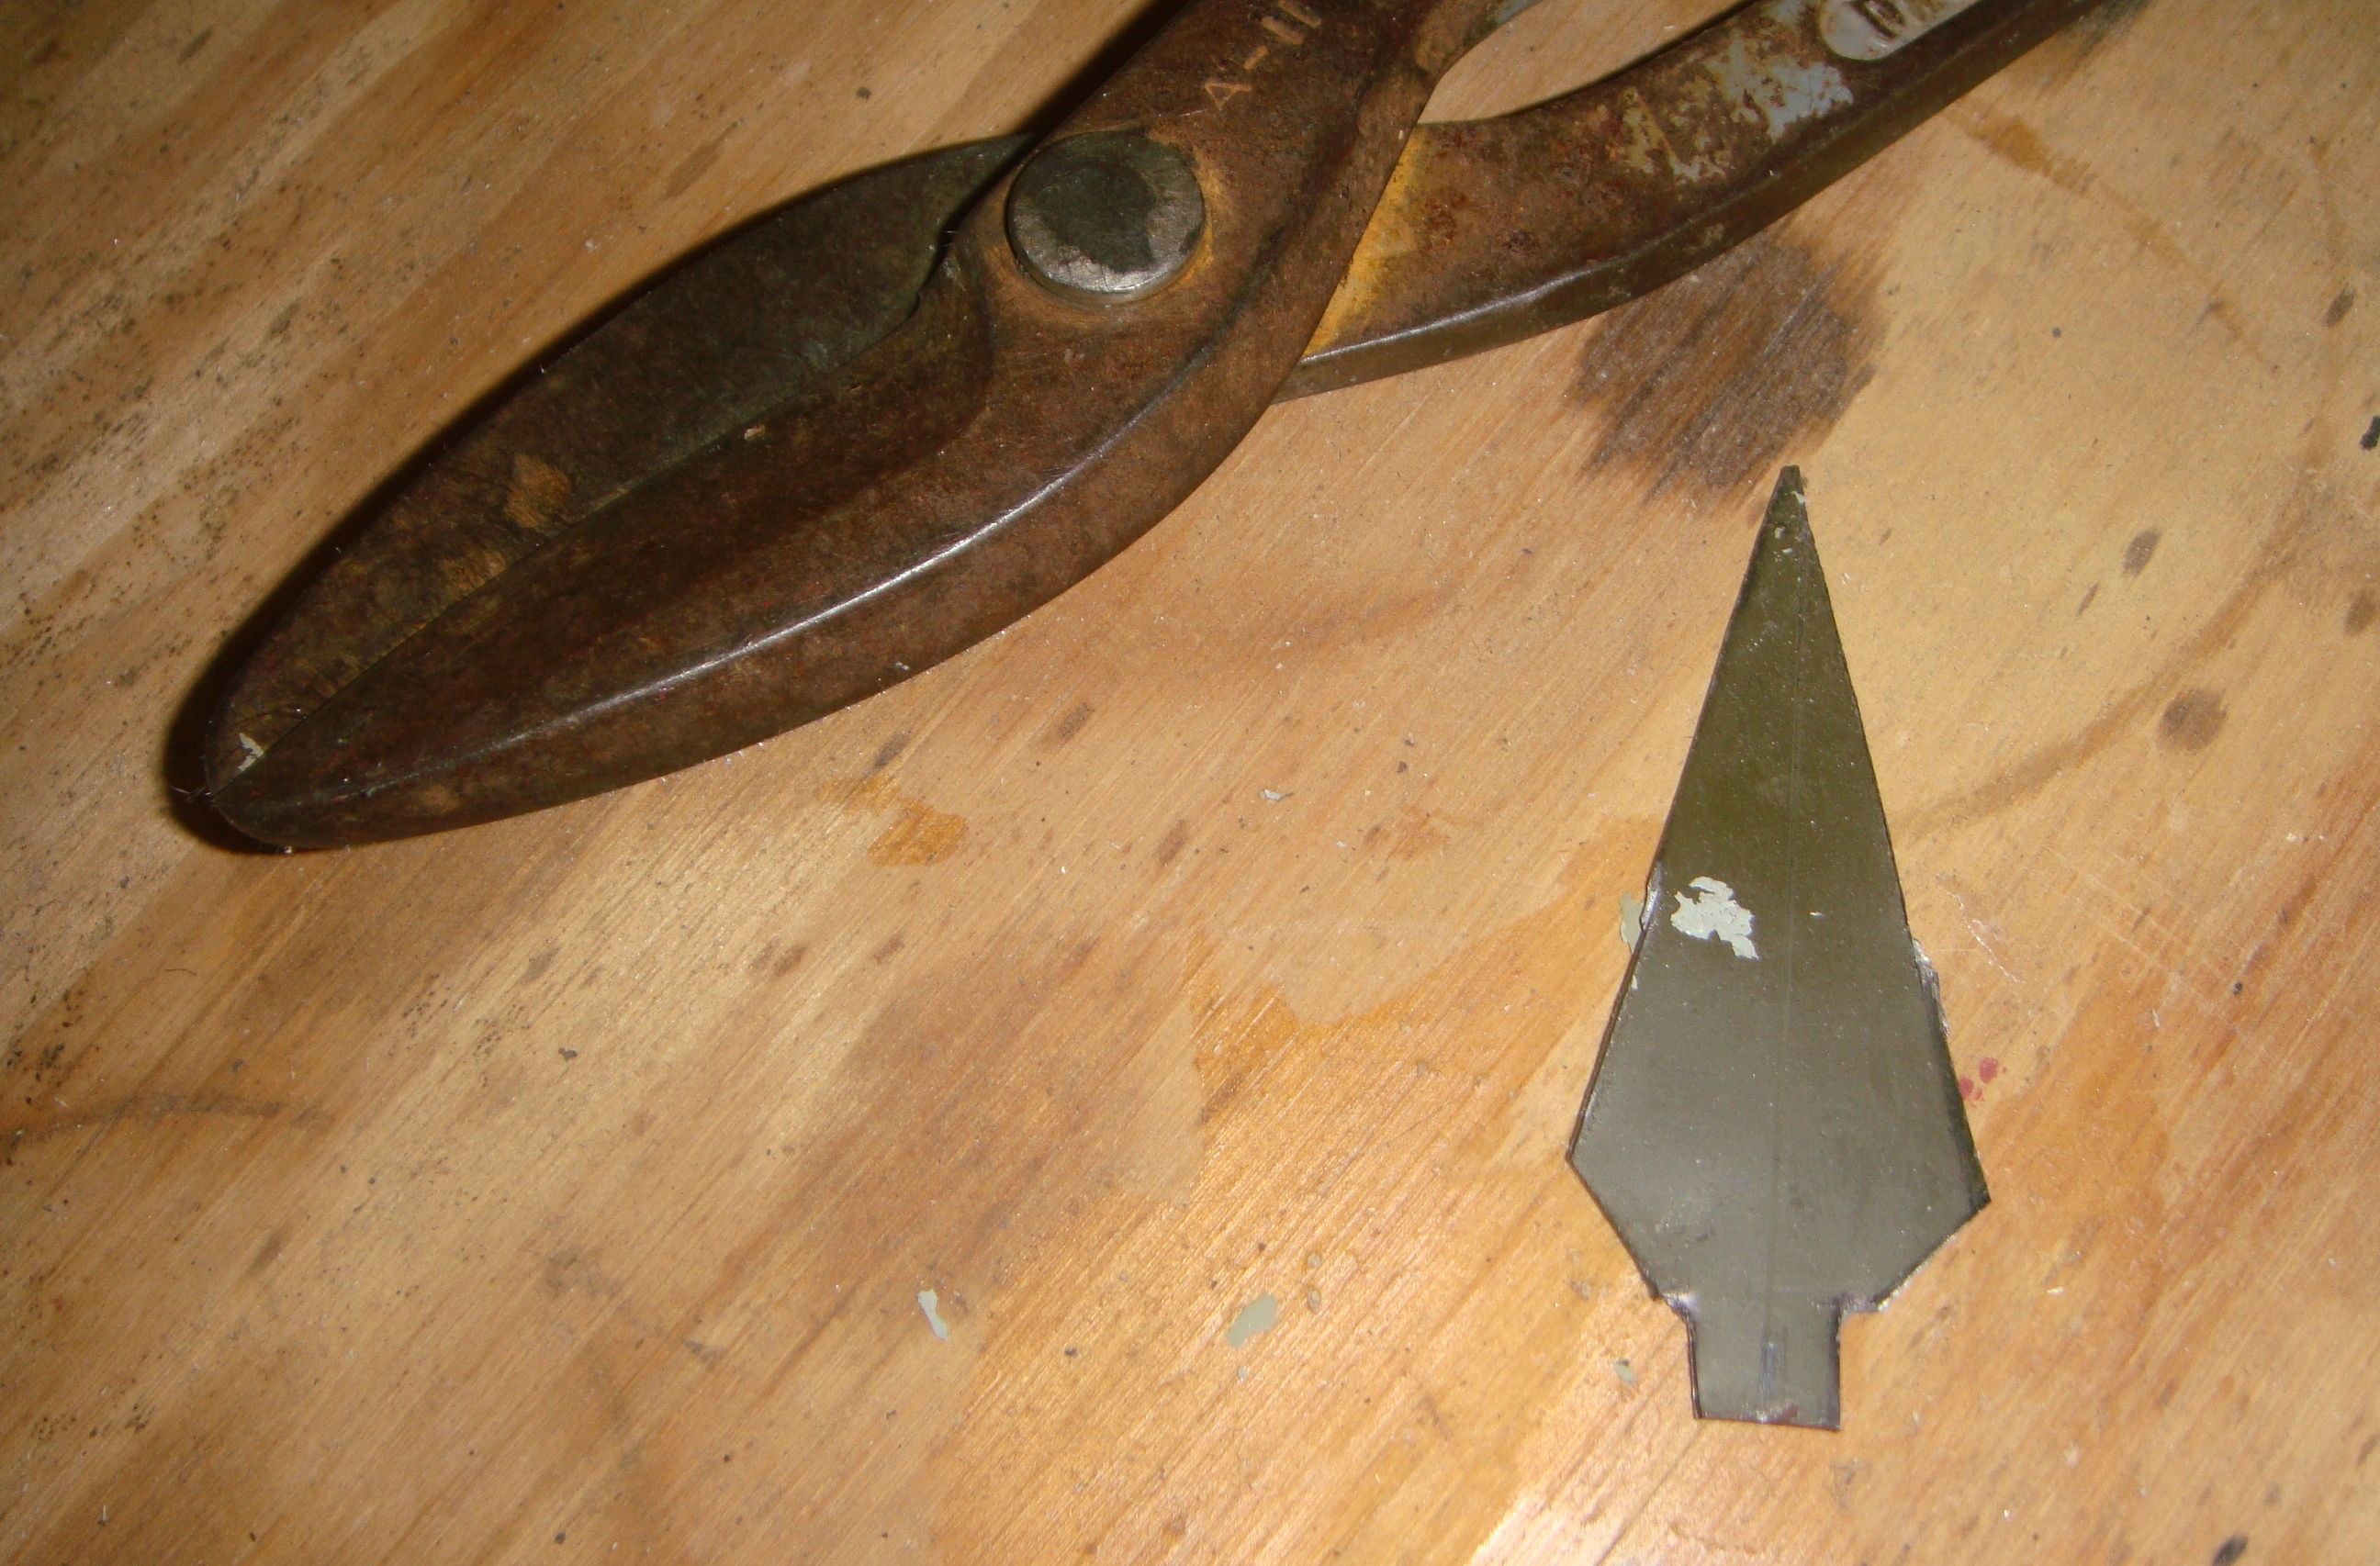
A file and sandpaper are used to finish up the blade.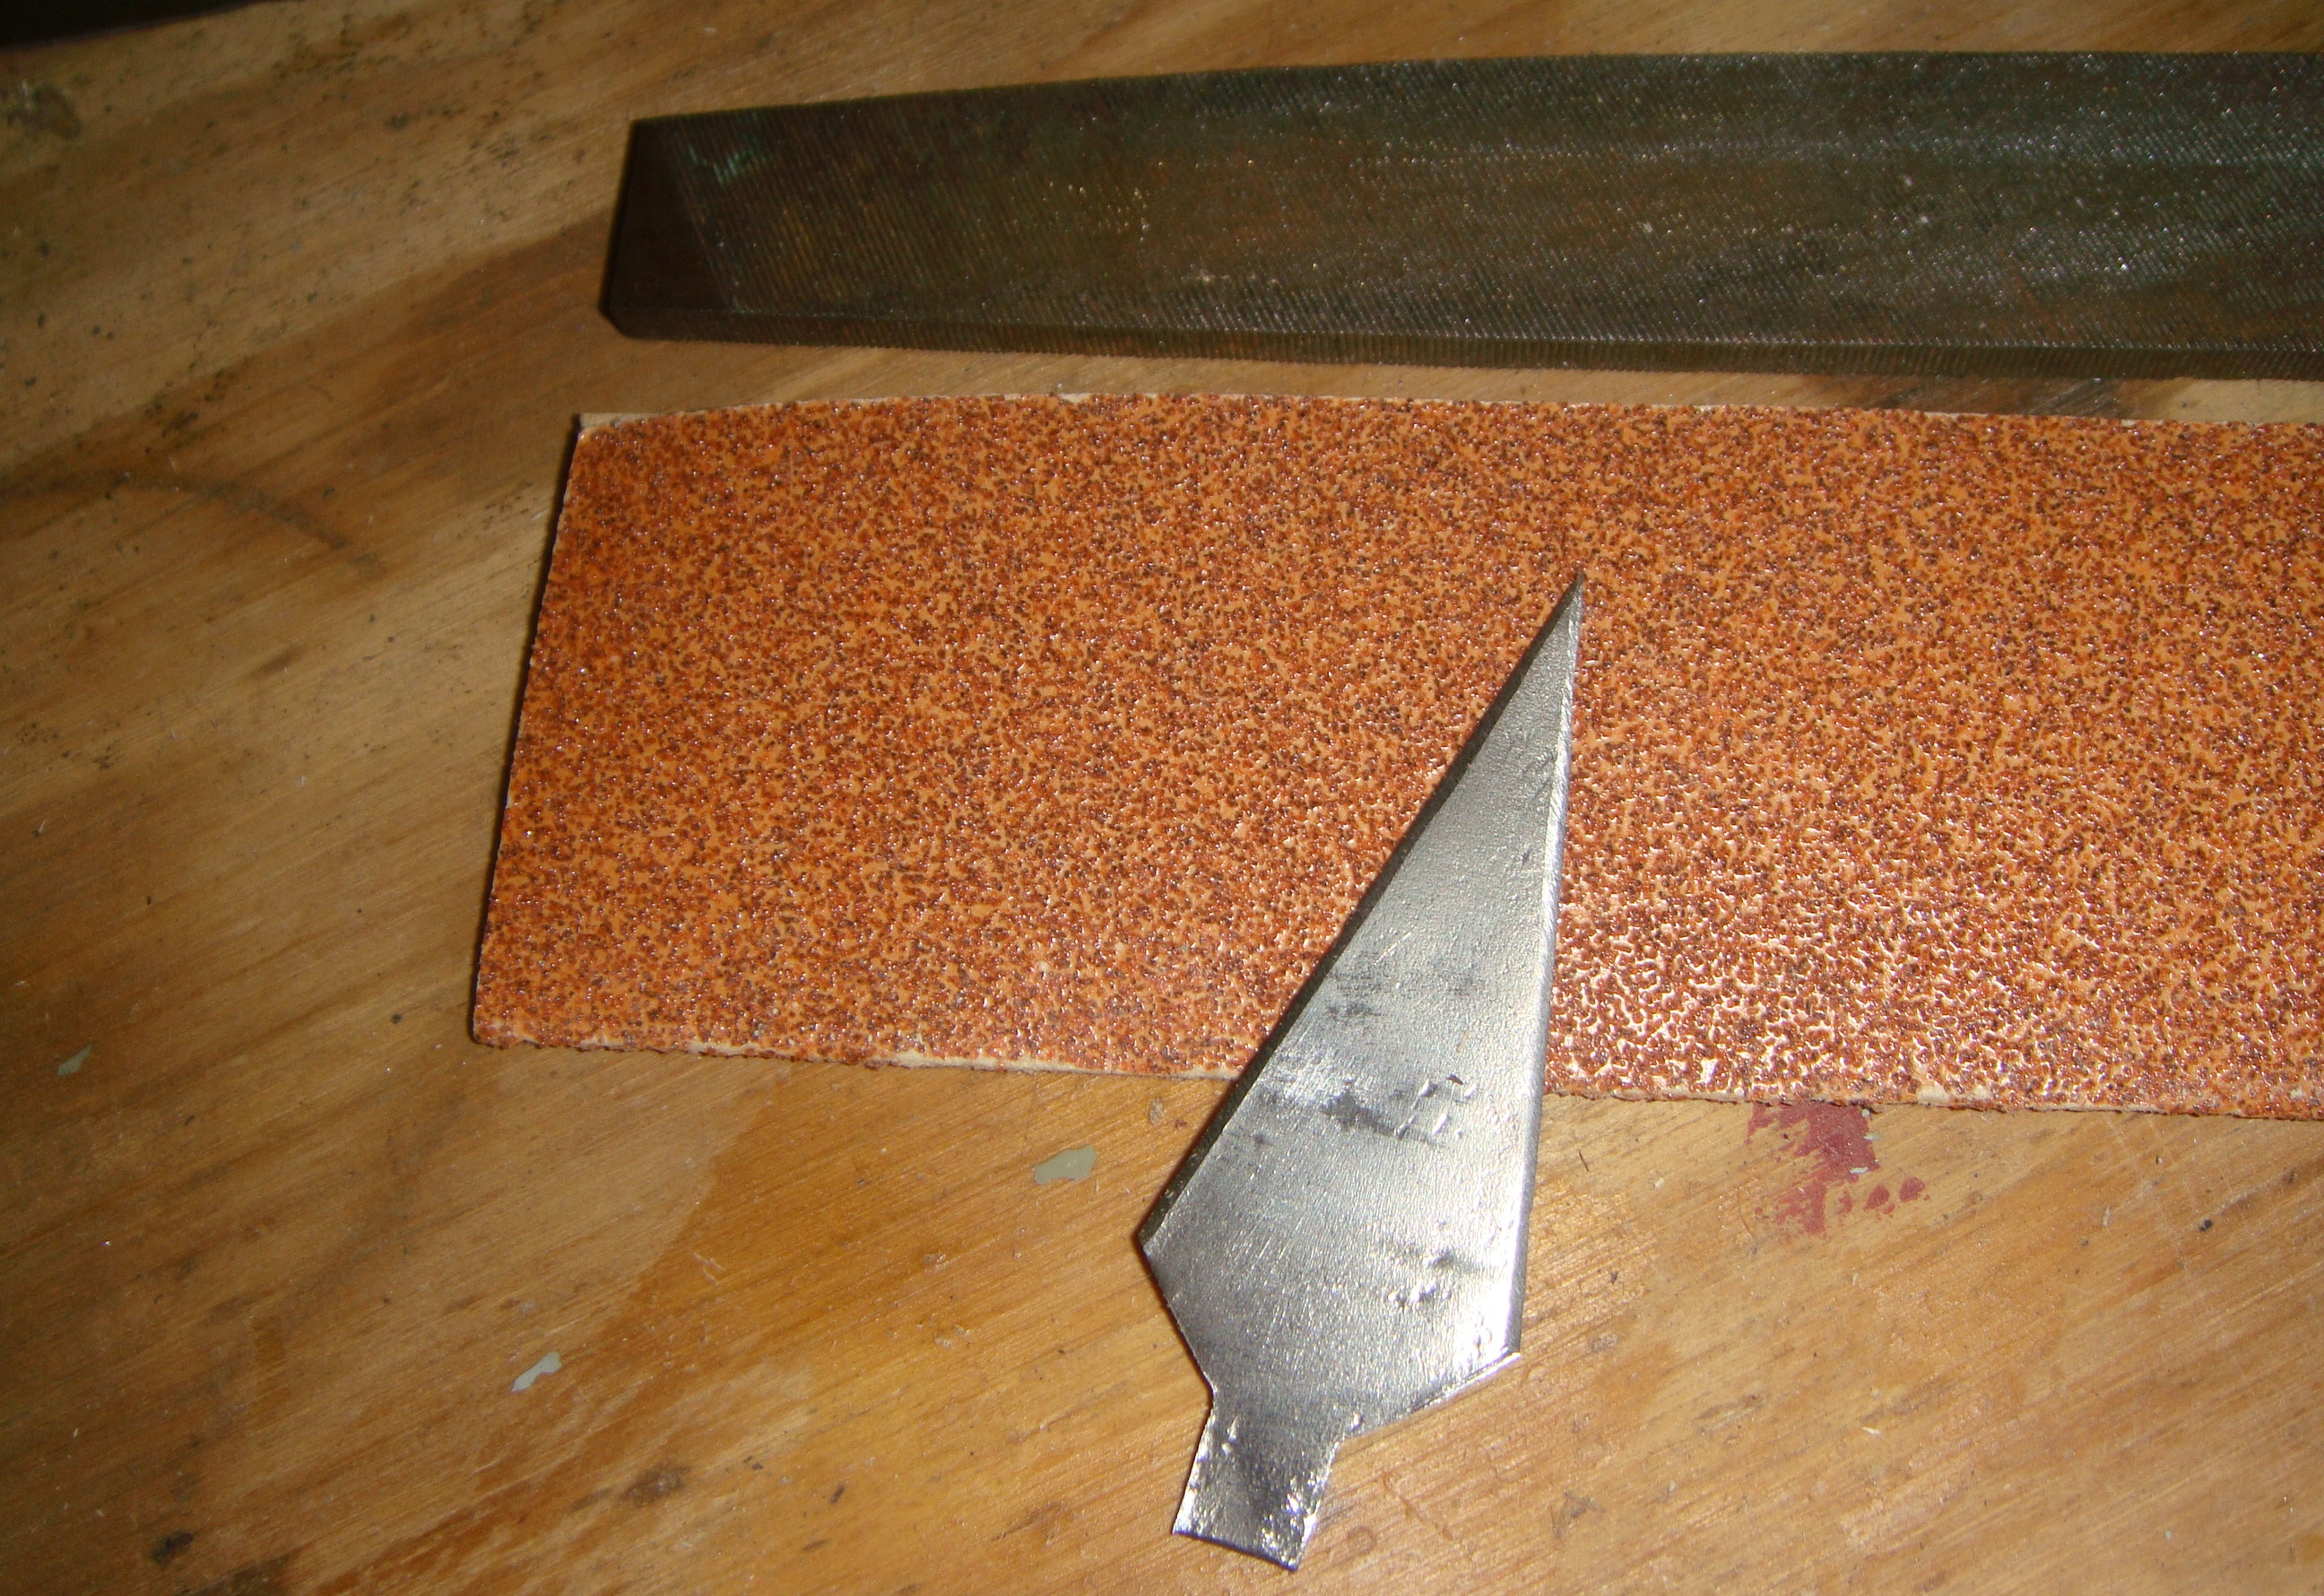
When the blade is finished I push it down into the slot that I have cut in the target point.
Now the broadhead is pushed back onto the shaft. The tang inside of the target point will fit on down into the shaft where I have slotted it.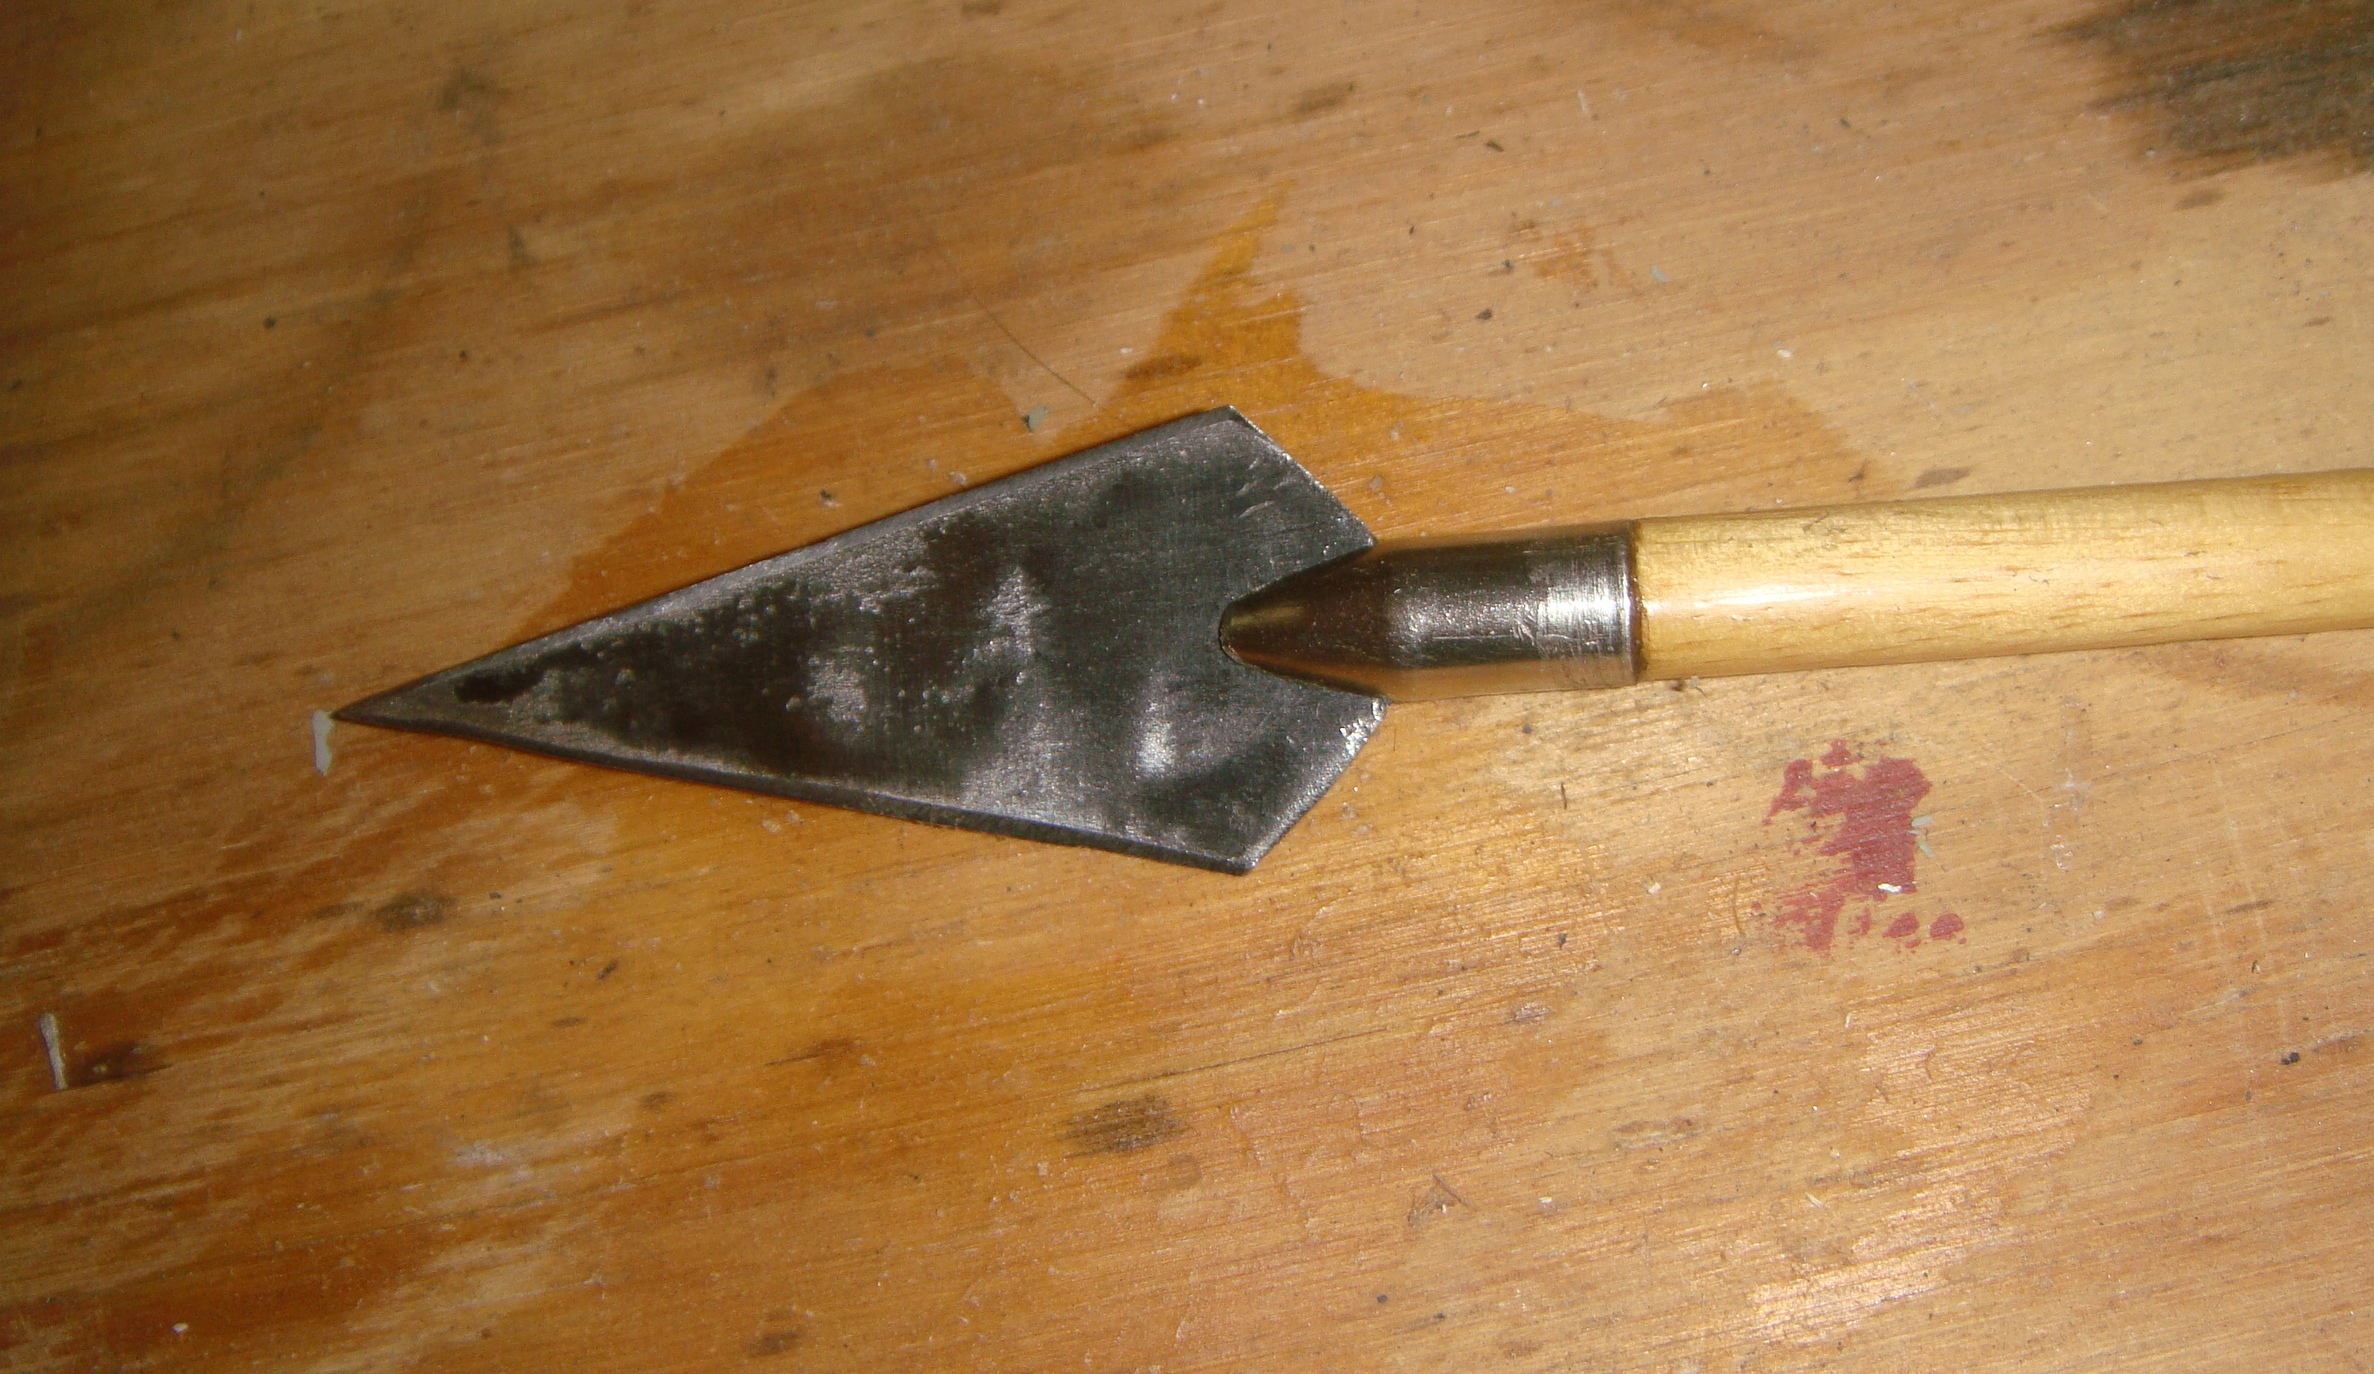
I drill a small hole that goes through the target point, the shaft, and the blade.
Then I push a small brad through the hole and cut the end of it off with wire cutters. I leave about a sixteenth-of-an-inch of brad sticking out.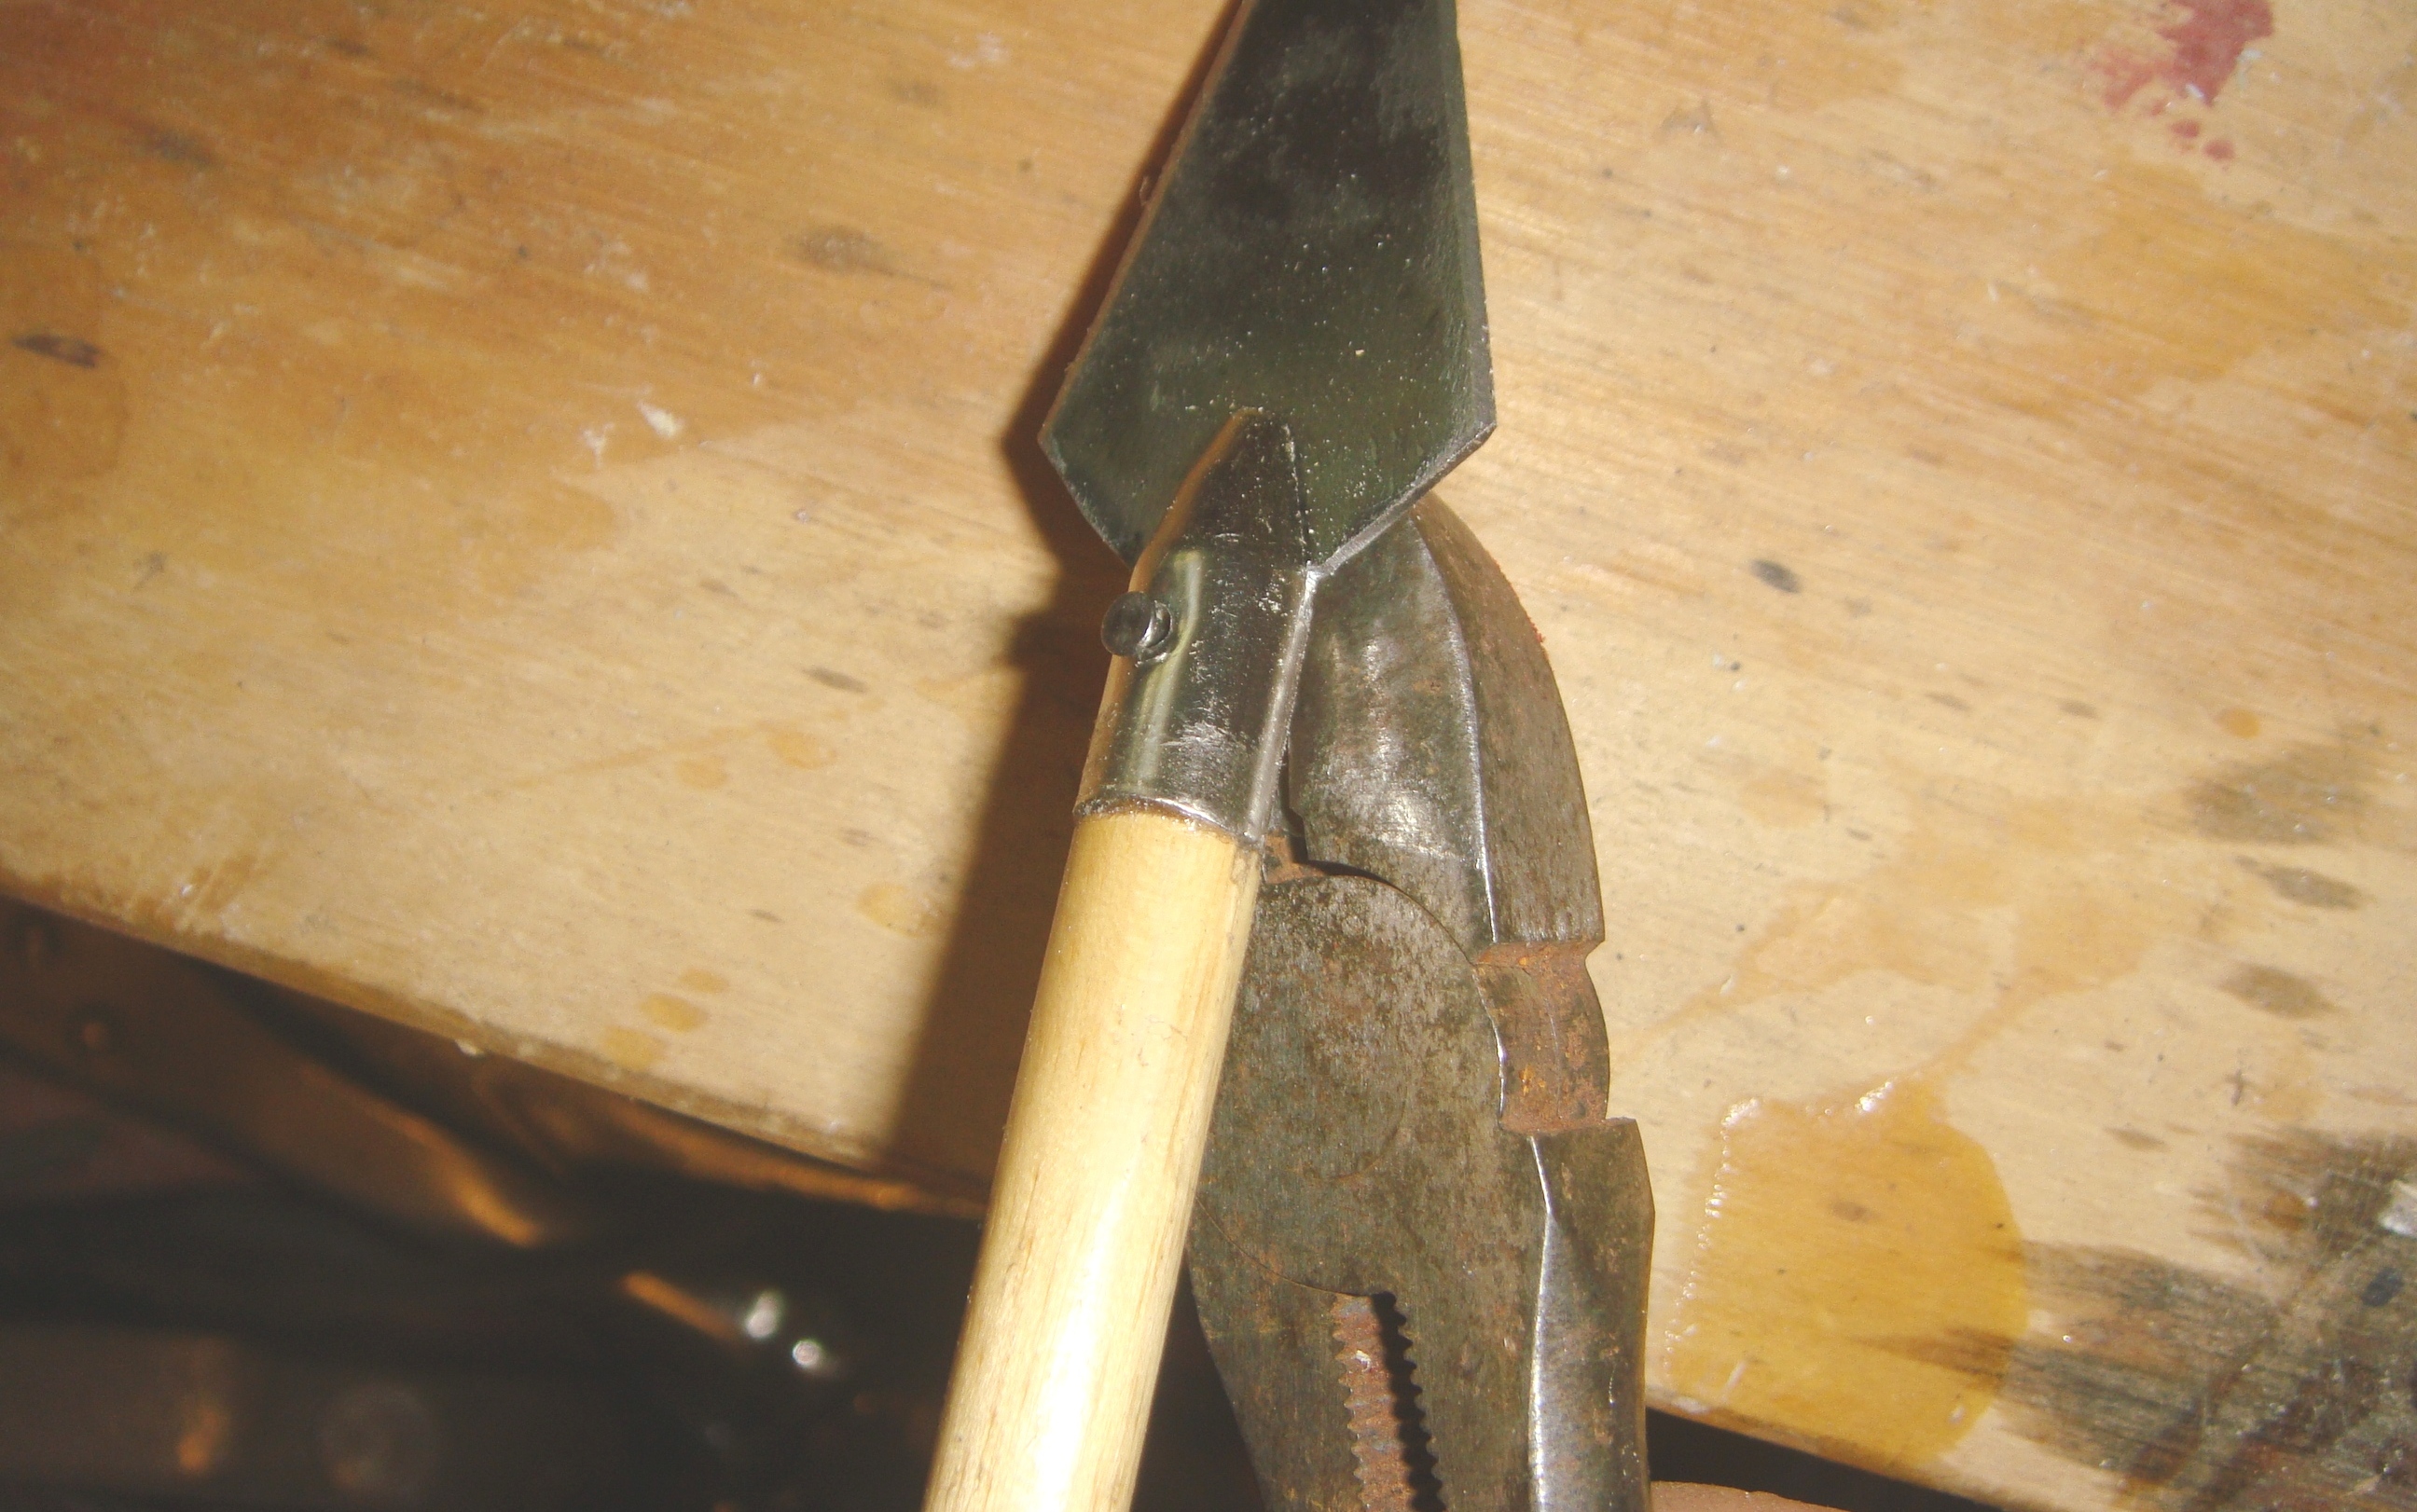
With a ball peen hammer, I peen down the raw end of the brad to make it a small rivet.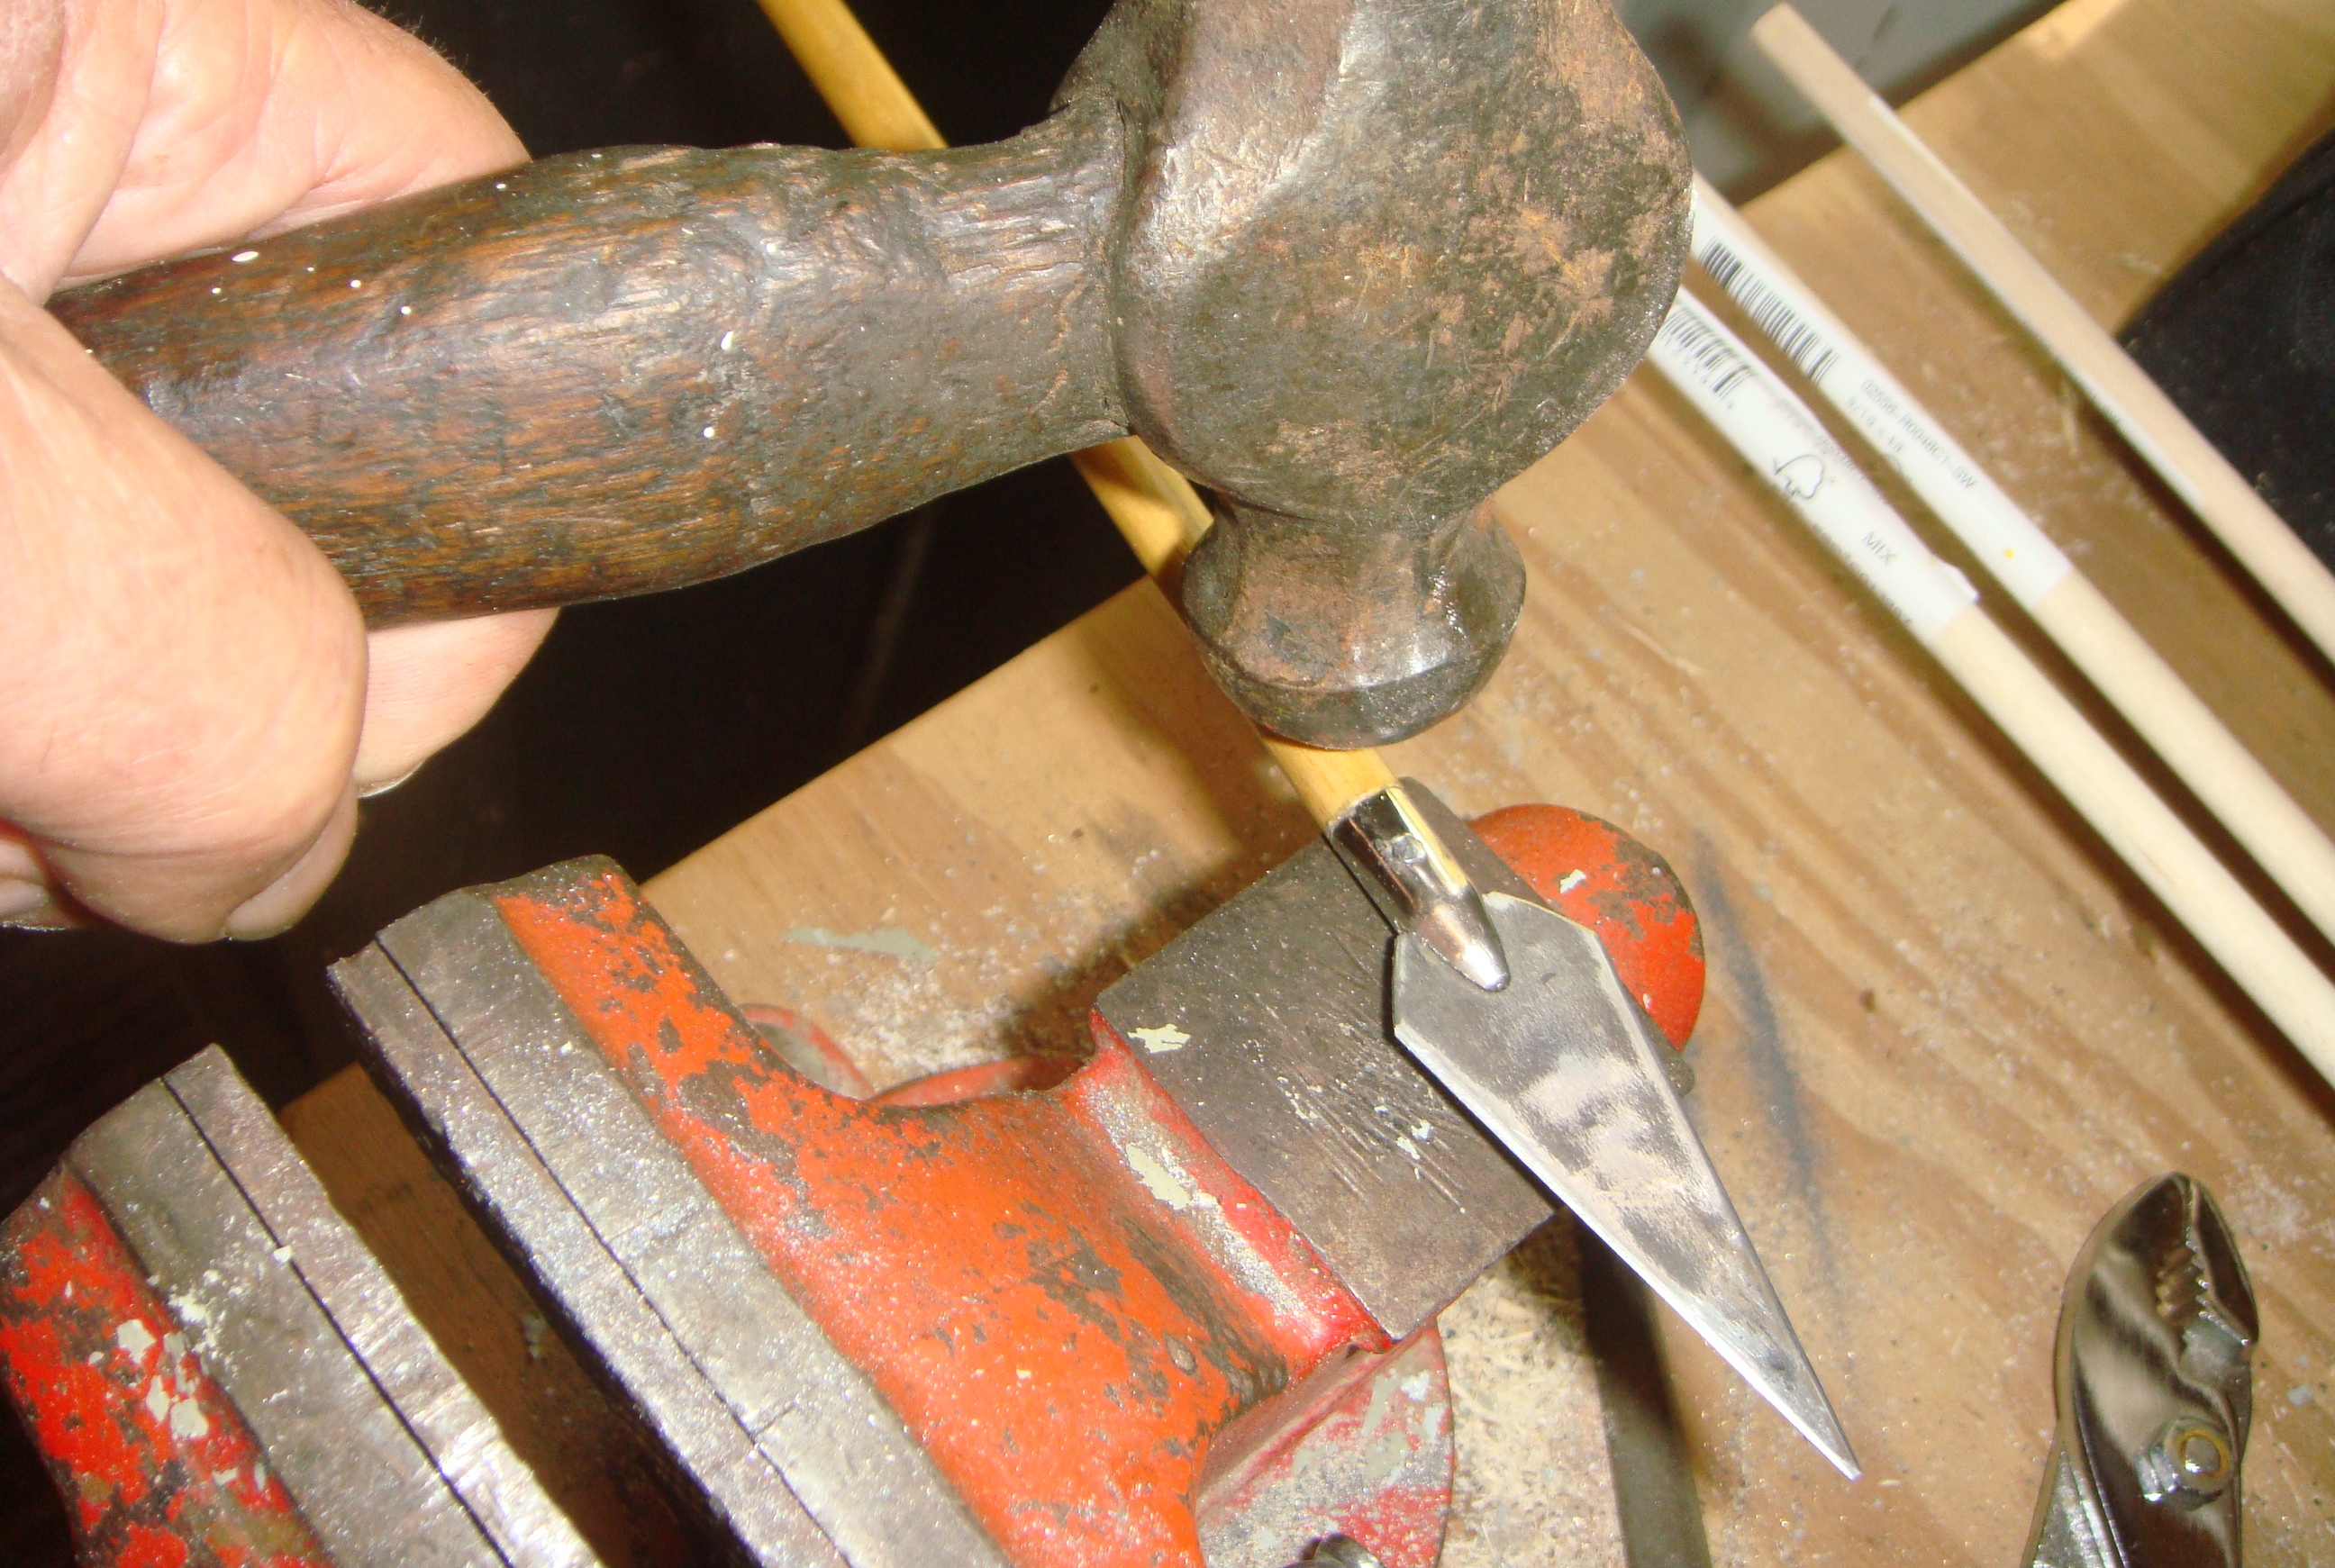
Voila, a target point and some scrap sheet steel have now become a hunting broadhead.
 Note that Saxton Pope made his broadheads with barbs on the back; something that is now illegal in some areas. Also, his broadheads were enormous; as much as three inches long. Of course he was often hunting very large game including elk and bears
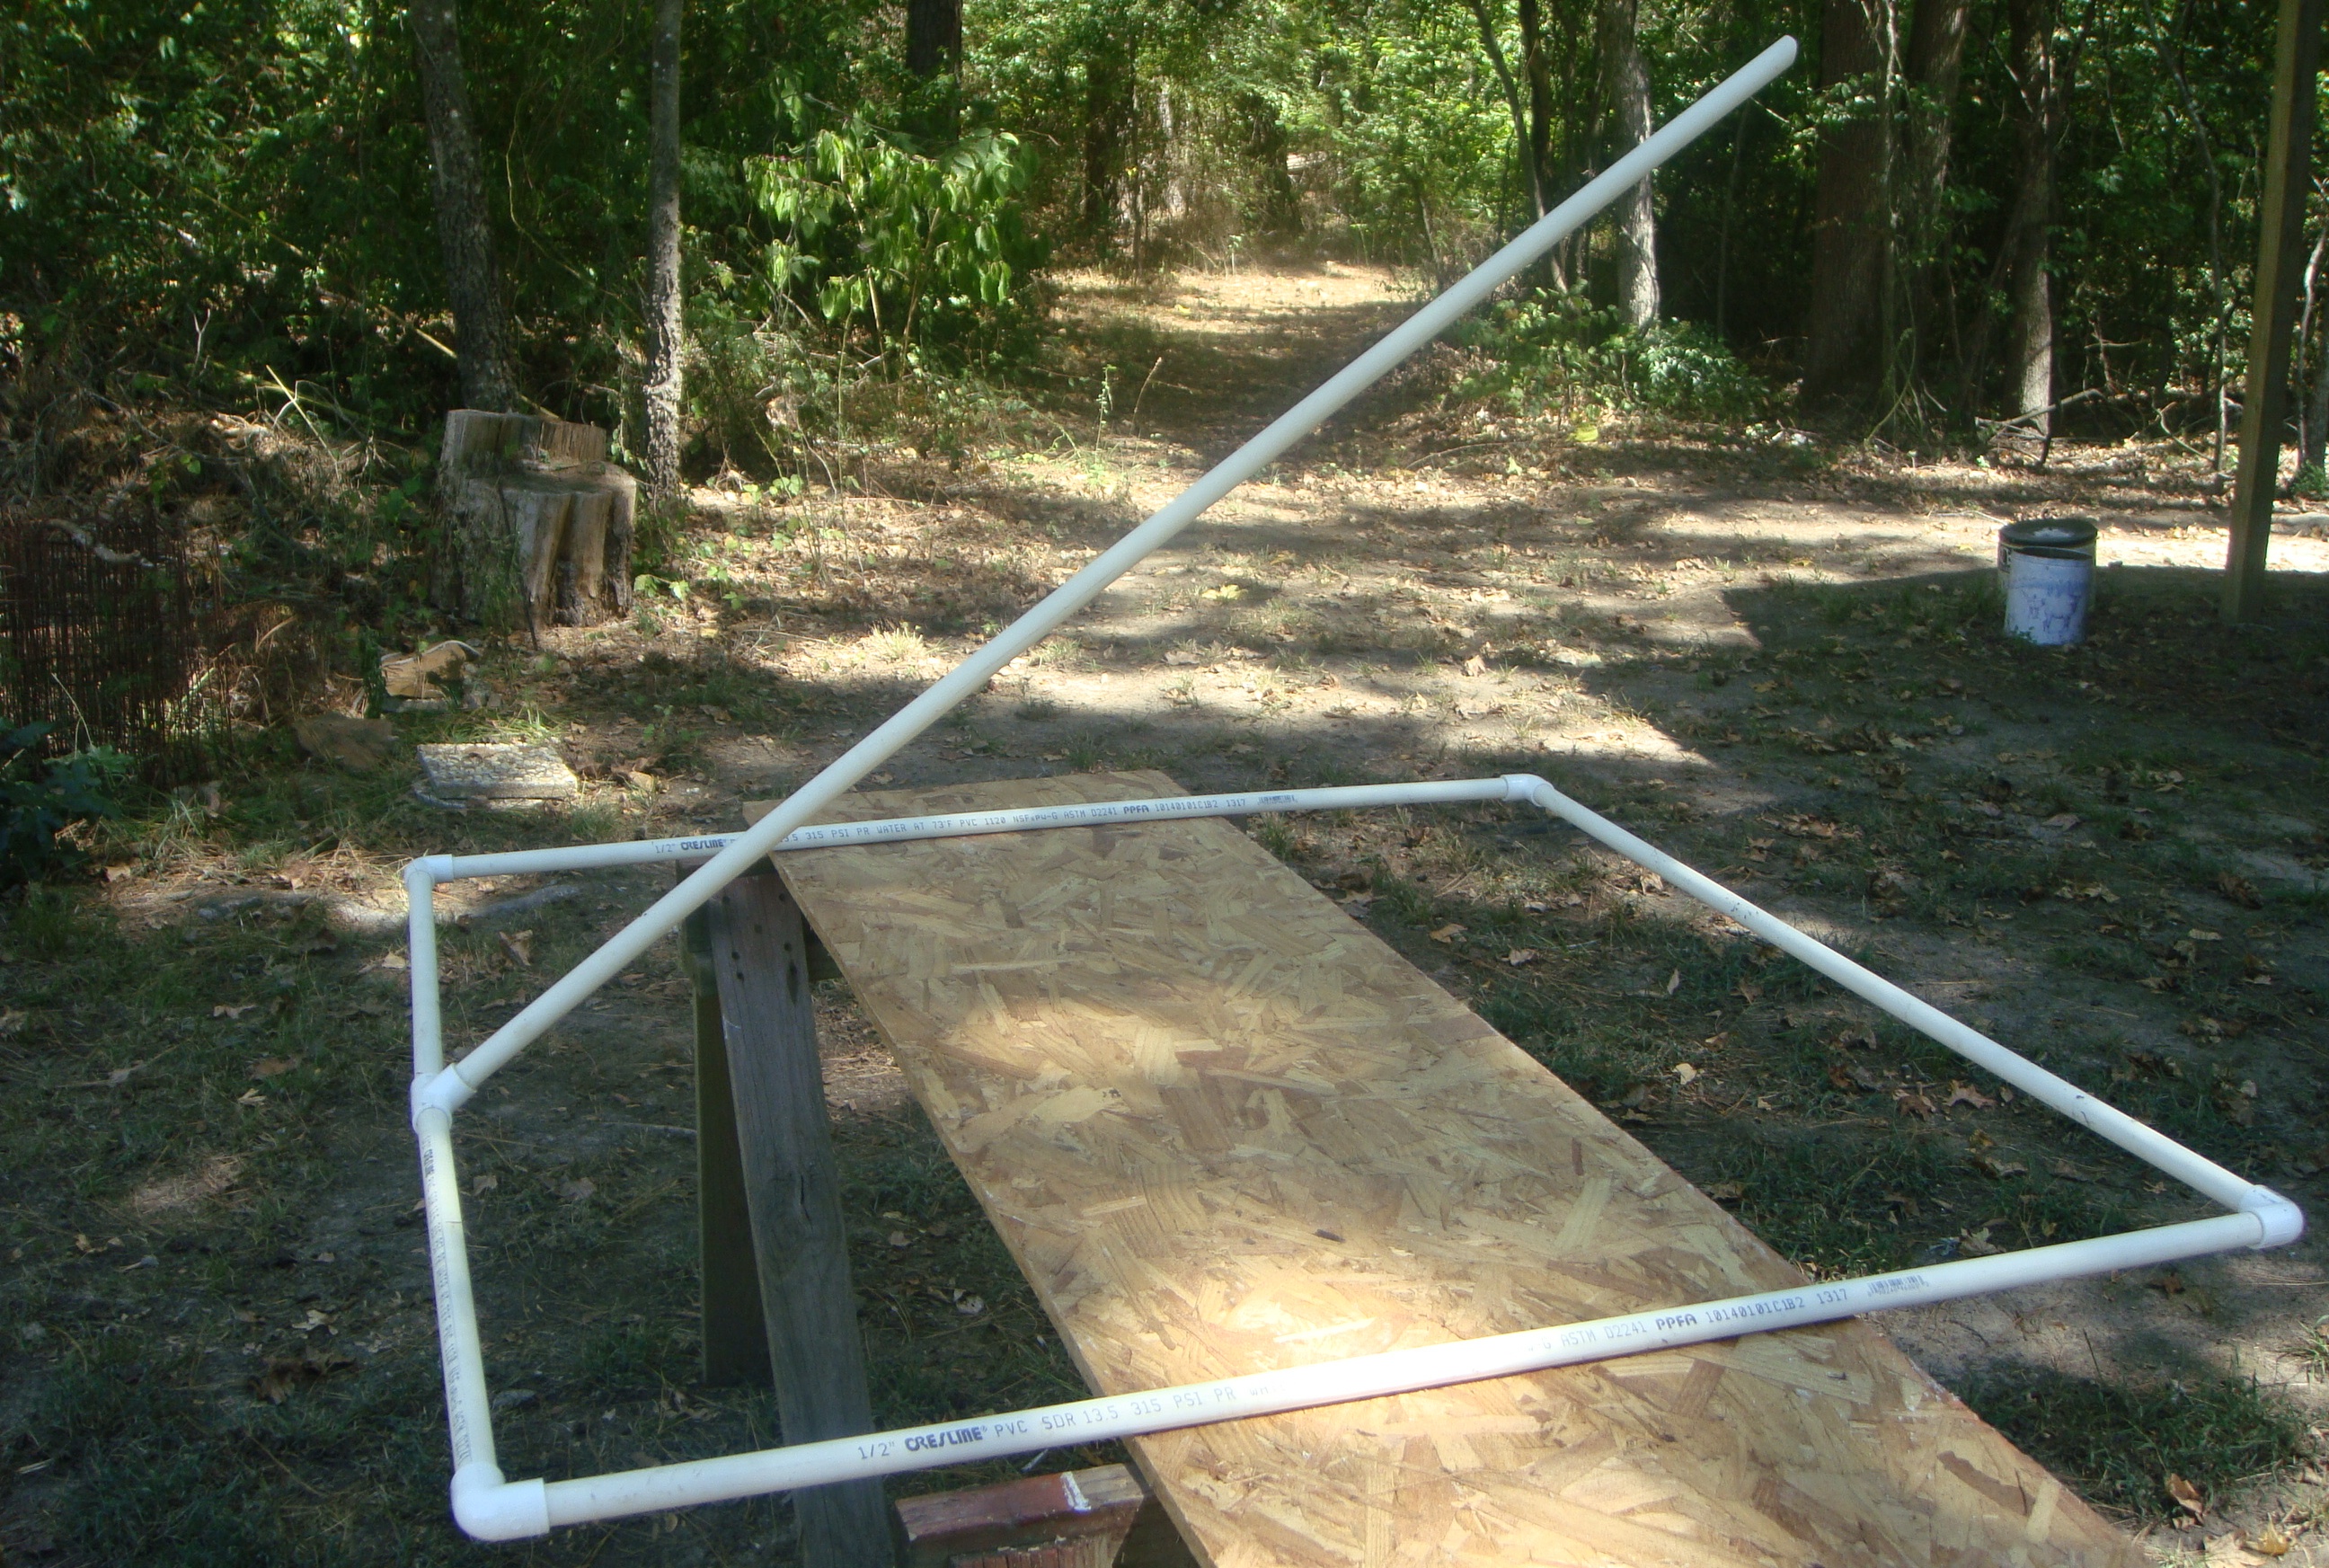
Deer season is coming up, and I wanted to build a blind to hang around my deer stand. I looked around the shop to see what I had on hand, and then I set to work building. The finished blind was built from about 90% recycled scraps and pieces, and I think the end product does a pretty good job of concealing me from my quarry.

These are the tools and materials that I used:
Tools
Hacksaw
Electric Drill and bit
Measuring tape
Pencil
Hammer
A few nails
Scissors
Straight pins
Materials
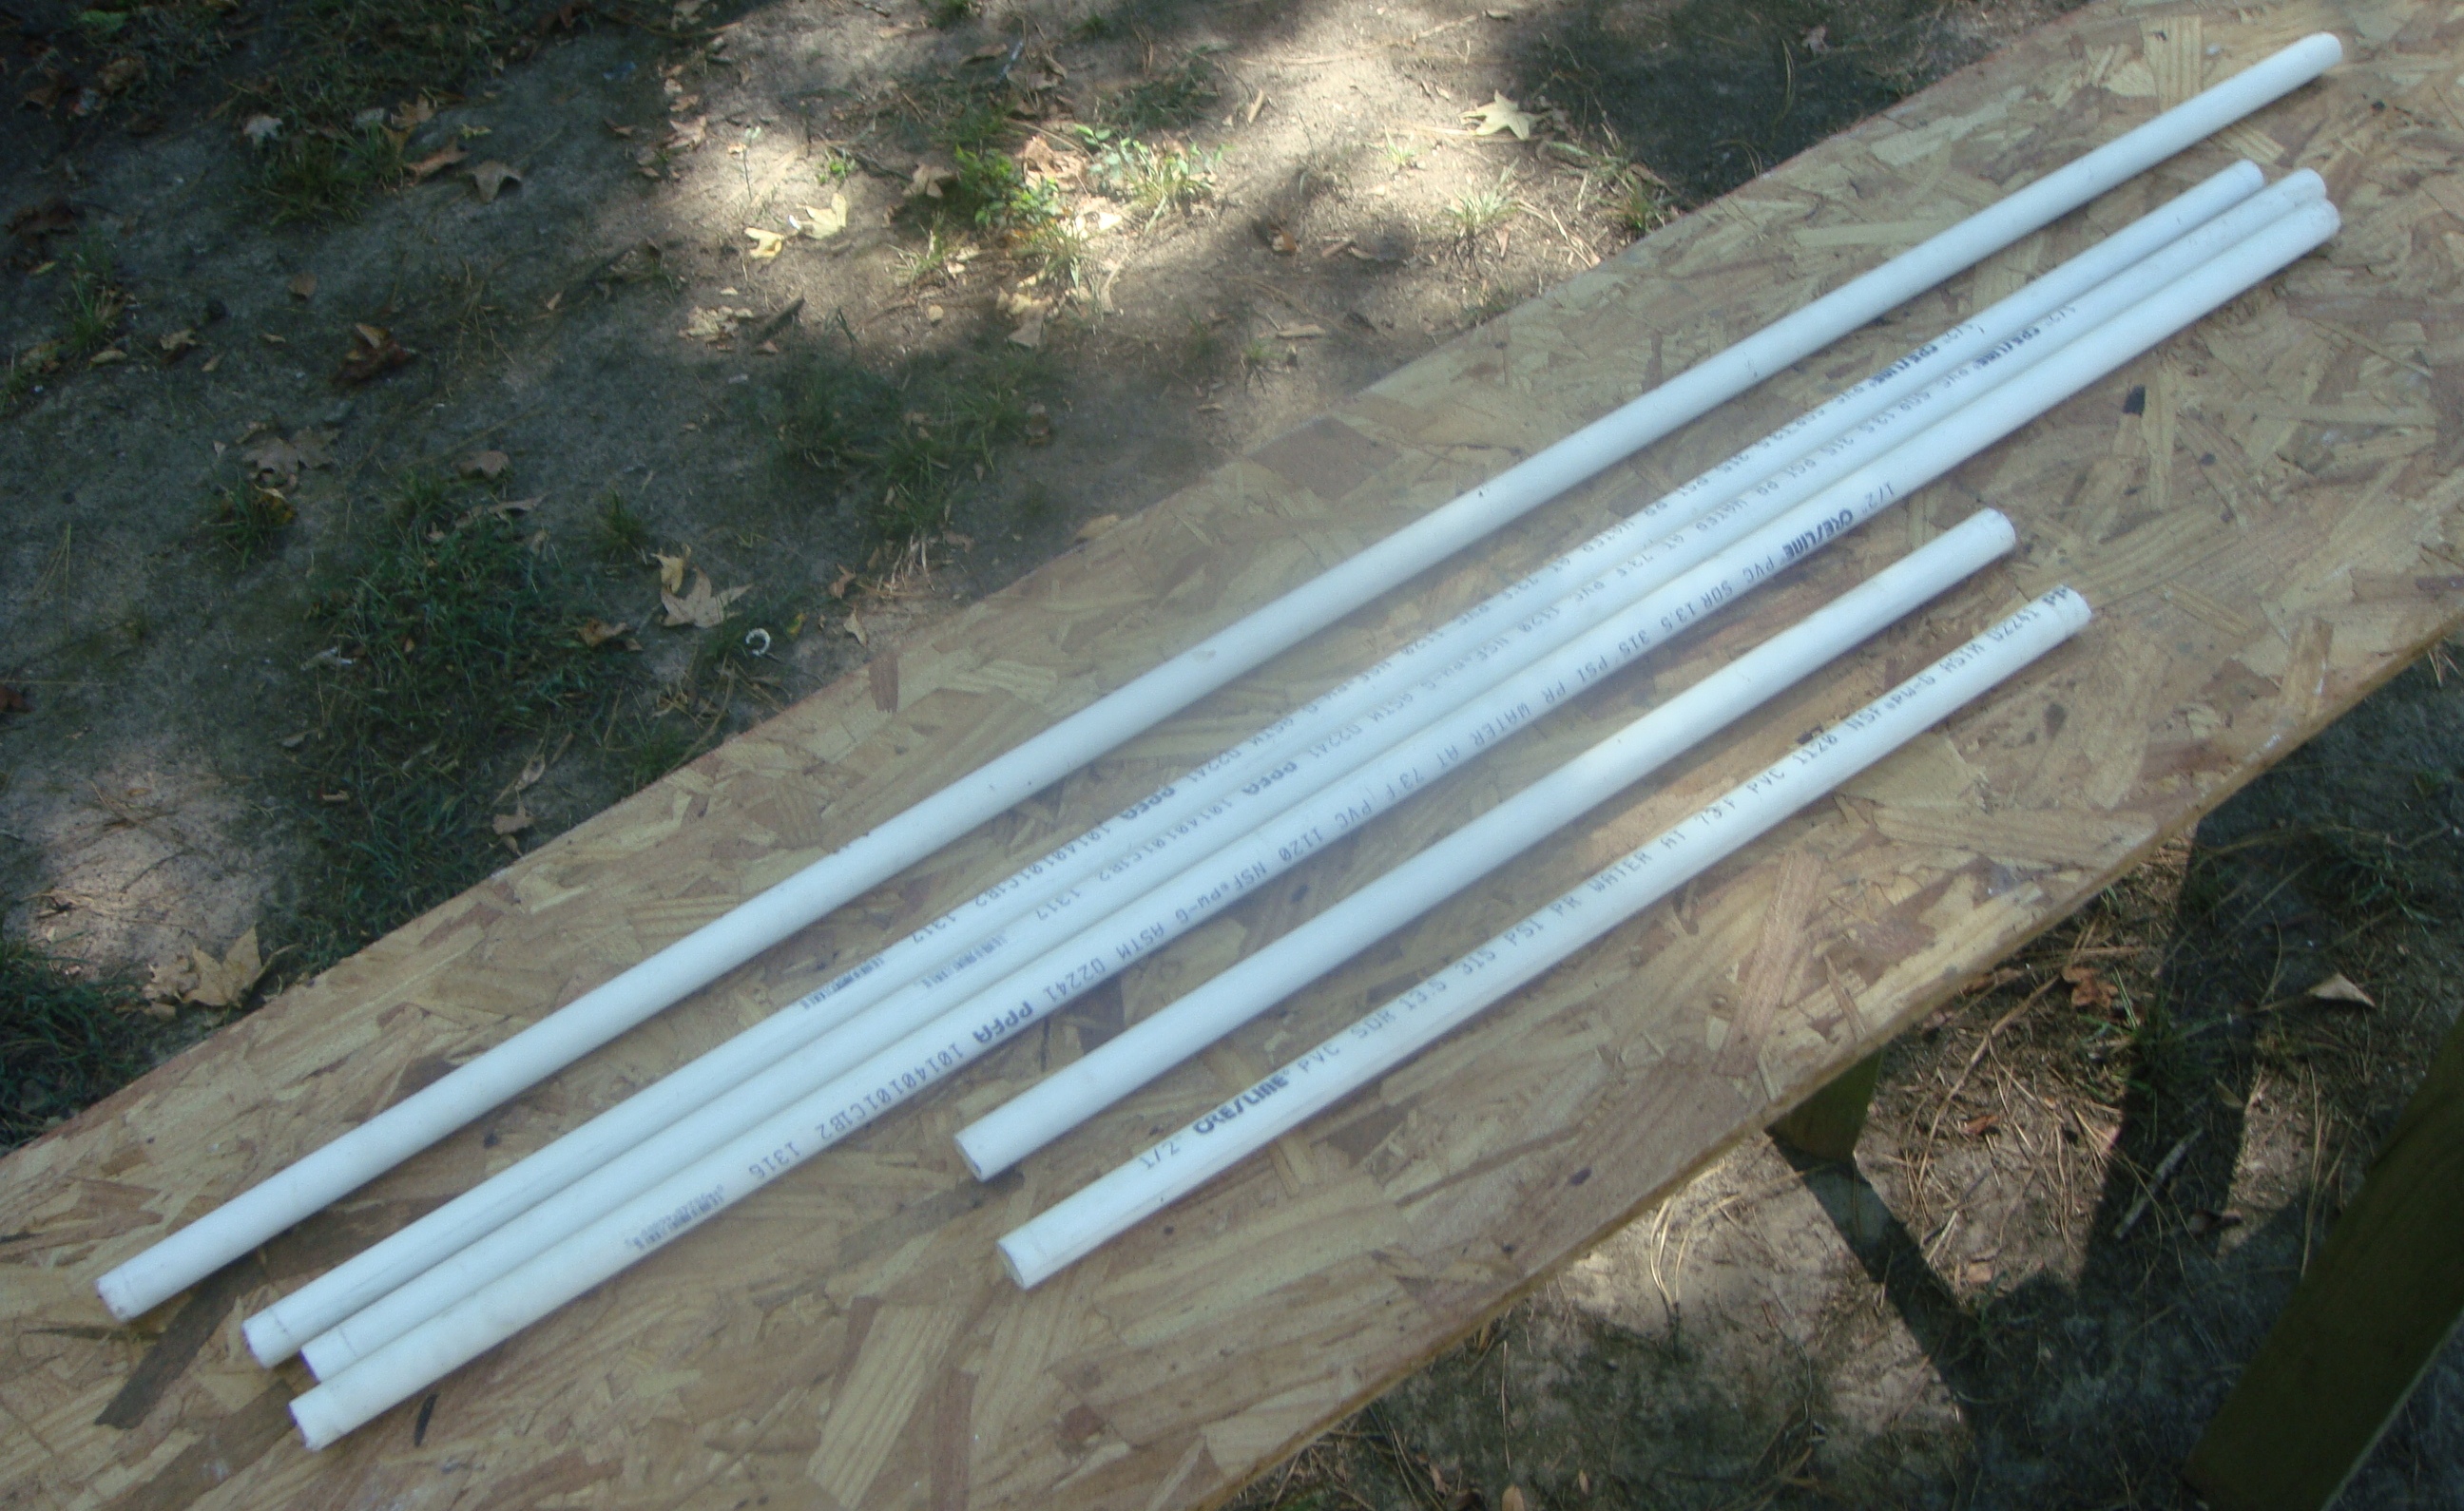
One joint (20 feet) of ½” PVC pipe
One ½” PVC “T”
Four ½” PVC 90’s
Some PVC glue
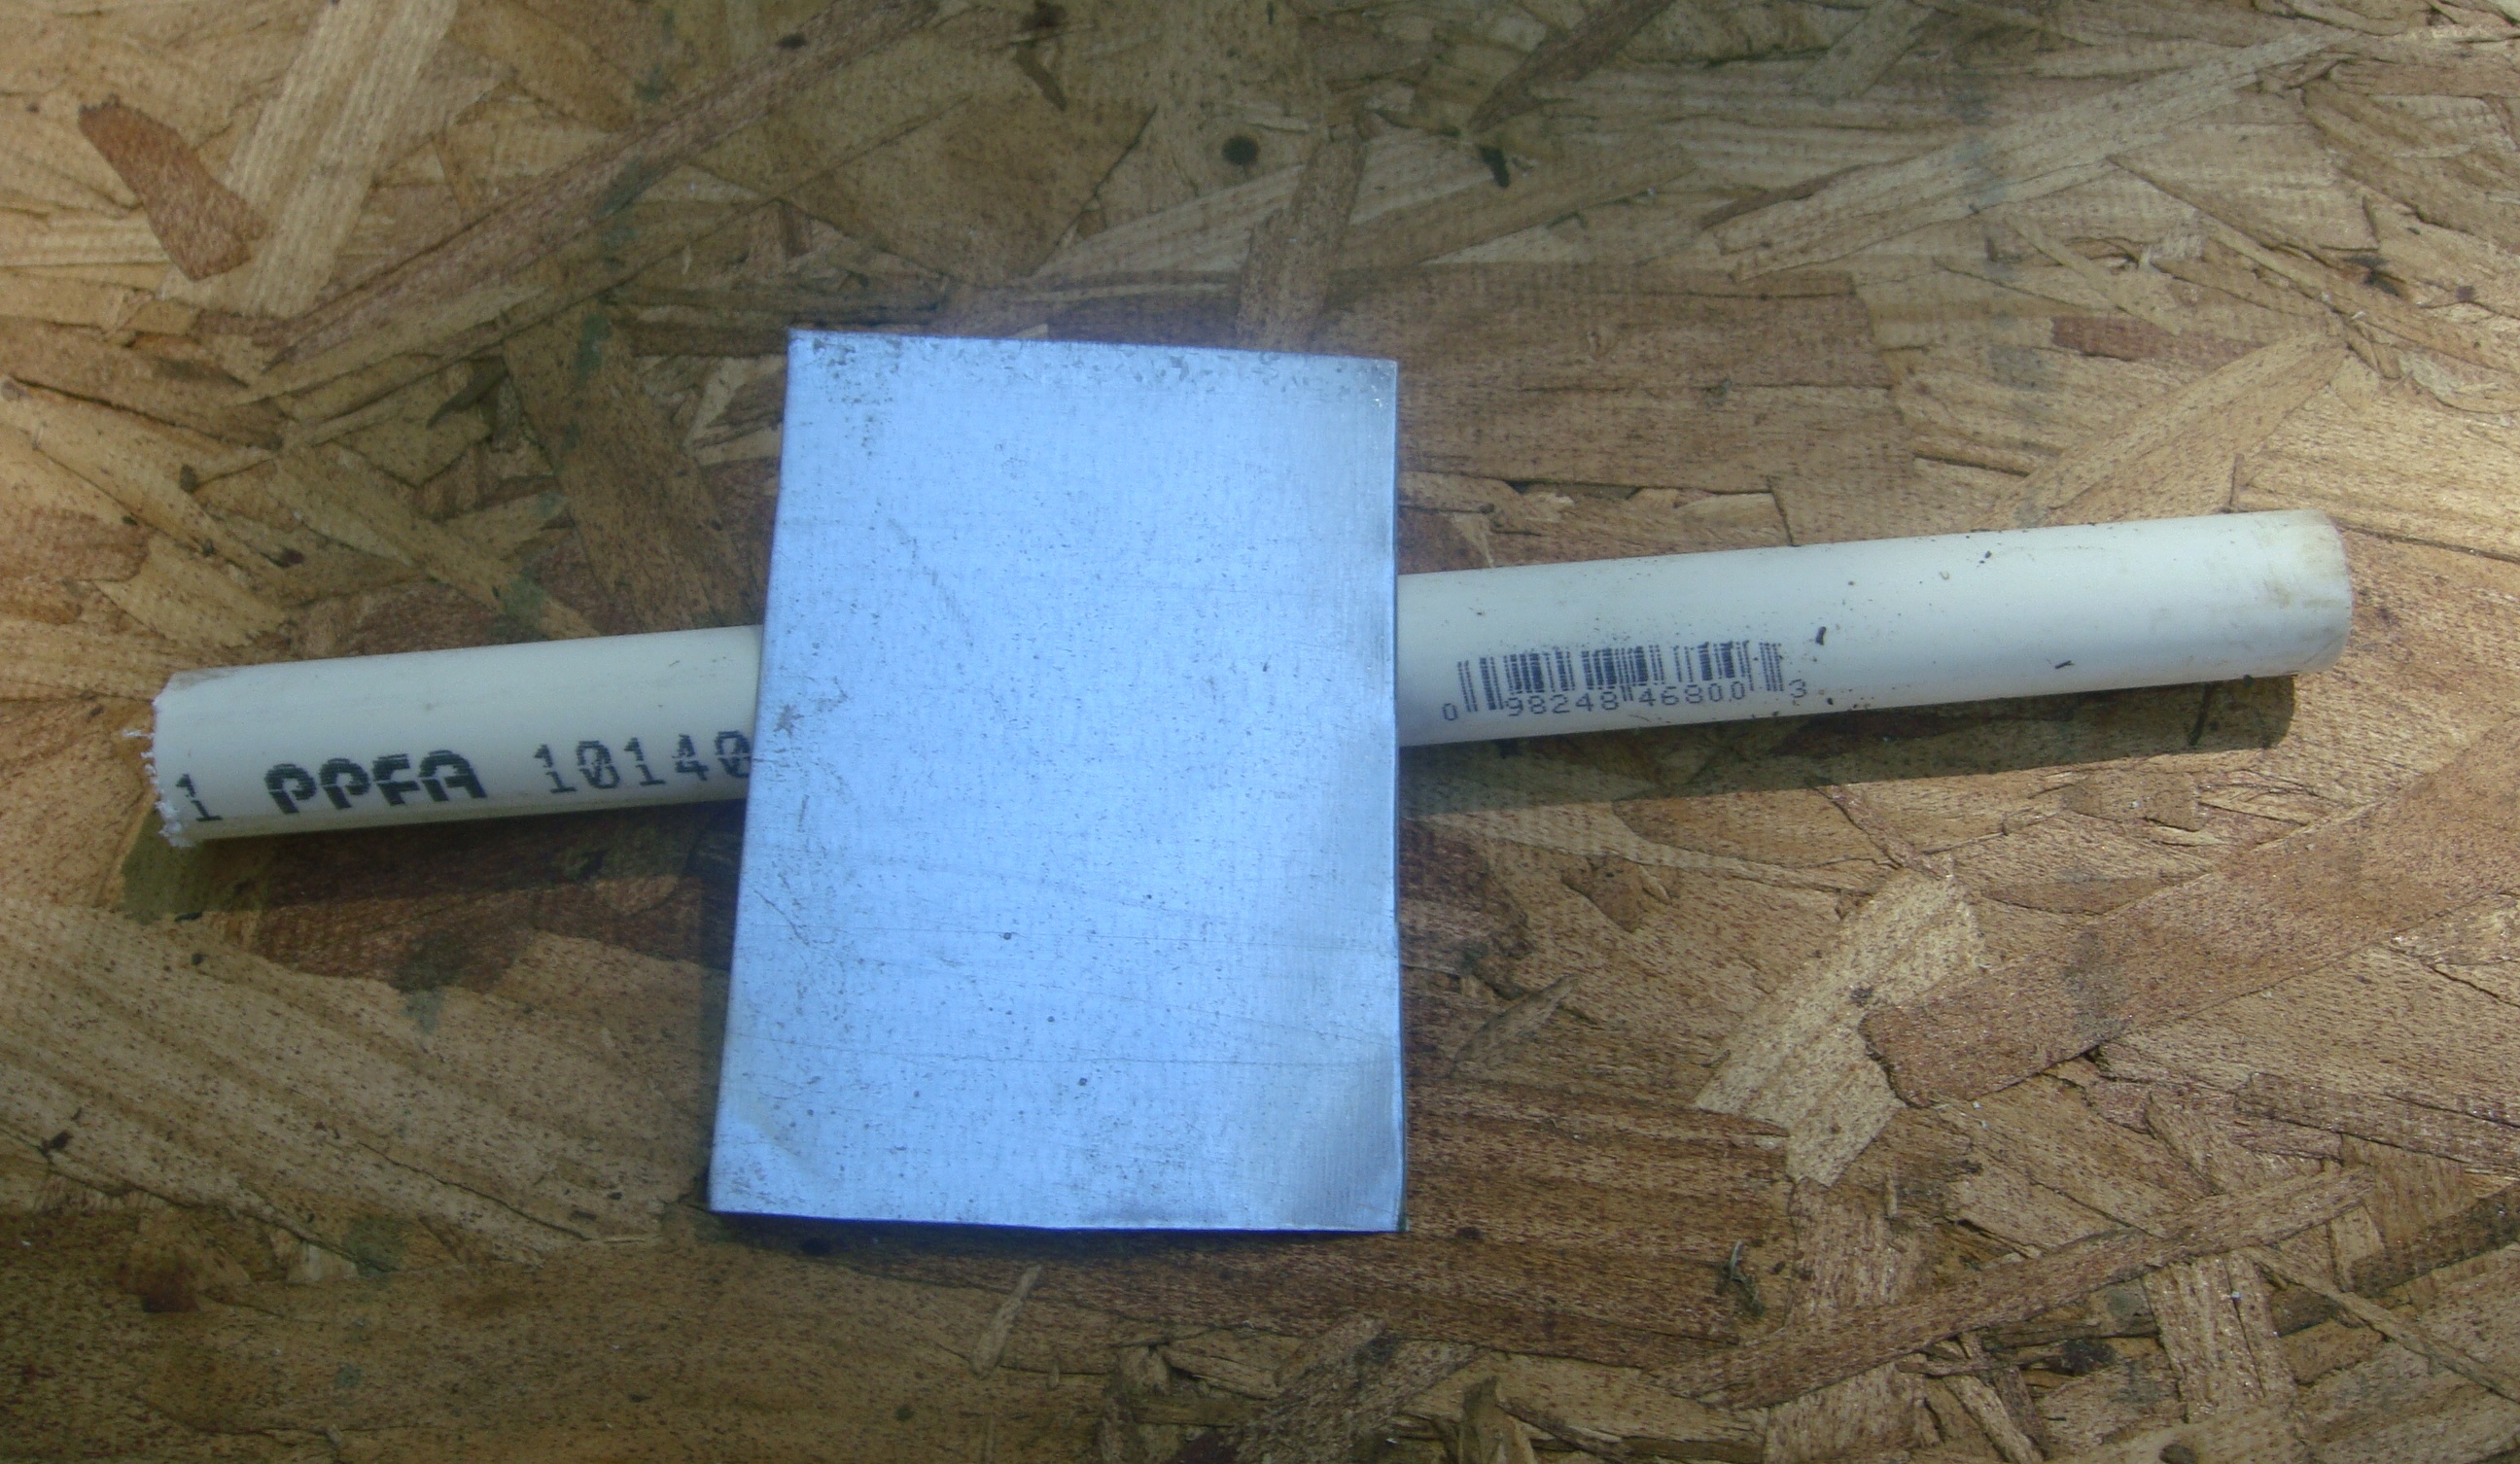
A small piece of sheet metal about 3” x 6”
Three partial cans of spray paint (I had some black, green, and gray in the shop)
Two pieces of camo netting
Three old burlap sacks (feed sack size)
Some permanent fabric glue


My finished blind is about 46” x 46”. If you make yours any bigger you may want to step up to ¾” PVC to support the additional weight. I made the curtains for the blind out of stuff that I already had around. Your can make your curtains any way that you want depending on what materials you have access to. This is how I put the blind together:
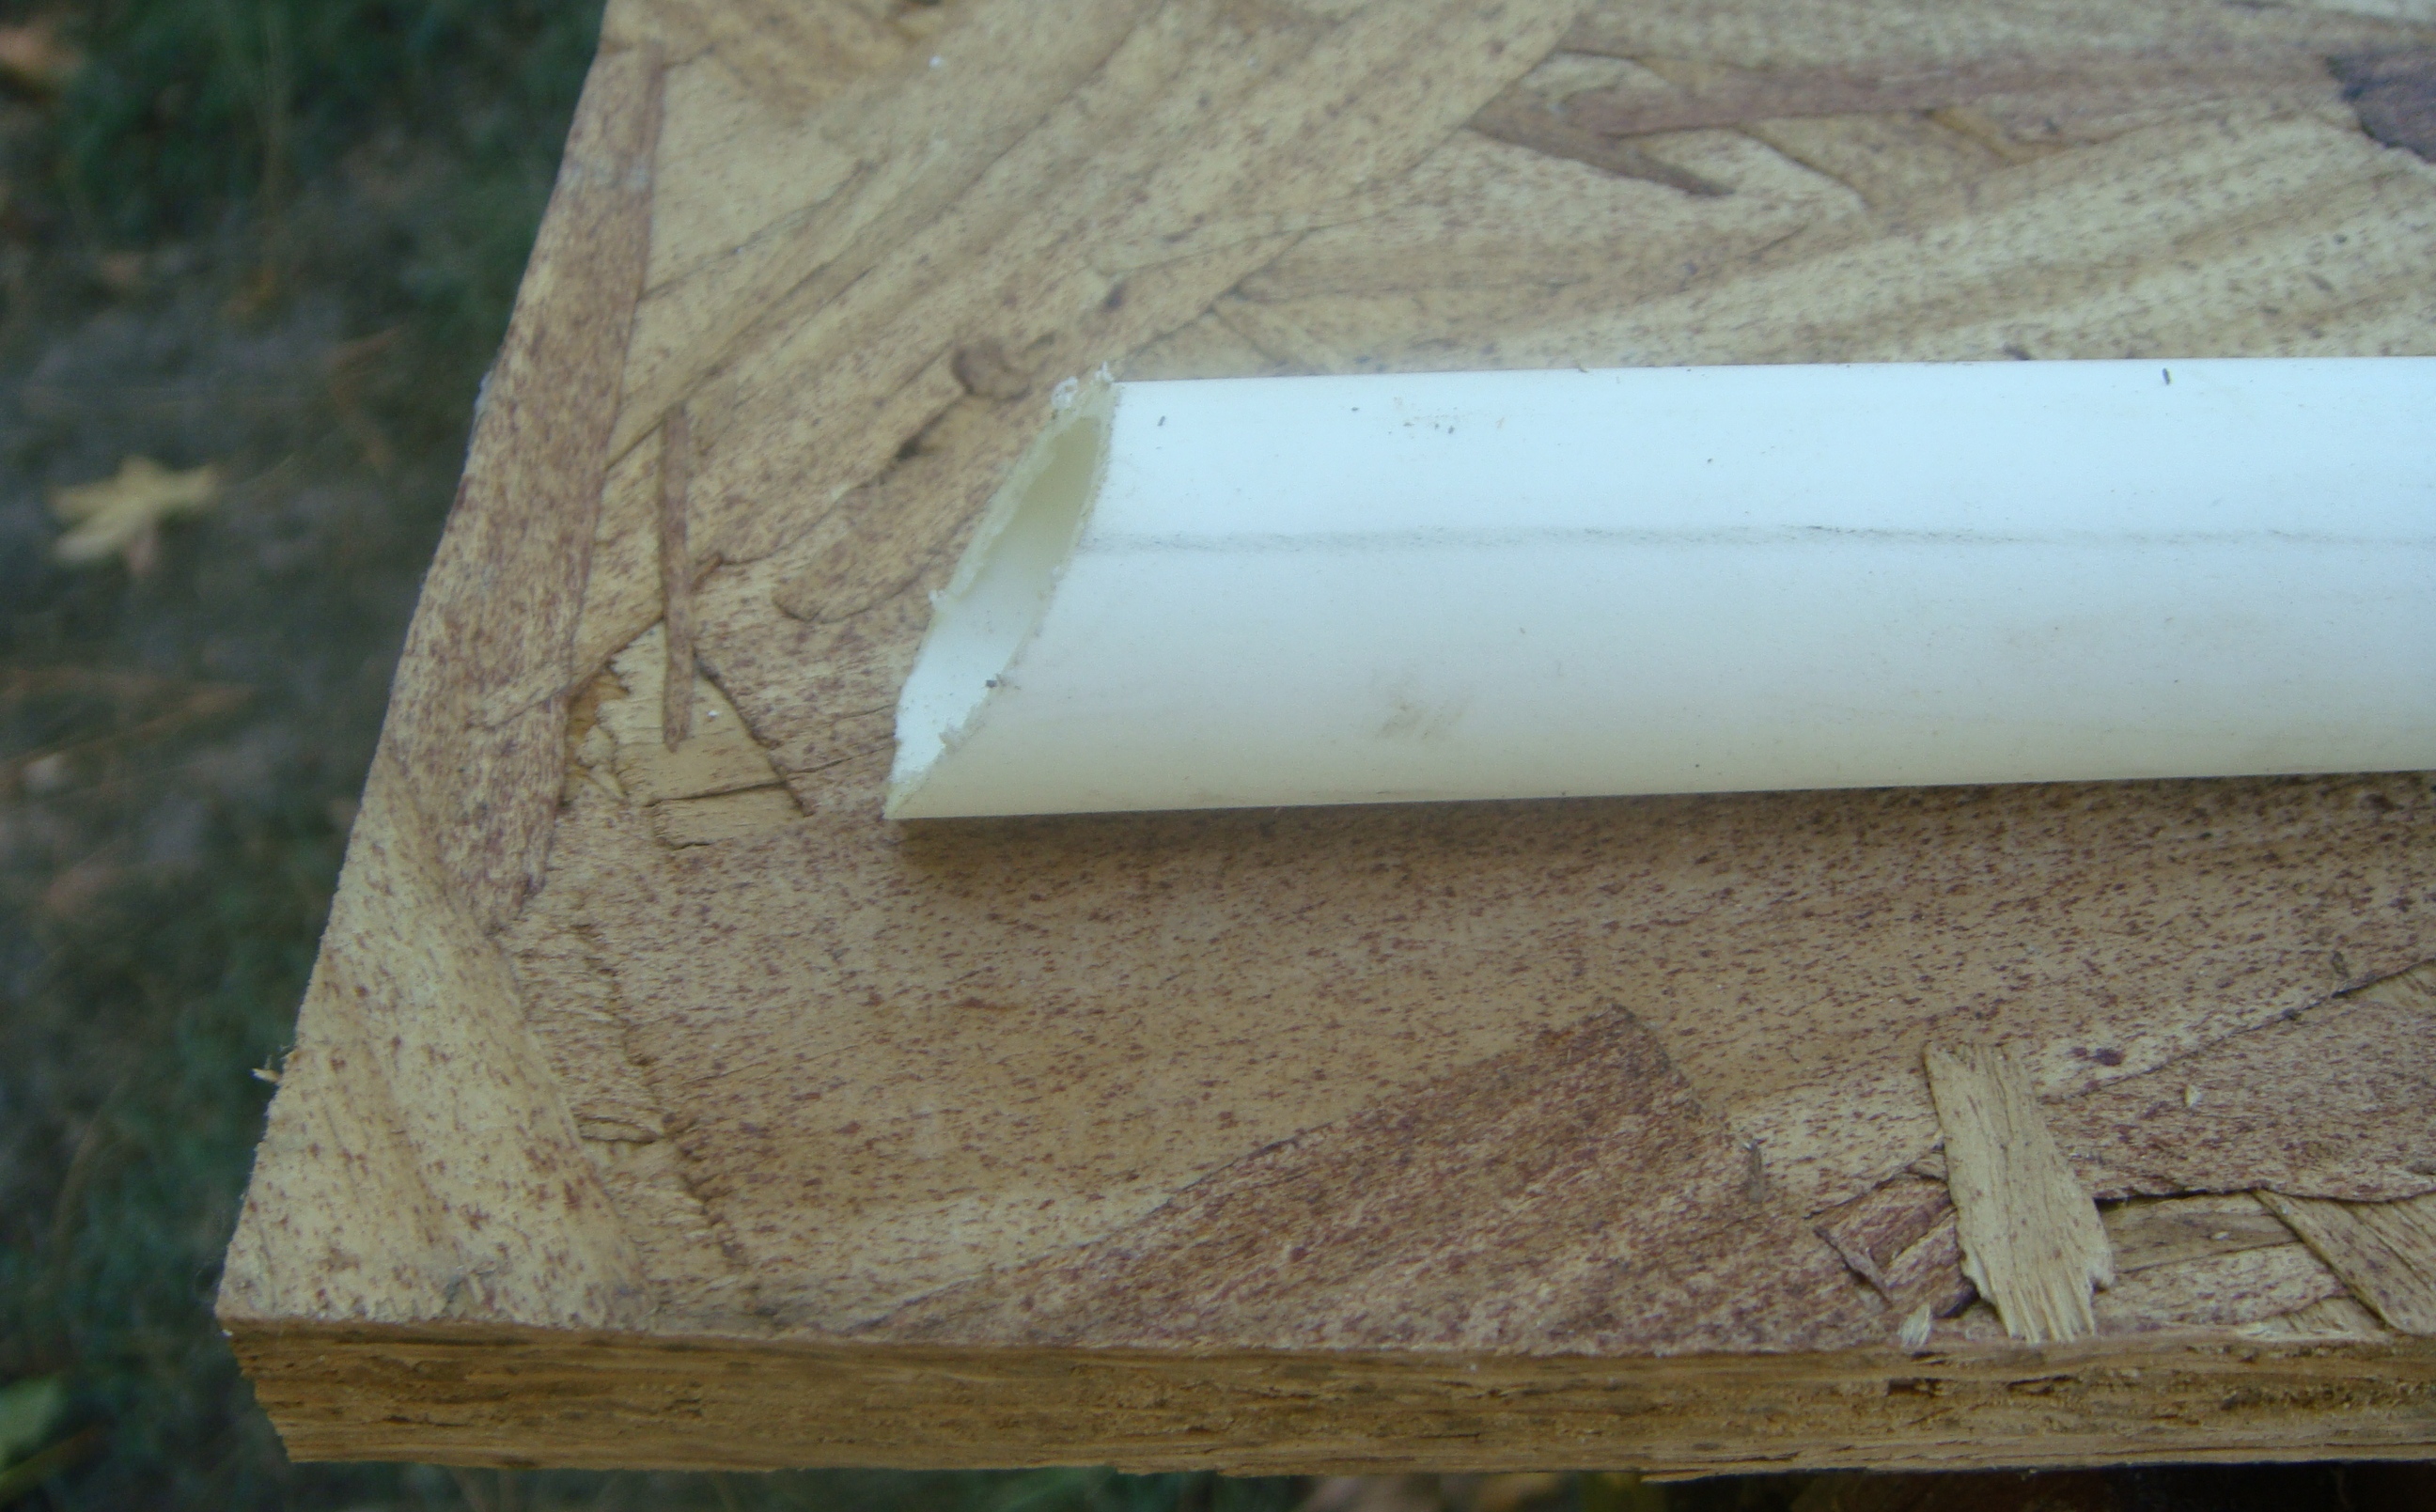
First I cut my ½” PVC into lengths. Three pieces 44” long, two pieces 21 5/8” long, and one piece 51” long.
I cut one end of the 51” piece at a 45 degree angle and drilled a ¼” hole in the part sticking out.
Next I glued the PVC “T” onto the flat end of the 51” piece. You want to do this so that when the “T” is lying flat, the angle on the other end is up-and-down and not sideways. This is the only joint on the frame that I glued. The rest of it just fits together by friction. That way you can disassemble the frame for easy transport and storage.

Now it’s a simple matter of snapping the framework together. What you end up with is a square with the “T” joint on the front and the 51” piece angling up at about 45 degrees. The angled piece will act as a brace that attaches the front of the frame to the tree.
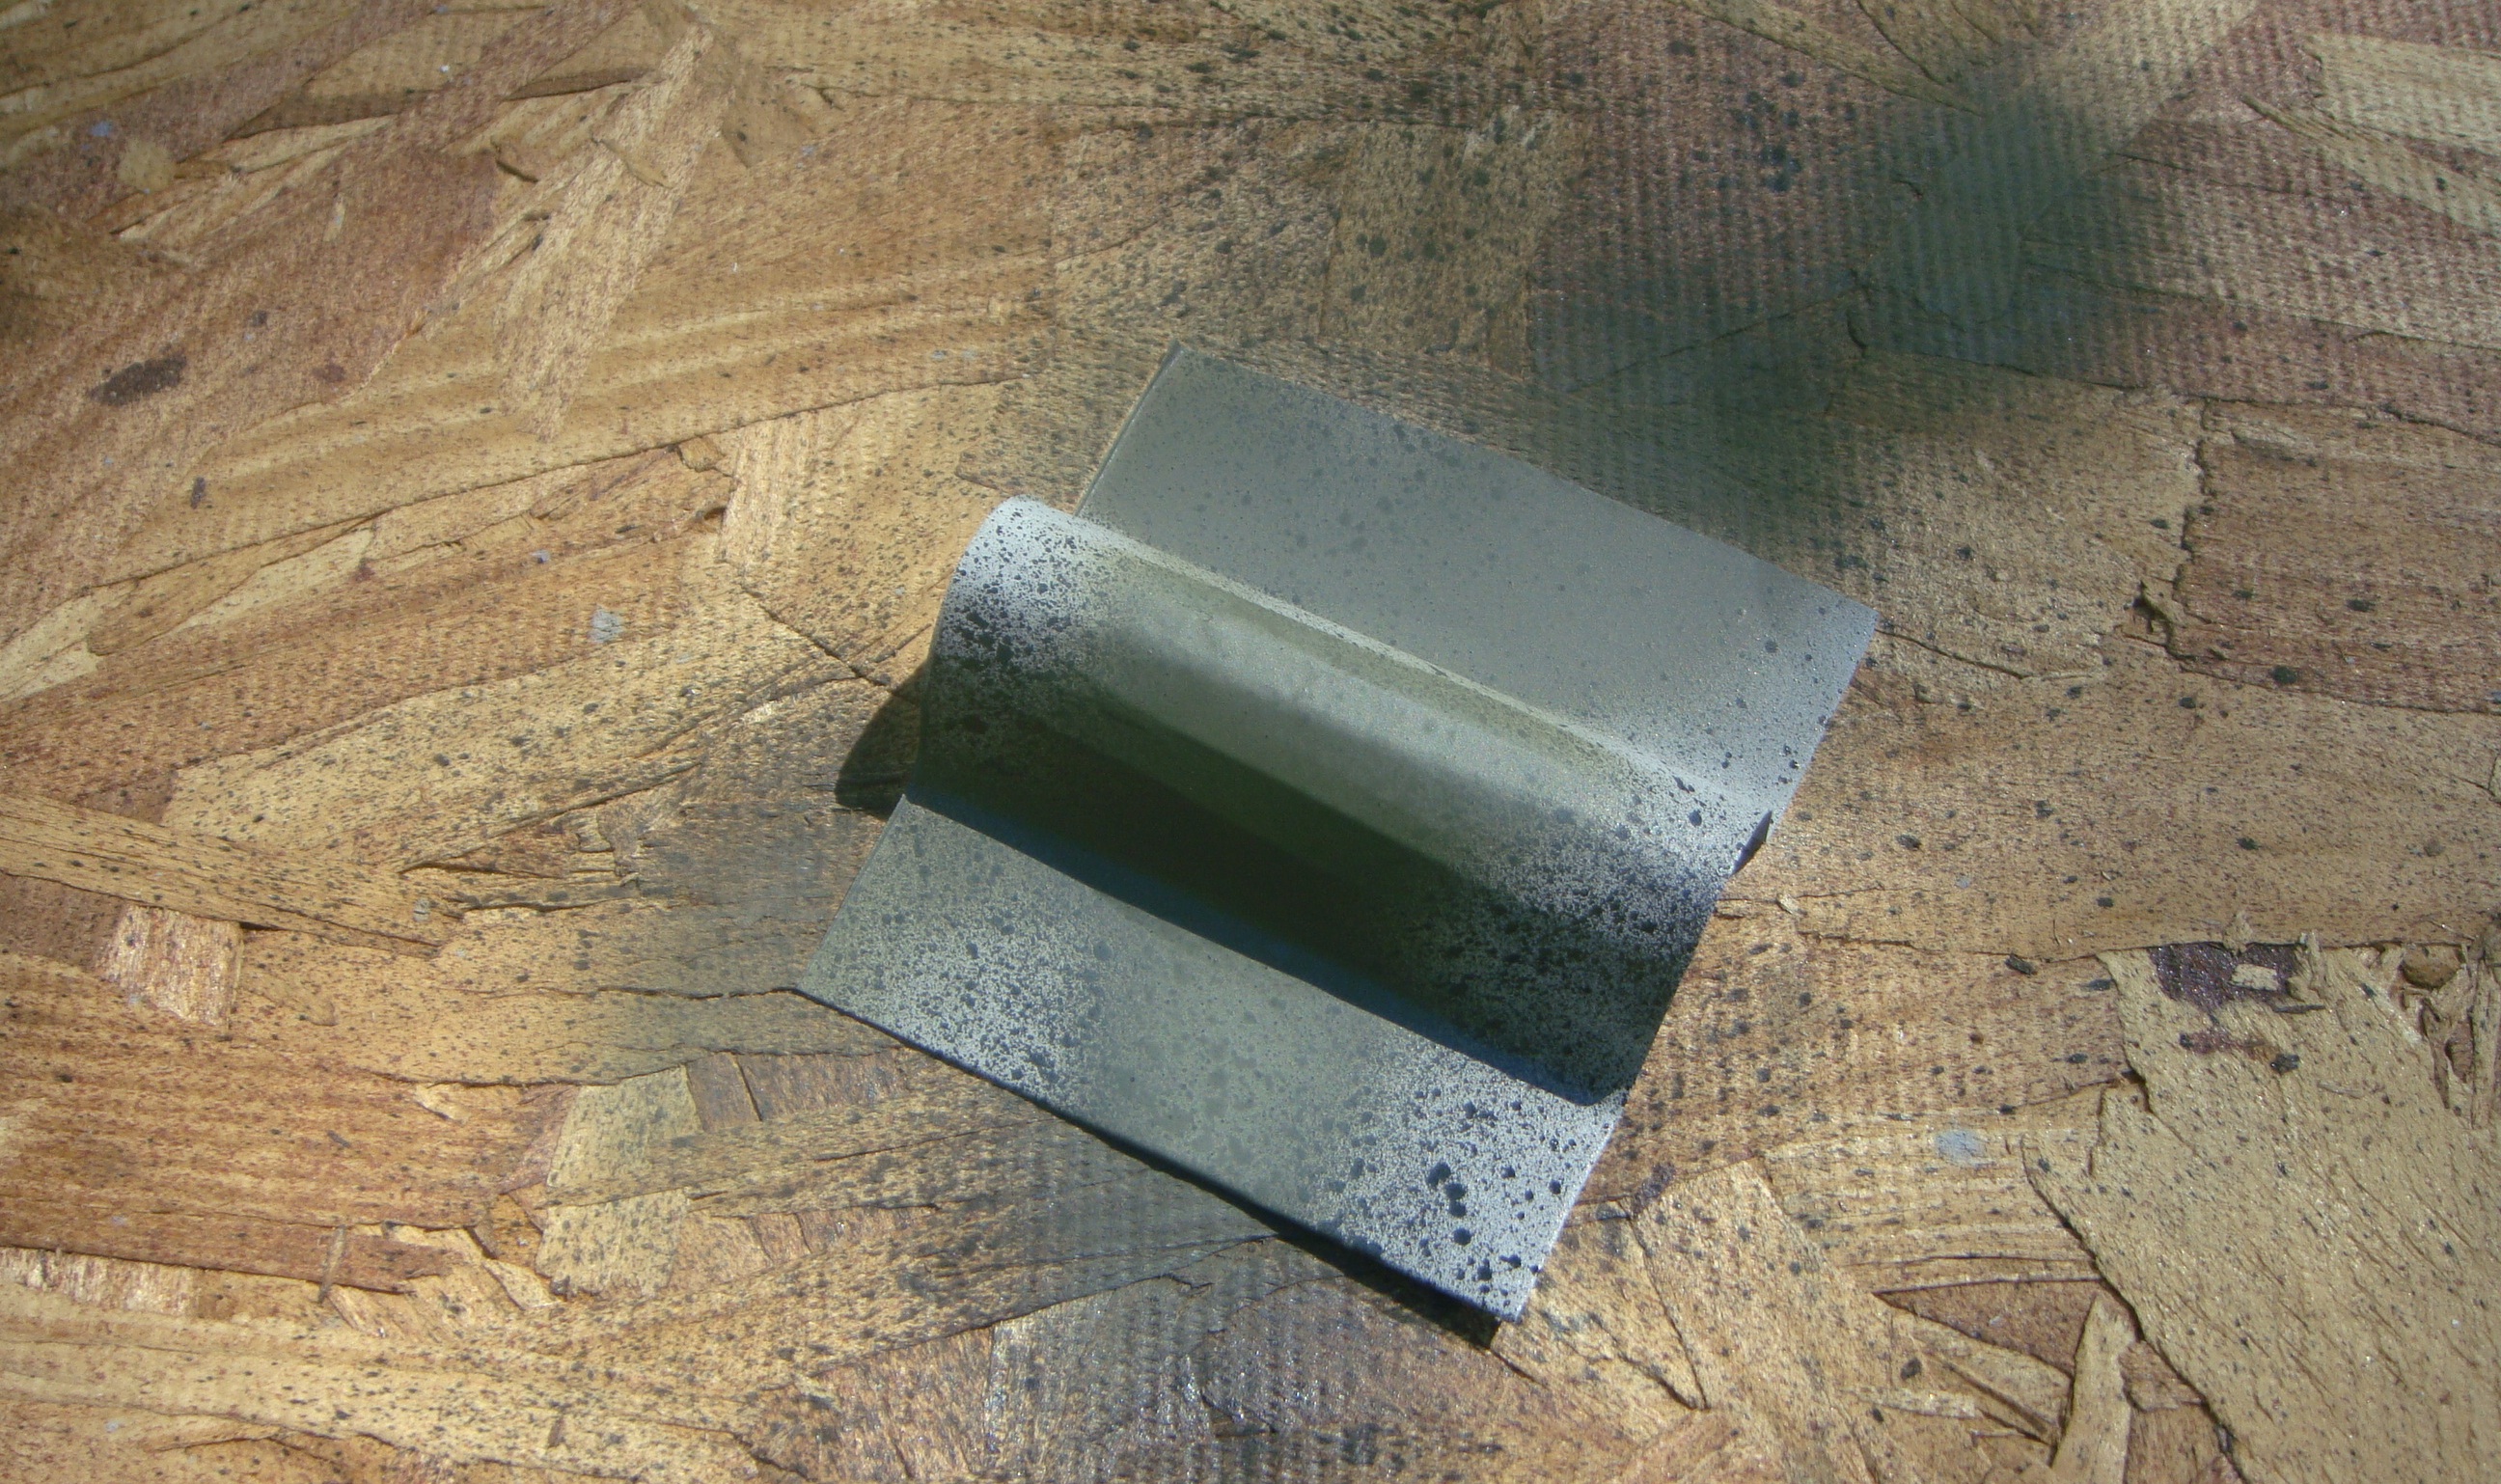
I used my spray paint to paint a camo pattern on the framework.

The back of the square framework will be held to the tree using a bracket made from the 3” x 6” sheet metal. To form the bracket I used a short piece of PVC and bent the sheet metal into a “U” shape to fit over the PVC.

I gave the bracket a coat of spray paint to make it less visible.
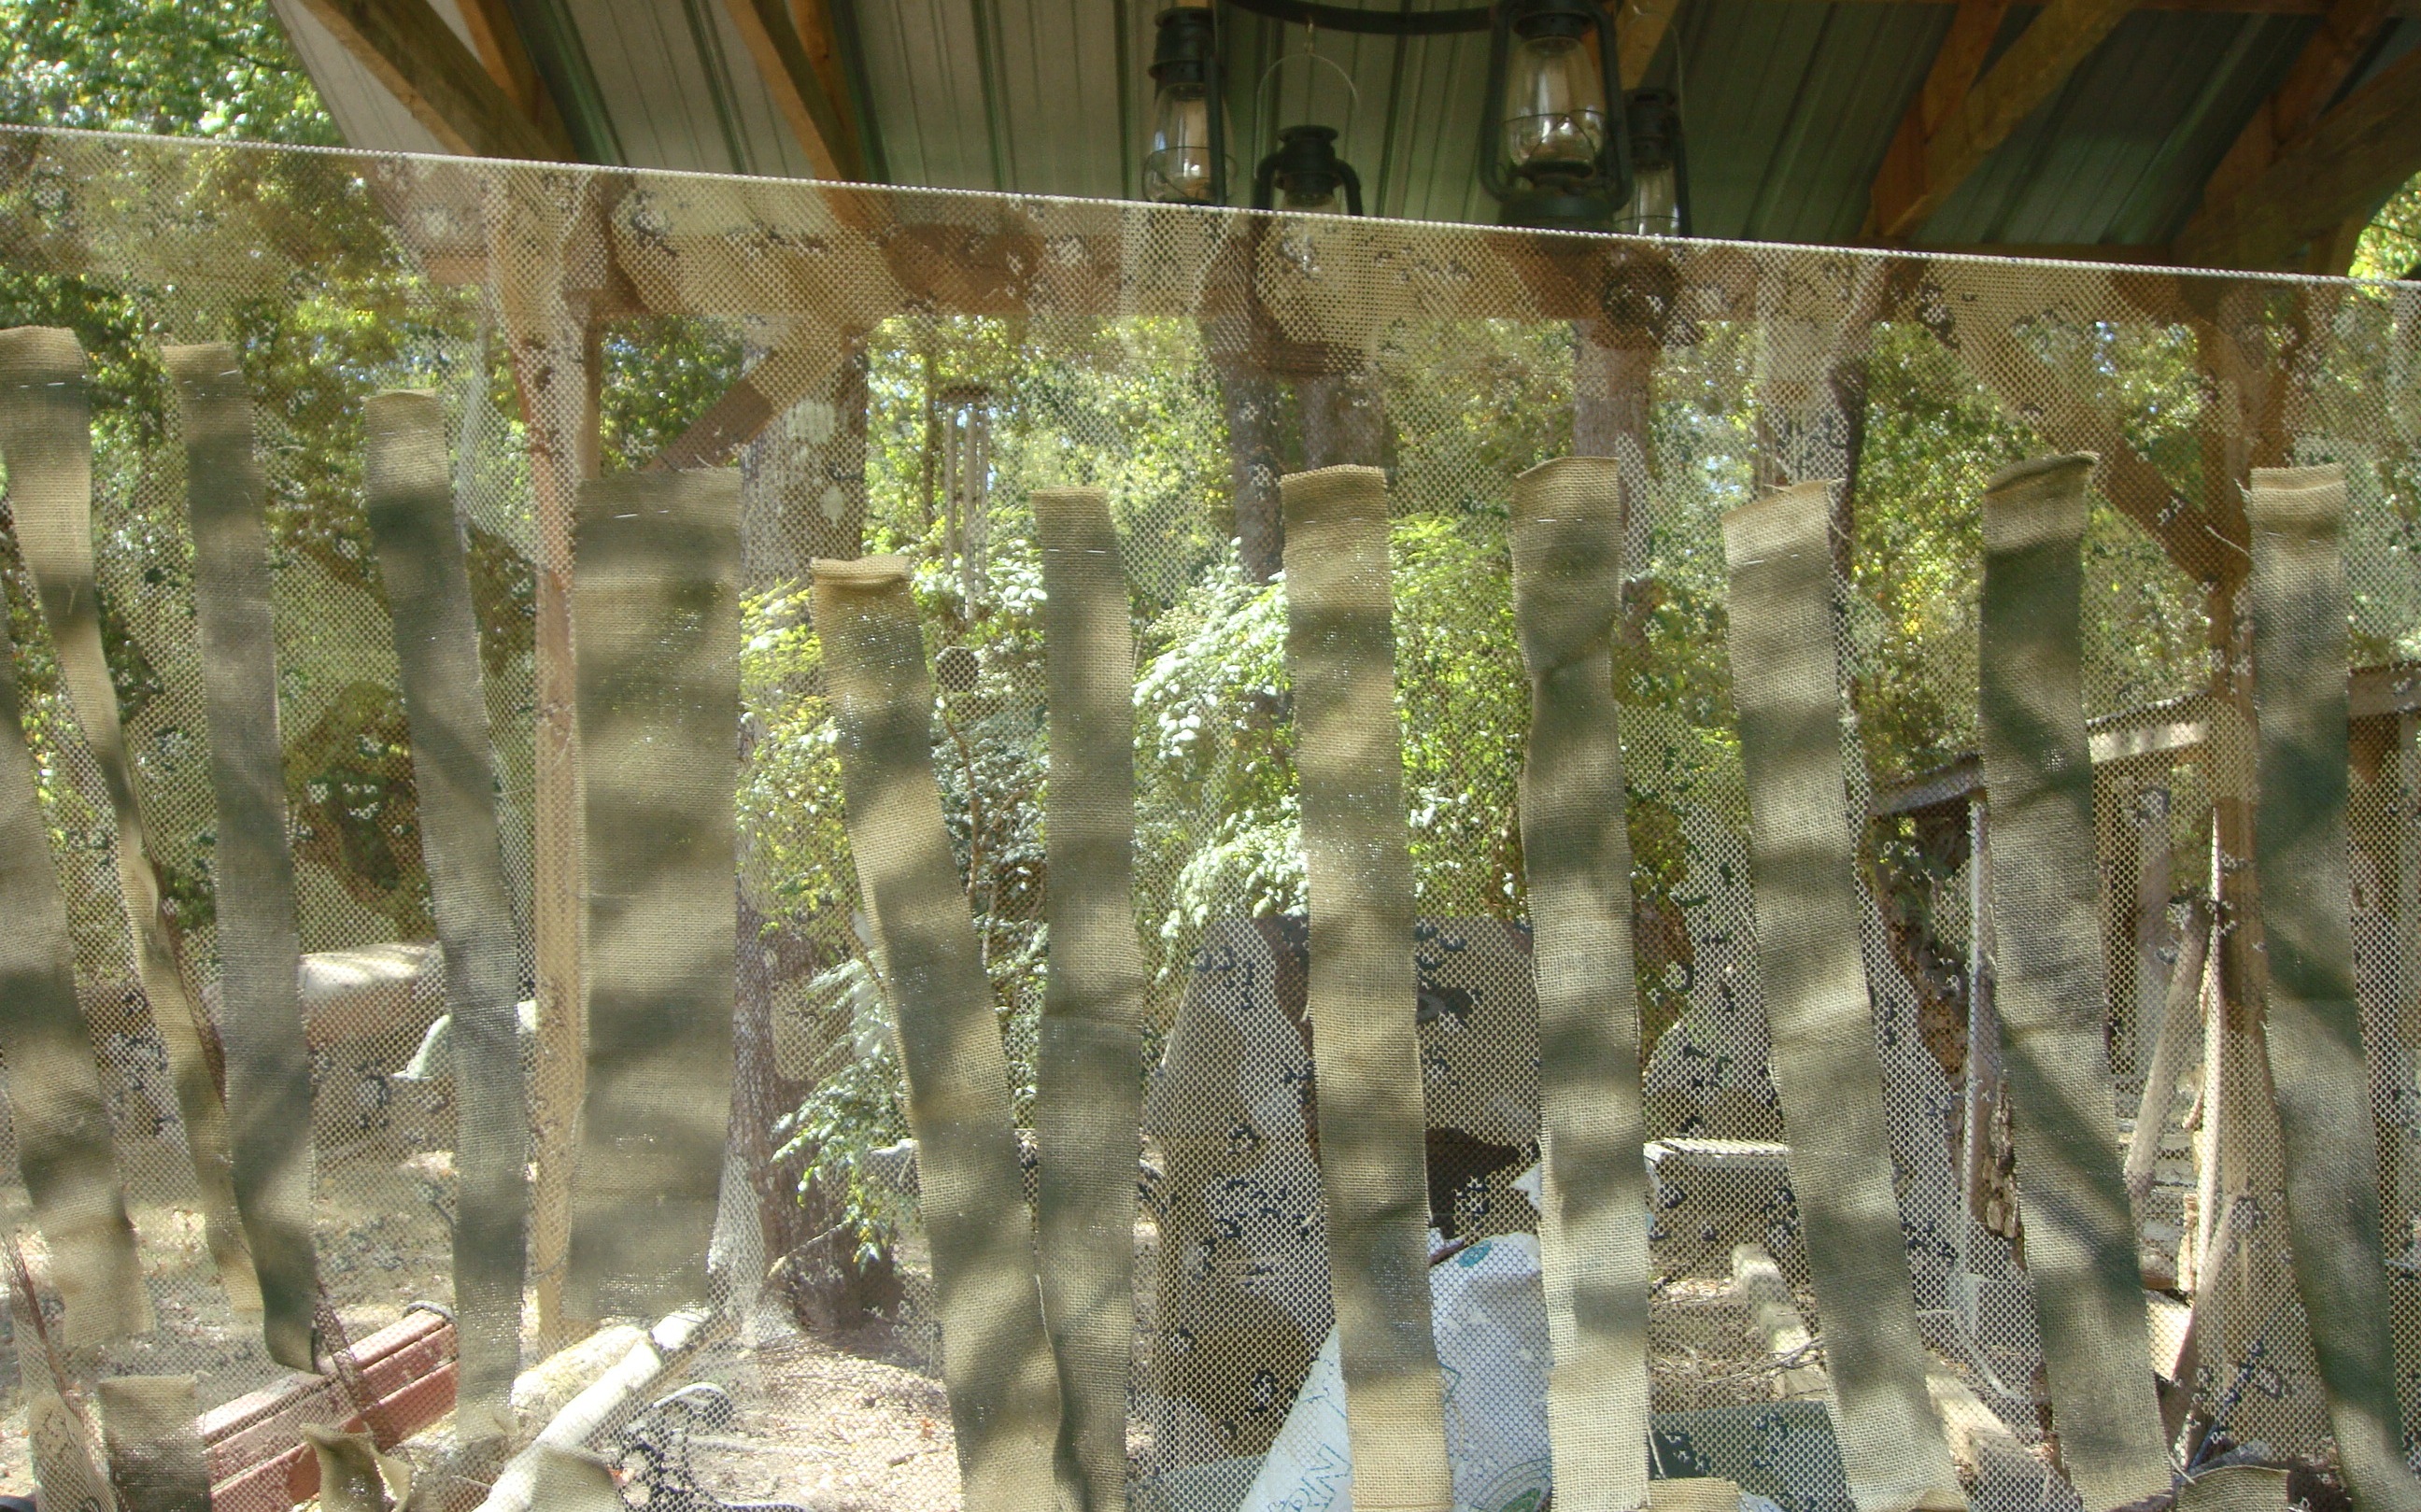
Now on this next part I had a little help from my wife. She took the two pieces of camo netting, folded down about four inches along one edge, and ran it through her sewing machine. This made a kind of sleeve that fits over the PVC like a curtain goes over a curtain rod.
Okay, we’re ready for a little test assembly. I set the blind up on the ground to see if it would hold together the way I hoped. If everything is good, I will finish up the curtains and climb up into my deer stand for final assembly.
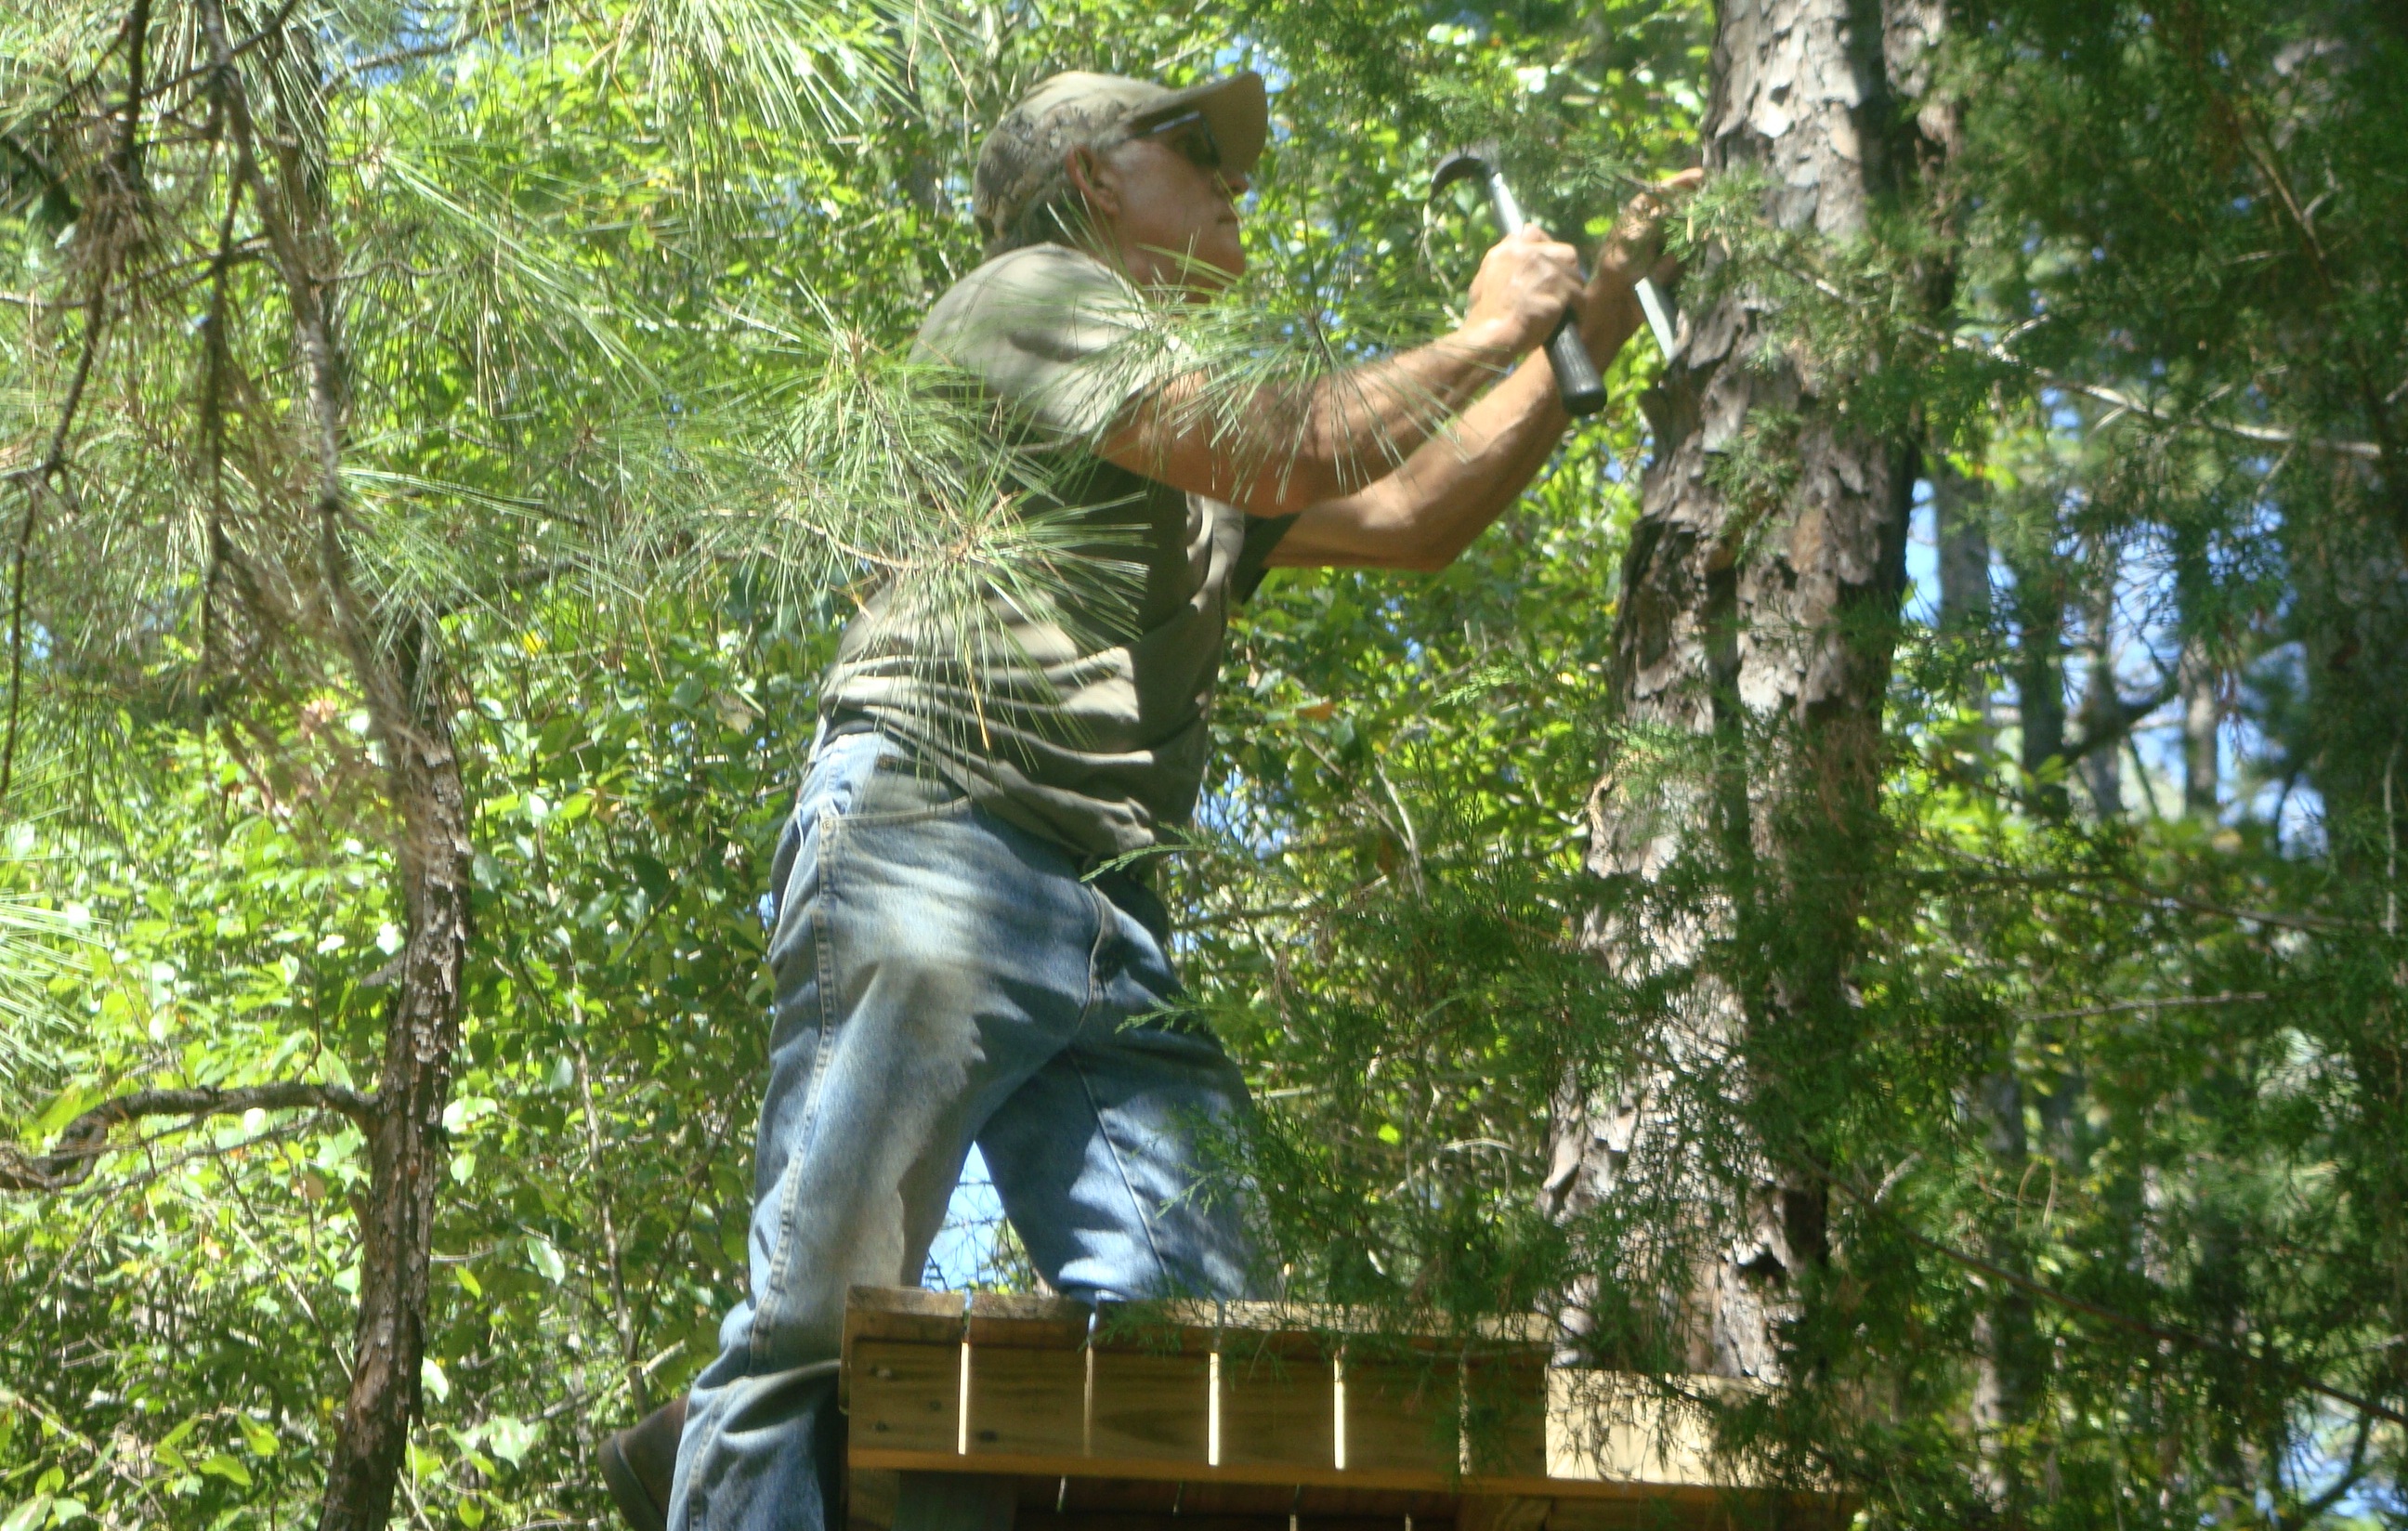
First I nail the bracket to the tree with the back cross piece in place.

Next I put a PVC 90 on each end of the cross piece and then push the side pieces into the 90’s.

Now I add 90’s to the front of the side pieces, and then shove a short front piece into each of these 90’s.

I thread the curtains onto each side of the framework.

Then I shove the free ends of the front pieces into the PVC “T”.

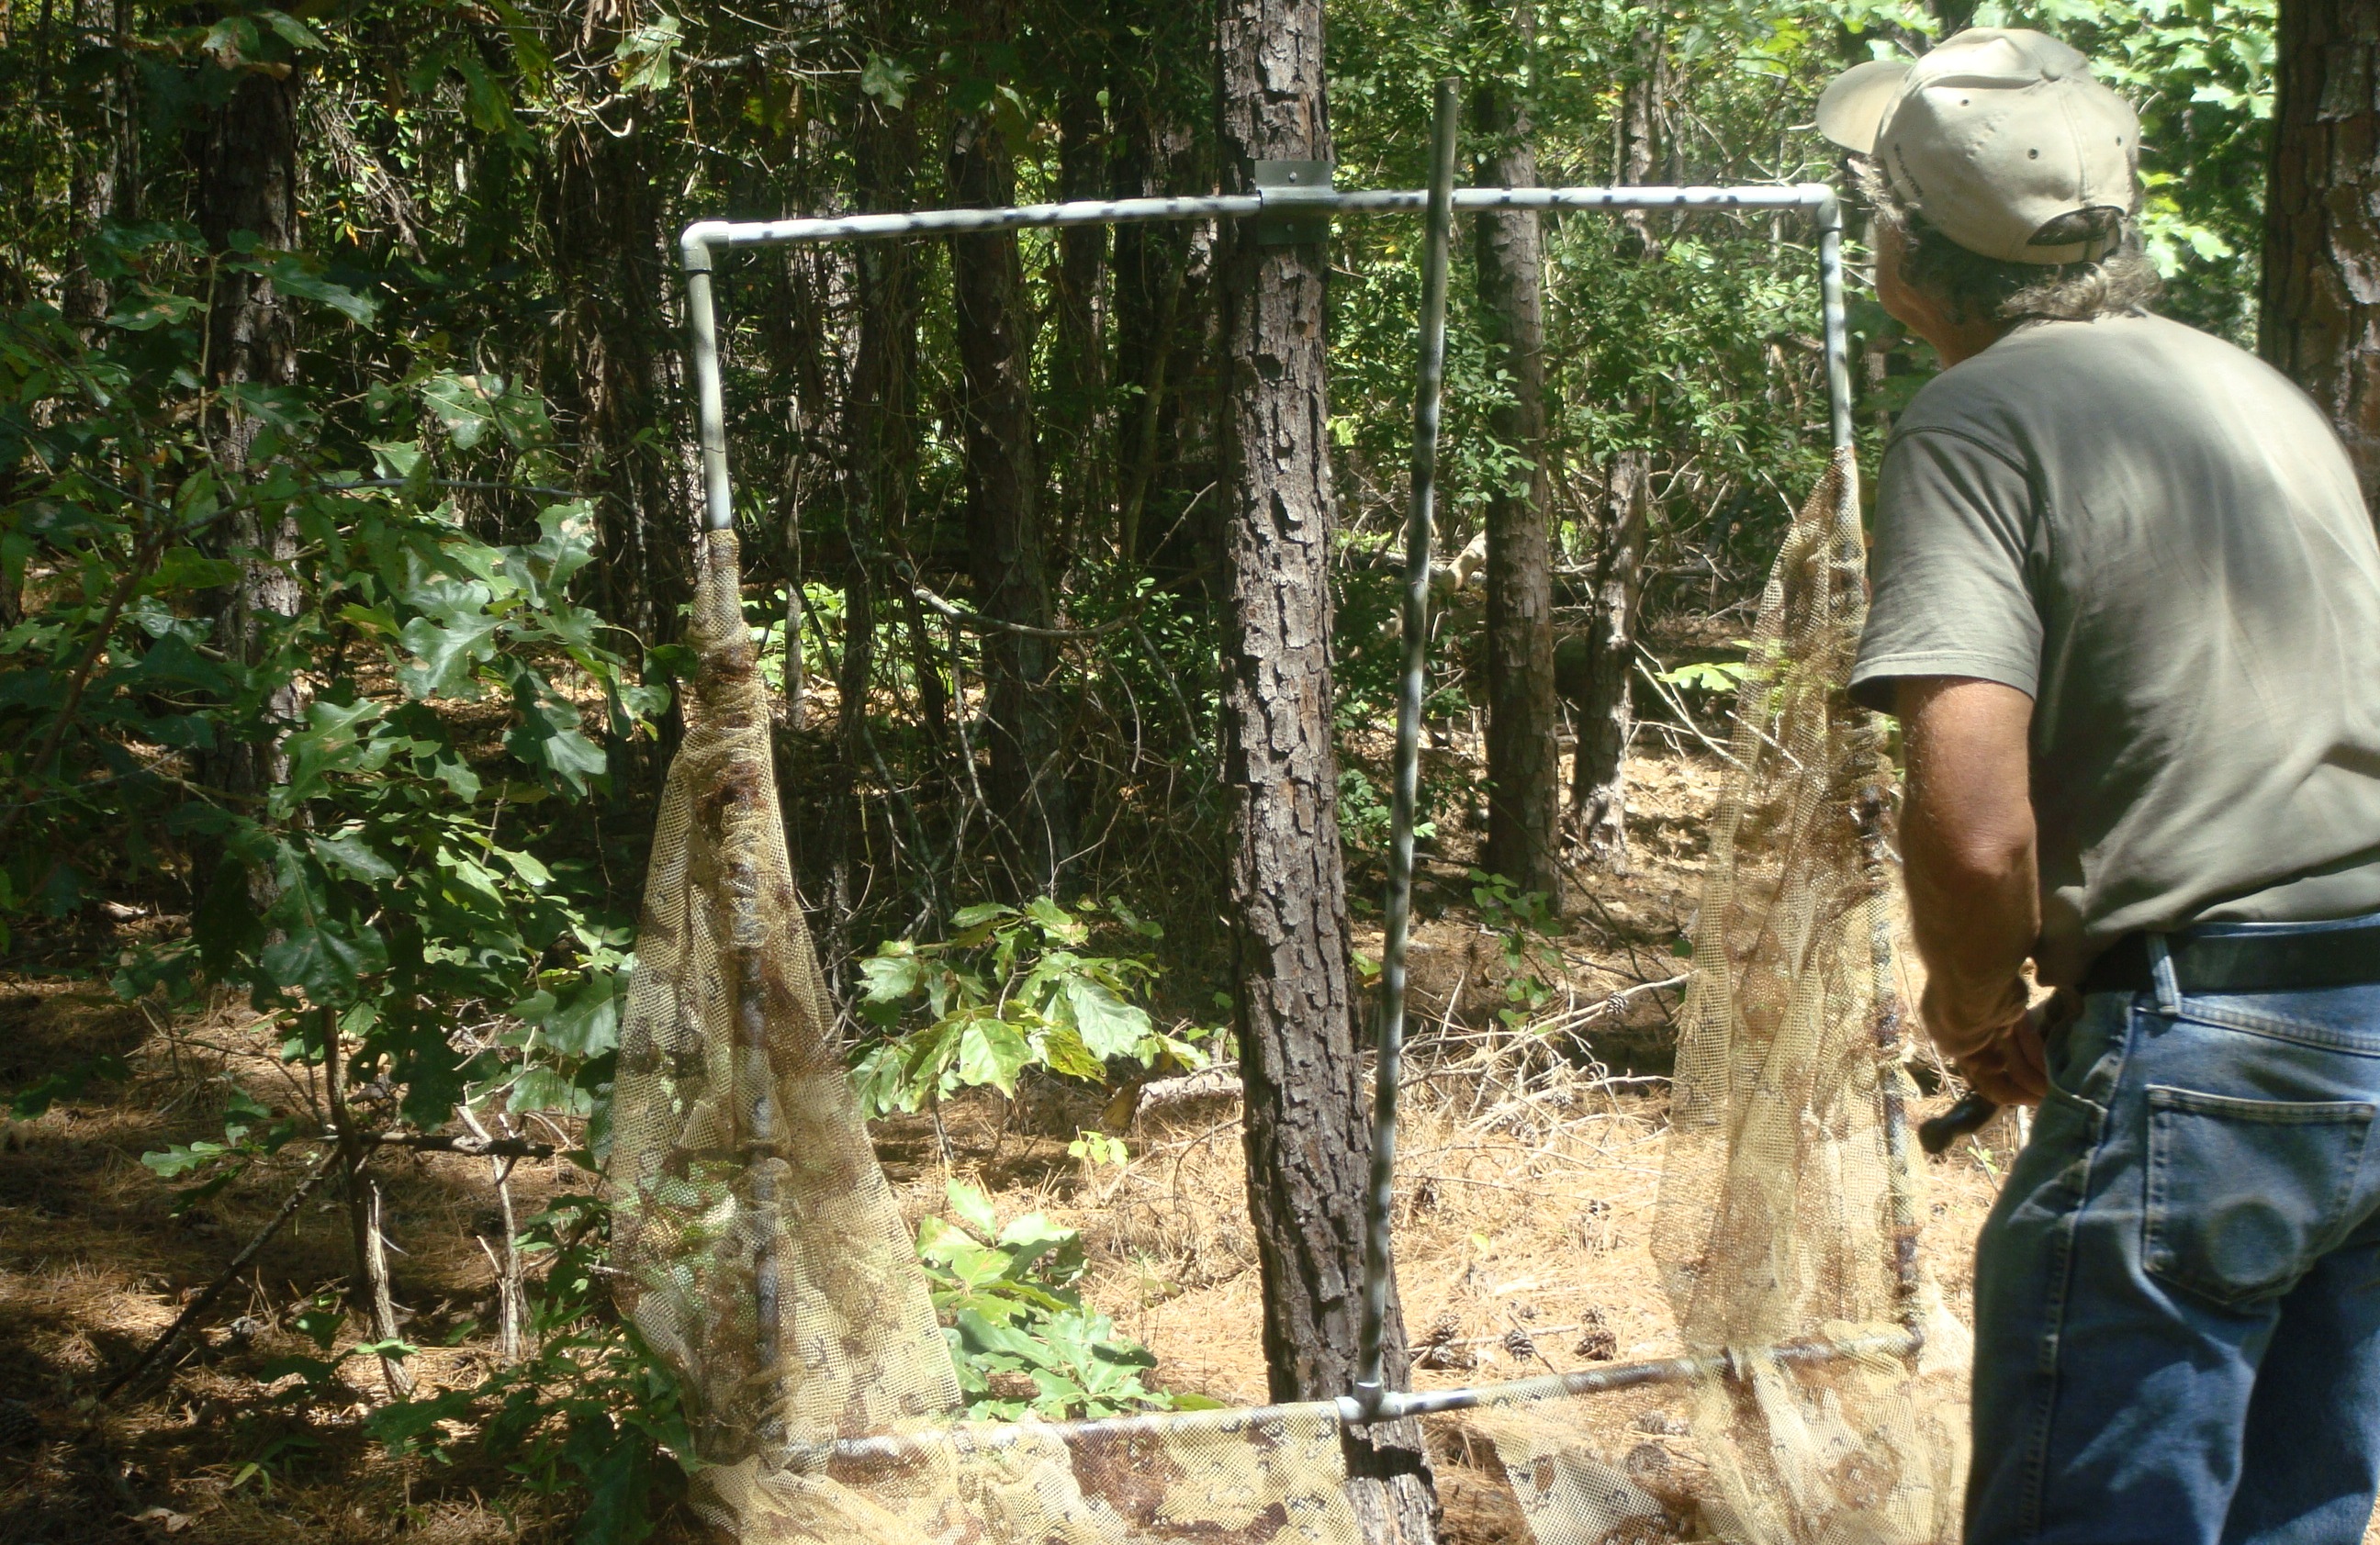
Next I drive a 16 penny finish nail into the tree to hold the top of the angle brace.
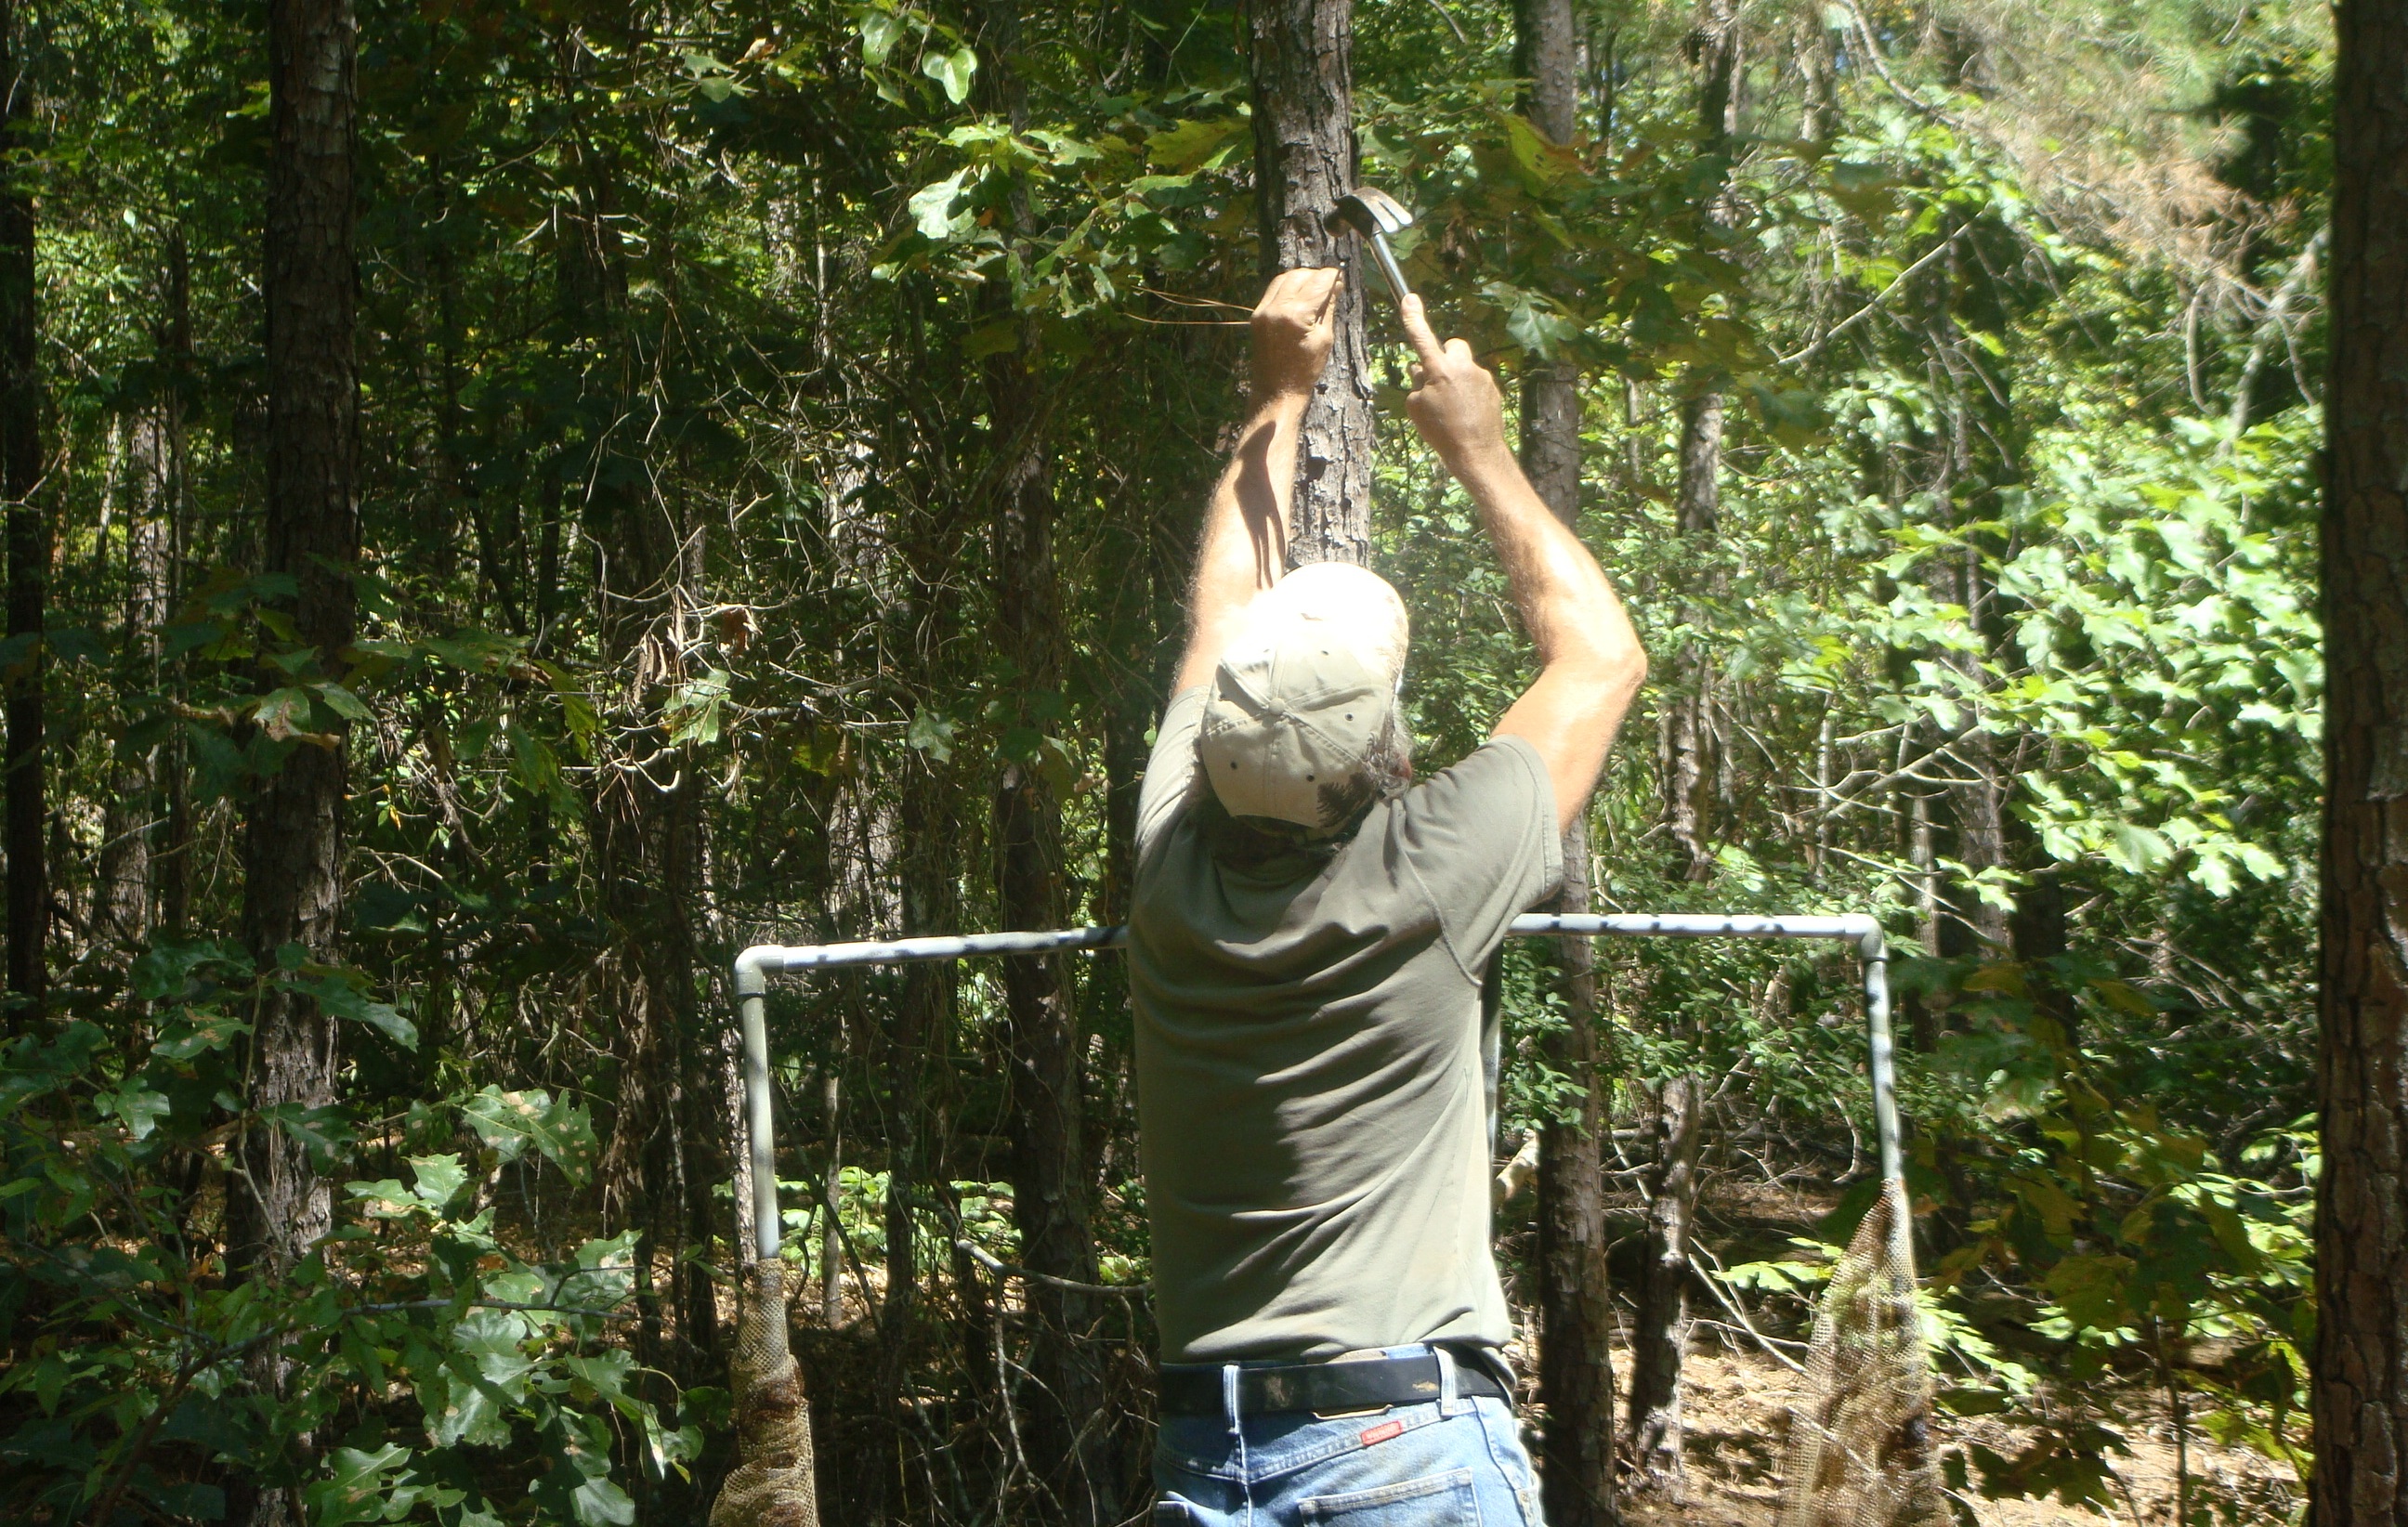
Lift the whole works up and slip the hole in the top of the angle brace over the nail that I have driven into the tree.

Everything looks good, so I disassemble it and put the finishing touches on the curtains.

I cut the side a bottom on my burlap bags and lay them out on a temporary table. Then I use my spray paint to pain a camo pattern on the burlap.

I take scissors and cut the burlap into strips about two inches wide.

I hang my netting up on a rope and pin the burlap strips to the netting. I pin the strips about an inch below the top.
Then I run a bead of fabric glue along the top of the strip and put another pin right on the spot I glued.
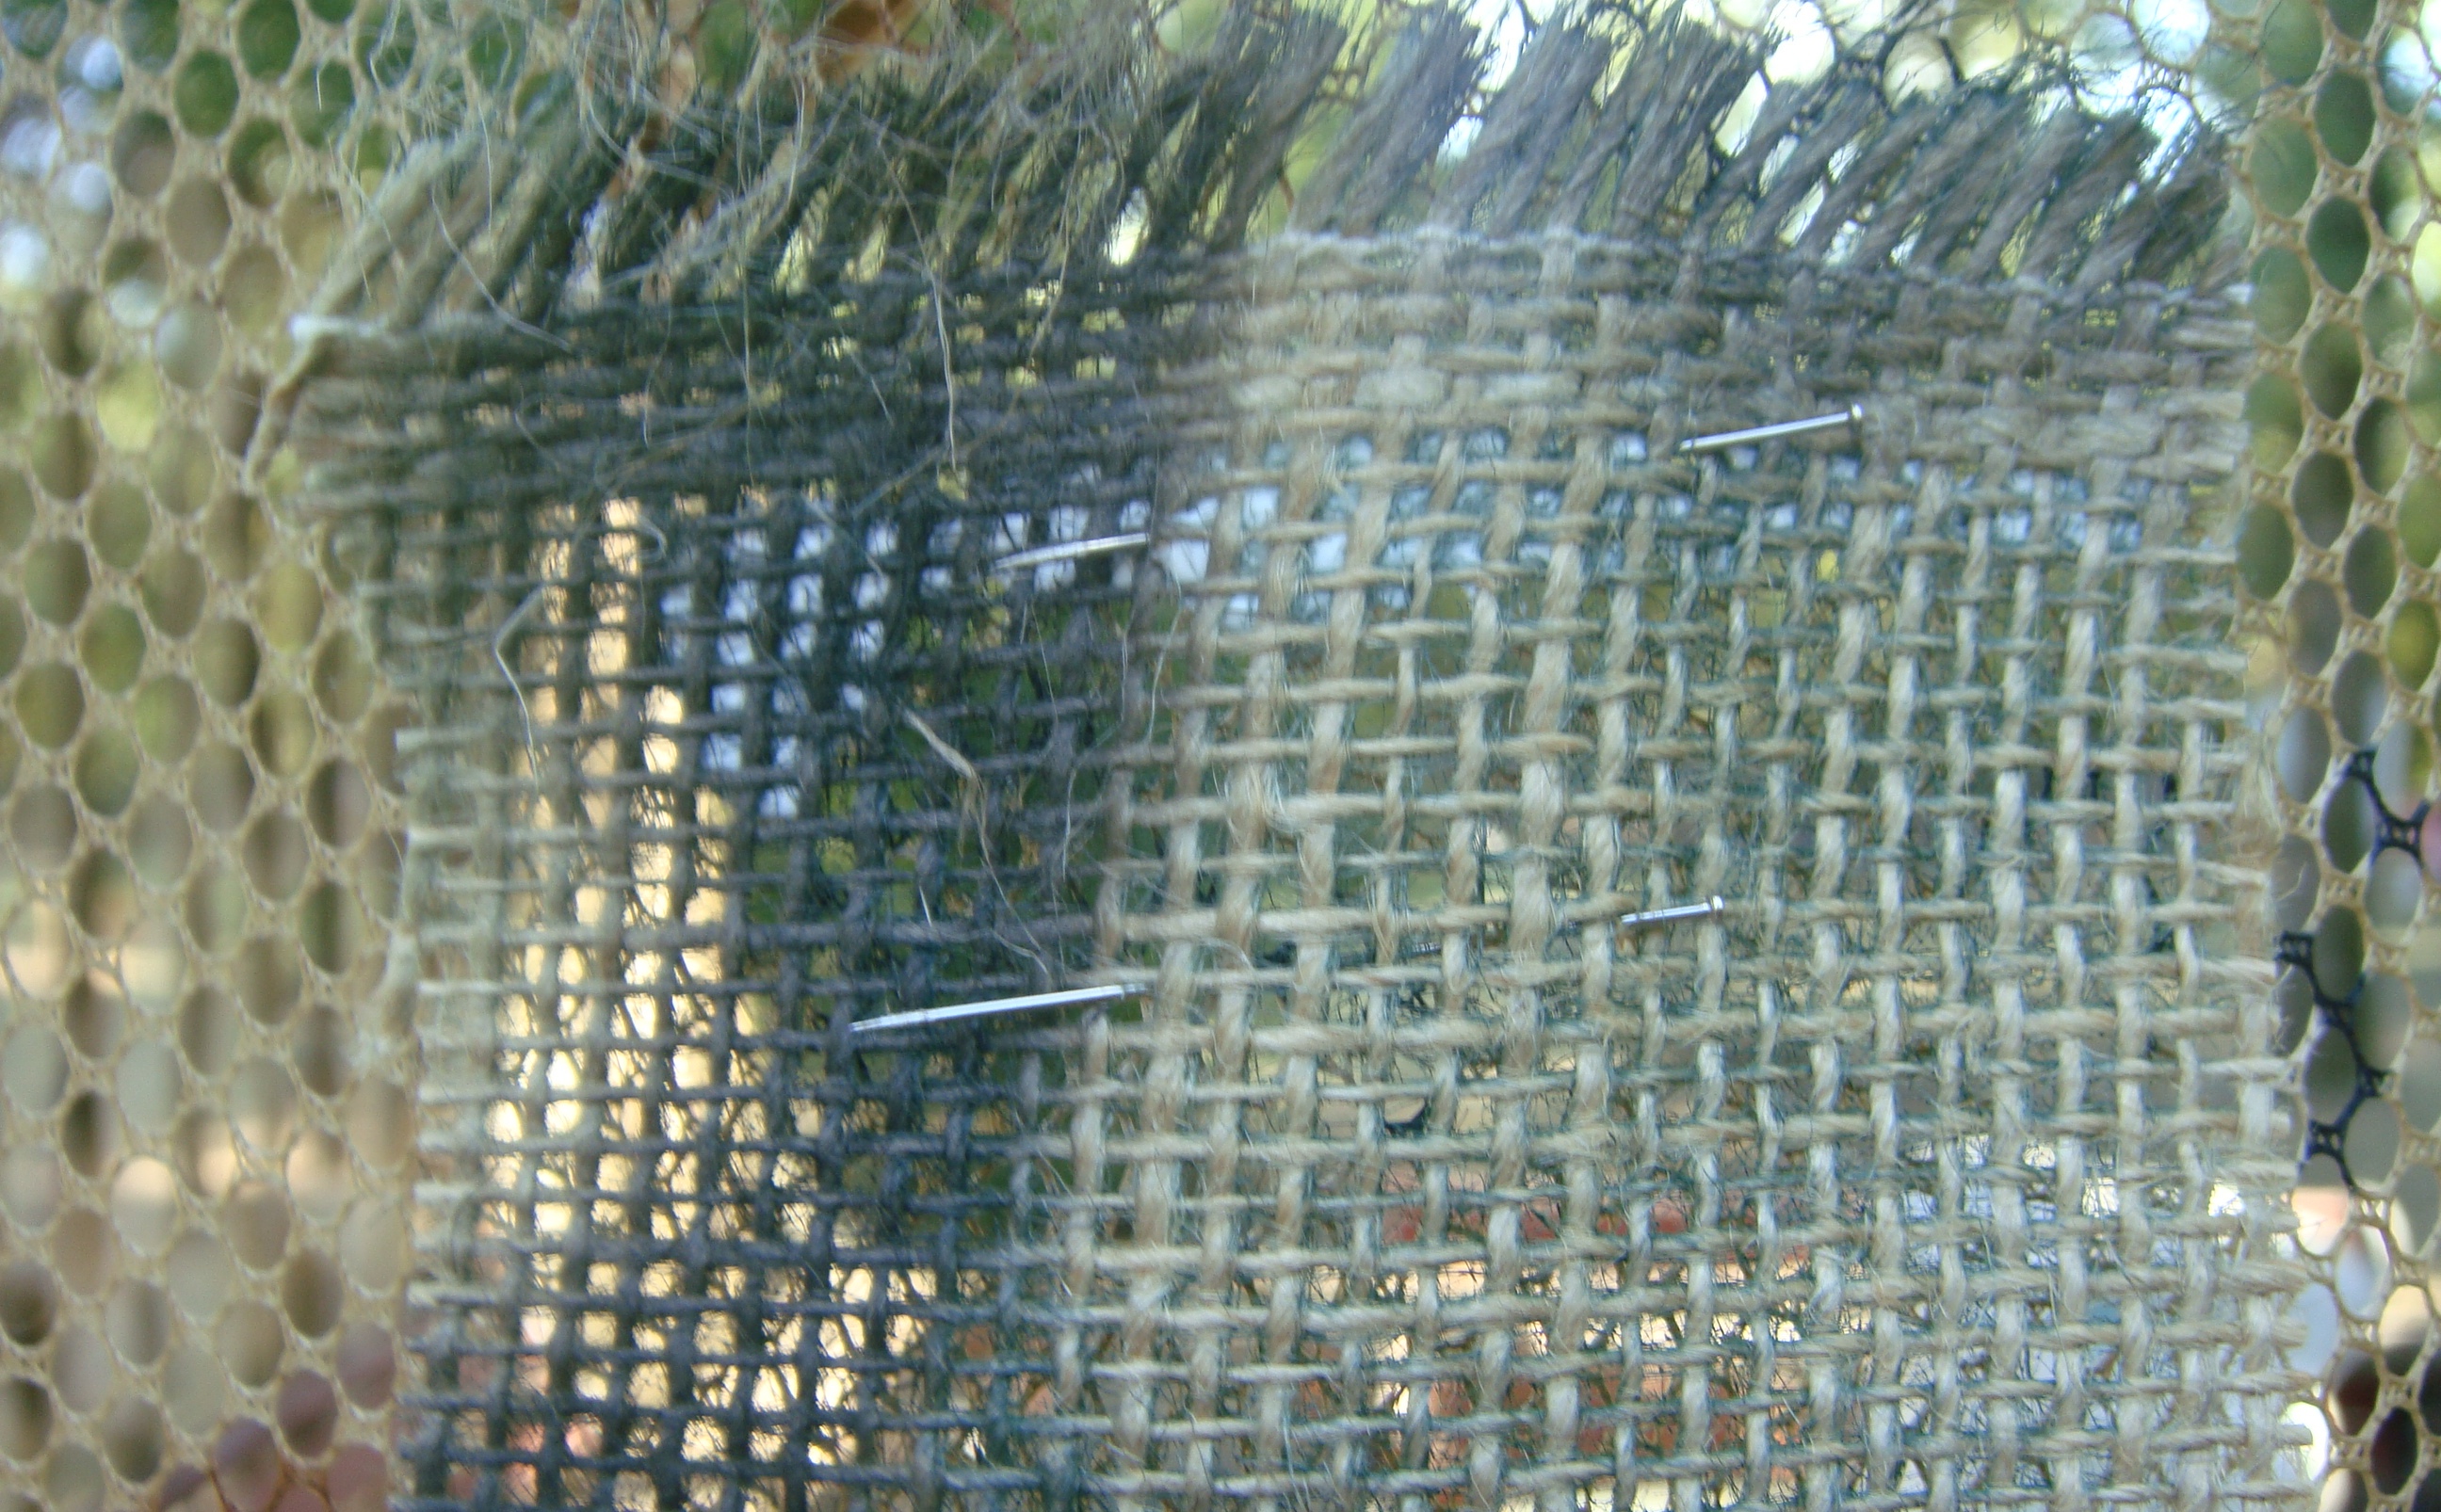
I let the glue dry over night. The next morning I pulled all of the pins out, and the burlap seemed to be firmly attached. I took the whole outfit down to my deer stand, climbed up, and put it all together. I think this will be a big help in my hunt this year.

There is probably no better way to store food for the long term, than in the form of seeds. Seeds are just amazing. I did at little project this year to see just how much food seeds would produce. I planted 50 pole bean seeds of one variety.
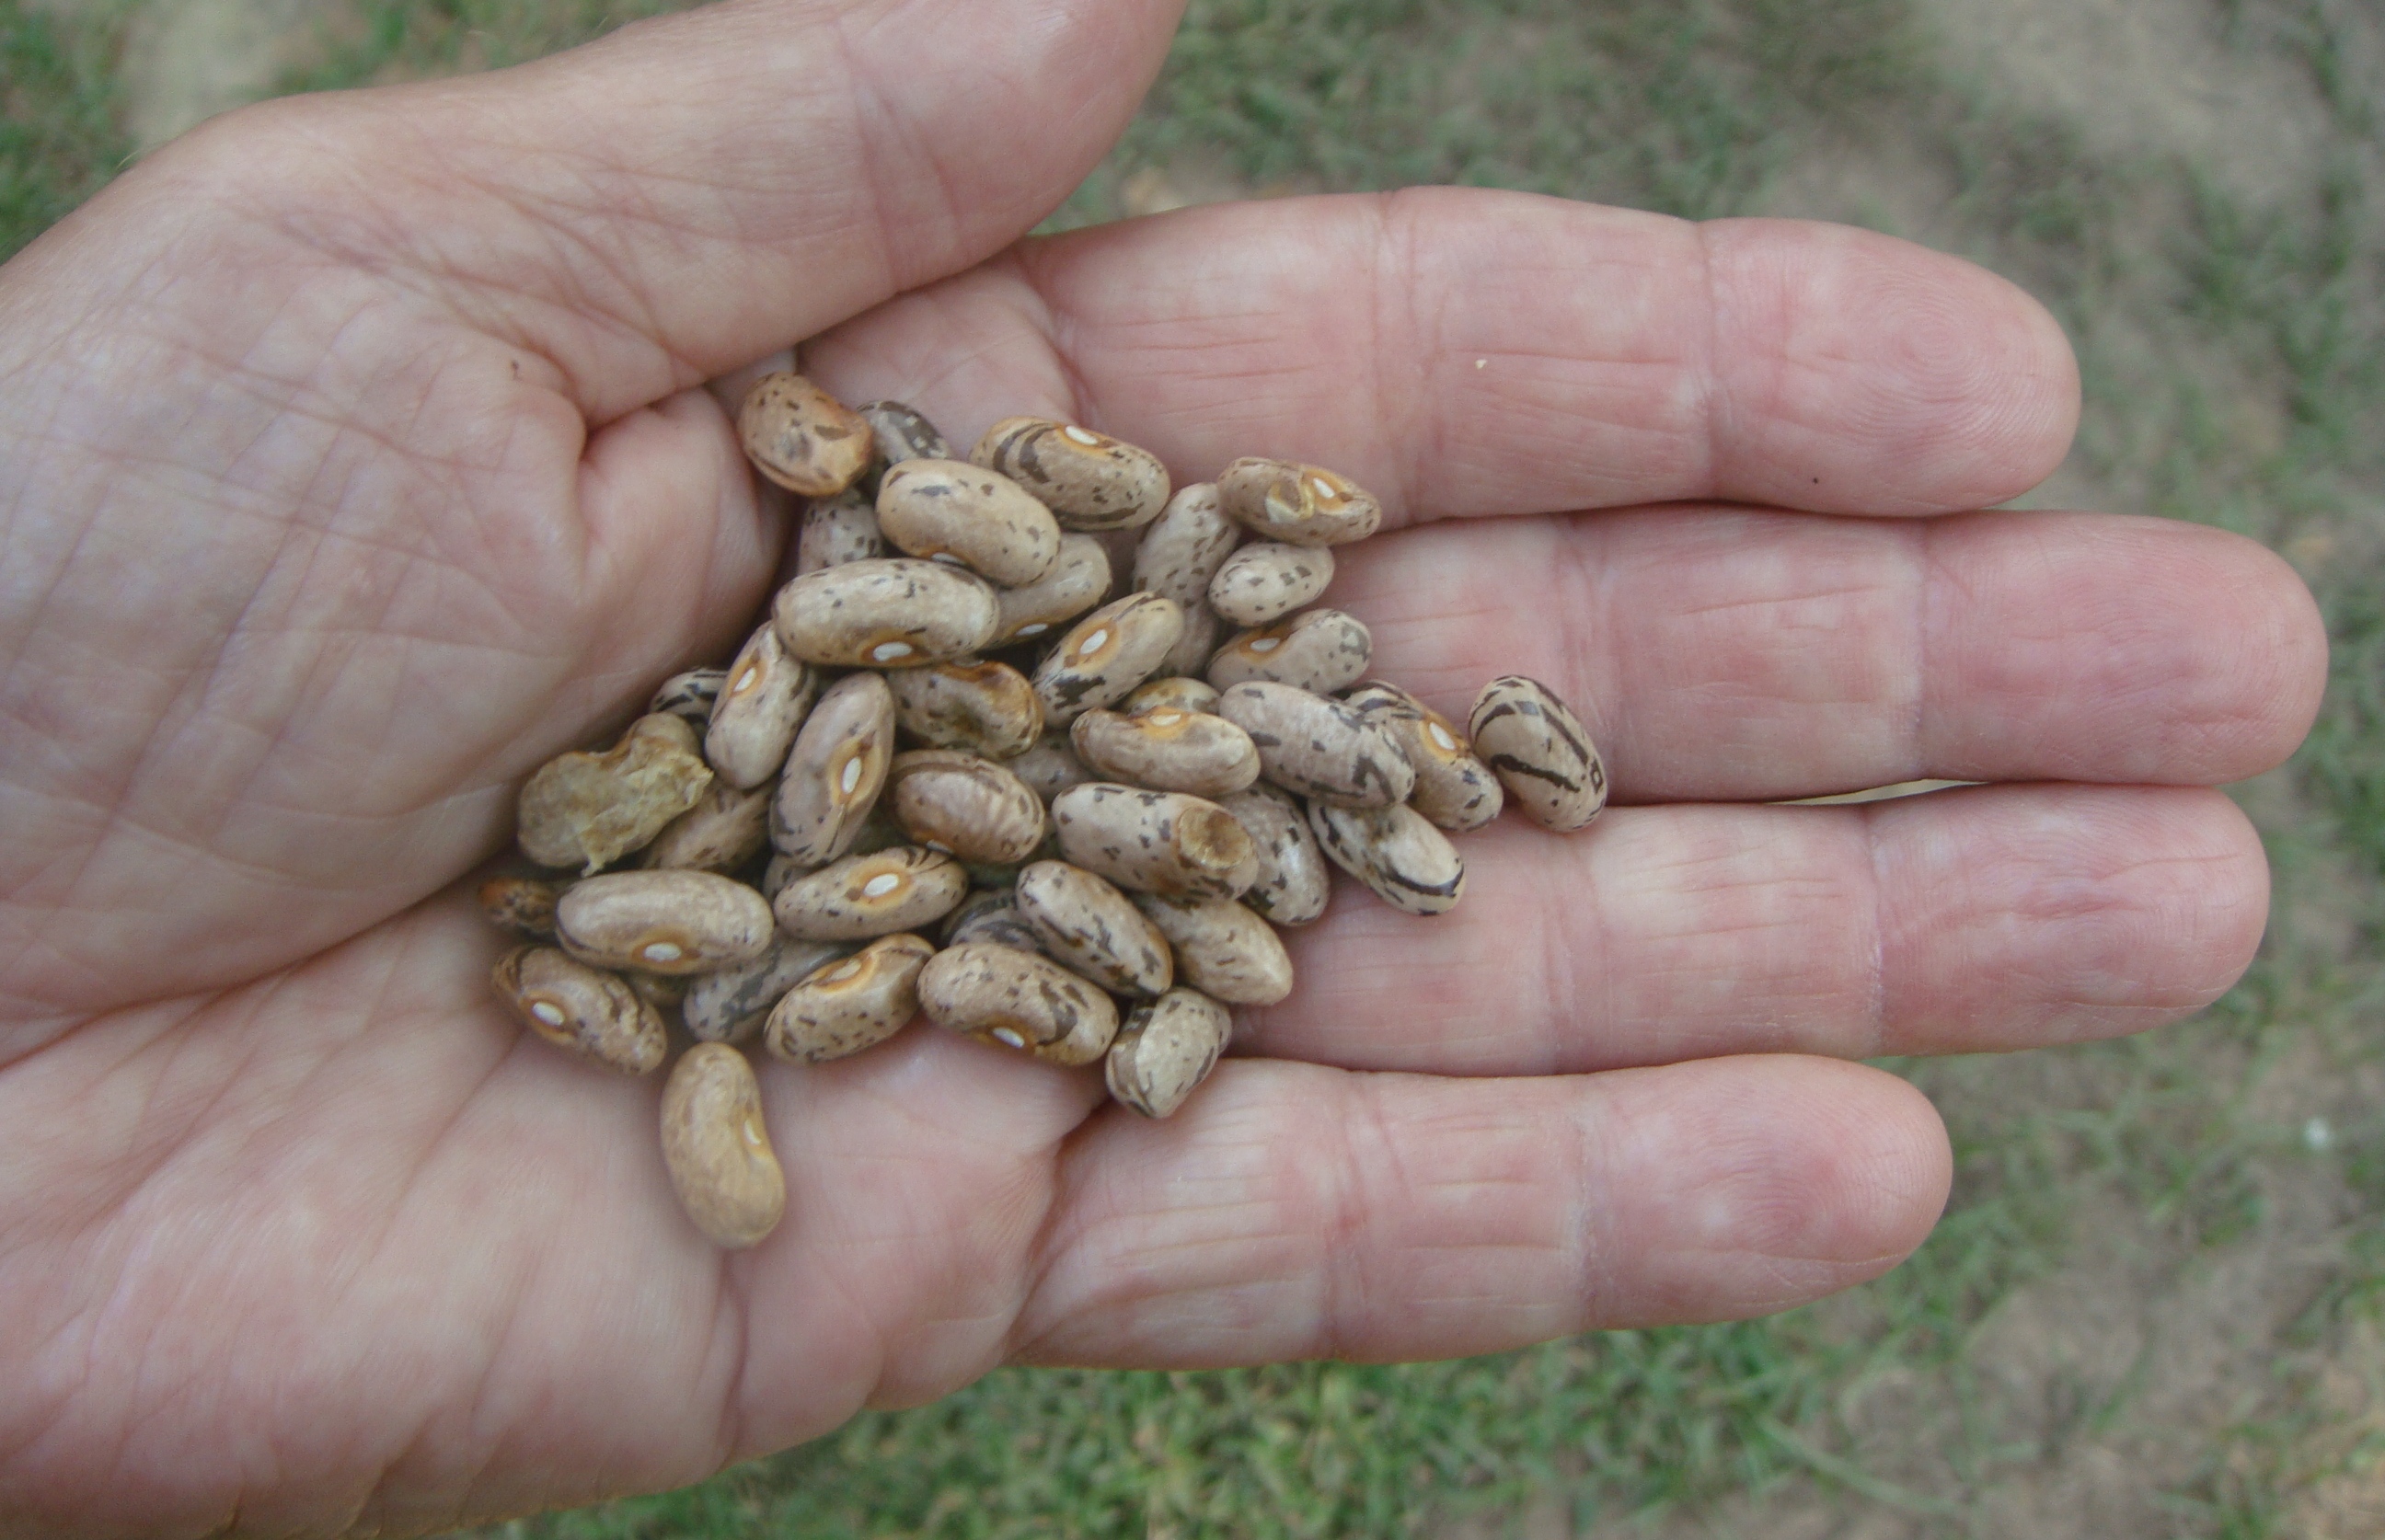
When I harvested the beans I weighed 100 of them and then I weighed the entire harvest to get an approximation of how many beans I produced. My fifty original seeds produced over 3200 beans. Just amazing.
I planted six tomato seeds that were so light they wouldn’t even register on my digital scale.

These six seeds produced over 80 pounds of tomatoes. So storing seeds is a very compact way of storing food. Of course the food is not instantly available, but if you can survive for a year on stored food, your stored seeds will make you self sufficient from that point forward.
As I have stated elsewhere in this blog, I only plant non-GMO, non-hybrid, heirloom seeds; and I save seed to replant. Even though I follow this path faithfully, I still think it is a good idea to have a long term seed bank. My seed bank acts as a back-up to the seeds I save each year, plus the seed bank is small and easily portable. In other words if I have to get out of Dodge, I can grab my seed bank and take it with me.
The concept of a seed bank is not just a crazy prepper idea. Many of you have probably heard of the Svalbard Global Seed Vault, often referred to as the “Doomsday Seed Bank.” For those of you who haven’t, the SGSV is a vast storage of seeds of all types from all over the world. The seeds are stored in an underground concrete bunker complete with blast doors and motion detector security. It is located in northern Norway on an island that is about 800 miles from the North Pole. The island was chosen because of its cold temperatures, its lack of earthquake activity, and its elevation above sea level. The project is funded by the Bill and Melinda Gates Foundation, the Rockefeller Foundation, Monsanto and several other agri-biz giants, and other assorted organizations. The purpose of the Svalbard Seed Vault is to preserve seeds of various plants that might be destroyed in regional or global disasters. Scary stuff.
Somehow, I don’t think I’m on the mailing list to receive any of these seeds if there’s a global disaster, so I decided to follow their lead and put together my own seed bank. What I did is spent about $40 on various different varieties of heirloom seeds that I know grow well in my area and that I have had experience raising. I took these seed packets and sealed them in zip-lock freezer bags, placed them in a sealed Sterilite container, threw in a few oxygen absorbers, and stuck the container in my freezer.


The seeds should keep this way for at least 10 years, probably much longer. There is plenty of information on freezing seeds on the internet. As usual some of the info is good, and some is not so good. You’ll just have to decide who to listen to. If it’s any consolation, I will tell you that I know personally that you can plant beans and field peas that have been in the freezer for 10 years.
I have noticed that several companies sell pre-packaged survival seed collections for long term storage. You could go this route, but I think you would be better off selecting seeds that you have experience with and that are specific to your growing climate. Just make sure that the seeds you store are non-hybrid, heirlooms.
I have been writing this blog for a few years. I’ve posted over 240 articles, and I’ve had about 1.2 million hits. So I guess it is to be expected that I would receive a few obnoxious comments over the years. Actually, I’m surprised that there have been so few given the lack of civility in our world today. But, there have been a few, so I thought I’d take a moment to address folks on the proper way to make a comment. That would be a comment on this blog, or anybody else’s blog, or to your next door neighbor as far as that goes.
Acceptable comments are comments that ask for clarification on a point, or comments that add additional information to the article, or comments that recommend another source of information about the topic at hand, or comments that reflect an individual’s personal experience with the subject. Comments that represent a different point of view or dispute some fact within the article are also perfectly acceptable so long as, and here’s the hard part for some morons, they are presented in a polite manner. There seem to be a very limited number of individuals who have nothing better to do than troll the internet looking for things to comment on so they can express there absolute superiority to the rest of us mere mortals. There comments generally start with something like, “you obviously have no clue what you are talking about,” or, “the information contained in this article couldn’t be more wrong.”
Here’s a heads up for people who write comments like this. I know that when you are writing this, you are picturing yourself as Arnold Schwarzenegger in the movie Predator, but trust me when I tell you that the rest of us are picturing you as Paul Blart in Mall Cop. All of the real experts that I have met over the course of my years have all shared two characteristics; (1) they have all been extremely humble about their knowledge and abilities, and (2) they have all been unfailingly polite. Rudeness is a sure sign of an insecure poser or to put it in the modern vernacular a “mall ninja.” I have never received a comment from one of these individuals that was factually correct, and in most instances it has been obvious that they haven’t even read the article.
So, if you are an individual who likes to make snotty comments on the internet, I have some advice for you. Lose some weight, move out of your parent’s garage, and try dating a real flesh and blood girl. This will give you something to do in the evenings instead of trolling the internet. If you still feel the urge to be a pompous horse’s ass then you should try and get a cable news program where you will fit right in. As for commenting on this blog; you will go straight to the spam folder, because I’m the one who moderates the comments, and, by God, we will have civility here.
Okay, my rant is concluded. Since there wasn’t any real survival info in this post, I will do another one in a couple of days on how to start your own seed bank.
What with weather satellites, Doppler radar, 24 hour weather channels, and internet weather reports we’ve become pretty spoiled at knowing what the weather will be; but this is all fairly recent stuff. It hasn’t been all that long ago when televised weather forecasting was pretty much a crap shoot, and before the age of television it was even harder to know what to expect from the weather. Just about any house built in my part of the world before World War II had a storm cellar. When a storm suddenly appeared people just didn’t know what to expect. It could be a tornado or it could be just a passing thunderstorm.
What you need to understand is that if there is some kind of major infrastructure breakdown, we could be right back in those days once again. With this in mind it would be a good idea to try and learn a bit about how weather was forecast back in the pre-mass communication days.
If you’re going to be raising your own food, which everyone will be eventually, then two things that will be very important to you are rain and temperature. You need to be able to predict rain, and you need to be able to record how much rain you have had. You need to keep an eye on temperature so that you know when seedlings and young plants need to be protected. To do these things you will need three weather instruments; a barometer, a rain gauge, and a thermometer.
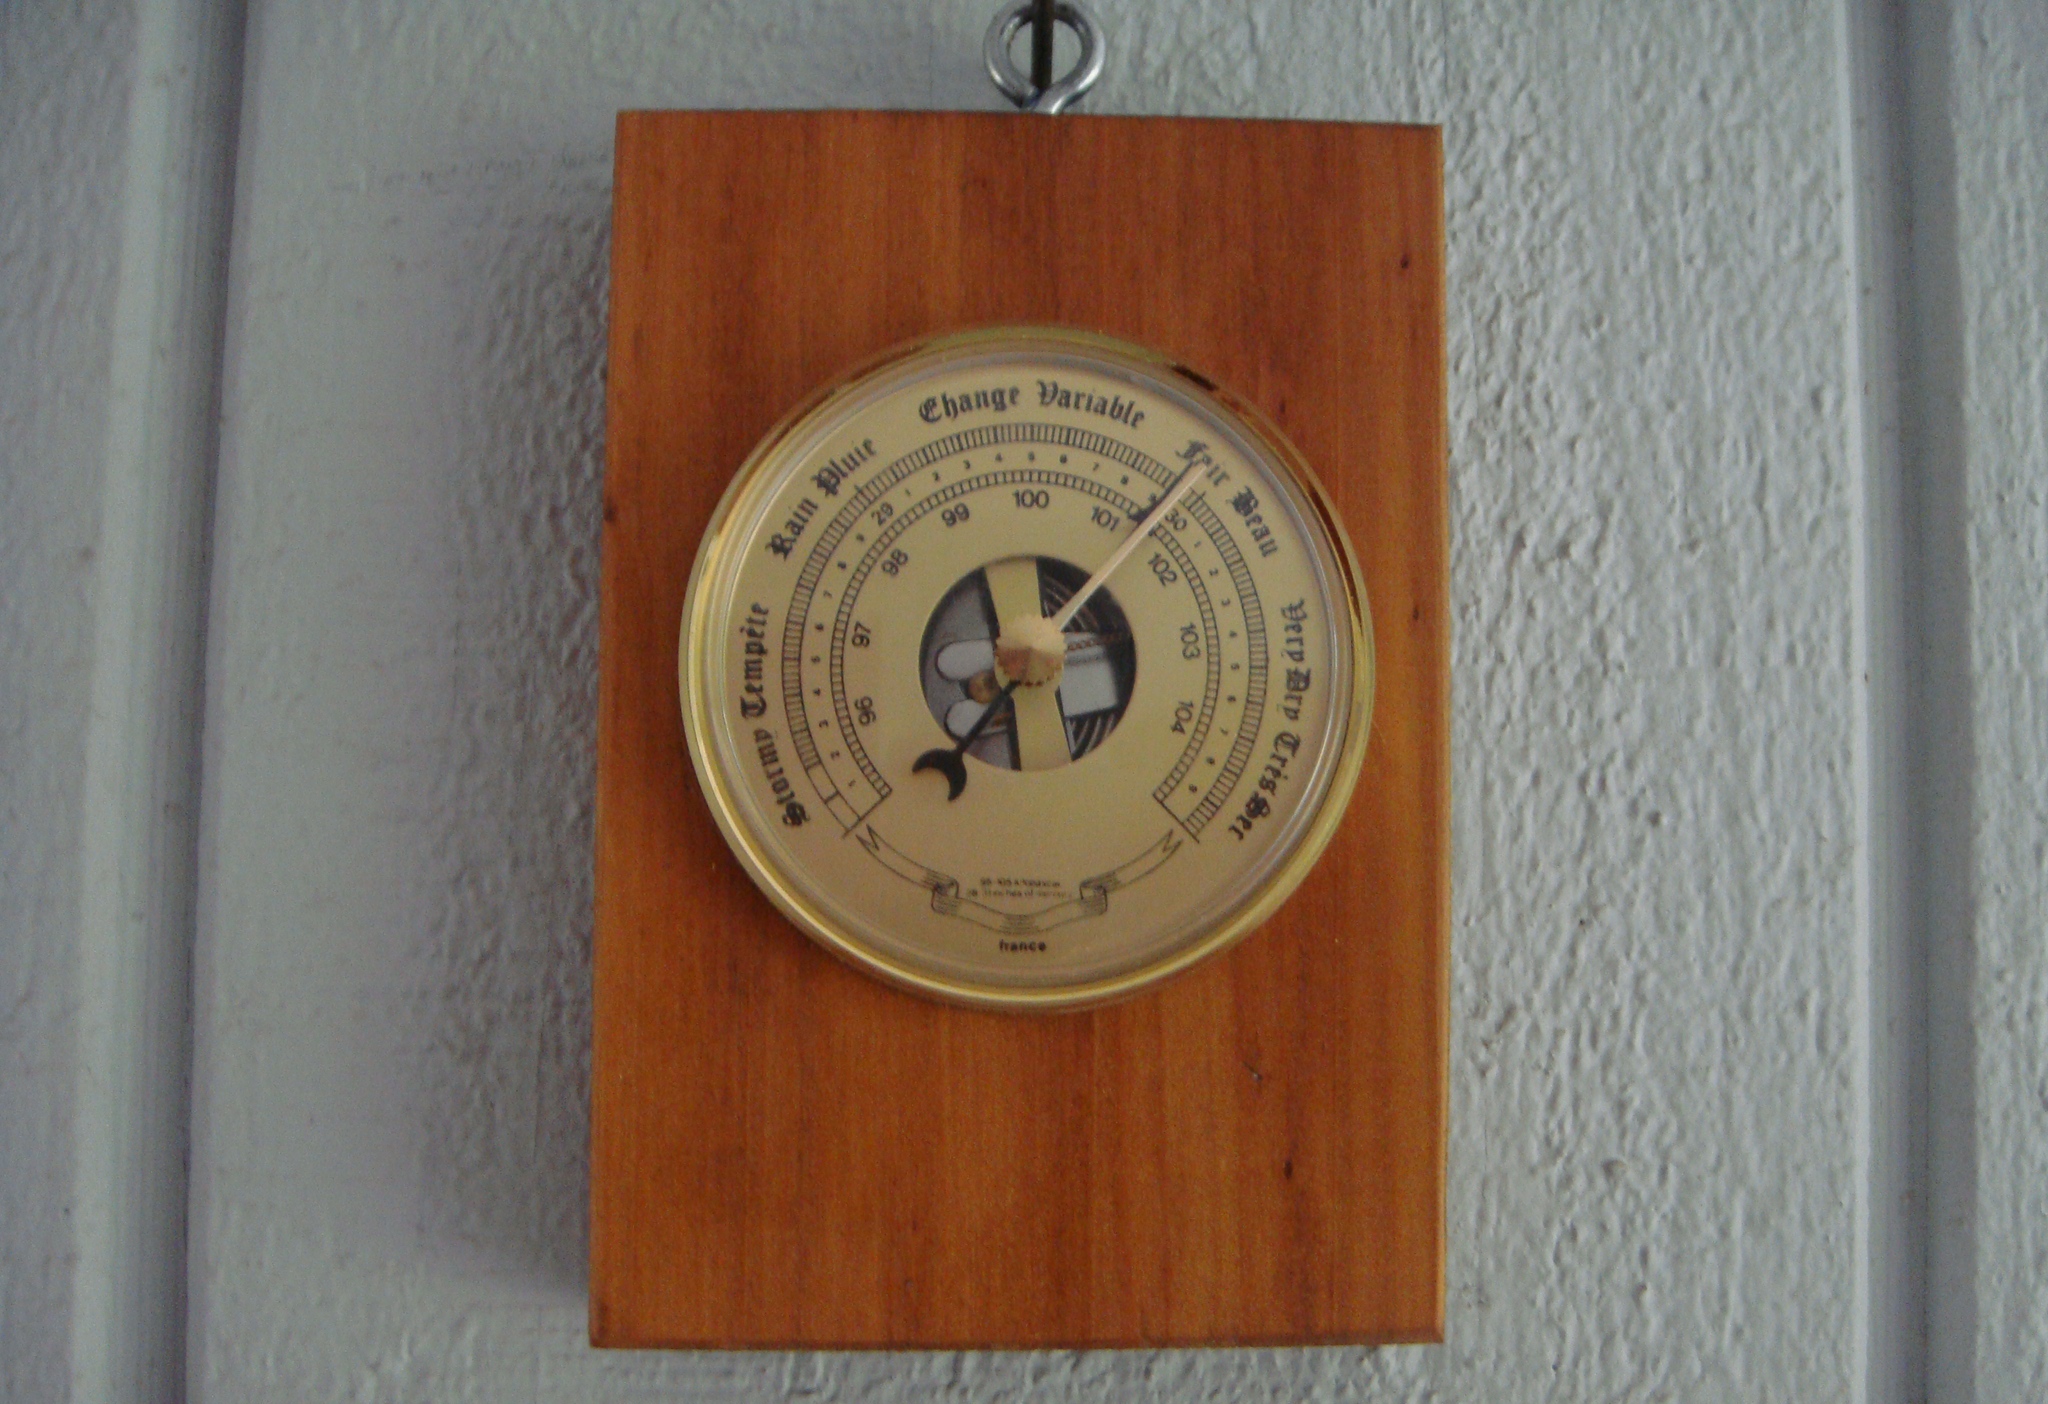
I’m going to suggest that you go old school on these items. You can buy very fancy, digital home weather stations, and they are very nice. My sister has one of these set-ups, and she doesn’t even have to get out of bed to look over and see what the outside temperature, barometric pressure, and rainfall levels are. Here’s the problem, these things run on electricity, so you have to have a reliable source of power; and they are digital which means that they could be susceptible to EMP. A solar let-up could solve the power problem, but you’re still left with the possibility of the system being fried by an EMP. So, I decided to go old school with an aneroid barometer, old timey thermometers, and a bucket rain gauge.
I have a small barometer that I mounted on the wall of my porch. A barometer tells you the air pressure. High barometric pressure is usually associated with fair weather, and low barometric pressure is usually associated with stormy weather. Since the pressure most often begins to change before the actual weather develops, a barometer can help to predict when rain may be coming. A falling barometer could mean that rain is on the way. The faster and more dramatic the fall in barometric pressure; the more eminent and violent the weather may be.
Thermometers are so abundant and so cheap these days, that there is no excuse to not have a bunch of them. Thermometers are very useful in everyday life, plus think “great trade item.” I have three thermometers set up around my house. One is mounted about five feet away from my bedroom window so that I can look out and see what the temperature is.

I have it mounted away from the window so that any radiant heat from the house won’t affect the reading. I have a large dial thermometer in my green house, and then I have a small thermometer inside the germinating tent which is in the green house.


With these three thermometers I can pretty well keep track of what I need to be doing with my plants.
My rain gauge is super high-tech. It’s a three gallon plastic bucket that I leave out in my garden.

When it rains I go out and measure the amount of water in the bucket (usually just by sticking my finger down in it), and empty the bucket. If I don’t have an inch of rain in a week’s time then I know I need to start watering the garden. I’m not collecting data for NOAA here, I’m just trying to keep my garden producing. Of course you can buy a much better quality rain gauge, but the bucket has been working fine for me for many years.
So, that’s my weather set-up. Just the way I like things; simple cheap, and low-tech. Prepare today, and you’ll have a better tomorrow.
Our modern society is fixated on time. We need to know what time to get up in the morning. We need to know the time so we aren’t late to work. We need to know when it’s time for lunch, when it’s time for dinner, when it’s time to pick the kids up, etc, etc, and etc.
But time hasn’t always been that important. Before society became so complicated, people didn’t need to know the exact time. You got up with the sun and worked for awhile, then you had a morning meal, then you went back to work. When the Sun was in the middle of the sky you had a mid-day meal and then rested for awhile. You went back to work until the Sun got low, and then you came in for the evening meal. A short time after dark you went to bed because creating light out of the darkness was not an easy task; and besides, you were very tired from all of that physical labor. Am I talking about Stone Age man here? No, I’m talking about my Dad’s life as a boy growing up on a farm in the early 1900’s. This is the way it was for most of rural America in those times.
Of course there have been time keeping devices around for millennia but clocks as we know them today are a relatively recent invention, and they weren’t invented for the convenience of the average Joe. The first mechanical clocks were closely guarded military secrets that were developed to help sailing ships navigate on the vast oceans. Specifically, they were used to determine a ship’s longitude.
If you have a compass you can determine your direction of travel, if you have a transit you can determine your latitude, and if you have an accurate clock and a book listing the time of sun rise each day (this is a huge over simplification of the process) you can pretty well determine your longitude. These three instruments revolutionized ocean navigation, and the mechanical clock was the last one to be invented. Prior to mechanical clocks, ships were equipped with an hour glass to keep track of the time. Must have been a pain to make sure that the thing got turned over on time.
So clocks were very important to the Navy, but to the average rural resident, the time wasn’t too important, and it probably won’t be real important to you either. I know that since I retire, I rarely look at a clock. I do, however, keep a close eye on the date; and you probably will too if our current technological society ever bites the dust. The date will be important so that you know when to start seedlings, when to plant various crops, and when to expect the first frost. Most everyone plants by the calendar today, so a good calendar is a must for home food production. You won’t be able to look at your cell phone or computer to see the date, so you need to plan on going old school with a paper calendar. Personally, I printed off 120 blank calendar pages to be filled out if and when necessary. After 10 years I guess I’ll have to start carving notches on a post like Robinson Crusoe.
There is one method of determining planting dates that does not require a calendar. I’d never heard of it until my sister, the Master Gardener, told me about it. It’s modern name is “phenological gardening”, and it’s based on the study of the life-cycles of plants. The old timers probably didn’t call it phenological gardening. To them it was probably planting by the “signs,” but the idea was that when certain wild plants and flowers bloomed it indicated that it was the proper time to plant various different domesticated crops. Here are some examples of this planting system:
When the daffodils bloom it’s time to plant peas.
When the catalpas bloom its time to plant broccoli
When bearded iris bloom it’s time to plant peppers
When shadbush blooms it’s time to plant potatoes
When lilies-of-the-valley are in bloom it’s time to plant tomatoes
It’s an interesting system. It might be worth looking into how it would apply to plants in your area and making a list of signs to look for. I know that I’ll be watching my catalpa trees this year to see if they bloom when my planting guide says it’s time to plant the broccoli.
For more information on phenological gardening my sister recommended the book, Vegetable Gardening the Colonial Williamsburg Way. You can also do an internet search on “phenological gardening” and you will find a number of interesting sites about this planting system. In my next post we’re going to talk about weather prediction. and we’ll be talking science rather than “signs.”
So now that we have our string jig and our serving dispenser together, we can make a bowstring. You can use many different things for the actual string. You can buy some B-50 Dacron that is specifically made for bowstrings, but I prefer to use the waxed Dacron that is sometimes referred to as artificial sinew. It’s easy to find at craft stores and relatively inexpensive. It also has the advantage of already being waxed. If you use B-50 you will also need beeswax to rub on the string.
Before we start wrapping our string onto the jig I want to give you a little diagram of what we are doing. Since my string jig is over five feet long it makes it hard to show it all in a photo. I thought a diagram might help.

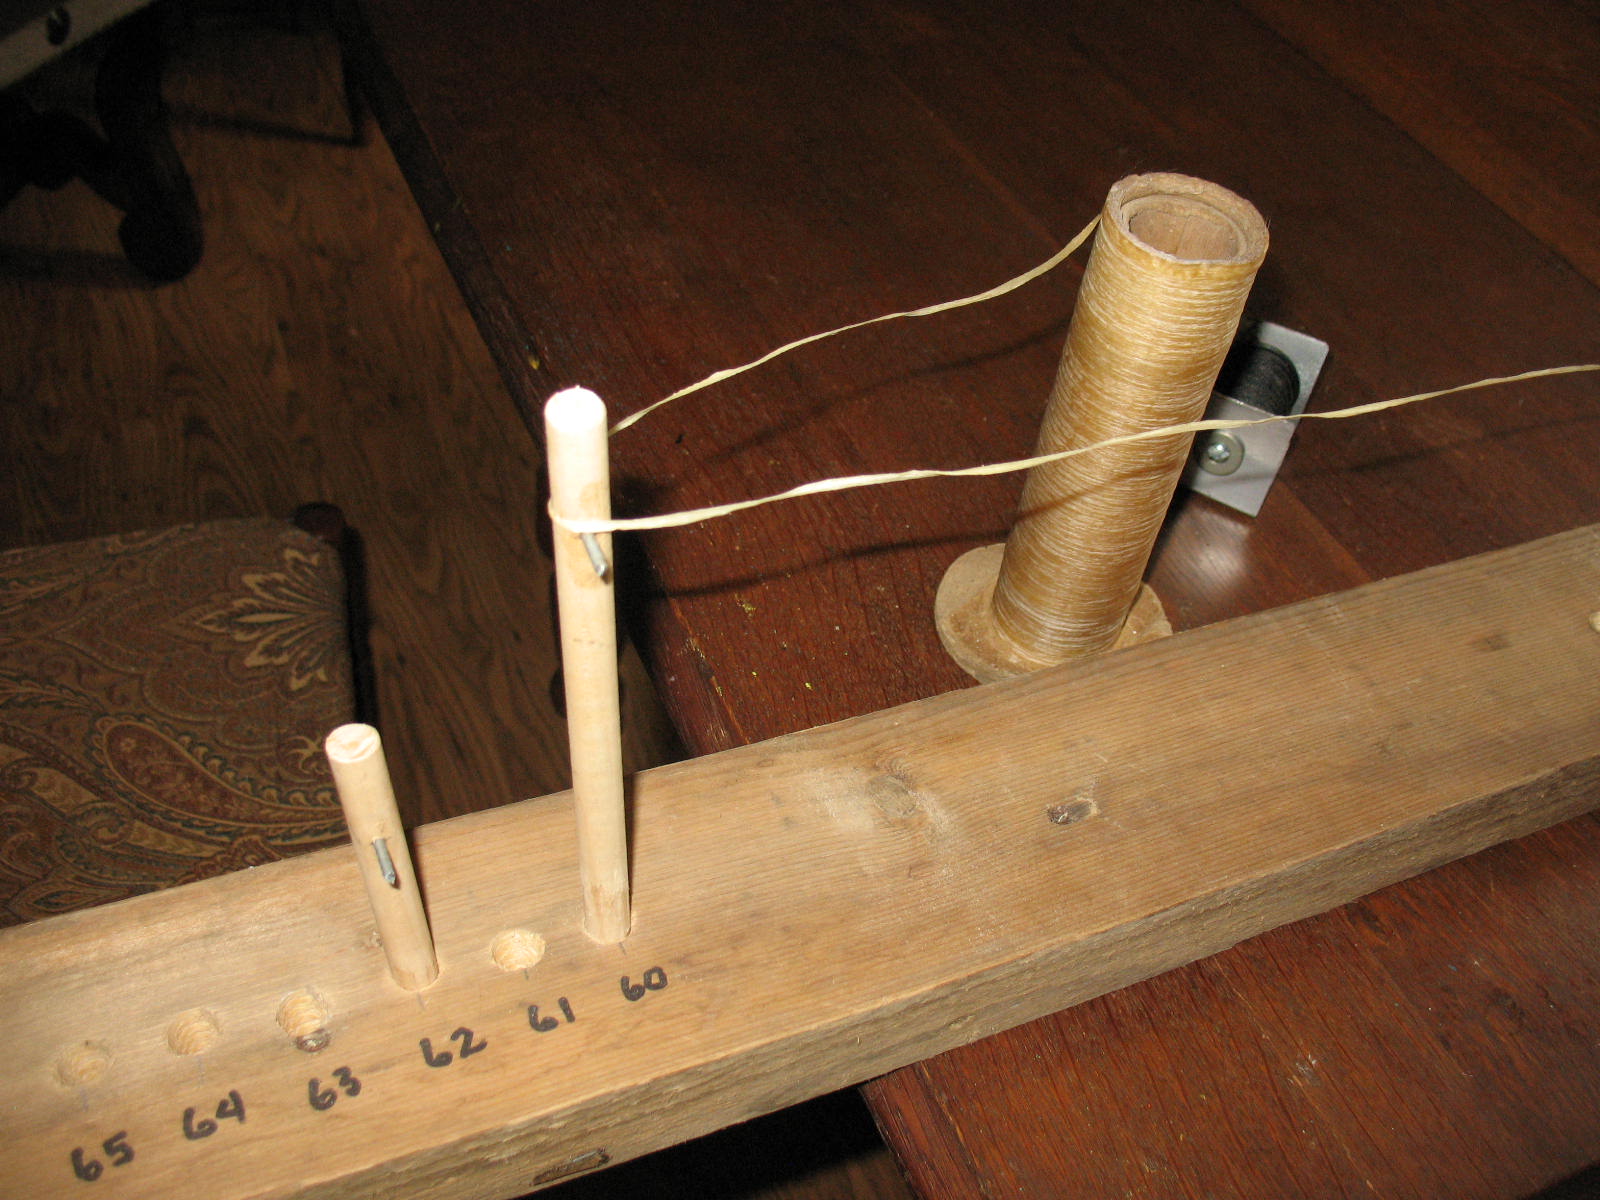
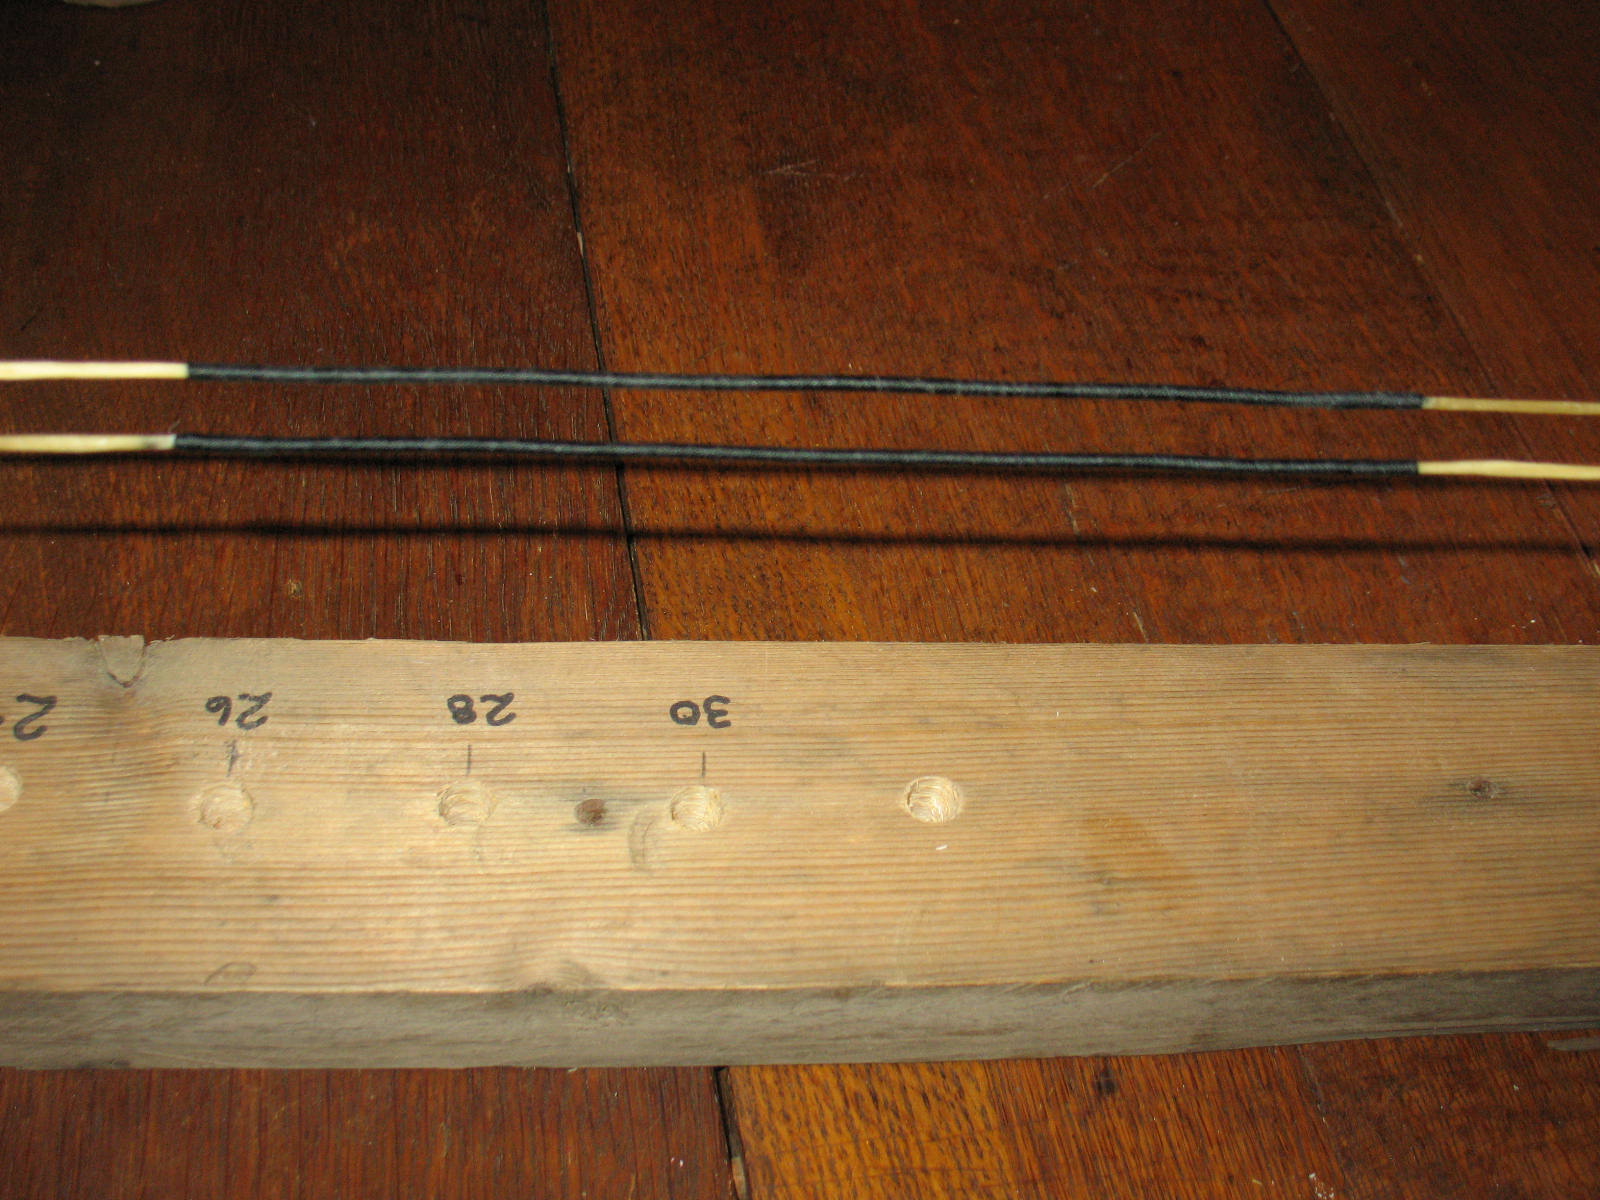
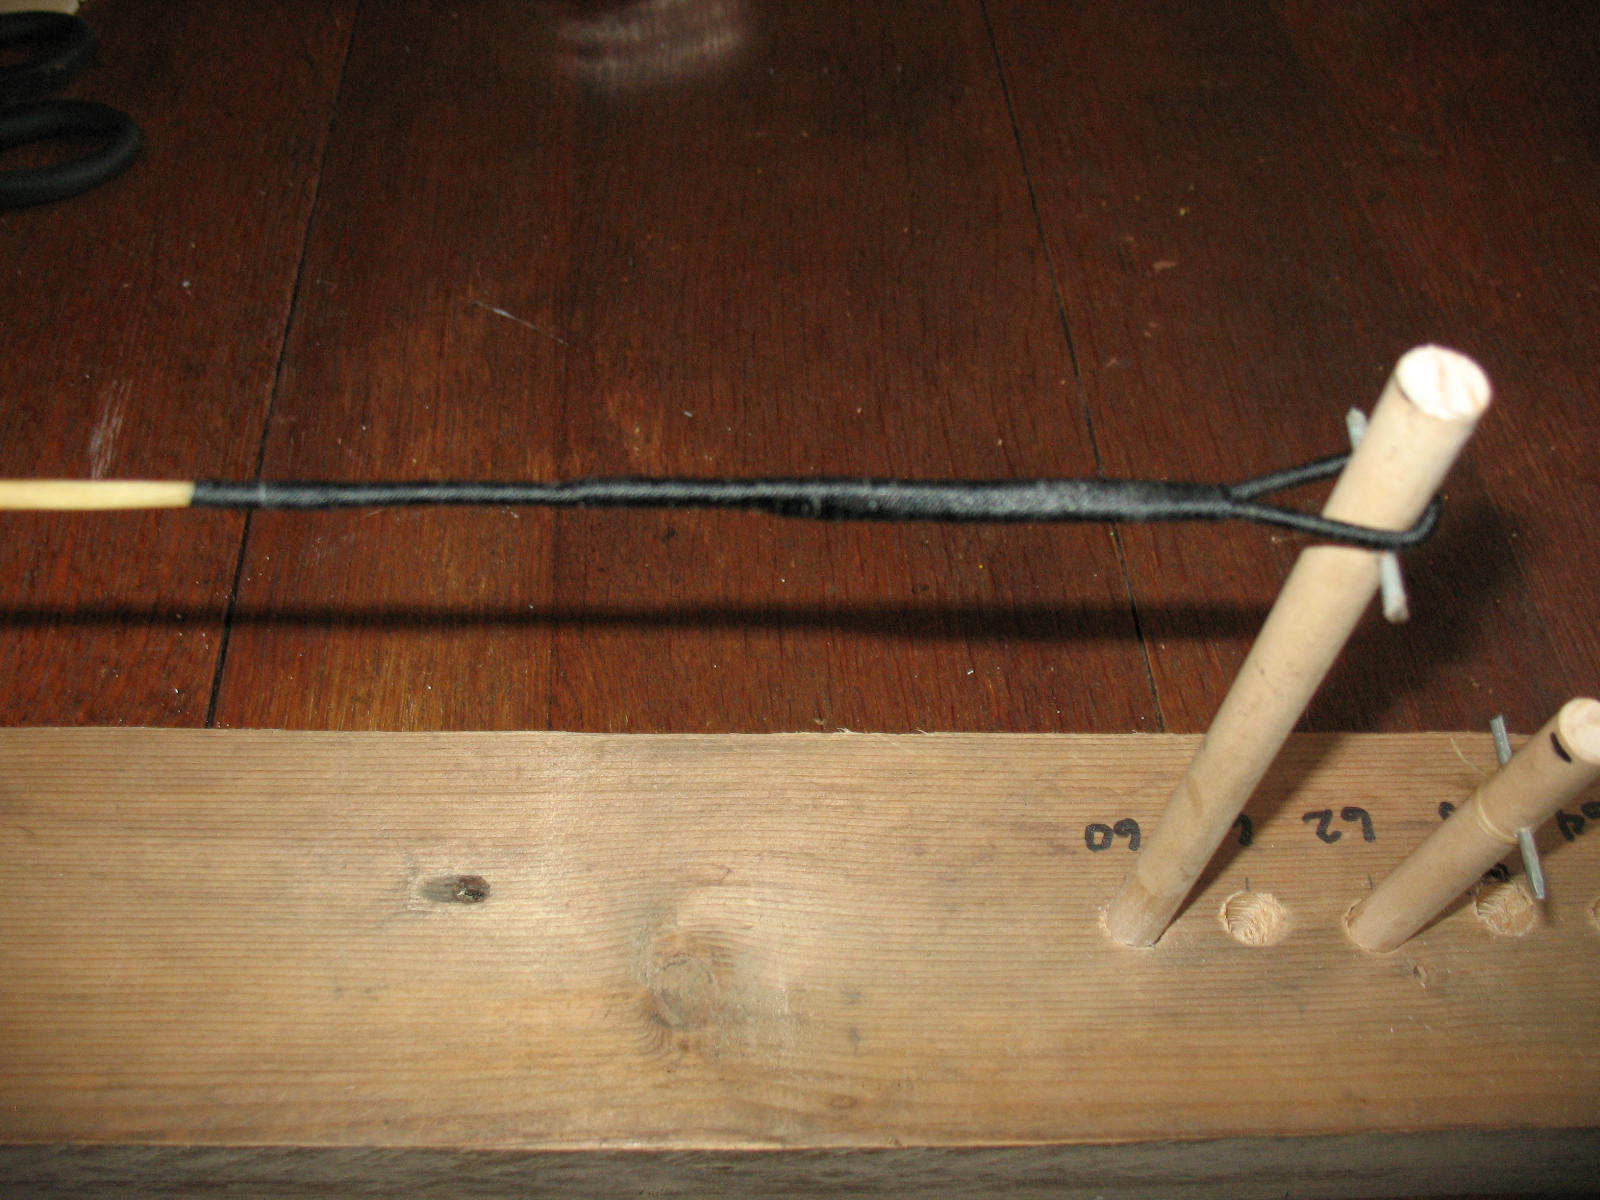
Now let’s get started. My two starter dowels are glued permanently in place. I’m going to make a 60 inch bowstring, so I set my two movable dowels with the tall one at 60 and the short one at 62.
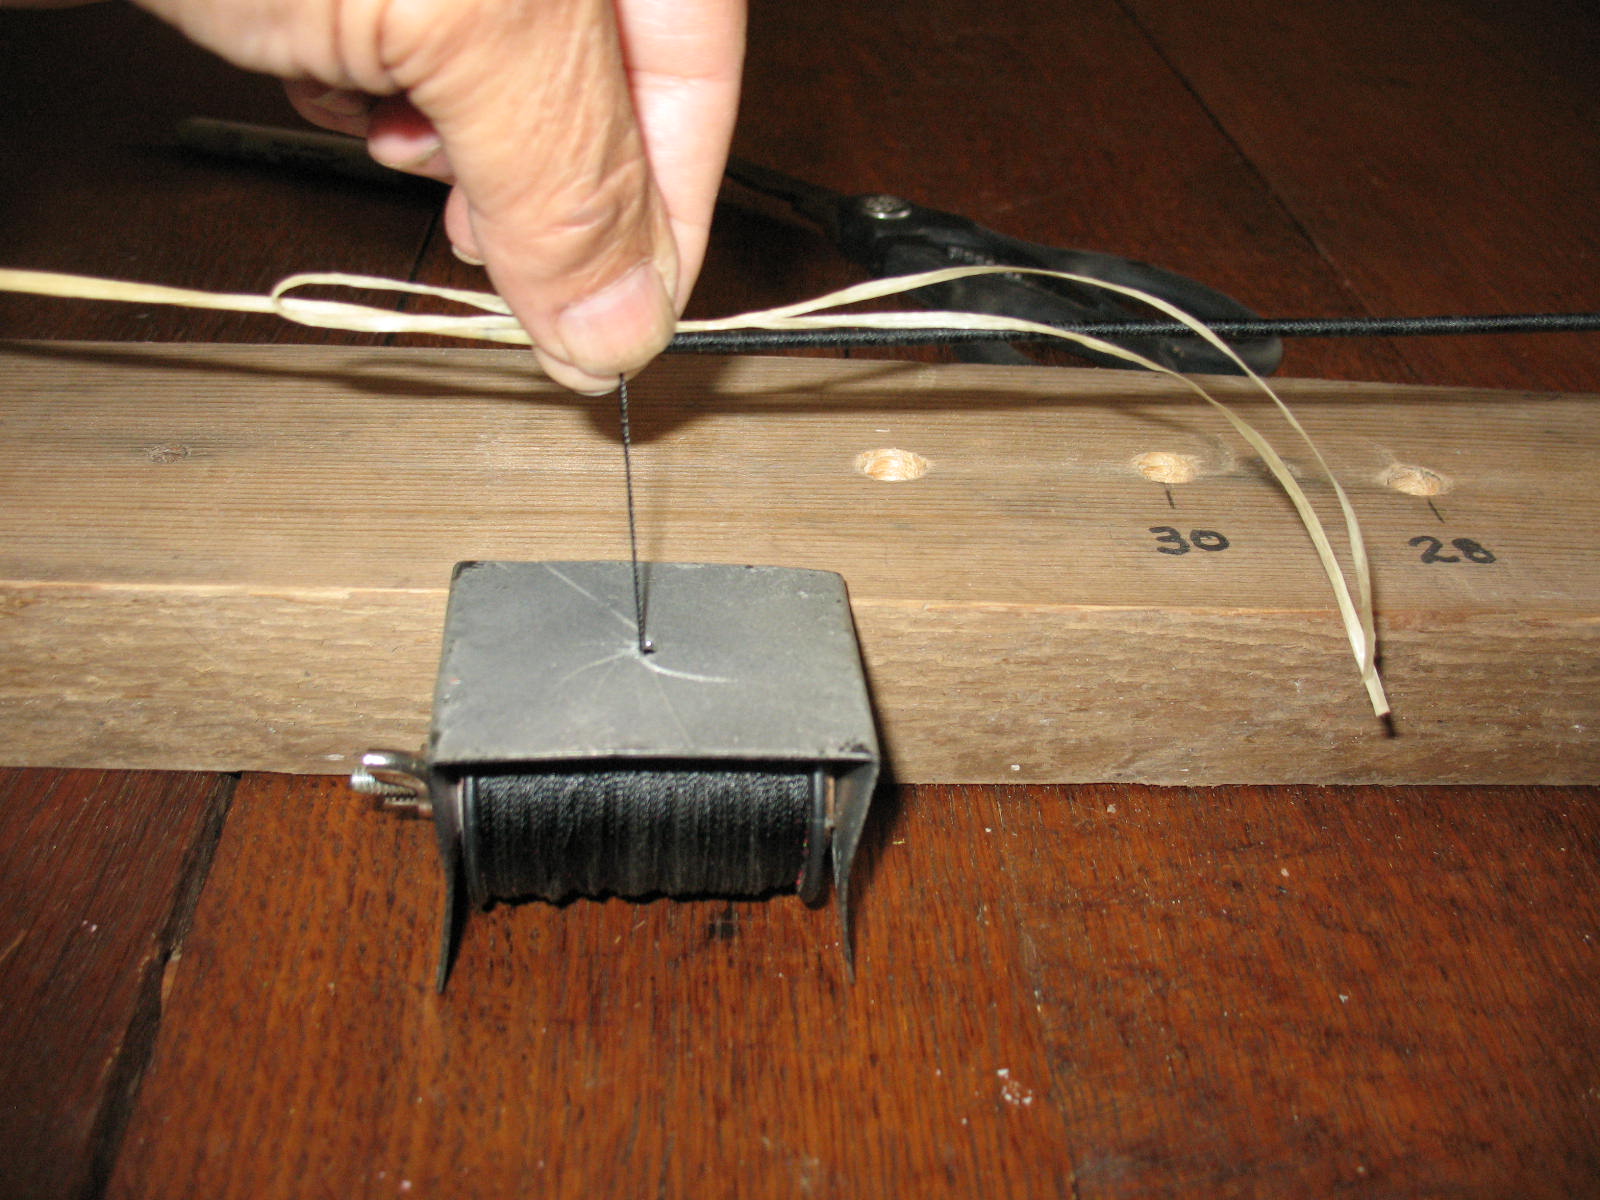
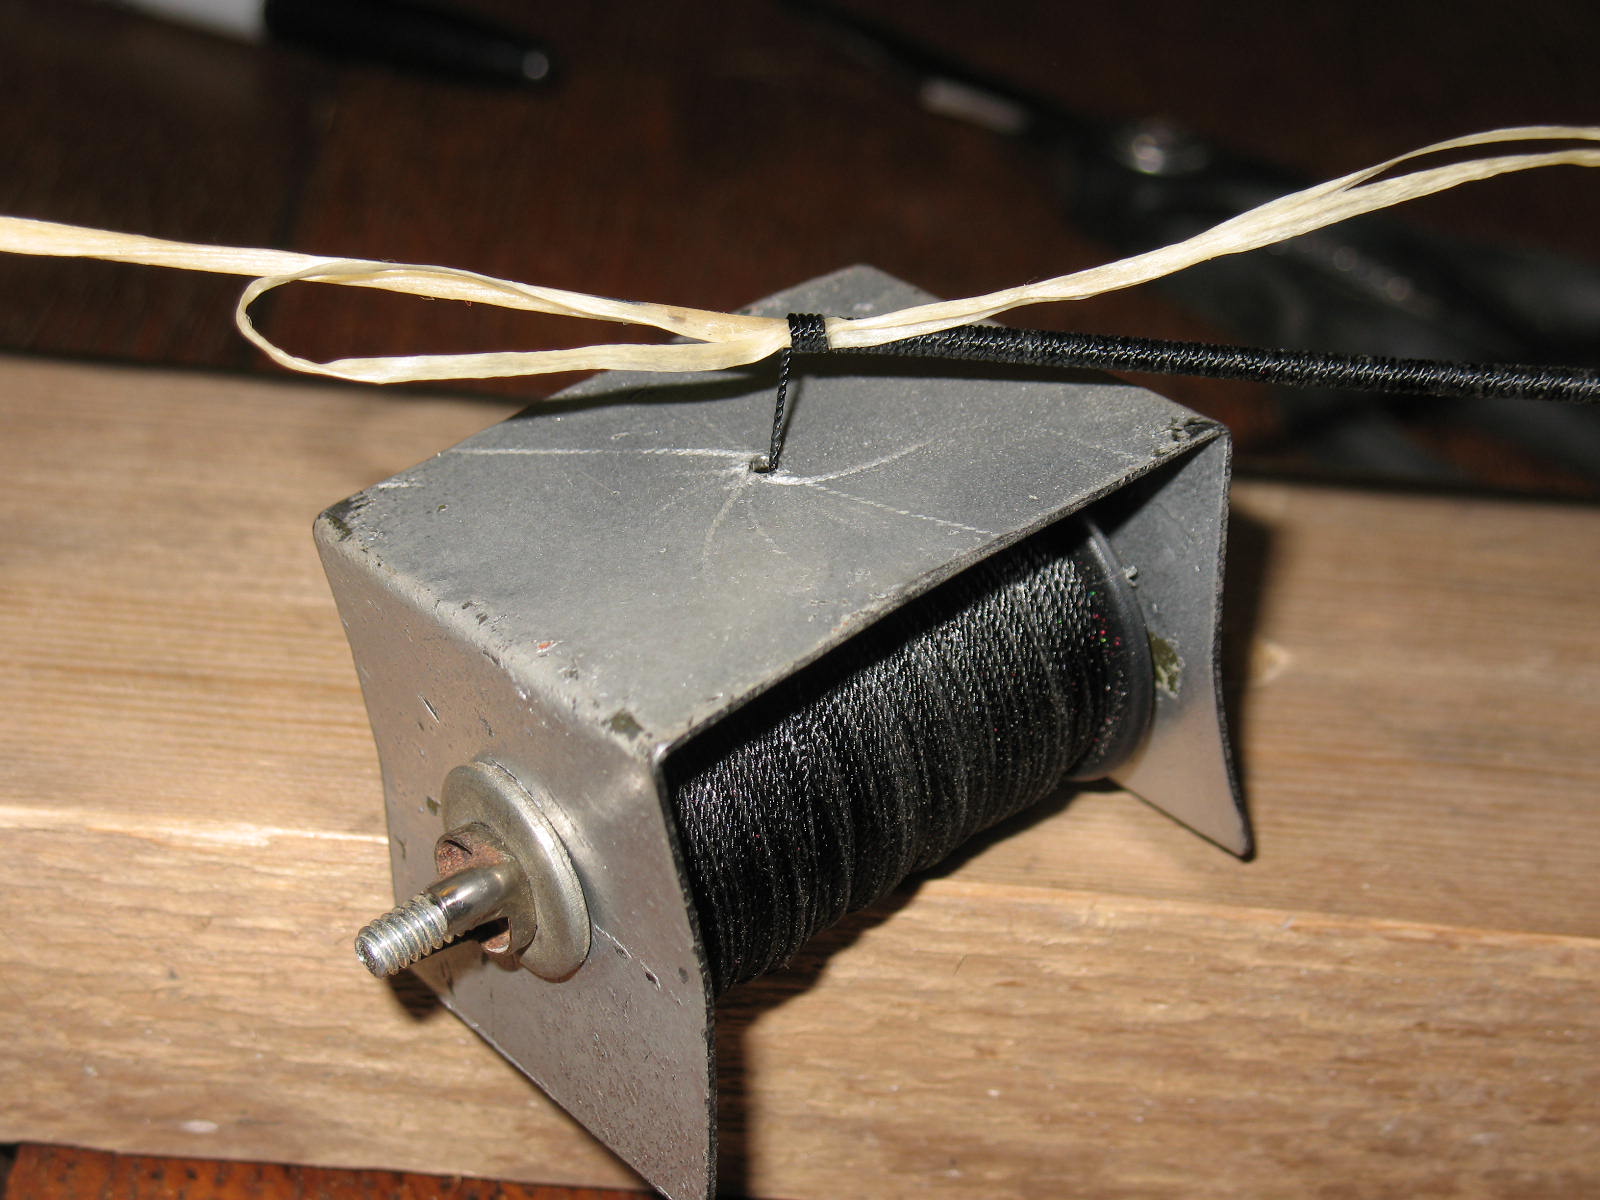
To start the wrapping I tie the end of my Dacron string below the cross pin of the permanent short dowel and then I bring the string over the cross pin on the permanent tall dowel. You can start on either side of the tall dowel.

Now I run the string down and loop it around the tall movable dowel. You should be on the same side of this dowel as you were on the permanent dowel. You don’t want your string criss-crossing in the middle.
Keep a little tension on the string and run it back to the permanent tall dowel and around. You continue this until you have as many strands as you want in your bowstring. If you want to make a bowstring with a total of six strands you will continue looping the string until you have five strands on the side that is tied to an end post and four strands on the side that is not tied to an end post. The reason for this will become clear in a moment.

When you tie the end of your string off at the finish, it must be tied to the opposite end from where you started.
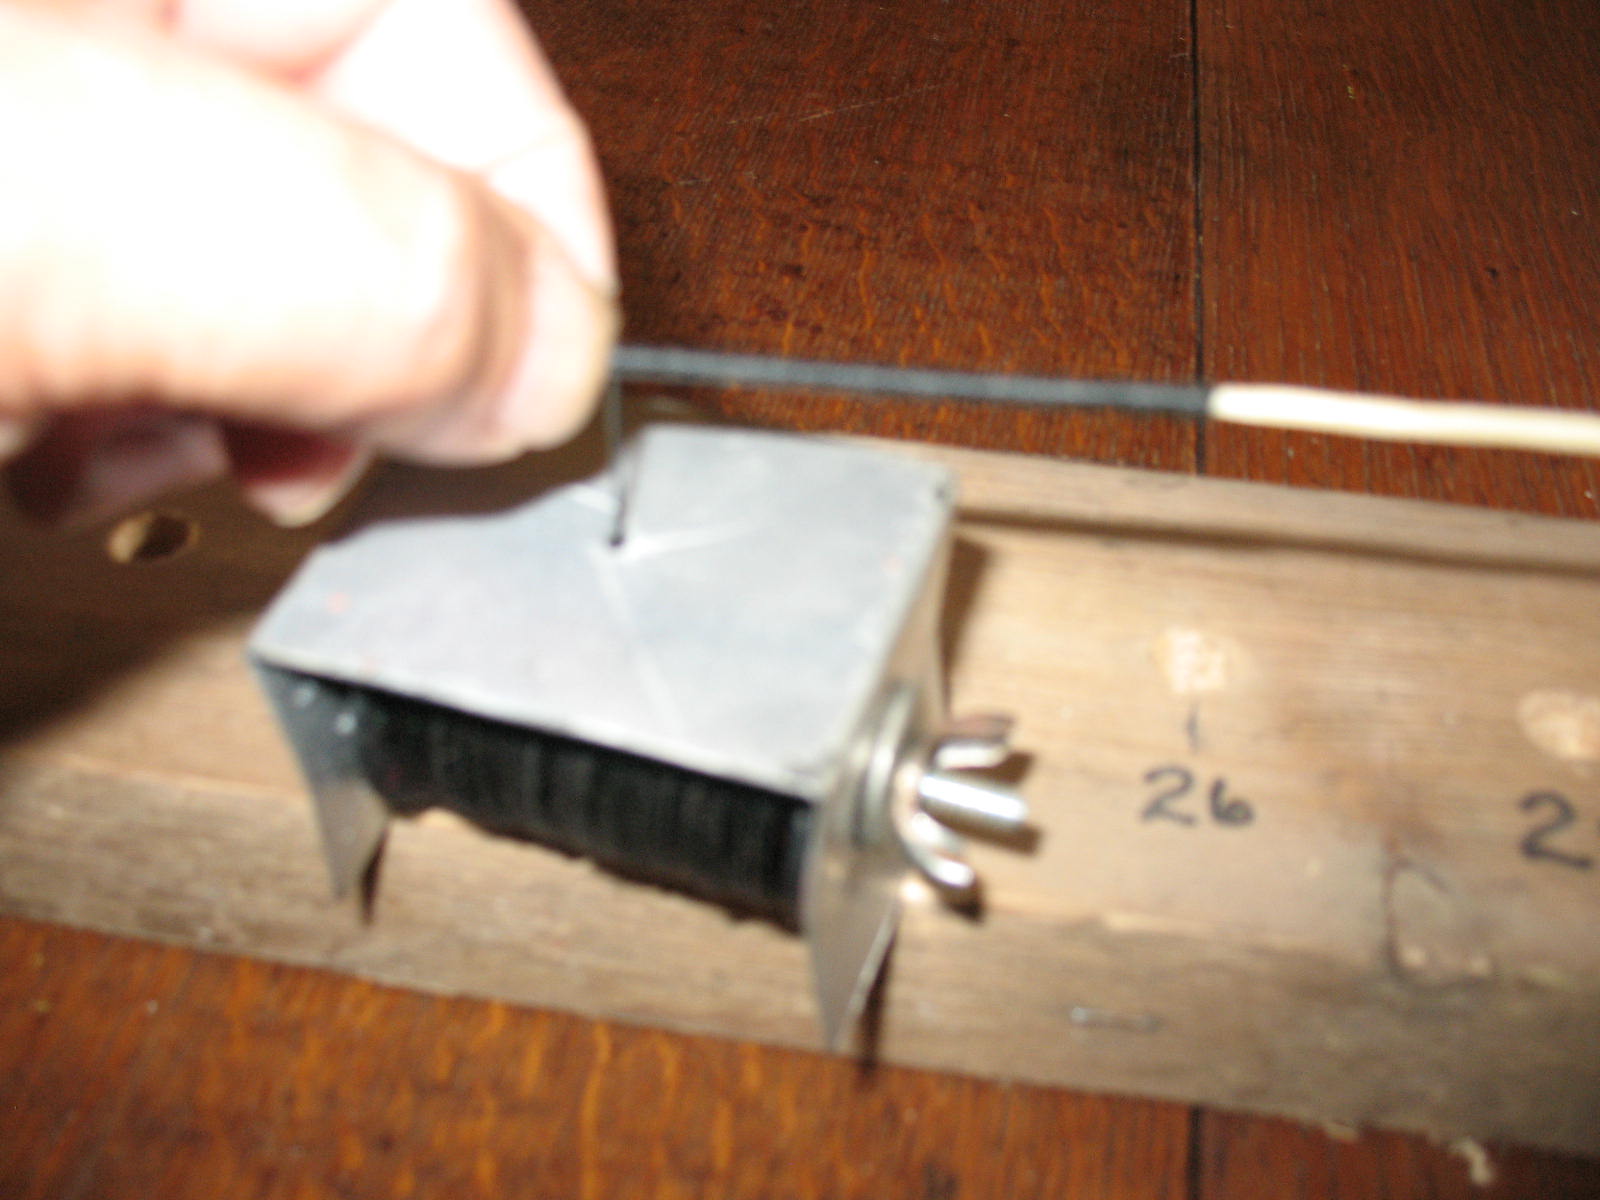
You now have two runs of Dacron that are separated by about a ½ inch of space. It is time to apply the serving to what will become the loops of our bowstring.
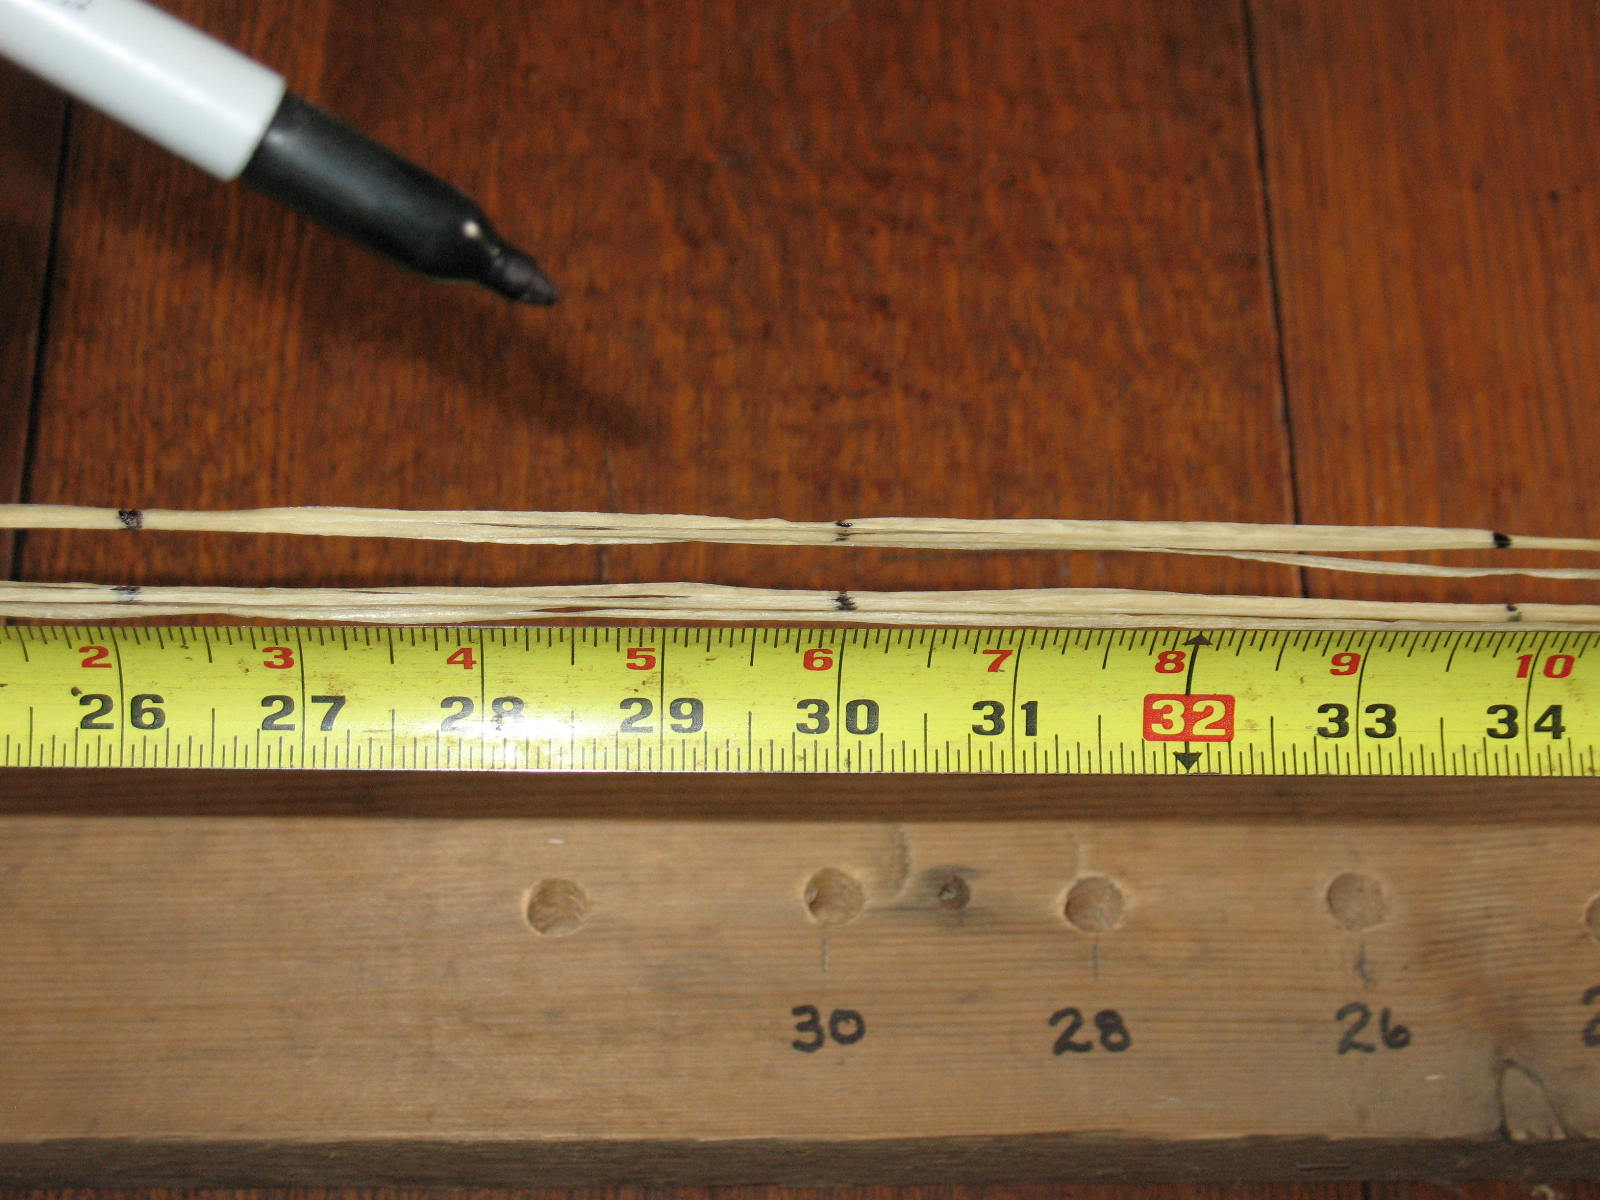
Measure to the center of the bowstring. Since we are making a 60 inch string, the center will be 30 inches. Mark the center and the measure out four inches to each side of center and make a mark. We are going to apply serving to each of these eight inch sections of bowstring.
To make it easier to work on each strand, place your string spreaders in between the strands to hold them apart.

Being right-handed I always serve from right to left, so that’s how the pictures show the process. I start at the mark on the right side of the closest strand and loop my serving around it. I leave an inch or two of tail on the serving and wrap my loops over the top of it. It is important to lay your serving loops right next to each other and to keep the serving tight.
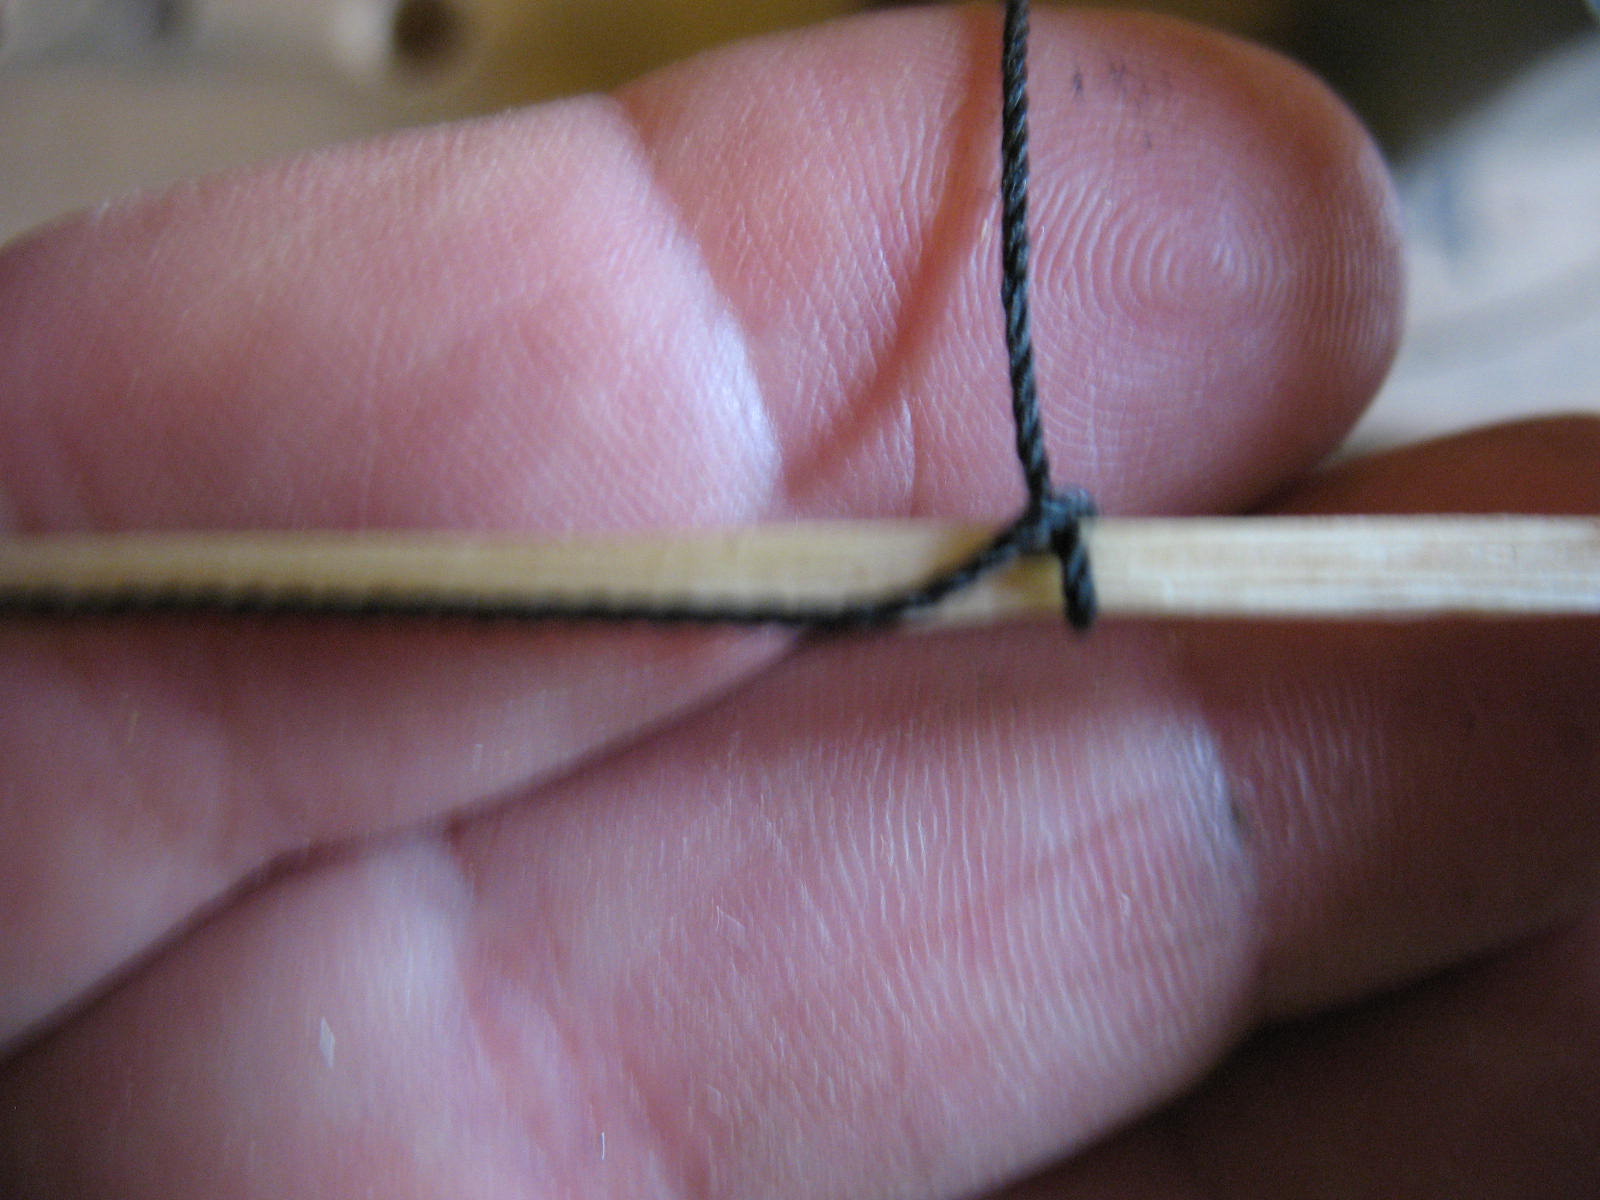

Your serving dispenser should be adjusted so that a firm pull will feed more serving out, but if you let the dispenser hang, it will not let serving come out on its own.

When you have covered up about ¾ inch of the tail, you can snip the remainder off. The wrappings will not let the tail come loose.
Keep wrapping the serving around and around until you are about ¾ inch from the far left mark.
At this point you want to take a scrap of Dacron about two feet long. Fold it into a loop and hold it along the bowstring as shown.
Now continue your wrapping, only now you are also wrapping on top of the loop.
Keep wrapping until you go about a ¼ inch past your mark; and then you can stop, reel out about six inches of serving and snip the serving off with scissors. Be sure and keep tension on the serving so that it doesn’t un-spool when you cut it.
Now take the end of the serving and stick it through your loop of Dacron.

Pull on the loose ends of the loop, and the end of your serving will be pulled back under the wraps. Snip any excess off, and the wraps will hold the, now hidden, end in place. You have to pull pretty hard on the loop ends, and it will probably compress the loops of serving back up the string. This is why you go about ¼ inch past your mark before ending the serving.


So now you have one section of serving done. Turn your jig around so that you are working from right to left again and do the same thing to the other strand.
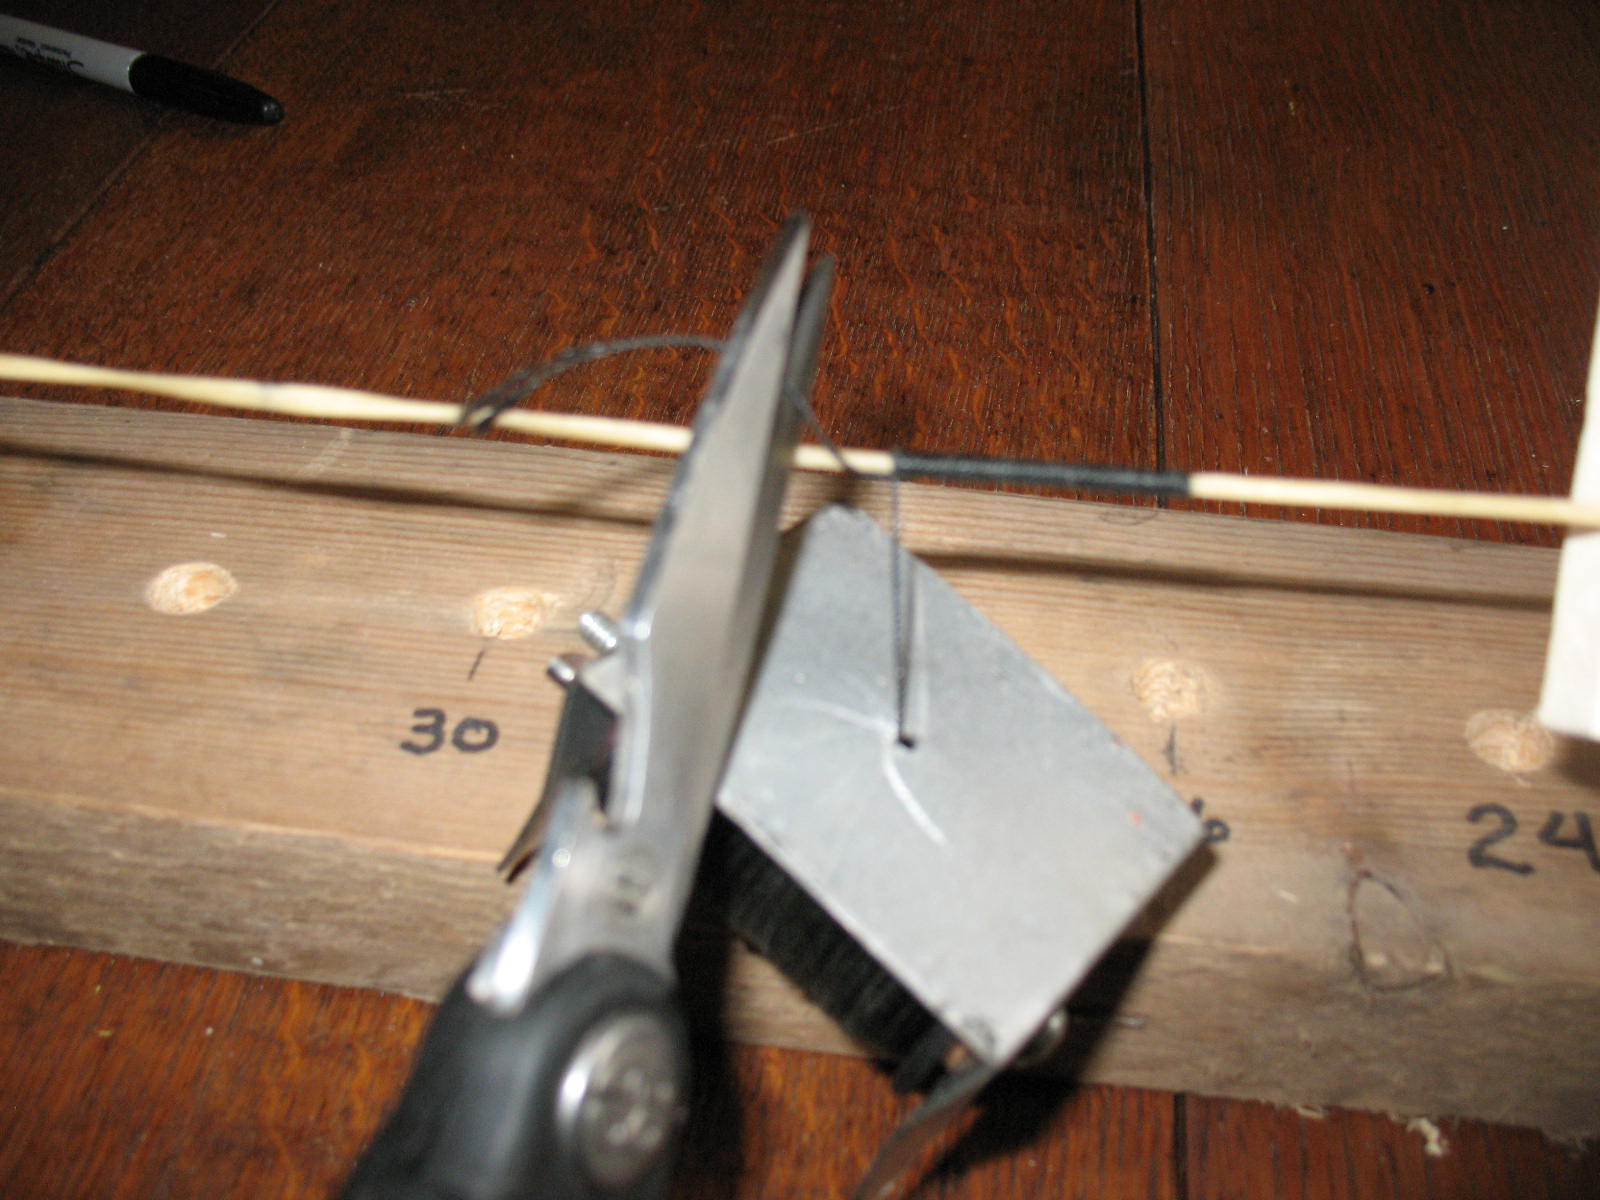
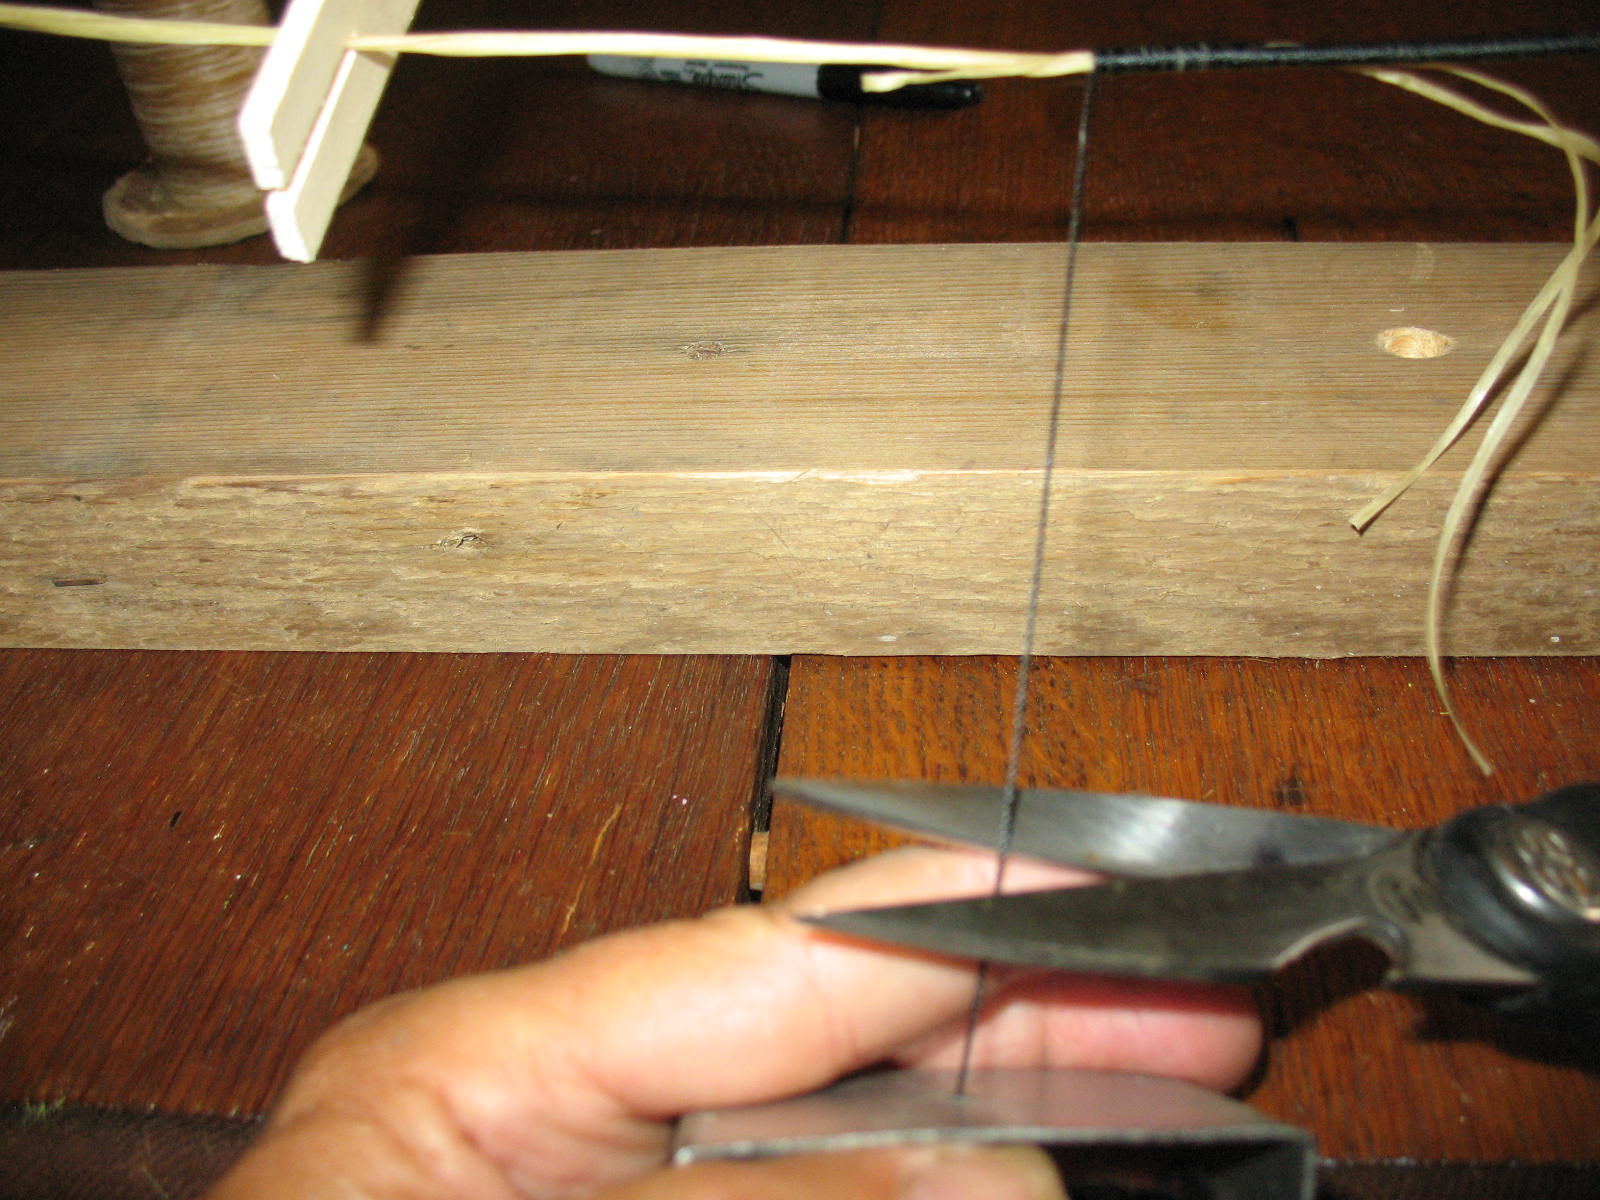
Now it’s time to cut the ties loose from the short dowels with a pair of scissors.
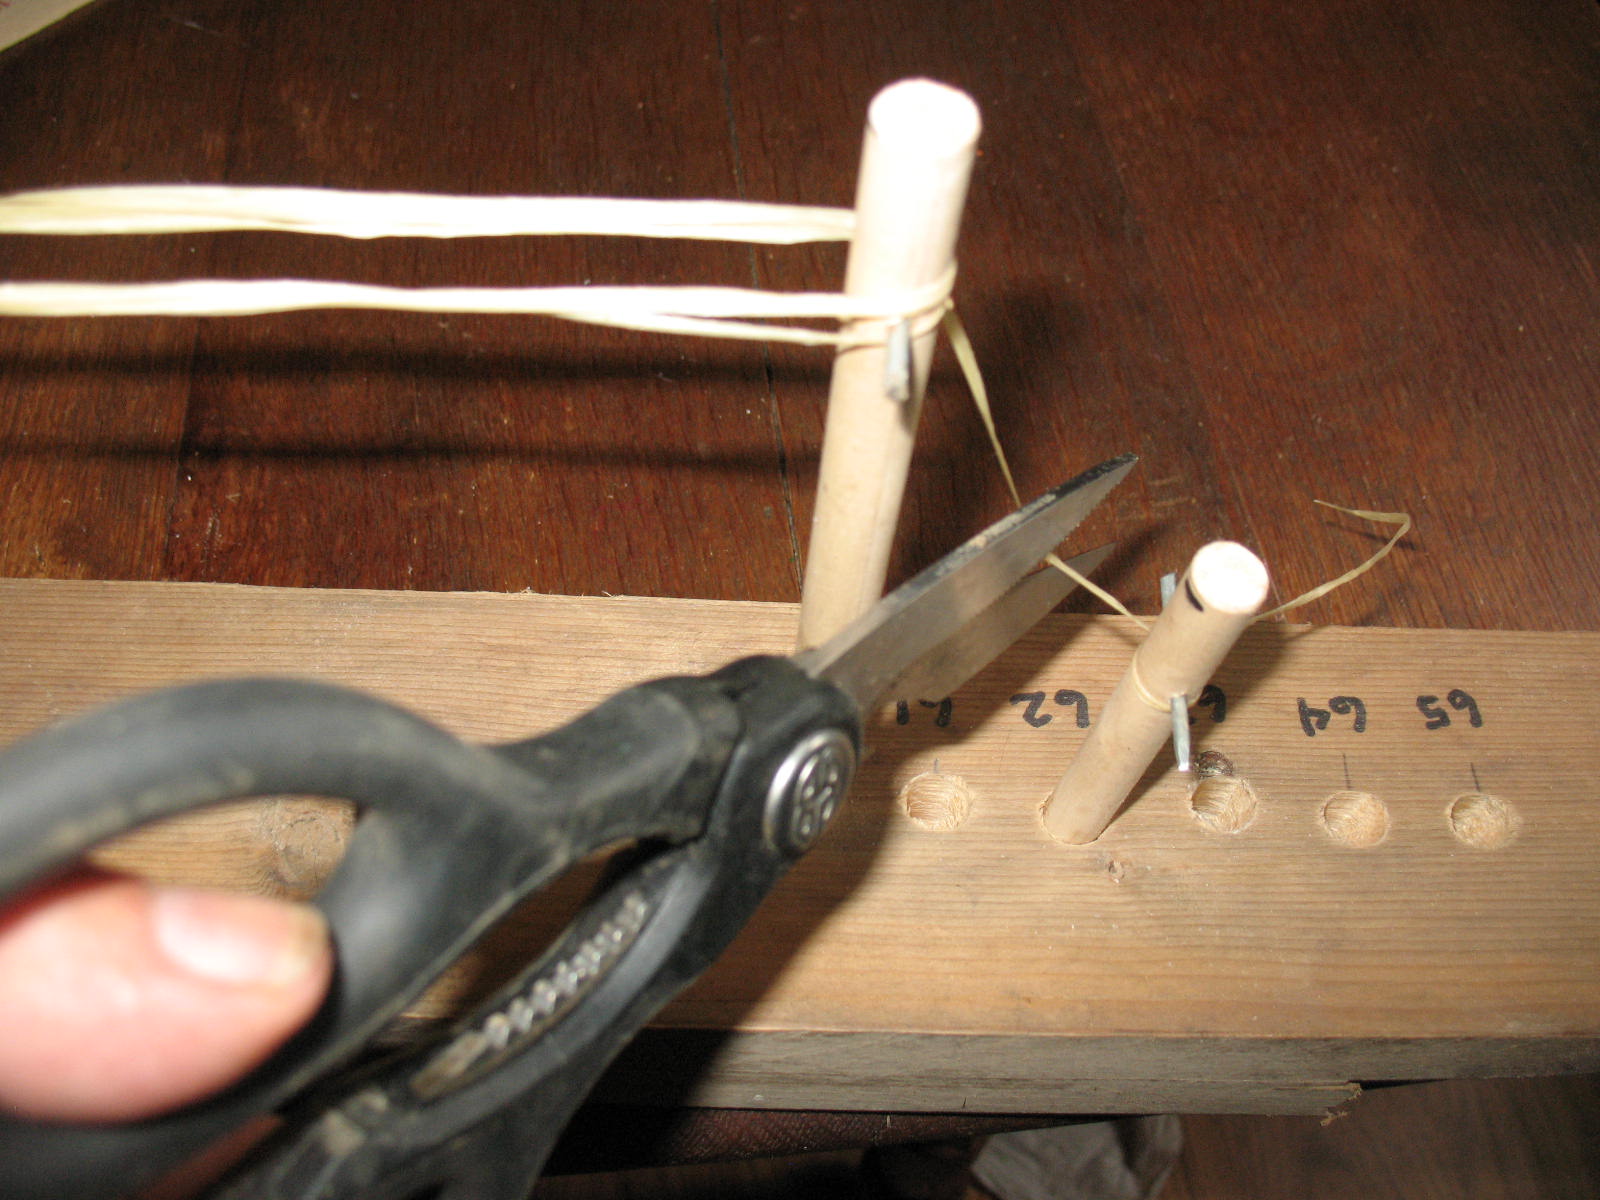
When you have snipped the string loose, lift it up so that it exposed all the way back to the serving. Now take your scissors and cut off the string right at the edge of the serving. Be careful not to cut the serving or any other strings. Do the same thing to the other tied off string.
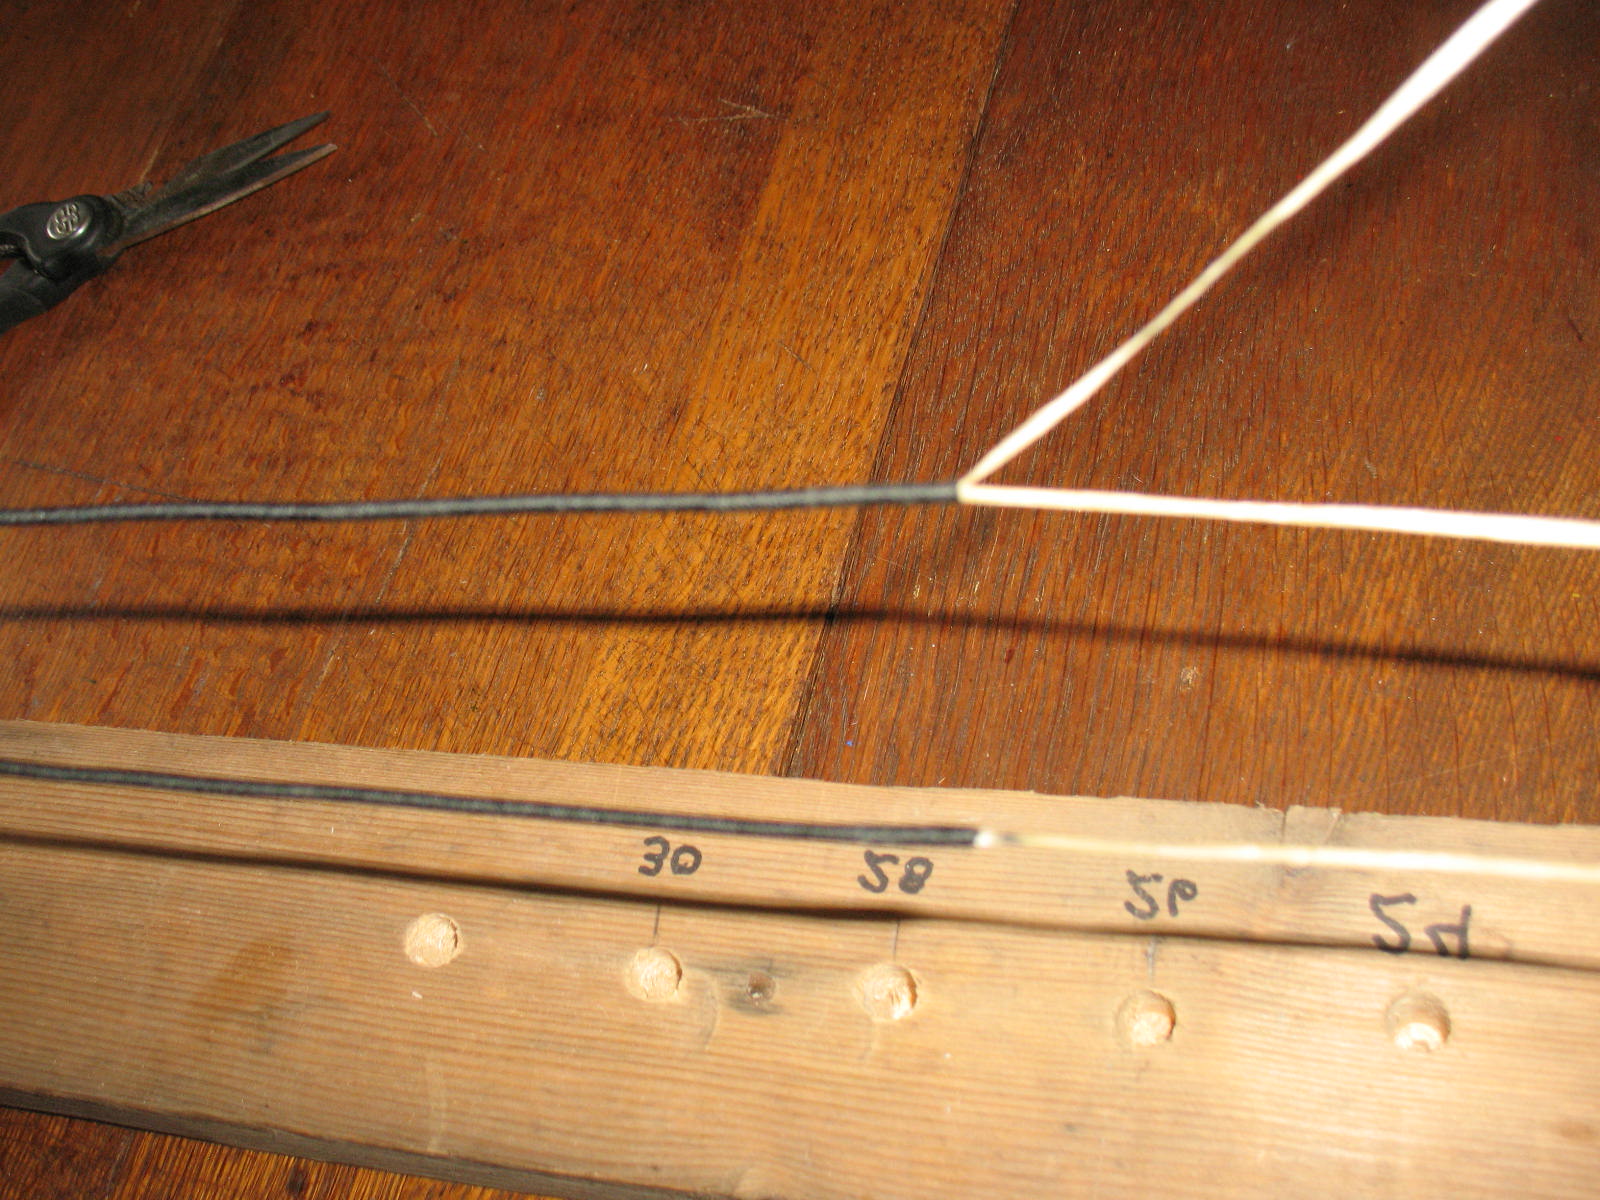
Now you can slip the bowstring around on the dowels so that the served area is around the dowels on each end. Off-set the ends of the serving about an inch or so as shown in the photo.

Now we can form the loops. All that you have to do to make the loops is squeeze the two strands together and apply a layer of serving over them as show below.
Run the serving down about six inches and finish it off just like you did before. Voila, you have a loop.
Now do the same thing to the other end. I usually make one small loop to stay in place on the bow, and one larger loop that will slide down onto the limb when I unstring the bow.

It is customary to apply serving to the string in the area where the arrow is nocked. This helps to prevent wear on the string. To locate where to put this serving, just string the bow, nock an arrow, and make a mark on the bowstring.


Apply serving to this area using the same method. I usually make my serving about four inches long with the nocking point in the center of the serving.
If you made your string a little too long, or if it stretches out, all you have to do is twist the string a little to shorten it. I always make my string a little long because it is easy to make it shorter; not so easy to make it longer. In fact, if it is too short you are going to have to start from the beginning and make a longer string.
Note: Sorry to be slow in posting part 2. My camera bit the dust and I had to buy a new one before I could continue. So on with the show.
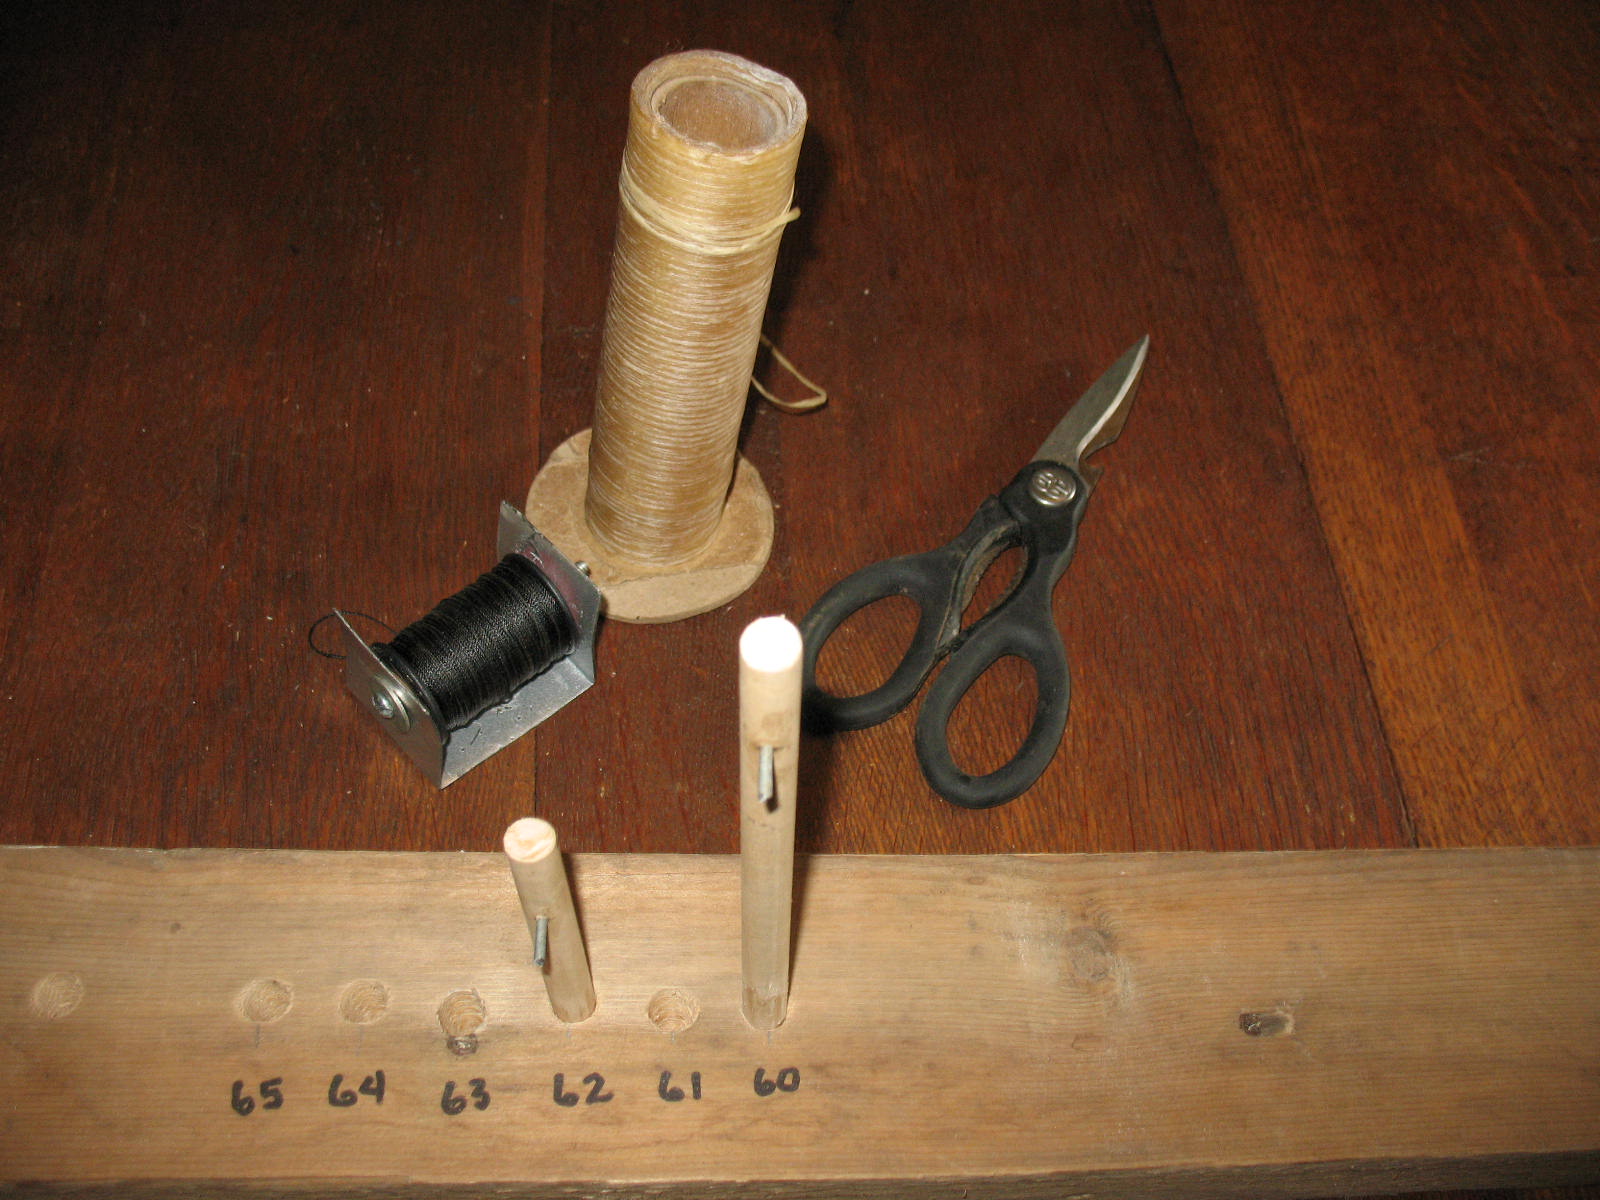
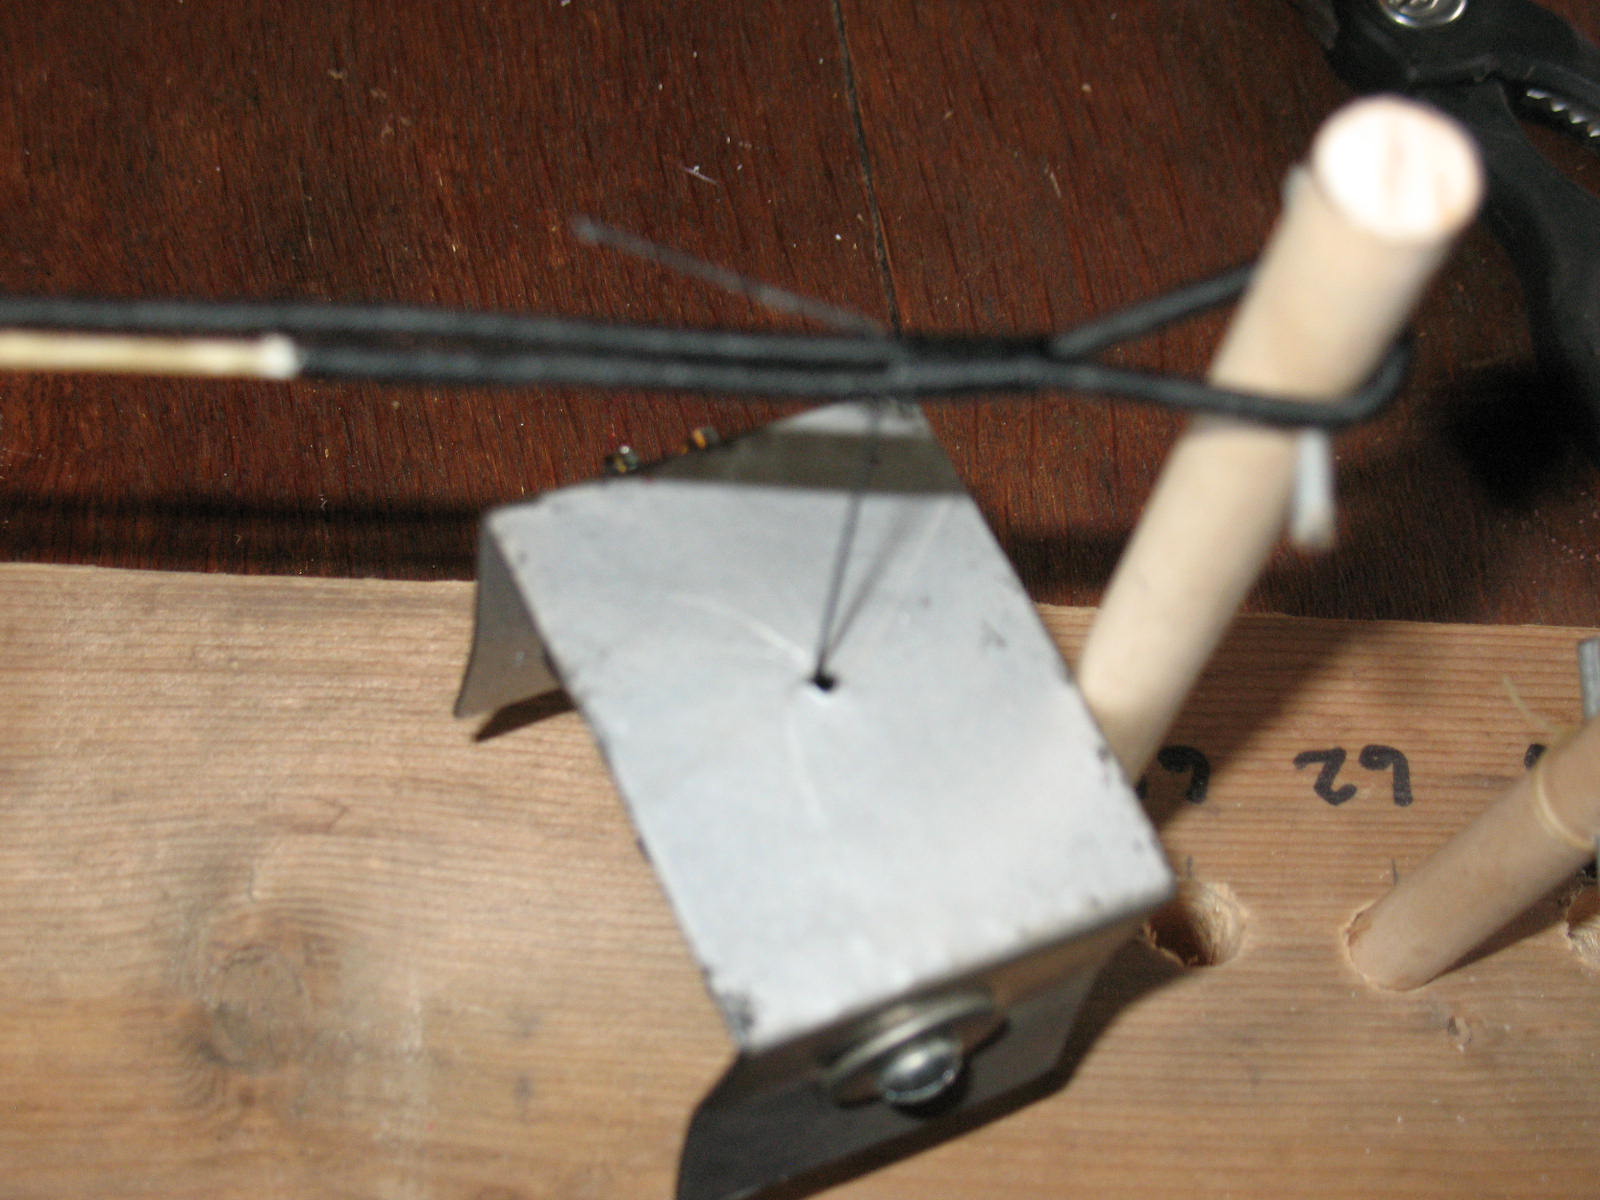
The second piece of equipment that we need to make our continuous loop bowstring is a string jig. This is so easy to build that you can probably make one faster than you can read this post. Material wise all you need is a six foot piece of 2” x 4” lumber, four pieces of 9/16” dowel rod with two of them being 7 inches long and two of them 4 inches long, four small nails (about 4 penny), and some glue. For tools you will need a saw, a drill, a 9/16” paddle-bit, a bit that is the same diameter as your finish nails, some heavy pliers that will cut the nails, a tape measure and a marking pen.
So let’s build this thing.
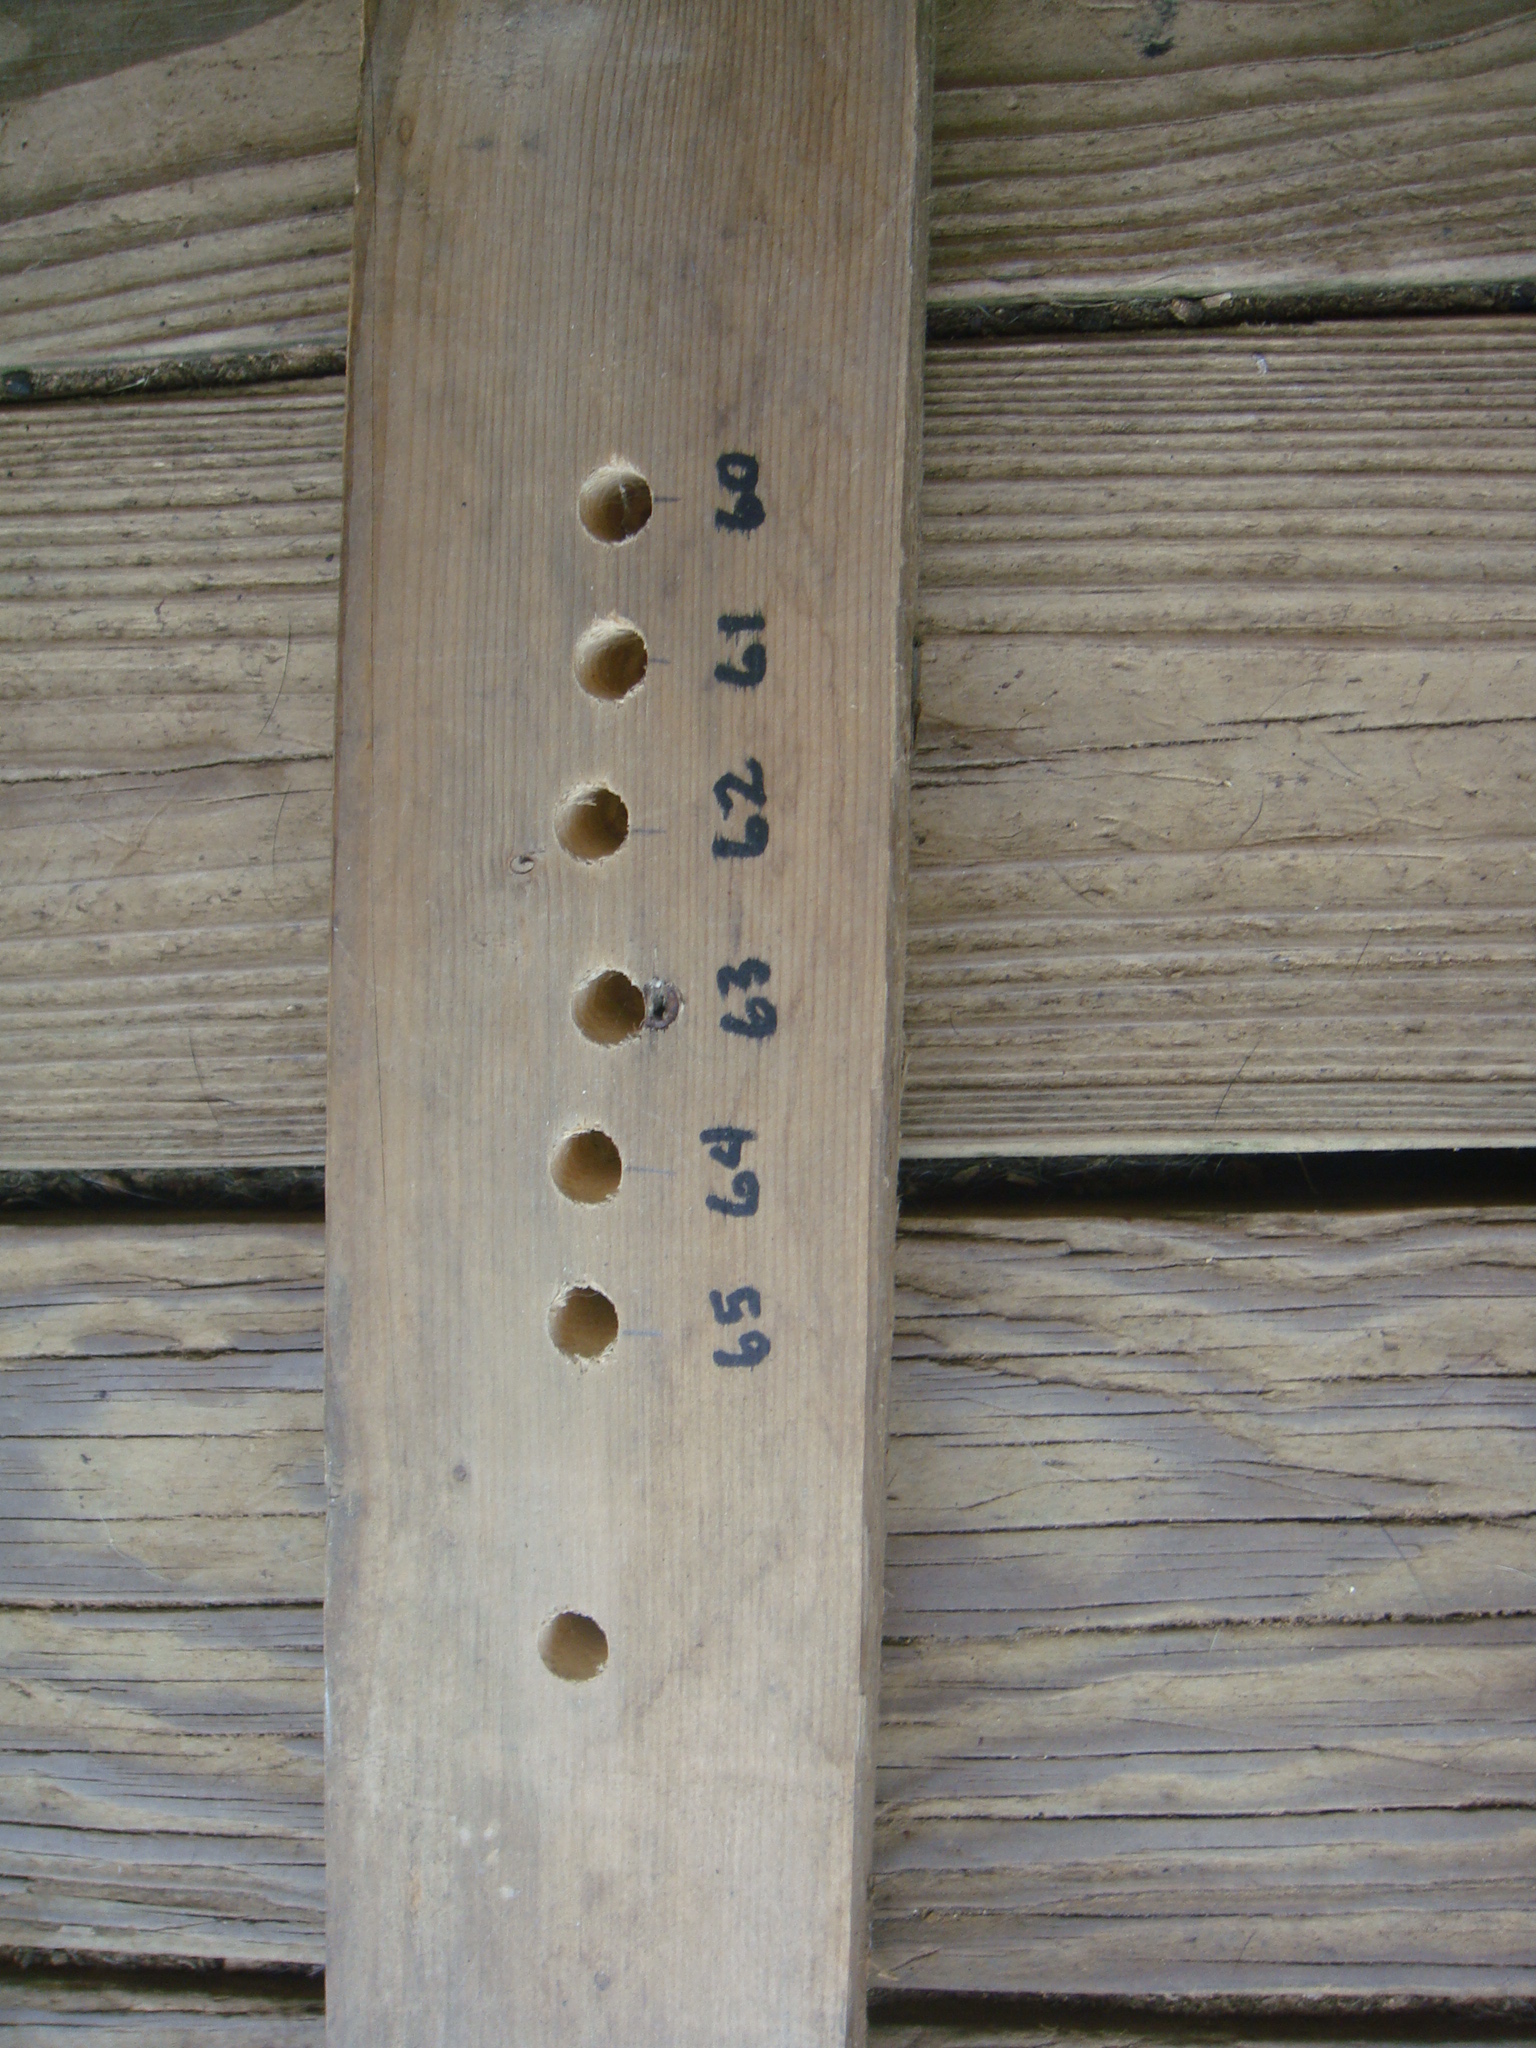
First you need to cut your 2” x 4” to a length of about six feet. This is assuming that you won’t have to make a string that is longer than 68 inches.
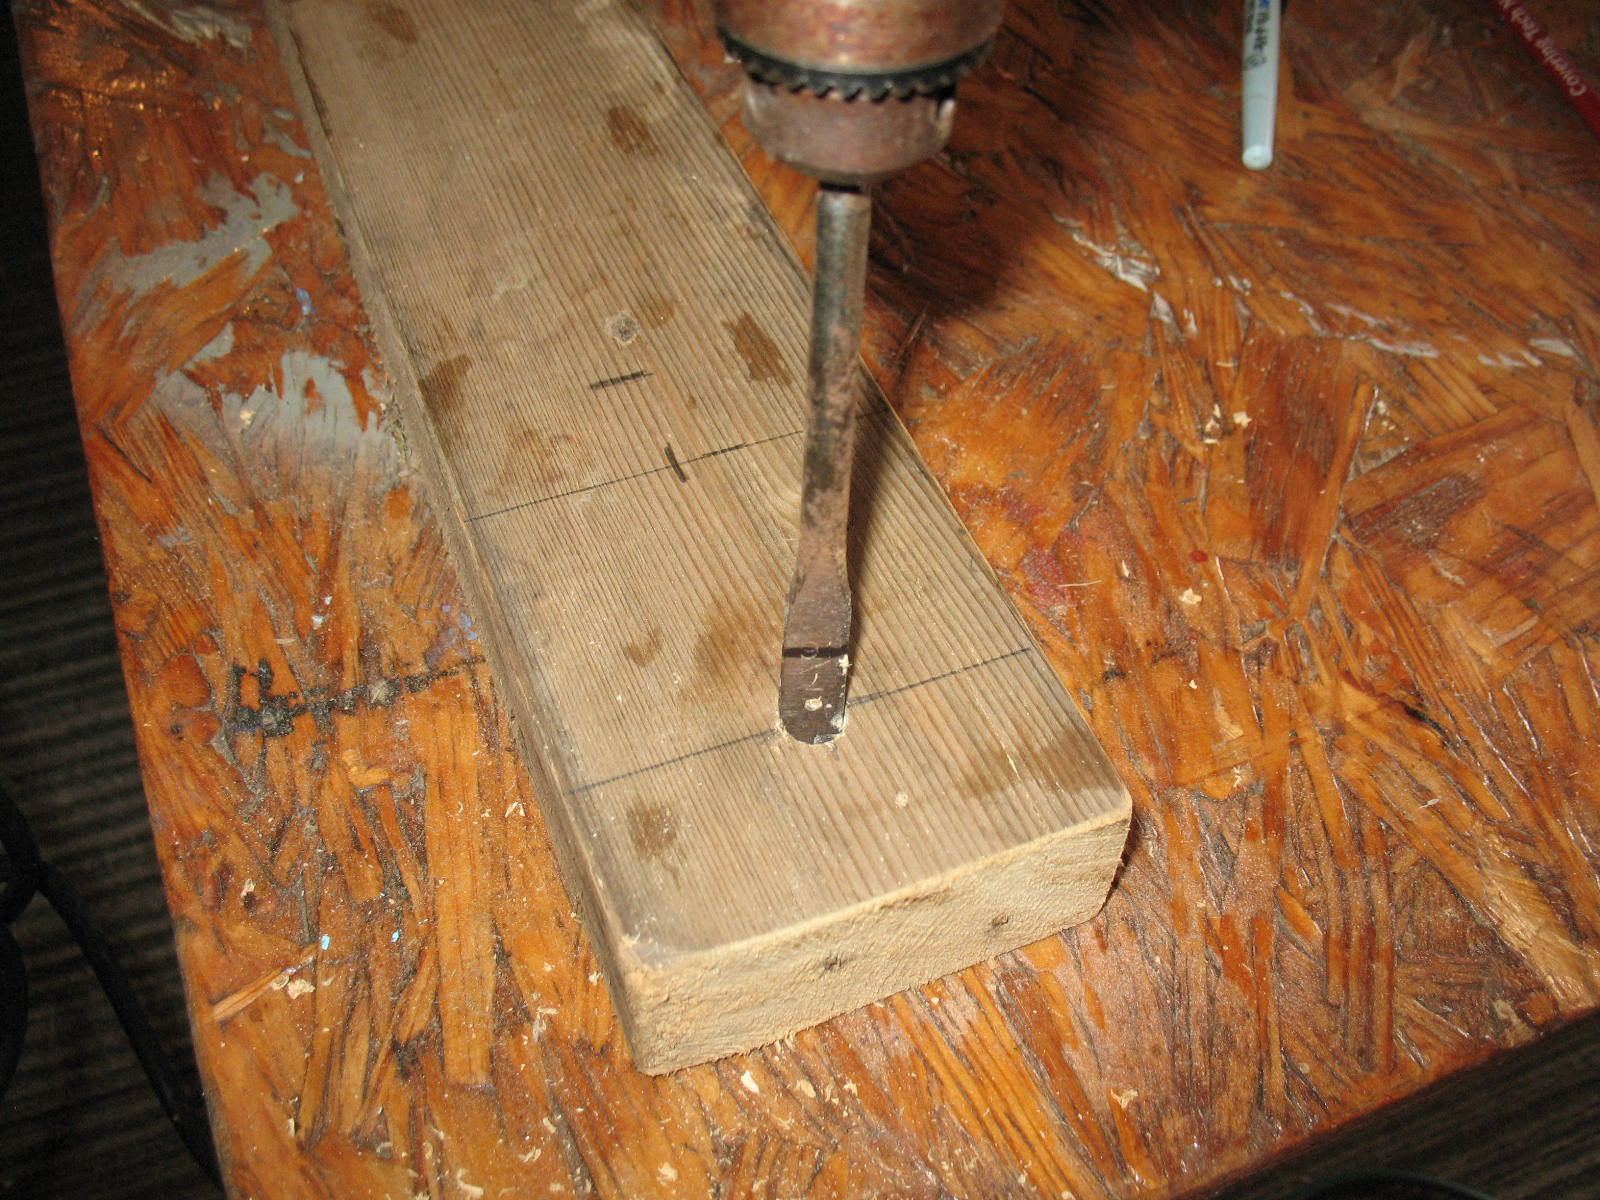
 Now at one end of the 2” x 4” you want to measure up and make a mark at 1 1/2 inchs and another mark at 3 1/2 inches. Try to keep the marks running pretty straight up the center of the board.
 Take your drill and 9/16” paddle bit and drill a one inch deep hole at each mark.
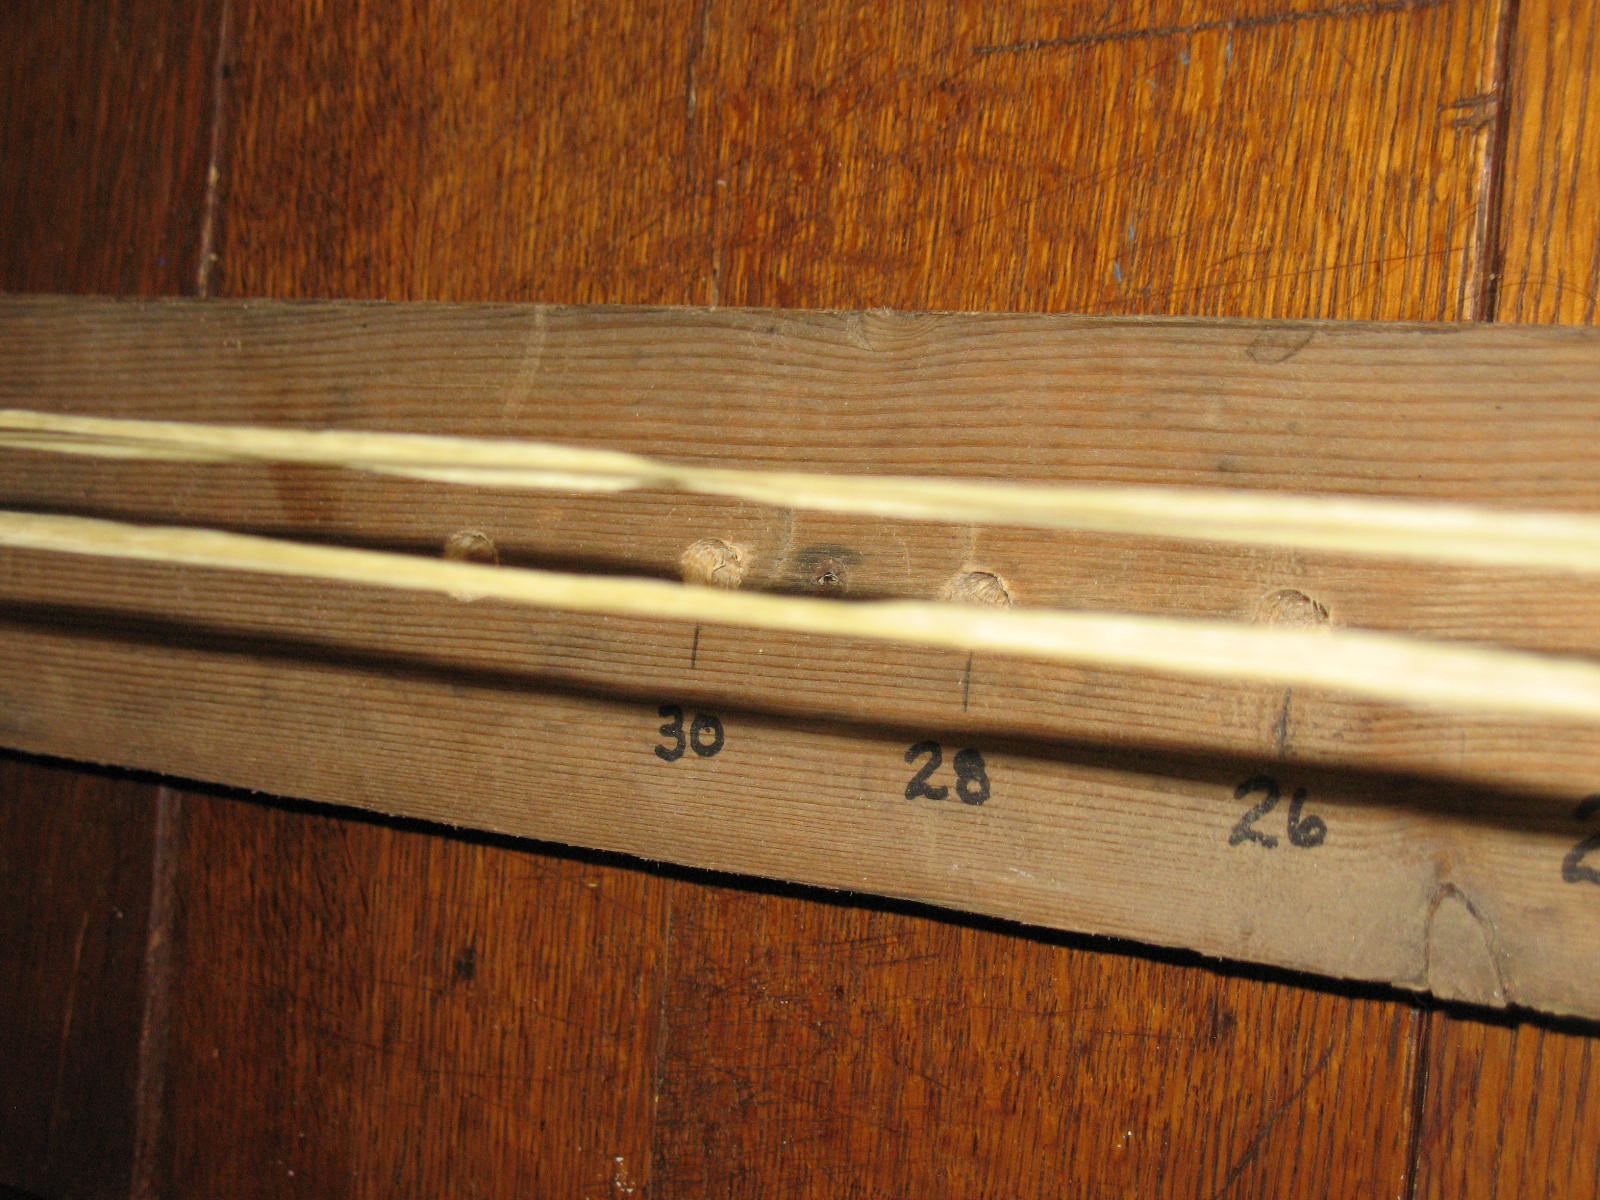
 The second hole is where you will place a dowel to hold one end of your bowstring, so you want to measure from this hole on up the board to drill some more holes to make various different lengths of bowstrings.
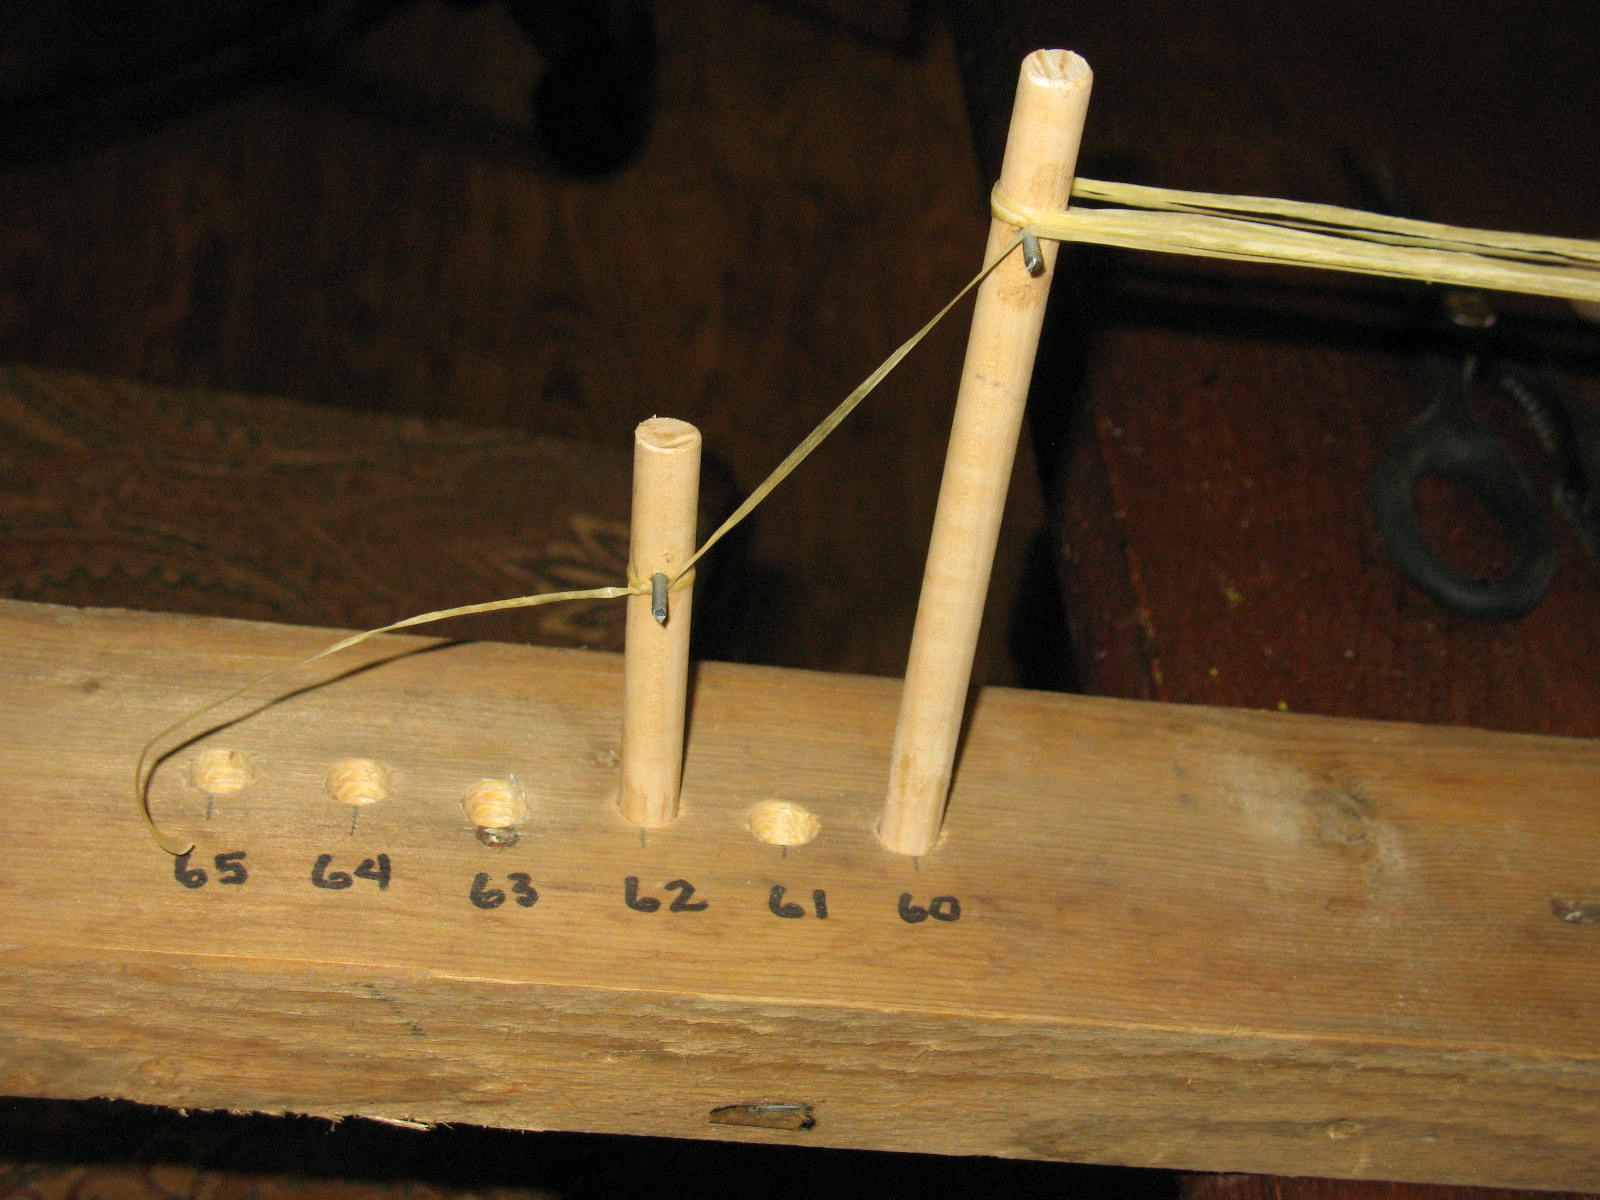
 I made holes for 60 through 65 inches. I drilled a few others at 22, 23, 24 and 44 inches so that I could make shorter bowstrings. It really doesn’t matter too much. If you need a different length string than you are set up for, it’s just a matter of drilling a couple of new holes. Notice that after the 65 inch hole I went up another two inches and drilled another hole. The reason for this will become apparent when we start building a bowstring.
Now we need to get our dowel rods fixed up. We need to put a small cross pin in each of the dowels. The cross pins will be made out of our 4 penny nails.
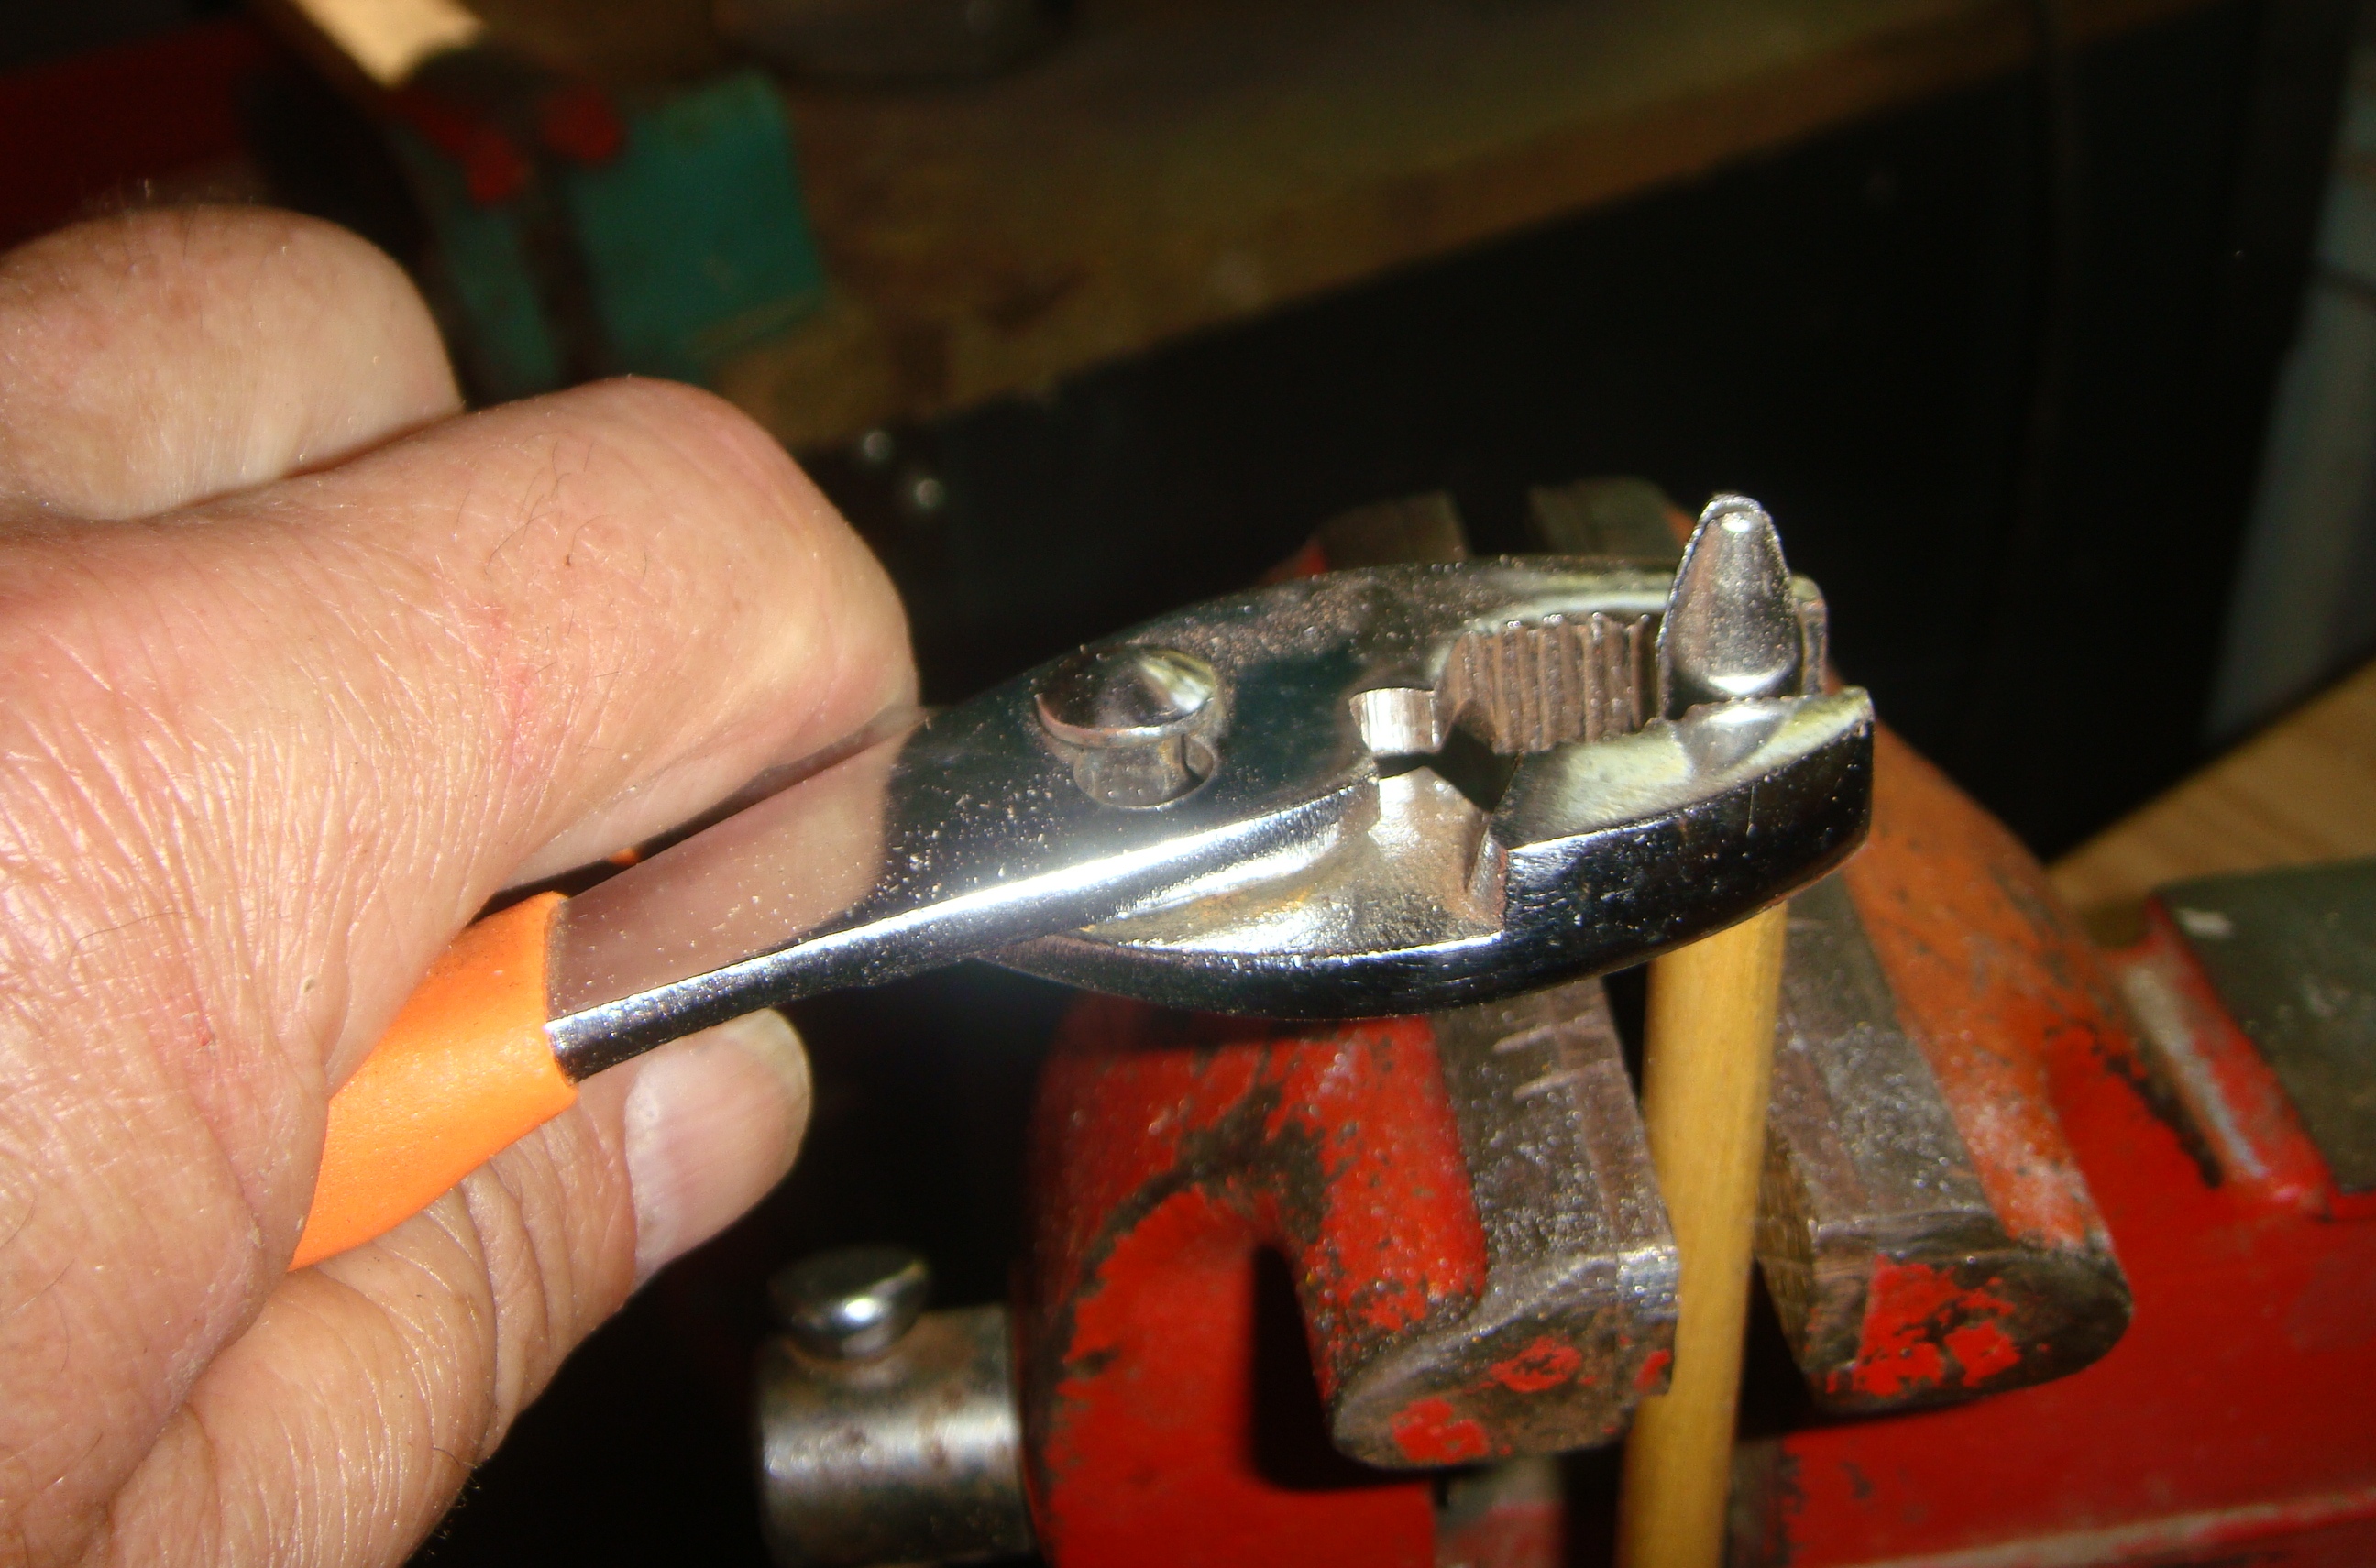
 First take your pliers or wire cutters and cut the heads off of the nails.
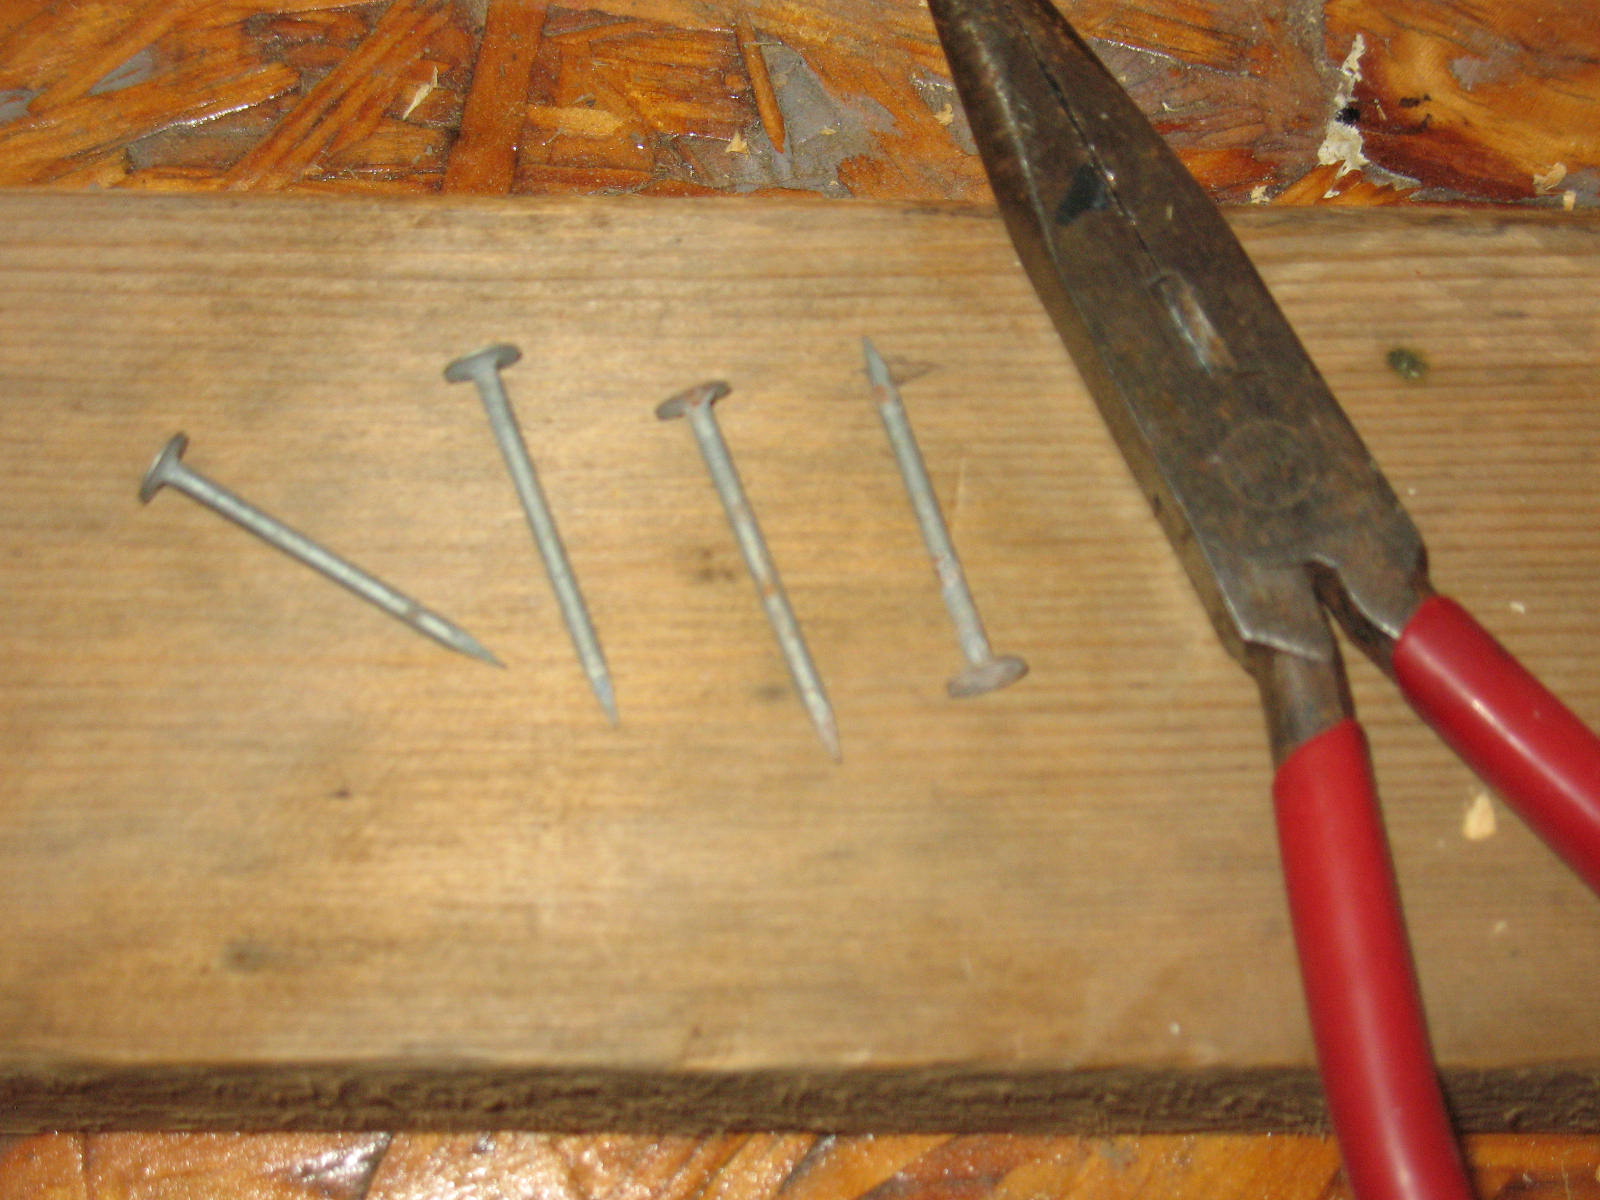
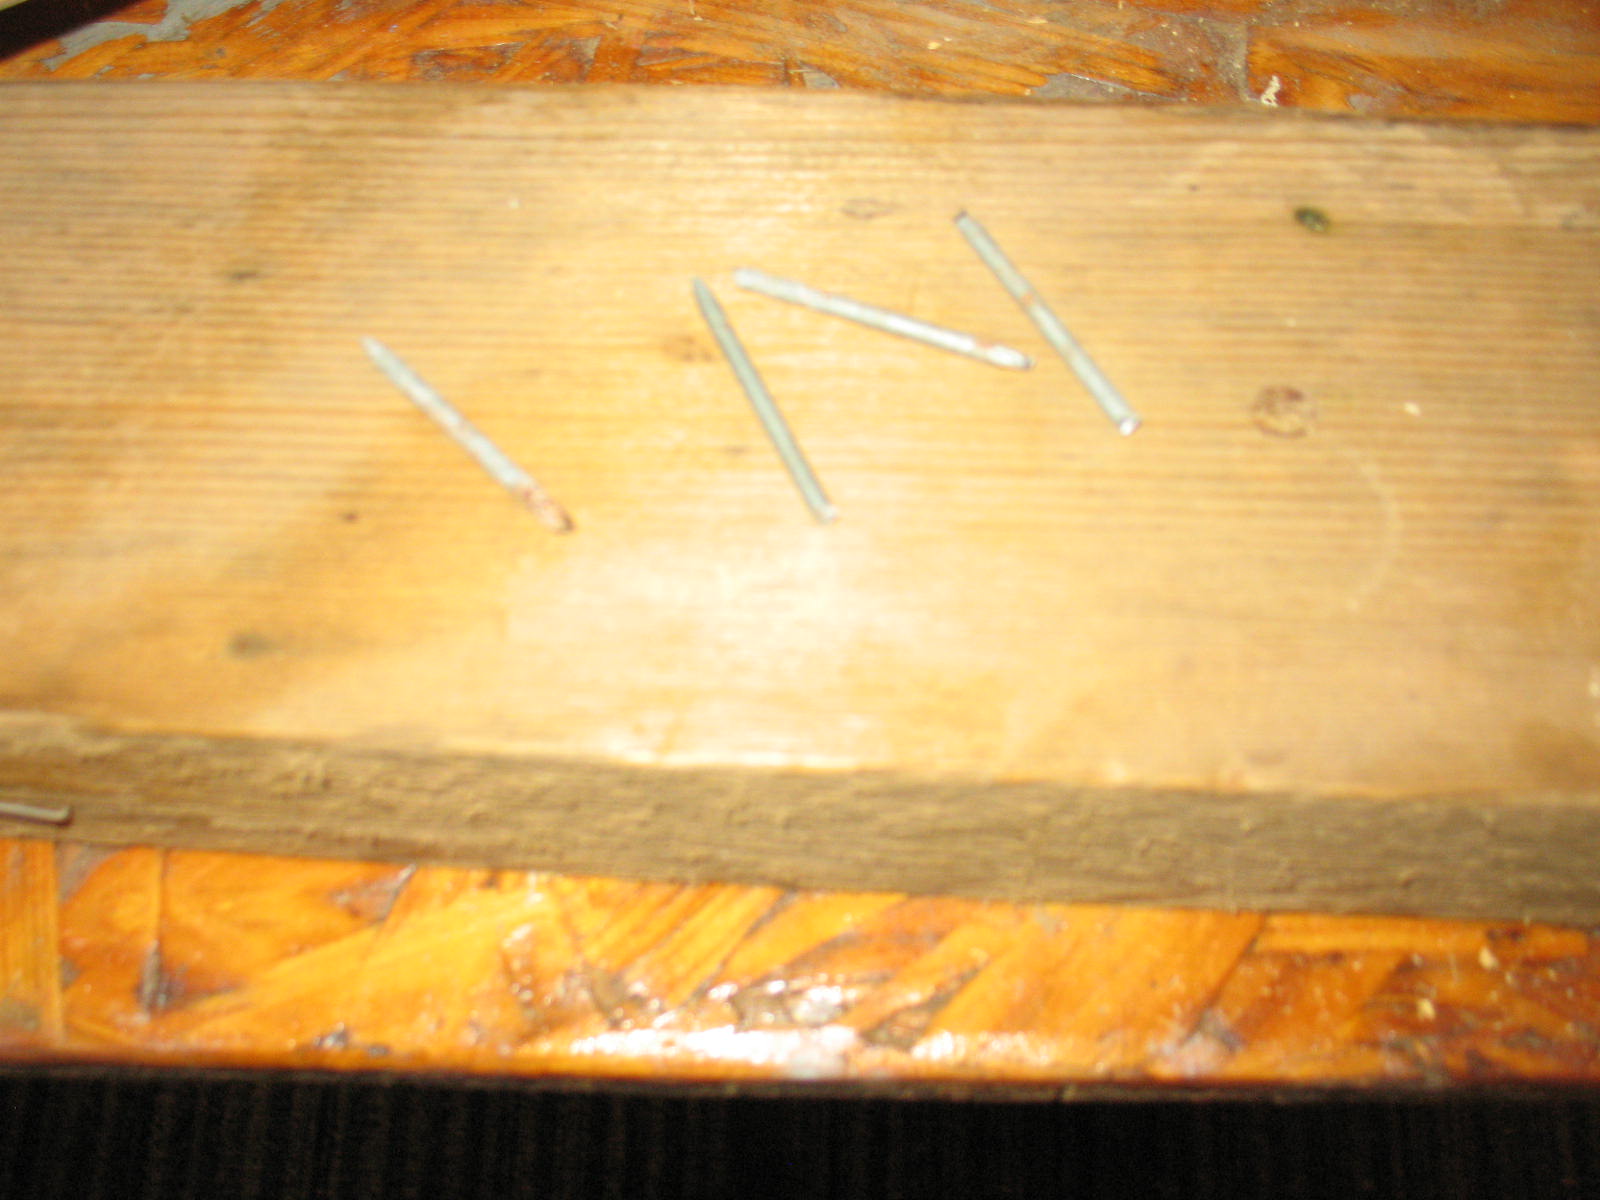 Now use the small drill bit to drill a hole through each dowel about an inch down from the end.
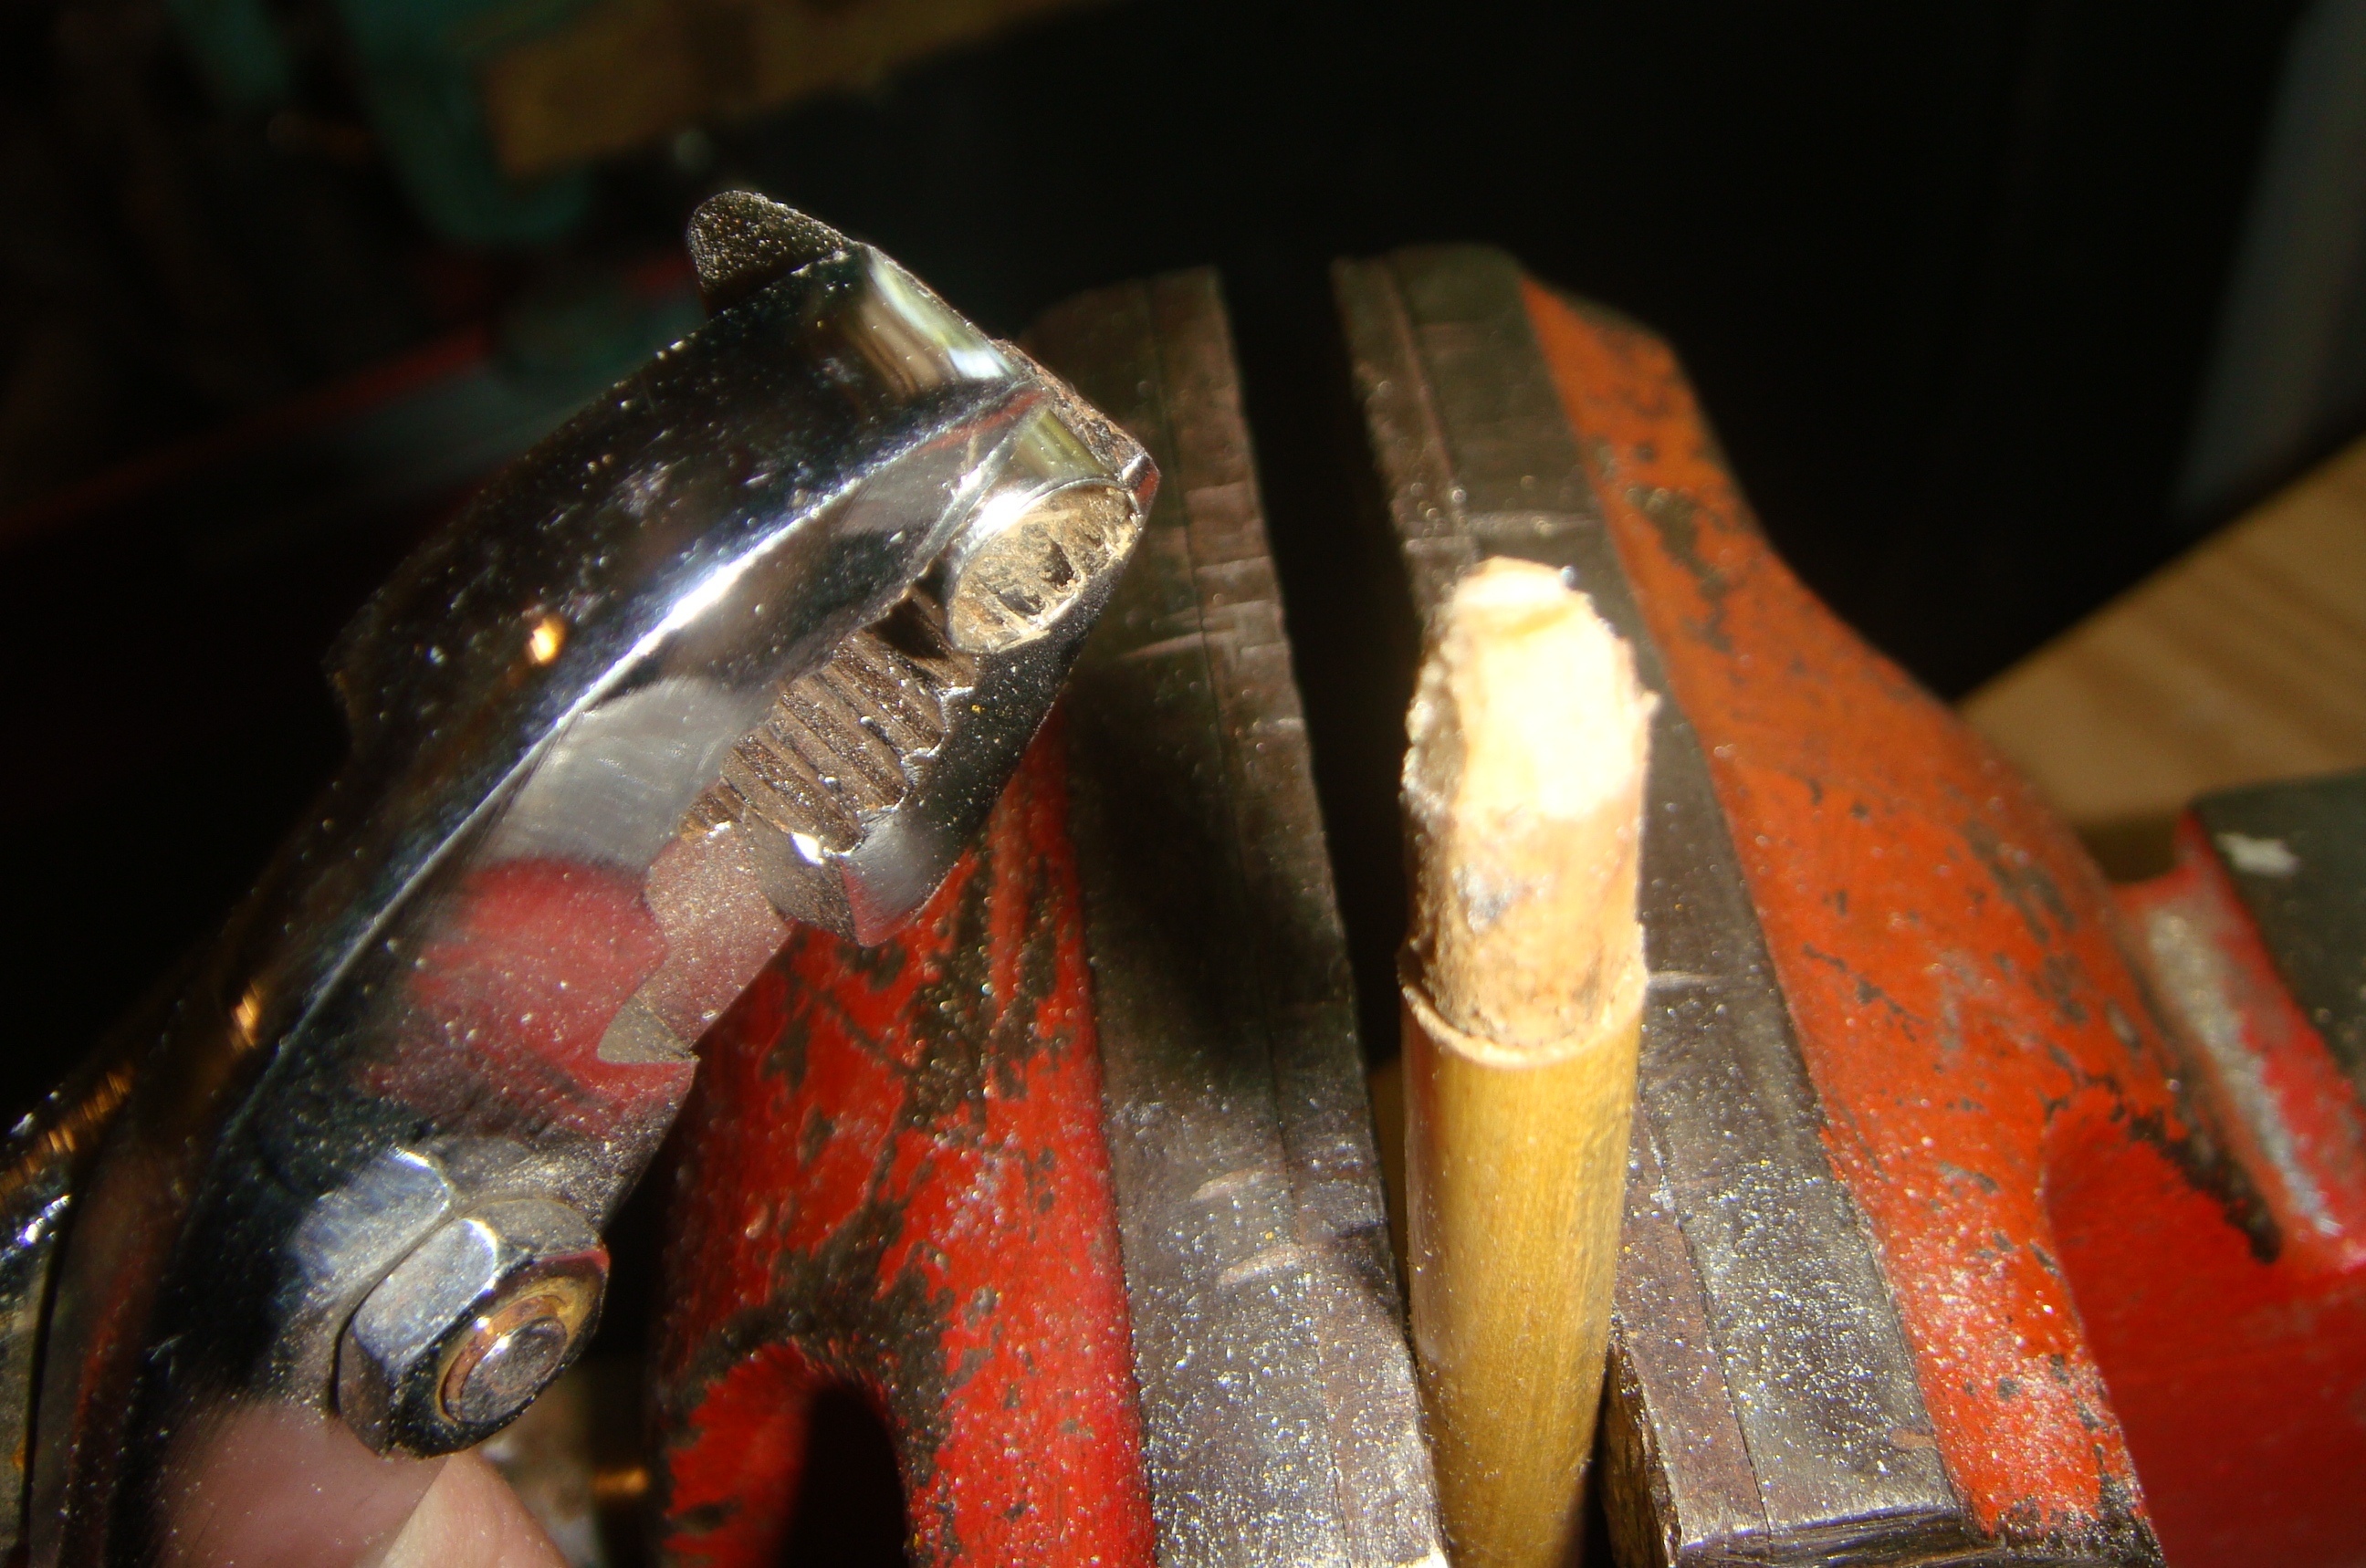
 Insert one of your headless nails through each dowel so that the nail sticks out on both sides. If the nail is too loose in hole you can put a drop of glue in the hole to help secure the nail.
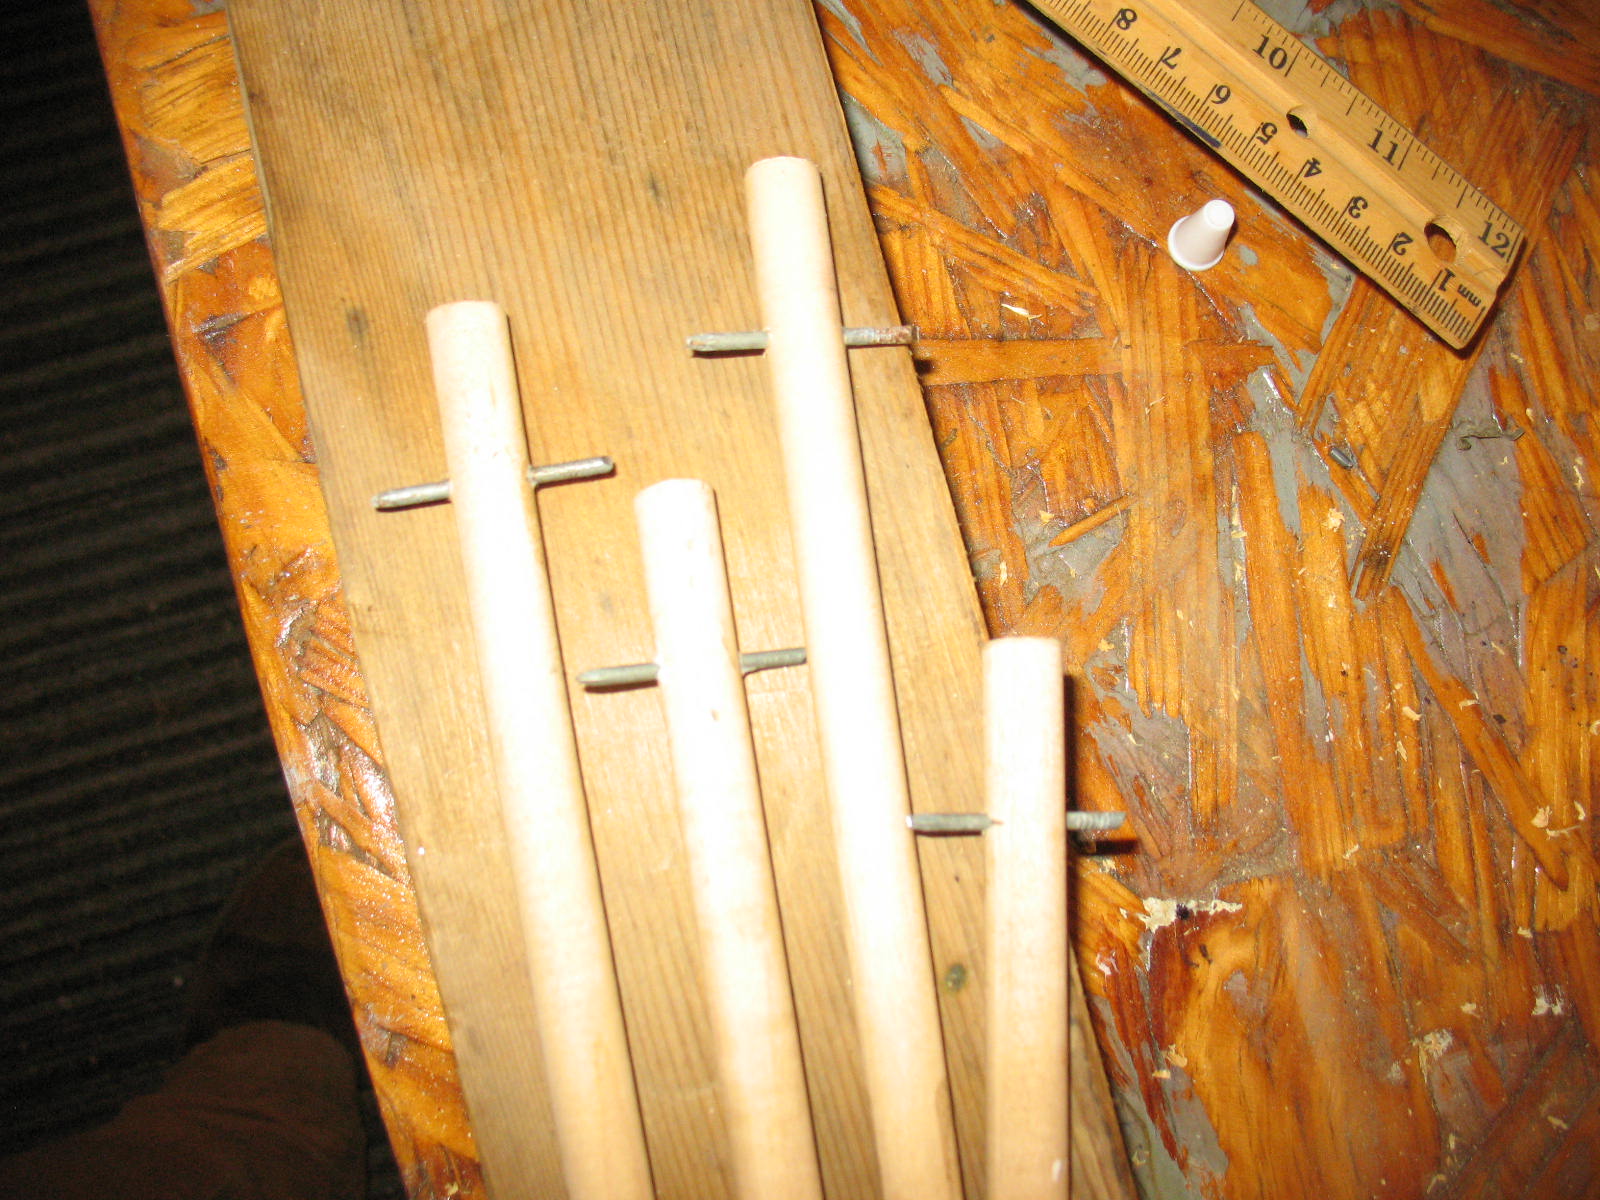 The dowels that go in the first two holes that you drilled in your 2 x 4 will stay there permanently, so you can glue them in place. A short dowel goes in the first hole and a long dowel goes in the second hole.
 The remaining two dowels will be temporarily pushed down into different holes depending on the length of the bowstring that you making at the time.
 One other thing that you will need for your string jig is some string spreaders. The function of these will, once again, become obvious when we start building a string. I made my spreaders out of a couple of old paint stir sticks. The spreaders are about eight inches long and have a one inch long slot sawn into each end. The slots are about 1/8 inch wide.

 Now you’ve got everything you need to make a continuous loop bowstring. Next post we’ll build one.
