A SPECIAL NOTE ON CANNING TOMATOES: There are many different varieties of tomatoes. Many modern hybrid tomatoes have been bred to be low in acid. For this reason many sources now recommend that tomatoes should be canned using a pressure canner rather than the water bath method. I only raise the older non-hybrid, heirloom type tomatoes which have a high acid content. I process them using the water bath method, and I have never had a problem. You will have to use your own judgment as to what type of canning method to use; and if you are in any doubt, you should ere on the side of caution.

To make and can 4 to 5 pints of hot sauce you will need the following:
1 gallon of stemmed and sliced fresh tomatoes
1 medium onion coarsely chopped
8 fresh jalapeno peppers stemmed and coarsely chopped
4 teaspoons of pickling or non-iodized sea salt
1 teaspoon of granulated garlic
1 teaspoon of powered cumin
1 tablespoon of chili powder
1/8th cup of distilled white vinegar
Equipment needed includes:
4 to 5 pint canning jars
4 to 5 canning lids and rings
A pot large enough to hold your upright canning jars with one inch of water above the tops of the jars
A smaller pot to sterilize lids and rings in
A large cook pot to prepare the hot sauce in
A long handle wooden spoon
A jar lifter
A canning funnel
A cup to pour hot sauce into the jars
Tongs to handle the hot lids and rings
A damp cloth to wipe the jar rims
Begin by placing your lidless jars in the large pot and covering with water until one inch above the jar tops. I always do five jars even though this recipe usually just makes about 4 ½ pints. The 5th jar is to hold the left-over which I put in the refrigerator for immediate use. Some times, for reasons only the canning gods can understand, I will end up with 5 full jars. Place the covered pot on your stove over high heat and bring the water to a rolling boil. Boil jars for ten minutes to sterilize. Reduce the heat to low to keep the jars hot.
Place lids and rings in your small pot and cover with water. Set this jar on the stove but do not begin heating yet.
To prepare your hot sauce begin with firm, unblemished, ripe tomatoes. Slice the tomatoes in half.
 Cut out the stem ends of the tomato removing most of the green where it intrudes down into the tomato.
 Nip off the bloom end of the tomato.
 Slice each half of the tomato into 3 to 6 pieces depending on size. I do not remove the skin from the tomatoes.
 For a single batch of 4 to 5 pints of hot sauce you will need one gallon of sliced tomatoes.
 Peel and coarsely chop one medium onion.
 Cut the stems off and coarsely chop eight fresh jalapeno peppers.
 Place one quart of sliced tomatoes, one fourth of your chopped onion, and one fourth of your jalapenos in a blender.
 Turn on blender. You will probably have to use your wooden spoon to press the mixture down into the blender until the mixture turns over and starts to blend. Be careful not to get the spoon down into the blades. Blend for about 30 seconds.
 Pour the blended mixture off into your large cook pot.
 Process additional batches of tomatoes, onions, and jalapenos until you have used all of your vegetables.
Place the uncovered pot of blended mixture over high heat and bring to a boil. Sir the mixture every 4 or 5 minutes. Drag your spoon across the bottom of the pot to keep the mixture from sticking and scorching.
 As the mixture begin to boil the pink foam on top on the mixture will largely disappear.
 Reduce the heat but make sure that the mixture continues to boil. Set your timer for 25 minutes for a single batch or 40 minutes if you are preparing a double batch. The purpose of the long cook time is to cook and sterilize the sauce and to reduce the moisture content and make the sauce thicker.
As the sauce boils add your salt, garlic, cumin, chili powder and white vinegar.
 Continue stirring and scraping the bottom of the pot every 4 to 5 minutes.
During the last 15 minutes of cooking, turn the heat on under your lids and rings. As soon as the lids and rings come to a boil, turn the heat off.
About five minutes before your hot sauce is done you can dip out a spoon full, blow it to cool, and sample it for flavor and (spice) hotness. If it is not hot enough for your taste, you can add some cayenne pepper to bring up the heat. You can also observe the thickness of the sauce at this time. If it is too thin for you, you can extend the cooking time to drive a little more moisture out of the sauce.
When the sauce is cooked to your taste it is time to can it.
Remove the sterilized jars from the canner dumping about an inch of water from each jar back into the pot.
Fill and apply lids to the jars one at a time. Pour hot sauce in jar leaving ½ inch of head space at the top.
 Wipe the jar rim with a damp cloth to clean it and insure a good seal.
Place a hot lid on the jar and immediately screw a ring firmly onto the jar.
 If you don’t have enough hot sauce to fill the last jar, you can partially fill it, wait for it to cool, then put it in the refrigerator for immediate use.
When all of the jars are filled and sealed return them to the water bath canner, cover, and turn the heat to high. Make sure that you have a least an inch of water covering the tops of the jars.
Bring the water to a full boil and process for 20 minutes.
When the jars have finished processing lift them, immediately, from the water bath and place them on the counter to cool. The lids should ping down as the jars cool. If a jar doesn’t ping, and the lid stays bowed up, then you don’t have a good seal on the jar, and it will spoil. At this point you can either replace the lid and ring and reprocess, or you can put the jar in the refrigerator for immediate use.
Be sure to label and date jars before you put them in storage. Be sure to check each jar before you open it to make sure that the lid is still bowed down and the seal is good. Any jar whose lid is bowed up should be discarded immediately.
The garden is in full production of jalapeno peppers, so its time to get some canning done. I pickle my jalapenos so I can do my canning using the water-bath method rather than pressure canning. To make six pints of pickled jalapenos you will need:
A one gallon freezer bag full of jalapenos, washed and dried
Six grape leaves
A large covered pot that is big enough to hold six pint jars completely covered with water
Six pint jars
Six canning lids and rings
A jar lifter
A canning funnel
A wooden chop stick or a thin knife
And ten cups of canning brine (ingredients below)
I always start my jars sterilizing first since this takes longer than any other part of the process. To sterilize jars, fill them with water and place them in the pot, then fill the remainder of the pot with water until the jars have at least ½ inch of water over the tops. Place the pot on the stove, cover, and turn the burner on high. After the pot comes to a rolling boil let it boil for ten minutes then turn the heat off. Keep covered.

 Next I prepare the pickling brine. To make the brine I use a medium large pot and pour in five cups of distilled white vinegar, five cups of water, and five tablespoons of canning salt. Be sure to use canning salt, kosher salt, or pure sea salt. Do not use iodized table salt. To this mixture I add one teaspoon of mustard seed, one teaspoon of granulated garlic, and ¼ teaspoon of turmeric. Cover this mixture and bring to a boil for 15 minutes. This is actually a little more brine than you will need, but there’s nothing more frustrating than to run short of brine and have to make a new batch to finish up that last jar.

 Place your lids and rings in a small pot and cover with water. Heat until the water just starts to boil then turn the heat off. I usually don’t turn the heat on under the lids and rings until about ten minutes before I’m going to use them. It doesn’t take long for them to heat up, and I want them to be hot when I use them.
 Now it’s time to prepare the jalapenos. Always wear protective gloves when processing jalapenos to avoid burning your hands. Don’t touch your eyes, nose, or mouth while processing.
 I cut off the stem end of the peppers and then split them in half. If you don’t want them to be too hot you can remove the seeds and ribs, but it kind of defeats the purpose of jalapenos to do this.

 When your jars have sterilized, use your jar lifter to take them out of the pot. Pour about an inch or two of water from each jar back into the pot then discard the rest. Recover the pot to retain as much heat as possible.
Line your jars up on the counter and stuff them as tightly as possible with the jalapeno slices. Add one grape leaf to each jar as you are filling it with jalapenos. The tannin in the grape leaves will keep the jalapenos from getting too mushy.

 Pour hot brine in each jar until it is about ½ inch from the top rim.
 Run your chop stick down the inside edge of the jar all the way to the bottom. Do this three or four times around the inside of the jar. This is to remove trapped air bubbles. Top up the brine so that it is about ½ inch from the rim.
 Wipe the jar rims with a damp paper towel to clean them and insure a good seal.
 Place a hot lid on each jar lid and as you place the lid on, immediately screw down a ring firmly on each jar.
 Use your jar lifter to place the jars back in the canning pot. Make sure that the jars are completely covered with at least one inch of water above the tops.
 Turn the heat back on and bring the water back to a boil. Boil your jars for ten minutes then cut the heat and immediately lift the jars and set them out on the counter to cool.
 As they cool the lids should make a loud pink as the center of the lid pops down a little. If the lid doesn’t ping down, you do not have a good seal and the peppers will spoil. All you can do is either replace the lid and ring and re-boil the jar, or discard the peppers. You may choose to refrigerate the contents and use them in the near future, but I either re-can or discard.
When the jalapenos have cooled for 24 hours; I remove and wash the rings for re-use, date the jars, and put them into storage. Be sure that the lid is still popped down and that the seal is intact when you open a jar for use. If the lid is not down discard this jar as it may contain botulism. I have never had this problem, but it can happen, so be safe.
One note: don’t be dismayed if your peppers float up and leave a little empty space of brine at the bottom. It is almost impossible to pack the peppers tight enough to keep this from happening.
We’ve all read those prepper novels where the protagonists escape to there well equipped retreats that have everything they need to survive. They have tractors, garden tillers, chain saws, generators, solar panels, windmills, fuel dumps and lubricants, four-wheel drive vehicles, ham radios, propane tanks, etc., etc., and etc. They are able to live, and thrive, and help out other poor unfortunates that were not prepared, and when society finally gets back on its feet they are able to re-enter it virtually unscathed.
Well, those are nice works of fiction, but here are some facts. In the last six months on my farm I have had to replace one car battery, one tractor battery, an ignition switch and a diesel cut off solenoid on a tractor, a chainsaw bar, bearings on a belly mower, the supply line and regulator on a propane tank, a burned out well pump and holding tank, and I still need to replace oil seals on a garden tractor, and roto-tiller. And that’s just the stuff I can remember.
The fact is that all machines eventually break down, and the parts to repair them and the power to run them are all dependent on a very fragile manufacturing and delivery system that will not exist after some cataclysmic event disrupts all of that. You can certainly stockpile some obvious maintenance parts and you can even buy duplicates of some items like chainsaws; but who can afford to have a back-up tractor or a duplicate vehicle that just sits in the garage? Maybe you, but certainly not poor old country-boy me.
A little ingenuity and a little scavenging may be able to keep things running for a while; but if a crisis lasts long enough, we will all be living on the frontier in the 18th century. All farming will be done with hand tools unless you are fortunate enough to have a plow and some mules. All wood work and wood cutting will be done with hand tools. All cooking will be done on wood. Your house will be heated by wood and lighted by homemade candles. Water will be drawn from a well with a bucket. Soap will be homemade. Shoes and clothing will be made from home tanned leather. Think “Daniel Boone” and you will be pretty close to what life would be like if society broke down for ten or fifteen years.
So, what I’m trying to say here is that prepping is a multi-layered situation, and one of those layers is “what if it goes on for years?” It certainly wouldn’t hurt you to start learning some of the daily living skills that were part of 18th century life. Learn how to cook on a campfire. Learn how to brain-tan leather and make moccasins and clothes. Learn how to make candles. Maybe even take up blacksmithing as a hobby. There are re-enactment groups all over the United States that promote and teach these skills, and it may be worth your time to check one of them out.
Hopefully you will never have to actually live in the 18th century, but it can be kind of fun to learn how, and it will add another layer of depth to your preparations for a possible calamity in the future.
When you’ve laid in a good supply of various different candles, you will need something to hold the candles while they are burning. Your candle holders can be as simple or as fancy as you wish. You can melt a little wax in a metal jar lid and stick your candle in that. 

You can pour a little sand in a glass jar and stick your candle down in that. Add a wire bail and you will have a fairly functional lantern that will not be blown out by every breeze that comes along.
I would advise against using wooden candle holders, either store-bought or home-made. When your candle burns down to the bottom it can catch the wood on fire and then you could have real problems. You can see by this photo from my earlier candle test that a wooden holder can definitely catch fire.
If your candles will be stationary and inside out of the wind, metal candlesticks work just fine. I have to admit to having a little bit of a thing for antique pewter candlesticks. If they are at all reasonably priced, I just can’t pass them up. 
We generally use oil lamps during power outages, but we have been known to break out the candlesticks on occasion. One winter our power went out about an hour before 12 people were due to come over for dinner and a small after-Christmas party. We already had the open face wood stove burning, so all we had to do was break out the candles and the party went off without a hitch. Of course it helped that the attendees were all members of our mountain man club, so they thought the 19th century ambiance was great.
We have wall sconces in our dining room that hold three candles each, and a candelabrum that sits on the table holding another three candles. 
 This makes for a fairly bright dining room, but in any long term situation I would not burn this many candles. If you have just a couple of candles burning in an average size room you will be surprised at how fast your eyes adjust and make the room seem fairly well lighted. Not read a book or do needlepoint well lighted, but good enough for most activities. Remember, most of the old time country folks didn’t “burn the mid-night oil” very often. Activities that required a lot of light were preformed during the day. When the sun went down, bedtime was not far off.
If you will be walking around the house with a candle, or especially if you are going outside; a candlestick will not work. No matter how slow you go, or how hard you try to protect the flame with your hand, your candle will blow out. What you need is a candle lantern.
There are many different kinds of candle lanterns, but they all have the same basic purpose. They are made to protect the candle flame from being accidentally blown out while still allowing the flame to illuminate the immediate area. As mentioned above you can improvise a pretty good lantern with a jar, some sand, a candle, and some wire; but there are many styles of ready made lanterns available.
The punched tin, or Paul Revere lantern is an attractive lantern; but, in my opinion, it is one of the least practical. It just does not emit enough light, and the light that it does emit is in a very distracting pattern. I would save this one for decoration and buy a more practical lantern for actual use.
Most stores that carry home decorator items will have a good variety of candle lanterns, and they usually don’t cost that much. You can buy two or three of these for your home without breaking the bank.
This wooden candle lantern is one that I bought at a mountain man rendezvous.

 I’ve used it for years, and it works quite well. The only problem I have with it is that the actual candle holder is wood, so you have to keep an eye on it so it doesn’t catch fire. Also, you can’t burn really tall candles in it or the flame may set the top on fire. Sounds kind of dangerous now that I think about it, but I’ve never had any problems.
This last candle lantern is one that I made on the same basic pattern as the mountain man lantern above. Two differences are that I made it much smaller because I will only burn tea candles and votives in it, and I made the actual candle holder out of a metal jar lid so as to avoid the catching on fire problem.

I also made a little protective box to carry it in. The box has some storage space on the bottom where I can keep candles, matches, and a chain with hooks to hang the lantern.

Here is a comparison photo of five different lanterns in use. From left to right they are (1) candle in a jar improvised lantern, (2) Paul Revere lantern, (3) decorator lantern, (4) wooden mountain man lantern, and (5) small home-made wooden lantern.  For purposes of comparison the first four lanterns are all burning standard paraffin emergency candles. Lantern number 5 is burning one of the paraffin tea candles that it was designed for. All except the Paul Revere lantern produce good light. I have been known to lay in my cot at night reading by the light of my mountain man candle lantern, so the light must be pretty good.
Many people keep candles in their emergency supplies, so I thought I would do a little experiment to see what kind of candle will burn the longest.
I used six different candles in my experiment as follow: Candle A is a bee’s wax candle. It is six inches tall, 7/8 inches in diameter, and weighs 46 grams. I weighed each candle so that I could more accurately compare their burn times.
Candle B is a paraffin decorative taper; the kind of candle that you stick into a candle holder when you have a fancy dinner on the table. I cut this candle down so that it was also six inches tall. It has a diameter of 7/8 inch and weighs 40 grams.
Candle C is a paraffin emergency candle. These candles are sold in supermarkets and variety stores and are specifically labeled as emergency candles. The candle I used is four inches tall, ¾ inch in diameter, and weighs 20 grams.
Candle D is a bee’s wax votive candle. It is 1 7/8 inches tall, two inches in diameter, and weighs 35 grams.
Candle E is a paraffin votive candle. It is 1 ¾ inches tall, two inches in diameter, and weighs 39 grams.
Candle F is a paraffin tea candle. It is 3/8 inch tall, 1 3/8 inches in diameter, and weighs 10 grams. The tea candle is contained in its own little aluminum foil tub, presumably to keep the melted paraffin from running off.
So, let’s get started. All the candles were lighted at the same time. I turned off the lights and closed the drapes to try and get an idea of how much light each candle produced. I don’t have anything to measure the amount of lumens each candle produces, so I just had to eyeball it. They all look to be about the same with the exception of the tea candle which is noticeably dimmer, and the emergency candle appears to be just slightly brighter than the others.
At the end of the first hour the emergency candle has burned down quite a bit.
By the end of the second hour the emergency candle is getting very short. 

The two votive candles are starting to form large puddles of wax around themselves. I don’t know for sure, but I think that this is because the votives only get hot enough to burn the wax that is right around the wick area. The wax that is farther away from the wick doesn’t burn. It just gets hot enough to melt and run off.
After two hours and thirty-five minutes the emergency candle is the first to go out.
By the end of the third hour the two votive candles are getting very low.

The tall bee’s wax and paraffin candles are still doing well.
After three hours and twenty-five minutes the tea candle goes out. It has not burned the longest, but remember, at only 10 grams weight it is the smallest candle in the test.
After three hours and twenty-nine minutes the paraffin votive goes out. You can see that it has left a large pool of melted (unburned) wax. In fact of the original 39 grams of wax there are 23 grams that remain as unburned waste.
The bee’s wax votive lasts for a total of three hours and thirty-seven minutes; just eight minutes longer than the paraffin votive. The bee’s wax votive leaves behind 21 grams of unburned waste.
It appears at this point that the paraffin taper will last the longest,
but for some reason it starts melting and pooling wax rather than burning it. After four hours and fifty-eight minutes the paraffin taper goes out.
The bee’s wax taper burns for over another hour and finally goes out after six hours and four minutes.
So to summarize the burn time of each candle:
A bee’s wax taper – 6 hrs. 4 min.
B paraffin taper – 4 hrs. 58 min.
C emergency candle – 2 hrs. 35 min.
D bee’s wax votive – 3 hrs. 37 min.
E paraffin votive – 3 hrs. 29 min.
F paraffin tea candle – 3 hrs. 25 min.
Now it would be easy to say that bee’s wax tapers burn longer than other candles, but let’s remember that the tested candles were all different sizes and weights. The only fair way to make an apples-to-apples comparison is to figure out how many minutes per gram of wax that each candle burned, and here the results are a little surprising.
The big losers are the two votive candles. The paraffin votive only burned about 5.3 minutes per gram of wax, and the bee’s wax votive only did a little better at 6.2 minutes per gram of wax.
The paraffin decorative taper burned about 7.5 minutes per gram, the paraffin emergency candle burned about 7.8 minutes per gram, and the bee’s wax taper burned about 7.9 minutes per gram. So these three were all pretty close to the same.
The run-away champion was the paraffin tea candle which burned an amazing 20.5 minutes per gram. By the way, I had some other tea candles that were ¾ inch tall instead of 3/8”. I burned one of them and the results held. The ¾” tall tea candles burned for nearly 7 hours.
So there you have the great candle experiment. Even if you have to burn two tea candles to get the same amount of light as from the other candles, you are still ahead of the game. If you are going to lay in a supply of emergency candles I would say that tea candles look like a winner, and did I mention that they are also cheaper than any of the other candles. Definitely a winner.
There are a lot of options about what kind of food to include in a bug-out-bag, or 72 hour pack as some call it. The kind of food you have in your pack is going to be a reflection of what your pack is intended for. Is it to get you through a hurricane? Is it to get you from your home in the city to a survival retreat somewhere? Is it just the beginning rations for a long term survival situation? Or maybe, like most of us, you don’t really know what it will end up being used for.
So, most people end up going with freeze dried back-packing meals, MRE’s, or dried and canned goods from the grocery store. These are a safe bet, but it’s hard to carry more than a few days worth of food this way, and what if you end up needing to live off of the land for a couple of weeks or more. Well, this is where the five staples come in.
And what, you ask, are the five staples? Well, the five staples are a little trick that was taught to me years ago by my wilderness mentor. We used to go on canoe trips in order to practice survival and wilderness living skills and we took very minimal supplies. My mentor called it Daniel Boone camping. In the food procurement and preparation department we usually took our fish spears, a frying pan, and the “five staples.” The five staples were; (1) self-rising flour, (2) corn meal, (3) salt, (4) sugar, and (5) lard or shortening.
The main purpose of the five staples was to enhance the preparation of wild foods that we procured; but, in a pinch, the five staples could be used to prepare a couple of very basic foods that would keep us going until nature saw fit to provide us with more.
For meat we speared gar, snakes, turtles, and on one occasion a nutria. Now all of these things can be prepared by spitting them on sticks and roasting them over a fire; but they taste about 1000% better if they’re salted, breaded with a little flour or corn meal, and fried in lard. It takes just a miniscule amount of salt, just a couple of table spoons of cornmeal, and maybe a quarter cup of lard (save what’s left to reuse) to turn a survival situation into a picnic. Things like wild greens and briar shoots are good, but they taste so much better with a little dash of salt on them.
Now what about the times when we weren’t so lucky at finding food? Well how do pancakes for breakfast sound? Take about a quarter cup of self rising flour and put about a teaspoon of sugar in it. Add enough water to make a nice batter. Fry it up in your skillet and you have some very good pancakes. For syrup you can dissolve a little sugar in hot water and pour it on. I remember on one trip we found some wild blackberries growing near the river. I picked about a quart of berries, and while Glen was cooking pancakes, I mashed up some of the berries with sugar and a little water and we had blackberry syrup on our pancakes. Later that evening we had a little blackberry cobbler made with nothing but berries, sugar, and a little crust of self rising flour mixed with sugar and water.
Another breakfast treat that Glen would sometimes make were his famous survival donuts. He would mix up batter just like for pancakes, but he would cook it in little globs, about a tablespoon of batter dropped in the grease. While the globs of fried batter were still hot, he would drop them in the sugar bag and shake them around a bit. These little “donuts” with their crunchy sugar coating were mighty tasty.
We usually managed to come up with something to eat by dinner time, but if not we would make some hot water cornbread. These corn cakes are really easy to make. Just mix a little salt into about a quarter cup of cornmeal. Pour some boiling water into the mixture until it is a thick paste, about like playdough. Pat the dough out into a cake and fry it until golden brown. You must use boiling water to make these or you will end up with a mess. The boiling water causes the cornmeal to release its gluten and the resulting dough will stick together. You can use this same recipe to make little cornbread dumplings to add to a pot of wild greens. Just drop the little balls of dough into the greens for about the last tens minutes that they are on the fire.
Can you see the value of the five staples? A pot of wild greens boiled in creek water is edible. A pot of wild greens boiled in creek water with a little salt, a little bit of lard, and some cornbread dumplings is a real honest to goodness meal.
If you think that you may end up needing to provide for yourself for more than 72 hours, and if you are in a position to live off of the land, you might want to think about the five staples and whether or not they might have a place in your bug out plans.

I was reading Woodcraft by Nesmuk the other night, and I was amused to read that he had spent 12 years in search of the right hatchet to carry while hiking in the wilds. He is a fast learner. I’ve been looking for the right hand axe for 50 years, and I’m not sure that I’ve found it yet. I’ve always been looking for an axe that’s light and convenient to carry; but it needs to be rugged, well balanced, and heavy enough to do camp chores. The following is a brief, illustrated history of my quest.
I all started when this was sitting on the mantle for my 8th Christmas.
 It was a Boy Scout hand axe, and man was I excited. It was a good axe and I carried it on many hikes and camps. I still have it, obviously; and I keep it for sentimental reasons; but I no longer carry it. It’s a little on the heavy side, and I don’t really care for the balance, but it’s a pretty good axe.
I tried a light-weight, back-packers hatchet; but it was just too light. It was not much better than a sheath knife for cutting or splitting wood, and the poll (the hammer end) was so narrow that it was useless for things like driving tent stakes, mashing up coffee beans, or cracking hickory nuts.
 Handy for dressing a deer, but as an all around camp axe, it just wasn’t the one.
I carried a tomahawk for a while, but I it was pretty heavy and I didn’t like the balance. The fact that it didn’t have a flat poll to hammer with was pretty inconvenient also. You could use the front to hammer, but it was about as likely as not to glance off what you were hitting. I kept the tomahawk, but now I only use it for a throwing axe at mountain man events.
I bought a Fort Meggs axe, but I was splitting some light wood and broke the handle the first time I put any side-ways torque on the axe. It was just too light. I don’t have it anymore so I can’t include a picture, but it is really small. The handle is thin all over, and inside the head it is really thin, only about 3/8 inch. So, not really up to the job.
I thought maybe I could kill two birds with one stone by carrying a knife that was big enough to serve as both knife and hatchet. I picked up a Pakistan Bowie knife and carried it a few times. I’ve heard that these things are made out of what ever is laying around, and some are good steel, and some are bad. I got lucky on this one, as it seems well tempered and will take and hold a good edge. But it missed the mark on several fronts. It was too big to be a good camp knife, and not heavy enough to be a good axe. Also, it didn’t fill-the-bill as a hammer.
I tried a machete for a while. I figured that East Texas is kind of a jungle so maybe a machete would be appropriate. It was nice that it had a saw on the back, but you can’t really hammer with it, and I hated the way it was always banging on my leg when I walked. So, I only pull this one out when I’m specifically going to be hacking brush and vines.
Currently I am carrying a hatchet that may be a winner. I have been using it for about five years and it has held up well. It is light, but it feels good in the hand. It will cut down small trees (3 or 4 inches in diameter) and it will split light wood. It has a nice big head on the front and serves well to hammer in tent stakes, mash up berries, crack nuts, and etc. It may be the one….. or then again, it may not.
I round out my woods tools with a Russel knife that a friend gave me, and a pocket-size Leatherman multi-tool. I find that with these three implements I can do just about anything that needs doing in the woods.
Whether you’re a prepper or not, every home needs a first aid kit. I’m not talking about the stuff that you keep in your medicine cabinet. When there’s an accident or injury it is not a good time to be digging through cologne bottles, out of date prescriptions, vitamins, and make-up to try and locate bandages and anti-biotic ointment. And be honest; how many times have you ended up driving to the store because you were either out-of or couldn’t locate what you were looking for in the medicine cabinet.
If you are a prepper you probably have some medical supplies stored up. You don’t want to be breaking open a bottle of 1000 acetaminophen tablets because one of the kids came down with a cold and you hadn’t noticed that the 50 tablet bottle in the medicine cabinet was empty. Or maybe you’ve injured yourself when you’re working in the garden or out in the woods. You need sit and hold direct pressure on the wound while your spouse or one of the kids goes to the house to get some tweezers, a bottle of water, an irrigating syringe, a roll of gauze, some bandage tape and some anti-biotic ointment. Wouldn’t it be a lot easier, and save a lot of time if all you had to say was “Run to the house and get me the first-aid kit and a bottle of water.”
So, just like every home should have smoke alarms and fire extinguishers; every home should have a first-aid kit. The kit should be of a reasonable size so that it is portable. If you are going on a long drive or a vacation you should be able to grab it and throw it in the car or truck. It should stay in a readily accessible location, and everyone in the family should know where it is.
You can buy pre-packaged first-aid kits, but I have not been real impressed by the ones that I have seen. To get a well equipped one is a costly endeavor, and most kits seem to be long on cut and abrasion care and short on a lot of other things.
You can build your own first-kit, as I did, but I will say right up front that it was not cheap. I probably spent about $50 on our kit, but I feel comfortable with the contents, and I feel like it will handle most common home or travel emergencies. Of course first-aid is meant to be just that. If you have a serious injury that requires debriding and sutures, the first-aid kit is not going to handle it. The first-aid kit will allow you to control the bleeding and help avoid infection until you can get professional medical help.
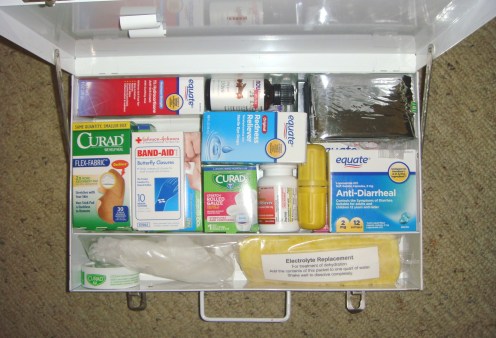
I was very lucky in obtaining a case for my first-aid kit. My wife brought an old first-aid box that was being replaced home from her work. The box was in good shape, of course the few items left inside of it were either dried out, torn open, or out of date; so they went to the trash. I cleaned the box up, and my wife used her vinyl cutter to make a new label for the front of it.


Now came the stocking with first-aid supplies. Here is what I ended up filling the box with:
For Wound Care
2 pair non-latex exam gloves
large syringe for wound irrigation
6 q-tips
tube of triple anti-biotic ointment
30 sterile adhesive bandages
10 butterfly bandages
10 2” x 3” non-stick gauze pads
1 roll 2” guaze
1 roll ½” adhesive tape
1 small tube surgical adhesive (Super Glue)
1 pair small scissors

For Disinfecting
1 2oz. bottle of jelled alcohol hand sanitizer
100 alcohol prep pads

For Removing Splinters
tweezers
plastic tube containing 3 needles
disposable lighter to sterilize needle tips

For Removing Objects from Eye and Eye Irritation
small mirror
magnifying glass
eye drops

For Pain Management
40 500 mg acetaminophen caplets

For Digestive Problems
3 rolls Tums anti-acid tablets
12 generic Imodium gels for diarrhea

For Colds and Allergies
6 eucalyptus lozenges
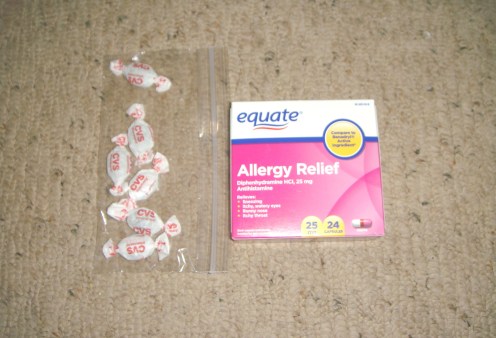
24 generic Benedryl capsules
For Burns, Stings, Poison Ivy, and Skin Irritations
1 tube 1% hydrocortisone cream

For Muscle and Joint Pain
1 tube menthol and methyl salicylate cream (Ben-Gay)

To Help Treat Shock
1 reflective mylar survival blanket

For Dental Emergencies
4 tongue depressors
1 oz. bottle of oil of clove (for toothaches)
dental repair kit to temporarily replace lost fillings and secure loose crows and caps

For Dehydration
1 pack of electrolyte replacement (Gatorade) to be dissolved in one quart of water

For Snake Bite
snake bite kit (to be used only as a last resort when no professional medical care is possible)

So, here’s my finished kit.
Of course you may need to add other things to your kit. You may need to include an emergency asthma inhaler or some epi-pens if you are allergic to bee stings. If you have small children you may want to include some syrup of ipecac. I personally would like to include an Ace Bandage for wrapping sprains, but they are just too bulky to fit in my box.
When you get your kit put together, be sure and put it in an easily accessible place. I hung my kit on the inside of the coat closet door, right next to my front door. It’s easy to get to, and it’s easy to grab on the way out the door and throw in the car.

By the way, I never claim to be the end all and know all. If you can think of something that you think I need to add (keep in mind that this is a first-aid kit, not an EMT bag) then let me know in the comments.
I have never personally known anyone who suffered from scurvy, rickets, beriberi, or pellagra; but at one time these diseases were very common, some were epidemic. All of these diseases have one thing in common. They are all caused by vitamin deficiencies. Scurvy is caused from lack of vitamin C. You probably heard in history class how sailors of old suffered and died from scurvy until someone figured out that eating citrus fruit prevented the disease. British ships started carrying barrels of limes for the sailors to eat, and hence the name “limey.”
Rickets is caused by vitamin D deficiency. Vitamin D is found in dairy products and eggs. If you look at a milk carton you will probably see the phrase, “Vitamin D Fortified.” The wide availability of dairy products and the addition of more vitamin D has virtually eliminated rickets from the modern industrialized world. Incidentally, unlike most vitamins your body can produce its own vitamin D but this requires exposure to sunlight. You’ve probably heard the phrase, “vitamin D, the sunshine vitamin.” That’s what it means.
Beriberi is caused by vitamin B1 deficiency. Vitamin B1 is found in nuts, seeds, and legumes among other things. Beriberi became epidemic is Southeast Asia when the population switched from eating natural brown rice to polished white rice.
Pellagra, which is caused by vitamin B3 deficiency, was long associated with poverty areas of the Southern U.S. where cornmeal was the staple. Vitamin B3 is found in fresh meat, peanuts, green peas, and sunflower seeds.
The widely varied and vitamin fortified diets of today have virtually eliminated these killers of olden times, but they could easily reemerge. All of these diseases are associated with narrow, repetitive diets. People who eat the same few things over and over. Kind of like you might end up doing in an apocalyptic survival scenario. A broad knowledge of edible wild plants and their vitamin content could help you get the nutrients that you need, but it just makes common sense to also store multi-vitamins along with the food that you store.
A years supply of high potency multi-vitamins and minerals for one person costs less than $25 and takes up about as much room as a canned soft drink. I would highly recommend that you include multi-vitamins and minerals in your storage program; two or three years worth for each person. Hopefully this would be enough time to re-establish agriculture, animal husbandry, barter, and trade; so that you could obtain your vitamins from a healthy and varied diet.
As with any chemical product, heat and light are the enemy; cold and dark will slow decomposition. Store your vitamins in the refrigerator or freezer and date and rotate just like you do your food.
 My daughter rescued Sammy as a puppy. She assured us that he was a Chihuahua, but it was obvious to everyone that he was not. He grew to be a medium small dog. He was a funny looking little guy with a long body, short legs, and a lab looking head and coat. He was no show dog but we loved him dearly. He spent the last four or five years of his life here with us on the farm, which he greatly enjoyed. He had the gentlest disposition and the most soulful brown eyes that you have ever seen. He alternately terrified or was terrified by our cat, depending on his mood that day. He was a fierce protector of his home, but he didn’t like guns and he was terrified of thunder. When a storm came it was into the house and under the bed. He would be waiting for me outside the kitchen door every morning so he could have a special treat, and he, in company with our Catahoula, followed me around the farm all day so we could keep each other company. Sammy passed away last Saturday from congestive heart failure at the age of eleven. I cried like a baby when he didn’t come for his morning treat and I found him laying in the front yard. He was a good little dog with a gentle soul. Run and play in heaven little buddy. I love you, and I will miss you.


