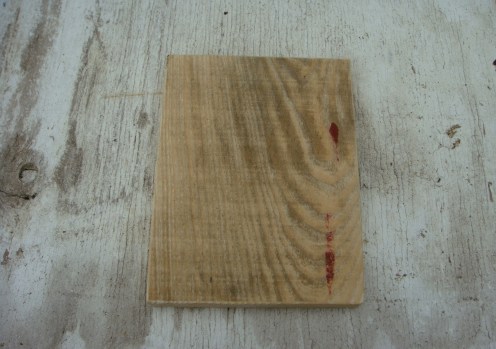
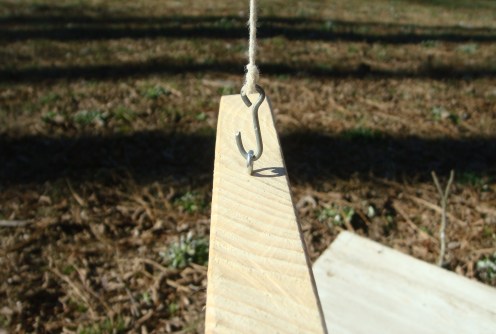
The wilderness survival community has, of late, taken a keen interest in using reflector blankets or reflector tarps to help create warmer lean-too shelters. The idea is that if the inside of your lean-too has a reflective surface, it will reflect the heat of a campfire onto you as you lie in the shelter.

This is not really a new idea. I can recall Mors Kochanski advocating for this quite a few years ago when he developed his concept of the “super shelter.” Mors suggested placing a shiny Mylar survival blanket on the inside of your tarp to reflect radiant heat into the shelter. More recently I have seen several companies selling survival blankets/tarps. These survival tarps are made of more durable material than Mylar and they have a reflective surface on one side and grommets to aid in set-up of a shelter. One problem with these commercial tarps is that the ones I have found are fairly small. What I am going to show you here is how to make any size vinyl tarp into a reflective tarp that is pretty durable and quite a bit cheaper than a commercially made model. Let me emphasize that I have only done this with vinyl tarps. I don’t know how it would work with nylon or other fabrics.
The idea for this tarp came to me in a blinding flash of the obvious when I was working on one of the out-buildings on my farm. The building in question is about 25 years old and is covered in corrugated sheet metal. The metal was starting to look a little on the rusted side, so I decided that I would paint it with some Rust Stop metallic aluminum paint from our local Ace Hardware store. I bought a gallon of the stuff for about $30 US.


They also had quarts for about $10, but I knew that a quart wouldn’t be enough. So, anyway, here I am standing up on a ladder painting this building when the sun comes up over the trees. In about ten minutes I started feeling like a rotisserie chicken. Man, I thought, this stuff really reflects some heat, and that’s when it hit me. I wonder if I could paint this stuff onto a vinyl tarp? Well, sure enough, I had about a half-gallon of paint left when I finished painting the building, so I decided to try a little experiment on a tarp. I got an old tarp and painted a couple of square feet with the aluminum paint. It flowed on smoothly and covered with one coat. It also didn’t appear to be damaging the vinyl in any way. So far; so good. I let it dry in the sun for a couple of hours before I gave it the durability test. When it was dry I scraped it with my finger nails and there was no peeling. I folded it into a crease, wadded it up, and just generally tried to make the paint crack or peal. The tarp seemed to be completely flexible, and the paint adhered beautifully. I thought to myself, “We may have a winner.”
I unstrapped the 8’ x 10’ camo vinyl tarps that my wife and I have attached to our bug-out bags and went to work. I laid a tarp out on the ground and used a three inch foam brush to apply the paint.


It went on easily and took about 45 minutes to apply. I left the tarp out in the sun for a couple of hours to dry.

When it was nice and dry I gave it another round of durability testing, and it seemed to work great. Even better, painting the two 8’ x 10’ tarps barely made a dent in my half gallon of paint. I bet a quart would paint three or four of these tarps, so if you have friends that are into this kind of thing you could share the cost of the paint.


I did learn a couple of lessons from the first tarp that helped make the second one a little easier. First of all, do this in the shade or on a cloudy day. These things really, really reflect a lot of light and heat. Second, use some tent stakes to stake down the corners before you paint. This keeps the tarp from moving around as you paint it.
So there you go. An easy way to turn a $15 Wal-mart tarp into a high dollar reflective survival tarp.
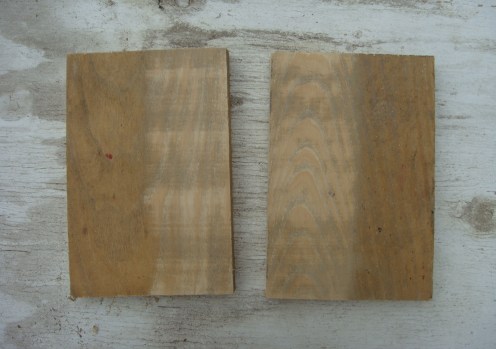
When you start talking about peas, people from the Northeastern United States are picturing English Peas; but people in the Southeastern United States are picturing blackeyed peas, purple hull peas, crowder peas, cream peas, lady peas and any of the dozens of other field peas which have long been a staple in the South. My personal favorite is the pink eyed purple hull pea. The pink eyed purple hull is an heirloom, bush pea. It loves hot weather, doesn’t require a lot of water, doesn’t need fertilizer, is an abundant producer, is easy to pick, and it tastes delicious. As an added bonus, it puts a lot of valuable nitrogen into the soil. In our area you can get two plantings over the summer; so we get two to four bushels of this pea out of the garden each year. You pick fresh purple hulls when the pods are dark purple but still soft. They are great when fresh shelled and fresh cooked, and the fresh frozen ones taste almost as good; but in a grid down situation frozen peas won’t last long. You could can the fresh peas, but that is sure a lot of work. In pre-refrigeration days the way to long-term store peas was to dry them. When dried and stored in dry, air-tight containers they are edible for years and remain viable for seed easily for two or three years.
Drying peas requires no shelling and no dehydrator. All you have to do is just leave them on the vine and, when the plant dies, they will dry nicely on their own.

The dried pods will be brittle and a light brown in color as opposed to the soft, pliable, dark purple pods of fresh peas.

Dried peas are also much easier to shell than fresh peas. The following photos illustrate how I thrash and winnow a small quantity of dried peas. The time to trash and winnow is on a dry, sunny day when a good wind is blowing.
First I spread a tarp on a table top and lay out my dried peas on it. A couple of hours of hot sun will drive the last of the moisture out of them and assure that the pods are nice and brittle.

Next step is to use your hands to start crushing up the dried pods. The vast majority of the peas will separate from the pods at this point.

To further separate the peas, pick up handfuls of the pods and rub them between your palms. Continue this rubbing until the pods have been reduced to small fragments. This will complete the trashing process.


Now you need to separate the chaff (crushed up pods, etc) from the peas. To do this you need a good stiff wind, or if it’s a calm day you can set a fan next to the table and turn it on high (obviously this won’t work in a grid-down scenario).
Pick up a double handful of peas and chaff, raise your hands a couple of feet above the table, and let the peas and chaff slip out from between your hands. The peas, which are heavier than the chaff, will fall straight down onto the table. The chaff will be carried away by the wind.

Continue winnowing over and over until most of the chaff has been removed.
Now set a wide pan on the table and, using small quantities of peas at a time, drop them down into the pan. 
You should end up with a pan full of pretty clean peas. You may have to pick out a few pieces of chaff from the pan, but it shouldn’t be too many.
Store your cleaned peas in air-tight containers and you will have a good long-term source of protein and seed for next year’s planting.
If you are processing a lot of peas, the same principles apply; but instead of a small tarp on top of the table, you can lay a large tarp out on the ground. Instead of crushing the pods in your hands you can walk on them. Just make sure that your shoe soles are pretty flat and don’t have lugs or deep treads. For winnowing you can place a few handfuls of broken down peas and chaff in a wide shallow basket or an upside down trashcan lid and toss the stuff up into the air and let the peas fall back into the lid. You will have to toss the same batch several times in order to remove the chaff. Be sure and stand over the tarp when you are winnowing so that any peas that you don’t catch will fall back onto the tarp. This takes a little bit of practice, but after the first bushel you’ll be doing it like an old pro.
The three main garden ingredients for these cabbage rolls are cabbage, new potatoes, and green onion tops. I make cabbage rolls this way for one very simple reason; all three of these ingredients are available from my garden at the same time. These cabbage rolls are actually a combination of two different Polish dishes; golabki, which are cabbage rolls stuffed with a meat and rice mixture; and pierogi, which are a wheat dough dumpling stuffed with a mashed potato mixture. I came up with this recipe on my own, but I’d be willing to bet that it already exists in some European folk cuisine. After all, I’m not the first gardener in the world that has potatoes, cabbages, and onions all come ready at the same time. So let’s make some cabbage rolls.
If you have a garden; start off in the garden. If you don’t have a garden, start off at the produce market. You will need about two pounds of fresh new potatoes,
a good sized head of cabbage,
and a few green onion tops. You can use chives, but I just pull a few smaller green onion tops and then cut them up with my kitchen shears.

I also like to add a little diced canned jalapeno to my rolls to give them a little zing.
In addition to these ingredients you will need a couple of tablespoons of butter, a heaping tablespoon of sour cream or plain yogurt, some shredded cheese of your choice, and a little salt and pepper.
Peel your potatoes and put them in a medium pot. Cover and boil slowly until done.
When potatoes are done, drain them and leave the potatoes in the pot. Use a potato masher or a fork to roughly break the potatoes up.
Add your butter and sour cream and mash the potatoes until they are pretty creamy.
Add shredded cheese and stir in well.
Add salt and pepper to taste and stir again.
Lastly add your green onion and jalapeno and stir until evenly distributed.

Now the filling is finished. Set it aside or put it into the refrigerator and let it firm up a little while you prepare the cabbage.
To prepare the cabbage first rinse it and then cut out the core.
Put two or three inches of water into a stock pot and place it over high heat.
Put your head of cabbage in the stock pot with the core end down. You are going to steam the cabbage for a few minutes to soften the leaves and make them easier to remove without breaking. About five to seven minutes ought to do it.
Turn off the heat and remove the cabbage from the stock pot. Be careful. It’s really hot. I use a couple of big wooden spoons to do this.
Carefully remove the cabbage leaves one at a time and stack them in a pan. The dark green outer leaves are a little tough, so you are better off using the light-green inner leaves. You will need eight leaves, so remove ten just in case.
Now take a sharp paring knife and shave off the top portion of the rib on each leaf. By thinning the rib down you will have an easier time rolling up the leaf when the time comes.
Now take your filling and divide it into eight equal portions. I just flatten it out in the pot and use my knife to slice it into eight wedges like you would a pizza.
Lay a cabbage leaf out on your cutting board with the rib side down and place one of your eight portions of filling at the bottom of the leaf. I kind of shape it into a little oblong mound.
Roll the leaf up to cover the filling.
Fold the sides of the leaf in even with the ends of the filling.
Now finish rolling up the leaf.
Place the finished cabbage roll into a lightly greased baking dish.
Now repeat this for the rest of the rolls.
When your dish is full cover it with aluminum foil.
Place the covered dish into a preheated 375 degree F. oven and bake for about 20 minutes. Remember, everything is already cooked. All you’re doing is heating it up.
I like to top these with butter and sour cream when I serve them. Note that there’s already a bite missing. They’re so good that I couldn’t wait.
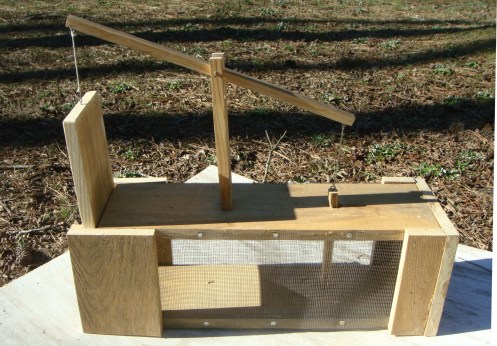
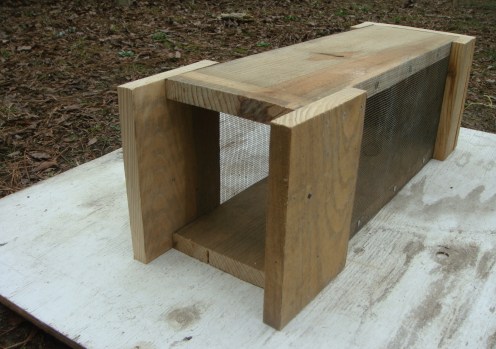
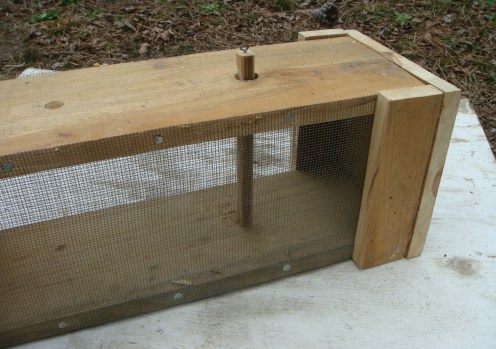
In this post I’m going to show you how to make one of my favorite survival traps, the toggle-trigger scissor trap. This is a very fast, killing trap. It’s kind of the improvised version of a Conibear trap. If it is set correctly it will kill an animal quickly and humanely. Please note that I am setting this trap in a location where I can take clear pictures of it, and you can see how it is constructed. This is not how or where you would set this trap to catch an animal. I will deal with de-scenting, camouflaging, and how to make an actual trap set in another post. The toggle-trigger scissor trap is not a super complicated trap (simple is better), but it does have quite a few parts. What I’m going to do is go over the making of the parts step by step, and then we’ll put all the parts together to make the trap. This trap has a total of ten parts, not counting the cordage, and six of those parts are the trigger assembly. The good news is that this same trigger assembly can be used on several other traps, so once you get the trigger down you’re more than 50% there on building a number of different kinds of traps. So let’s get started.
The Toggle-Trigger
As mentioned above, the toggle-trigger assembly has six parts. You can manufacture all of these parts with nothing more than a pocket or sheath knife, and you can assemble the trap with nothing more than a knife and a rock; but a multi-tool with a saw blade and a small hatchet make it a lot easier to do the job. 
The six parts for the trigger are as follow:
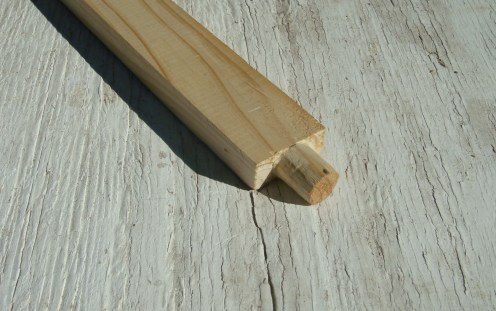
First you will need two fairly long stakes with a down-slanting side branch. The diameter of these stakes will depend on the size trap you are building. The stakes illustrated below are about ¾ inch in diameter. These stakes will be driven into the ground, and there will be considerable upward pressure on them; so they should be a minimum of a foot long below the side branch. Make sure that the tops are flat and the bottoms are pointed so that you can drive them more easily into the ground. You will need a cross-bar to hold your toggle. This is nothing more than a straight stick that is about six inches long. This one is about ½ inch in diameter.
 The toggle itself is a straight stick that is about two inches long and maybe 3/8 inch in diameter. Notice that I have carved a small groove around the center of the toggle. This is not completely necessary, but it only takes a minute to do, and it will insure a more positive fit for your trigger line.
 The last two parts of the trigger assembly are the trigger stick and what I call the bumper stake. The bumper stake is about ¾ inch in diameter and about six inches long. About five inches of the bumper stake will be driven down into the ground so it needs to be sharpened on the bottom end.
 The trigger stick is the part that makes the whole thing work. It is what will hold the bait and spring the trap when an animal takes the bait. It will have considerable pressure on it, so it is best if it is a dead and dry, but solid stick. A green stick may bend and not hold the toggle back. This trigger stick is about ¼ inch in diameter and the length will be determined by the final trap set. For now you should cut it about a foot long, and then you can cut it to final length when you set the trap.
 So, that’s it for the trigger parts. Now let’s make the final four parts that will actually capture the animal.
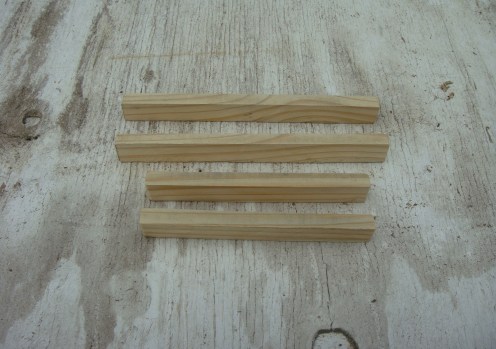
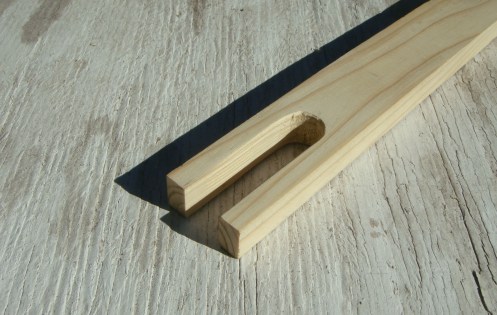
First we will need to make the scissor. This will consist of two straight sticks that are about 3/8 inch in diameter and about ten inches long. Size will, of course, vary according to the target animal and the size of the trap.You want to cut the bottom of each scissor stick at about a 45 degree angle so that when you put the bottoms together the sticks will spread out at about a 90 degree angle. Next, come up about 3/8 inch or so from the slanted bottoms and carve a shallow groove around each stick.
 Now go to the top of each stick, about 3/8 inches from the end, and carve another shallow groove.
 Now set these aside and we’ll make the scissor guides.
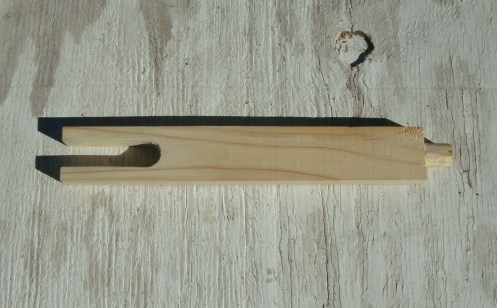
The scissor guides are part of the trap that help guide the scissors, and help the scissors ensnare the animal. They will have a great deal of upward pressure on them when the trap is sprung, so they must be set firmly in the ground. The size of the guides and the depth to which they must be set is determined by the target animal and the size of the trap. One important consideration for the scissor guides is that they have to be bent into a half hoop. They must be flexible enough to bend without breaking, but still sturdy enough to hold the game. In my experience, the scissor guides are the hardest part of the trap to locate and make. Setting up the Trap
To set up the scissor trap you are going to need about five feet of nylon twine and about two feet of waxed Dacron (artificial sinew). You don’t absolutely have to have the waxed Dacron. Just use what you have or what you can make. The trap will still work. You are going to need something to power your trap. In this instance I am using a sapling as a spring-pole. You could use a counter-weight just as easily although that would take considerably more twine. I will talk more about counter weights in a later post.
 First you want to bend your spring-pole down so that you can see exactly where you should to position your trigger assembly. When you have that location, start off by driving your two forked stakes into the ground about four inches apart.
 Your cross bar will fit under the forks in the two stakes.
 Next you will need to position and drive down the bumper stake. The best way to do this is to put it about eight inches from your cross bar and then come back and cut your trigger stick to the appropriate length.
 This picture shows how to measure the length of the trigger stick. Notice that the toggle stick is on the front side of the cross bar, and the trigger stick goes from there to the bumper stake.
 Now you will need about three feet of nylon twine to set the trigger.
 Tie one end of the twine firmly around the toggle stick.
 Move up the string about a foot and tie a knot in it. The reason for this knot will be explained in a minute.
 Then tie the other end of the string onto your spring pole.
 To set the trigger, bring the toggle down in back of the cross bar, then twist it up in front of the cross bar and set the trigger stick between the top of the toggle and the bumper stake. The picture below shows the trigger after it has been set. It is best to go ahead and smear the trigger stick with bait or shove bait onto the stick before you set the trigger. You can do this later but you will have to be very careful not to spring the trap.
 Now let’s put together the scissor:
Take some of your waxed Dacron and tie together the slanted ends of your two scissor sticks. Leave a little space between them so that the sticks can be pulled out into a “V” shape.
 Now go to the other end of the sticks and, using more Dacron, tie a loop at the top of one of the sticks.
 Take about two feet of nylon twine and tie one end of it to the top of the other stick and then thread the loose end of the nylon through the Dacron loop on the other stick.
 When your scissor is completed it should look like this.
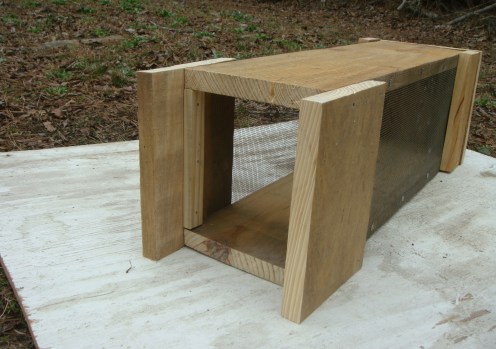
 Take the two sticks that you have cut for your scissor guides and bend them carefully into a half hoop and then shove them down firmly into the ground. They should be about an inch-and-a-half apart and should be located two or three inches away from the trigger stick. This photo shows you how they should be positioned.
 Now spread your scissor sticks apart and set them down between the scissor guides.
 Make sure that the nylon twine connecting the scissors is not down between the scissor guides, and then use some Dacron to tie the tops of the scissor guides together. You want to leave about an inch between the tops of the loops.
 Finally, take the loose end of the nylon twine on the scissors and tie it onto your toggle-trigger line. Tie it just above the knot that you tied in the trigger line. This will keep the scissor line from sliding down when the trap is sprung.
  Be very careful when doing this so that you don’t set off the trigger. It is best if you have someone to hold the spring pole down while you complete this step; but if you are alone, you will have to just be very careful. Whatever you do, don’t get your face up over the trap. If you do, and if the trap springs you will have all kinds of stuff headed toward you.
So now the trap is set.  When you build an actual trap set you will build a “cubby” or use other obstructions to make sure that the animal can only get to the bait by sticking its head in between the scissors.
 When the animal starts chewing on the bait stick, it will spring the trap. The scissors will slam together on the animal and jerk it up against the scissor guides. The animal will, most likely, be killed immediately.
Any survival situation that lasts more than a couple of weeks is going to make it necessary for you to collect food. Foraging for wild plants is one possibility, but it is hard to get enough protein and fat from plants alone. You will need meat. One of the most efficient ways to obtain meat in the wilds is by trapping. Trapping is great because your traps will be hunting 24 hours a day, in multiple locations. While your traps are hunting for you, you will be free to take care of other business like wood gathering, plant foraging, shelter improvements, and etc.
So, the simple solution to making meat in the wild would be to just throw a half dozen double-spring, number 2 steel traps into your bug-out-bag, right? Wrong! One number 2 steel trap weighs over a pound. Six of them weigh almost seven pounds, and they are bulky. Not the kind of thing that you need in your pack when every ounce counts.
You could bring the weight down to around two pounds by carrying half-a-dozen rat traps, but you would be seriously limiting the size of animals that you could trap. Anything larger than a squirrel will probably just shake off a rat trap; or worse, run off with it.
The most weight efficient way to trap animals is to (1) learn how to build improvised traps, and then (2) put together a light-weight kit that will make it easier to build these traps. Don’t get me wrong. You can build improvised traps using only native materials; but man, it can take a lot of time consuming work to build a trap this way. If you’ve ever twisted up enough yucca cordage to build just one good snare trap, you know what I’m talking about. And after you’ve built your trap you still have to find something to bait the trap with. It’s much easier to carry along a few light-weight items that will enable you to build and bait some better quality traps in a shorter amount of time.
My trapping kit, including carrying bag, weighs just a shade over 13 ounces. Depending on the kind and size of traps you build, it has enough materials for from ten to thirty traps; and it also includes enough bait to bait each trap several times. Here’s a closer look at what goes into my trapping kit.
First there’s the bag itself. The bag is about nine inches by fourteen inches and is made out of heavy cotton with a cotton twill strap to tie the bag closed.

Inside the bag I have two different kinds of light cordage wrapped around wooden cradles.
The larger cradle holds about sixty feet of nylon twine. This twine can be used to hold down spring poles or hold counter weights for snare traps. Note that this twine is a kind of golden yellow in color. Since most animals don’t have very well developed color vision, this golden yellow actually looks gray to them making it less visible than either black or white twine. A little dirt or mud rubbed on the twine gives it a mottled appearance which makes it even less visible. The toggle trigger snare picture below was built using yellow nylon twine for the trigger and picture hanging wire for the snare loop.
The small cradle holds about twenty feet of waxed Dacron (artificial sinew). Although it is small cordage, it is very strong. It’s great for things like tying off toggle triggers on Paiute dead-fall traps, hanging sight lures, and making small snare loops. The toggle trigger scissor trap pictured below was built using both waxed dacron and yellow nylon twine.
I carry a small roll, about twenty feet, of light gauge steel wire that is perfect for making leaning log squirrel snares. Since each of these snares uses about two feet of wire, you can make quite a few snares with twenty feet.

I have a roll of picture hanging wire in the bag that is my favorite for making the actual snare loop on snare traps. It’s stiff enough to hold open well and it slides closed quick and smooth on spring pole snares.
One of the disadvantages of all natural traps is coming up with bait for them. You can, of course, set snares in animal pathways and hope that an animal runs into them, but your chances of success increase dramatically if you have a bait that draws animals into your trap. I keep an old baby food jar in my trapping kit that is full of my special trapping lure; peanut butter and sardines. Just put them in the jar, stir them together, and twist the lid on tight. The older it gets, the funkier it smells; and the funkier it smells, the better it works. Smear a little of this on your bait stick and hardly any animal will be able to resist it.
Some animals don’t have as keen a sense of smell as others. These sight hunters often need a visual lure to draw them to a trap. I keep a plastic bag with twelve or fifteen turkey feather fluffs in my kit. If you hang one of these on a piece of string over your trap, every puff of breeze will cause it to swing and twirl. This will often catch an animal’s eye and draw them in to investigate.
As with any other survival skill, building successful traps takes practice. You need to learn not only “how” to build traps, but “where” to build them. Do a little research on how to build different kinds of traps, how to descent them, and where to locate them; then head to the woods with your trapping kit and practice. Be sure to know the law and use common sense. The actual trapping of animals, game or fur bearing, can be outright illegal or regulated by any number of laws that vary from state to state and sometimes from county to county. On the common sense side of things, don’t set a trap and leave it where you might catch someone’s pet. It’s best to just set the traps and see if they work by tripping them yourself. You can test your bait and your ability to find good trapping locations by smearing a little bait on a twig and sticking it in the ground at a site that you think would be good for a trap. Come back the next day and check your bait stick. If it’s missing, or if it has been gnawed on, you will know that you picked a good location.
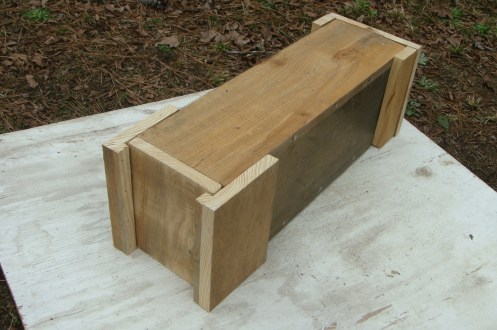
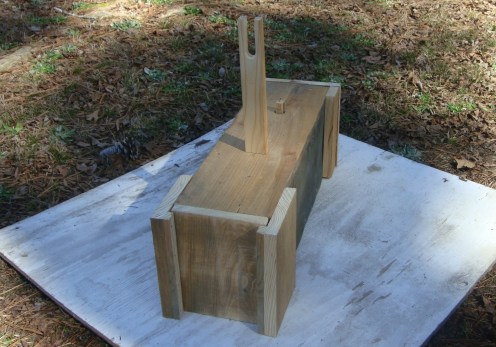
Live traps, or box traps as they are sometimes called, are one of the easiest traps to build in your shop or garage. They can be used to catch and relocate nuisance animals, or they can be used to catch food.
The construction of box traps requires minimal tools. A tape measure, a square, a pencil, a saw, a hammer, a drill with a few bits, and a sheet of sand paper are all you need. The building materials needed are an 8 foot long piece of 1” x 10” lumber (actual dimensions are ¾” x 9 ½ “), an 18” by 2 foot piece of ¼ inch hardware cloth, a few nails, 4 small screw-eyes, and some string.
We’ll start out by building the box and door first, and when that’s done we’ll build the trigger and set the trap. Incidentally, the dimensions I’m using here will build a medium size box trap; good for squirrels, rabbits, possums, small coons, feral cats, and (unfortunately) skunks. So let’s cut out the pieces for the box and the door from our ¾” lumber.
You will need to cut the following:
2 pieces 24” x 7” for top and bottom
1 piece 8 ½” x 8 ½” for the back
2 pieces 4” x 8 ½” for the back sides
2 pieces 6” x 8 ½” for the front sides
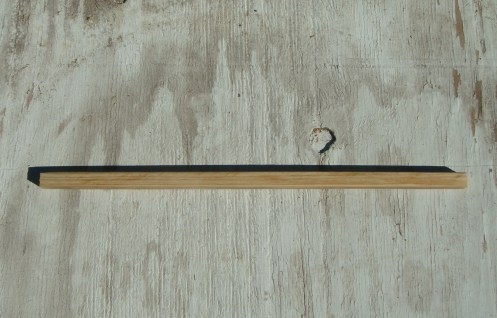
1 piece 7” x 8 ½” for the door
2 pieces ¾” x ½” x 7” for the inner door guides
2 pieces ¾” x ½” x 8 ½” for the outer door guides
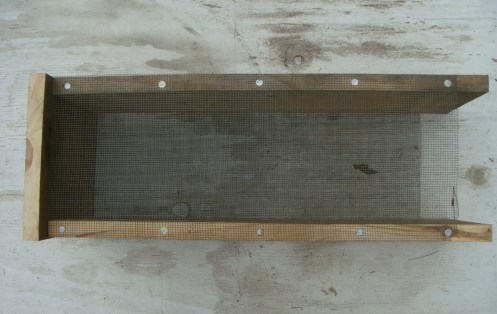
You will also need to cut two strips of hardware cloth 8 ½” high by 22” long for the sides.
Now we’ll assemble the box:
First, nail the back piece to the top and bottom. The top of the back piece should be flush with the top of the top piece and the bottom of the back should be flush with the bottom of the bottom piece. The back piece should stick out ¾” on each side of the top piece and the bottom piece. That sounds a little confusing, but if you’ll look at the picture below you’ll see what I mean.
Now we’re going to nail our hardware cloth onto the sides of the box. I have found that short roofing nails are good for this job but you can use carpet tacks, small u nails, or even heavy staples. Just make sure that the hardware cloth is secure enough to hold a trapped animal. The hardware cloth should butt up against the back and be flush with the top of the top and the bottom of the bottom. Again, confusing but look at the picture.
Next step is to nail on the back side pieces. Easy enough.
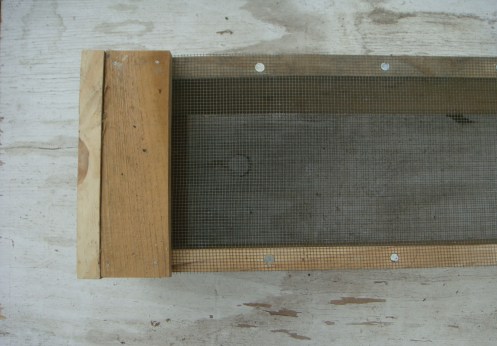
The front side pieces are next, but before you nail them on, take your sand paper and sand the insides of them smooth. This is to reduce friction so that the door will fall quickly and completely into place.
When you’ve finished sanding, nail the front side pieces on so that 1 ¾” of them (the part that’s sanded) extends out in front of the top and bottom pieces.
Now it’s time to nail on the door guides. Before nailing we want sand the edges of the guides where the door will be sliding along them. Smooth guides mean a faster and cleaner drop of the door.
When the guides are smoothed out we’ll first nail on the short, inner guides. You want to position these so that they are flush with the edge of the top and bottom pieces. I used some old paneling nails to attach the guides.
Next we’ll do the outer guides. You want to place the outer guides so that the distance between them and the inner guides is about an 1/8 inch wider than the thickness of your door.

With the guides all nailed in place it’s time to sand the edges of the door smooth. Round the edges and corners a little to help keep them from binding when the door drops.
Slide the door down between the guides and check to see that everything fits and slides easily.
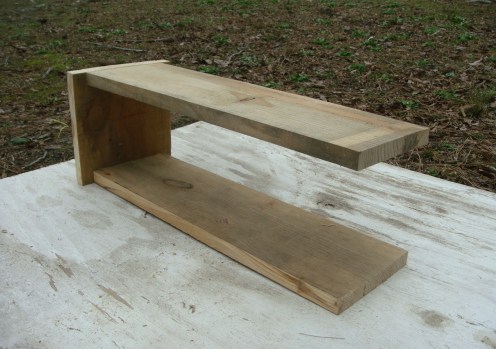
If everything checks out, it’s time to build the trigger. The way this trigger works is pretty simple. The actual trigger sticks down into the inside of the box. The trigger is attached to the back end of a rocker arm that is supported by an upright on top of the box. The front of the rocker arm is attached to the top of the door. When the trap is set, the trigger stick is down in the box and the rocker arm holds the door up. When an animal enters the trap and hits the trigger stick it releases the rocker arm and the door drops closed.
So the first thing that we need to do is drill two holes in the top of the box. The first hole will be 8 inches from the back of the box and is 1 inch in diameter. This is the hole that the trigger will fit down into. The second hole is 16 inches from the back of the box and is ¾ inch in diameter. We will use this hole to mount the upright that supports the rocker arm. So let’s drill holes.
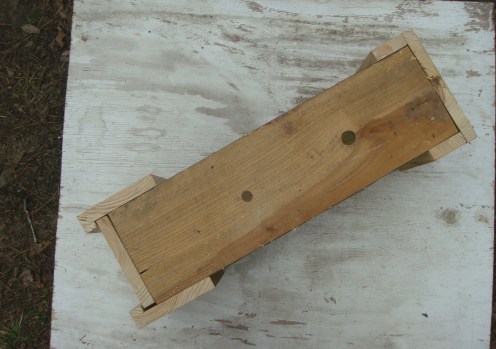
Once the holes are drilled we’ll make the trigger stick. The trigger stick is made of a ¾” x ¾” piece of wood cut 9 inches long. Round off the edges and give the stick a light sanding so that it will slide easily. Cut a notch in the stick that is ¼” deep with the bottom of the notch 2 inches from the top of the stick and then screw a small screw-eye into the top.
The trigger stick should fit easily into the 1 inch hole and the notch should catch on the underside of the board. When the notch is engaged, the trigger stick should not touch the bottom of the trap.
Now for the upright that will support the rocker arm. Cut a piece of your ¾” lumber that is one foot long and 1¾” wide.

On one end cut away wood on each side to leave a ¾” wide by ¾” long tab in the middle. Use a knife or wood rasp to round off this tab so that it forms a peg that will fit easily into the ¾” hole in the top of the trap.
On the other end of the upright we are going to cut a slot that is ¾” wide and 3 inches long. The easiest way to do this is to use your drill and ¾” bit and drill a hole three inches down from the top, then use a saw to cut down to each side of the hole.
When you’re finished with the upright it should look like this.
The rocker arm is just a ¾” x ½” stick that is cut to 20 inches long.
Lay the rocker arm down so that one of the ¾” sides is facing up at you and drill a 3/16” hole in the center of it (10 inches from each end). When this is done, drill a 3/16” hole through the slotted end of the upright. The hole should be one inch from the top of the upright. When the rocker arm sits in the slot of the upright it should look like this.
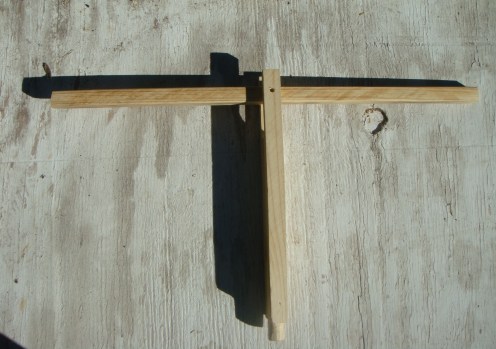
You should now be able to mount the upright into the hole on the top of the box, line up the rocker arm, and stick a nail through the holes in the upright and rocker arm. The rocker arm should pivot freely.
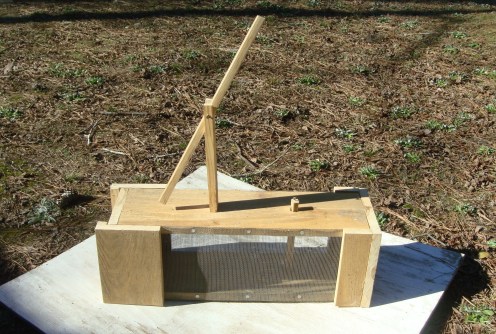
We’re almost done. All that remains is to screw a small screw-eye about ½” from each end of the rocker arm and another screw-eye into the top of the door. Tie a piece of string from the trigger stick to the back end of the rocker arm so that there is about 5 inches between them. Lastly, tie the front of the rocker to the top of the door so that there is, again, about 5 inches between them. When you are finished, the set-up should look like this.
One little thing that I like to do instead of tying the string to the door is to make a little wire hook an tie it onto the end of the string that hooks to the door. This makes it easier to disassemble the trap for transportation or storage.
Well there’s your live trap. To set it just place your bait in the back. I like to use a slice of apple with some peanut butter smeared on it or a sardine, but just about anything will do. Sometimes it helps to put a small piece of bait out in front of the trap. If the critter gets a taste, they are less reluctant to go on into the trap for more. Set the trigger and wait. When the animal goes into the trap they will hit the trigger stick while trying to get to the bait. The trigger goes up, the door goes down, and, boom, you’ve got him. Once you’ve set the trap be sure to check it every day so that you don’t leave an animal confined for too long.
Happy hunting.
In the past I always wore a little Iver Johnson in 32 S&W when we’d go trot lining. Why, you ask, would I wear a sidearm to go trot lining? The answer is Gar. We fish for catfish, but we often get a gar on the line. Because of their mouth full of razor sharp teeth, you can’t just grab them and unhook them. You have to kill them, and thence the sidearm. Well, last spring my friend was running the boat, and I was pulling up lines, and lo and behold I pulled up a five and a half foot alligator gar. I let the line go very fast. I pulled out my revolver, pulled the line back up and shot the gar to little effect. In fact I fired five rounds into its head and it didn’t seem to notice. It took my friend’s .357 magnum to put the thing down, so I decided it was time for a little fire power upgrade. The pistol I ended up buying was a little Taurus PT709 slim which compared nicely in size to my little .32, but fires the much more powerful 9mm parabellum.


So, the problem was that we didn’t go fishing anymore that spring or summer and I never fired the gun. When I finally got around to taking the Taurus down to my range, I was unpleasantly surprised to find that it jammed about ever third round. Bummer. I’ve had a Taurus PT92 for years and it has never missed a lick, even with the cheapest ammo.
The good news is that Taurus has one of the best warranties in the gun business. I shipped it off to the factory with a letter of explanation and they repaired it for free and returned it within three weeks. No warranty card, no writing in for a repair order, nothing. They also sent me an e-mail saying that they had received the gun, called me to confirm my shipping address, sent another e-mail saying it was being repaired, and a third e-mail saying that it was being shipped back. They stand behind their products no matter how old they are or where you buy them. I had a friend that bought a Taurus with a broken firing pin at a garage sale. He mailed it in, and they put in a new pin for free and mailed it back to him. So, anyway, I got the gun back, and it hasn’t jammed since.
Now for the technical stuff. The PT709 Slim is 6 1/8’ long, 4 ½” tall, and, including the slightly protruding safety lever, 1” wide. It is chambered for the 9mm parabellum. When fully loaded with 7 in the magazine and 1 in the chamber, mine weighs one pound and 6.4 ounces. The lower frame is a nice heavy polymer and the slid is steel.

The name “Slim” is well earned. The profile is very slim.

The only protrusions are the manual safety lever, which sticks out less than an eighth of an inch,

and the slide release which sticks out even less.

The magazine release is located near the front of the grip and has a very low profile. This keeps the release from snagging on anything, but it is a little awkward to curl your thumb around and press it down. Maybe my thumb is just too short.


In addition to the manual safety there is also a trigger safety to prevent discharge unless your finger is actually pulling the trigger.

There is a chambered round indicator on the back of the bolt. This indicator sticks up about a sixteenth of an inch and is easily felt with the thumb to determine if you have a round chambered.

The PT709 feels good in the hand. Due to its small size you can only wrap two fingers around the grip, but it does not feel awkward and the gun stays under good control with this grip.

The grip is nicely textured and a small depression at the top of the grip provides a place for your thumb to rest.


The grip is situated in such a way that slid pinch is virtually impossible when the firearm cycles.

The slide itself is deeply knurled in order to facilitate racking it back, but it still takes a good grip and a firm pull to operate.

The sights have a low profile and the familiar three white dots to help with target acquisition. A very nice feature is that the rear sight is fully adjustable for both elevation and windage.


The Pt709 is striker fired so there is no external hammer. The trigger pull is around five or six pounds. Because it is striker fired, the first trigger pull is long. The first time I shot this gun I thought it was never going to fire, but the trigger finally broke, fairly crisply, and the gun discharged. You don’t have to let off all the way on the trigger for subsequent shots so the long travel is only on the first shot. It takes a little getting used to, but you fall into the rhythm pretty fast.
Recoil is not nearly as bad as you would expect for a 9mm that barely weighs a pound. Smaller individuals should not be afraid that the recoil will be too much to handle.
Accuracy is very good considering that the PT709 only has a two inch barrel. I shot this 7 shot group off-hand from 30 feet. The bull is 2 ½”, and I’m not a great shot, so I’m happy with the way it shoots.

The slide locks back when you fire the last round making mag changes quick and easy. Just hit the mag release button to drop your empty mag, shove in a fresh one, and thumb down the slide release. You’re back in business.
The PT709 field strips for cleaning using the same system that Glock has made famous.
First remove the magazine, take the safety off, and clear the round in the chamber.

Then pull the slide back just slightly and pull down on the little tabs located on each side of the frame just below the chamber. This will release the slide.

Now pull the trigger (you did make sure that there wasn’t a round in the chamber, right?), and move the slide forward and off of the frame.


Push the slide spring forward and up to remove it.

And lift the barrel out of the slide.

The PT709 lists for a little over $400 US, but you should be able to find one for $350 or less. They now come with a hard case and two magazines, but at the time I bought mine from DICK’s they apparently did not. Very unfortunate because the mags are expensive.
So there’s the Taurus PT 709 Slim. If you’re looking for a small 9mm, I don’t think you’ll go wrong with this one.
If you make a lot of arrows, gluing the feathers on can become a real chore. Getting the feather in the right position and then holding it in place as the glue sets is very tedious. A device that makes this job a lot easier is a fletching jig. You can buy fletching jigs that range in price from tens of dollars for a bare bones one-feather-at-a-time rig, up to hundreds of dollars for a bench mounted, fully adjustable, three-feathers-at-a-time set-up. Or…… you can make a fletching jig for less than ten dollars depending on what kind of junk you have laying around in your shop. There are a lot of different ways to build a fletching jig; this just happens to be the way I built mine. It’s not hard to build, it’s easy to use, and it does a good job.

To start with, you’ll need to assemble a few supplies. You’ll need a scrap piece of 2” x 4” lumber and a scrap of 1” x 4”, a very small piece of wood that is about 1/8” thick (a paint stir stick works good for this), and few square inches of felt cloth. You’ll also need about two feet of 1/8” or 3/16” all-thread rod and four wing-nuts that will fit onto the all-thread. The heart of the fletching jig will be made from an old clipboard. I used an old one I had laying around that is made of masonite with a six inch metal clip. If you don’t have one on hand, you can pick them up at an office supply store for about three dollars.

Miscellaneous hardware includes a bottle of wood glue or some epoxy, four wood screws that are about an inch-an-a-half long, four small finish nails, one 12 or 16 penny nail, and two rubber bands that are about 4” long.
Tools needed are a saw (a hand saw and miter box will do), a drill (hand or electric), a 1/8” , a 3/16” and a 3/8” drill bit, a tape measure, a square, a pencil, a hammer and some scissors.
How to Build It
First, take your piece of scrap 2” x 4” lumber and cut off a block 6 ½” long. Then cut two pieces of 1” x 4” that are each 6 ½” long.

Now measure down 2 3/8” from the top of the two pieces of 1” x 4” and use your square and pencil to scribe a line across each board. Measure to the center of this line and make a small vertical mark.

Take your drill and the 3/8” bit and drill a hole in each board where the horizontal and vertical lines intersect.

Now take your saw and cut each of the 1” x 4”s along the horizontal line.

Scribe three lines on the top of each short portion of the 1” x 4” blocks. One line should divide the block in half long-wise, and the other two lines should cross the block ¾” in from each end.

Put the 3/16” drill bit in your drill, and drill a hole completely through the block where the lines intersect on top of the blocks. It is important to keep the hole as nearly straight up and down as possible.

Now place the short portion of each block on top of the long portion. Square everything up and make sure that the top and bottom portions of the 3/8” hole line up perfectly. Drop your 12 penny nail into each hole in the top block and tap the nail lightly with your hammer. This will give you a mark to drill on the lower block.

Use your drill and the 1/8” bit to drill a one inch deep hole at each mark on the bottom block. Again, try to keep the hole as nearly straight up and down as possible.

Take your all-thread rod and cut four pieces that are each four inches long. Smear one inch of each piece of all thread liberally with wood glue and tap them down into the four holes in the bottom portion of you 1” x 4” blocks. Set aside for a couple of hours and let the glue dry. (If you use epoxy you won’t have to wait as long)

If you did everything right, the top portion should slide down over the all-threads and the 3/8” hole in each block should line up nicely. You may have to bend the all threads a little to make slight adjustments for a good fit. To keep from getting confused it’s probably a good idea to mark which top goes with which bottom and the direction the blocks should be turned.
Now we’re going to cut a groove in each of our top blocks for the clip to slide down into. The groves are going to go from the top of the block down to the top of the 3/8” hole. It is important to note that natural feathers do not have the vanes centered on top of the quill. On right wing feather the vanes sit to the right of center of the quill as you look down the feather. On left wing feathers they sit to the left. So, the point of all this is that the grove can’t be dead center of the 3/8” hole. It has to be slightly off-set. The good news is that this fletcher will do either right wing feathers or left wing feathers depending on which direction you put the arrow shaft into it.
So let’s cut the grooves. My clipboard is just a shade over 1/8” thick, so I made my groove just a shade over 3/16” wide. If your clipboard is the same size, you can use the same dimensions. Lay out your grooves with a pencil and straight-edge so that on one block the center of one groove is just slightly (about 1/16”) left of the center of the 3/8” hole and on the other block it is just slightly right of the center of the 3/8” hole. Clamp the top portion of the block into a vise and use your hand saw to carefully cut out the grooves about 5/16” deep. I found that the best way was to make a cut to establish each side of the groove and then a cut down the middle. This left some little ridges of wood in the groove which I broke out with a pocket knife and then smoothed off with a rat-tail file. Of course if you have a table saw this would be an easy job.

O.K., things can start to move faster now. Assemble your 1” x 4” blocks and glue and screw them to the ends of the 2” x 4” base. Make sure that you have the grooves facing to the inside.

Cut the bottom portion off of your clipboard so that there is about 1/16” remaining below the edge of the clip.


Cut the ends off of the clipboard so that it seven inches wide.

Saw a little notch out of the bottom corners of the clip so that it will not get hung up on the felt that will be protecting your arrow shaft.

If everything has been done right, the clip should drop down into the grooves and slide easily down to the 3/8” hole. I find it helps everything slide better if you rub a little bar soap on the edges of the clipboard and in the grooves.

Now dissemble the 1” x 4” blocks so that you can line the inside if the 3/8” holes with felt. Just cut the felt into ¾” wide strips and glue the little strips into each of the half holes. It may take more than one layer of felt to get the fit that you want around your arrow shaft. You want the shaft to be held firmly in place when the blocks are clamped together, but you still want to be able to turn the shaft with a little pressure from your fingers.

To help keep a constant, even pressure on the clip while your glue is drying, take your four small finish nails and hammer them part-way in to the base block bout two inches in from each end. Your rubber band will go over the top of the clip and hook over these nails.

Cut a small wedge from you thin scrap of wood to make the position indicator for your jig. When a shaft is properly positioned in the jig, just the nock will protrude, and the indicator can be wedged into the exposed nock.


Notice that the 1” x 4” has been marked with the proper shaft position for gluing on each fletching. These markings are placed on each end along with a designation for whether the nock protrudes for a right wing feather or a left wing feather.


After using the jig for a while I made a couple of improvements. One was to drill a little slot into the base of the jig so I could put the little wedge in it and, hopefully, keep it from getting lost.

Another improvement was to paint the fronts of the two upright different colors so I could easily see which top went with each bottom.

How to Use It
To use the fletching jig the first thing that you have to do is take the clip out and loosen the wing nuts enough to slide your arrow shaft through the holes. In the photos below I am fletching with right wing feathers, so the shaft is placed in the jig with the nock protruding on the right wing end.

Now snug the wing nuts down so that the shaft is held firmly but not immovable in place.
Place the small wedge in the nock and turn the shaft until the indicator is pointing to one of the fletching positions. I have a “C” on my indicator to show which position is correct for the cock feather.

Now take the clip and, before placing your fletching in it, rub a little bar soap along the bottom and front edges of the masonite. I find that this helps keep the clip from sticking to the fletching if get a little too much glue on the quill.
When the clip is lubricated place a fletching in the clip with the quill resting up against the bottom of the masonite. Position the large end of the fletching to the left and line it up with the edge of the metal clip. I find that this gives me the right location for my fletching on the shaft. If you would like the fletching to be closer to the nock or farther away, you can make a mark on the clip at the position that you favor.

Next you need to run a thin bead of glue down the quill. I use Fletch-Tite, but you may wish to use Super Glue, fletching tape, or whatever.

Slide the clip down into the grooves and press the fletching firmly into contact with the shaft.
Loop the two rubber bands over the top of the clip to keep pressure on the fletching.

Let the whole thing sit for a couple of minutes to give the glue time to set, then remove the rubber bands, pinch the metal clip open, and lift the clip assembly out of the grooves.

Use the indicator wedge to rotate the arrow shaft to the next position, load another fletching into the clip, and repeat the gluing process.

When all three fletchings are glued in place, loosen the wing nuts on the left block a little, and remove the block on the right completely. Slide your finished arrow out of the jig, and insert a new shaft.

That’s all there is to it. I find that it takes me about ten minutes to fletch one arrow, that the position of the feathers is more consistent, and that the glue contact of fletching to shaft is more even.
Many people are intrigued by the idea of making their own bow, but they are intimidated by the thought of making a wooden bow. This is totally understandable since making a wooden bow involves so much in the way of procuring the right materials, taking the time to season the wood, and then making the actual bow; all with no guarantee that the bow will turn out to be an effective shooter.
Well what if I told you that there’s a way that you can make a bow in one day, and that said bow is made from readily available low cost materials, and that the bow is virtually guaranteed to work. Would you be interested then? Well, it’s not just a pipe dream. This is a bow that anyone can make and it won’t take a lot of time or cost you an arm and a leg. It’s the amazing PVC bow.
PVC, or poly-vinyl-chloride, pipe is one of the most widely used plumbing pipes in the world today, and it is readily available from big-box and local hardware stores almost anywhere. To make this bow we are going to use ¾ inch schedule 40 PVC pipe. A ten foot piece of this pipe at my local hardware store costs about three dollars, U.S., and that is enough to make two bows. 
Tools you will need to make this bow include a tape measure, a pencil, a hacksaw, two or three wood clamps, a rat-tail file, a flat wood rasp, a small piece of 80 grit sand paper, and of course you will need something to make a string out of. You can use your kitchen stove to heat the PVC for this project, but a heat gun makes the job a lot easier. I bought a heat gun for $20.00 U.S. at a discount tool store, and I have used it to make several bows as well as other projects around the house.
You will also need a few pieces of scrap lumber to make a simple jig. The jig is super easy to make and shouldn’t take more than ten minutes for construction.
So, let’s get started. Assuming that you have a ten foot joint of PVC, let’s make our bow five feet long. that way we can get two bows out of this one pipe. So step one is to use your hacksaw and cut a five foot piece of ¾ inch, schedule 40 PVC. 
When the pipe is cut, measure to the center and make a mark. Then measure and make a mark three inches on each side of the center mark. This six inch section will be the handle of your bow.
When you have your PVC cut it is time to taper the limbs down. To do this, you will heat the PVC until it is pliable and then press it between two flat boards to leave it thick at the handle and tapered down to flat at the ends.
I found that the easiest way to do this is to build a simple jig out of a few pieces of scrap lumber. The base of the jig is a piece of 2 x 6 that is 36 inches long. The top board of the jig is a 36 inch 1 x 4. 
To hold the PVC in place while it is being heated and shaped, I nailed a couple of 1 ½ by 1 ½ inch blocks on each side of the pipe. These blocks need to be the same height as the thickness of your pipe. In this case they are one inch tall.

I recommend that you pre-drill the blocks to keep them from splitting when you nail them down.


I also nailed a couple of 2 x 4 blocks under each end of the bottom base board. This lifts the whole jig up so that you can get your wood clamps onto the jig without a big hassle.

So, now you need to heat the PVC to make it pliable. You can do this over a burner on your stove, but I have found that an inexpensive heat gun, $20 U.S., works better for this part of the project. We are going to shape one limb at a time on the bow, so set your PVC into the jig with the center mark between the small blocks and fire up your heat gun. Heating the PVC evenly takes a little practice. You need to keep the heat gun moving slowly up and down the pipe, and keep turning the pipe so that you heat it all the way around. Make sure that the end of the pipe is well heated, as this is the part that will be flattened out the most in your jig. If you are using your stove to heat the PVC, keep the pipe moving, and keep turning it.
You can tell when the pipe is ready to shape because when you lift it, it will sag easily.
Now is the time to move fast. Place your pipe in the jig with the end of the handle section even with the edge of the small block. Place the top board over the PVC, and press it down. Quickly attach your clamps and squeeze the down tight. The end of the pipe should be pressed completely flat.
Let everything sit for about five minutes and then remove the clamps and the top board. Your pipe should be evenly tapered from the round handle to the flat end.
If it isn’t tapered correctly, or if the limb went a little crooked, don’t despair. The great thing about working with PVC is that if things don’t go right, you just heat it up and go again. As long as you haven’t scorched the pipe, there’s virtually nothing that you can’t correct.
OK, you’re half way there. Now do the same thing to the other limb. When you have both limbs tapered it time to round each tip off to give your bow a more finished appearance and to cut the string nocks. Use your hack saw, wood rasp and sandpaper to round the tips.


Then use your rat-tail file and sandpaper to form the string nocks.

You can make a simple string by twisting together six strands of artificial sinew that are about one-and-a-half times as long as your bow. Tie an overhand loop in one end and then tie the other end off as you string the bow. The string will stretch a little at first, but you can correct this by unhooking the loop and twisting the string tighter. This will shorten the string. Keep making this adjustment until you have the brace height that you want.
That’s it! Your bow is ready to shoot. Your five foot bow should be pulling at around 30 lbs. at 28” draw. If you make a shorter bow, the poundage will naturally be higher. 
If you want to dress the bow up a little you can give it a couple of coats of black heel and edge shoe dye.
And then it’s time to head to the range.
There’s nothing like actual time in the woods to improve your camping skills. A recent trip into the woods for a little camping trip with my son and one of his friends resulted in yet another lesson on how to prepare for wilderness living.
You see, the weather on this campout was not a beautiful spring day. It was a very early spring day, and it was still cool, and it was raining. Hey, there’s no weather guarantee for the apocalypse, so you’ve got to practice in all kinds of conditions. So anyway, we’re in the woods and we decided that we needed to get a fire going. Everything was wet, but I had some paraffin and cardboard fire starters; so I wasn’t worried about getting a fire lit. But then we discovered a problem. All we had to start the fire with was a fero-rod striker. A fero-rod is not the right tool for igniting a wax and cardboard fire starter. So, we had to traipse out into the field and locate a juniper tree, peal some bark off the dry side, shave off the inner bark, and buff it up into tinder. Then we could use the fero-rod to light the juniper bark, use the juniper bark to light the fire starter, and use the fire starter to get our damp squaw-wood twigs burning. Not a major problem; I’m sure we could have got the fire started with enough juniper bark and some rich pine slivers, but it was kind of a pain.
So after our camping was done, and I was back at the house; I decided to make some fire starters that I could ignite with a fero-rod. This is what I came up with:
To make these fire starters you will need some corrugated cardboard, a pair of scissors, some heavy jute macramé string, some light cotton string, and some wax. I use recycled candle wax that I keep in an old coffee can.

Start by cutting your corrugated cardboard into strips that are about an inch and a half wide by twelve inches long. Cut your jute into pieces about four inches long.
Place a jute wick onto one of the strips of cardboard.
Roll the cardboard up into a cylinder and tie a piece of light cotton string around the cylinder to hold it in place.
Place your can of wax into a pot of water and set it over heat. Never set the can of wax directly on a flame. There is danger that it might ignite and start a serious fire.
Holding your fire starter by the wick, dip it down into the wax. Cover the cardboard completely with wax and also make sure that the first ¾ inch of the wick is also coated with wax. If the lower part of the wick does not have wax on it, the jute will all burn up too fast, and won’t ignite the starter.
Set the fire starter on a piece of aluminum foil to cool.
The series of photos below show how to use the improved fire starter. Note that you must fray out the wick before striking a spark to it. This will insure that the wick ignites.


A final lesson learned from this camping experience….. Make sure that you throw a cigarette lighter in your bug out bag. Always better to have multiple options.
