Fishing is often overlooked as a survival food source, but it is really one of the most reliable and easiest ways to acquire high quality protein. The equipment needed to harvest fish is simple and inexpensive, and you can set out lines that will fish for you while you do other things. And hey, fishing is fun. Pictured below: My collapsible fishing rod.
For fishing equipment you need, at the very least, to have a pole, extra line, hooks, floats, and sinkers. I cut poles from a nice stand of river cane I know of, and then I put them up in the rafters of my workshop to cure. Line, hooks, floats, and sinkers come from the hardware store and the cost is next-to-nothing. This, and a few worms, is all you need to catch fish, but if you want to take fishing to the next level, buy yourself a rod and reel, a tackle box, extra line, hooks, floats, sinkers, some plastic worms, a nice assortment of artificial lures, a stringer, and some long nose pliers. I have a pretty good assortment of rods and reels that I have picked up at garage sales. A good tackle box doesn’t cost much, and I keep my eyes open for sales on lures, plastic worms, etc. I would recommend that you buy several hundred fishhooks of various sizes. The fish hook is the most important part of the fishing set-up, and fish hooks make a good trade item if we should ever find ourselves in a barter type economy. Pictured below: Tackle box with fishing equipment.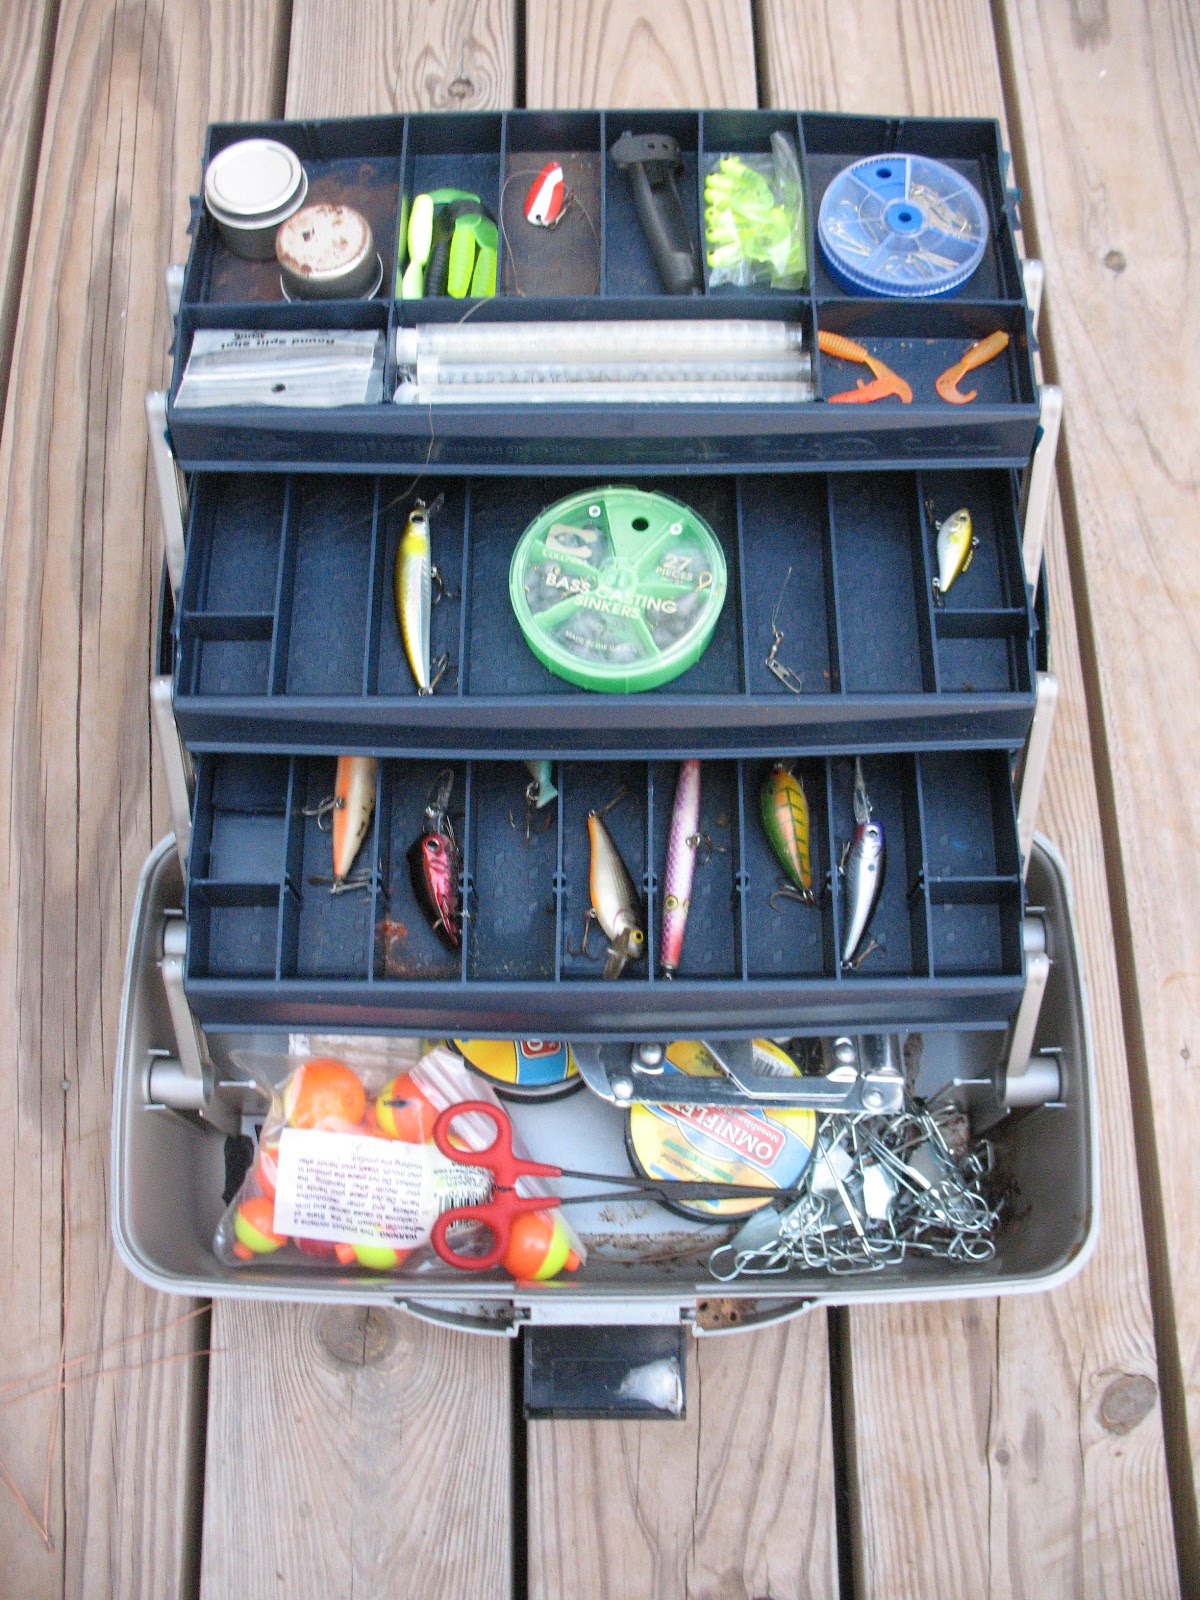
Fishing with a pole or a rod and reel is a good way to catch a fish, but a trot-line is the way to catch many fish. A trot-line is a long string (usually nylon) that is stretched out underwater, or just above the water. Suspended from this string are short (2 to 3 foot) drop-lines with a baited and weighted hook on the end of each line. There are many ways to set a trot line. You can tie it off on both ends to fixed objects, you can tie off one end and put a drop-weight and a float on the other end, or you can put a drop-weight and a float on both ends. A drop weight can be made from anything that will sink. A coffee can full of dried concrete with an eye-bolt embedded in it makes a good weight. Empty bleach bottles make good floats. Trot-lines can be baited with anything. Worms, crickets, minnows, chicken livers, strips of beef liver, shrimp, or blood bait will all work fine. If you do set out a trot-line, be sure to run it every day and collect your catch. Pictured below: Store-bought trot line in package.
My next few posts will be about how to make and use primitive fishing equipment.
I have recently begun propagating plants and herbs from cuttings, and I have been amazed at how easy this is. All you need is a pot, some potting soil or compost, some rooting hormone, and a cutting from the plant that you want to propagate. I have lots of plastic pots left from stuff I have bought in the past, I also have some peat pots, and some terracotta pots. I save the peat pots for starting vegetable plants from seed, and use the plastic and terracotta pots for cuttings.
Here’s the method I’ve been using to start cuttings:
First, prepare the pots you will use a day or two before you take your cuttings. I generally use the little 3 inch by 3 inch pots. Fill the pots with potting soil or compost and press the soil down firmly. Don’t pack it down; just compress it a little so that it’s not loose in the pot. Place the pots in a plastic or metal tray and water them thoroughly. Some water will run out of the bottom of the pots into the tray because the potting soil will not absorb the water right away. Compost seems to absorb the water faster than potting soil. If you use potting soil you may have to water the pots a couple of times before the soil will become moist. Pictured below: Home made potting soil.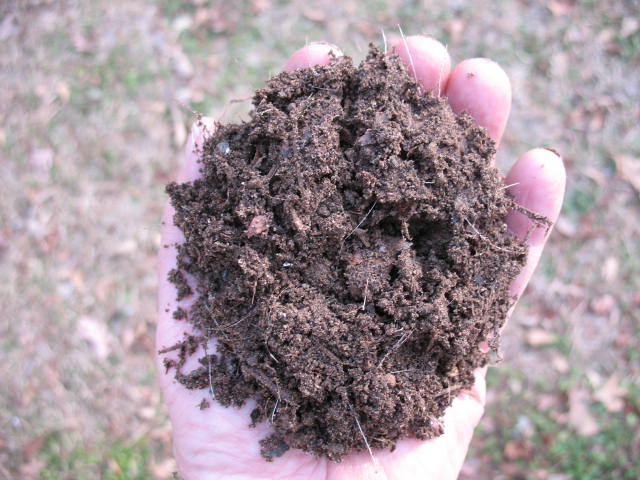
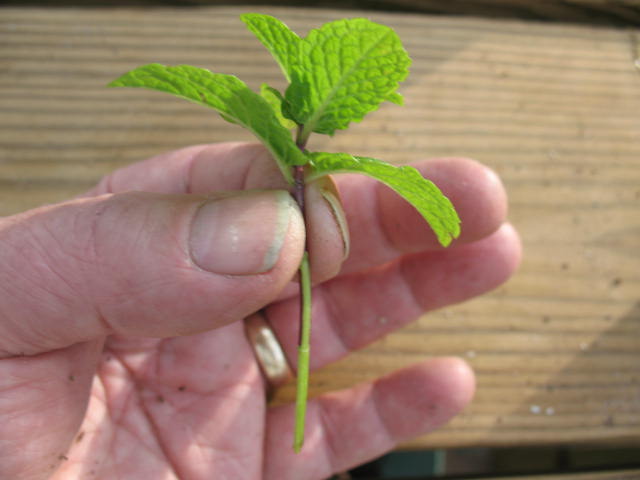
Second, find the plant that you want to propagate and take a cutting. You want to take a cutting of healthy, new growth off of the tip of a stem. Don’t cut an older woody stem. I generally make my cuttings about 3 inches long. Remove any leaves from the bottom inch of the stem, and use your fingernail to scrape off the skin from the stem. You don’t have to get every bit of the skin off; just drag your nail down a couple of times. Pictured below: Mint plant and cutting from mint.
Third, dip the cleaned portion of the cutting in water, then stick that portion down into the rooting hormone (a white powder). Tap the stem on the rim of the rooting hormone bottle to shake any excess hormone back into the jar. Pictured below: Cutting with rooting hormone.
Fourth, shove the cutting down into the moist potting soil up to the first leaf on the cutting. Press the soil lightly with your fingers to firm it in around the burried portion of the cutting. Pictured below: Potted cutting.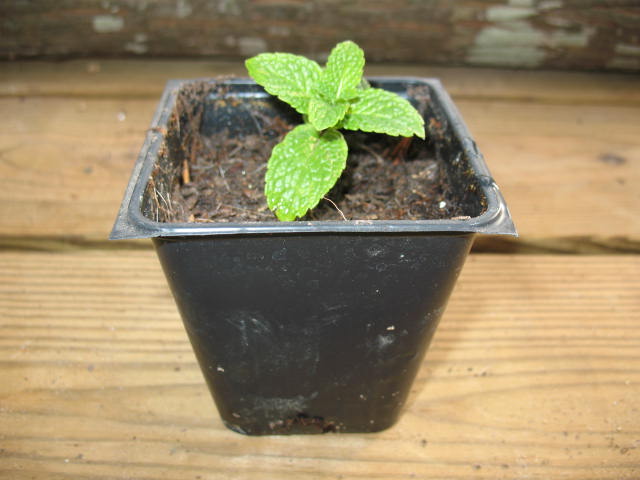
Place your cuttings a warm sunny place and keep the soil moist but not waterlogged. In a week or so you will begin to see some growth. Keep your cuttings in their original pots, or repot them if necessary, until time to plant. If they will be in the pots for a while, you may want to feed them with a little liquid fertilizer like miracle grow or maybe a manure tea. Pictured below: Rosemary, Thai Basil, and Lemon Mint Marigold all propagated from cuttings. 
I’ve only just started doing this, and I’ve had about an 80% success rate; so it must not be too hard. So far I have propagated peppermint, Thai basil, rosemary, lemon mint marigold, lemon verbena, and roses. The lemon verbena was not successful, everything else lived and grew.
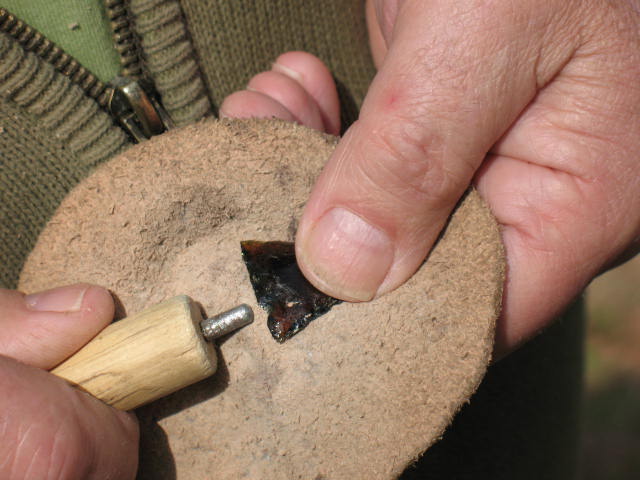
Once you have roughed out the shape of your point, it is time to bring out the pressure flaker and start working down to your finished point. Most knappers do their pressure flaking with a deer antler tine or a piece of large guage copper wire mounted in a wooden handle. I personally use deer antler because that’s what I’ve got. You’ll also need a palm pad to protect your hand while you’re pressure flaking. I use a piece of heavy leather, like belt leather. The pad is oval shaped and a little bigger than the palm of my hand. The leather needs to be flexible so that you can close the pad around the piece that you are knapping and hold it tight. Shown below: Pressure flaking tools. 
When you pressure flake, you need to be fairly precise on where you remove a flake. Pressure flaking is how you will finish out the shape of the point and how you will straighten out the edge of the arrowhead so that it is sharp and will penetrate well. You want to try and make your flakes long so that you will not be left with a bulky point that’s fat in the middle. The trick to pressure flaking is to push in and down on the edge. If you just push down you’ll end up taking off a short flake and you’ll have a point that’s fat in the middle and then drops off at a too steep angle to the edge. Pictured below: How to take off flakes so that you keep the edge centered.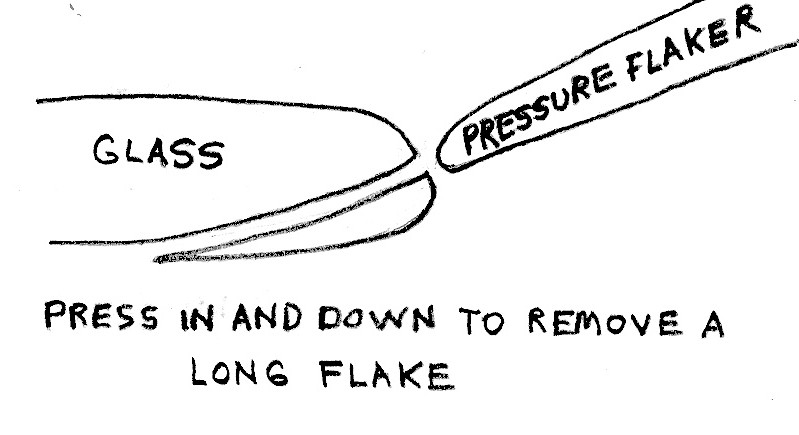

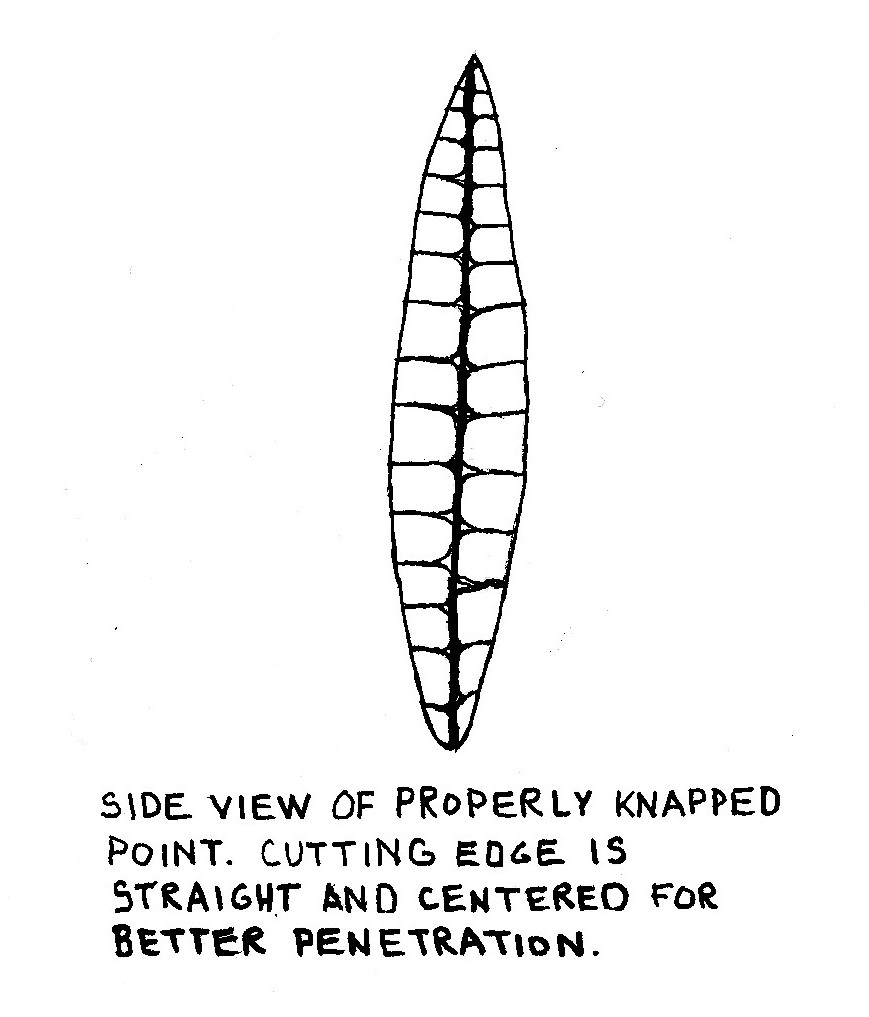
It takes practice, but that’s why you’re using glass, so you can practice. If you have a thin edge, pushing in and down may crush the edge rather than taking off a flake. You can prevent this by rubbing the edge on a piece of sandstone to grind it flat, and then using your pressure flaker to take off a flake. Turn your point up on edge and look at it frequently. You want the cutting edge of the point to run straight and to be centered. In other words, remember to flake both sides of the edge. Show below: Top: Improperly knapped edge; Bottom: Properly knapped edge. 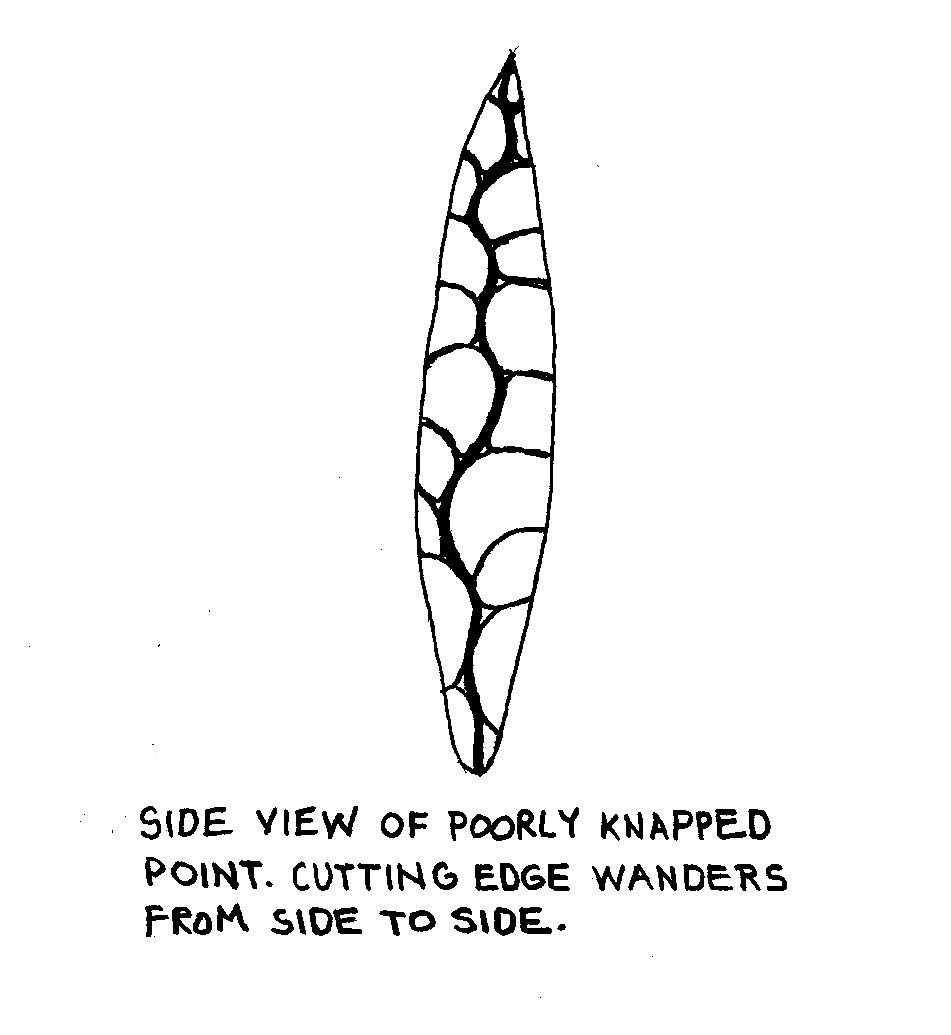
The final step to finishing up your point is to cut the base notches for mounting the point on an arrow shaft. I made a special tool for cutting notches. I just drove a six penny nail into a wooden handle and clipped the head off of the nail. I use the same flaking motion to carefully cut the notches, and “shazam” I have a finished glass point. Pictured below: Finished point without notches, flaking notches, and finished point with notches.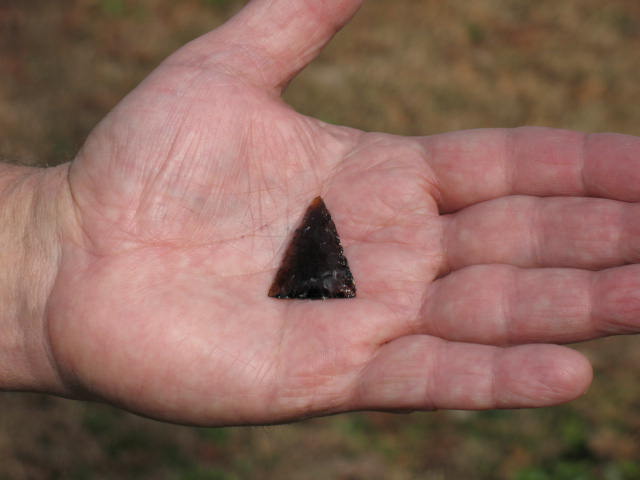

By the way, I have since learned that Native Americans used glass, when they found it, to make some of their points. Ishi, the famous “last wild Indian” made beautiful points from broken bottles, so this is not just some modern invention. Shown below: Finished glass points.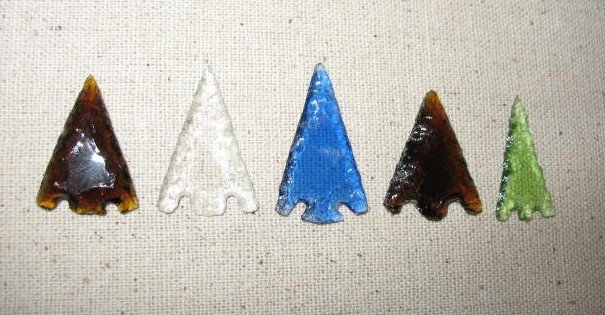
So there you have it. A cheap readily available supply of knapping materials. Practice and enjoy. You’ll find that your skills will improve, and you can move on to using that flint and obsidian that you’ve been afraid to bust into; or you may, like me, get hooked on knapping glass. Either way it’s a great hobby.

Note: This is a copy of an article that I had published in Backwoodsman Magazine a couple of years ago. I’m posting it here because I think it fits in with my last couple of blogs on survival archery equipment. Because of its length, I am making two posts out of it.
I have always wanted to learn how to flint knap but I have been plagued by a problem that many aspiring flint knappers face; there is no flint or obsidian where I live. For years I looked for flint whenever I was on vacation, always with very limited success. I bought a chunk of obsidian at a garage sale, and was able to work with it for a while, but it played out long before I learned much about knapping. The problem with being a beginner is that, at least in my case, I ended up with more waste than I did points. When you’re producing more junk than good stuff, it’s hard to justify paying money for a piece of rock. Pictured below: Flint and obsidian arrow points.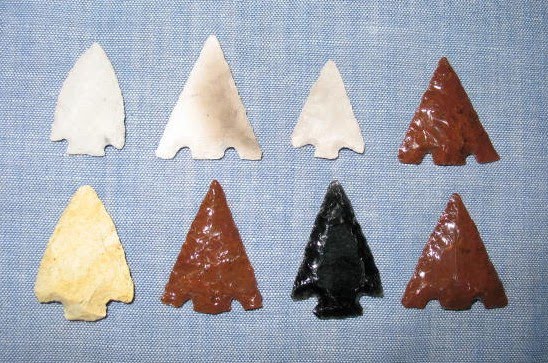
Finally, an acquaintance of mine, who is a first class knapper, turned me on to an inexpensive and virtually limitless supply of locally available knapping material. He told me to do my practicing on old glass bottles. When you think about it, it makes sense. After all, obsidian is nothing but a natural glass made by volcanoes; so instead of buying expensive natural glass, why not practice on cheap man-made glass. What a revelation! I dug through the trash for an old beer bottle and started right away. And you know what, my first glass point turned out pretty decent. Since then I’ve been hooked on knapping old glass bottles. I now refer to beer bottles as my East Texas Obsidian, but I didn’t stop with beer bottles. I started keeping my eyes open at garage sales and thrift stores, and buying colored bottles. I’ve turned out some really nice green and blue points using old bottles. Pictured below: Colored bottles.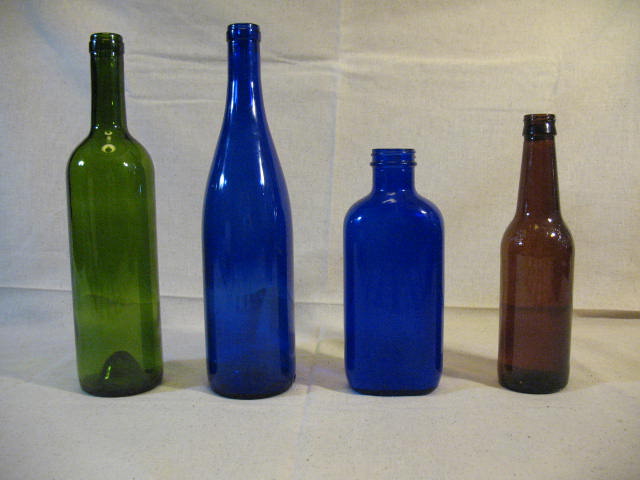
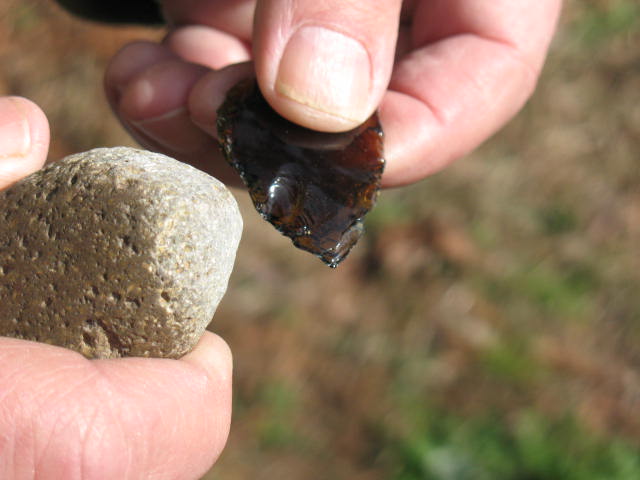
You learn pretty fast that some bottles are better than others, and some parts of the bottle will make better points. When it comes to beer bottles, I like to use what they call “bar bottles.” These are the bottles that can be refilled, and the glass in them is a little thicker than the throw-away type bottles. One problem with bottles is that they are curved; and the smaller the bottle, the tighter the curve. This can be a problem if you’re making a very large point. I’ve found that the best part of the bottle to use, especially on beer bottles, is the bottom. The glass on the bottom of the bottle is thicker and the curve of the glass is not as pronounced as the glass on the sides of the bottle. Another thing that I’ve learned is that the way the glass breaks is affected by the temperature. If the glass is cold it is more unpredictable. I like to set a bottle by my wood stove or by a campfire and warm it up a little before I break into it. You don’t want to get it so hot that you can’t hold it; just warm it up. Pictured below: Warming bottles by my wood stove.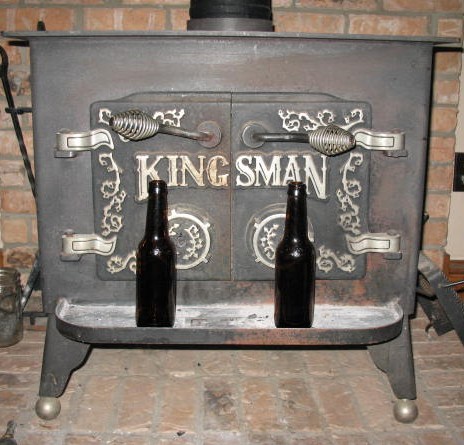
When you’ve selected a good bottle and warmed it up, it’s time to start breaking glass. Before you bust into the bottle you need to take some safety precautions. You should always wear safety glasses, not just regular glasses, but real safety glasses. Those little shards of glass fly like shrapnel, and an eyeball won’t slow them down much, so wear your safety glasses. If you do a lot of knapping it’s probably a good idea to wear a dust mask over your mouth and nose. Every time you knock a flake off, you’re sending loads of nearly microscopic glass particles into the air. Breathing this glass dust into your lungs can cause really bad things to happen, just like breathing asbestos dust. So, now that you’re all geared up, let’s break some glass. Take your bottle and wrap it up in an old towel, lay it on a hard surface, and gently wack the side of the bottle with a hammer. Try not to smash the bottle, or you’ll end up with pieces that are too small to use. I usually hit the upper shoulder of the bottle because I’m trying to keep the bottom in one piece. Pictured below: Breaking a bottle. 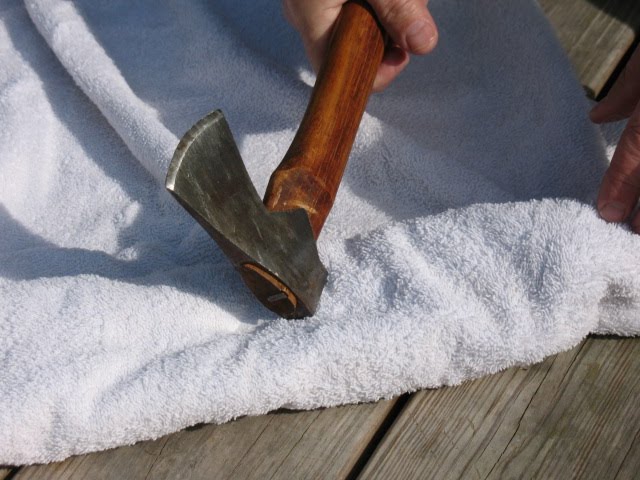
After you hear that satisfying crunch, unwrap the towel and see what you’ve got. With any luck the bottom will still be in one piece with a few jagged points of glass sticking up. If you weren’t so lucky, no big deal, it’s just an old bottle. Grab another one and try again. Pictured below: Bottom of bottle. This is what you are looking for to make your arrowhead out of.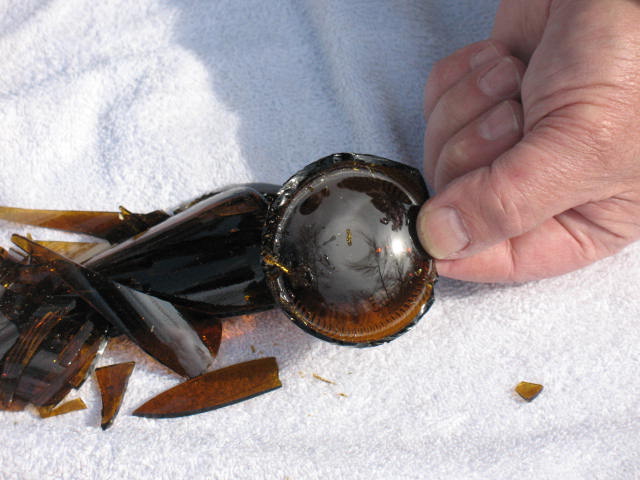
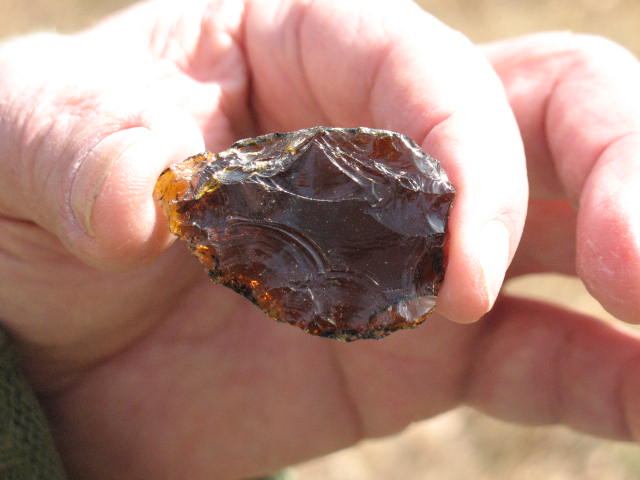
Now it’s time to do a little percussion flaking. Percussion flaking is where you use a rock or an antler billet to knock flakes off of the edge of your glass. Percussion flaking is not going to be pretty; it’s just how you’re going to rough out the shape of your point. Pictured below: Percussion flaking tools.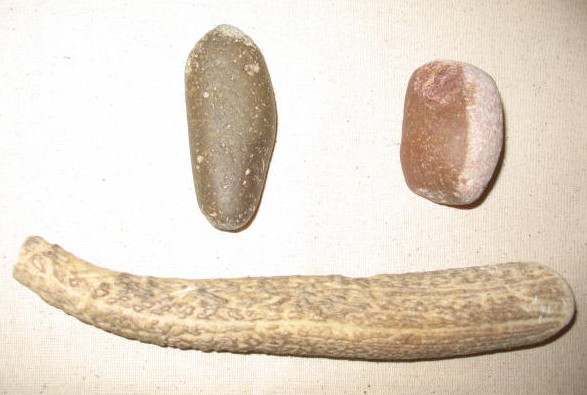
You’ll want to start by knocking off those jagged points where some of the glass from the sides of the bottle is still attached to the bottom of the bottle. Be careful and try not to cut yourself. Remember, glass is sharp. Pictured below: Removing jagged points from bottle bottom.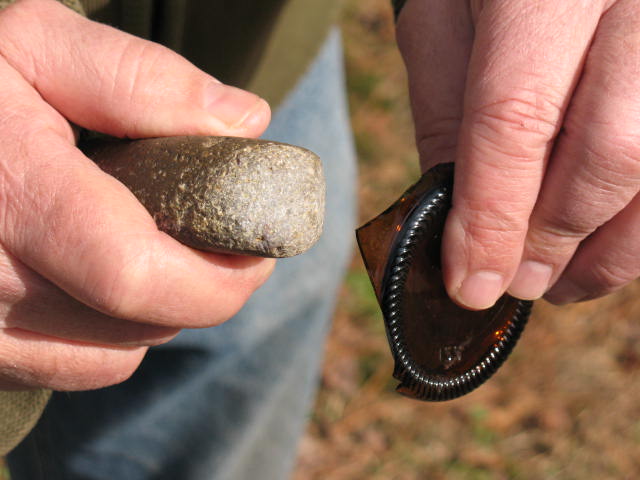
When you have the side glass removed, it is time to start knocking the bottom into shape. Just strike glancing blows to the edge of the glass. Don’t try to take off too much at one time. After you have knocked a series of flakes from one side of the glass, turn the glass over and knock flakes from the other side. Work your glass down into a triangle that is somewhat bigger than you want your finished point to be. Picture below: Percussion flaking the bottle bottom into a rough shape from which you can flake the finished point.
Next blog will be about how to pressure flake the rough point into its finished shape.
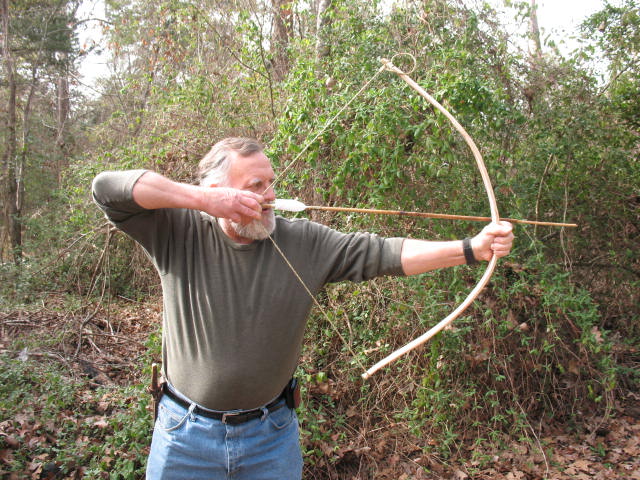
If you have access to river cane you can make some quick and effective arrows out of it. River cane is native to North America. Bamboo is not native, but it has escaped cultivation and is widely available in the wild. River cane makes better arrows because it is round. Bamboo has a tendency to have a groove or flat area on one side of the canes, which does not contribute to good flight. If you use bamboo to make arrows you must select the canes carefully. There are other native canes that can be used to make arrows but they are weaker than river cane. So I’m going to make my arrow out of river cane. Pictured below: River cane arrow at full draw.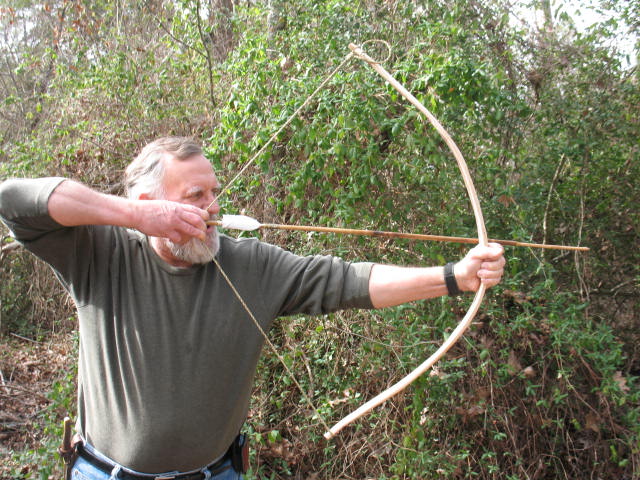
Let me describe a cane arrow before we start gathering materials. A cane arrow has a cane shaft that is about as long as the distance from you armpit to the tip of your middle finger. Inserted into the front of the cane is a hardwood foreshaft that goes down into the cane about two inches and extends out from the cane about six to eight inches. This hardwood foreshaft may be sharpened to a point, or it may be notched and a metal, stone, or bone point attached to it. The rear of the cane is notched to fit your bow string. Feathers are tied to the cane using natural fiber, string, or animal sinew. If you can’t find any feathers you can actually use leaves as fletchings. You can make arrows without fletchings (the Bushmen don’t use fletchings on their arrows), but you will have to experiment to get the right balance between cane and foreshaft.
So, let’s build an arrow. The first thing is to select the best canes that you can. This will save you work in the long run. Select canes that are as strait as possible. Do not select canes that have short joints. Look for canes that are not too tapered. The large end of the cane should be no larger in diameter than your little finger. Cut your canes a few inches longer on each end than you will need them. Canes that are not straight (which is nearly all of them) can be straightened by heating gently and bending them straight. Don’t burn the cane. Hold it over coals rather than a flame, and keep the cane moving and turning so that it doesn’t burn. Pictured below: Unstraightened piece of river cane.
When you have the cane as straight as you can get it, let it cool, then use your knife and/or a sandstone rock to smooth down the joints. You are now ready to cut the cane to length. First we’ll cut the front end where the foreshaft will be inserted. You want the larger end of the cane to be the front of the arrow. Cut the cane so that you have about two inches of cane in front of the last joint. This way when you insert the foreshaft, it will rest on the cane joint. This will help to keep the foreshaft from being pushed down into the cane when the arrow strikes its target. The easiest way to cut the cane is to run you knife blade all of the way around the cane several times in order to score a groove into the cane. The cane should snap off cleanly when you bend it at the score mark. Pictured below: Straightened cane with joint smoothed down.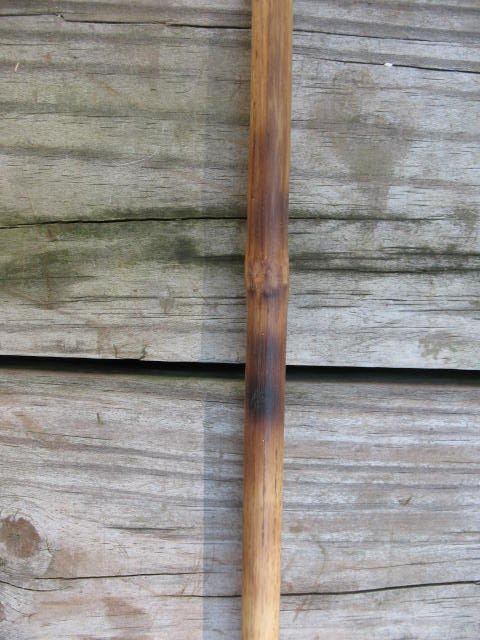
Now we need to cut of the back of the cane so that we’ll have the proper length shaft. Stick the front of the cane (the end that you just cut) up under your armpit. Now extend you arm straight down. Where your middle finger touches the cane is the proper length. Cut the cane here. To cut a nock for your bowstring, take your knife and slice into the cane about a half inch from the back and shave a little off of both sides of the cane. Use your knife point to clean out the resulting U-shaped nock. Pictured below: Finished nock.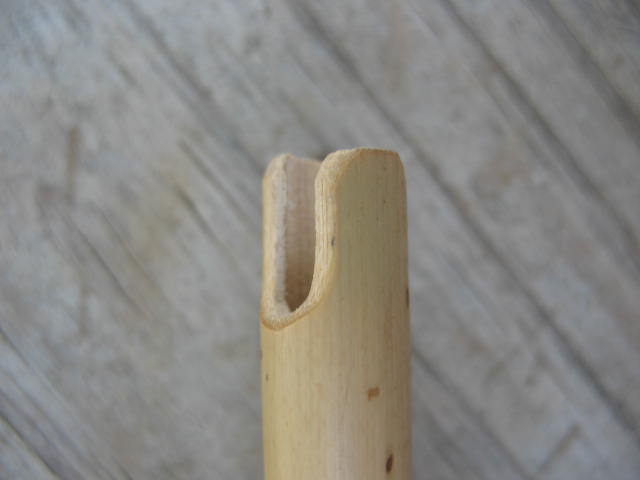
The foreshaft can be any straight piece of hardwood that is eight to ten inches long and about a quarter inch in diameter after the bark is removed. I usually use huckleberry, yaupon holly, or privet; but anything will do as long as it is solid and strong. Remove the bark, trim one end down so that it will slide all the way down into the first joint of the cane, and sharpen the other end to a point. You can fire harden the point by holding it over hot coals. Don’t char the point; you just want to drive the moisture out of it to make it harder. You can just stick the foreshaft down into the cane, but I prefer to put a little heated pine sap on the foreshaft and glue it down into the cane. When the pine sap hardens it will hold the foreshaft securely in the cane. Pictured below: Foreshaft glued into front of cane.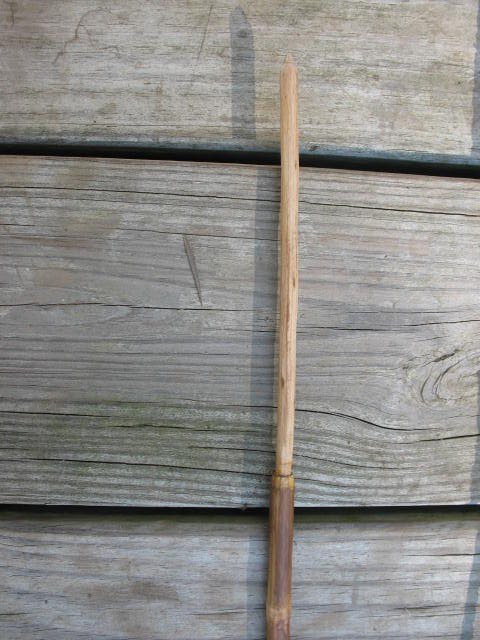
In a survival situation any kind of feathers that you find in the woods will make a good fletching, but if you are just making arrows for practice you need to make sure that you are using legal feathers. A hawk or vulture feather that you find laying in the woods can end up costing you $2000 in fines if a game warden gets involved. I make sure my feathers are legal by buying them at the hobby store. You can buy chicken, duck, pheasant, and other feathers in packages.
The purpose of the fletching is to put some drag on the back of the arrow. With the back wanting to go slower than the front, the arrow will travel in a straighter course. Nicely split and glued feathers look nice on an arrow, but they are not at all necessary to make the arrow perform properly. As you can see from the photo below, I have taken two whole feathers, trimmed some off of the back, and used yucca fibers to tie them, laying flat, on opposite sides of the shaft. I put a little melted pine sap on the yucca fibers to hold them more securely in place. Pictured below: Fletching tied on with yucca fiber and sealed with pine-sap glue. 
This arrow will now fly straight, and should be capable of killing small game. Total time on this arrow, not counting gathering materials, is about an hour. Pictured below: Finished green-wood bow and river-cane arrow. 
I decided to do an experiment to see how quickly I could make a bow and arrow that would be capable of killing small game. I’ve made a lot of bows and arrows over the years. I’ve always taken the time to cure the wood and taken several days to shape and tiller the bow. I’ve always tried to produce a quality bow with a smooth finish. The same for my arrows. Carefully selected shafts, heated and straightened, knapped points, and fletchings and points attached with sinew and rawhide glue. So my experiment was going to be a big change. Here I am looking for “will it work” and “how fast can I build it using only a knife and hatchet?” And so, I started my experiment.
I decided to make my bow from what we call cedar in East Texas (it’s really juniper). I selected juniper because it is fairly easy to work, it is readily available, and it has fairly good cast even when it is green. The down-side is that it is pretty brittle, and I would never make a cured bow of juniper unless I was going to put some kind of backing on it. This bow will probably work well for a while, but after it dries out it will probably break. But hey, the whole point is to simulate a survival situation where I make a quick workable bow that will last for a few days, or maybe a week. So, cedar it is.
Since cedar is abundant on my farm it only took me about 20 minutes to locate a suitable piece of wood. I selected a limb about an inch and a half in diameter without any side branches coming off of the portion that I wanted to use. The limb was also slightly curved. The curve was smooth and even throughout the length of the limb and I thought that this would give my bow a slight re-curve and help add a little power. I used the saw blade on my Swiss Army knife to cut the limb off. I then sawed off the other end of the limb and was left with an inch and a half diameter stave about four and a half feet long. It turned out to have a little jog in one end, but it wasn’t too bad, and I decided that the stave would probably make a decent bow. Pictured below: Cedar limb that I cut for the bow.
One reason that I selected a fairly small stave is that I didn’t want to have to remove a lot of wood in making the bow. Remember…….. limited time and tools. I turned out that the stave was just right. I was able to use my hatchet like a splitting wedge and split the stave cleanly. I stood the stave up on end, placed the hatchet blade across the end, and used a piece of wood to tap the hatchet/wedge down through the stave. Cedar is a straight grained wood, so once I got it going it continued to split right down the middle. Pictured below: Scraping bark from stave. 
I used the blade of my knife to scrape the bark off of the stave, and took a look at what I had. Being a tree limb, the stave was obviously tapered, so one end of my stave was thinner and narrower than the other end. If I was making a quality bow, I would have my straightedge and pencil and be measuring out dimensions. Under these circumstances I took my hatchet and started wacking away. Of course I did all my cutting on the belly and sides of the stave; never on the back. First I shaped the narrow end of the stave to a fairly smooth taper, then I started at the middle and worked toward the other end. When both ends of the stave were tapered about the same I started flexing the bow to see if the bend was even on each limb. It wasn’t. Next came my knife and removing a little wood at a time to try and balance the limbs. When the limbs were pretty close I turned the knife blade up perpendicular and began scraping and smoothing things up a little. Last step on the bow was cutting the nocks. I used both the saw and blade on my knife to do this. Total time on shaping the bow; an hour and fifteen minutes. Pictured below: Belly of bow roughed out flat.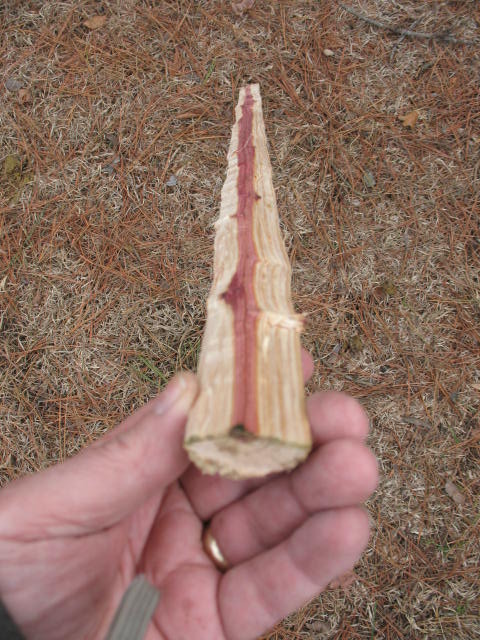
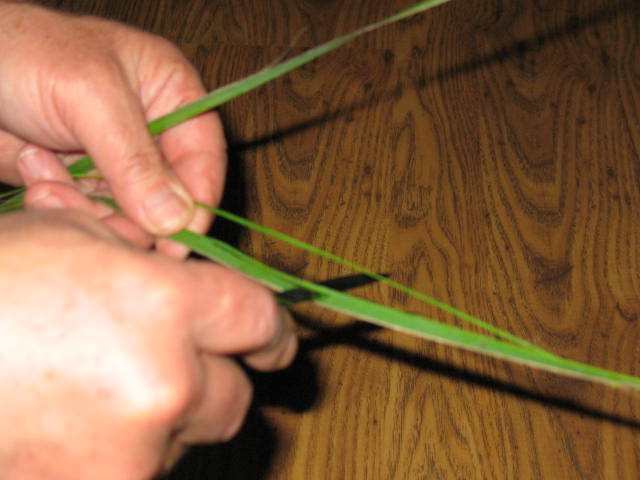
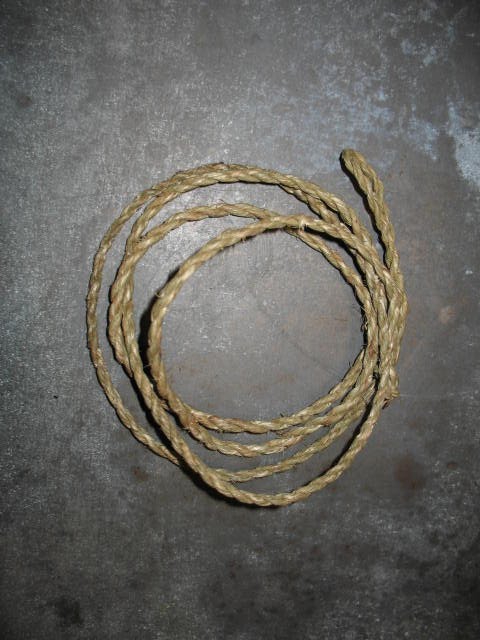
Now to make the bow shootable I needed a bow string. I walked back to where I knew a yucca plant was growing and cut about ten leaves off of it. I split the leaves into strips of fibers a little less than a sixteenth of an inch thick, and twisted the fibers up into a bowstring. For directions on how to make a bowstring see my post for Feb. 24, 2009. Total time to gather yucca, split it, and twist up the bowstring: one hour and thirty minutes. Pictured below: Yucca plant, yucca leaves, splitting yucca leaves into fibers, twisting up yucca fibers, and finished yucca bow sting. 


I strung the bow, and it was pretty close to right-on. The limbs were bent pretty evenly. There was a little jog in one limb, but nothing to bad. It had good flex when I pulled it back, and although I wouldn’t recommend it for bear hunting, I think it should easily take rabbits, coons, possums, and (if I was in a true survival situation) I would even try for a whitetail deer with it. Total time on project: about three hours.
Now I need to make a couple of arrows.
You can make preparations for an emergency by storing food, water, fuel, and medicine in your home. You can have a bug-out bag packed and waiting by the door. You can have survival equipment in your vehicle. And as luck would have it you won’t be at home or in your vehicle when the need to survive arises. That’s why I carry some basic survival equipment with me at all times. Now don’t get the idea that I walk around with a backpack and utility belt all the time. I look about as normal as any person that you’d run into at the grocery store (more normal than a lot these days), but I am prepared.
For one thing I always carry a Swiss Army knife which is something a lot of “normal” people carry. This way I have a knife, two screwdrivers, a hand saw, a leather awl, tweezers, and a couple of other little gadgets with me at all times. I also keep a disposable cigarette lighter in my pocket, even though I don’t smoke.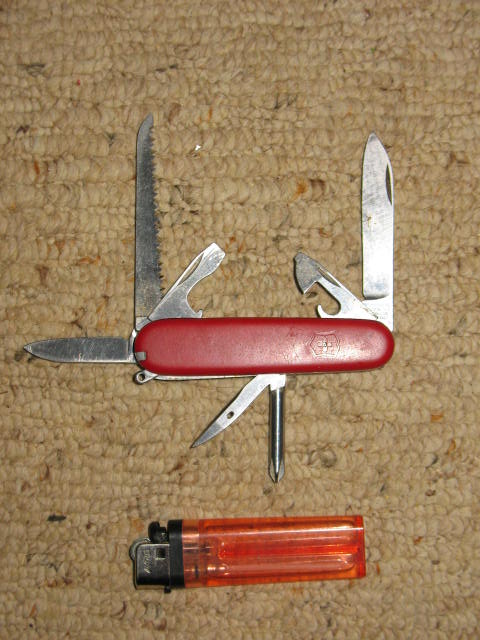
On my keychain I have a metal match, a fire striker that looks a lot like just another key on the ring, but can be used to strike up a fire with great ease.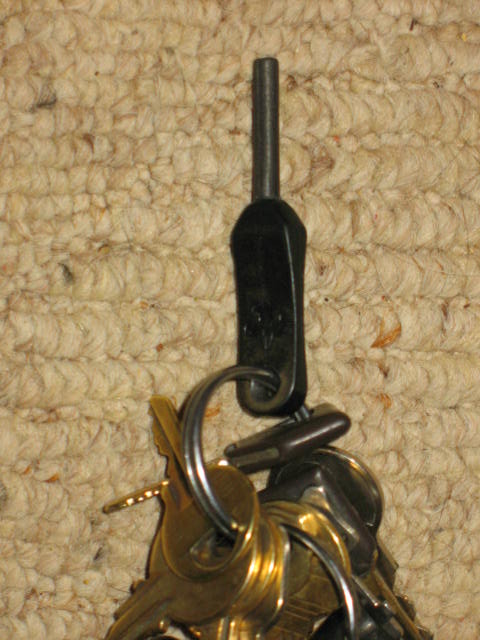
My wristwatch is just a regular digital model that my son gave me. He knew that I would like it because it has a small compass attached to the wristband. The compass is accurate too. I made sure to check that.
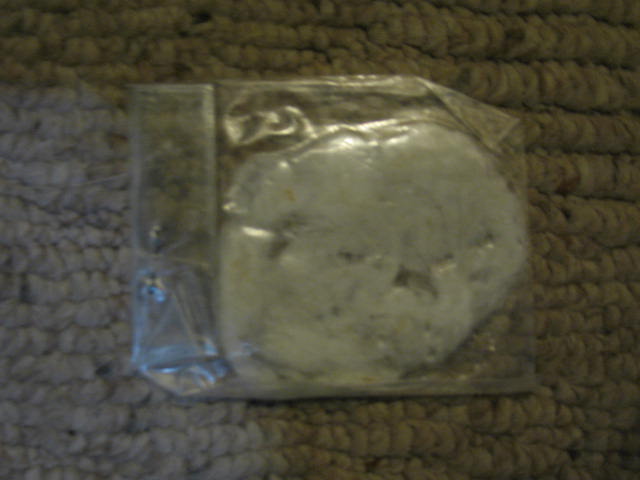
In my wallet is my fishing license which comes in a little cardboard envelope. Also in the envelope is a card that holds 3 fish hooks, a needle, and about 10 feet of mono-filament fishing line; an a little sealed plastic bag with some cotton that has been coated with Vaseline. This make an excellent fire starter.
My most important survival tool that I always have with me is my brain. Knowledge and attitude are always the keys to survival. With them your chances of survival are good. Without them, it doesn’t really matter what else you have.
Building a fire in wet weather presents special problems. Dry tinder and kindling are difficult to find, and even the driest materials that you find will be somewhat damp due to humidity. Igniting these materials requires more heat and longer burning time from your tinder. It also helps if you can locate highly flammable materials that will ignite in spite of high humidity.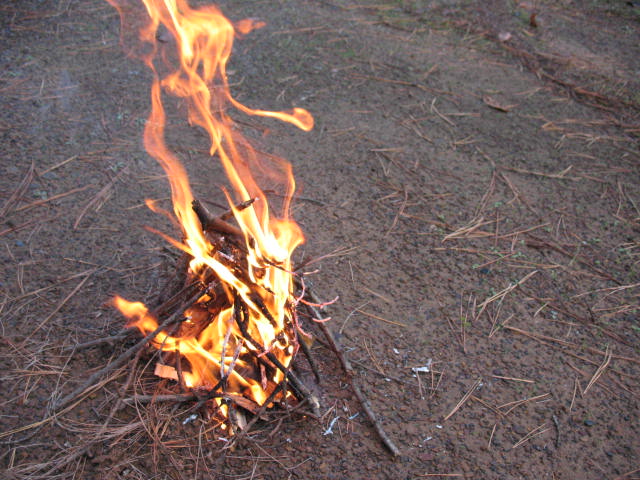
In nice, dry conditions you can be a little lax in your fire building technique and still get a good fire going with little trouble. In wet weather everything must be perfect. You must choose your fire building location carefully, you must locate the best and driest materials for your fire, and you must have a near perfect fire lay. Finally you must be ready to protect and nurture the first flames of your fire until they have developed enough to become self-sustaining. Failure in any one of these areas means that you will have no fire.
Location
Wet weather fires need to be on high ground to avoid flooding. Also, don’t dig a fire pit for your fire. Normally safety considerations would preclude building a fire under overhanging limbs, but sometimes the finer points of safety must yield to survival. I have found juniper trees to shed water better than any tree in my area, so when building a fire in the rain I look for a big juniper tree with the lowest limb eight to ten feet off the ground. Use common sense in a situation like this. Keep your fire small, and avoid using fuel that produces a lot of sparks. Of course, the fact that it is already raining will make the danger of a spreading fire very low. A big advantage of building your fire near a juniper tree is that you will have a ready supply of tinder in the form of juniper bark.
Tinder
The best way to make sure that you have dry tinder is to carry it with you. One of the best and most compact sources of tinder is jute rope. Jute rope is medium brown in color and separates easily into very fine fibers. Jute rope was widely used at one time for making macramé plant hangers, and it is still available in hardware and hobby stores. A piece of one-quarter inch jute rope that is two feet long takes up hardly any room in a pack or jacket pocket. That same two feet of jute, when separated into fibers, will make a bundle of tinder the size of a soccer ball. Jute is highly flammable, in fact it burns a little too fast. Your tinder will burn a little longer if you mix the jute fibers about fifty-fifty with dried grass, shredded cedar bark, dry pine needles or some other form of natural tinder. If you can’t find any dry natural tinder, stick with straight Jute. If you mix the jute fibers with damp tinder, the jute will absorb moisture and become difficult to light. You will be better off using straight jute and making sure that your small kindling is the kind that will ignite rapidly from burning tinder. Pictured below: Jute rope and shredded jute.

Another very helpful item to carry in your pack or pocket is a beeswax candle stub. I stress beeswax because beeswax candles burn so much longer than paraffin candles. A one inch stub of beeswax candle will burn for up to forty-five minutes; long enough to dry out and ignite damp kindling.
Very effective fire starters can be made by filling an old toilet paper tube with a mixture of sawdust and melted paraffin See my post of December 2008 for exact instructions on how to make these fire starters. Throw a couple of these fire starters into your pack, or the pocket of your jacket before you go into the woods. When you get ready to use these fire starters, all you have to do is peal back a little bit of the cardboard along the spiral seam around the tube. Light this protruding bit of cardboard just like it is a wick. In a matter of moments the entire fire starter will be burning, and it will continue to burn for quite some time. You should have no trouble igniting damp kindling with one of these handy little devices. Pictured below: Paraffin fire starter.
Gathering natural tinder in the wilds is a fairly simple matter in dry weather. It becomes more difficult when the weather is damp and rainy. Rain is usually accompanied by wind, and if the wind is blowing from only one direction, most tree trunks should be fairly dry on one side. This is the side of the tree that you want to go to when you are looking for tinder and kindling.
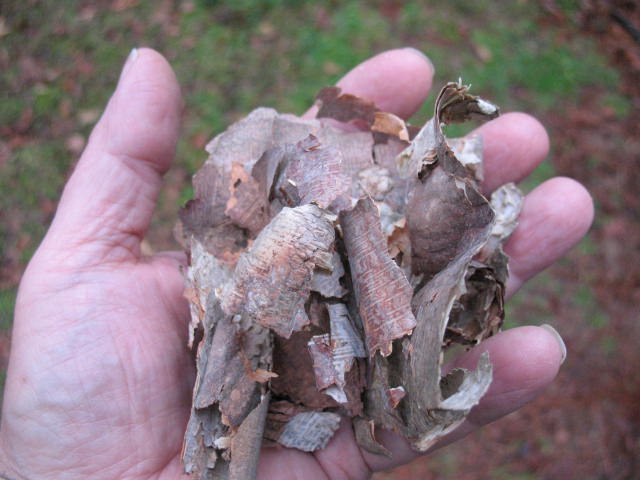
One excellent source of dry tinder is the inner bark of the cedar or juniper tree. Look to the dryer side of the tree and start peeling off strips of the long brown fibrous bark. Just beneath the course outer bark, is a layer of softer inner bark. Because it is protected by the outer bark, and because you are removing it from the dry side of the tree; inner bark is usually dry and ready for fire starting. pictured below: Cedar bark on tree and shredded in hand. 

The bark of the River Birch tree is excellent for wet weather fire starting. It is not fine enough to be ignited with flint and steel or a fire-bow-drill; but if you can apply a flame to it, this bark will burn like it has been soaked in kerosene. It is, in fact, very rich in oil as you will be able to tell by the black smoke that it puts off when burning. One tip about River Birch bark; don’t pack it tightly into a fire set-up. It will not burn well unless you leave it fairly loose where the oxygen can get to it. Pictured below: River birch bark on tree and in hand.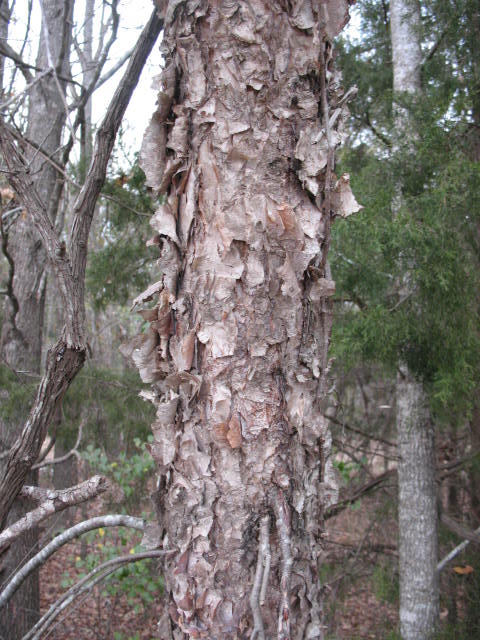
Many kinds of grasses have highly combustible seed heads on them in the fall and winter. Look for soft, downy seed heads on tall grasses. Some of these are so combustible that they will light even in a pouring rain. Dry cattail down does not make good tinder by itself, but it can be mixed in with other tinder to help catch the initial spark and spread it.
Kindling
The hardest part of building a fire in wet weather often comes after the initial flame has been ignited. All too often, a person will take great pains to locate good tinder and get it burning, only to have their fire fail because the flame does not spread to the selected kindling. This can be extremely disheartening, especially if the tinder was hard to locate and ignite. Once you get that first flame, it is important both physically and psychologically to have it become a self-sustaining fire. To turn your flame into fire, you must use the right kindling. It must be dry, combustible, and small enough to ignite from the tinder.
The term kindling does not mean a specific size of wood. It merely refers to the wood that is ignited by burning tinder and then, in turn, ignites the larger fuel logs of a fire. In size, kindling may range from matchstick size to sticks that are two inches in diameter. The most common mistake in fire building is trying to start off with kindling that is too large. The initial layer of kindling that is placed over your tinder should be very small, no larger in diameter than a matchstick, and there should be a lot of it. This is important in any weather, but it is doubly important in wet weather. The next layer of kindling should be only slightly larger, and the layer after that only slightly larger again. I cannot stress strongly enough that each layer of material in your fire set-up must increase in diameter very gradually over the layer below it. This is the only way that you can be sure of your initial flame growing into a fire.
One of the best-known sources of dry kindling is squaw wood. Squaw wood refers to the very small, dead limbs that stick out from the lower trunks of trees. Trees that grow in thickets tend to overshadow their lower limbs. These limbs die but remain attached to the trunk. They are off of the ground, so they don’t absorb ground moisture. The foliage above them protects them, to some extent, from falling rain. To find good squaw wood just look to the dry side of the tree and start snapping off the brittle twigs that you find there. If they don’t snap, you don’t want them. Pine thickets are a great says be at the center where the pinesap has collected and concentrated itself in the wood. Rich pine will remain after the entire rest of the stump has turned to dust. The presence of rich pine can be confirmed by its smell. It has a strong turpentine aroma. Rich pine is extremely flammable. It will even burn after it has been submerged in water. Split a piece of rich pine up into varying sizes of kindling and lay it over your tinder. It will catch easily and burn for a good while, enabling you to ignite other kindling that may be a bit damp. Rich pine gives off a black, resinous smoke as it burns. Do not breath this smoke as the resins may damage your lungs. Do not cook over rich pine. The resinous smoke will impart a bad flavor to your food and may upset your stomach. Pictured below: Rich pine log and piece of rich pine burning.

If you have an axe you can always find dry wood by splitting open logs and removing the dry wood from inside of them. This method is hard work, but it is sure fire. You can split the dry inner wood up into varying sizes of kindling and even small fuel logs. Once you have these pieces of dry inner wood burning well, they will produce enough heat to dry out and ignite the damper portions of the log that you have split.
Fuel Logs
If the weather is wet it is very helpful to split fuel logs. This exposes the dry inner wood, which can be placed in contact with flames first. As the dry wood catches and burns it will help to dry out the remainder of the fuel logs. Fuel logs should be added as soon as possible so that all available heat can be used to dry them. Additional fuel logs should be lain as near as possible to the fire so that the heat will start to dry them even before they are added to the fire. Try not to lay the “fuel logs in waiting” directly on the ground where they will soak up water as fast as you can dry them out. Lay a couple of small logs down as a support and set a fuel log on top of and across them. Lay your fuel logs so that the sides are exposed to the fire, and rotate them regularly so that they dry on all sides. Once a fire is burning well, you can put some pretty damp logs on for fuel, and they will still ignite; but be careful not to put too many on at one time, or you may kill your fire. Use only very dead wood for fuel. Soft woods like pine and willow will ignite at lower temperatures than hardwoods like oak and hickory, but hardwoods will release more heat, burn for a longer time, and produce better coals. If you have access to both kinds of fuel, place some softwood on the fire first and then, after it catches well, add your hardwood.
Wet Weather Fire Lay
The teepee fire lay is excellent for wet weather. Each succeeding layer of material in the fire lay protects the layers below it from moisture, and the conical structure of the teepee fire lay helps shed water as the fire ignites. Pictured below: Teepee fire lay.
To start a teepee fire lay you will need three sticks to serve as the base of the teepee. These sticks should be about a quarter of an inch in diameter and about a foot long. Shove the bases of these sticks into the ground with an equal distance between them to form a tri-pod. The sticks should slope in at a forty-five degree angle and should cross about two inches from the top. This will leave you with eight inches of space inside the tripod for tinder. Fill the interior of the tri-pod with the driest and finest tinder that you can find. Rather than placing the tinder flat on the ground, try and push it up into the top of the tri-pod leaving a hollow, or small cave, at the bottom of the tinder. This is where you will ignite the fire, so it should face into the wind.
Now begin leaning small sticks of kindling vertically around the tri-pod. Use very small, very dry twigs for this. Cover the outside of the teepee completely will twigs except for a small opening on the upwind side that will give you access to tinder. Add additional layers of kindling, gradually increasing the size of the kindling with each layer. The final layer of kindling may be as large as three-quarters of an inch in diameter.
Lighting Your Fire in Wet Weather
When you have gathered all of the necessary materials and prepared your fire lay, it is time to ignite the fire. If you have a candle stub or a fire starter with you, you can place it into the small tinder cave inside of the teepee and ignite the fire starter. If you do not have a fire starter, you will need to take a small handful of dry tinder and light it outside of the teepee. When this bundle of tinder is burning well, shove it into the tinder cave inside of the teepee. If your materials are dry, and your fire lay is correct, the flames from you tinder should spread rapidly through the kindling; and you should have the beginnings of a good fire. When it is apparent that your fire is going to catch, you should begin adding larger pieces of kindling and then fuel logs on the fire. Try to add the driest wood that you have first so that the heat from this material can dry and ignite some of the damper wood that you will be forced to use. Pictured below: Lighting teepee fire and teepee fire burning.

This is a recipe for homemade tomato soup that I make entirely from ingredients in my food storage. Why, you ask, don’t I just keep canned tomato soup in my food storage? Well, I do; but I only keep a couple of cans. The reason for this is that tomato soup can only be used for tomato soup. Stewed tomatoes and tomato sauce can be used in lot of different recipes, so I keep more of them on hand. Besides, this soup tastes so much better than canned soup that there is no comparison. Here’s the recipe:
Ingredients:
1 can stewed tomatoes (sliced or whole)
1 small can tomato sauce
1 cup water
2 tablespoons dehydrated onion
1/2 teaspoon dried garlic powder
1/2 teaspoon black pepper
1/2 teaspoon salt
2 tablespoons cooking oil or canned butter
Preparation:
1. Soak the dehydrated onion for 1/2 hour until it is soft then drain
2. Open stewed tomatoes and chop fairly small. Be sure to same the juice
3. Open tomato sauce and have it ready to use
4. Heat oil in a cook pot and sauté onions until translucent. Add garlic and pepper to sautéing onion.
5. Add chopped stewed tomatoes, tomato sauce, and 1 cup of water to sautéed onions.
6. Add salt and stir.
7. Let soup simmer for 20 minutes, then taste and add salt and/or pepper as needed.
A couple of notes: (1) when you make this with tomatoes fresh from the garden, it is even better, and (2) if you have dried tomatoes from you garden, you can substitute a handful of crushed dried tomatoes and another cup of water for the stewed tomatoes.
That’s it. Once you’ve tried this recipe you’ll never eat canned tomato soup again.
Every culture has its own prejudices concerning what foods it will and won’t eat. In some oriental countries snakes and cats are considered a delicacy, but cheese is considered disgusting. In certain parts of Mexico exotic dishes are made out of the fungus that grows on corn, and many Native American tribes ate raw liver and boiled dog but would have been horrified at the thought of eating fish or pork. If you are living off of the land, however, you must put aside your food prejudices and take advantage of whatever is available that will keep you alive. Yes, even creepy-crawly things. You might be surprised at how tasty some of these critters really are if you will just judge them by taste and not emotion.
Grasshoppers are an abundant source of protein. In many native cultures they are a regular part of the diet. The best time to hunt for grasshoppers is in the cool of the morning when they are lethargic and easy to catch. You can walk around with a bag and pick them off of foliage as easily as picking berries. When the sun warms them up they are considerably harder to catch, in fact you may burn more calories trying to run them down than you will gain by eating them.
To prepare grasshoppers for consumption you should remove the wings, legs and head. You may cook grasshoppers by roasting them on a heated flat rock, or by skewering several of them on a sharpened twig and cooking over an open fire. Always cook grasshoppers in order to kill any parasites that may be living in the insect’s digestive tract. Cooked grasshoppers do not taste bad. I think they taste a little like filberts or brazil nuts. I personally like them with a little honey on them. I understand that this is also how John the Baptist preferred his grasshoppers.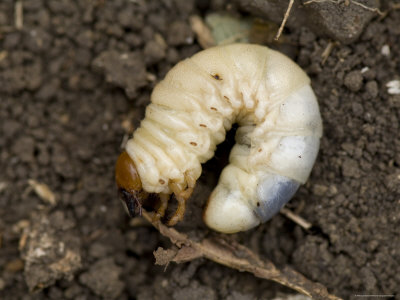
Grub worms are disgusting to think about, but in truth they don’t taste bad at all. To prepare grubs just pinch of the yellow head (I don’t think there’s anything harmful about the head, but it is kind of bitter). The only time I have eaten grub worms, we roasted them in a skillet with a little salt. They swell a little as they cook and the outside turns a light brown. I thought that the grubs tasted like lobster. They are a good source of fat, which is the hardest food substance to find in the wild.
Many people have eaten snake meat as a novelty, and you have probably heard that it tastes like chicken. I guess that it depends of what kind of snake you are eating. I have eaten banded water snakes, rattlesnakes, copperheads, and water moccasins and I really didn’t think that any of them tasted like chicken. The snakes that I have eaten seemed to have fairly stringy meat (maybe a little like dark meat turkey) and a lot of bones. Water moccasin, which is my least favorite, has a distinctly fishy smell. But if you are hungry, which I was on at least one of these occasions, a snake can taste pretty good.
A friend of mine who went on an extended desert survival trip said that small lizards were his most consistent source of protein. I have never tried a lizard, so I can’t vouch for their taste; but I guess if I were hungry enough they would taste pretty good. Like the old mountain men said, “Meat’s meat.” One word of warning, don’t ever eat the meat of a poisonous snake that has bitten itself. I have heard on the one hand that cooking will kill the poison, and I have heard on the other hand that people have died from this. My rule is don’t take unnecessary chances.
