The gun that sits next to my bug-out bag is an old Savage Model 24 combo gun chambered in .22 over 20 gauge. To me this is the perfect survival gun. It is light, well made, accurate, and has few moving parts. It can be used to hunt anything from wood rats to deer, and in a pinch it can serve as a personal defense weapon. I particularly like to shoot .22 CB’s in my combo gun. CB’s are small .22 caliber subsonic rounds that have a signature about like an air rifle but are capable of penetrating 300 pages of a telephone book. Someone 100 yards away won’t even hear the discharge. 
I decided to make a few modifications to my combo gun so that even if the gun was all I had time to grab, I would still have a fighting chance at survival. The first thing I did was buy a set of sling mounts and attach them to the gun. Then I used fifty feet of 550 para-cord to tie up a nice cobra knot sling. The sling makes it easier to carry the gun and it can be dissembled to provide a lot of cordage. 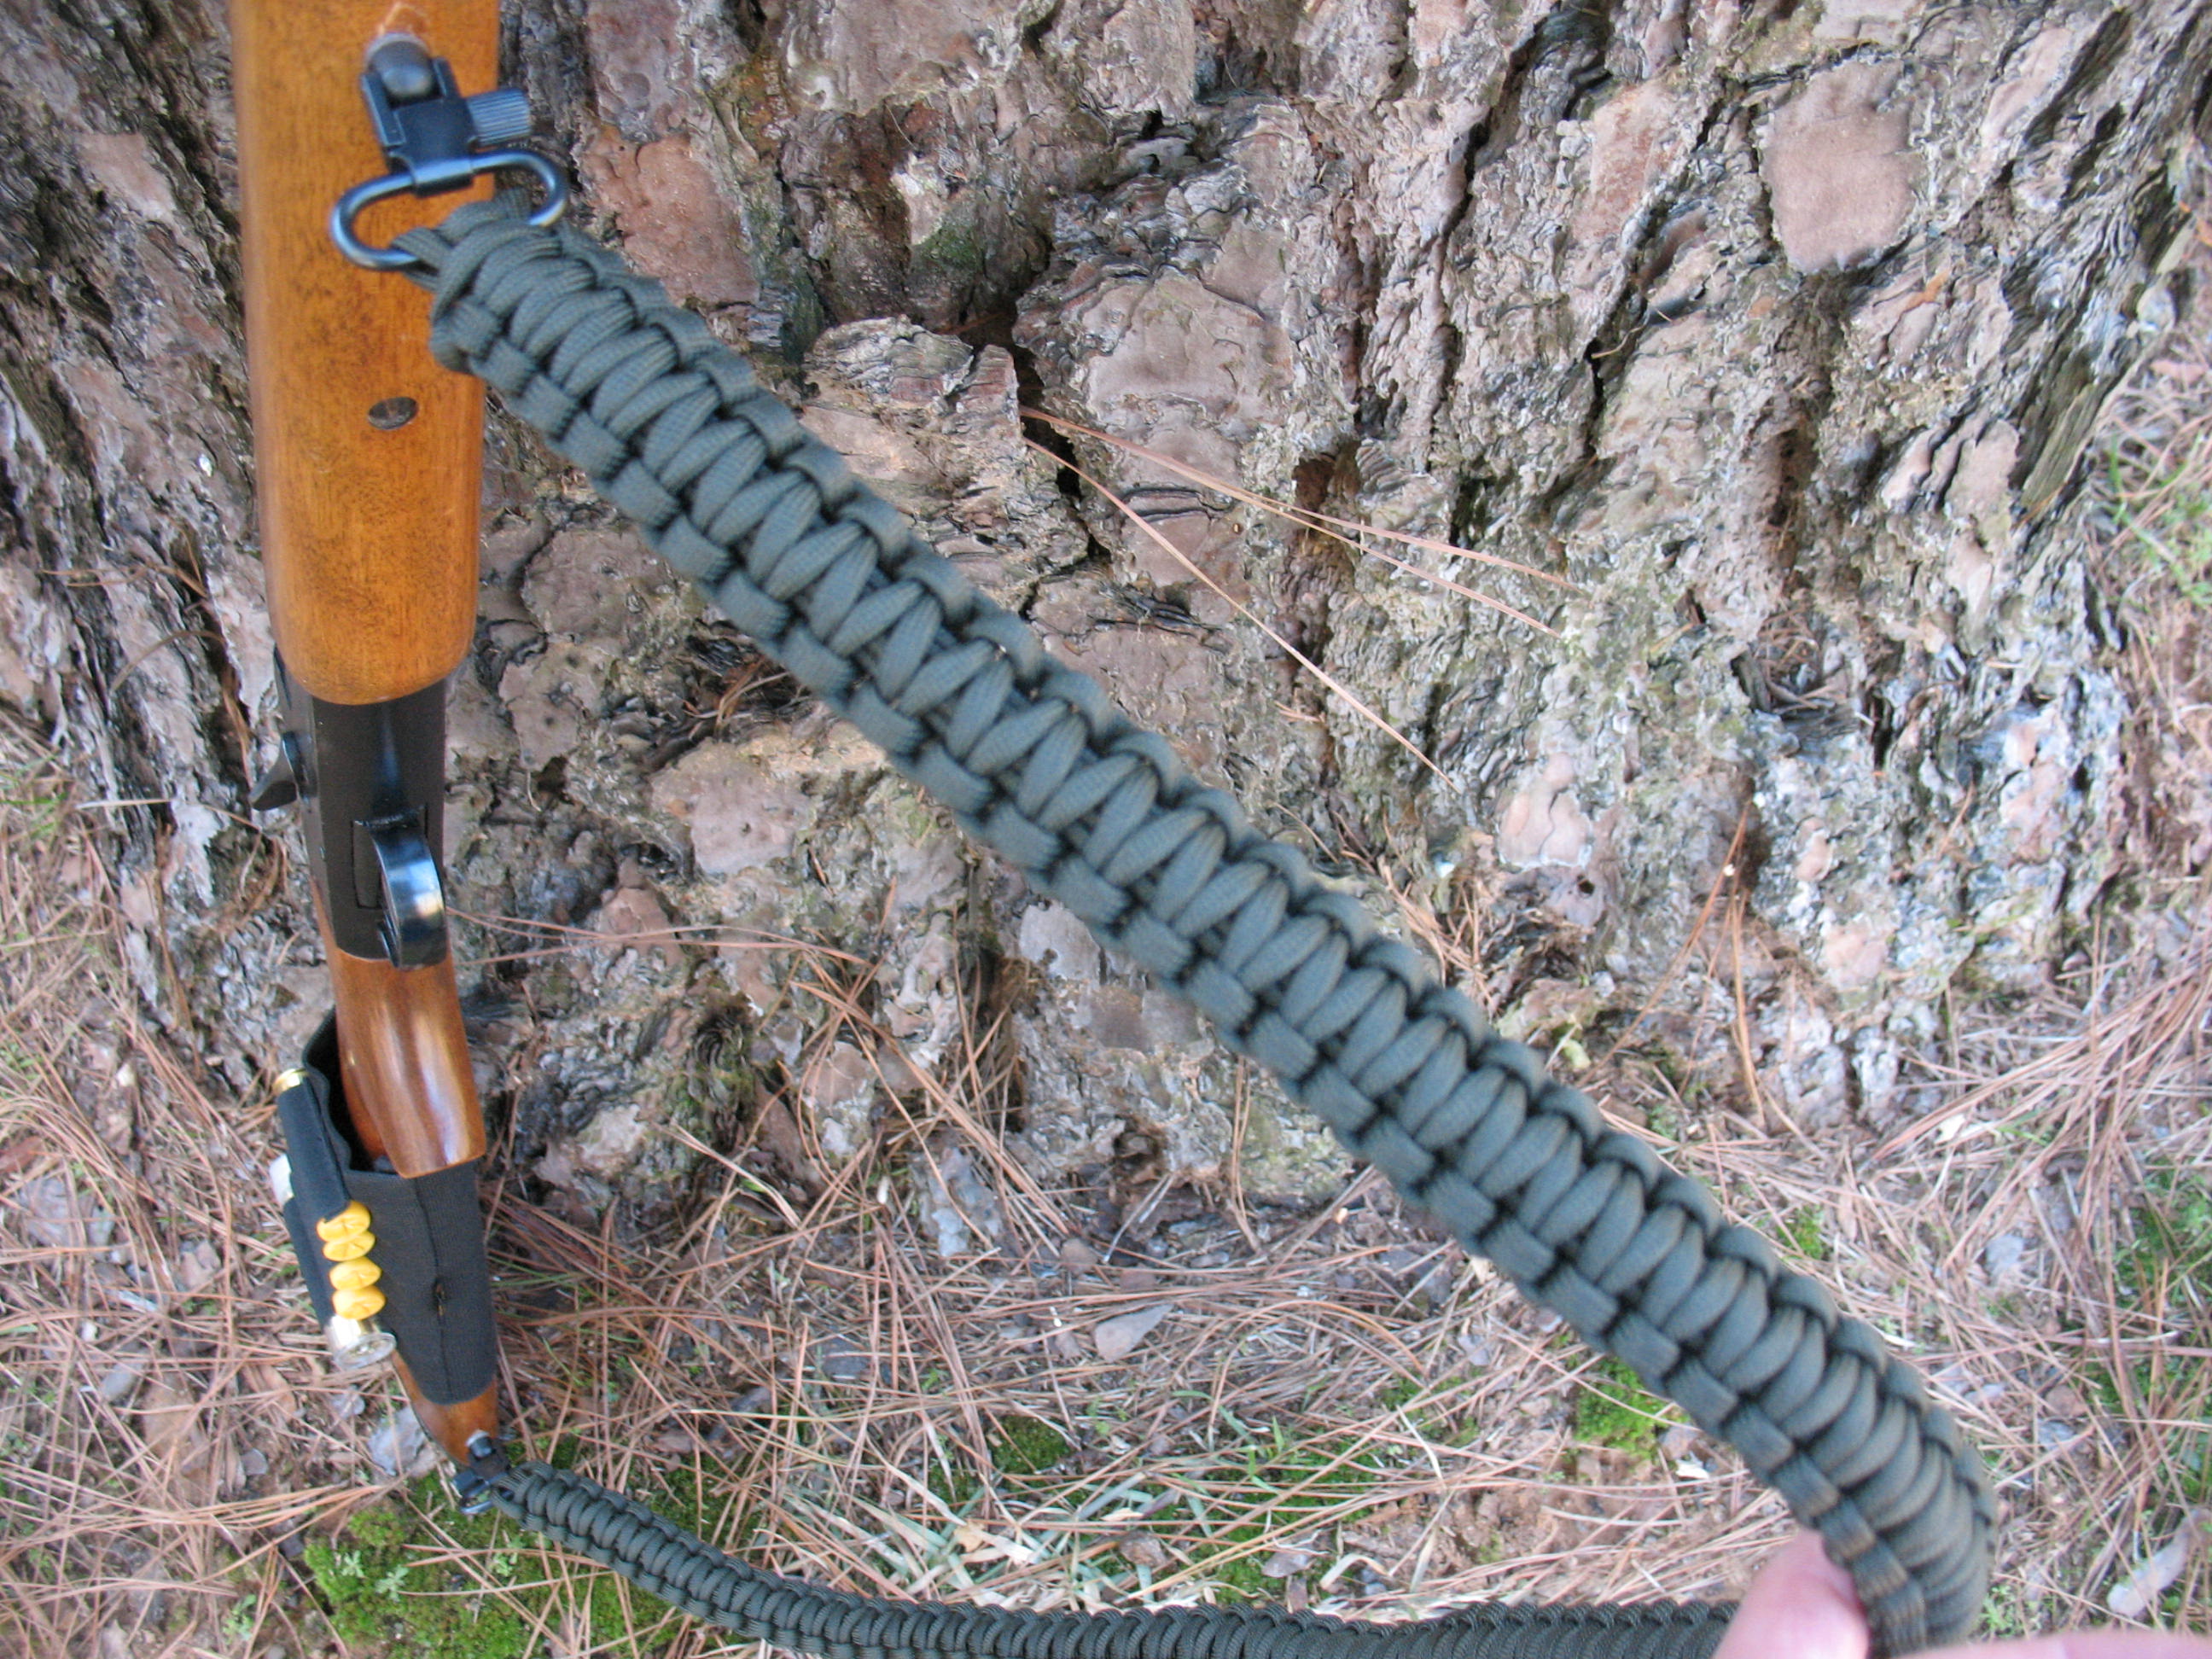
Next I bought a cartridge sleeve for the stock. This sleeve has five loops on it, so I placed 20 gauge buckshot shells in four of the loops. In the fifth loop I inserted a plastic coin tube with a screw on lid. This tube holds sixteen .22 long rifle hollow points and ten CB’s.

I removed the butt plate and found that a nice, deep hole had been drilled for the nut that attaches the receiver to the stock. I scrounged up a long plastic tube that would hold 18 more CB’s and 6 more long rifles. When this tube was inserted into the hole, I had about an inch-and-a-half of space left over; so I cut a strip of cloth, rolled it up, and stuffed it in the hole. I figured this would keep the tube from rattling around and provide me with some cleaning patches. 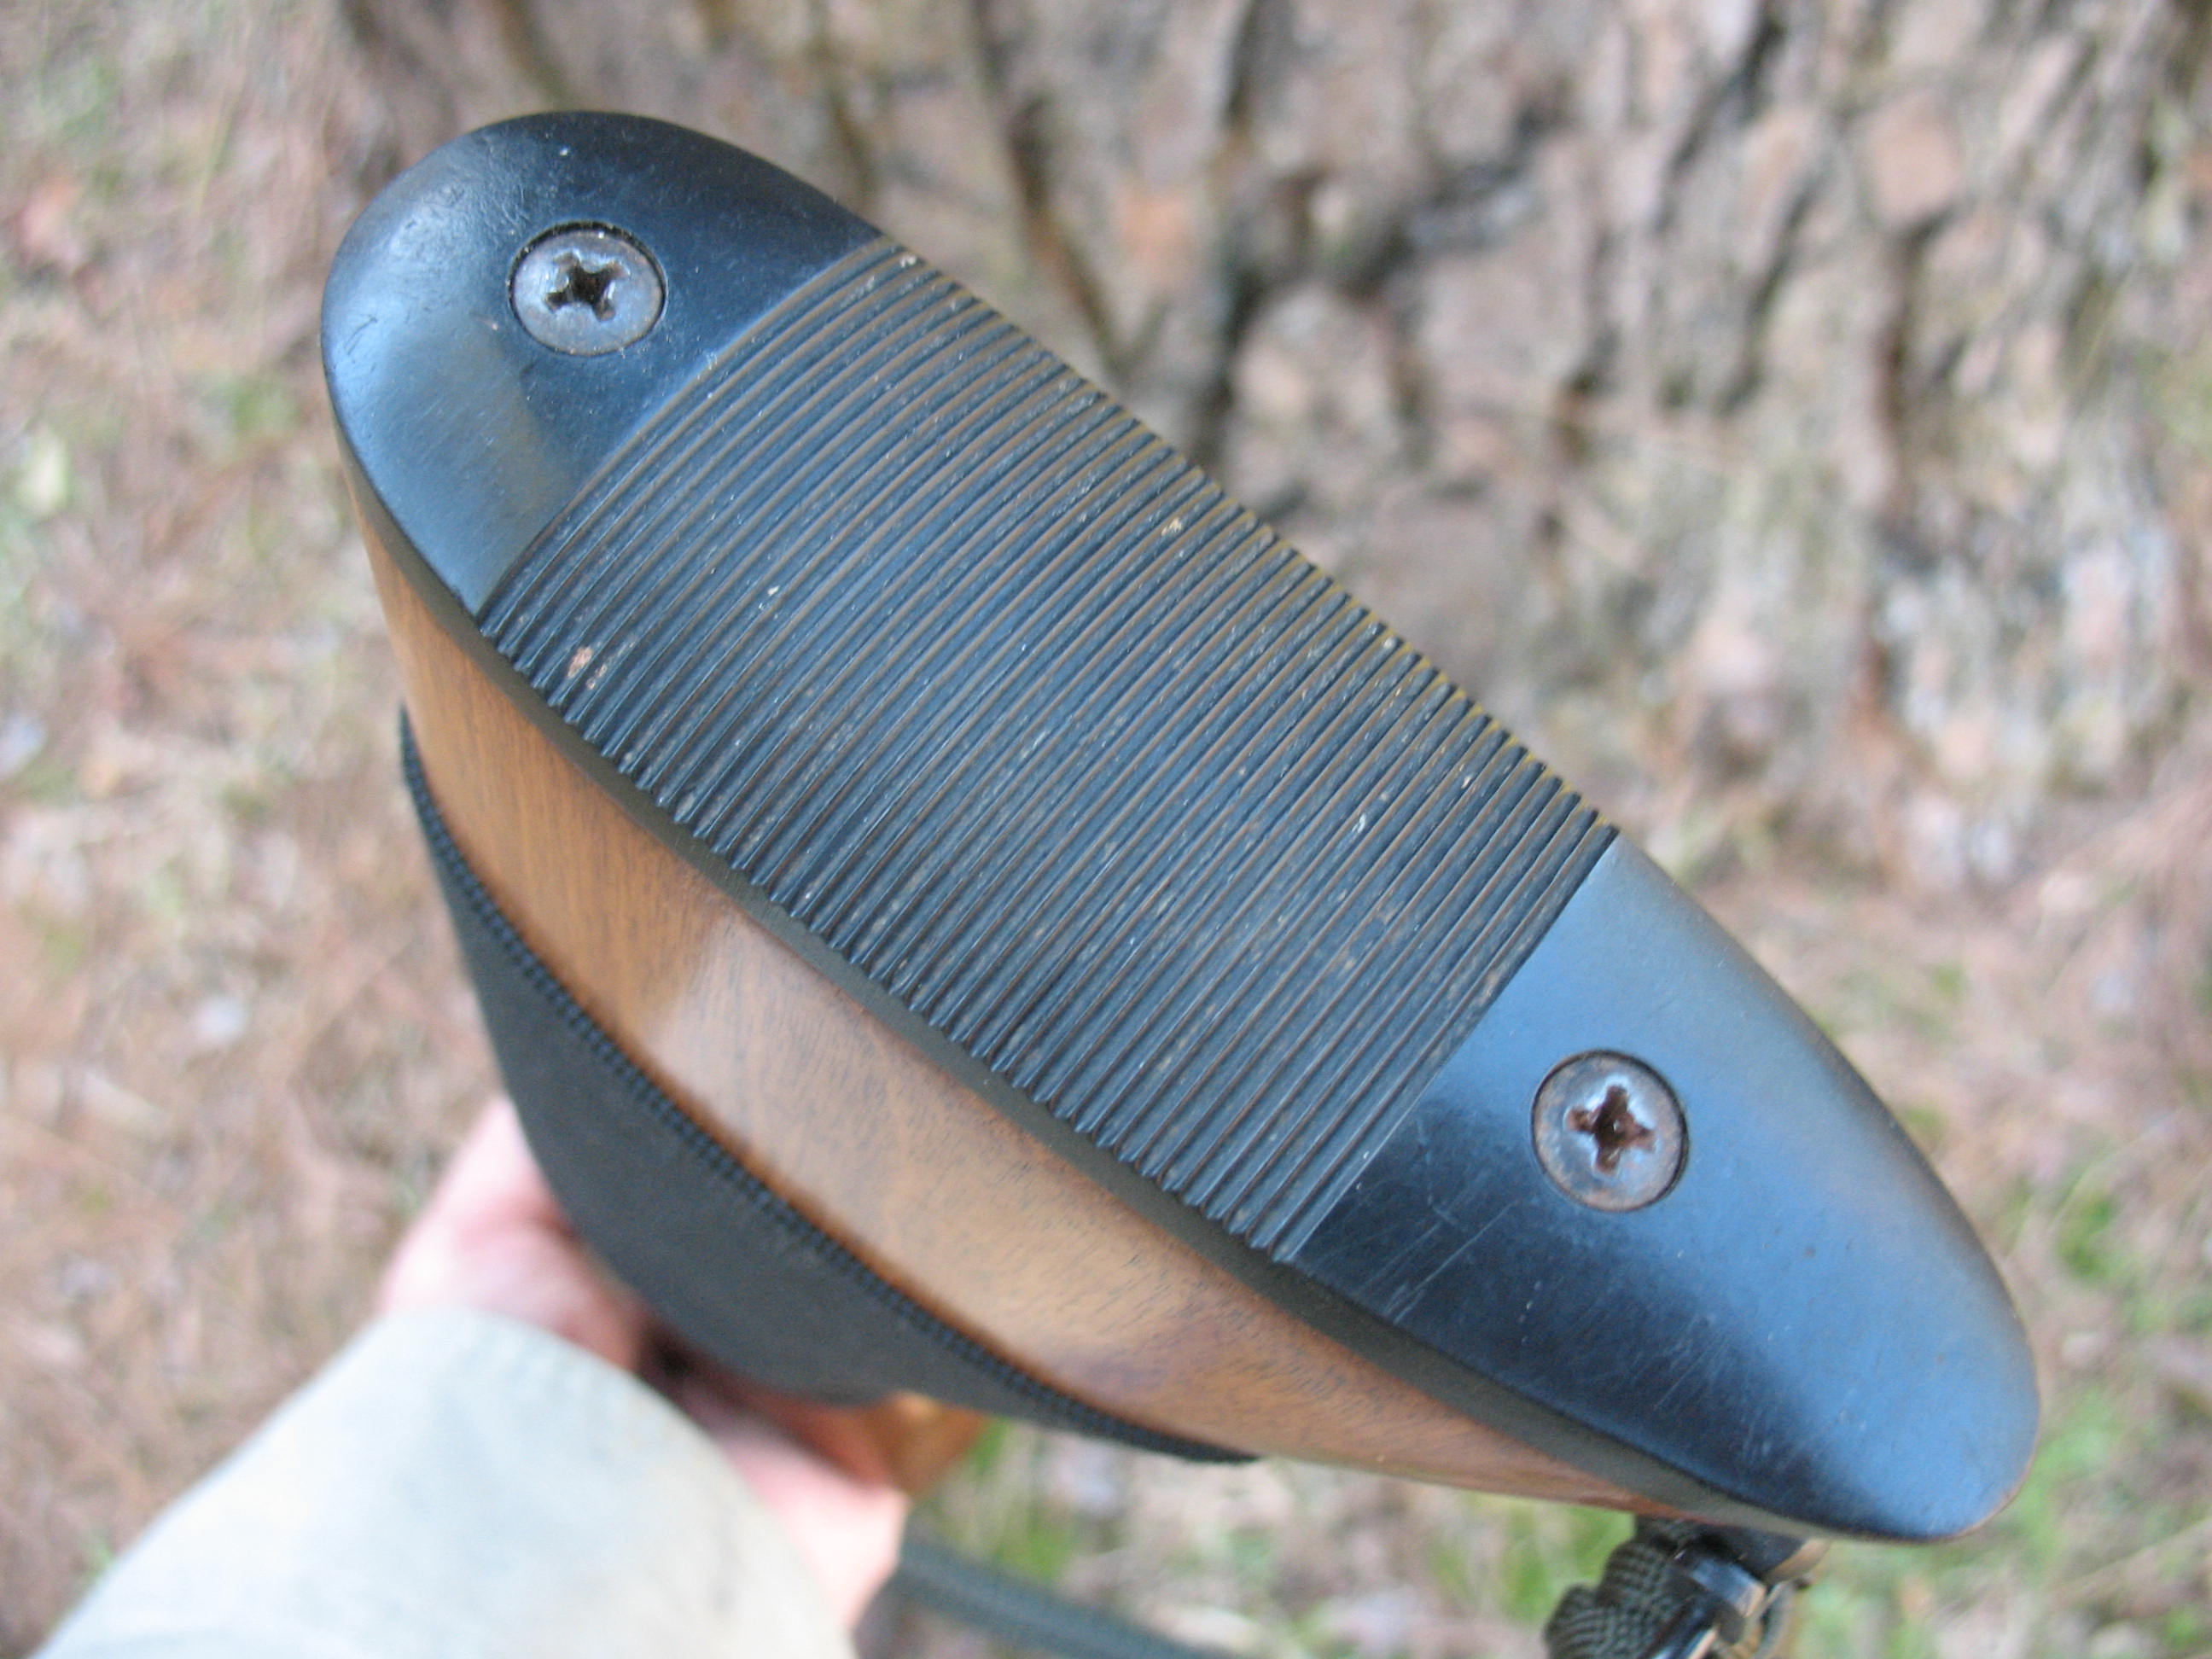

I took a 7/8” paddle bit and drilled another hole into the butt that is about two inches deep. In this hole I placed a small compass, a fire striker, some jute string for tinder, a small packet with 5 fishhooks and 5 sinkers, a 30 feet of mono-filament fishing line.

I put a piece of duct tape over the butt of the stock to help protect the contents and then screwed the butt plate back on. Now, if all I have is my combo gun, I feel that these few additions will help keep me alive in the wilderness.
My wife and I both love spaghetti, and we keep a good supply of angel-hair pasta in our food storage; but in a long term survival situation, we will eventually run out of pasta. No more spaghetti. Of course you can make your own pasta, but if you’ve ever done that you know it’s a lot of work; and that’s if you already have the flour. So, we were looking for another alternative.
A couple of years ago a friend asked if we’d ever tried spaghetti squash. I told her that we had not; in fact I didn’t even know what spaghetti squash was. She proceeded to tell me how to prepare it so we gave it a try. It tasted great and it was totally crazy to see what looked like spaghetti coming out of the inside of a squash. Many of you have probably tried spaghetti squash, but some of you, like me, may not even know what it is. Here is a brief tutorial on how to prepare spaghetti squash for those who don’t already use it.
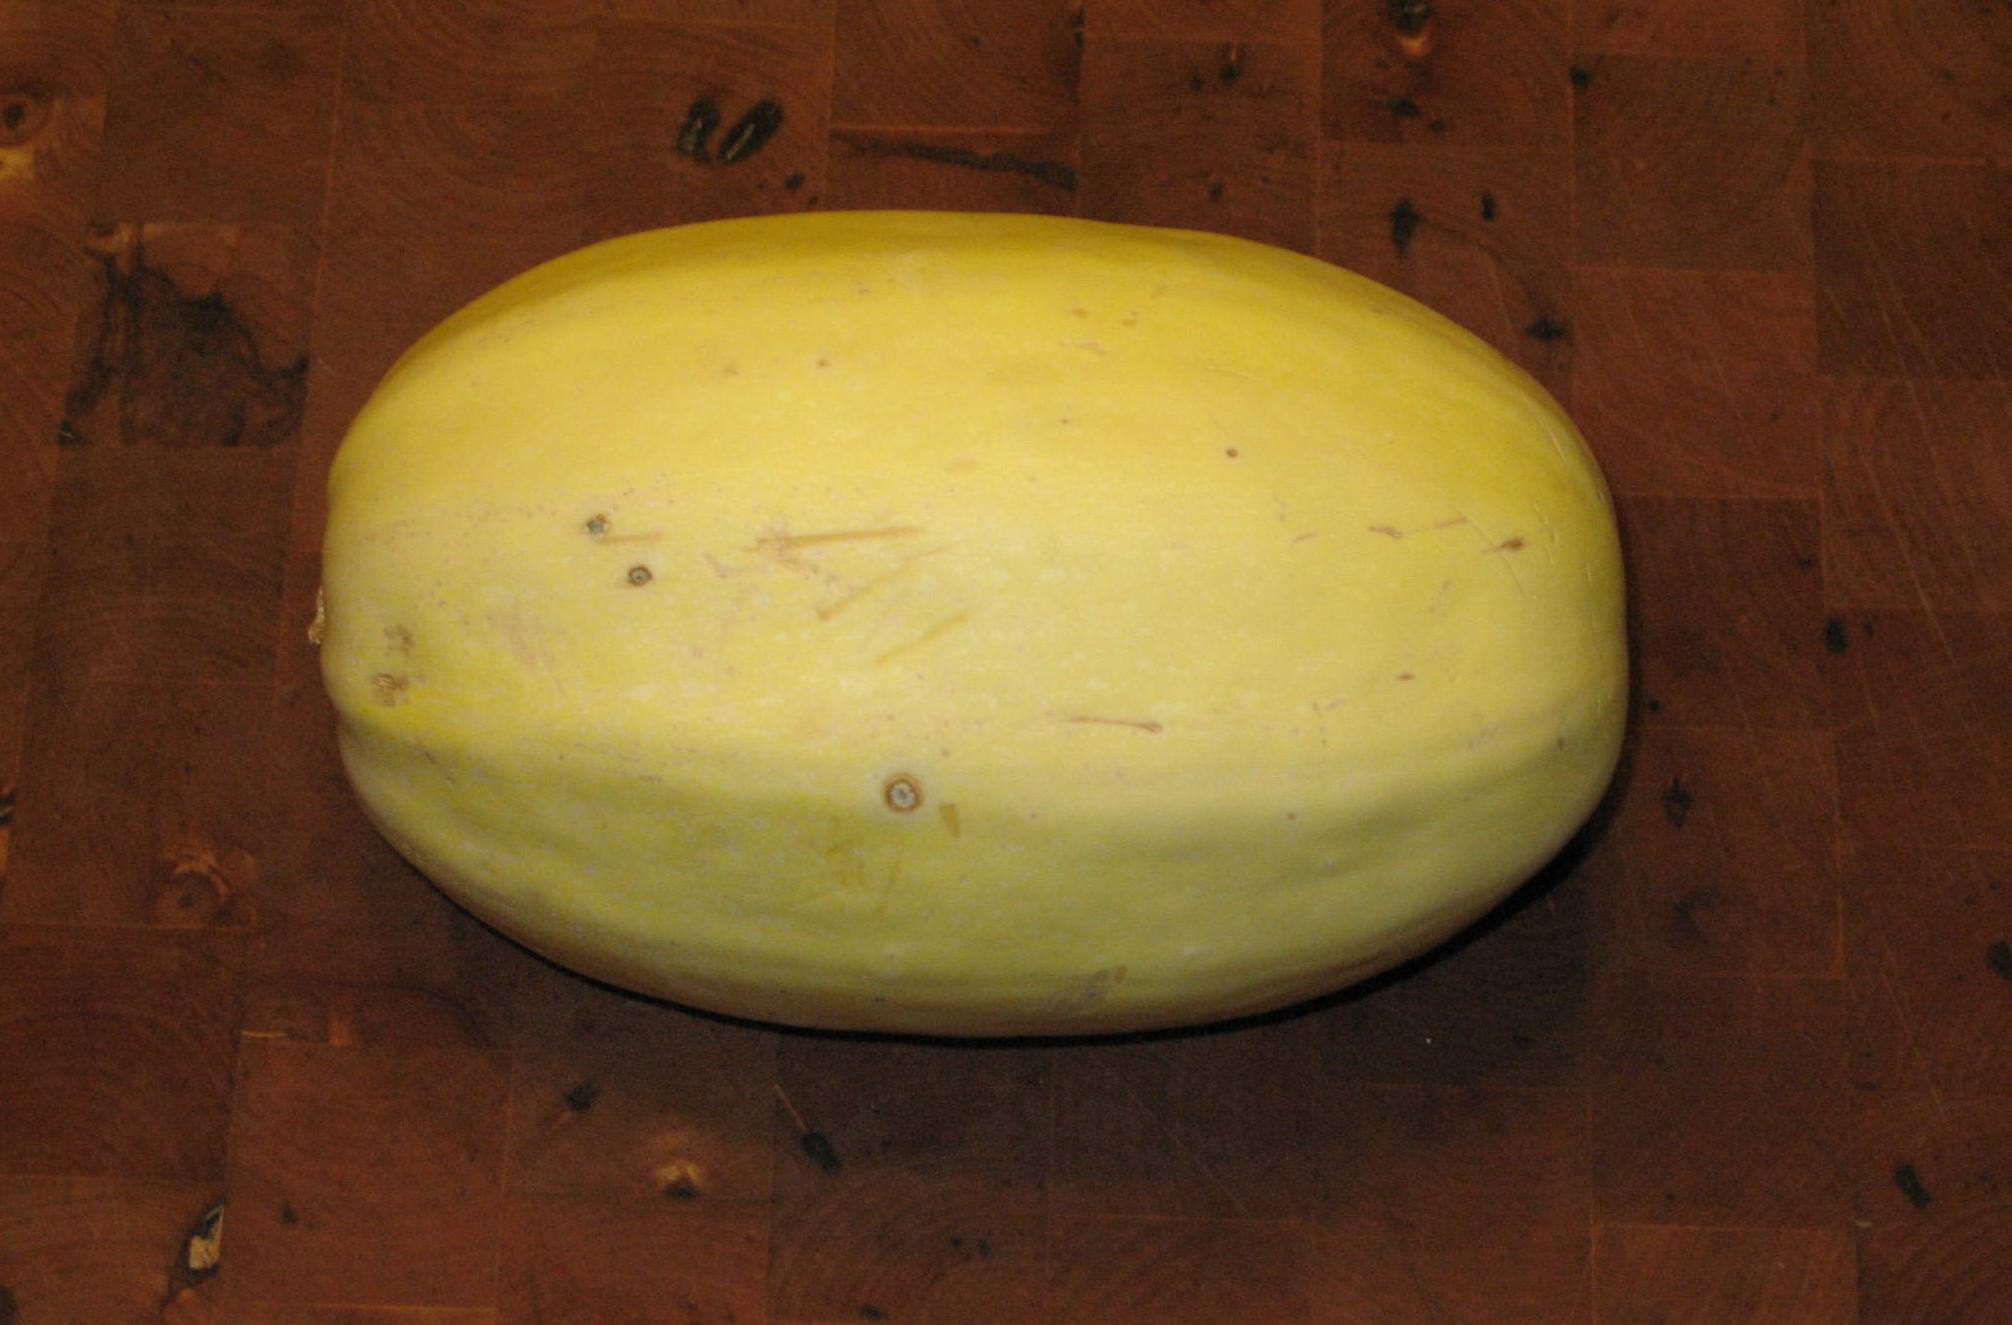 First take a spaghetti squash and cut it in half. It takes a good sharp, serrated knife to do this because the skin is pretty tough.
Next, take a spoon and scrape out the seeds from the inside of the squash. If it’s an heirloom be sure to save the seeds. 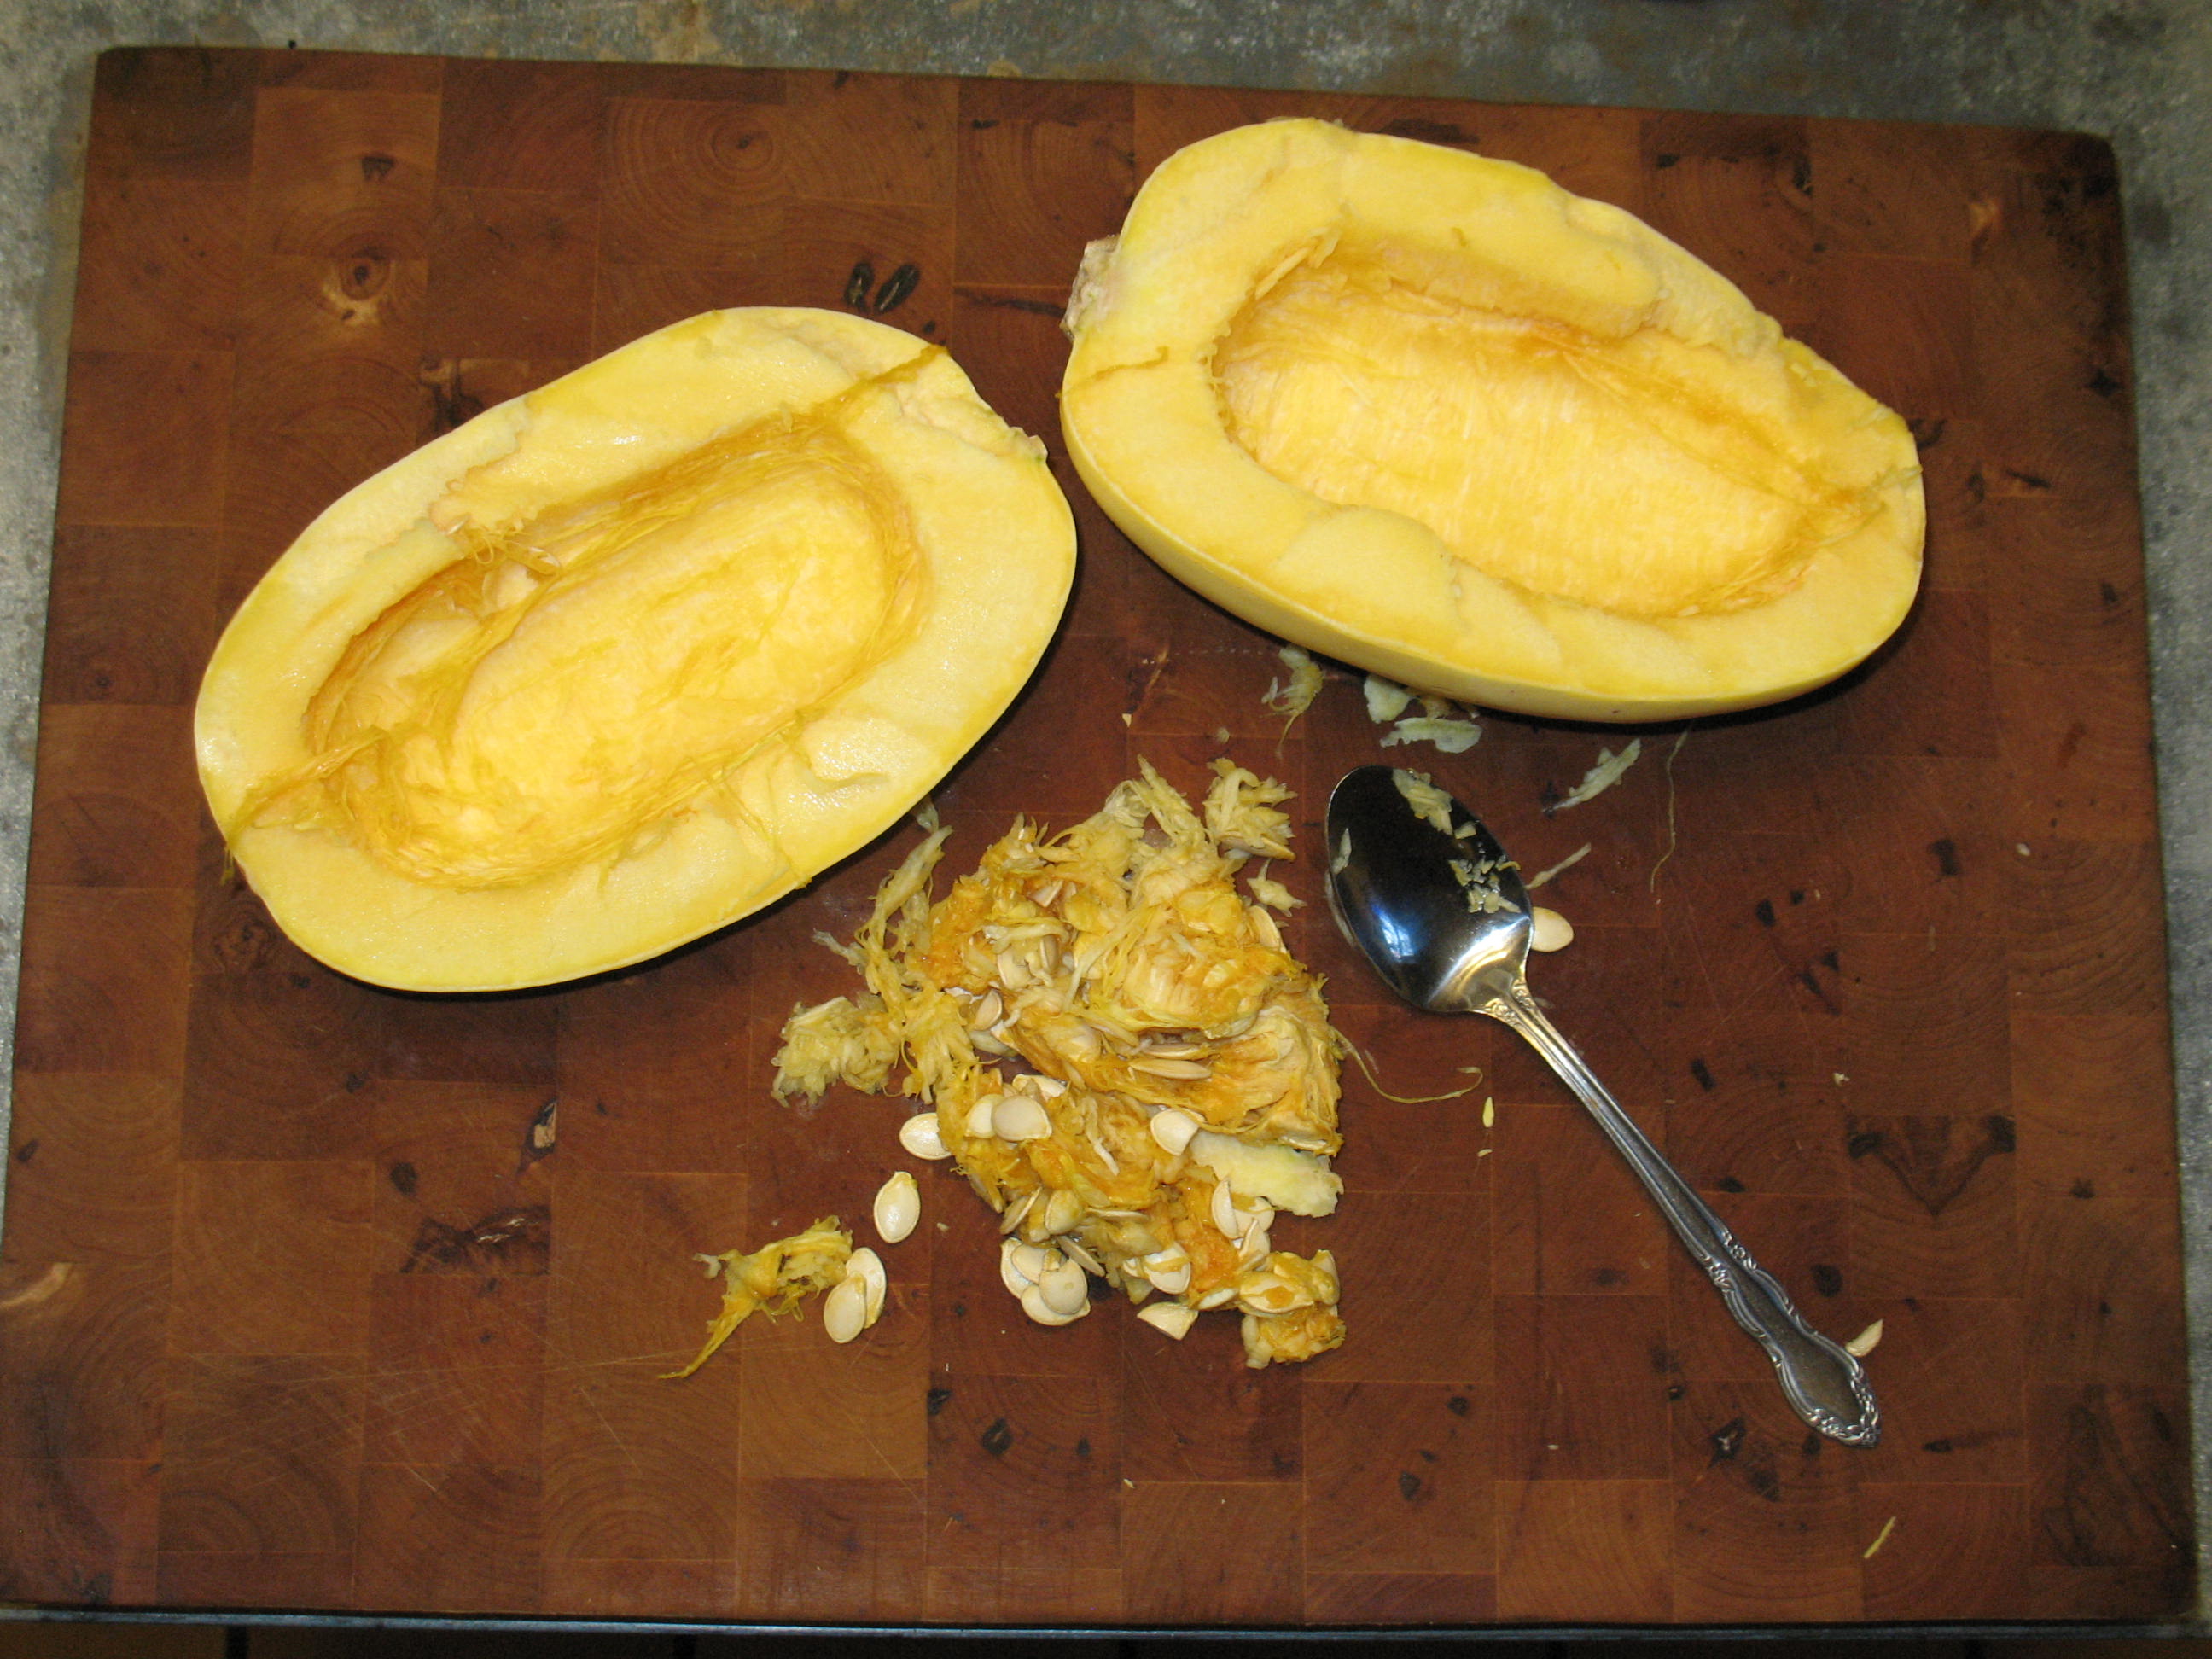
Place a steaming rack into a good size pot of water and bring the water to a boil.
Place the halves of spaghetti squash, cut side down, on the steaming rack, cover, and let it steam for twenty minutes or so depending on the size of the squash. 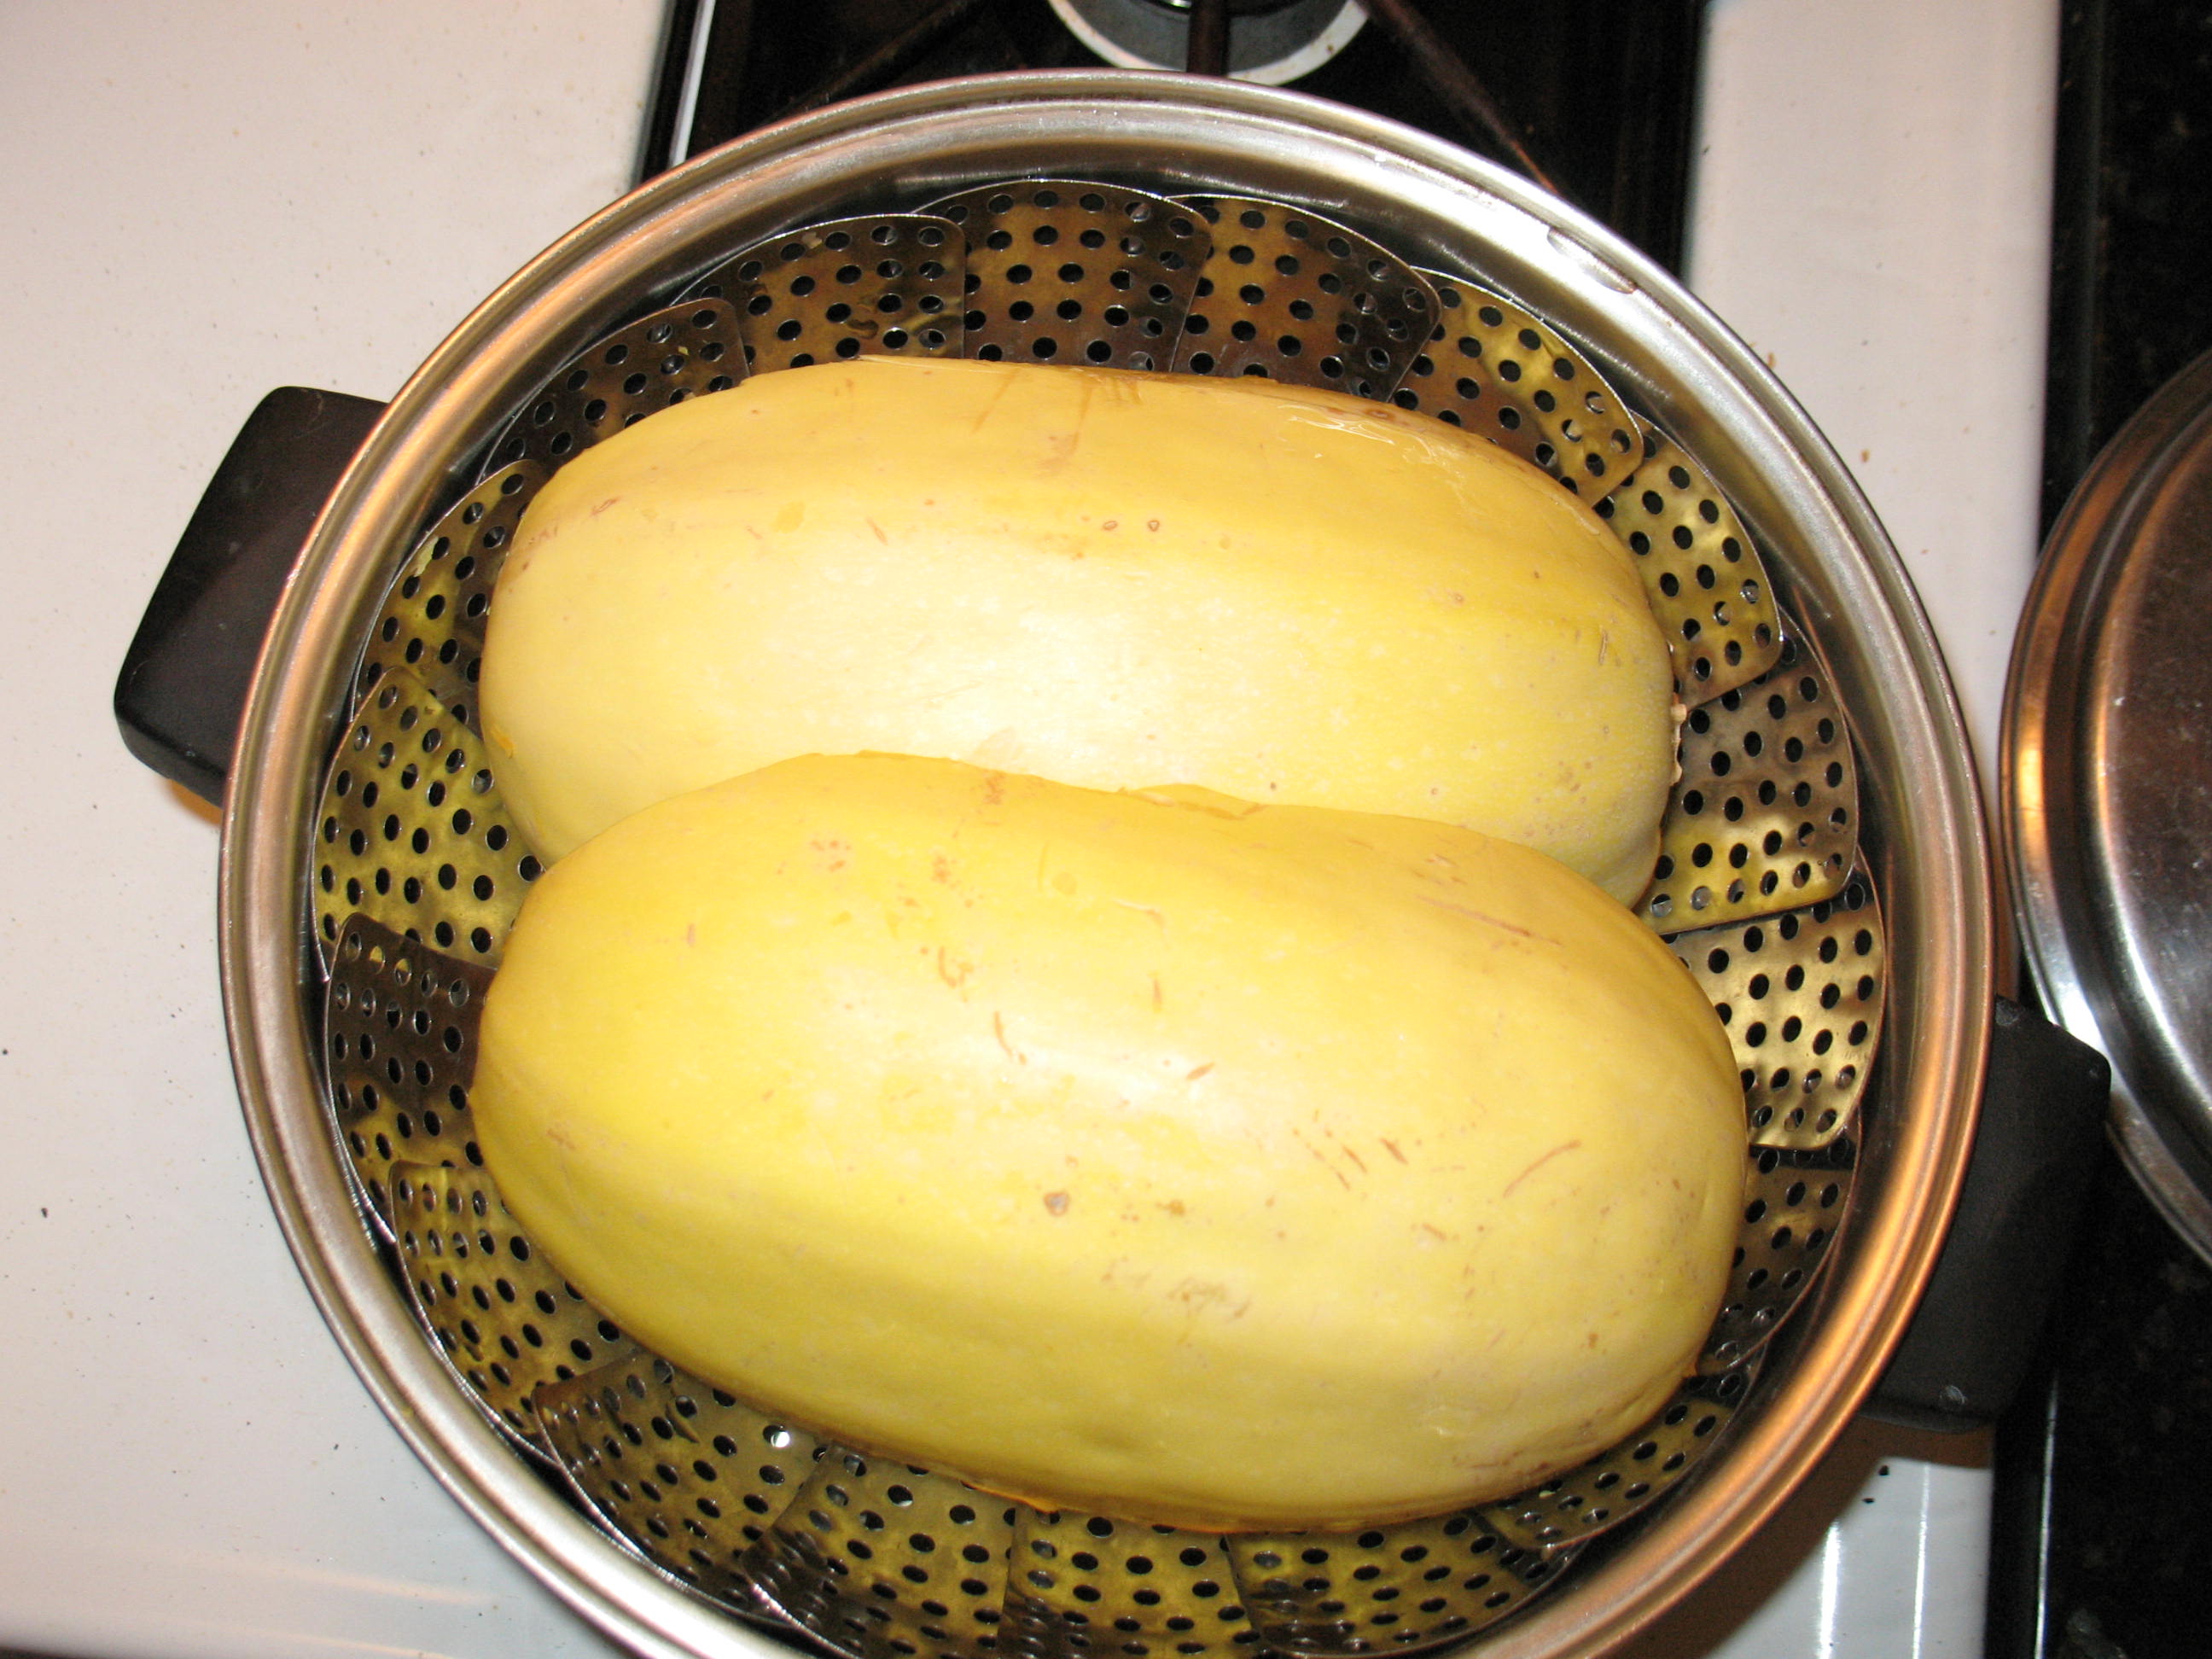
Remove the squash from the steaming rack. Use hot pot holders because it will be very hot.
Take a fork and begin scrapping the flesh out of the squash and into a bowl. As you scrape, the flesh will come out in little strands that look like spaghetti. It is really freaky looking, the way it comes out. 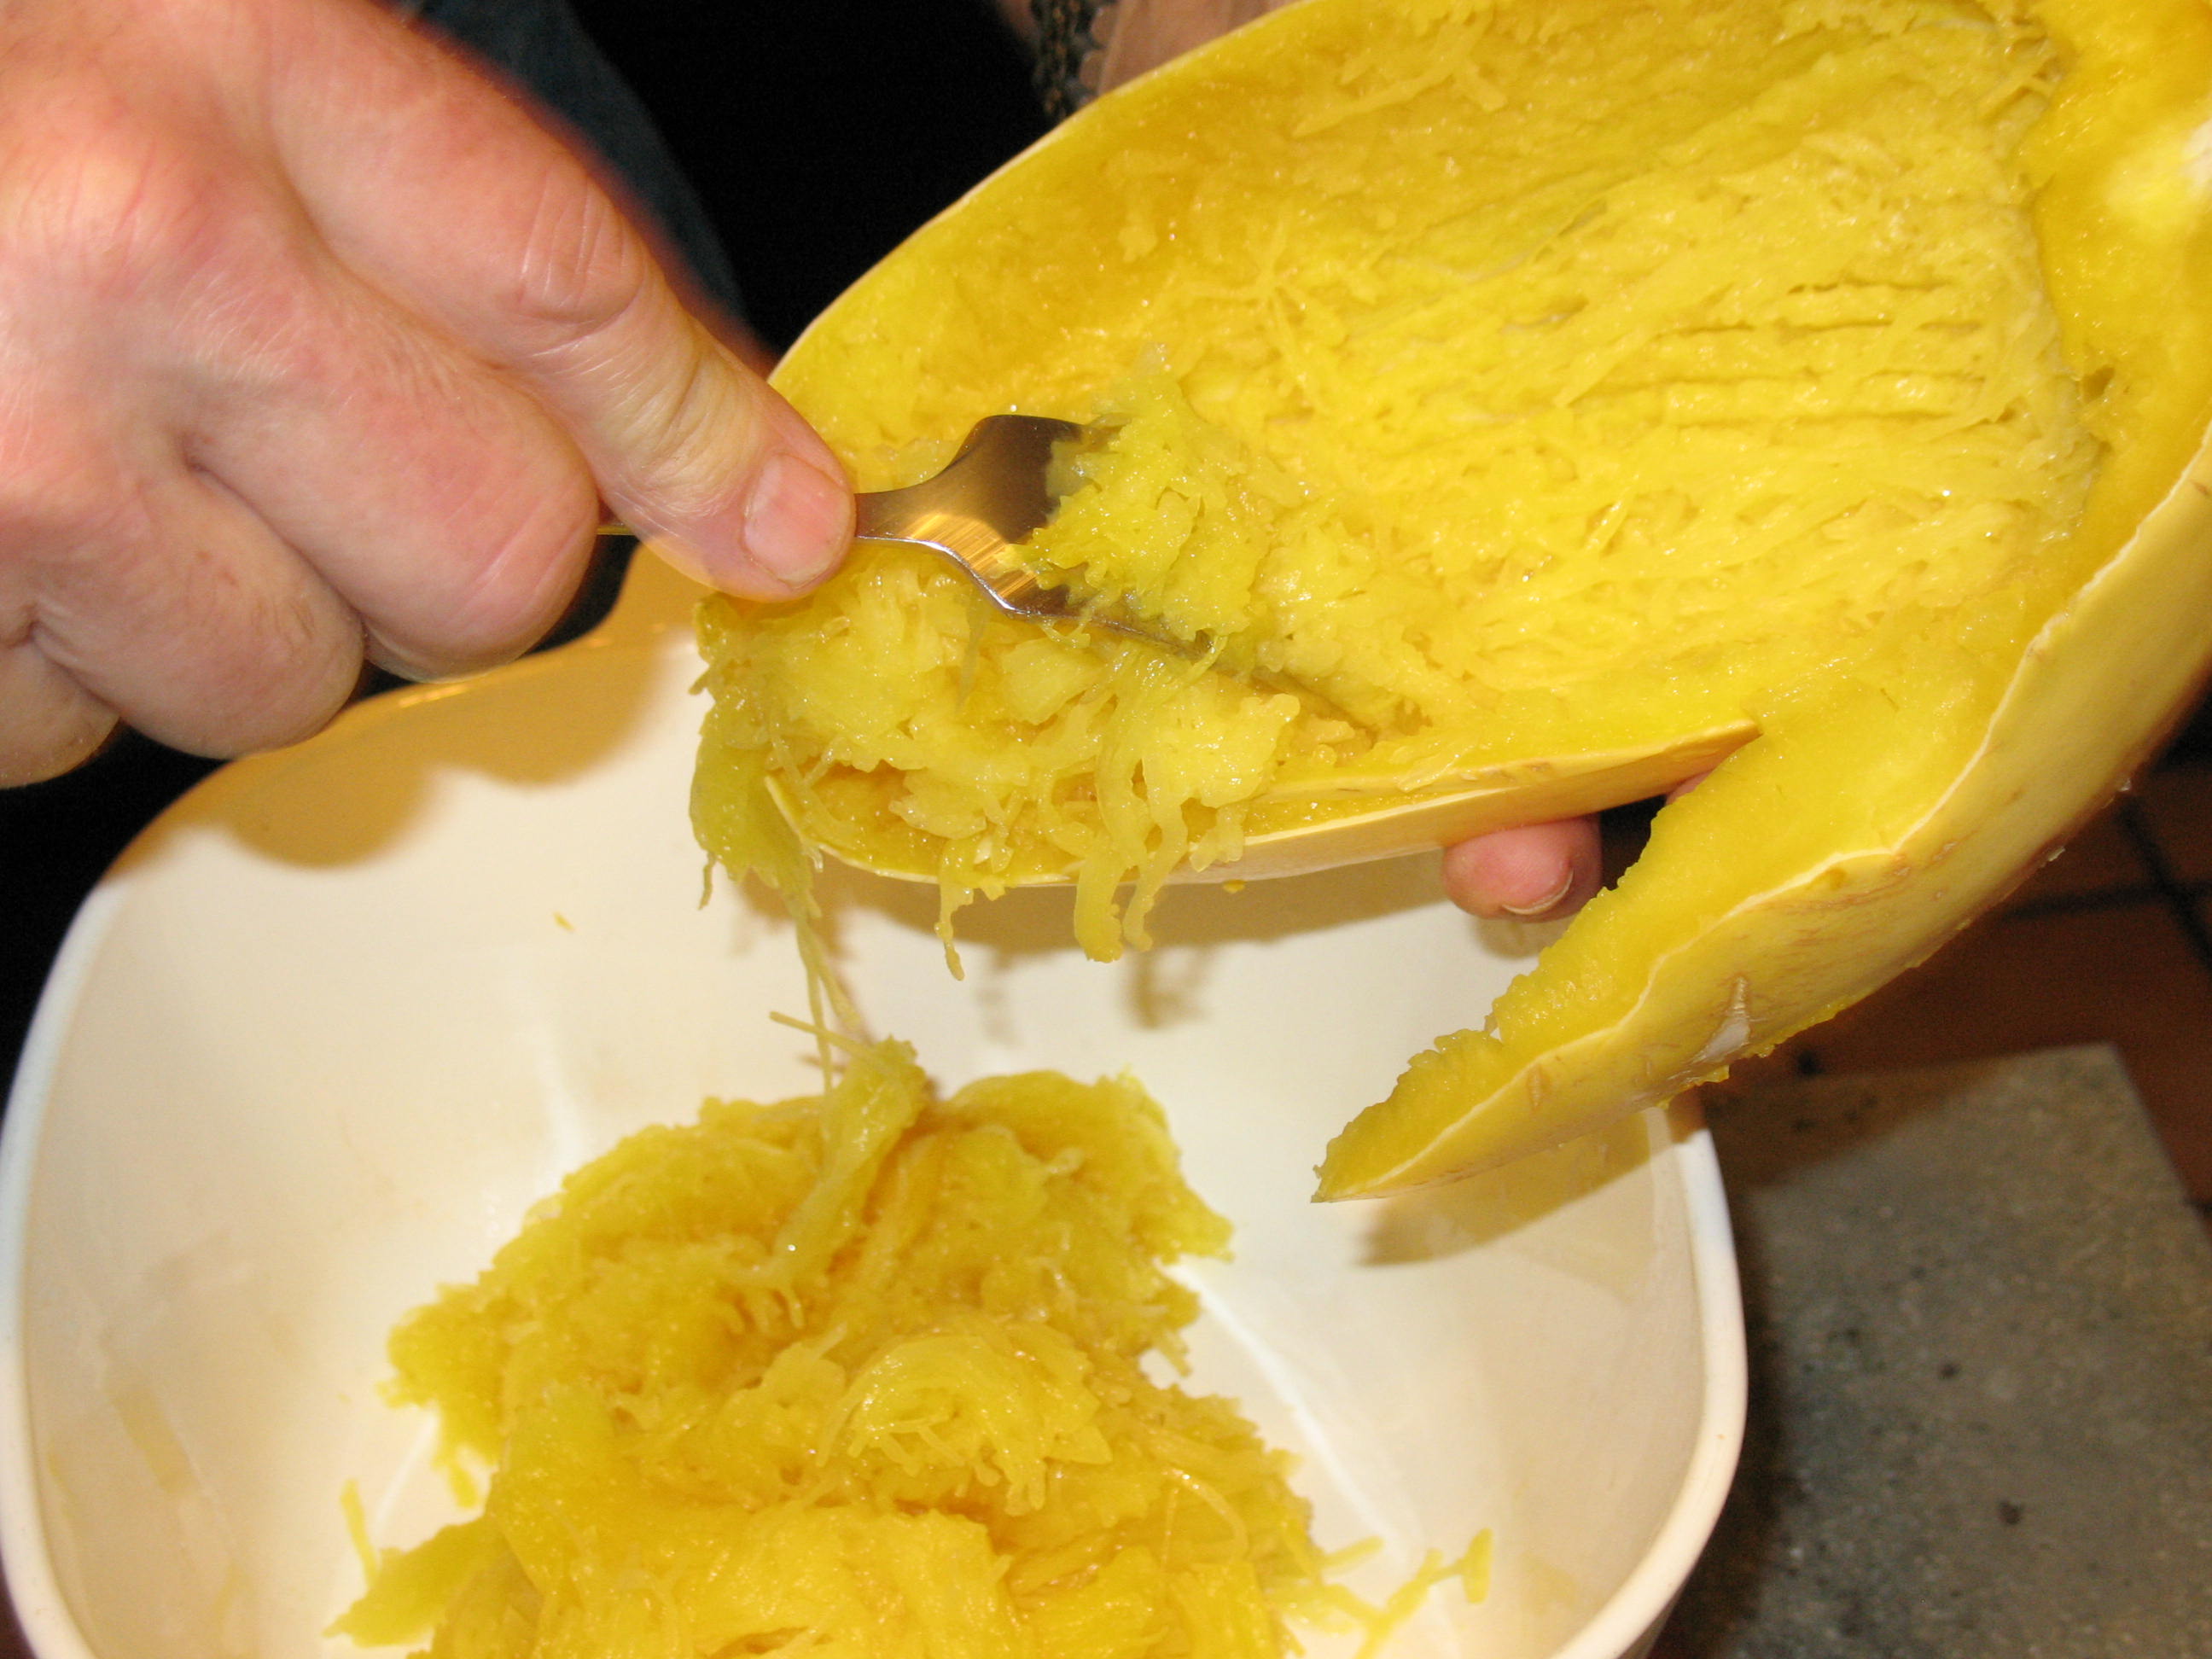
I like to add butter, salt, pepper, and garlic to the strings of squash and stir it all in. 
Dish a serving out onto a plate, pour hot spaghetti sauce on top, and you are ready to eat. 
If you have electrical power you can cook the squash in your microwave. Take the whole squash and poke eight or ten holes down into the center with an ice pick. Microwave the squash on high for ten or twelve minutes, cut the squash in half, scrape out the seeds, and remove the flesh.
We love spaghetti made with spaghetti squash. After we tried it the first time, we new this was a winner. In fact, I don’t think we’ve eaten regular pasta since then. I went to a feed store in a near-by town that carries a full line of heirloom seeds, and I bought a bag of spaghetti squash seeds. These seeds; along with the heirloom tomatoes, onions, garlic, and herbs that we grow; mean that we will now have a lifetime renewable source on spaghetti for our dinner table.
When I first started gardening I always planted yellow crook-neck squash and zucchini. I always got a ton of squash. We would eat squash until we were sick of it. Then we’d give squash to the neighbors until they pulled the drapes and quit coming to the door. Finally we’d start throwing it out into the woods. But by November the squash season would end and before long we’d be craving fresh squash. I tried every possible way to store squash. I tried canning, freezing, and drying. It just didn’t taste anything like fresh squash. I could, of course, have bought fresh squash at the grocery store, but my blood boiled at the thought of paying $1.79 a pound for something that I was throwing away two months earlier. That’s when I discovered winter squash. 
Now, don’t let the name fool you. You might think that winter squash is some kind of squash that grows in the winter. It does not. When the frost comes, winter squash plants die just like summer squash plants. The difference is that winter squashes have a thick, hard skin that allows them to be stored for a long time, so you can eat them far up into the winter.
Examples of winter squash are Butternut Squash, Acorn Squash, and Spaghetti Squash. All of these are available as heirlooms, so you can save the seeds to replant. You need to plant winter squash in the early to mid-summer to allow time for them to produce before the first frost. Around where I live that means planting in early to mid July since our first frost is usually in mid-November.
It’s best to harvest winter squash before it gets a frost on it. Squash picked after a frost will not store as long. You only want to store blemish free squash. It is best to cut the squash from the vine leaving a couple of inches of stem. After harvesting, you should set the squashes out in a warm, dry place to cure for a couple of weeks. Set the squashes so that they’re not touching.
After the squashes are cured you store them in a cool, dry, place and they will keep for a good while. Acorn squash will keep for about a month. Spaghetti squash will keep a little longer. Butternut Squash (which makes a great soup) will store for as much as six months. So, if you play your cards right and pick the right varieties, you can have fresh squash nearly year round.
It’s easy to get seduced by the flashy side of preparedness. By this I mean the assault rifles, the freeze dried foods, the exotic off-grid energy systems, etc. I’m not saying that these things don’t have a place in preparedness; I’m just saying that sometimes we place a little too much emphasis on these big ticket items and forget about the small, mundane things that will be part of day-to-day life in a long-term survival situation. For example, do you have a back-up supply of work gloves?
Think about it, self-sufficient living involves a lot of manual labor. Right now, I work outside on my farm about two hours a day; maybe four to six hours a day on weekends. A lot of this work involves wearing leather work gloves. I’ve never really kept track of it, but I would estimate that a pair of work gloves lasts me about nine months. In a total self-sufficiency environment I can see that dropping down to something like six months or less. You could opt to just work without gloves and put up with the pain until your hands get tough; but it’s about more than pain. Remember, you are now in a situation were ever cut, scrape, or puncture could be life threatening. No antibiotics to treat an infection; no tetanus shots to prevent lock-jaw. A cut on the hand could kill you as dead as a bullet. So you really need to wear gloves if there is a chance of injury in what you are doing.
Now think about what would be involved in making a pair of work gloves. You would have to harvest the hide. Then you would have to tan the hide (trust me when I tell you that this is a pain, even if you know what you’re doing). Then you would have to cut out the leather (assuming that you already have a pattern), hand-punch the leather with an awl, then hand-stitch the gloves together.
Recently, one of the hardware chains had work gloves on sale, five pair for $5.99. A great price considering that I usually pay four to six dollars for one pair. I went down and bought ten pair and added them to my survival storage. They’re not exotic, and they’re not expensive, but they are an everyday necessity if you plan to survive.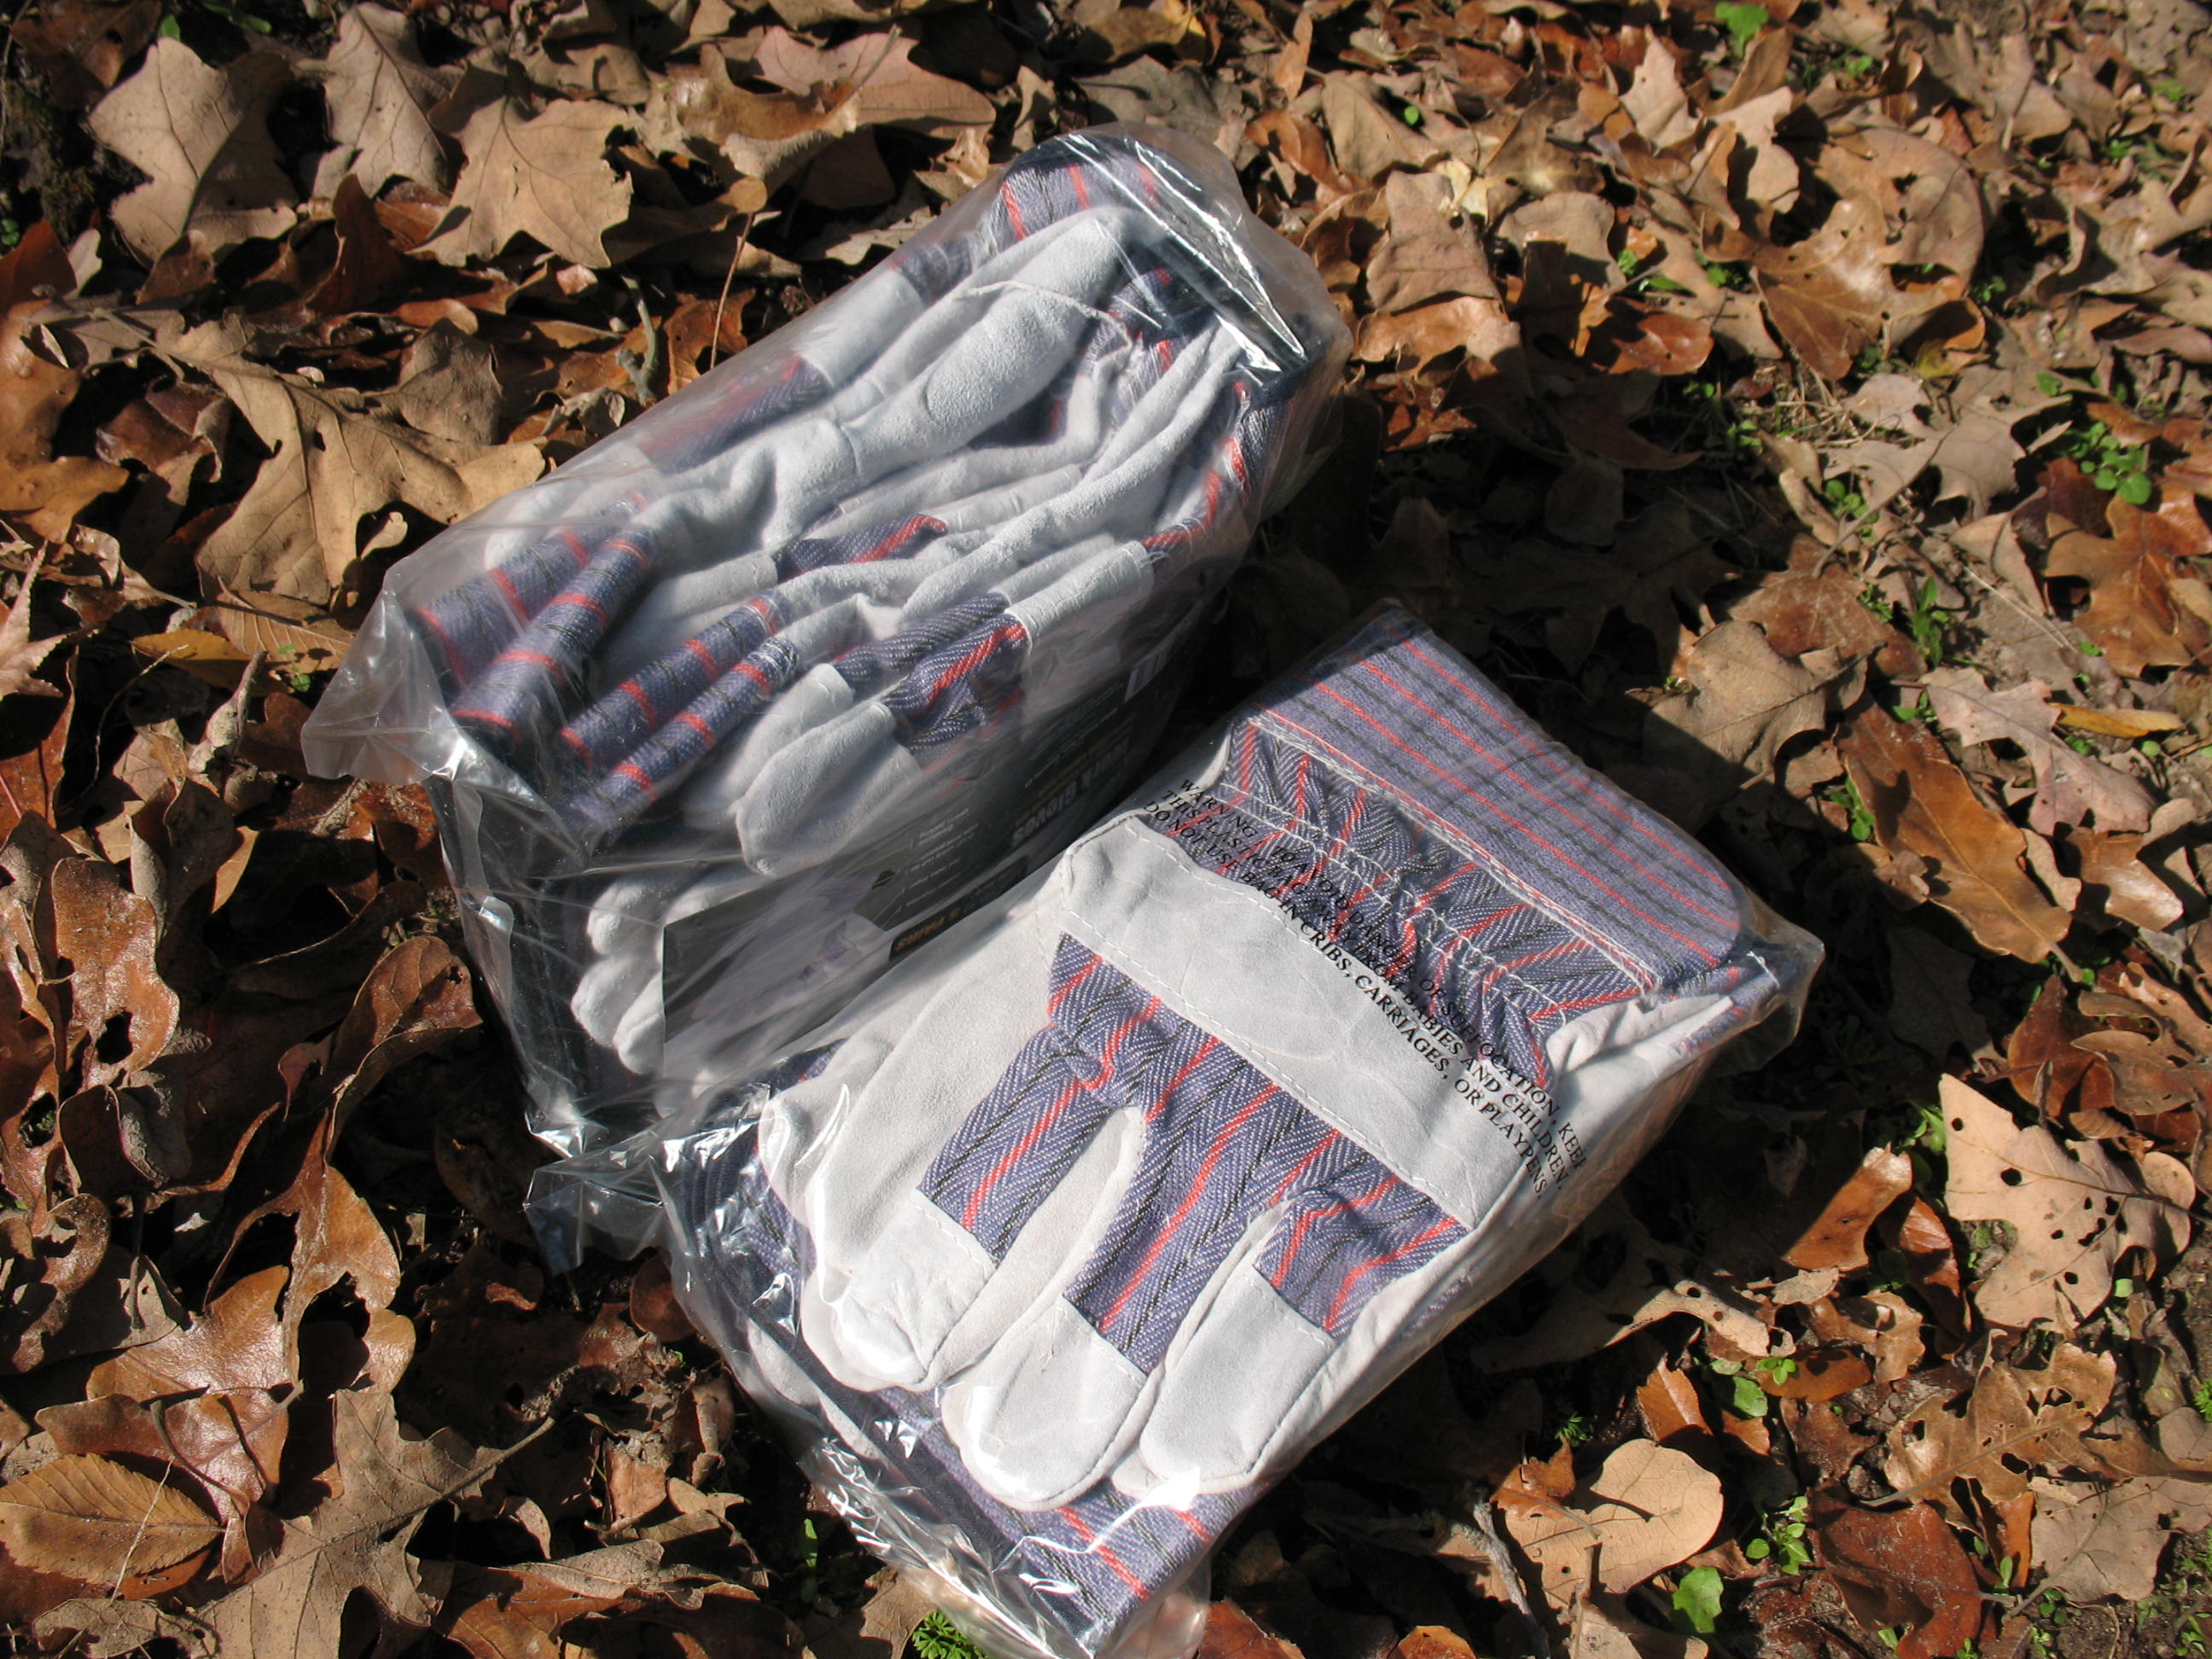 While we’re on the subject of gloves, do you have extra winter gloves? I keep two pair of lined pig skin gloves for winter.
I also have two pair of rag-wool gloves without fingertips. These are very handy when you are doing something that requires a good deal of manual dexterity, like screwing a small nut and bolt together or working a combination lock on a gate. I also wear these gloves when I’m picking dewberries and black berries. They are a real help at protecting your hands from those itchy thorns while leaving your fingertips free to pluck berries off the vines. 
I use a pair of insulated wool mittens when hunting in cold weather. The tips of the gloves fold back and expose your fingertips so that you can use a bow and arrow or pull the trigger on a rifle. Very handy. I keep several pair of Playtex gloves, the kind that your mother used to wear when doing dishes. These are good for butchering game and processing hides.
 And lastly, I have two boxes of non-latex exam gloves to use in medical emergencies. I also carry a pair of these when I’m hunting so that I can wear them when field dressing game. This may seem overly cautious to some, but a twenty cent pair of gloves is a lot cheaper than treating a case of tularemia that you catch when dressing an infected animal.
 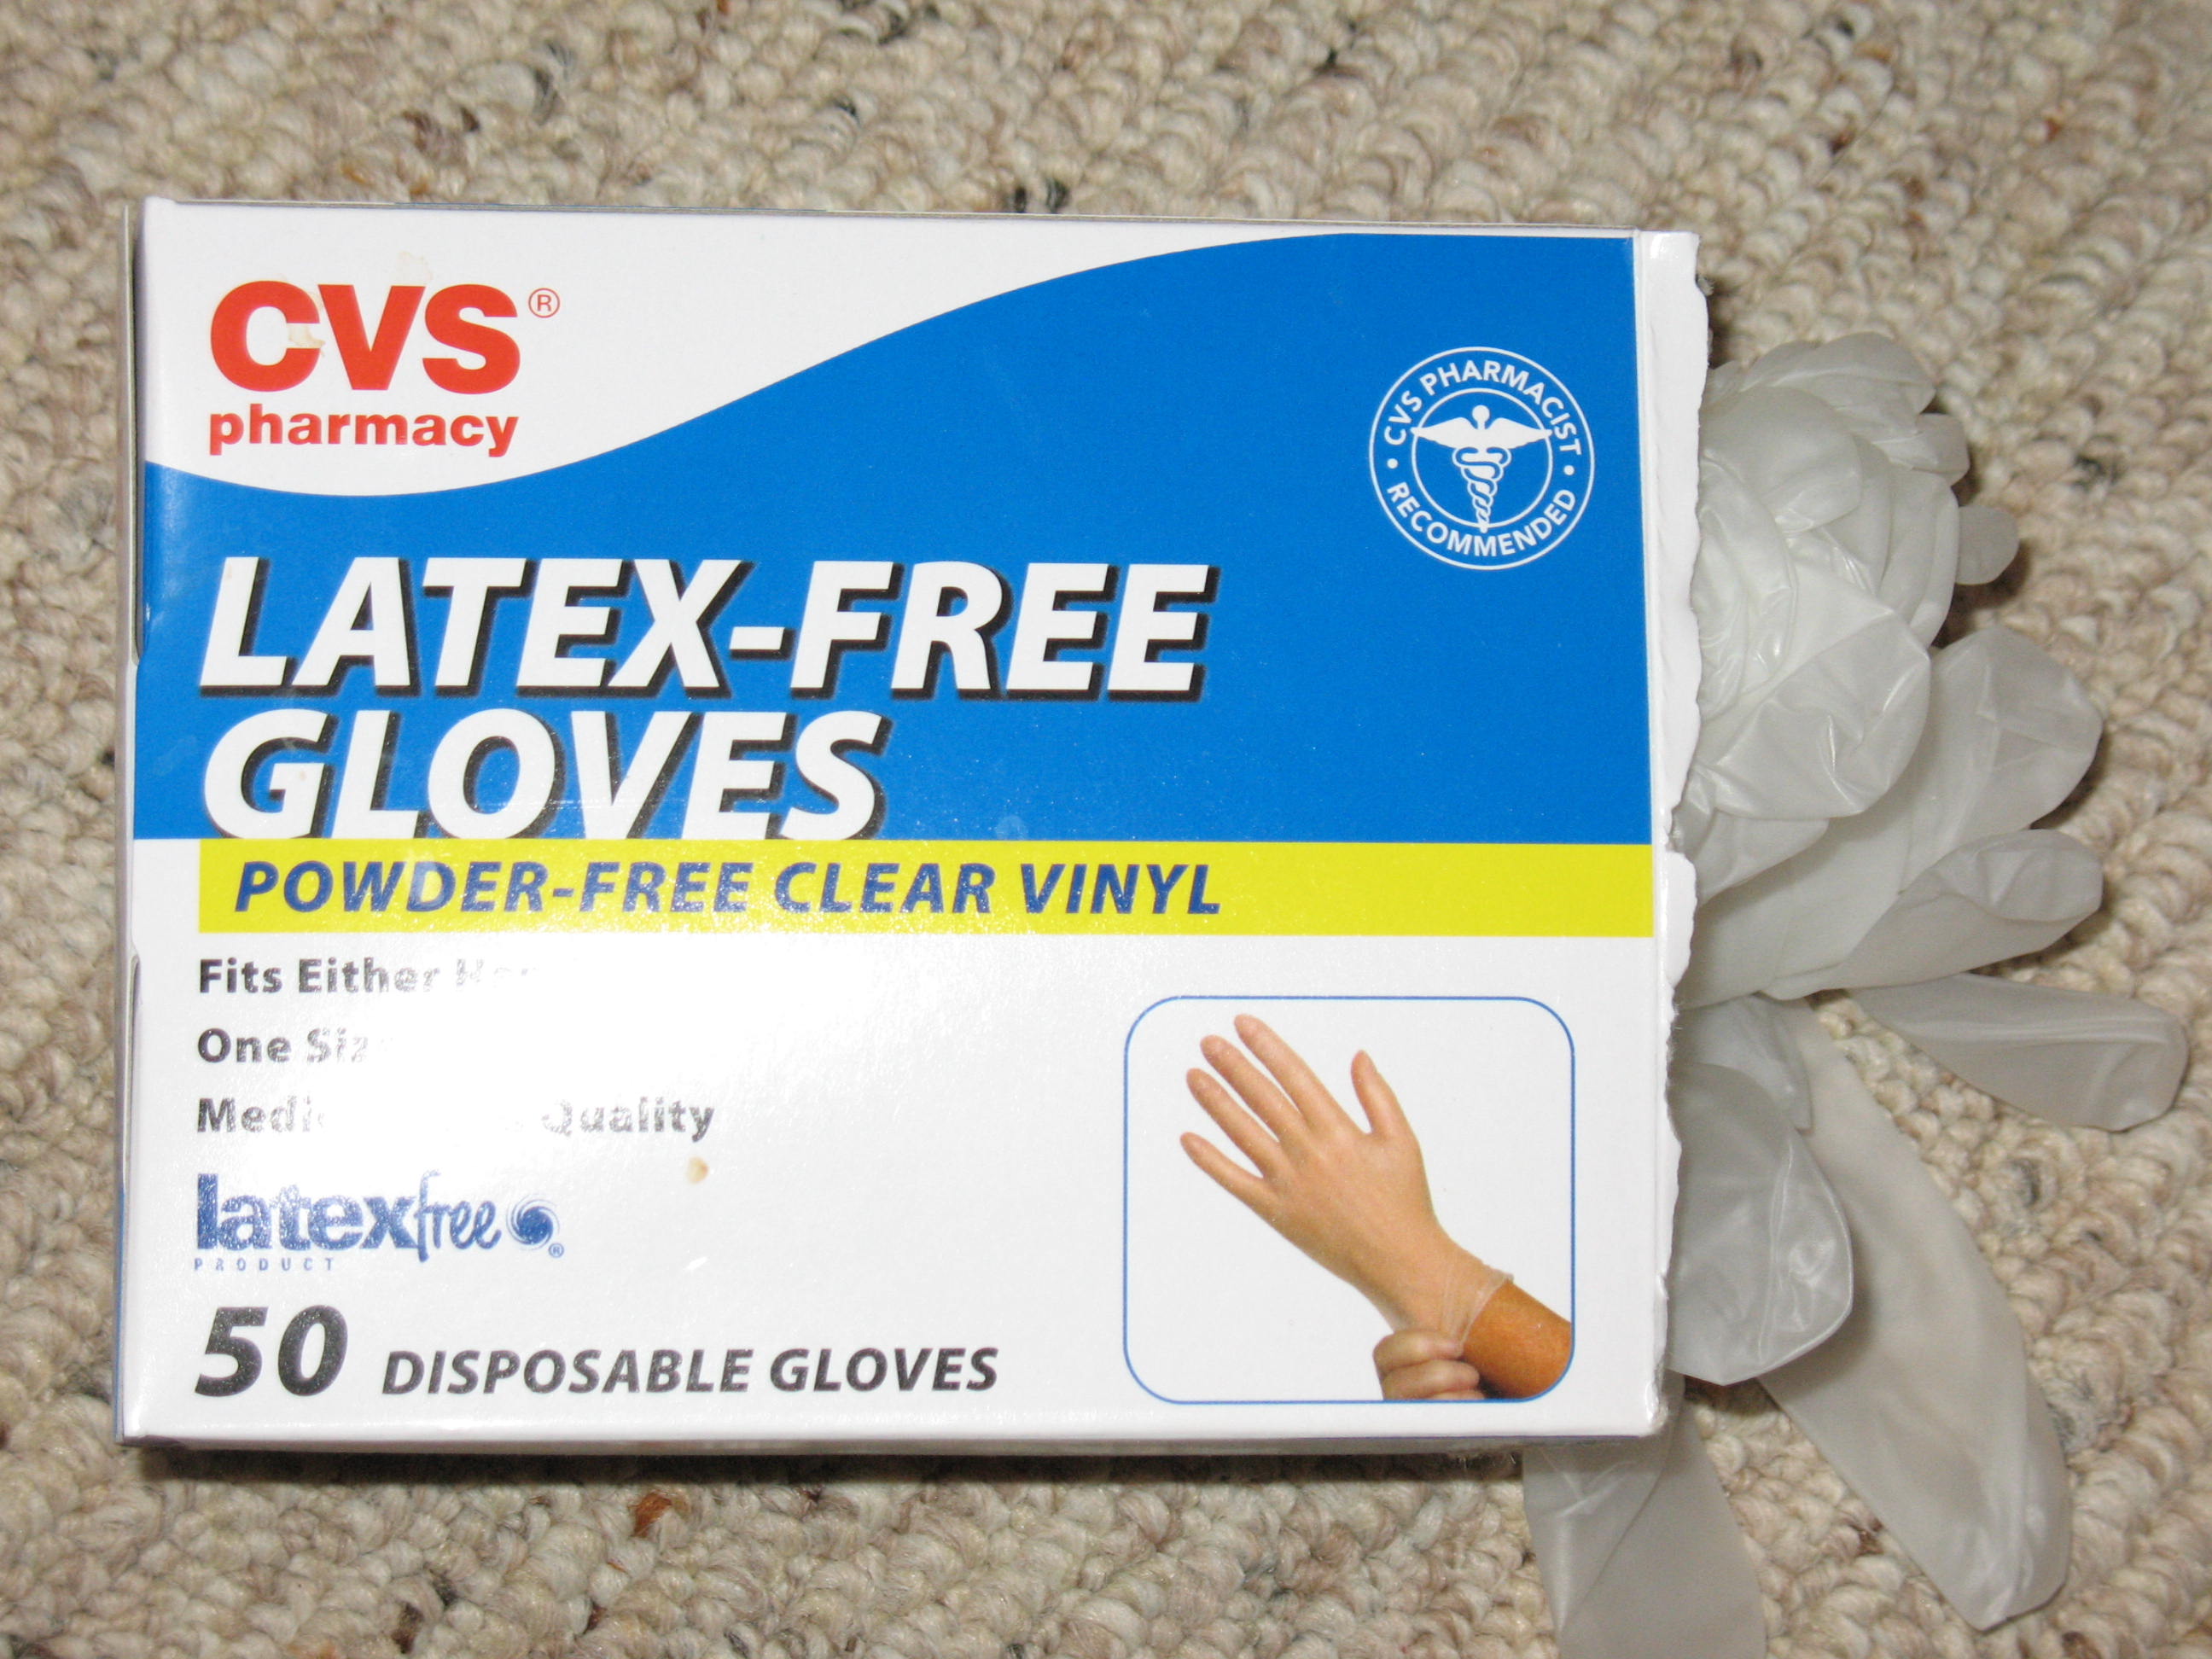 So there you go. There’s nothing very exotic about gloves, but when you are in a survival situation they can sure make a big difference in the quality of your daily life. So spend a relatively small amount of money and prepare yourself with a good selection of gloves.
I have an old Yugo SKS. The SKS is a WWII era Soviet Block semi-auto weapon with a ten round box magazine that is loaded via stripper clips. Tapco, which makes pretty good after market products, makes a twenty round detachable magazine for the SKS. I bought a Tapco replacement stock for my SKS (the subject of a future post) and I decided to go ahead and get the twenty round detachable magazine to go along with the new stock. This is my personal experience with the Tapco 20 round detachable SKS magazine. It should be noted that the SKS was widely manufactured in several Soviet Block countries, so what I experienced with this magazine is not necessarily what you may experience. 
This Tapco magazine is made of the same polymer material that Tapco uses for its stocks, magazines, and other after market products. I have purchases several Tapco products and found them to be reliable and of good quality. In appearance, the SKS magazine has an ungainly nose piece that extends about two inches from the front of the magazine. The purpose of the nose piece is to lock the front of the magazine into the retainer that secures the front of the original box magazine. The extension makes this magazine rather difficult to store in a mag pouch. For this reason, and because I wasn’t going to buy multiple mags until I knew that they worked, I bought only one magazine and planned to reload it either manually after removal, or using stripper clips while the mag was still attached to the rifle.
To prepare the rifle for accepting the removable magazine, you must first remove the original box magazine. This is a simple operation that involves only removing the stock and unhooking the box magazine.
Once the rifle is re-assembled, you should be able to attach the removable magazine by inserting the nose piece into the front attachment point of the old box magazine and then pressing the rear of the magazine up until it locks into the rear tab that was used to release the rear of the original box magazine. Because the SKS was not originally designed for a removable magazine, it does not have a magazine well like an AK or an AR. Consequently, there is nothing to really guide the insertion of the removable magazine. It is not a smooth operation. You have to feel around to get the magazine seated correctly.
It seemed to me that since magazine transitions would be pretty slow, loading the still seated magazine from stripper clips might be the way to go. I grabbed a stripper clip, inserted it into the slot on the bolt, and pushed. No luck. I tried several different clips, I cycled the bolt thinking maybe something wasn’t lined up right, it just wouldn’t work. I’d get one or two rounds down into the magazine and then everything would lock up and no more rounds would feed down into the mag. Pretty disappointing.
Once loaded and in place the magazine fed without problems, and it looked really good along with the new stock, but I just couldn’t see any practicality to it. It would be a situation of firing twenty rounds and then having a very slow transition to a fresh mag. I feel certain that I could fire twenty rounds out of the box mag using ten round stripper clips faster than I could make a magazine transition using the removable magazine. Add to that the space that is required to store the removable mags, and I just couldn’t see it working out. I could carry fifty rounds in stripper clips in the same space that would be required for one twenty round removable magazine.
It was with great disappointment that I removed the stock and re-installed the original box magazine. Maybe it’s just me and my particular rifle; but, in this case, the removable magazine was a definite bust.
Any of you who are experienced gardeners will recognize these simple truths.
(1) It takes practice to become a successful gardener.
(2) Gardening skills developed in one location will not necessarily transfer to another location
(3) Even the most experienced gardeners have bad years
Let me address these statements one at a time:
(1) It takes practice to become a successful gardener.
It never fails to amaze me that perfectly intelligent and rational people think that they can read a book about gardening, buy some seeds, and think that they will be able to produce enough food to feed themselves and their family in an emergency. If you told the same person that they could read a book about golf, go buy some clubs, and then provide for their family by becoming a professional golfer; they would say that you were crazy. Making things grow is a pretty complicated skill set. There are so many variables. Even commercial farming operations, which try to carefully control all the variables possible, still have disastrous years. I would say that it takes a minimum of three years of gardening, in the same location, to come anywhere close to understanding how to cultivate a successful garden, and it will take that long or longer to get your soil built up to the condition that you want. You will probably need to turn in compost and mulch. You may need to add crushed limestone if the soil is too acid. Remember, survival gardening will mean organic gardening. Commercial fertilizers, soil amendments, and insecticides will be hard to come by in a post catastrophe world. My advice would be to start gardening now. If you don’t learn how to garden before the collapse, you would be wise to have several years of food storage so that you don’t starve during the learning curve.
(2) Gardening skills developed in one location will not necessarily transfer to another location
When I first started gardening I lived on the Texas Blackland Prairie. The soil was black, heavy and very alkaline. We received about 35 inches of rain a year. I only gardened there a few years, but I was starting to get comfortable with my gardening. Then I moved to East Texas about a hundred miles away. Sandy loam soil, very acid, and about 45 inches of rain. Hardly anything that I learned on the prairie did me any good in the Piney Woods. For one thing, the plants that were hardest to grow in the alkaline prairie soil were the easiest to grow in the eastern acid soil, and vice versa. Fortunately I moved from West to East and the elevation was about the same, so there wasn’t a huge difference in temperatures or planting dates. If you move North/South, or change elevation by more than a hundred feet it can make a big difference in planting dates and length of growing season. Other local gardeners and your local feed store owner can be a big asset in choosing the crops and varieties that will grow best in your location; and how and when to plant them. So the best thing to do is practice gardening where you will be trying to produce your survival crops. This may not be possible; but you should, at least, be aware of the differences that you may encounter when you move.
(3) Even the most experienced gardeners have bad years
I have been gardening and raising fruit trees for years. This year we had a late frost and I did not get one piece of fruit off of any of my ten fruit trees. No amount of experience could have overcome this. Just ask a Florida orange grower. Some years it doesn’t rain enough, some years it rains too much. One year the coons got in my corn field and wiped it out. One year the deer cleaned out my pea patch. These things just happen. An old neighbor of mine used to say, “Plant enough for yourself, then plant some for your neighbors, and be sure and plant enough for the bugs.” The best plan is to always have a year’s worth of food and two years worth of heirloom seed stored.
I know next to nothing about electronics which is kind of embarrassing since my dad was an electrical engineer. He designed missile guidance systems, and I can barely operate a flashlight. I must have missed out on that gene. Anyway, if I’m doing any kind of project that involves electronics I have to have the real dummy’s version of how to do it. There are some things that I would like to do or know how to do to help with my survival preparations that involve electronics. I haven’t done any of these projects yet, but I have searched the web and bookmarked several sites that have instructions that I feel like I could follow. And if I can follow them that means that pretty much anybody can follow them. Besides simple and clear instructions, my other criteria for choosing these sites is lots of pictures to illustrate the process, and few or no exotic parts required. I can’t vouch for the info on these sites, and I don’t know how long they will be active, but you might want to take a look at them if you are interested in building any of this stuff.
How to build a simple crystal radio using household items and commonly available parts – http://scitoys.com/scitoys/scitoys/radio/homemade_radio.html
How to build an electricity producing wind turbine – http://www.mdpub.com/Wind_Turbine/
How to build a simple telegraph set – http://www.w1tp.com/perbuild.htm
How to build a hand cranked generator – http://www.zetatalk.com/energy/tengy05n.htm
How to build a generator powered by a lawnmower – http://theepicenter.com/tow082099.html
How to build a generator powered by a bicycle – http://www.thediyworld.com/DIY-Bicycle-Powered-Generator.php
How to build a solar battery charger. This is one that you would have to do before TEOTWAWKI because it does involve some parts that are not going to be found in your garage; but it is a good step-by-step article on how to do this project – http://www.solarjourneyusa.com/installguidesmall.php
Dried beans are a must for any food storage program. Beans are cheap, they are a good source of protein, they taste good, and they are easy to store. You can buy sealed, nitrogen packed, buckets of dried beans; but that is not really necessary unless you just want to do it for convenience and you have a lot more money to spend than I do. One problem with buckets of dried beans is that when you open a bucket, you now have about five gallons of the same kind of beans to eat. If the only reason that you are buying the beans is for emergency food storage then that’s not too big of a problem. But, I like to eat and replace my stored foods, and I don’t want to eat five gallons of pinto beans before I can get my first bowl of black-eyed peas. So here’s how I store my dried beans. I don’t know if they will last 30 years like the nitrogen packed ones, but I am eating beans that were stored 8 years ago and they are perfectly fine.
First buy your beans. You can go to places like Sam’s Club, Costco, or many health food stores and buy them in 25 to 50 pound bags or you can buy them at the grocery store. Most grocery stores don’t carry bags larger than 5 or 10 pounds. I usually go to the grocery store and buy bags of pinto beans, kidney beans, black beans, navy beans, garbanzo beans, lima beans, lentils, and etc.
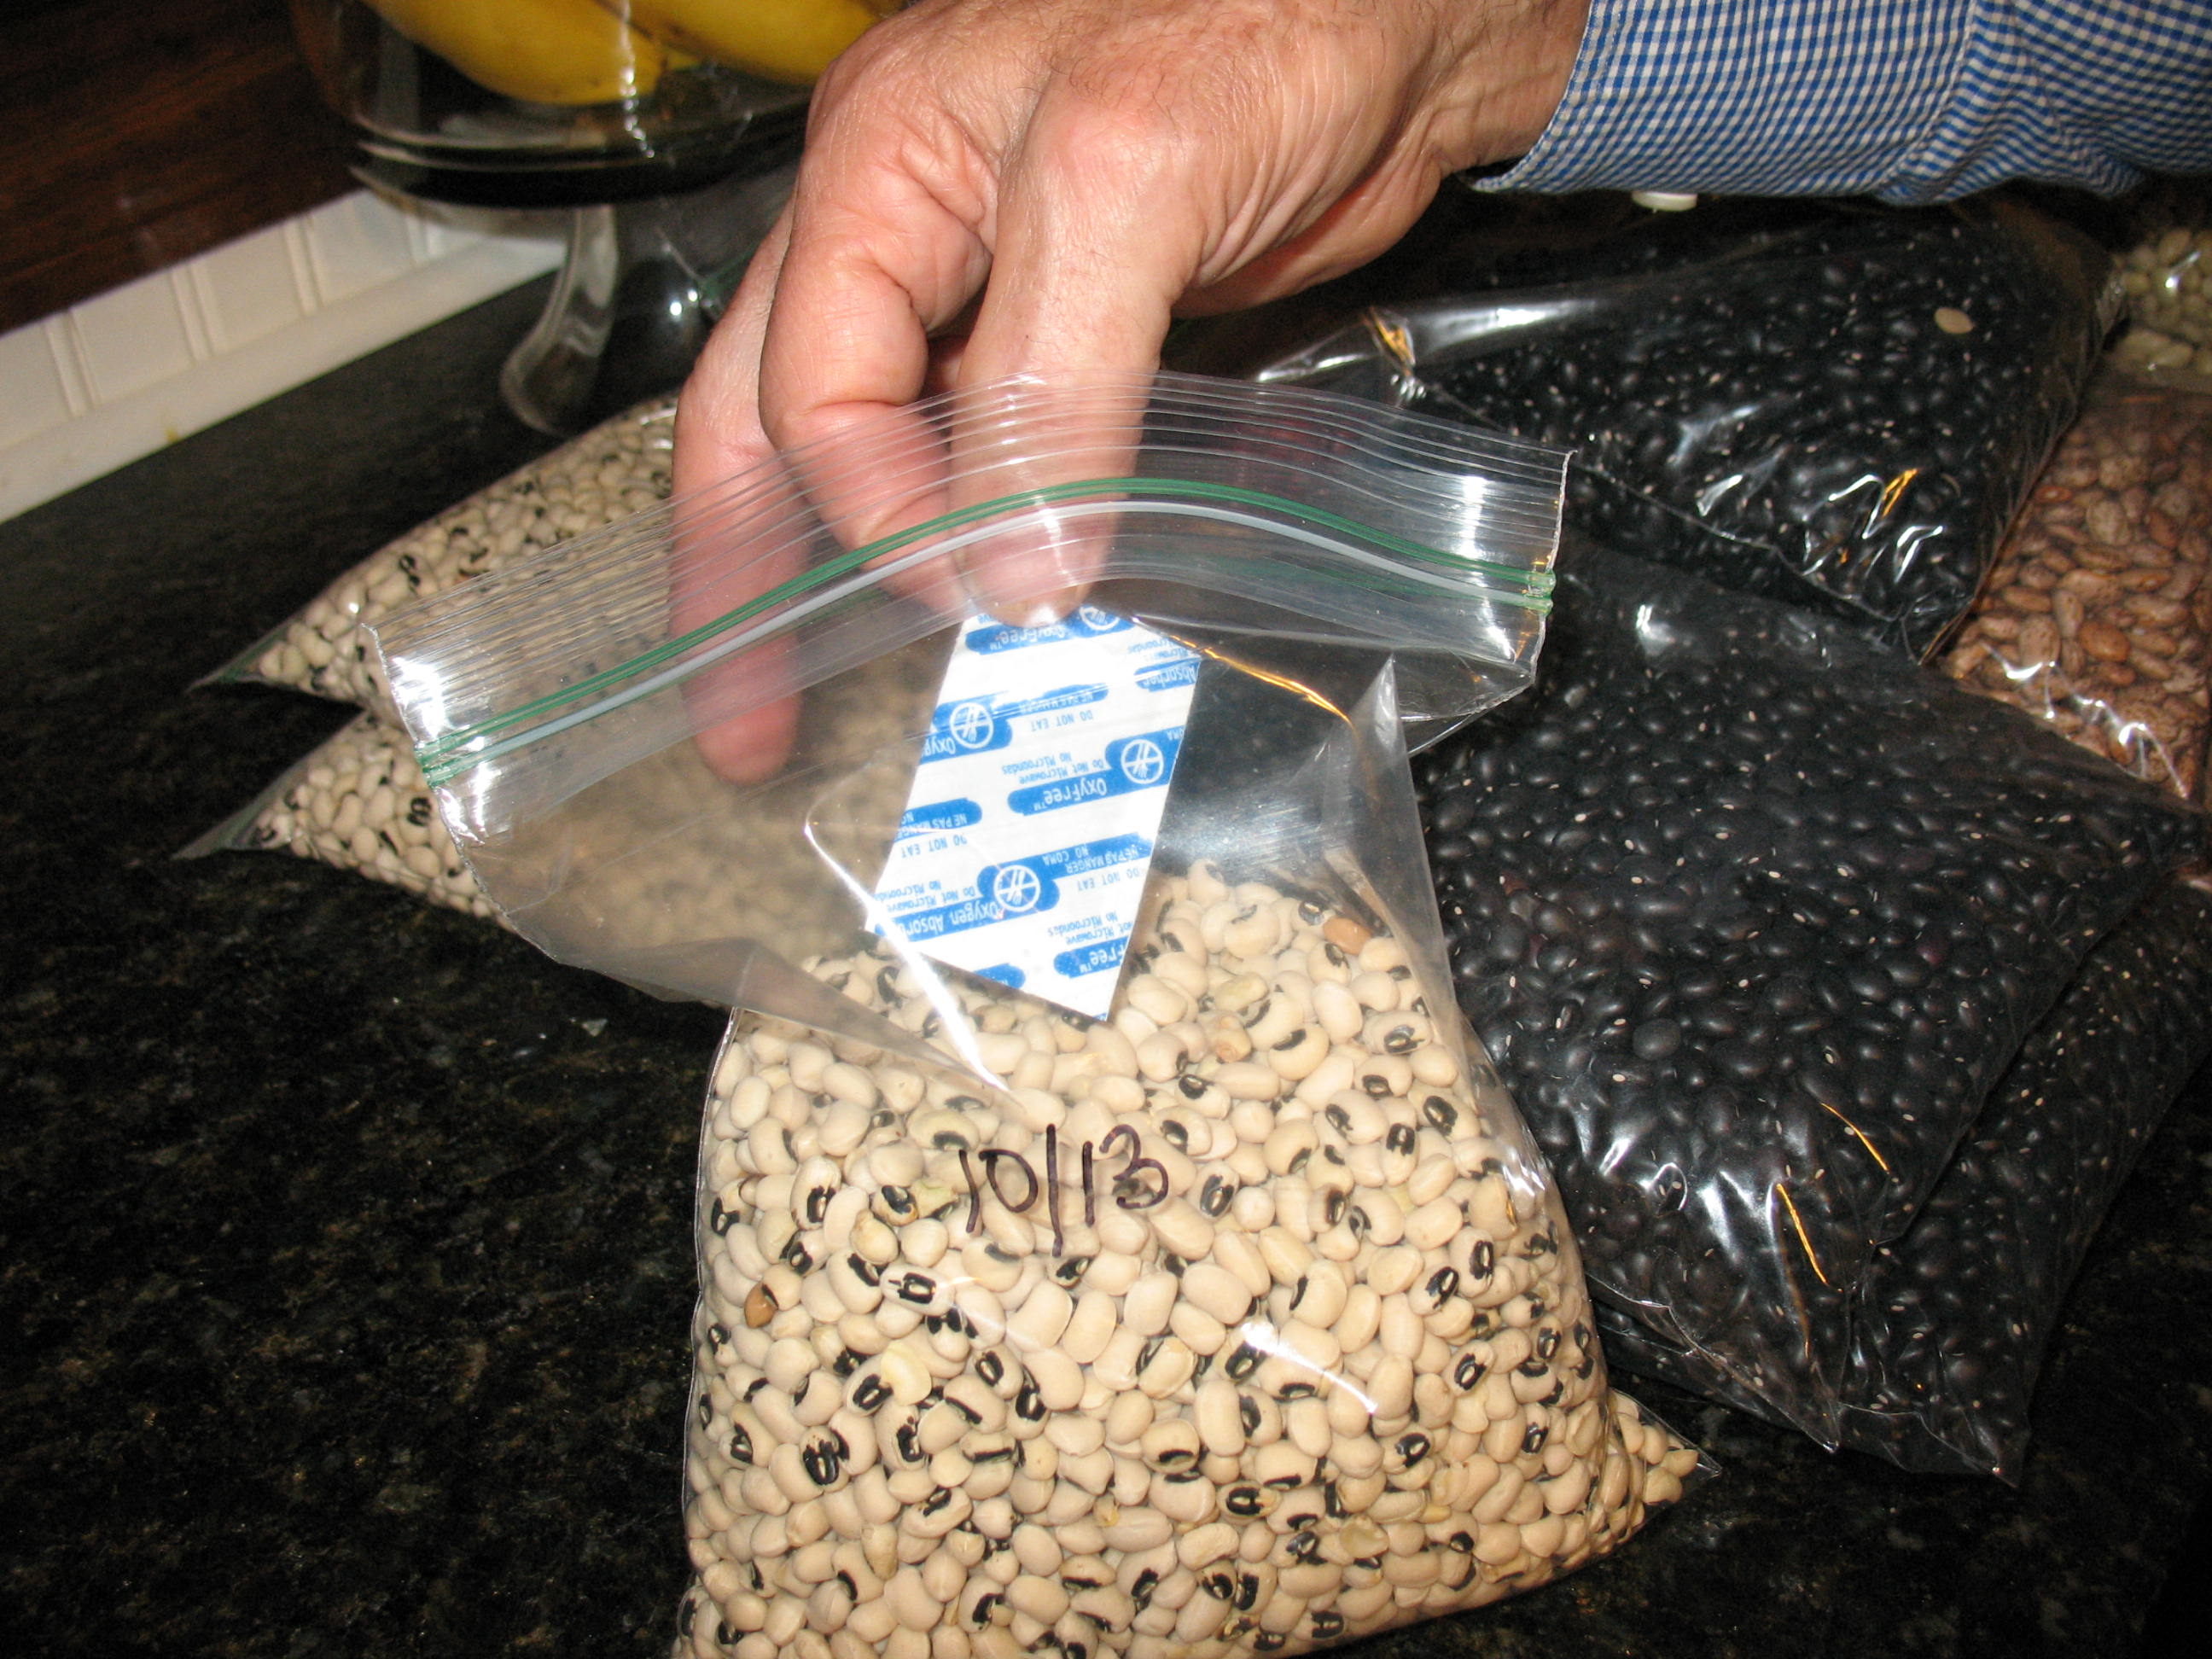
When I get home I repack the beans into 1 quart storage bags filling the bags as full as I can and still get them sealed. 
I use a marker to mark each bag with the date (this is easier to do before you put the beans into the bag). 
I place the quart bags of beans in the freezer and let them stay in there for a week. This kills any bugs or larvae that may be in the beans. 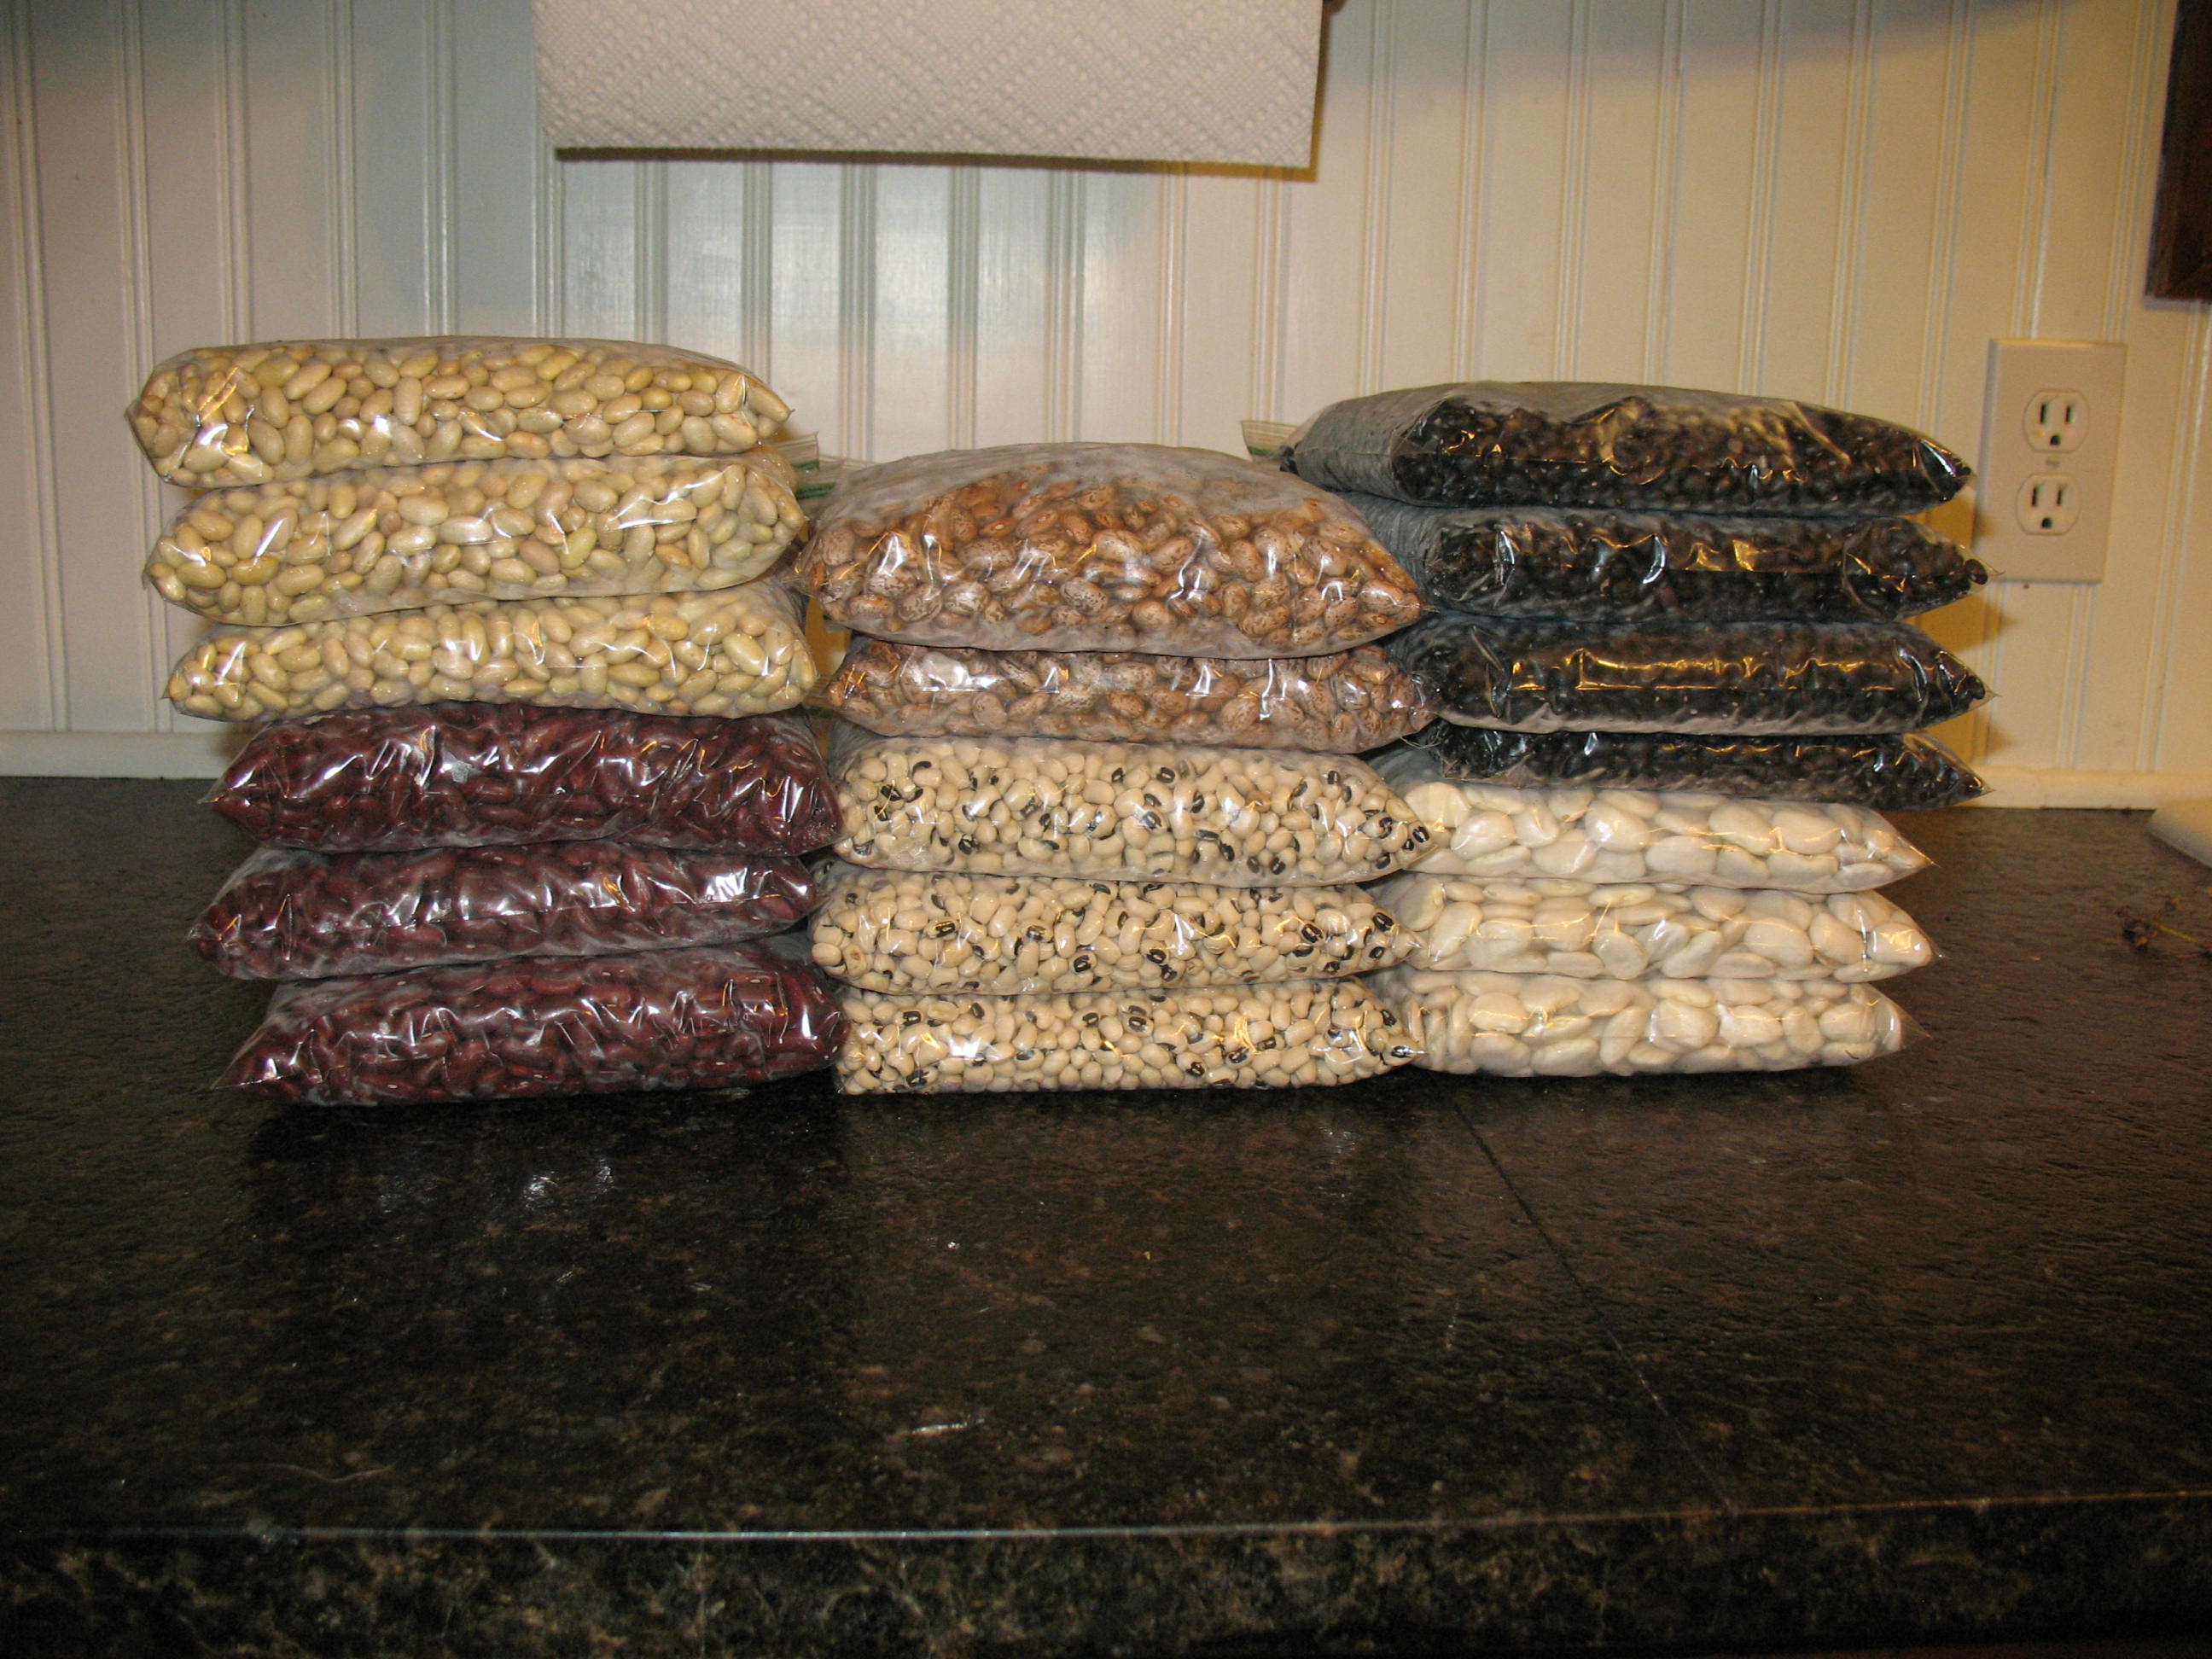
After the beans have been in the freezer for a week, I take them out, open each bag, drop a 100cc oxygen absorber pack into the bag, and reseal the bag. 
Next I place the assorted bags of beans into a 5 gallon food grade bucket that has been lined with a plastic trash bag. 
Be sure that the trash bag is not treated with a deodorizer or insecticide (the cheap bags usually don’t have any of these fancy additives). A lot of people recommend using food grade mylar bags, but in this case I don’t really see the point. The food is actually contained in food storage bags. The plastic trash bag is just another layer of protection against moisture, and the food never comes into contact with it. Now, just seal the trash bag and seal the bucket.

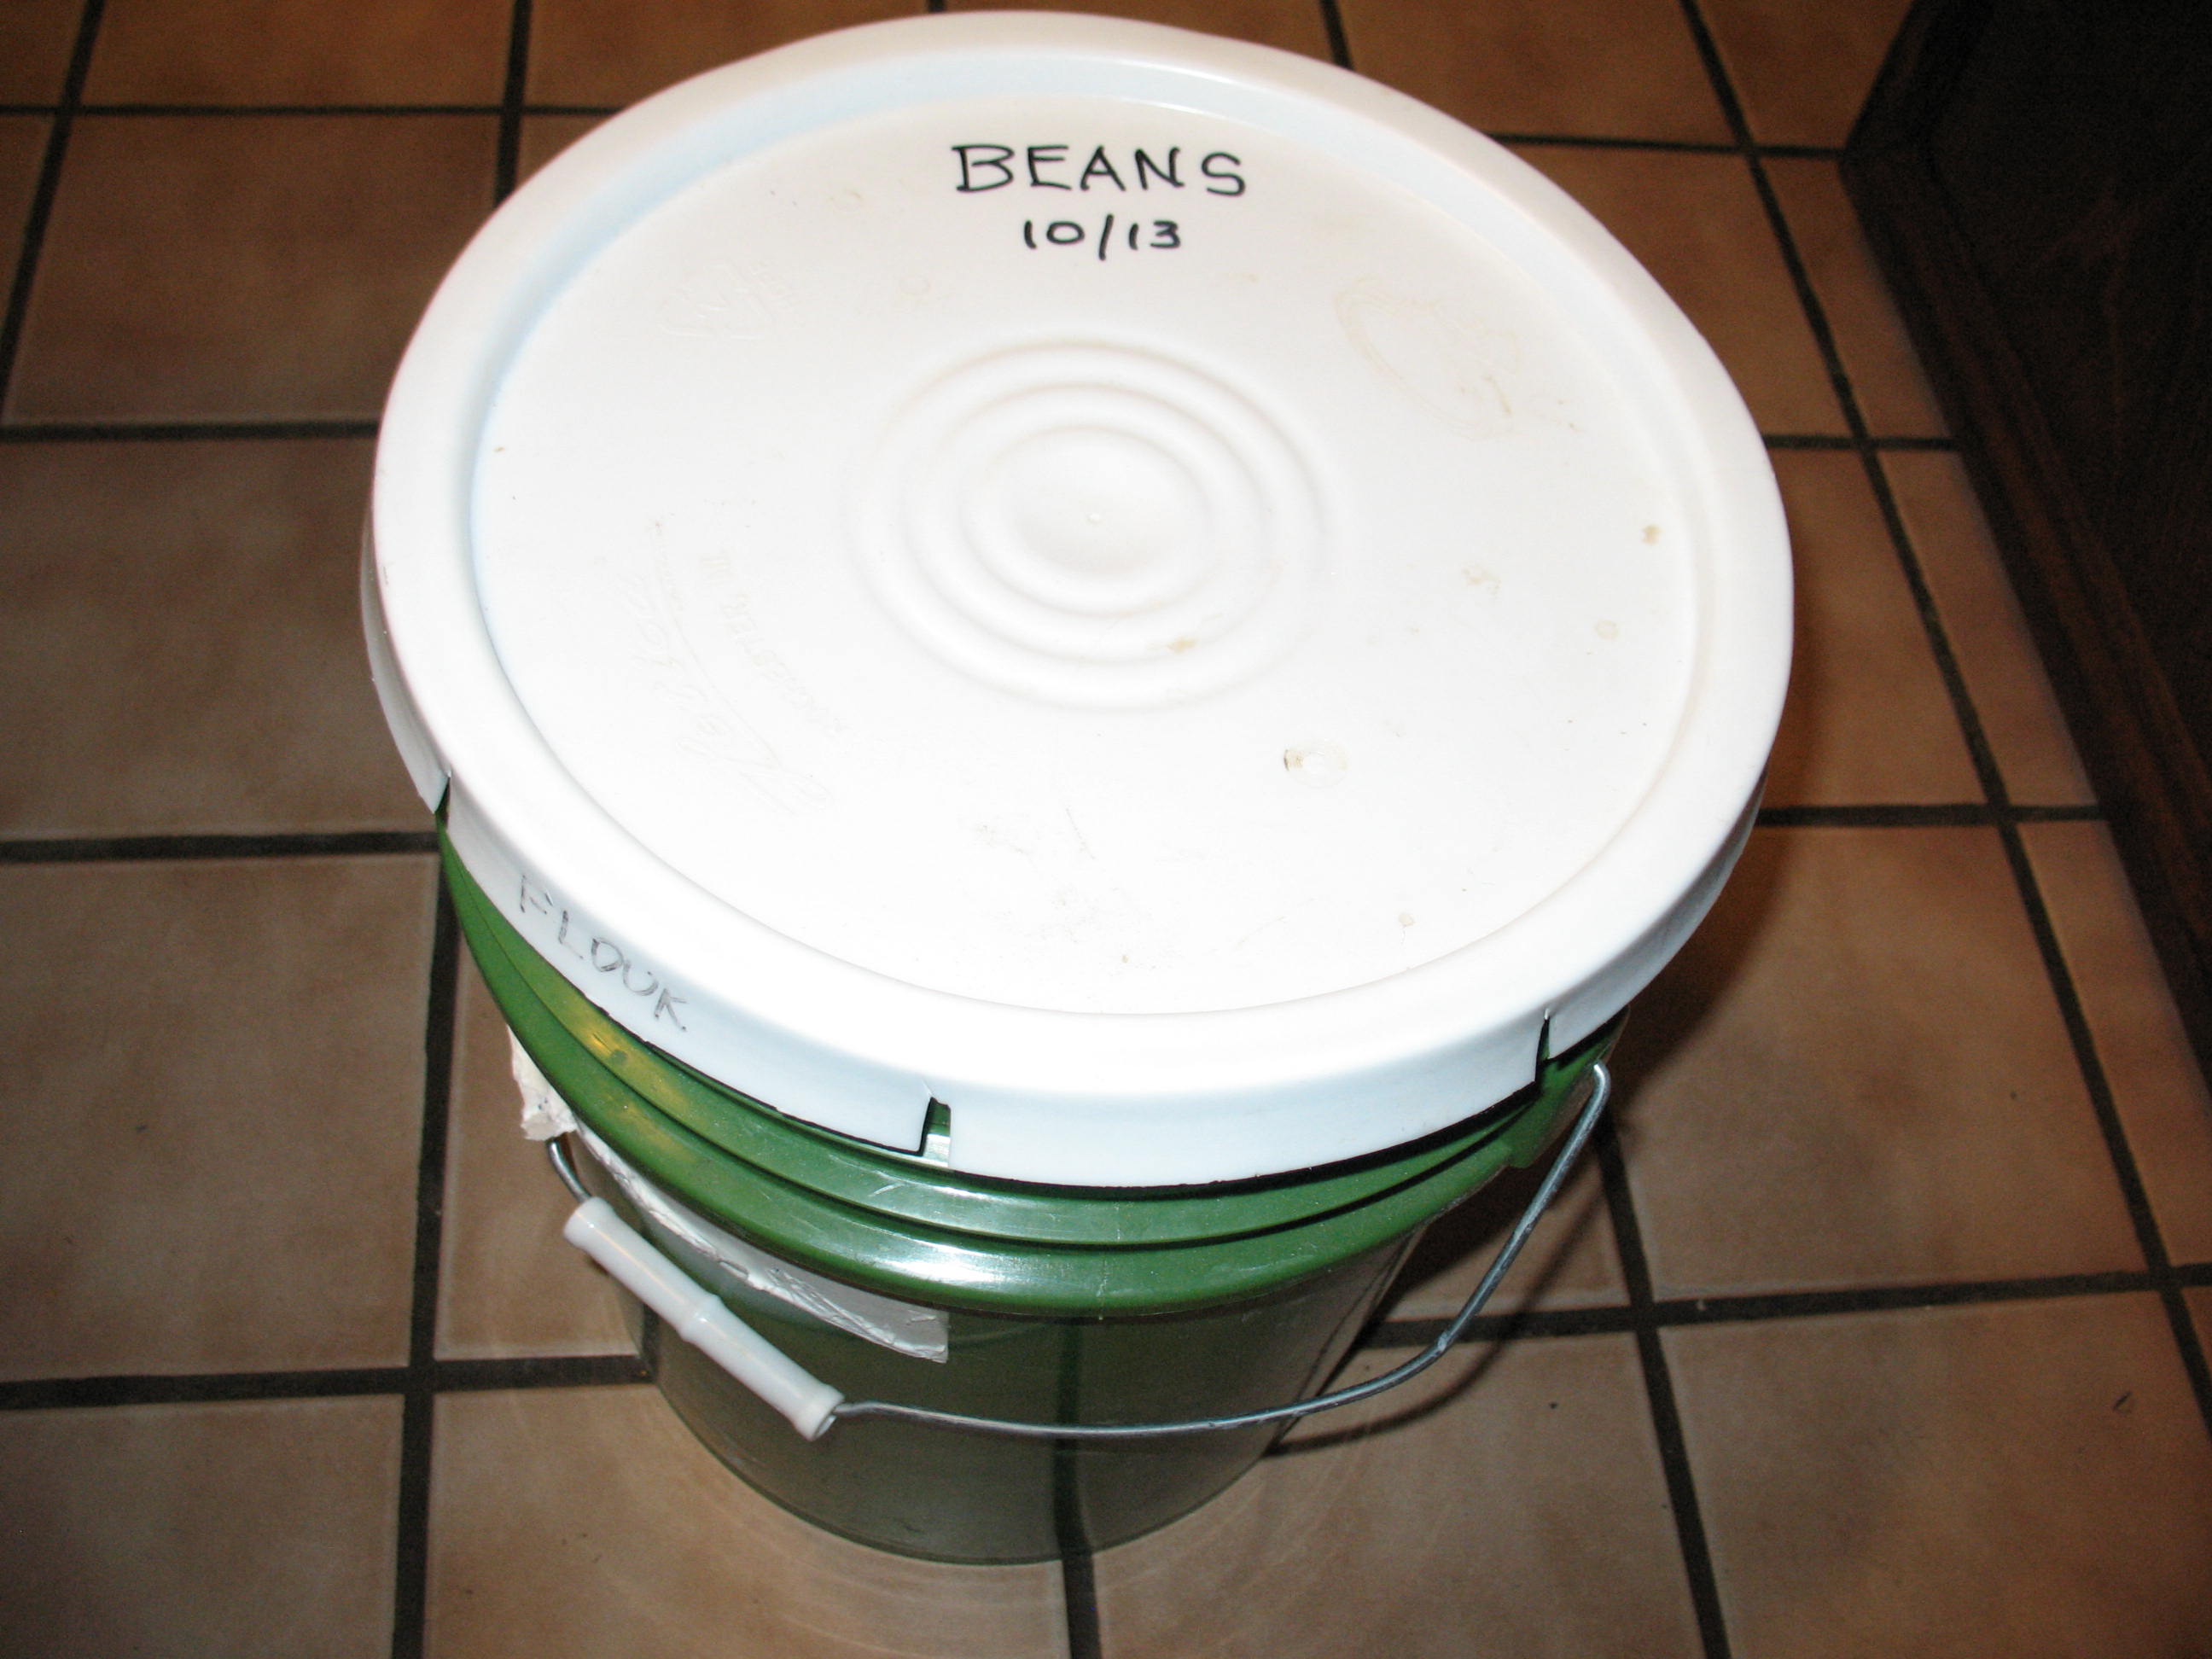
If you want, you can place a small piece of dry ice in the bucket before you seal it. The dry ice will sublimate into CO2 gas which is heavier than air and will force the air out of the top of the bucket. If you do this be sure to not seal the top of the bucket until the dry ice has melted down to a sliver about the size of a nickel. If you seal the bucket too early, the CO2 gas that is forming will expand the bucket and possibly blow the lid off. Not good. I personally don’t go the CO2 route and I have never had a problem with the beans going bad. Which ever way you do it, be sure to label the bucket “BEANS” and put the date on it.
Now you have a sealed bucket full of assorted bags of beans. You can remove a bag of pintos, and when they are used up, you can pull out a bag of navy beans. This keeps your diet from becoming too monotonous. When you have gone through an entire bucket of beans (probably a couple of years depending on how many you are feeding and often you eat beans) you can refill and re-label the emptied bucket and start eating out of the next bucket in your rotation.
The worst has happened and the social order is in a state of break-down. You had hoped that this wouldn’t happen, but you were smart enough to plan ahead in case it did. You have a comfortable home in the country. You have stored food, medical supplies, hunting and defensive weapons, a good stock of ammo, garden tools, and heirloom seeds. There’s no live water on your land but you had the foresight to have a 75 foot deep well drilled. You installed a good wood burning stove in your house and cleared off a good size piece of land where you can plant a garden. You and your family are safe; it’s day one and you are ready to survive.
First things first, you need water and fire wood to start the day with breakfast. While your wife is digging through the food storage you go out to draw some water from the well. There’s no electricity so it’s a rope and bucket. You need water for 4 people to wash up, fix breakfast and do the dishes. Three buckets ought to do it. So, you spend about 15 minutes pulling on the rope, hand over hand; and then haul the five gallons (41 pounds) of water up to the house.
Now for the fire wood. There are plenty of downed and seasoned trees from where you cleared your garden spot, but you will have to cut them up with a crosscut saw and split them with an axe. You could use your chainsaw but you know that’s not a good idea. Too much noise that might attract unwanted attention, and besides you need to save the gas. So, you spend the next 45 minutes sawing, splitting, and carrying firewood for breakfast. You can come back after breakfast and cut more for the rest of the day’s cooking and to heat the house tonight.
After breakfast you decide to get started on the garden spot. You have food stored, but it will eventually run out so you need to start right away getting the ground ready for a spring garden. This will require digging up three or four stumps, digging up roots, hauling out rocks, and hand turning the soil. You want to put in a 40 foot by 60 foot garden so preparing the ground will occupy most of your working days for the next several weeks. Of course then it will be time to start building a fence around the garden to keep deer out. You walk to the tool shed and get out your grubbing hoe, shovel, long pry-bar, and a pair of leather work gloves.
OK. Now go look in the mirror. Are you physically ready to live like this? Everything that you do will involve muscle power. We are so used to modern conveniences that we have totally lost sight of how physically challenging life is without them. Our great-grandfathers had to consume about 4000 calories a day just to maintain their body weight. Today many of us gain weight on 2000 calories a day. We have to make a special effort to indulge in any physical activity.
In our very uncertain future, the term “survival of the fittest” could mean exactly that. The physically fit may be the only ones that survive. I would suggest to you that physical conditioning is just as important to your survival plans as food storage, or self defense. You could join a gym and take the traditional route of jogging, resistance training, aerobics, and etc.; but I’ve never really understood the logic behind paying one guy to do your yard work, and then paying another guy to let you work out in his gym. Wouldn’t it be more productive and more realistic to get out and do some physical labor similar to the types of things that you would need to do on a self-sufficient farm. How about starting a garden using only hand tools, splitting firewood with an axe, or hand digging post holes for a new fence. You’ll get some great exercise, and you’ll have something to show for it besides muscles. If a survival situation never arises you haven’t wasted any effort. Being fit will improve the quality of your life no matter what happens.
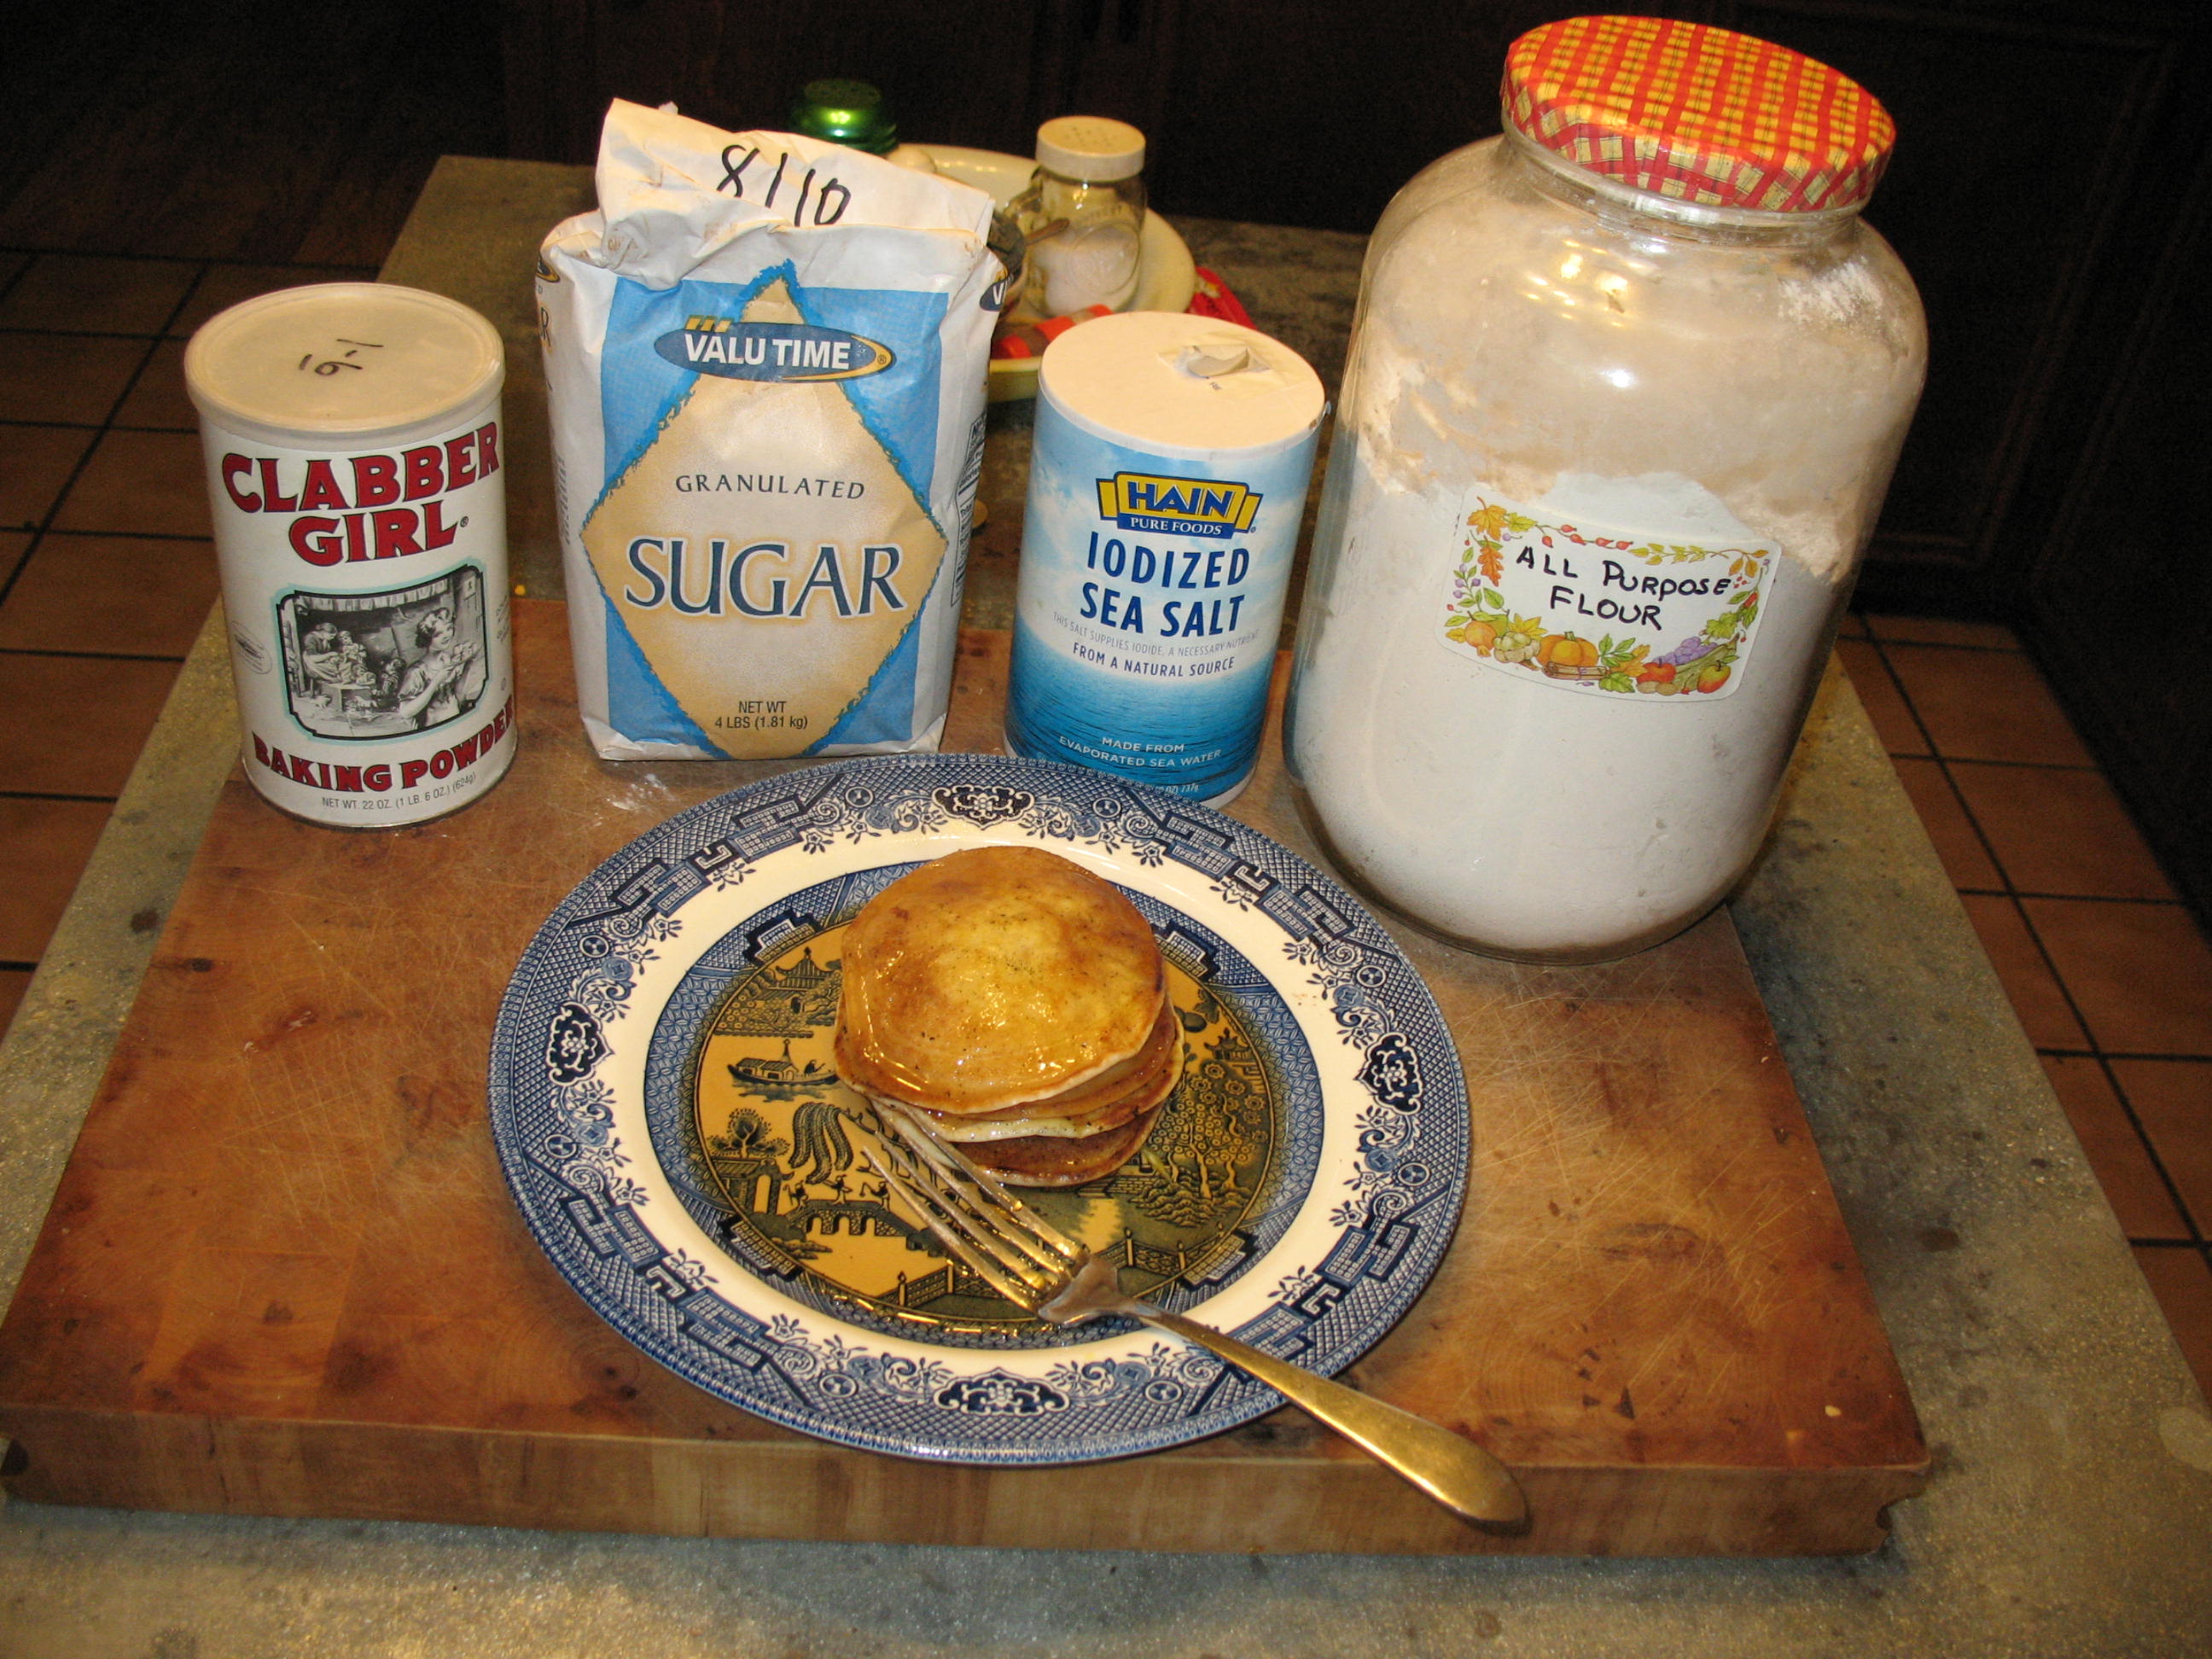
For years I made pancakes using a recipe that called for eggs, milk, and oil. The pancakes were good, but they were kind of a hassle to make. Also, eggs and milk kept me from making pancakes when going light-weight camping because it would entail taking powdered eggs (yech) and powdered milk and reconstituting them before cooking. About 20 years ago I went camping with a friend of mine who taught me how to make pancakes the quick and easy way, and I’ve been doing it ever since. The nice thing about this recipe is that you can make these pancakes using nothing but items from your food storage. I have also thrown in my mother’s recipe for pancake syrup; again, this requires only ingredients that can be part of your food storage. 
Here’s the pancake recipe. It will make four to six pancakes depending on the size.
Ingredients:
1/2 cup all purpose, or whole wheat, or fresh ground flour
1 teaspoon of baking powder
1/4 teaspoon salt
2 teaspoons sugar, honey, molasses, etc
water
1 tablespoon shortening, lard, or oil
Yes, that’s all there is to it.
Mix the flour, baking powder, salt, and sugar together.
Add water a little at a time, stirring until the batter is a little thicker than heavy cream
Use shortening, lard or oil to grease your skillet or griddle
Pour out batter onto griddle in pancake size pools
Cook until bubbles form in the top of batter and burst
Flip pancakes over and brown the other side
Stack pancakes on a plate
Add butter, margarine, or butter spray if desired
Cover with syrup
Eat and enjoy 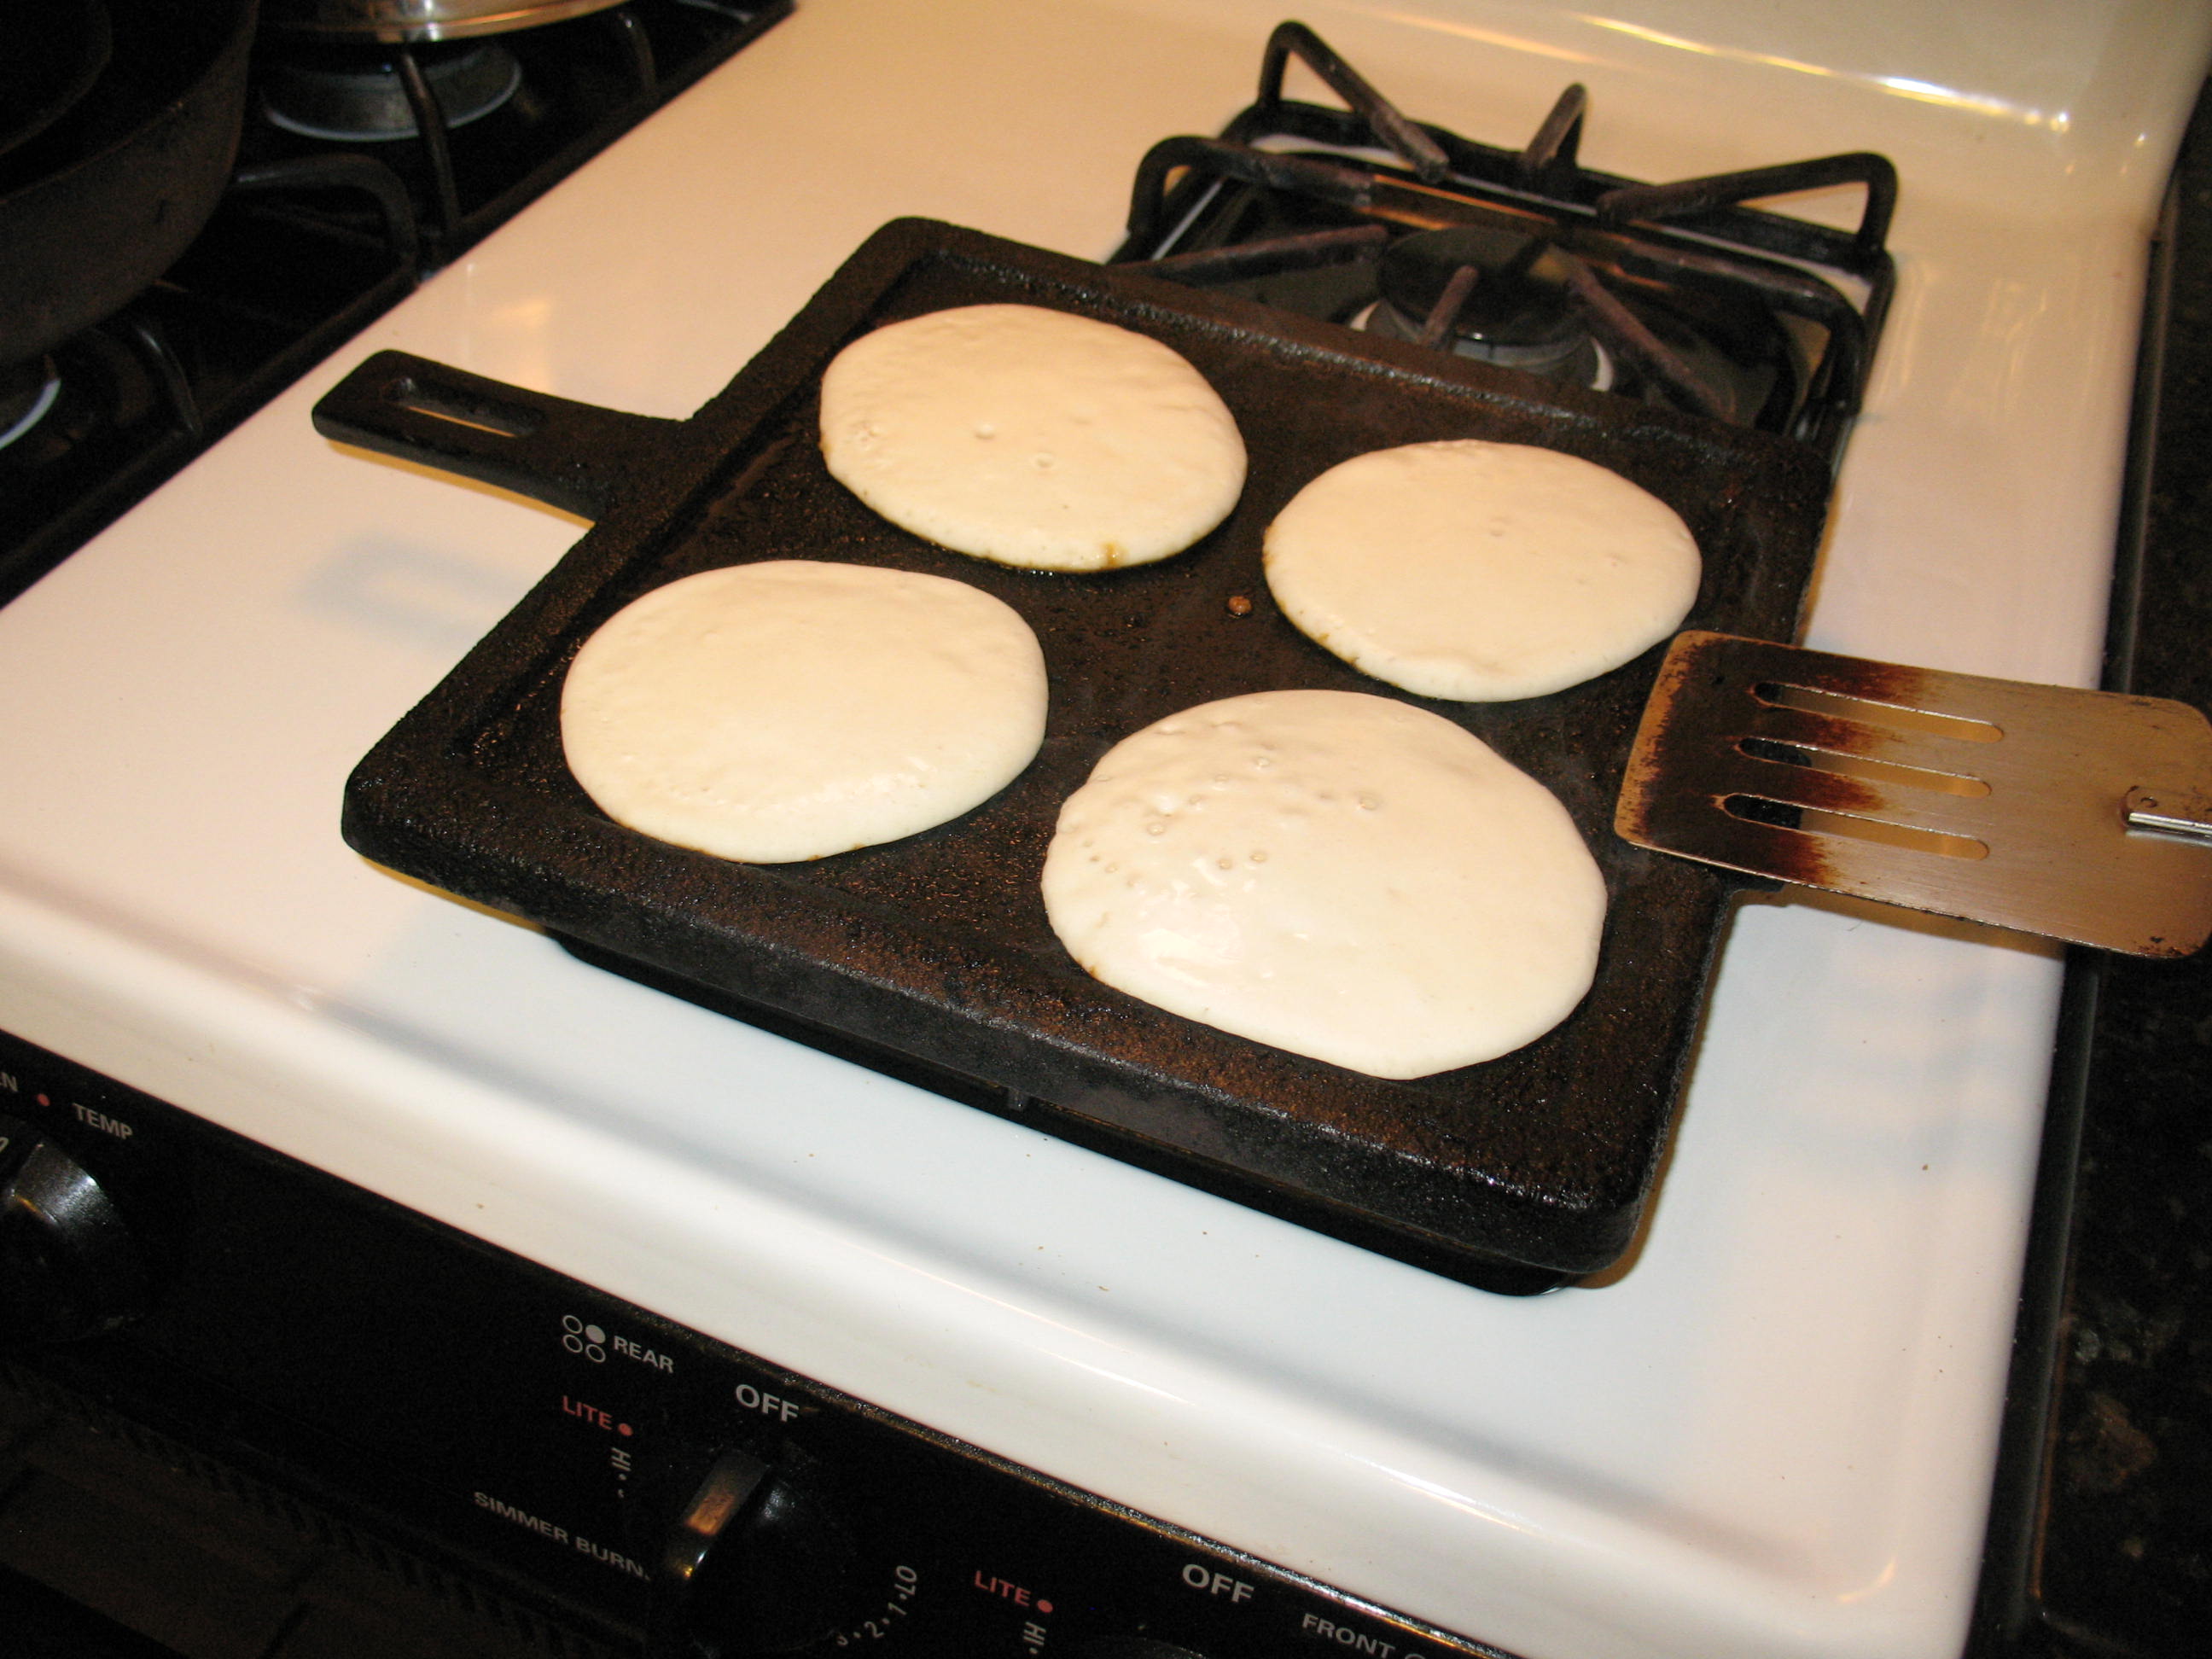
The great thing about this recipe, other than tasting good, is that you can pre-mix the dry ingredients and carry them trail camping. Another alternative is to by self-rising flour which is nothing but flour, salt, and baking powder already mixed together. My friend that taught me how to make this kind of pancakes always carried some brown sugar on the trail. He would mix a little water with the brown sugar to make syrup. Not as good as maple flavored syrup, but not bad at all.
When I was a kid there was no way that we could afford fresh maple syrup. Mama made our pancake syrup. Here’s her recipe: 
Ingredients:
2 cups white sugar
1 cup water (yeah, that’s right, twice as much sugar as water)
1 teaspoon of maple flavored extract
Mix sugar and water in a cooking pot
Heat over a low flame. Do not boil
Stir as the mixture heats until sugar is dissolved
Add maple flavored extract and stir
That’s all there is to it. Enjoy.
