I don’t care what it is that you’re interested in, there’s always going to be somebody that is sure that they know how to do it better, that they are more knowledgeable, more evolved, and more precise. In short, there are always snobs. Of course the classic example is the wine snob, but these guys exist in every human endeavor, including prepping.
I was reading some stuff about food storage on a forum the other day. One guy had asked how he could tell if five-gallon plastic buckets were food grade or not. The rest of the thread was taken up by several individuals who were desperately trying to one-up each other on how to be absolutely certain that a given bucket was suitable for food storage. My favorite was a guy who pointed out that even though the plastic bucket itself might be food grade, it is vitally important to know if the lubricant used on the bucket mold is also food grade and that this would involve contacting the manufacturer to find out what kind of lubricant they are using. Really? Numerous possible comments flashed through my mind. “Aren’t you going to wash out the bucket?” or “ Aren’t you going to put the food inside of sealed plastic food storage bags before you put it in the bucket?” or “ Are you aware that there is a Federal standard for how many rodent hairs are in that hotdog that you are eating?” But I’m not a member of that forum, so I just shook my head and went my merry way.
Another one I read not long ago was from some guy railing about how buying anything but original factory made metal gun magazines was just a waste of money. Well, maybe so; but I’ve been using Tapco polymer magazines for years, and I’ve fired hundreds and hundreds of rounds through them. I’ve never had a problem except with their SKS magazines and everybody has trouble with those because an SKS was never meant to have a magazine. You can argue with me till you’re blue in the face but I’m still not going to pay the extra $8.00 just because it has Colt stamped on it.
I could give many more examples, but I’m going to stop my rant right here. I’m just trying to tell you that you should seek answers to questions that you have about prepping, but that you should not take every answer at face value. Our world is rife with, mall ninjas, prepper snobs, and experts that have never really done it. Don’t let them deter you from proceeding with your preps.
I just wanted to do a little follow-up on my June post about starting sweet potato slips and planting them.
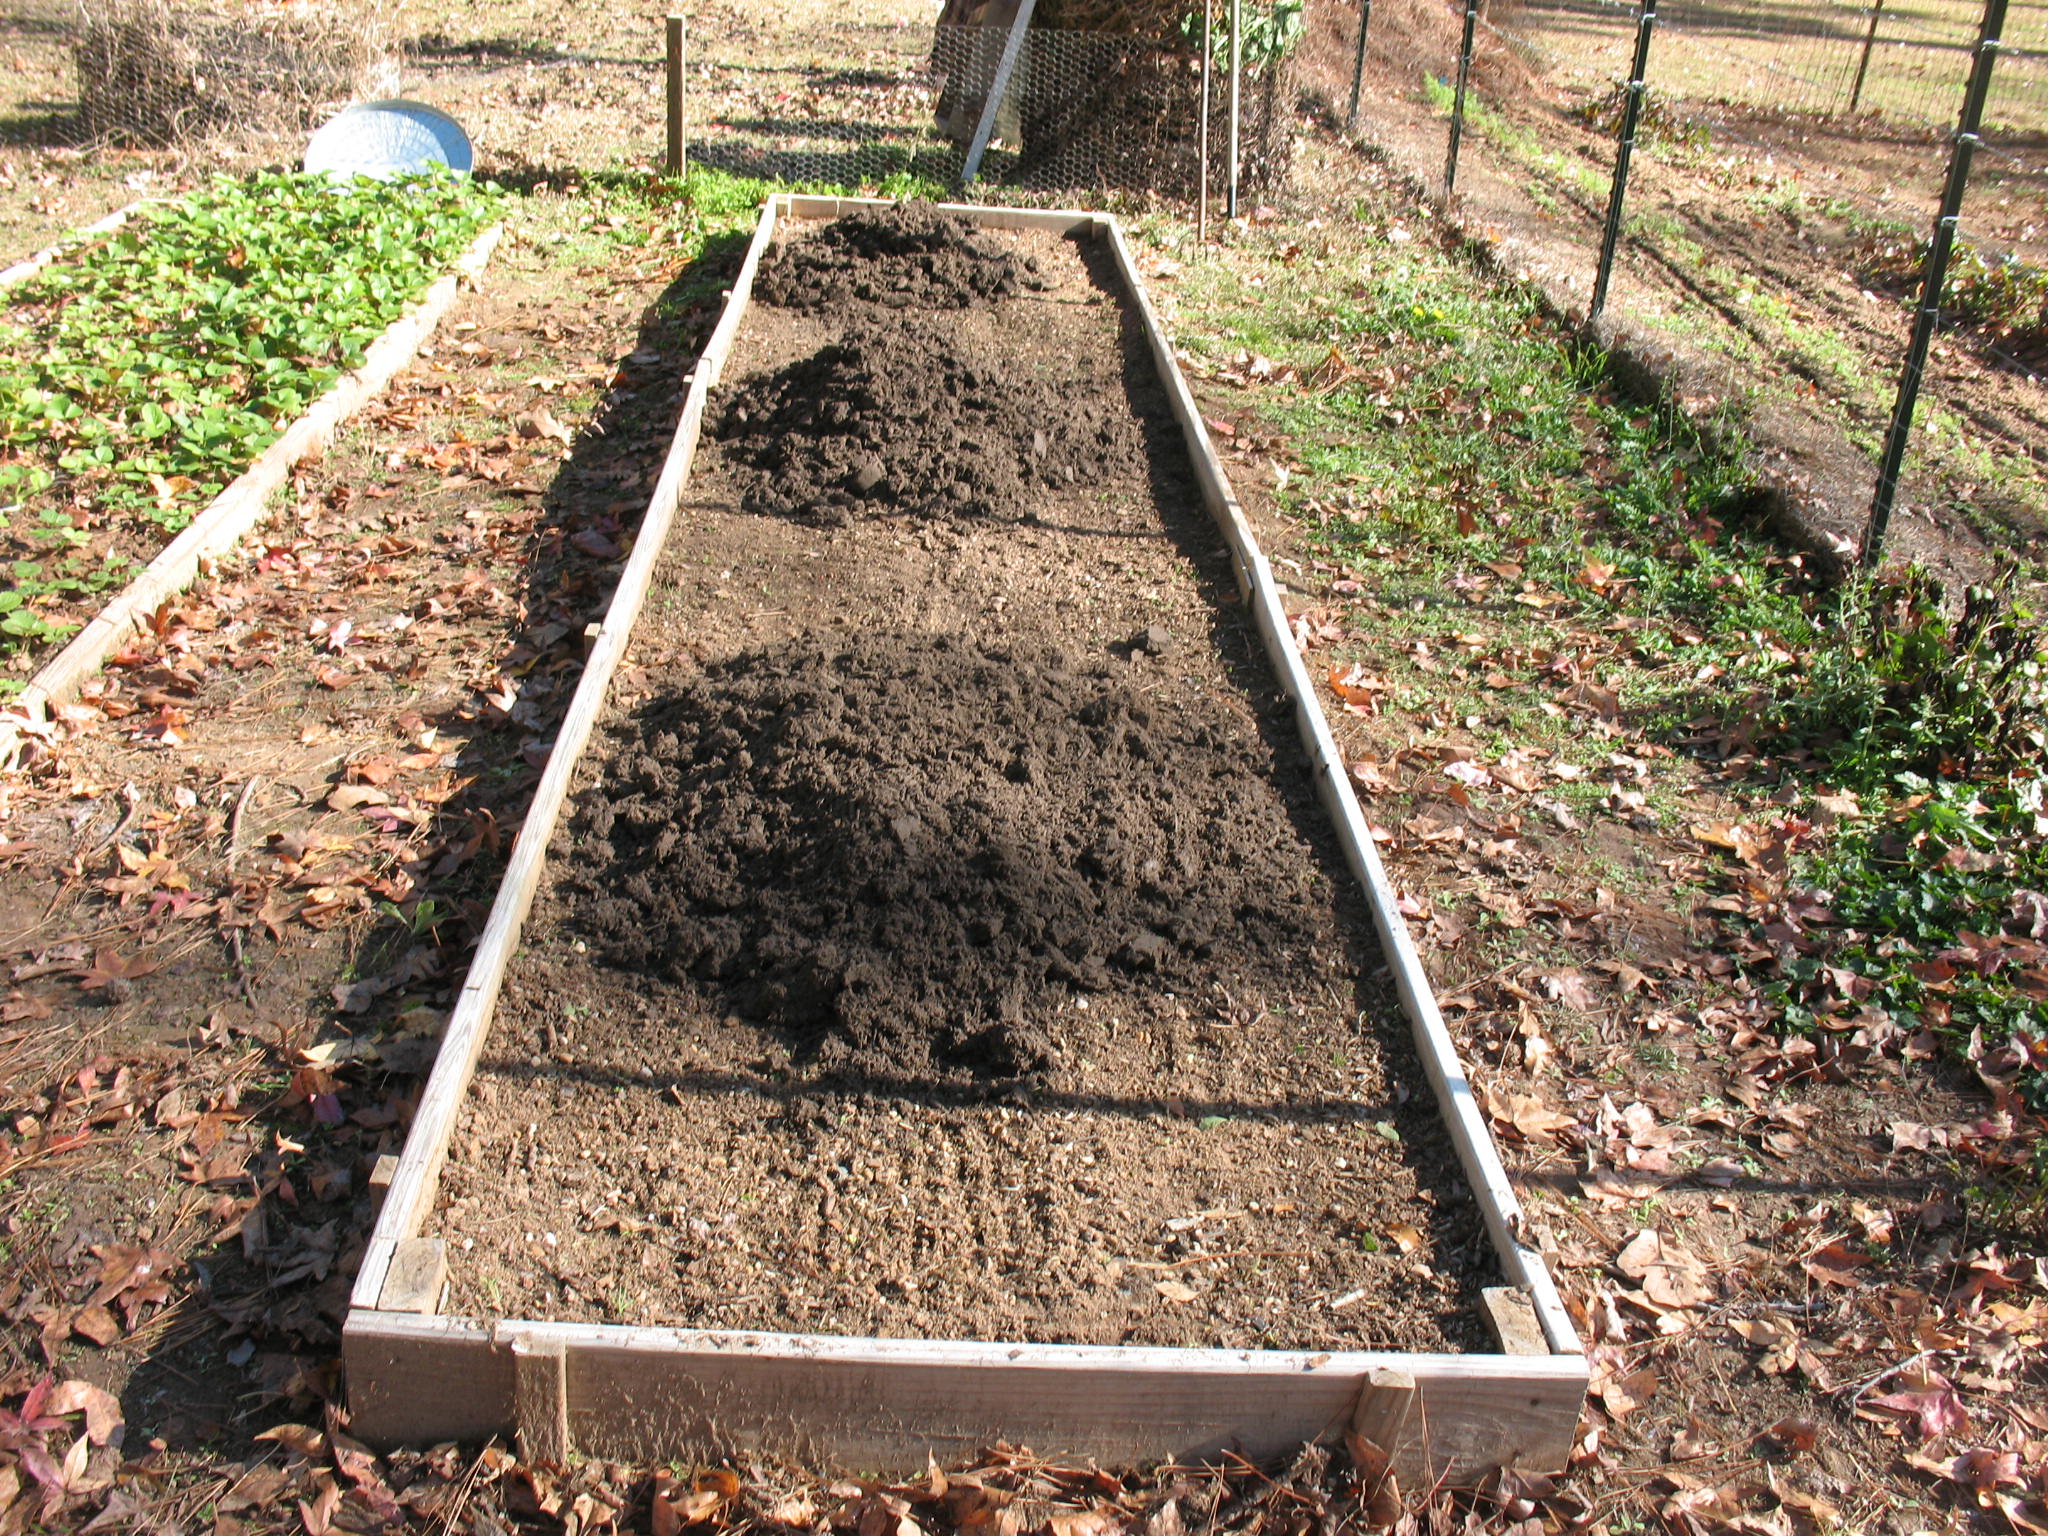
 I had originally planted 14 slips in a bed that measured about three feet by twelve feet. Of those 14 slips, 12 of them lived to maturity.
 In mid-October I decided that it was time to harvest them. Although we hadn’t had a frost yet, the weather was getting cooler and wetter, and the vines were beginning to lose a little of their color; so I decided I’d dig up at least one hill just to see if they were ready.
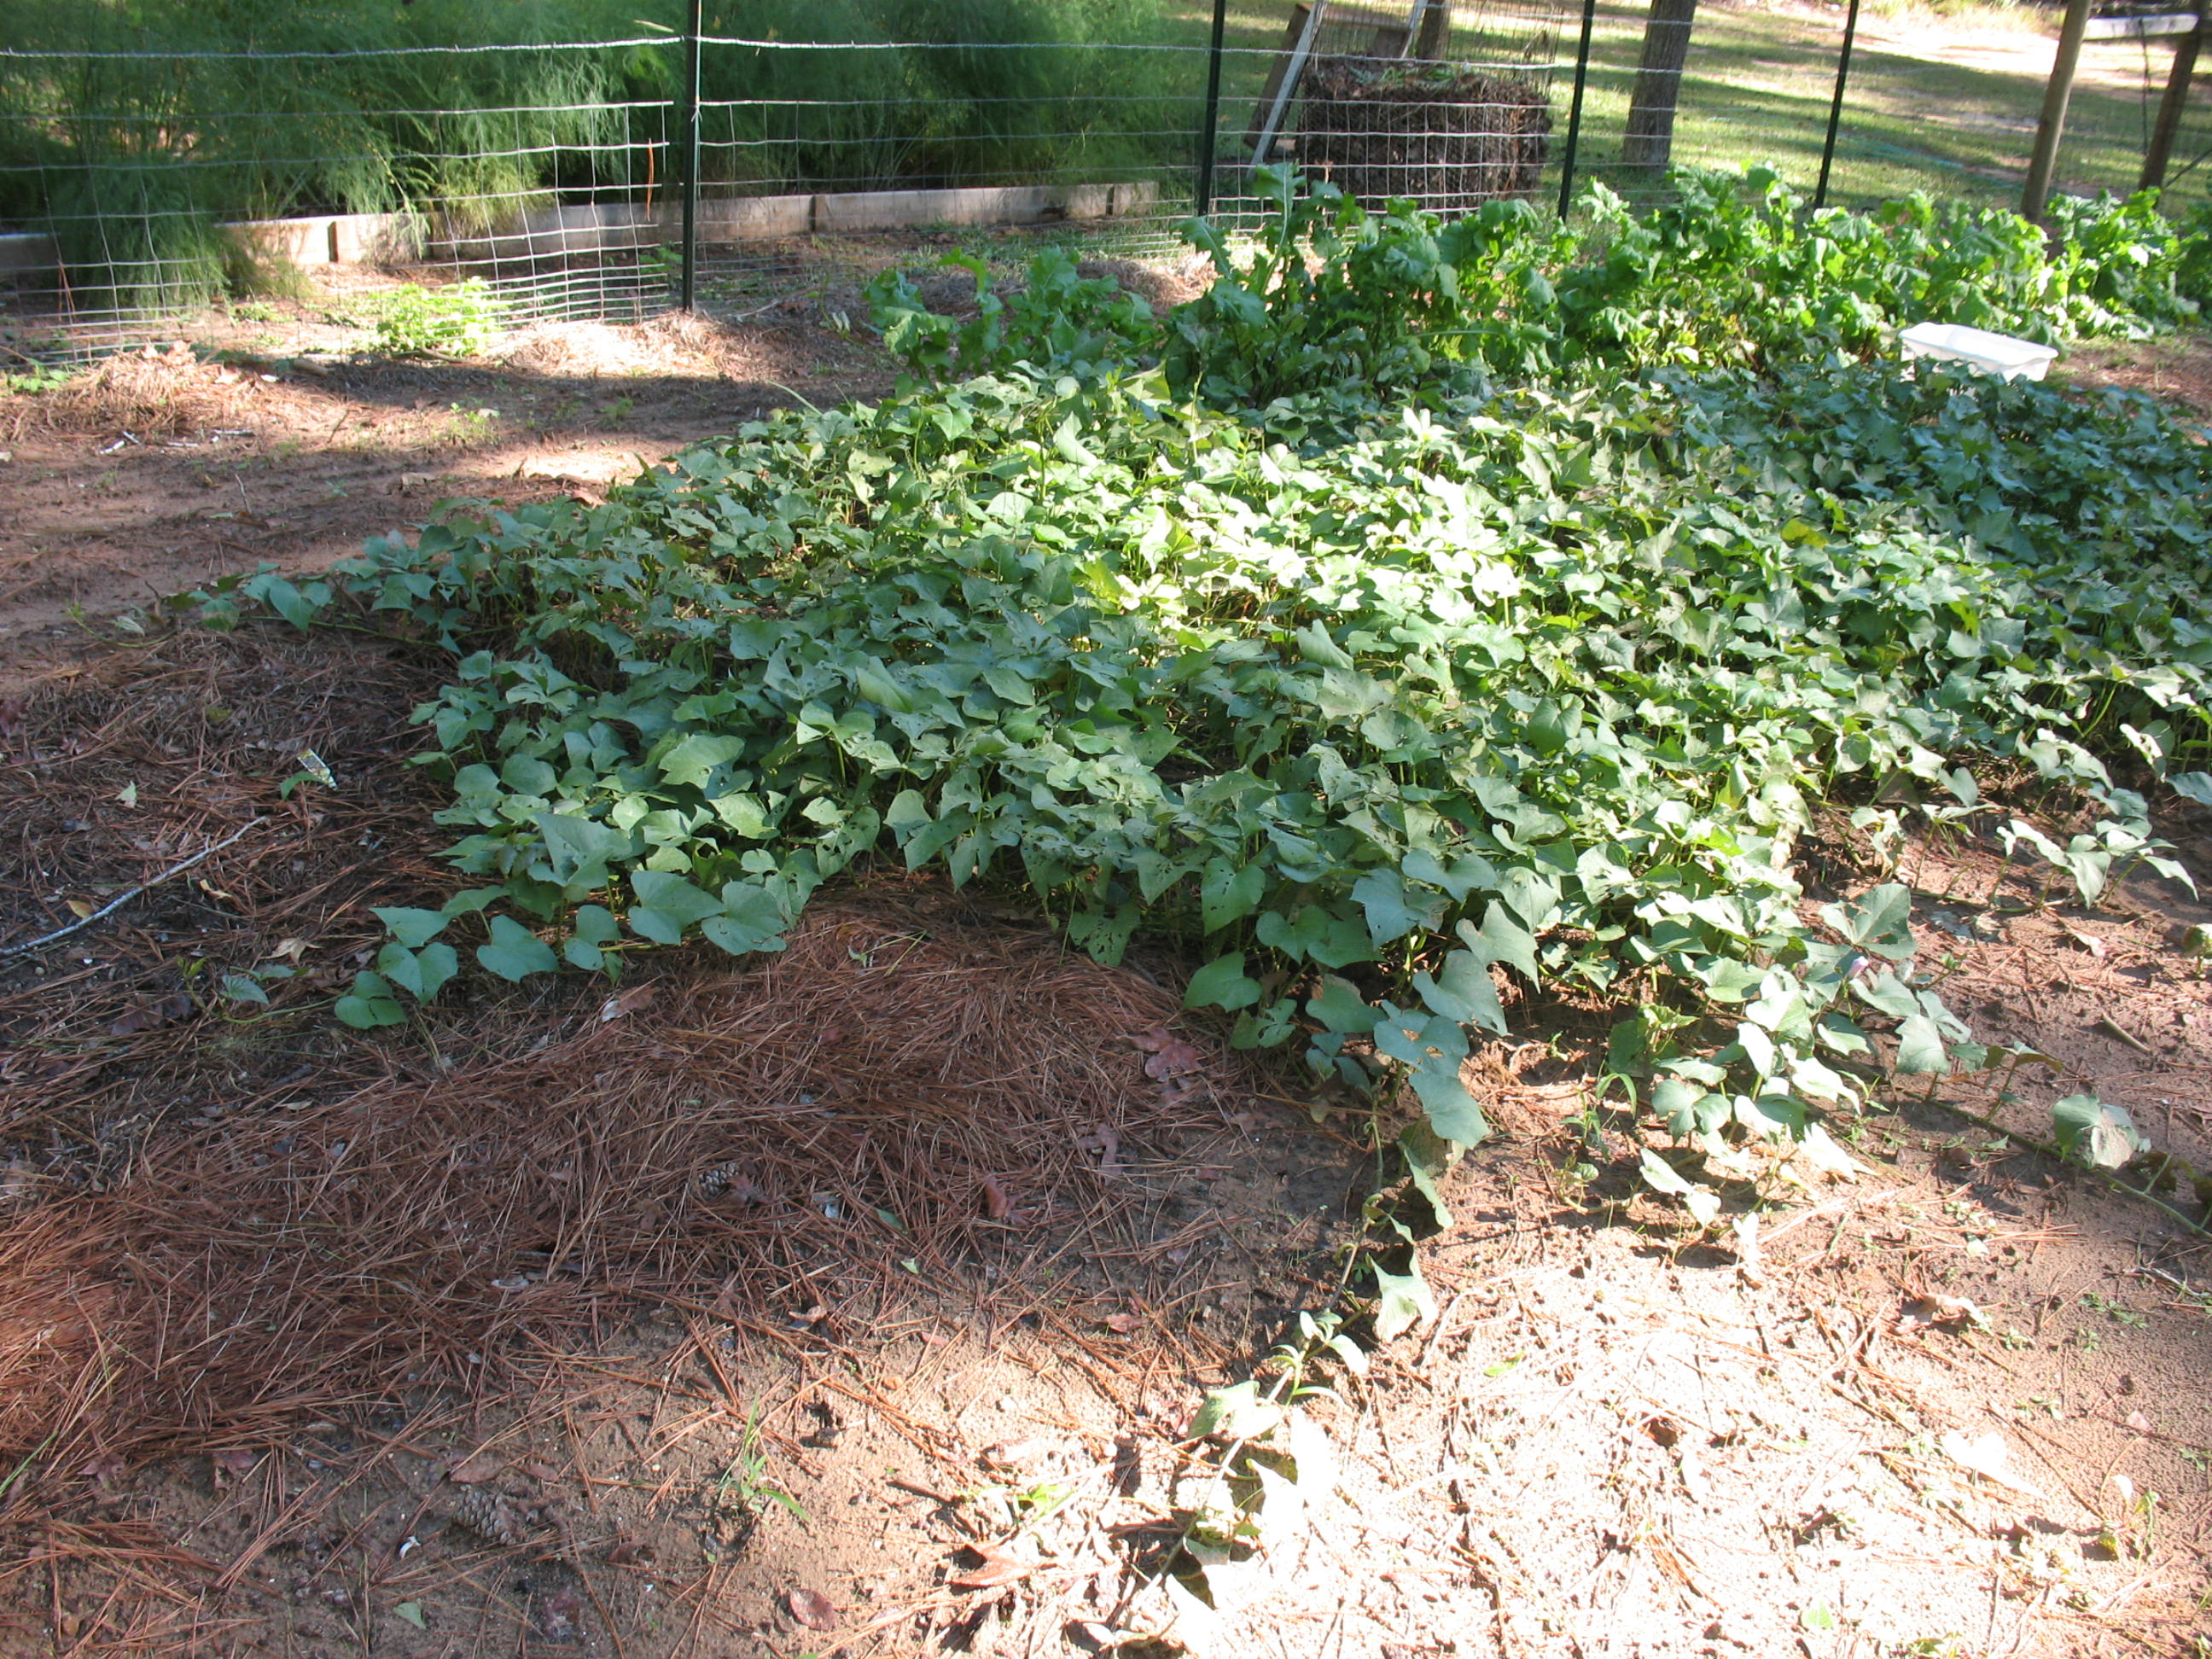
I pulled back the vines and could see a potato jutting up out of the ground, so I used my hands (thanks to the addition of a lot of sand the soil is very loose) and dug down around the potato. What was sticking out of the ground was just the tip of the iceberg. There was a pile of sweet potatoes down there.


I went ahead and dug all of the hills and laid the potatoes out in the sun so the skins would set.


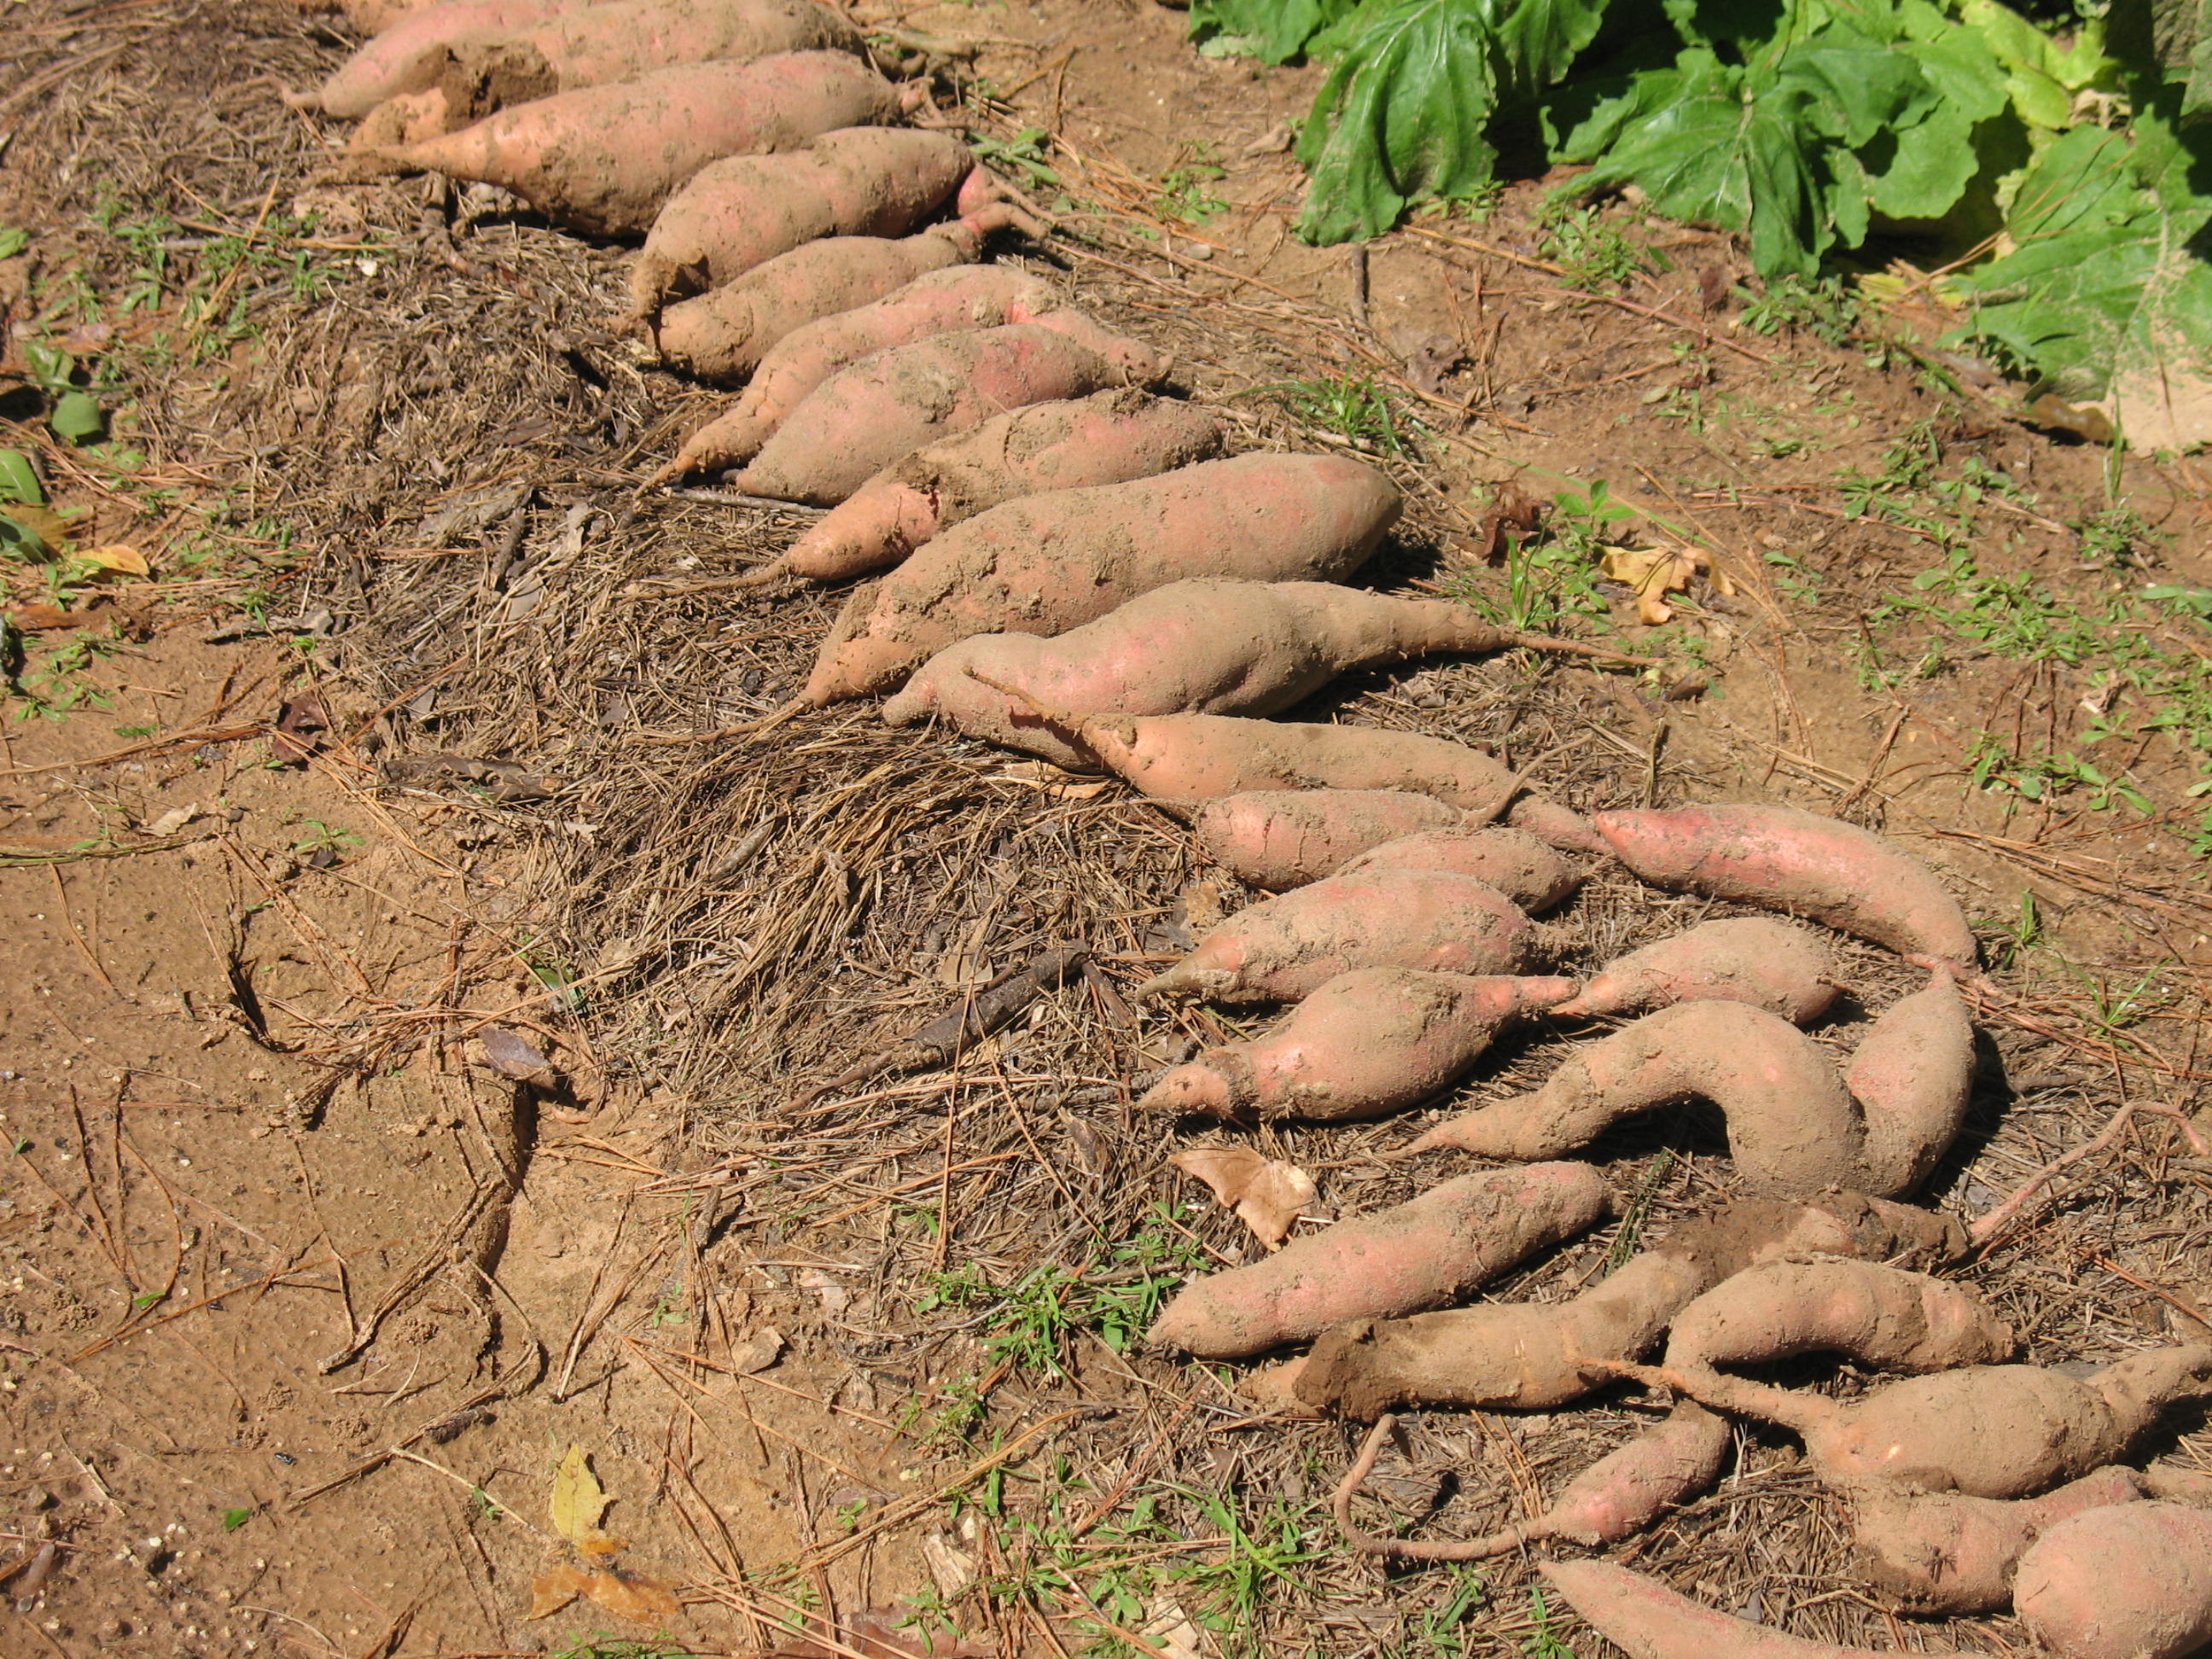
That afternoon I went out and brushed the dirt off of them (never wash them until you are ready to cook them) and hauled them up to the house. According to the scale I had 46 pounds of sweet potatoes. That’s an average of a little more than 1.7 pounds per square foot. Pretty good return on investment.

I laid the sweet potatoes out, not touching, in a warm, dark room to cure for two weeks. This increases the sugar content of the potatoes. After two weeks we started eating and boy are they good.
By the way, did you know that sweet potatoes are a staple of the Okinawan diet, and that the Okinawans have the longest average life expectancy of any people on earth? Could it be the sweet potatoes
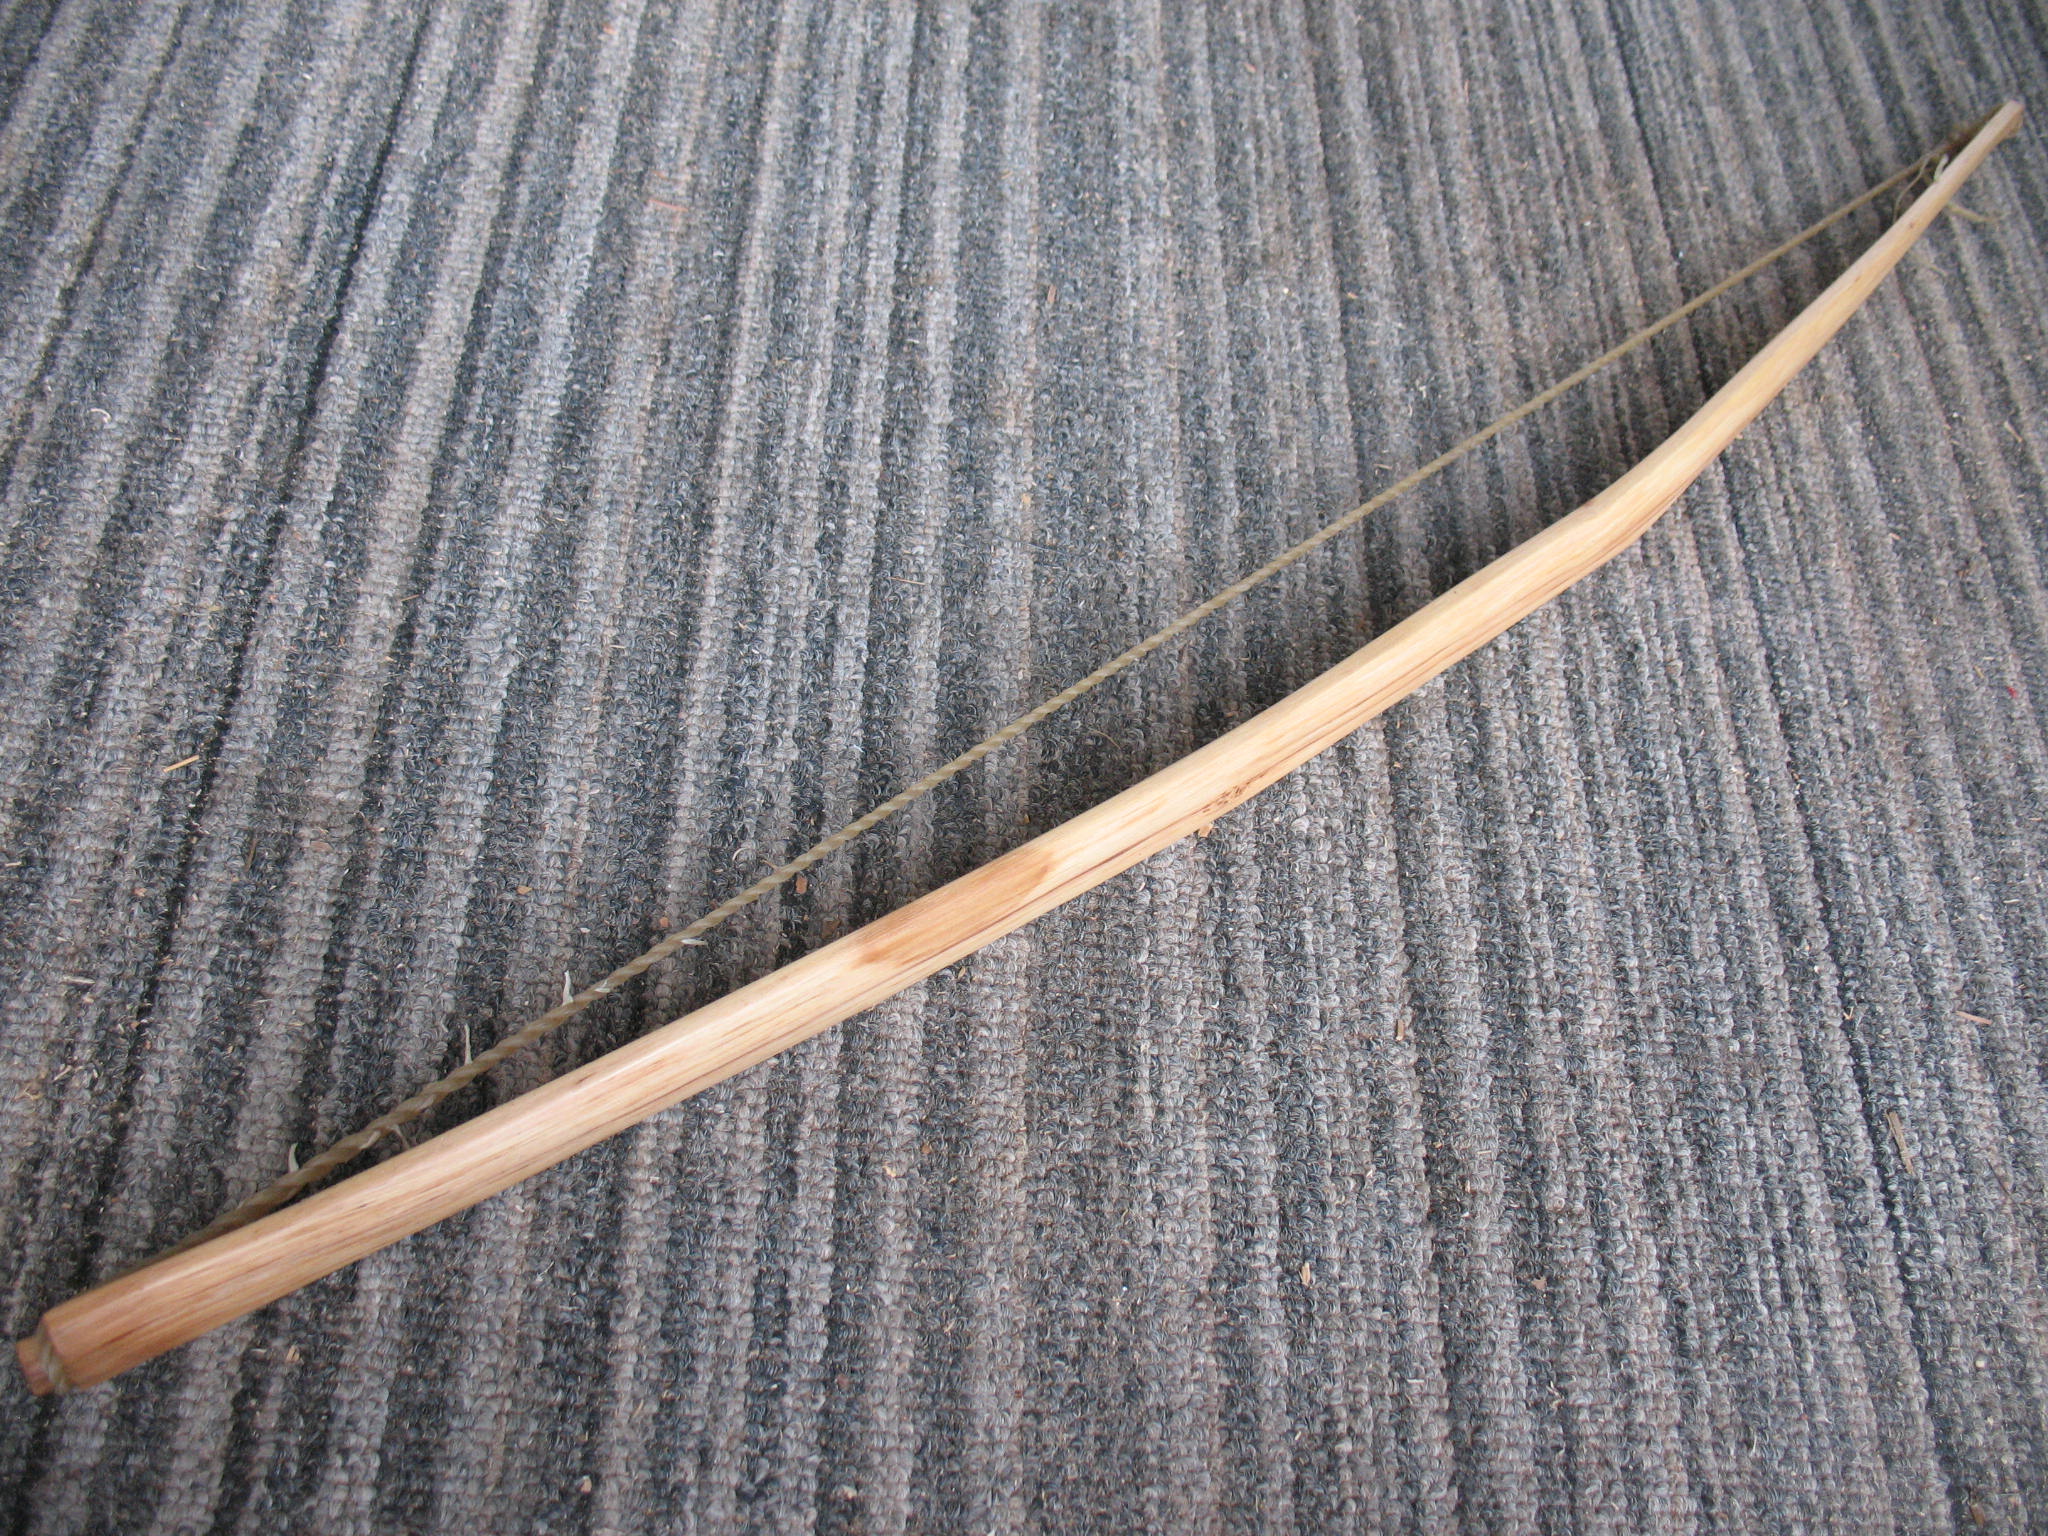
Montagnard is a French term referring to several hill tribes in Southeast Asia. Many Montagnard tribesmen, with the help of U.S. Special Forces, joined in the fight against the Viet Cong during the Vietnam War. Historically, the Montagnard people used crossbows for hunting and self defense. These crossbows are simple and no-frills, but they are very effective and can be very powerful.

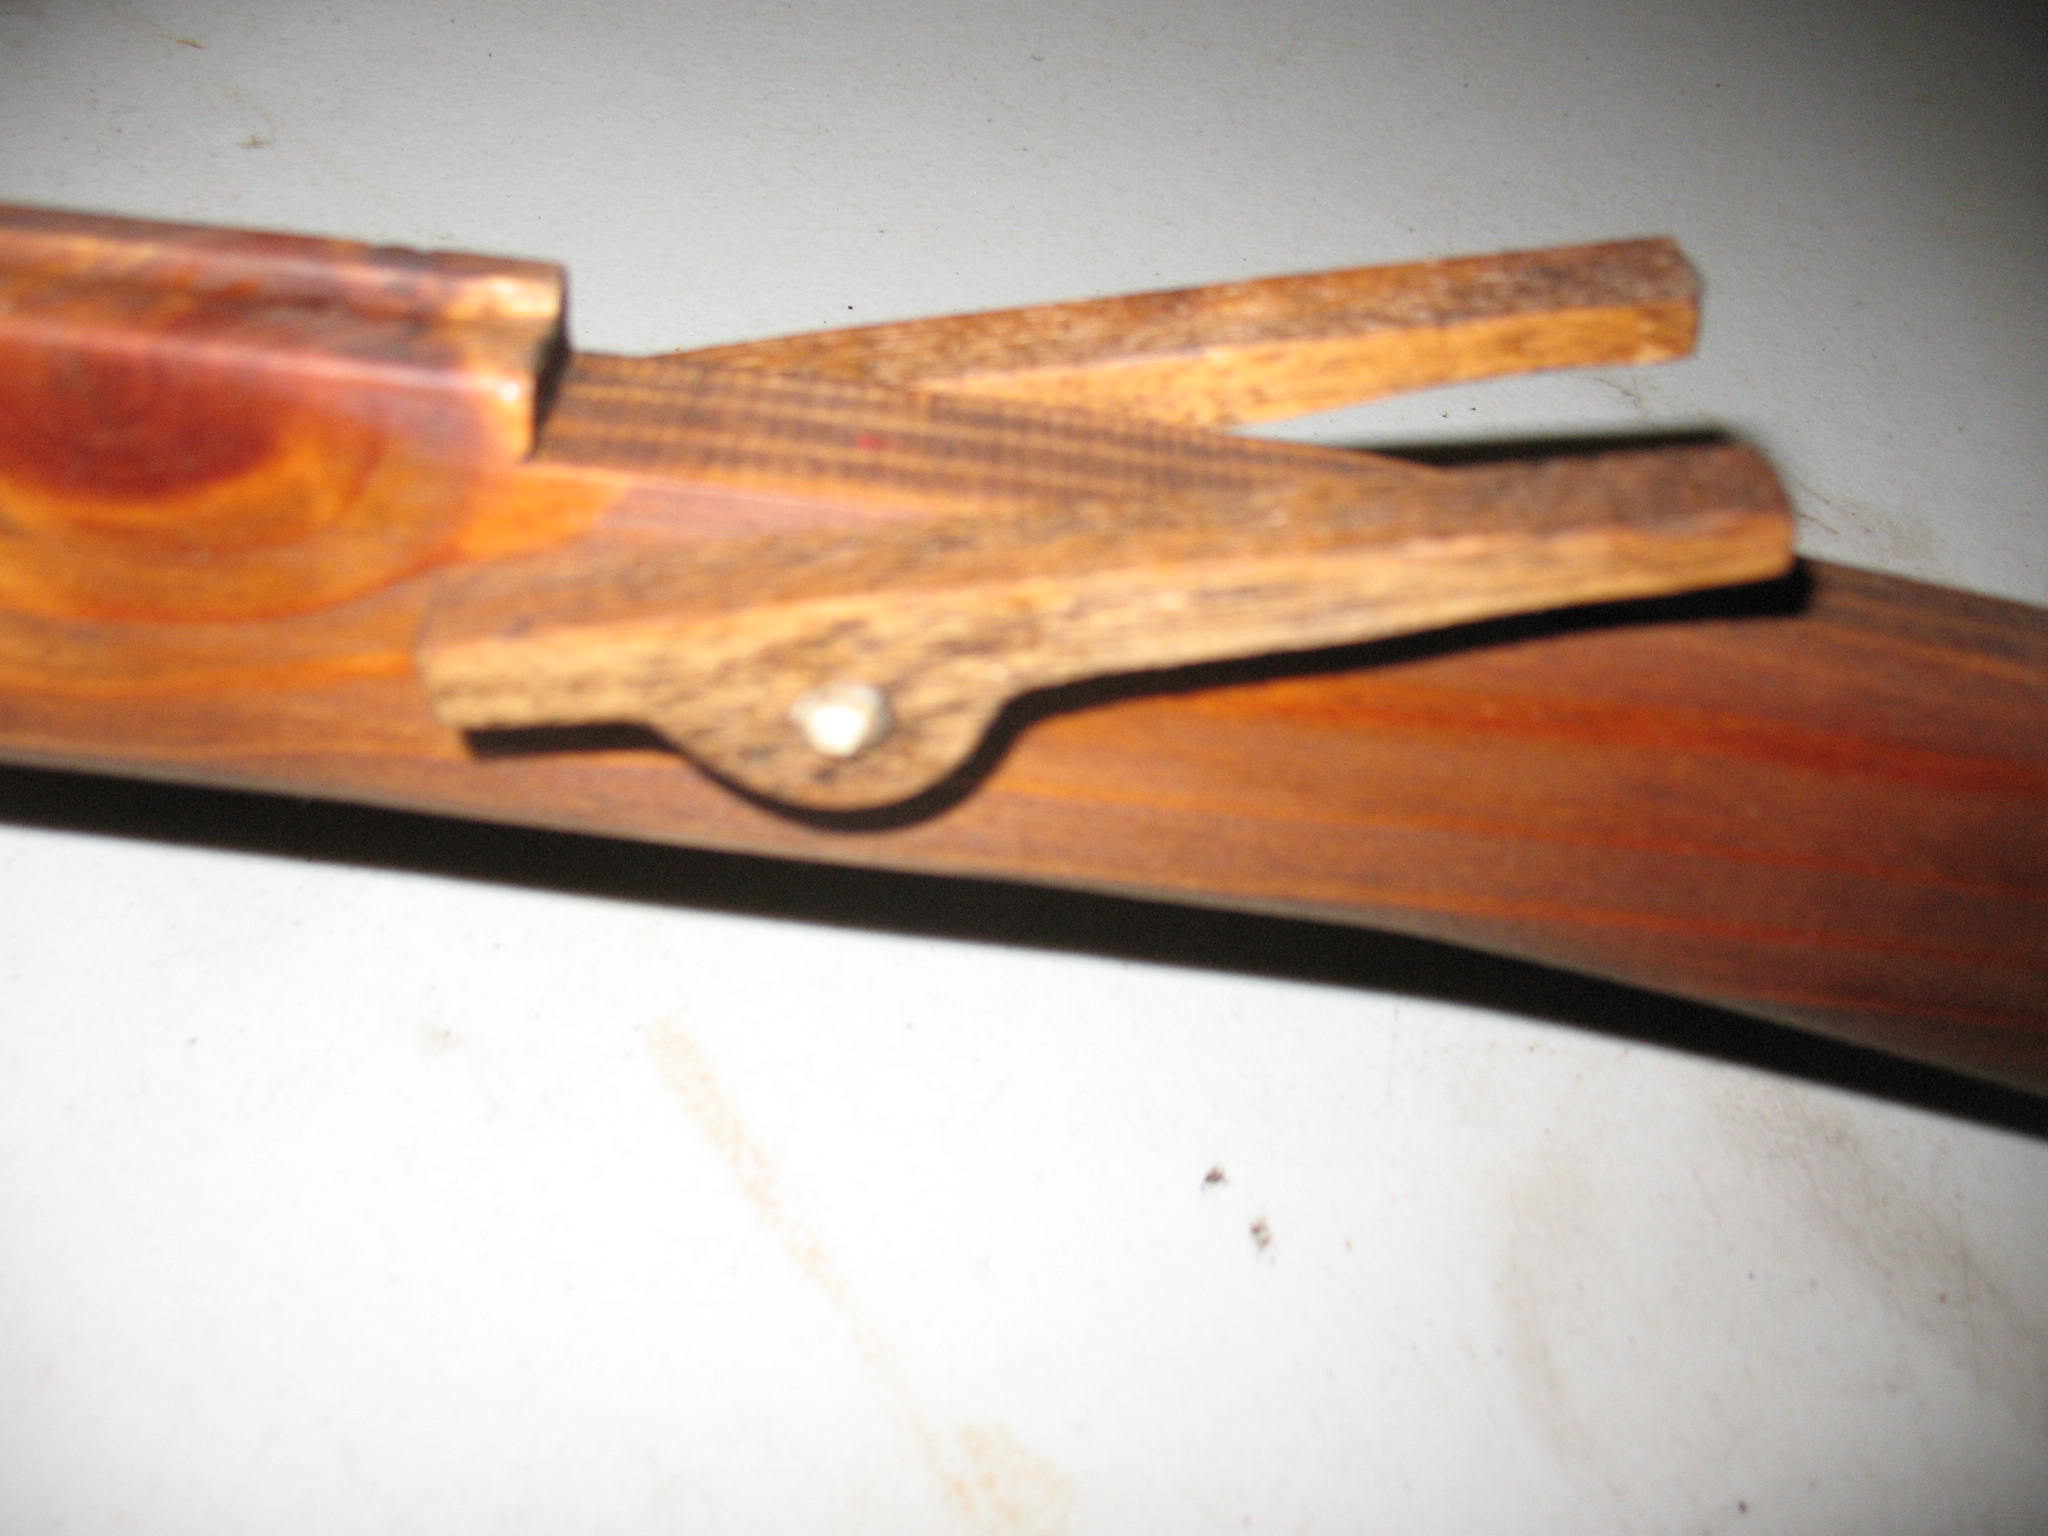
I have recently become interested in crossbows, and for my first project I decided to build a copy of a Hmong crossbow. Although there are tribal and individual variations in these crossbows, they all work pretty much the same. The major difference that I found in these bows is the trigger system. Some of the bows used a “T” shaped wooden trigger that drops down through a slot in the tiller (stock). Other bows use a little lever on the side of the tiller that lifts the string when you push down on it with your thumb. I used the “T” trigger on the first bow that I built, but I couldn’t get it to work reliably enough to suit me. I ditched the “T” trigger and tried out the lever system. This worked very reliably, but because the lever is mounted on the right side of the bow it tended to lift the right side of the string first and thus caused the bow to shoot to the left. I corrected this short-coming by putting a lever on both sides of the tiller with a dowell connecting the two levers. This lifts both sides of the string at the same time, and although it is probably not strictly traditional, it makes the bolt (arrow) fly much straighter.
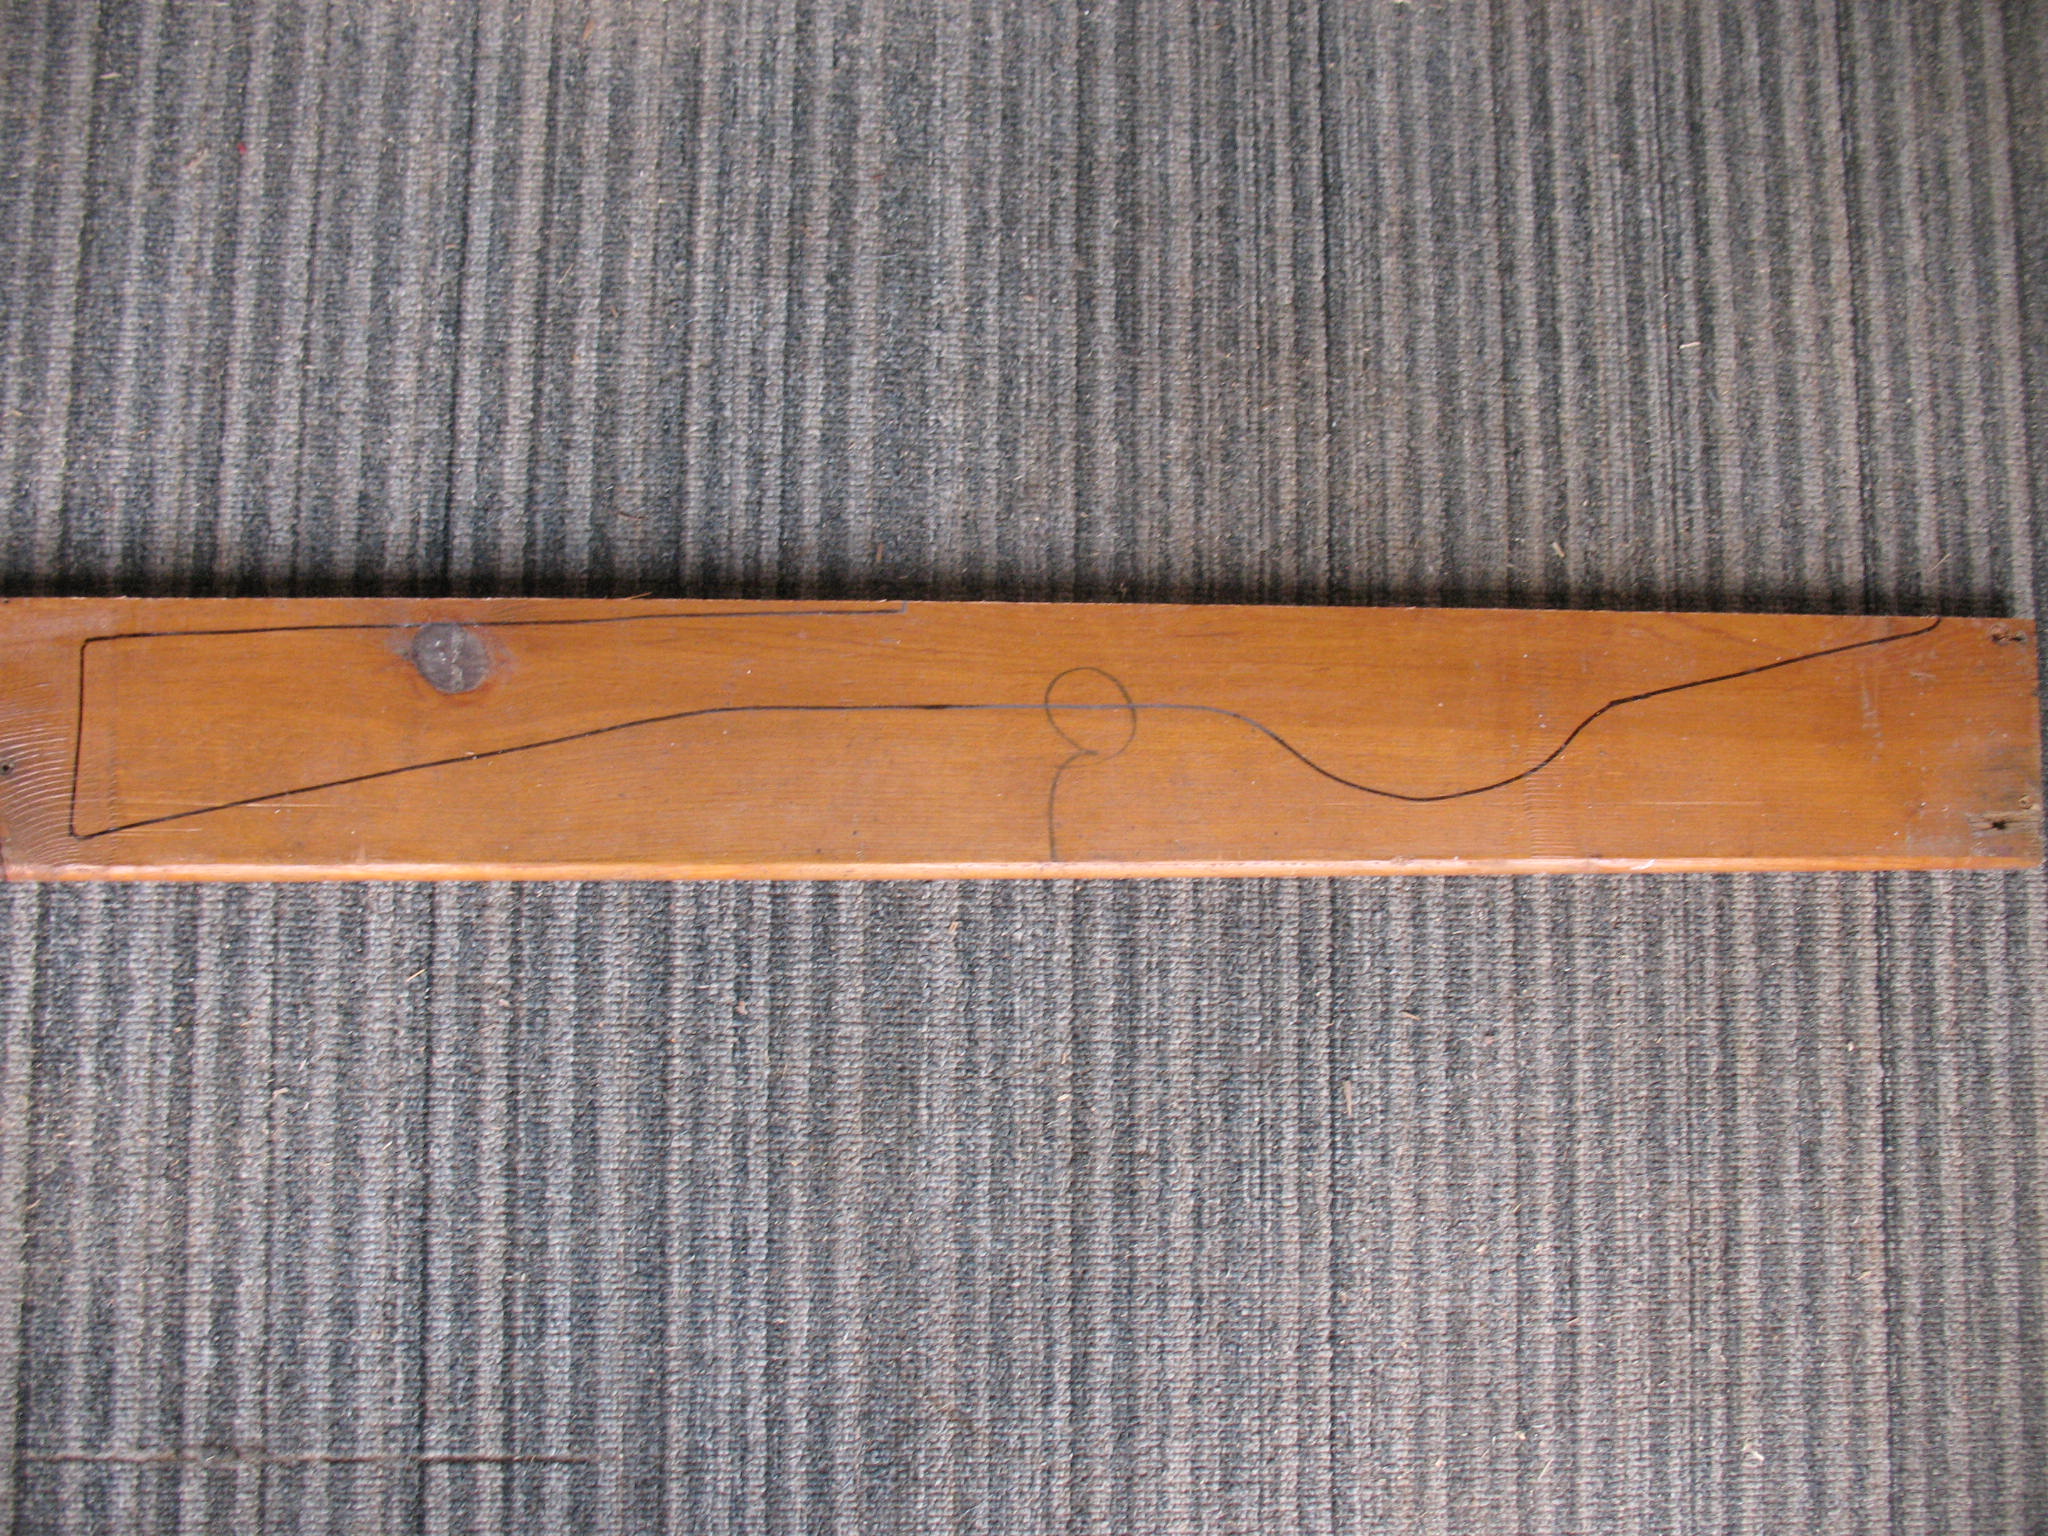
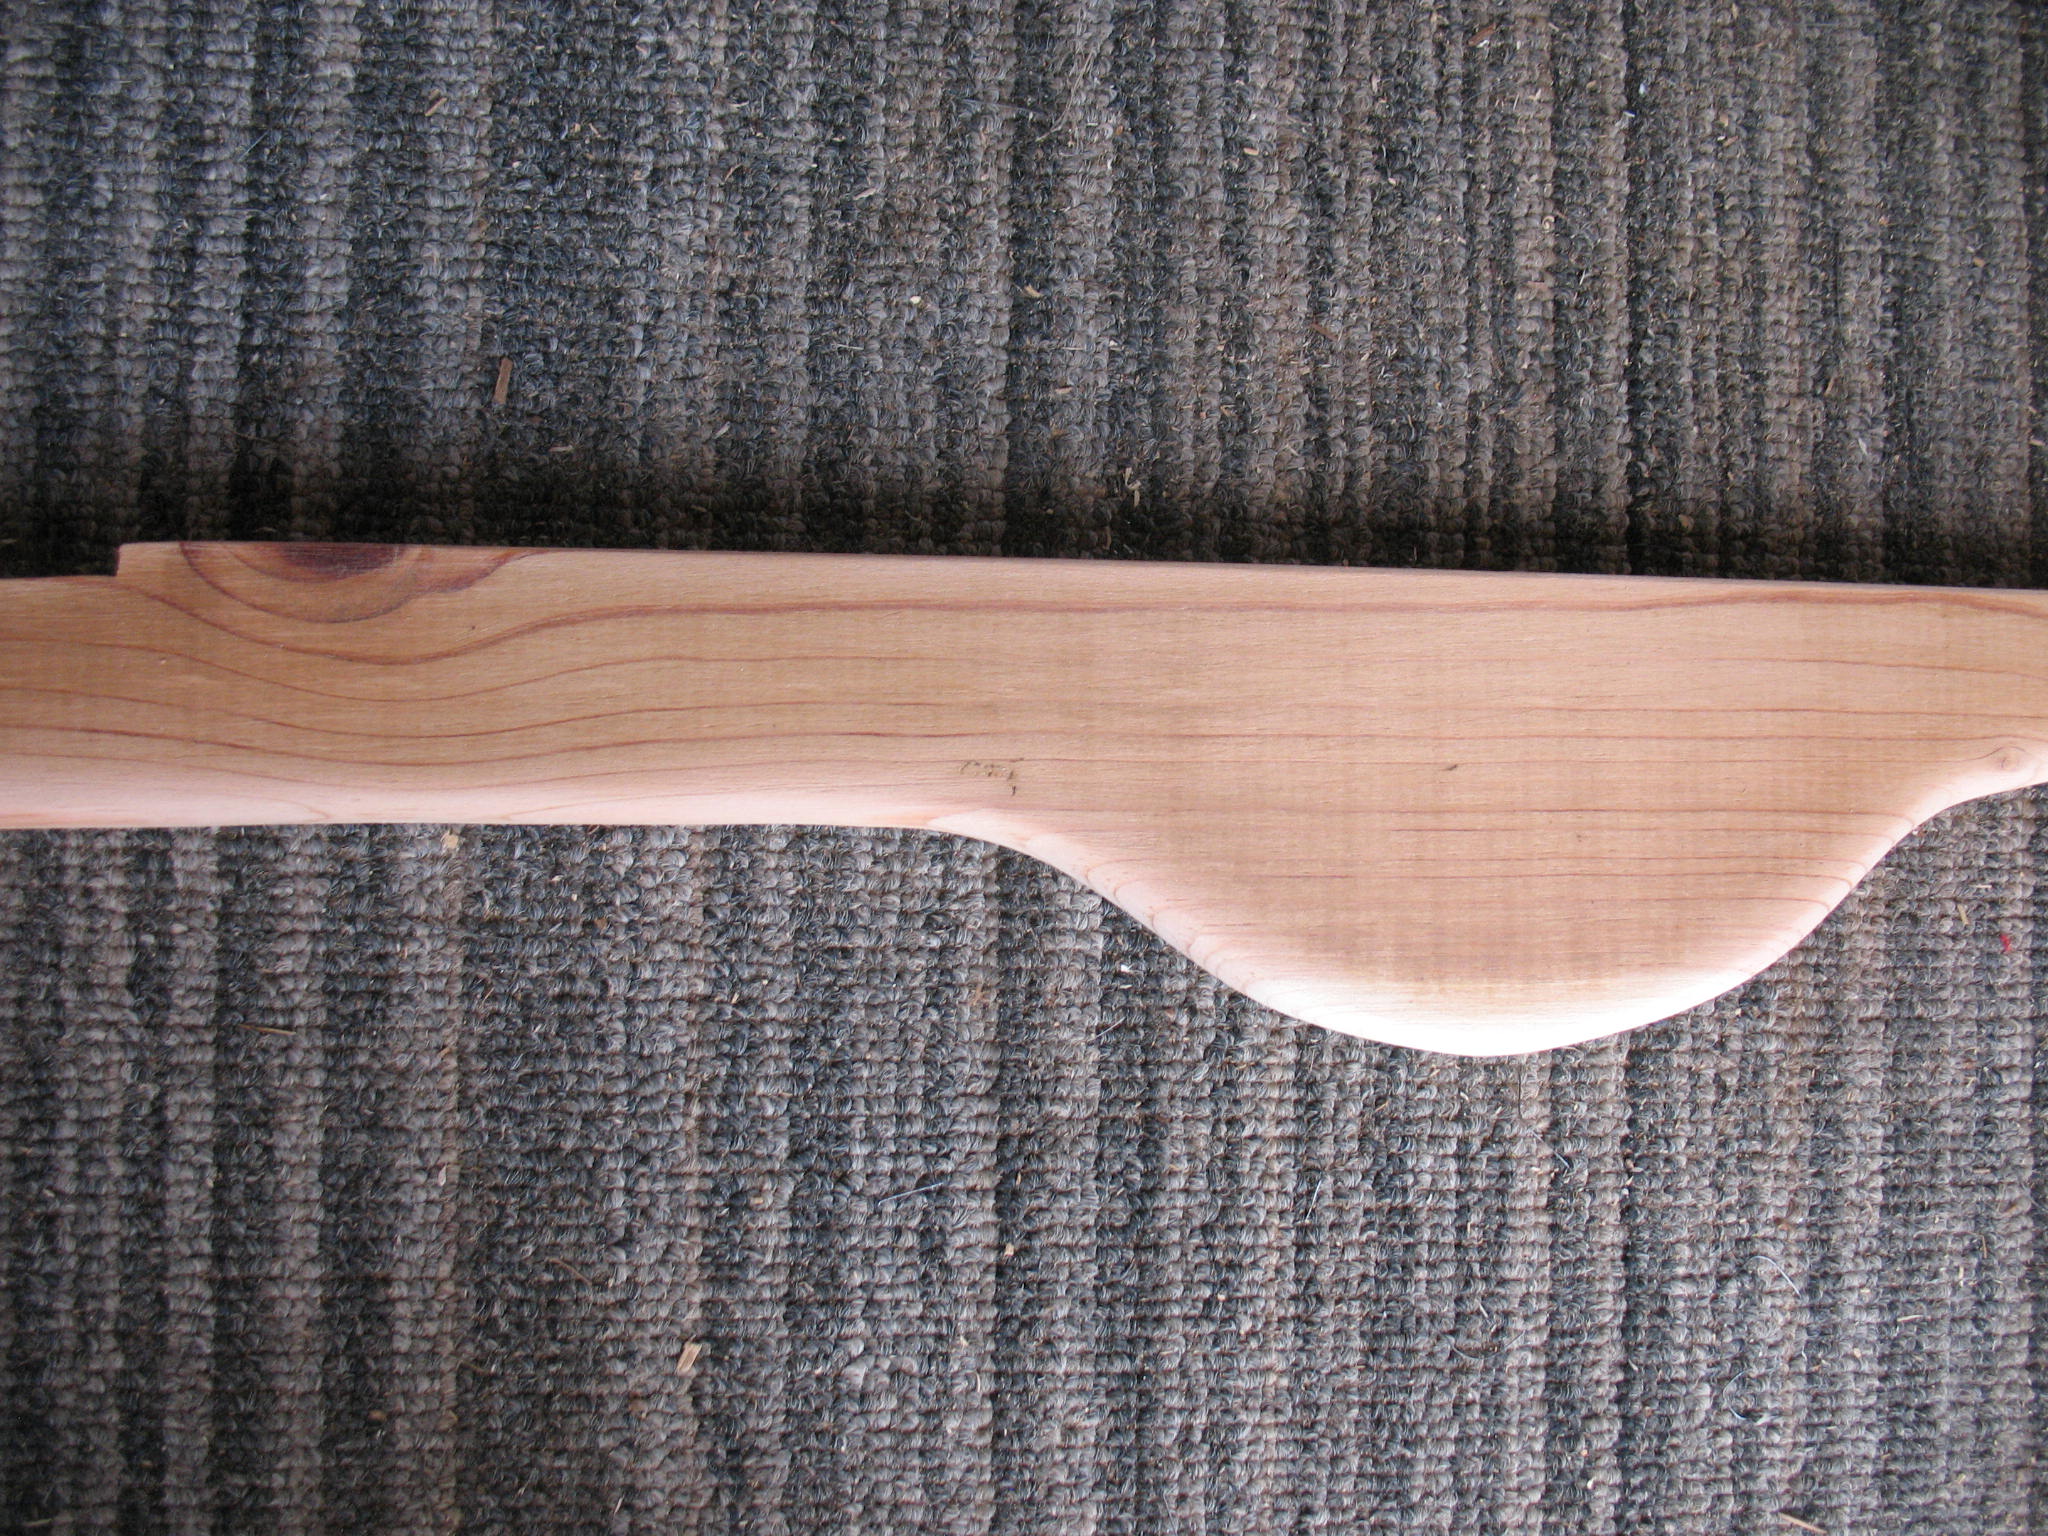
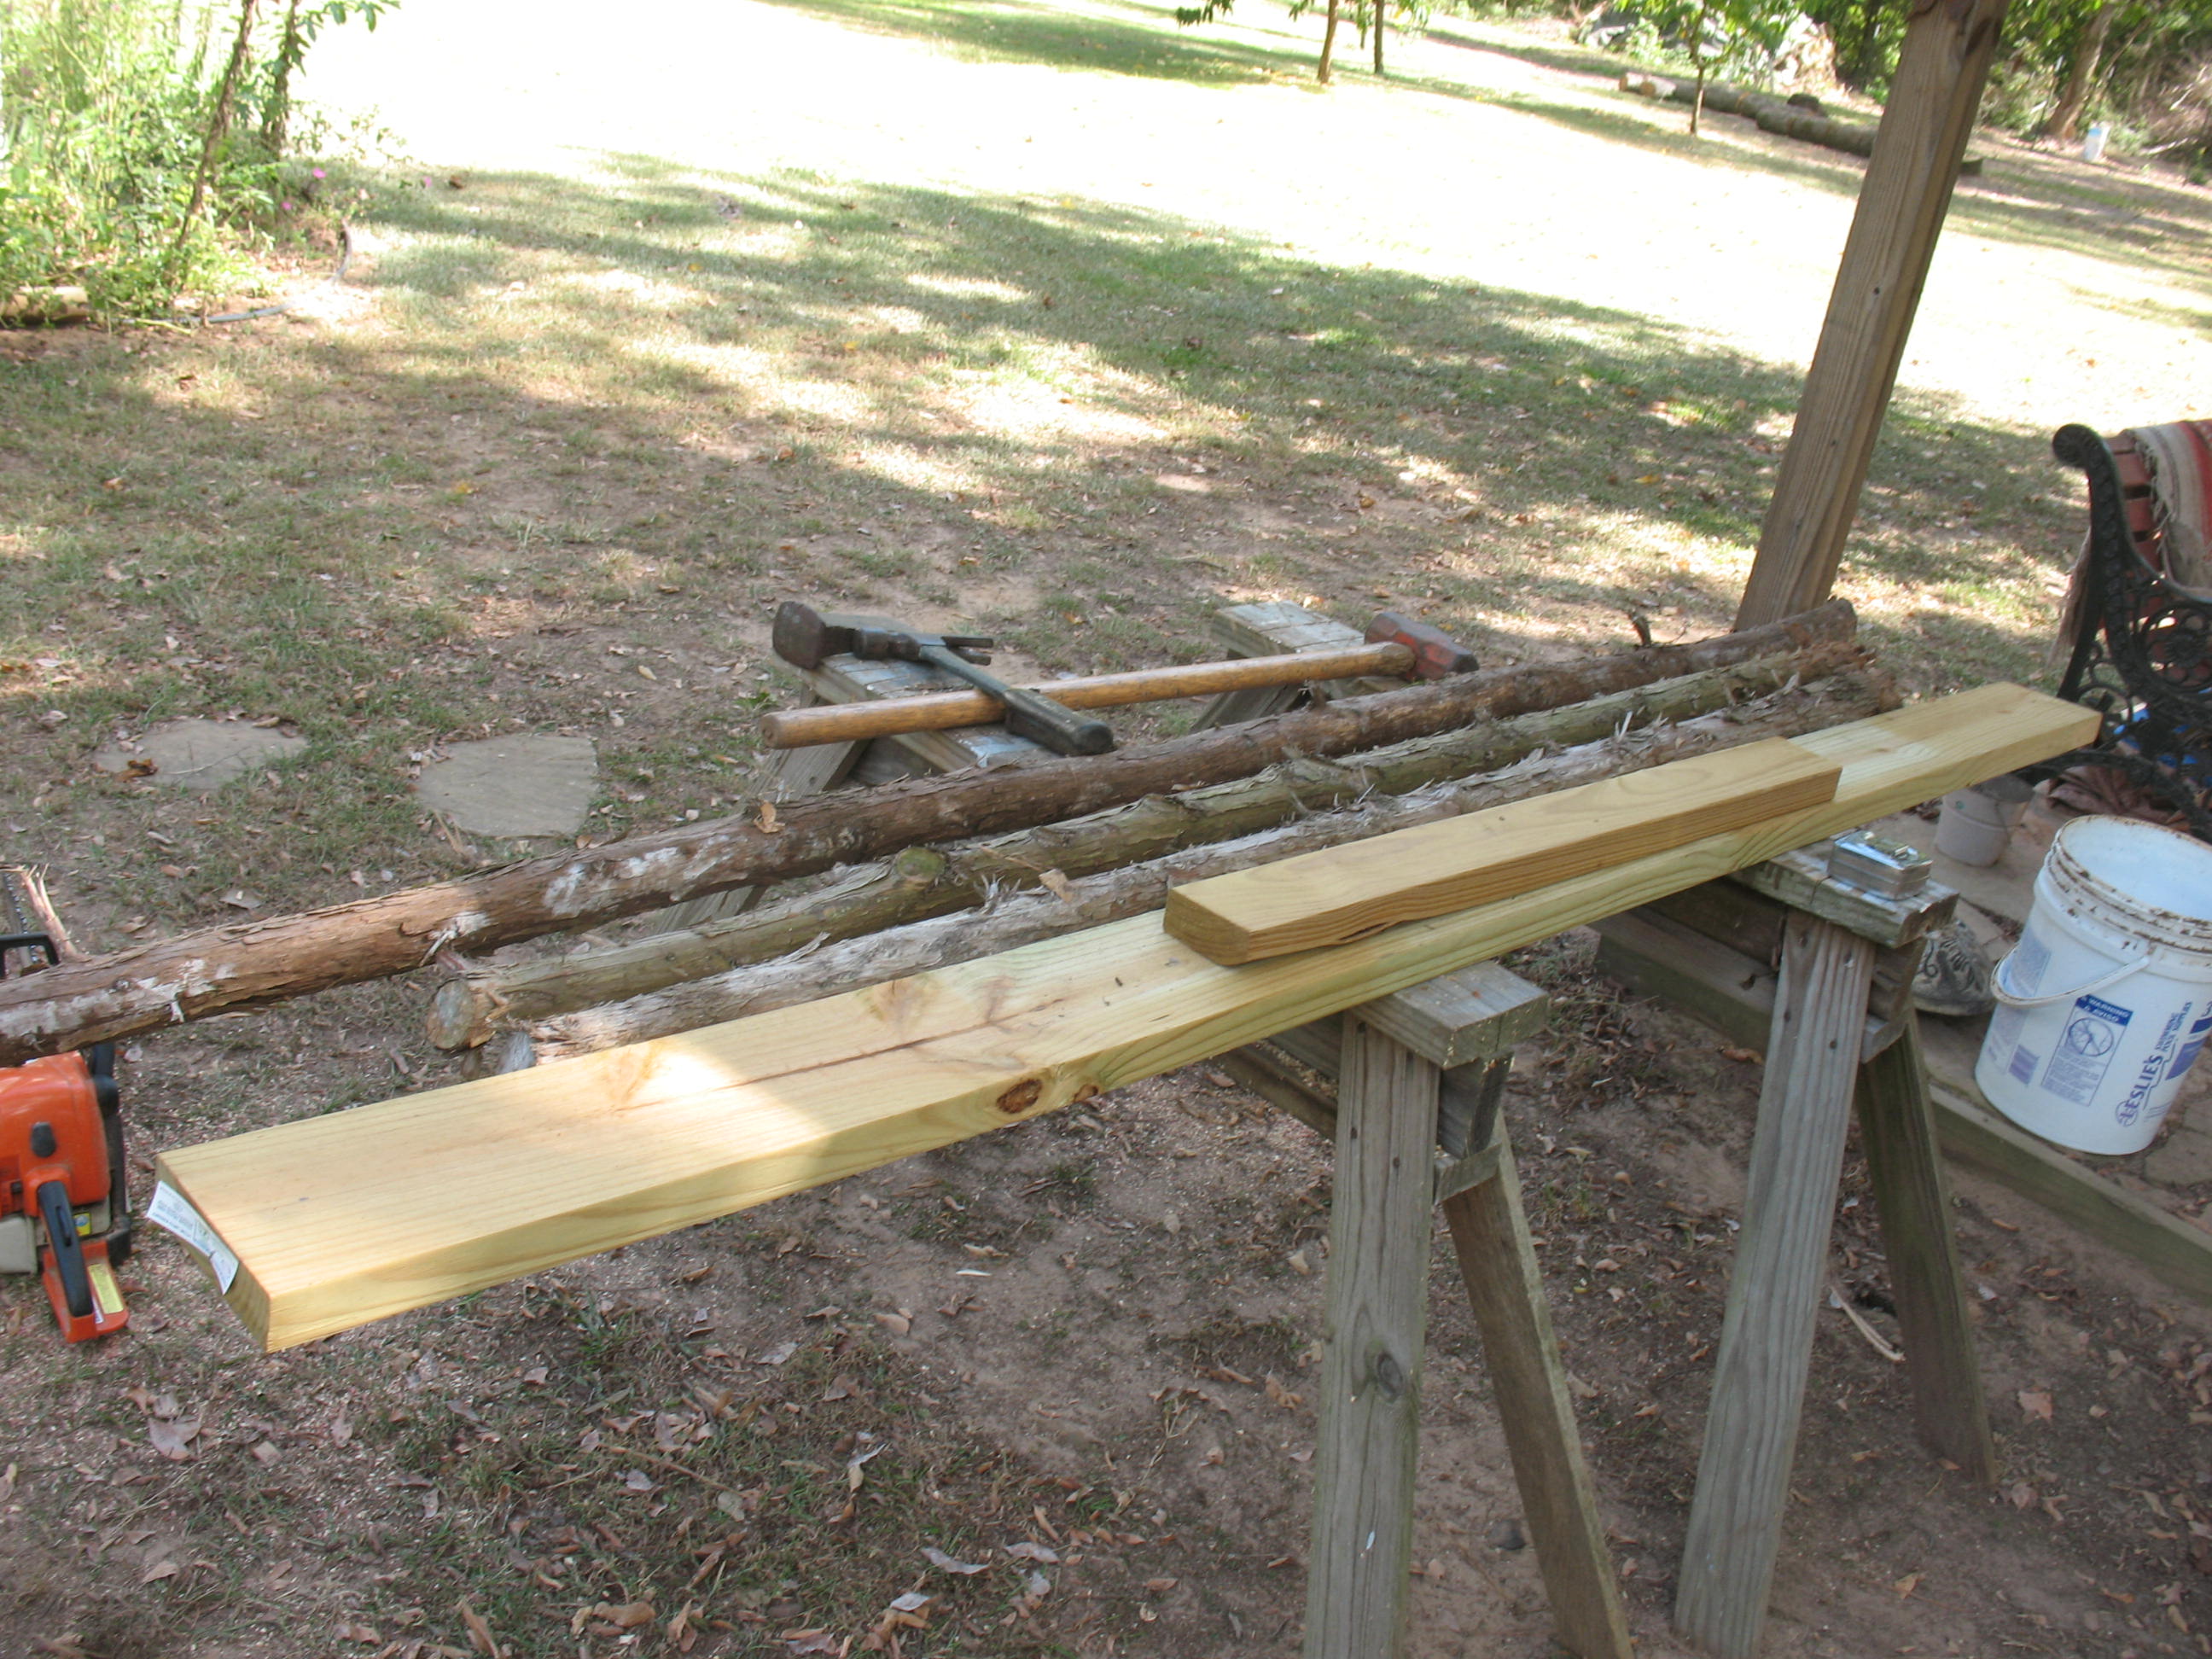
Here is a quick tutorial on how I built my Hmong style crossbow. The tiller is built of scrap ¾” shelving lumber, and the 30” prod (bow) is made of hickory. I won’t go into making the prod in this post as there are already several posts on this blog about how to make a bow and bowstring. I will say that I have made one similar crossbow using 3/4” schedule 40 PVC pipe for the prod, and it worked very well. If you are leery of trying to make a wooden bow, you may want to go the PVC route.
First I drew out the outline of the tiller on a ¾” pine board.
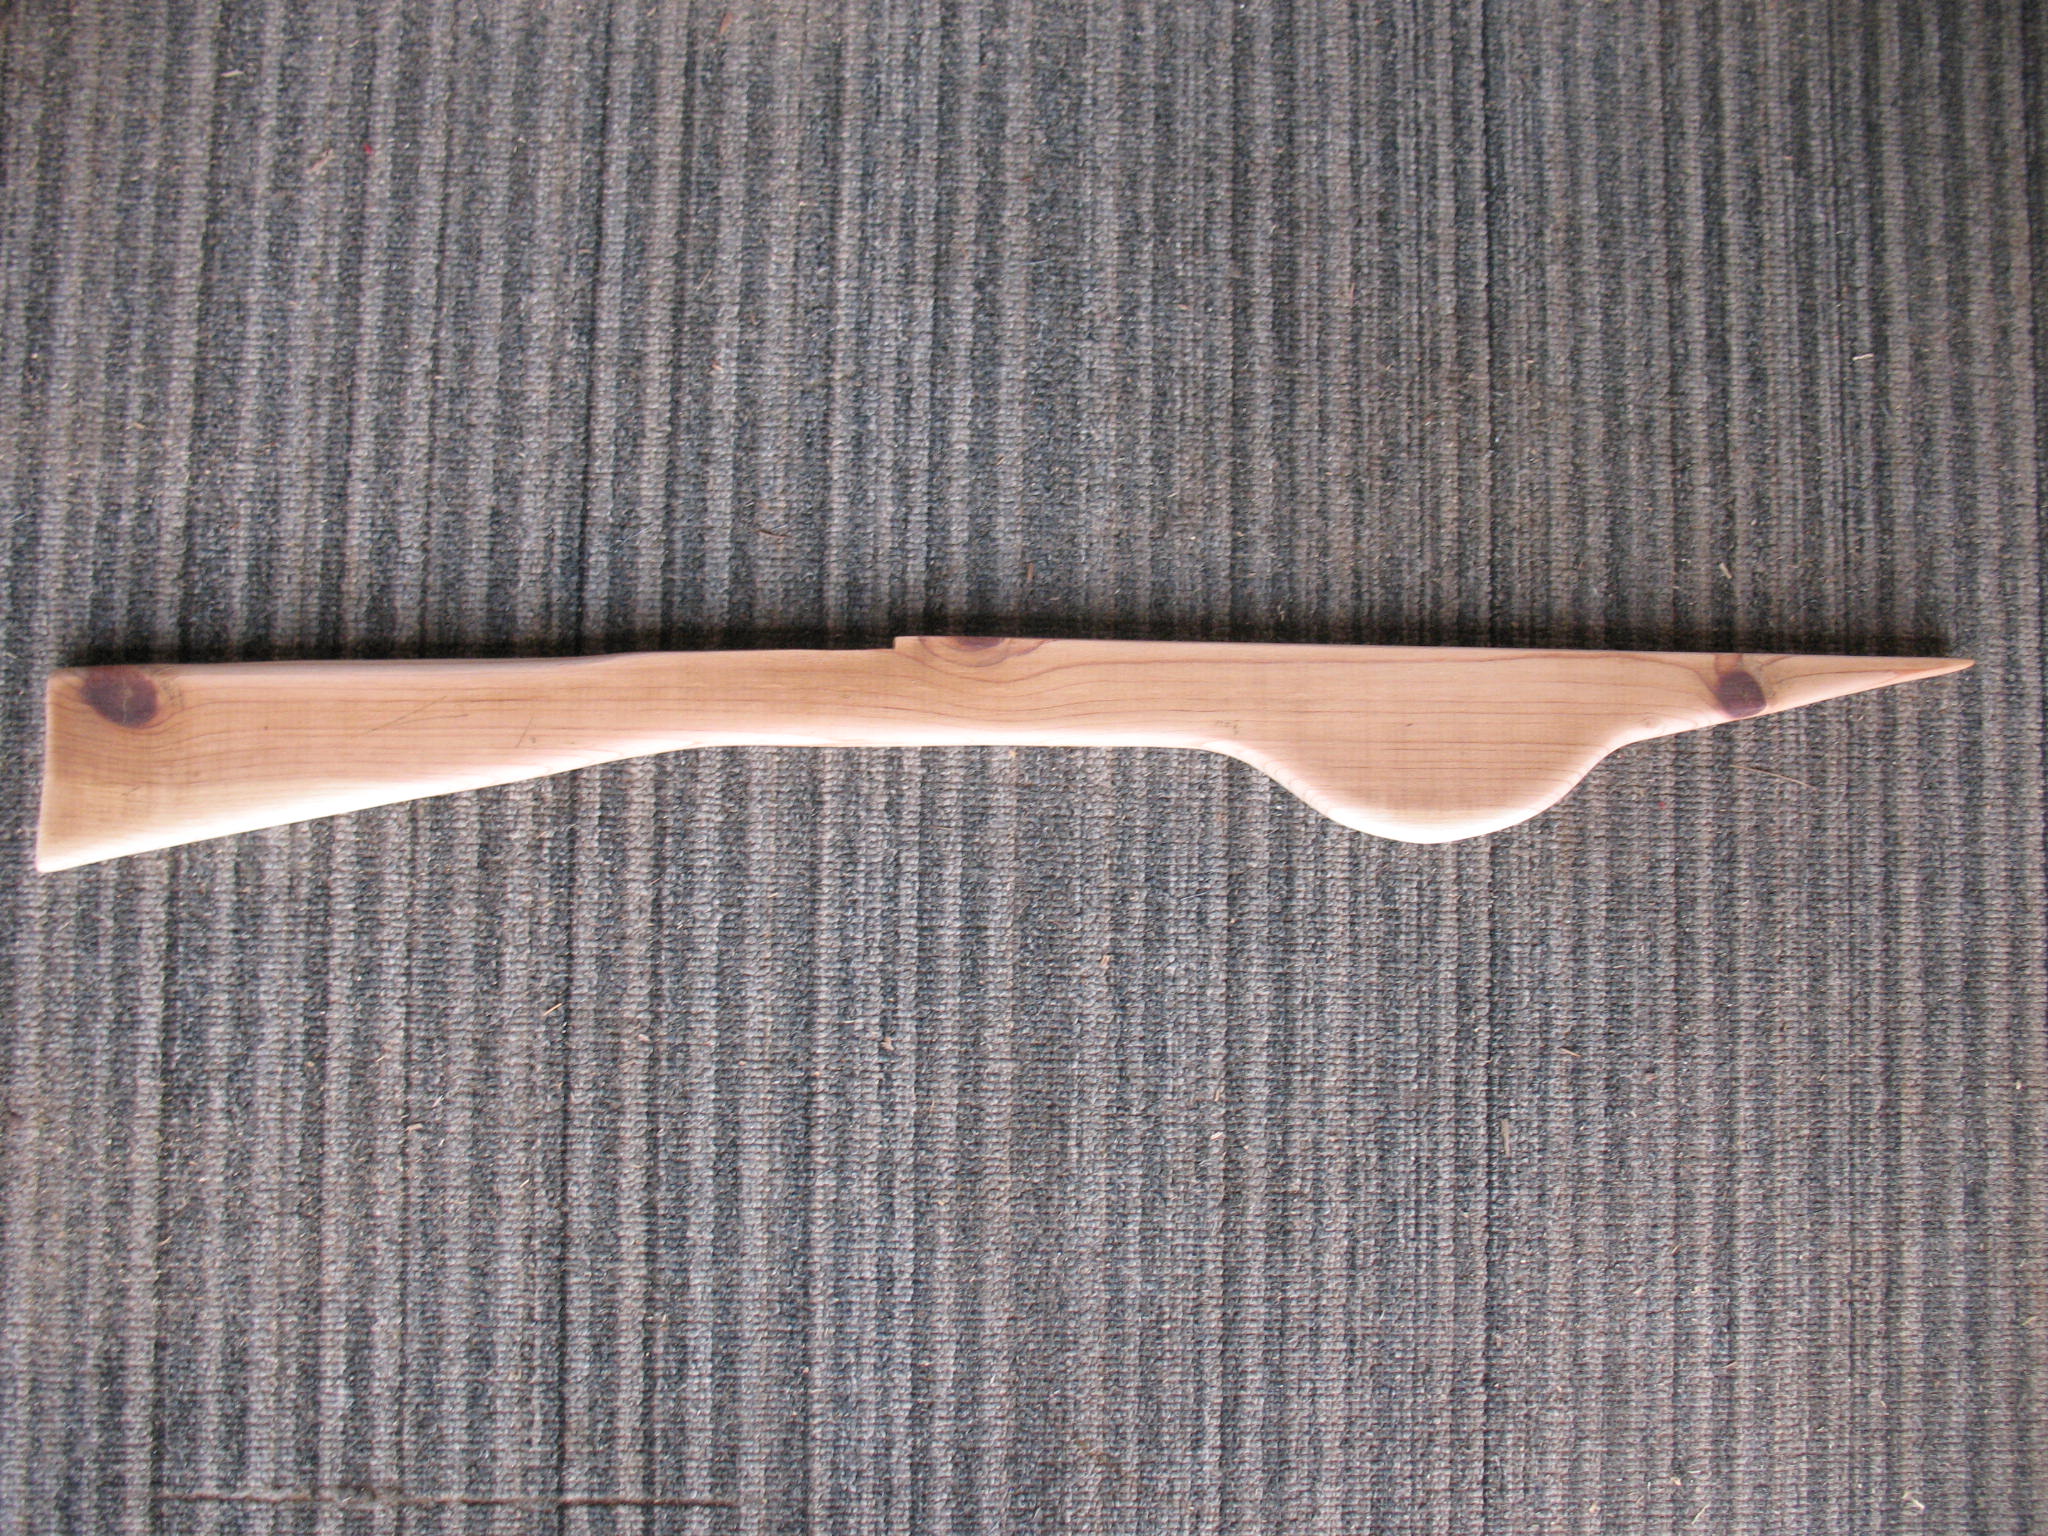
Then I used my band-saw to cut out the tiller. You could do this with a jig-saw or even a hand saw, but it’s quicker and easier if you have access to a band-saw. I used a wood rasp and sandpaper to round off the edges and clean the stock up.
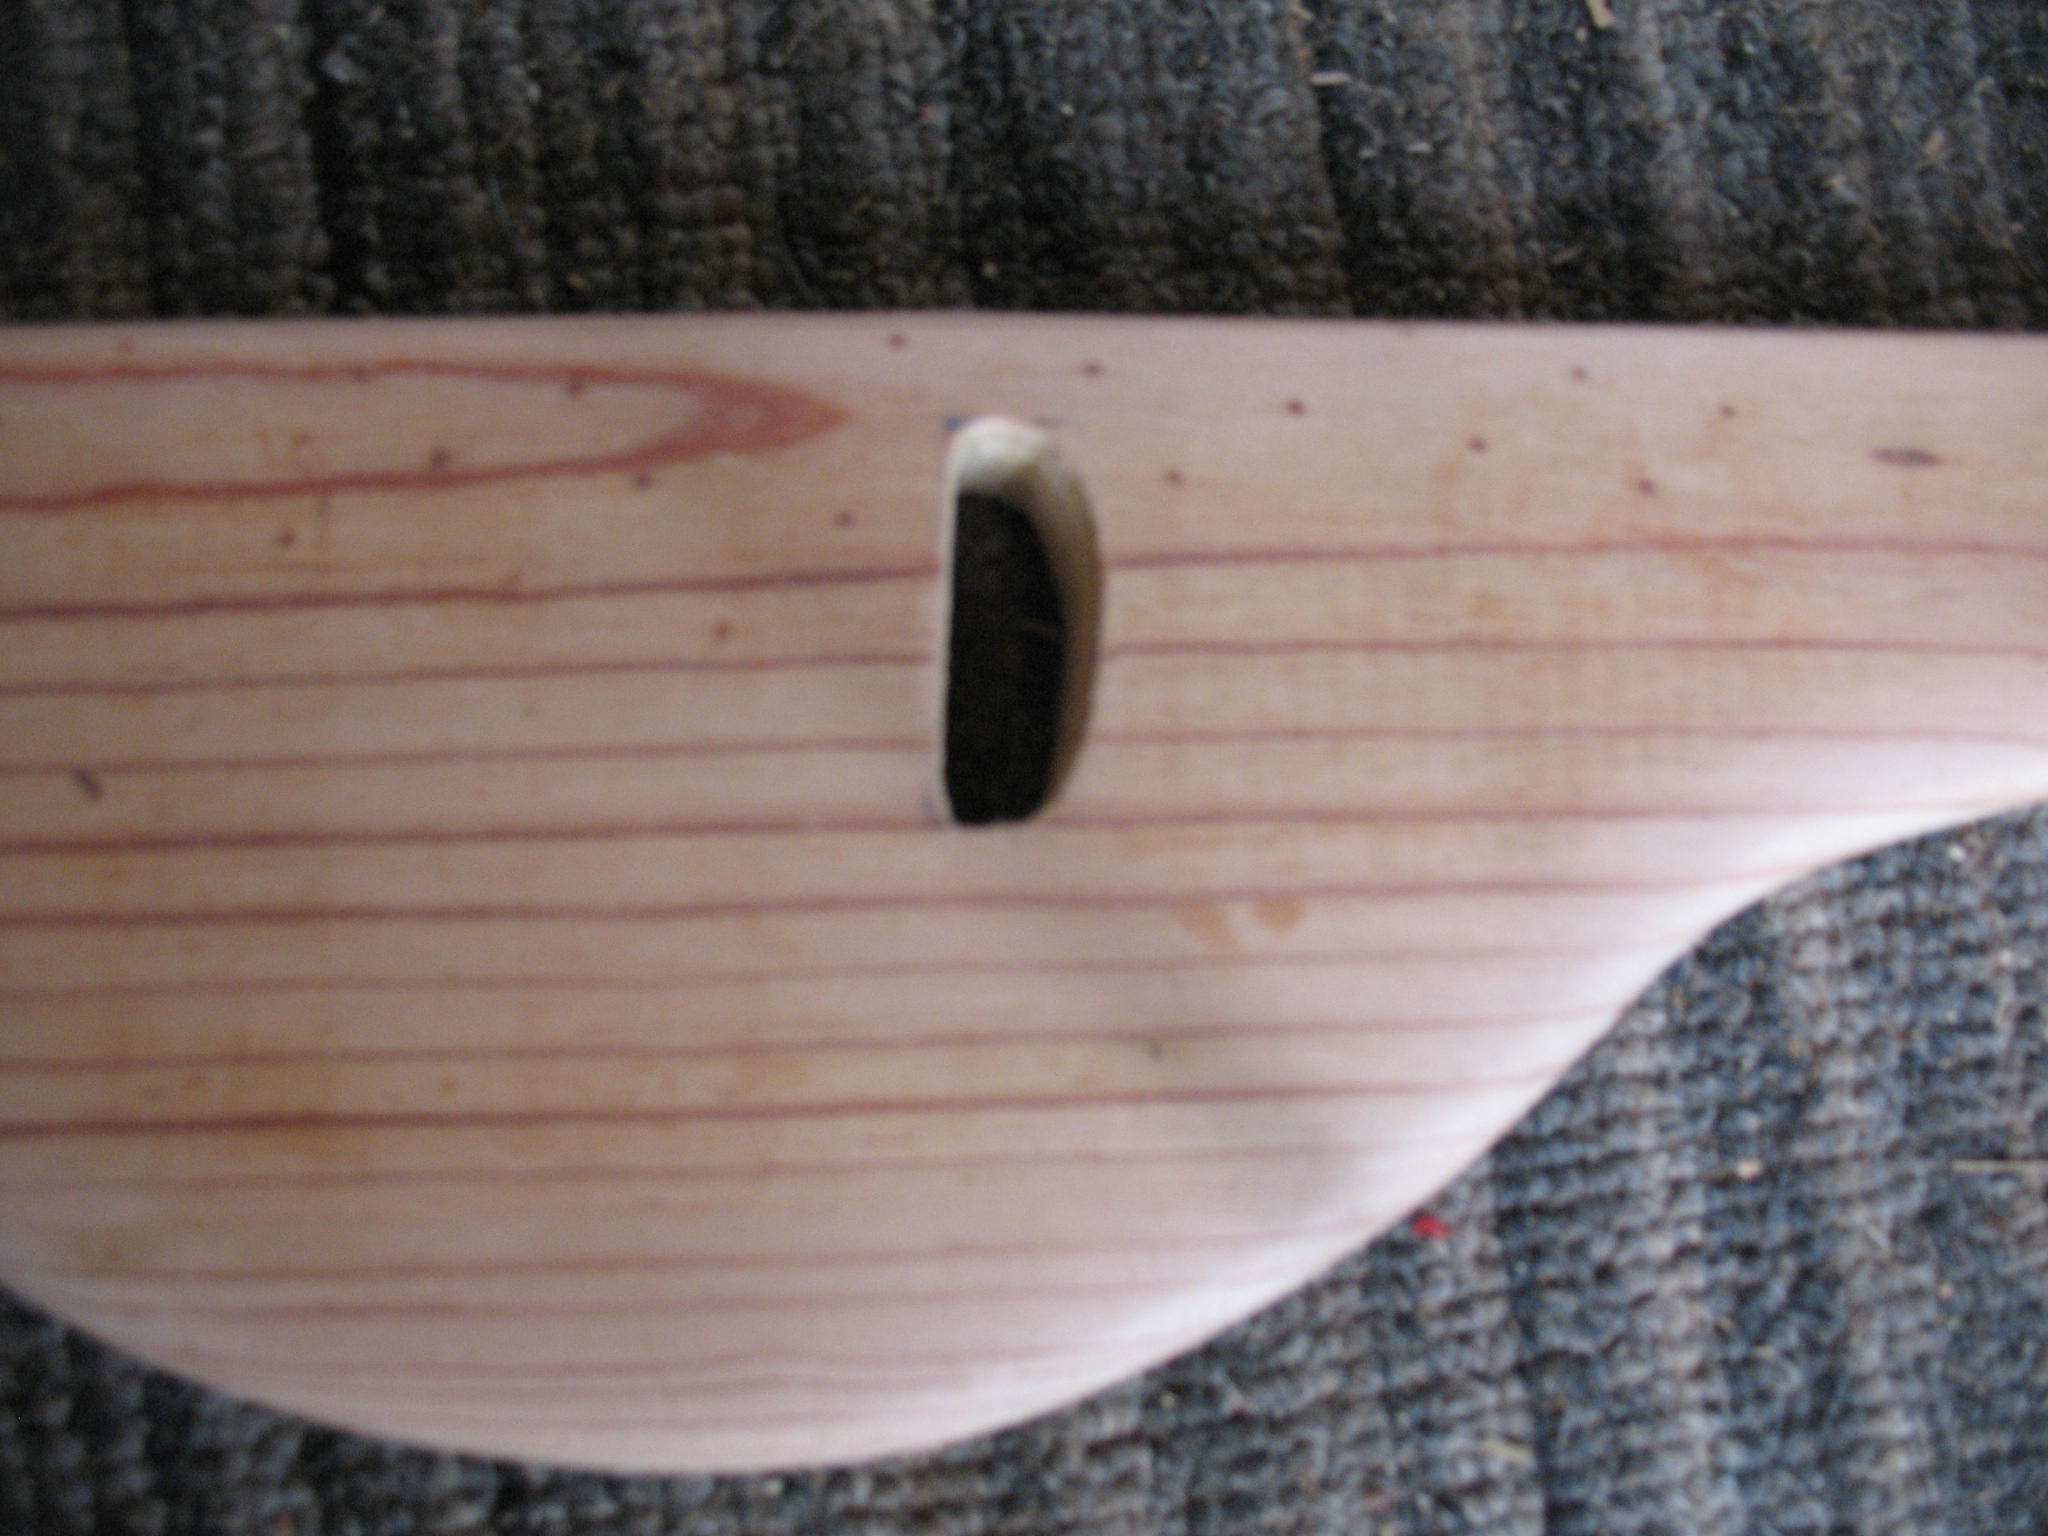
You need a shallow groove in the top for the bolt (arrow) to rest in. I made this by drawing a line down the center of the top then using my knife point to scratch a shallow groove along the line. With the groove to act as a guide, I rubbed back and forth with a round file to create a rounded groove about 1/8” deep. That’s as deep as you really need.
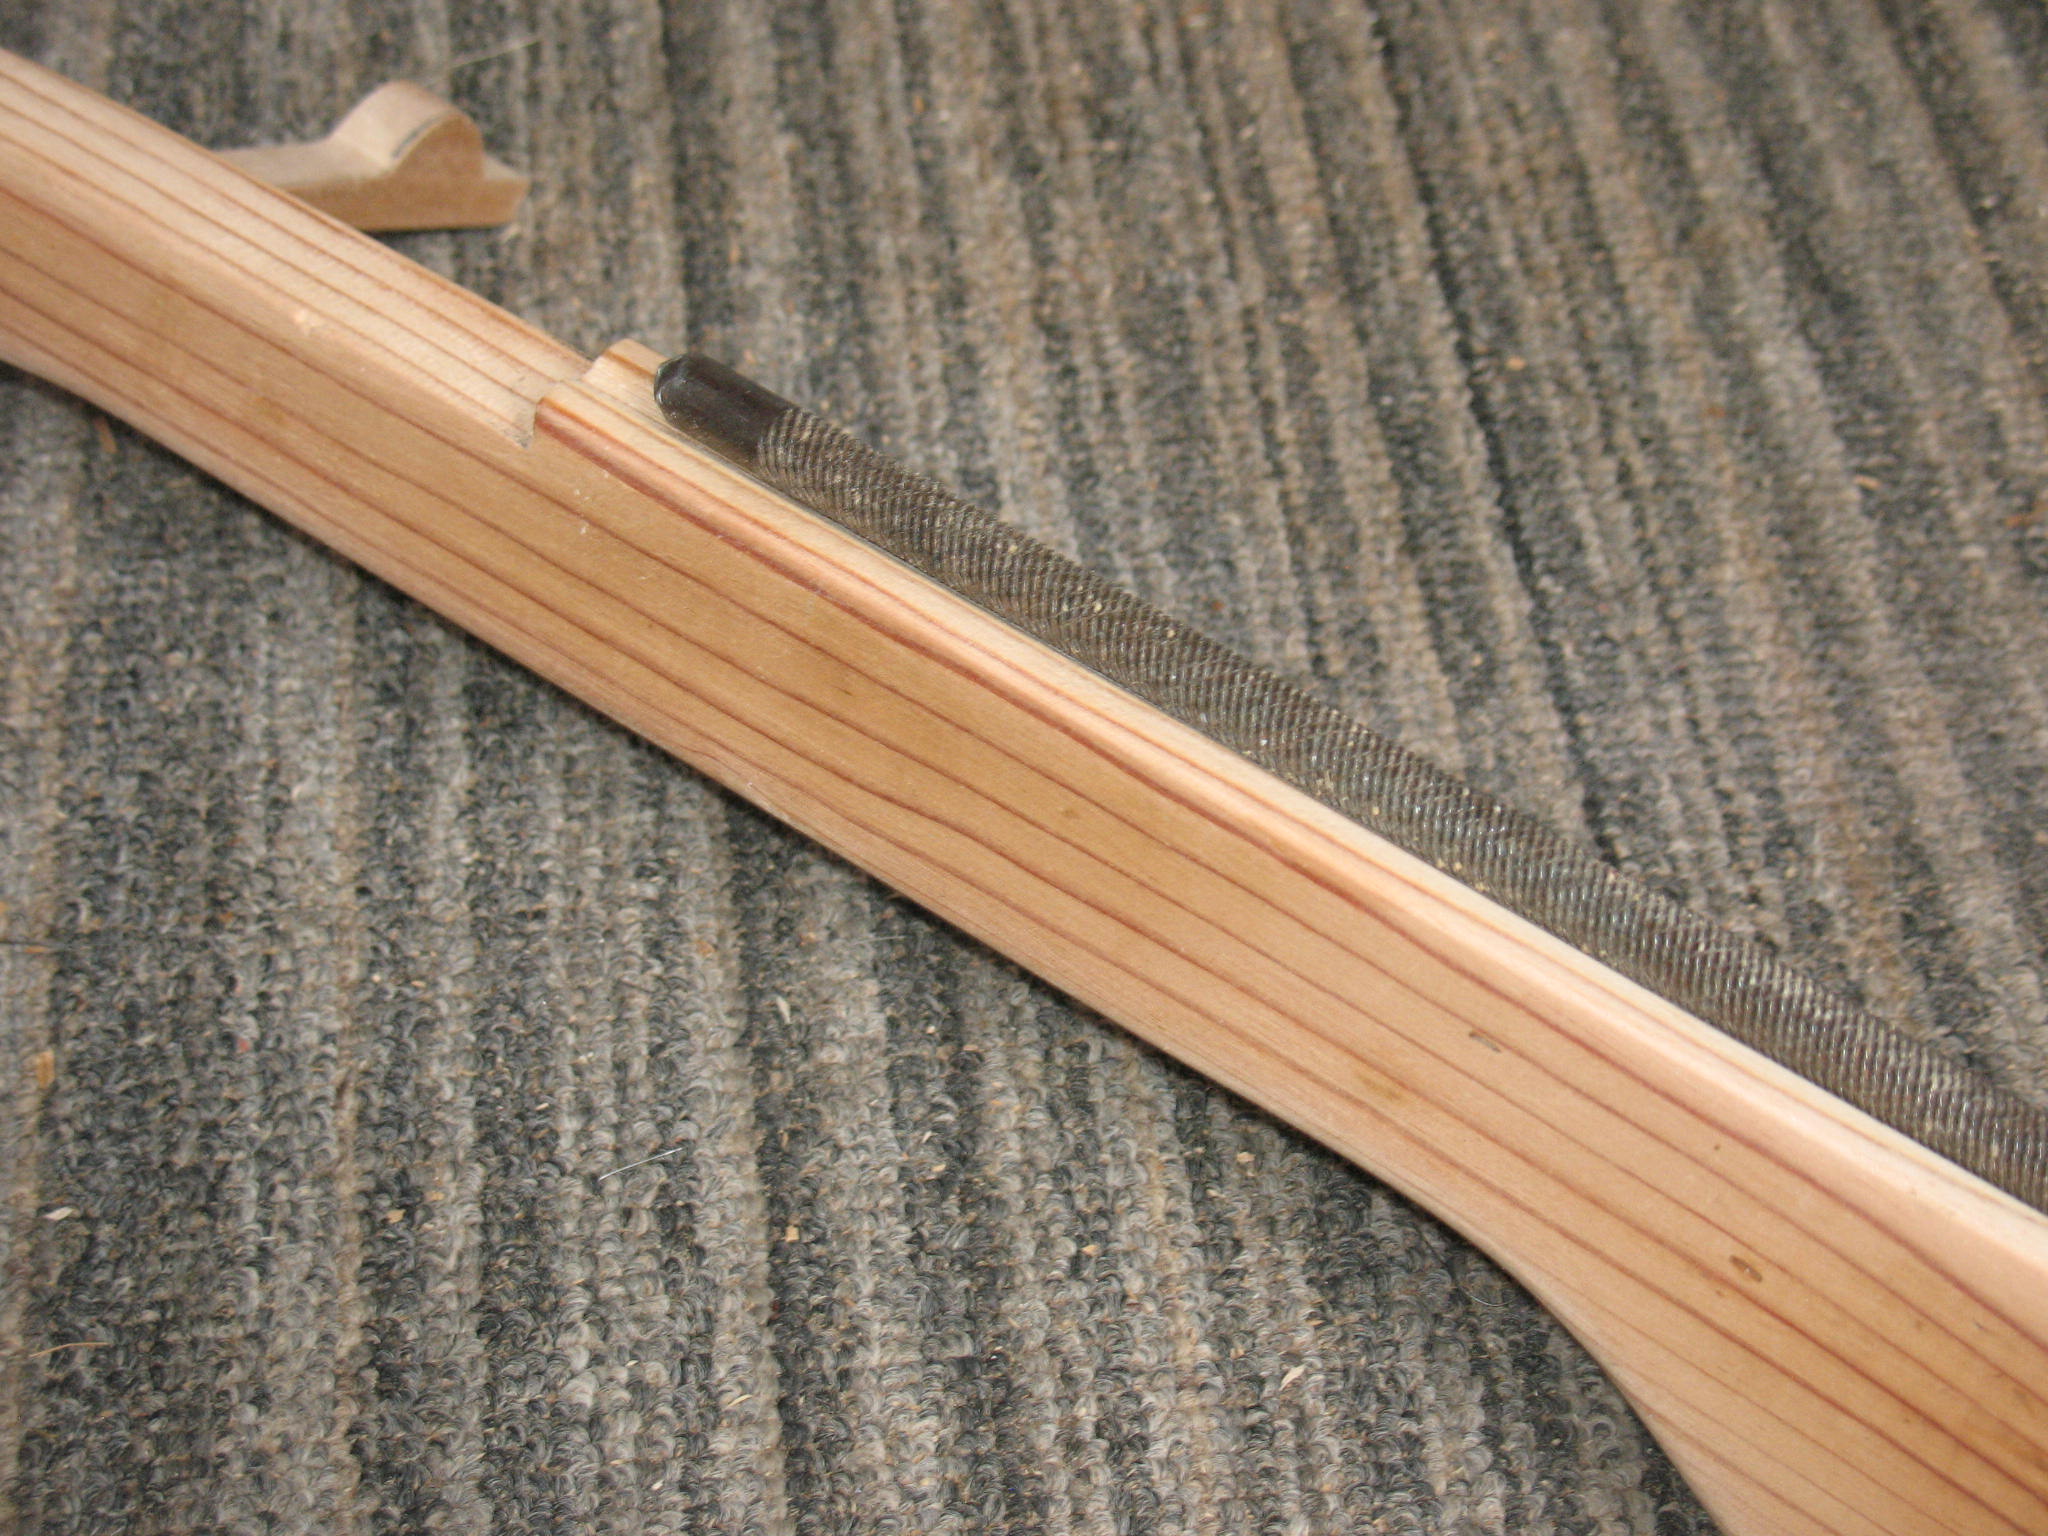
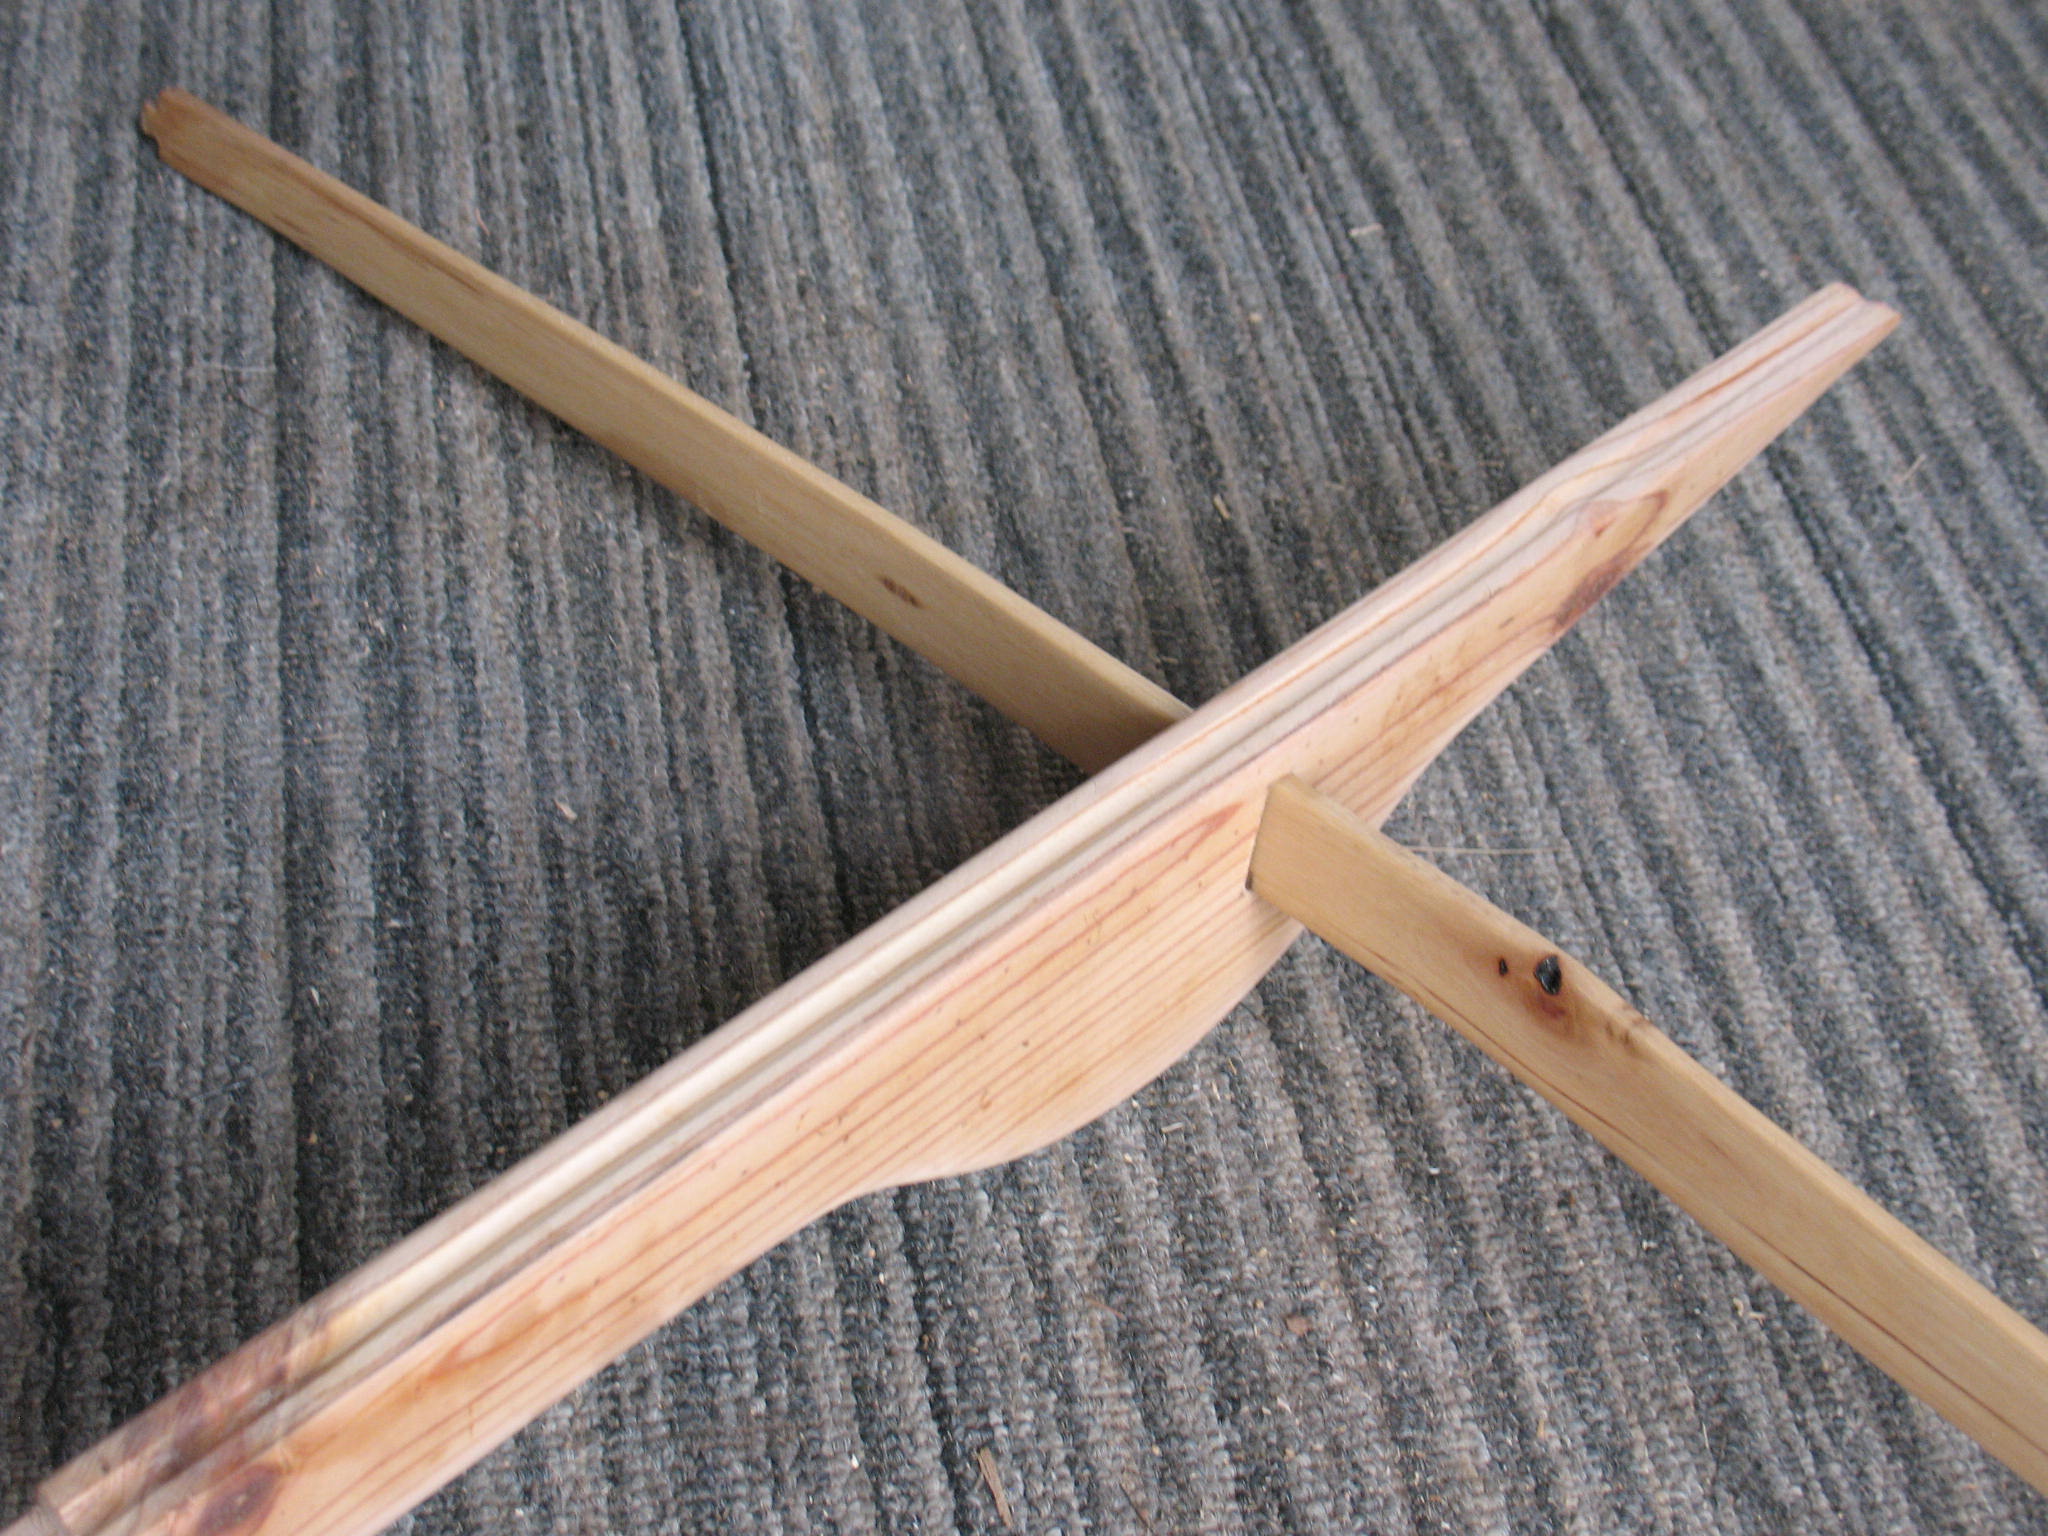
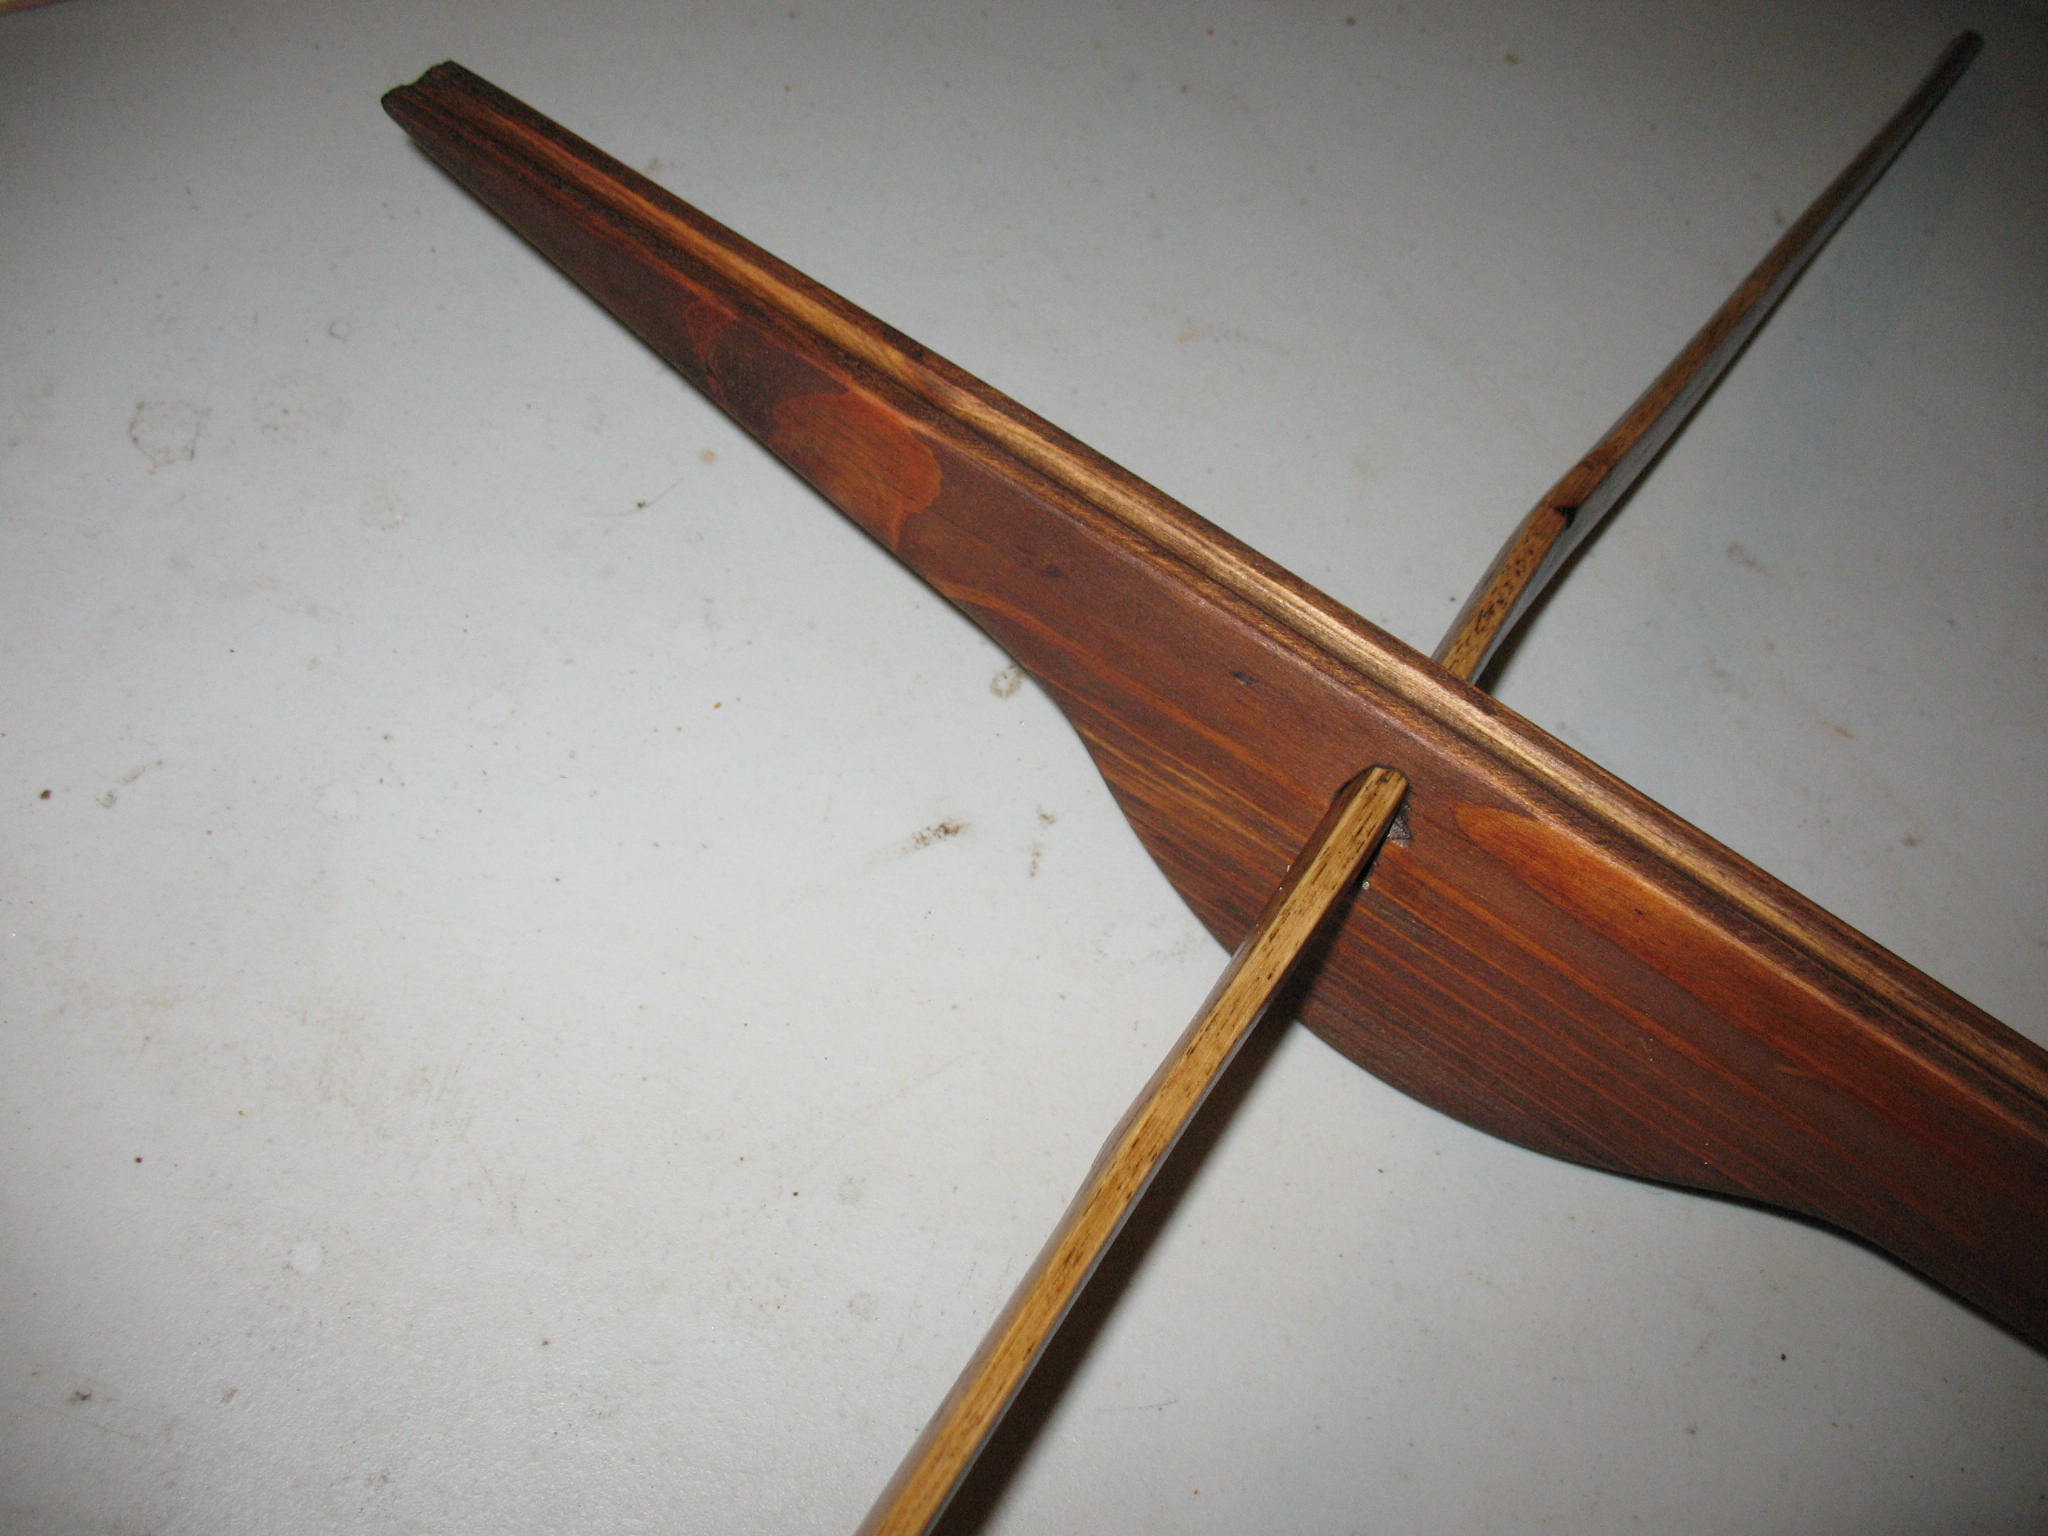
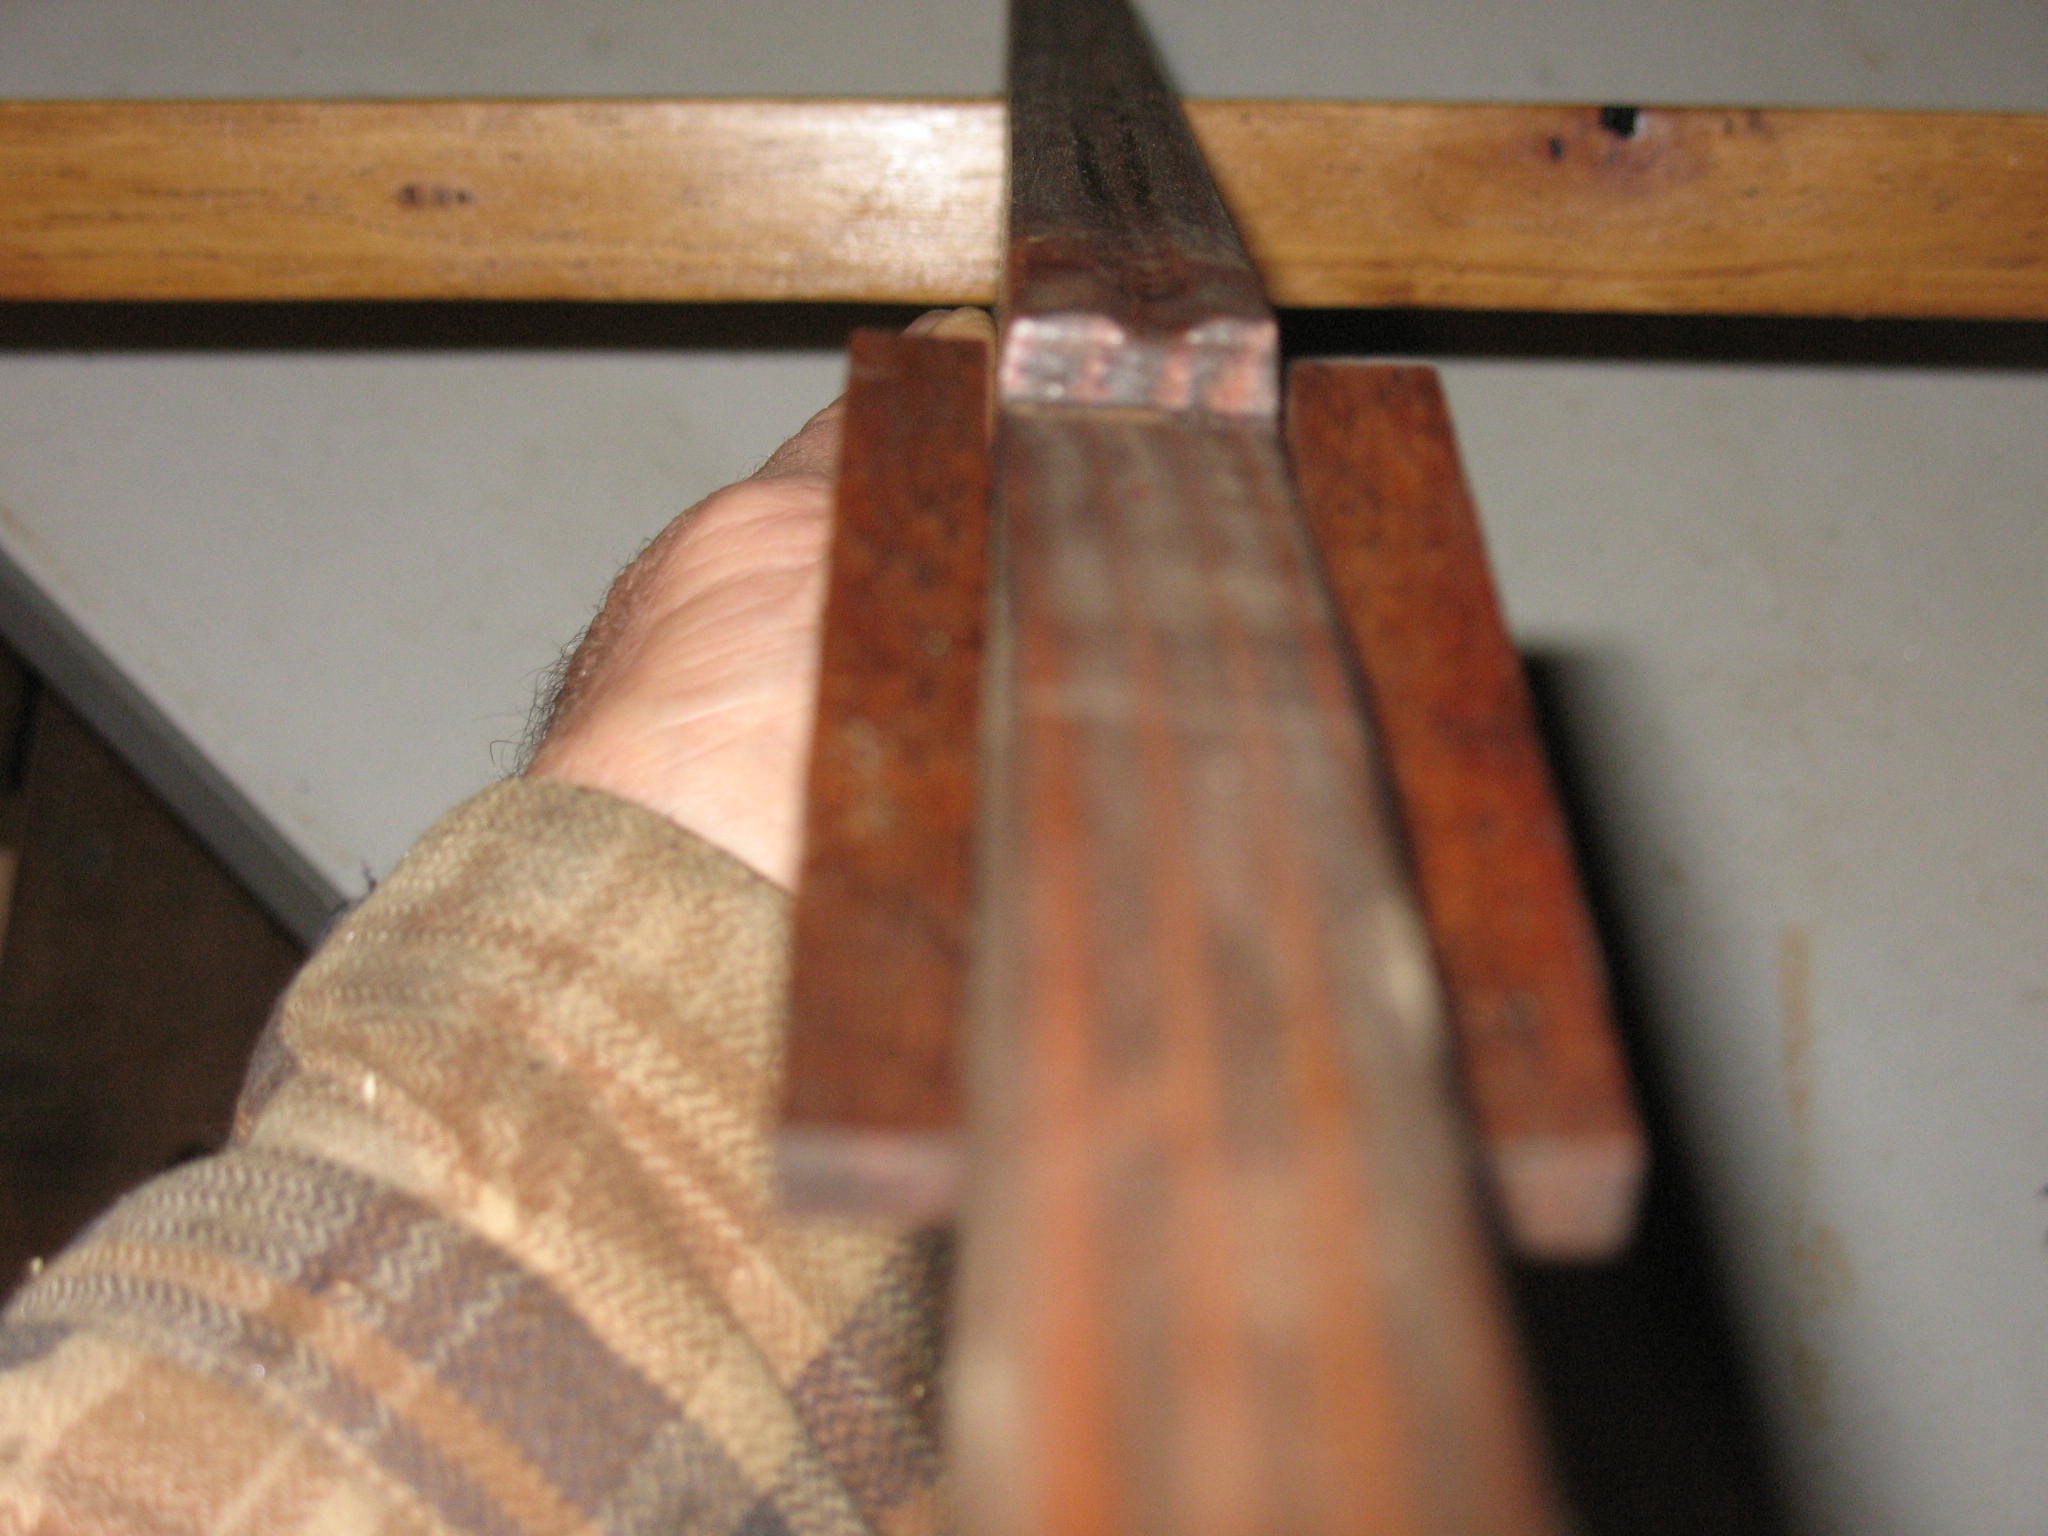
Now it’s time to mount the prod in the tiller. I found the center of the prod and took a few measurements which I transferred to the side of the tiller. I drilled several holes through the tiller and then used a rattail file to complete the slot. I took my time on this with a lot of pauses to check the fit of the prod. It needs to be a snug fit. Don’t worry if you get the slot a little too large. You can use a small wedge or two to hold the prod in tightly. I have seen these wedges on several Montagnard crossbows.


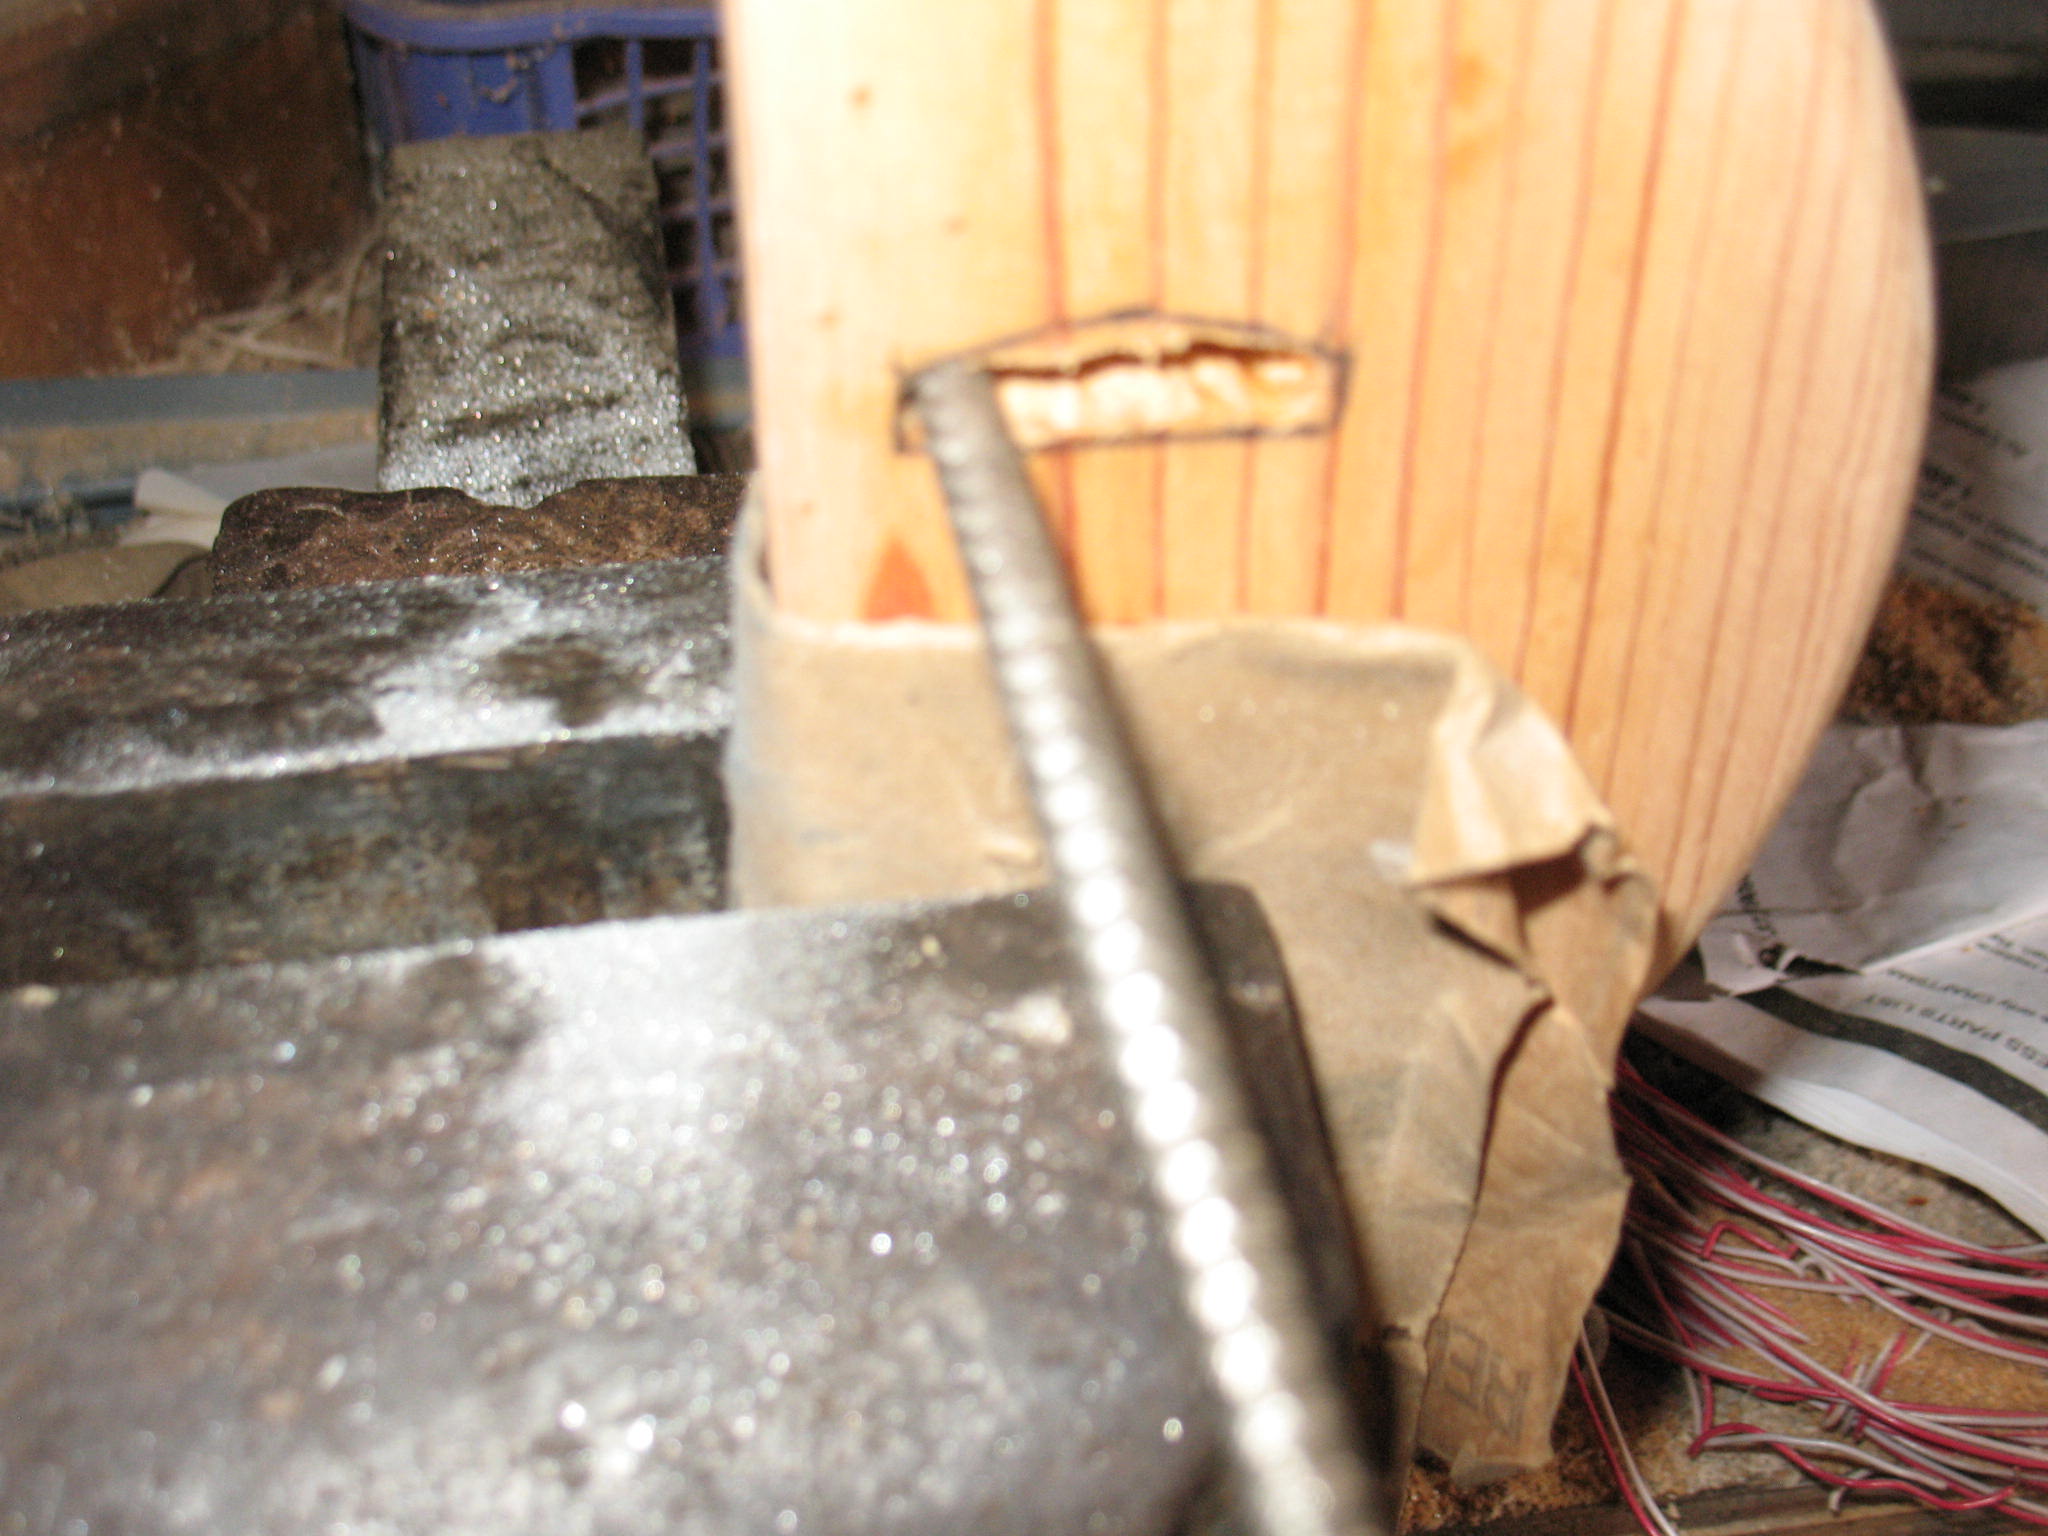
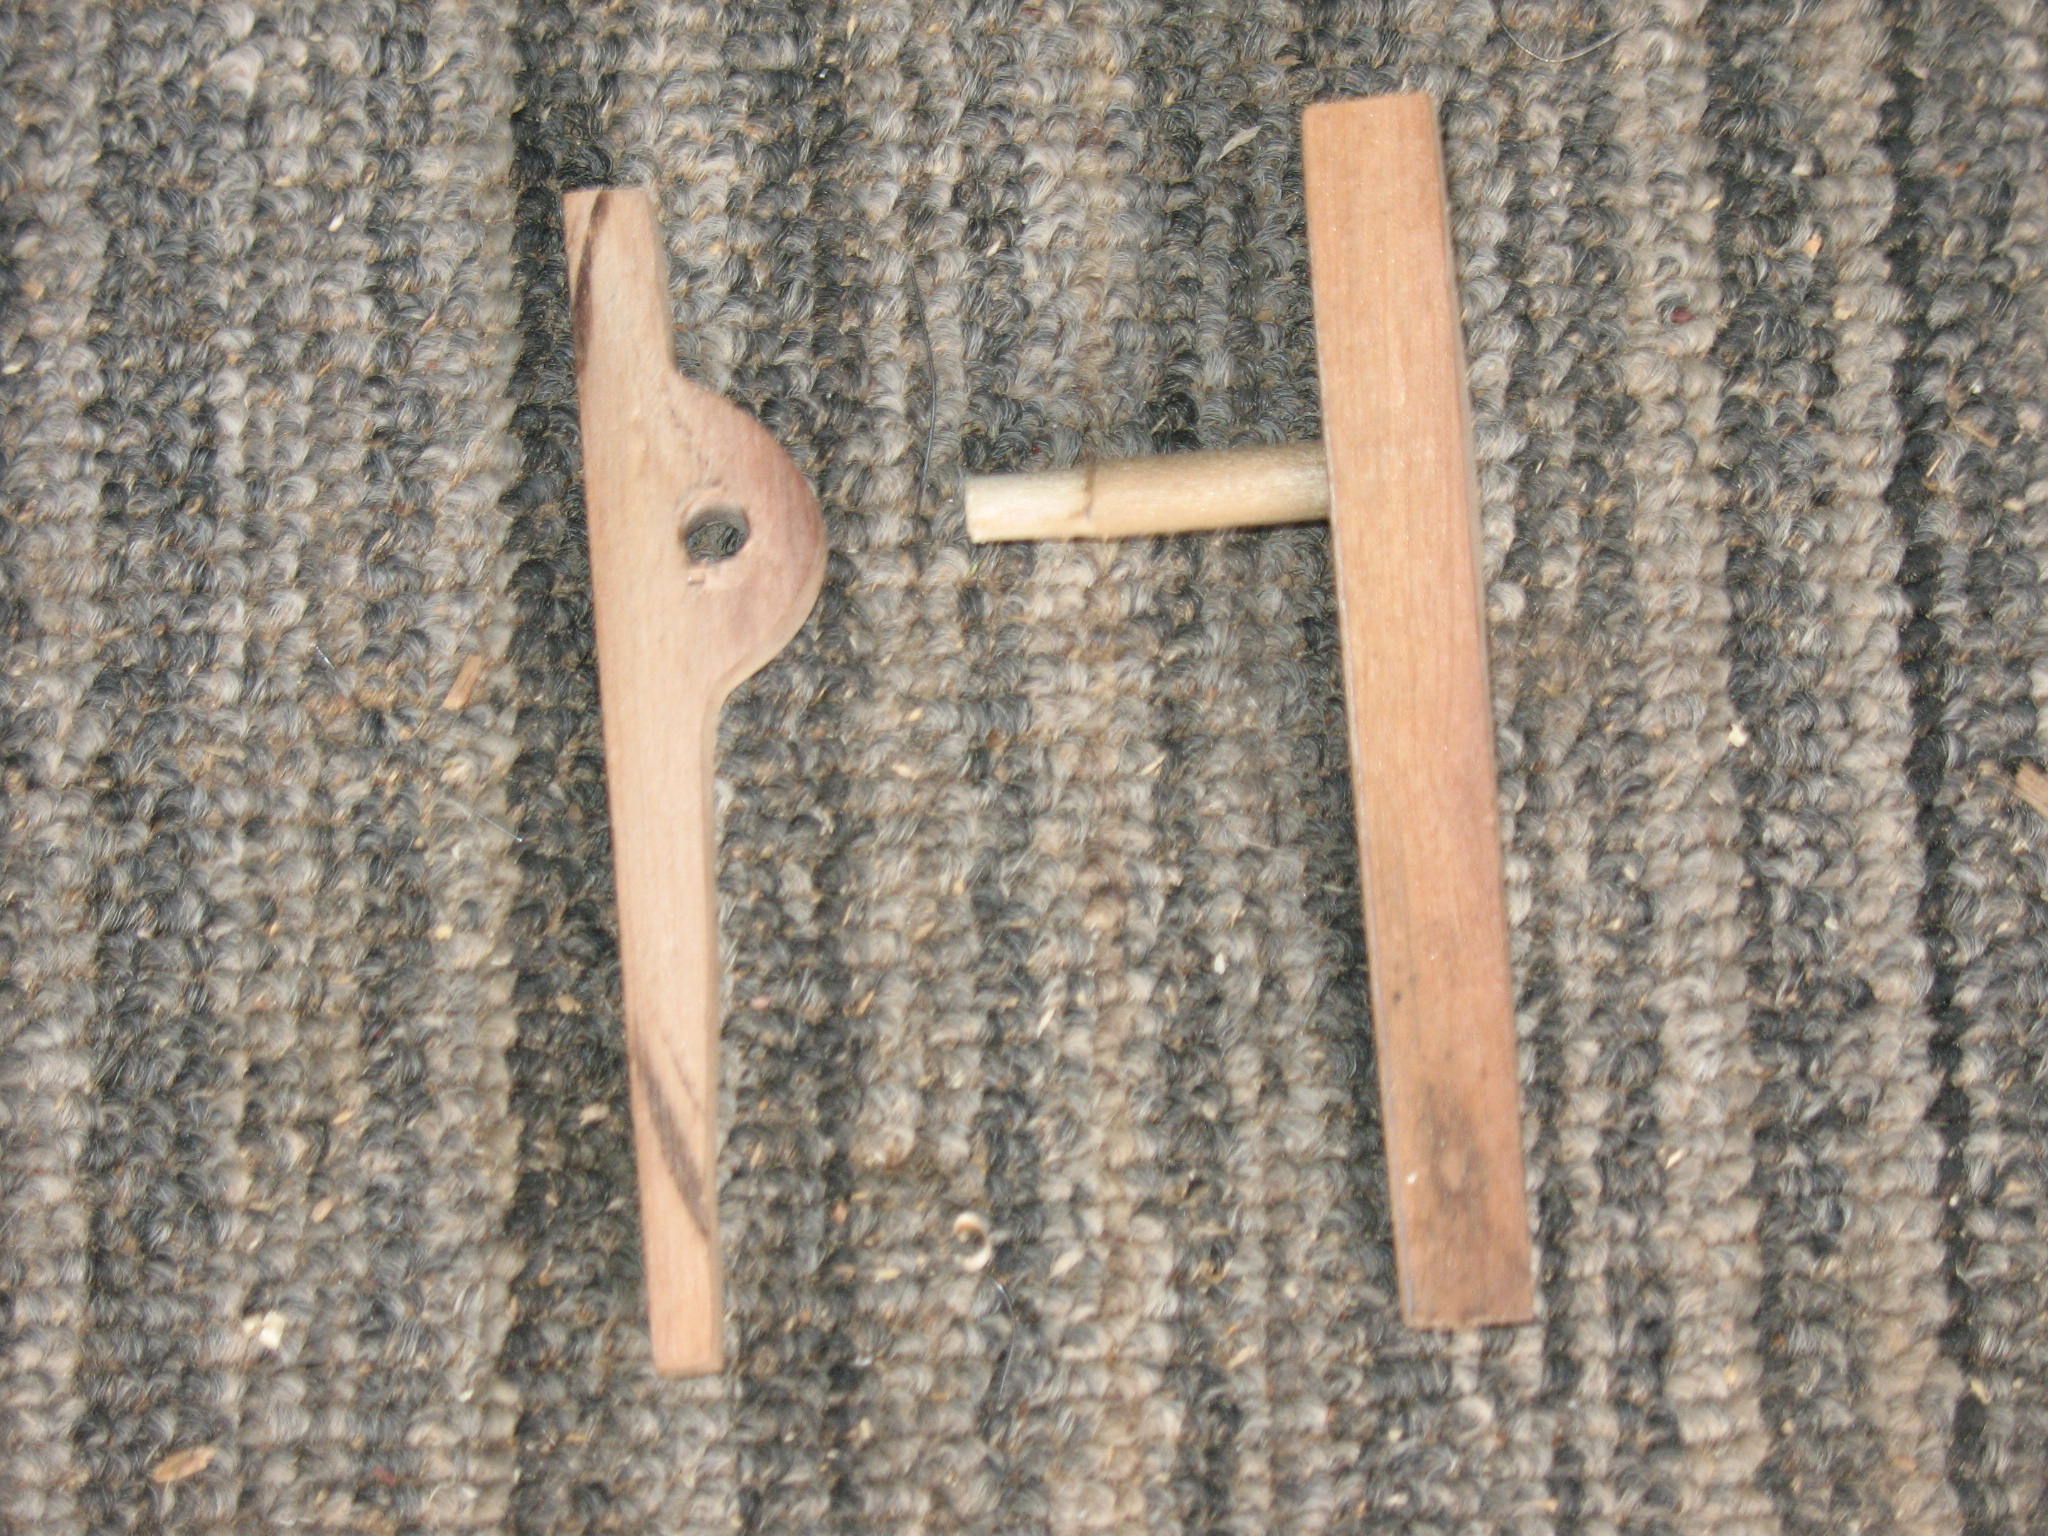
The trigger assembly consists of three parts; two levers and a short piece of ¼”dowel rod. I cut the levers out of some ½” scrap. I cut them in a little bit of a fancy shape, but this is not at all necessary. They could be simple rectangles.

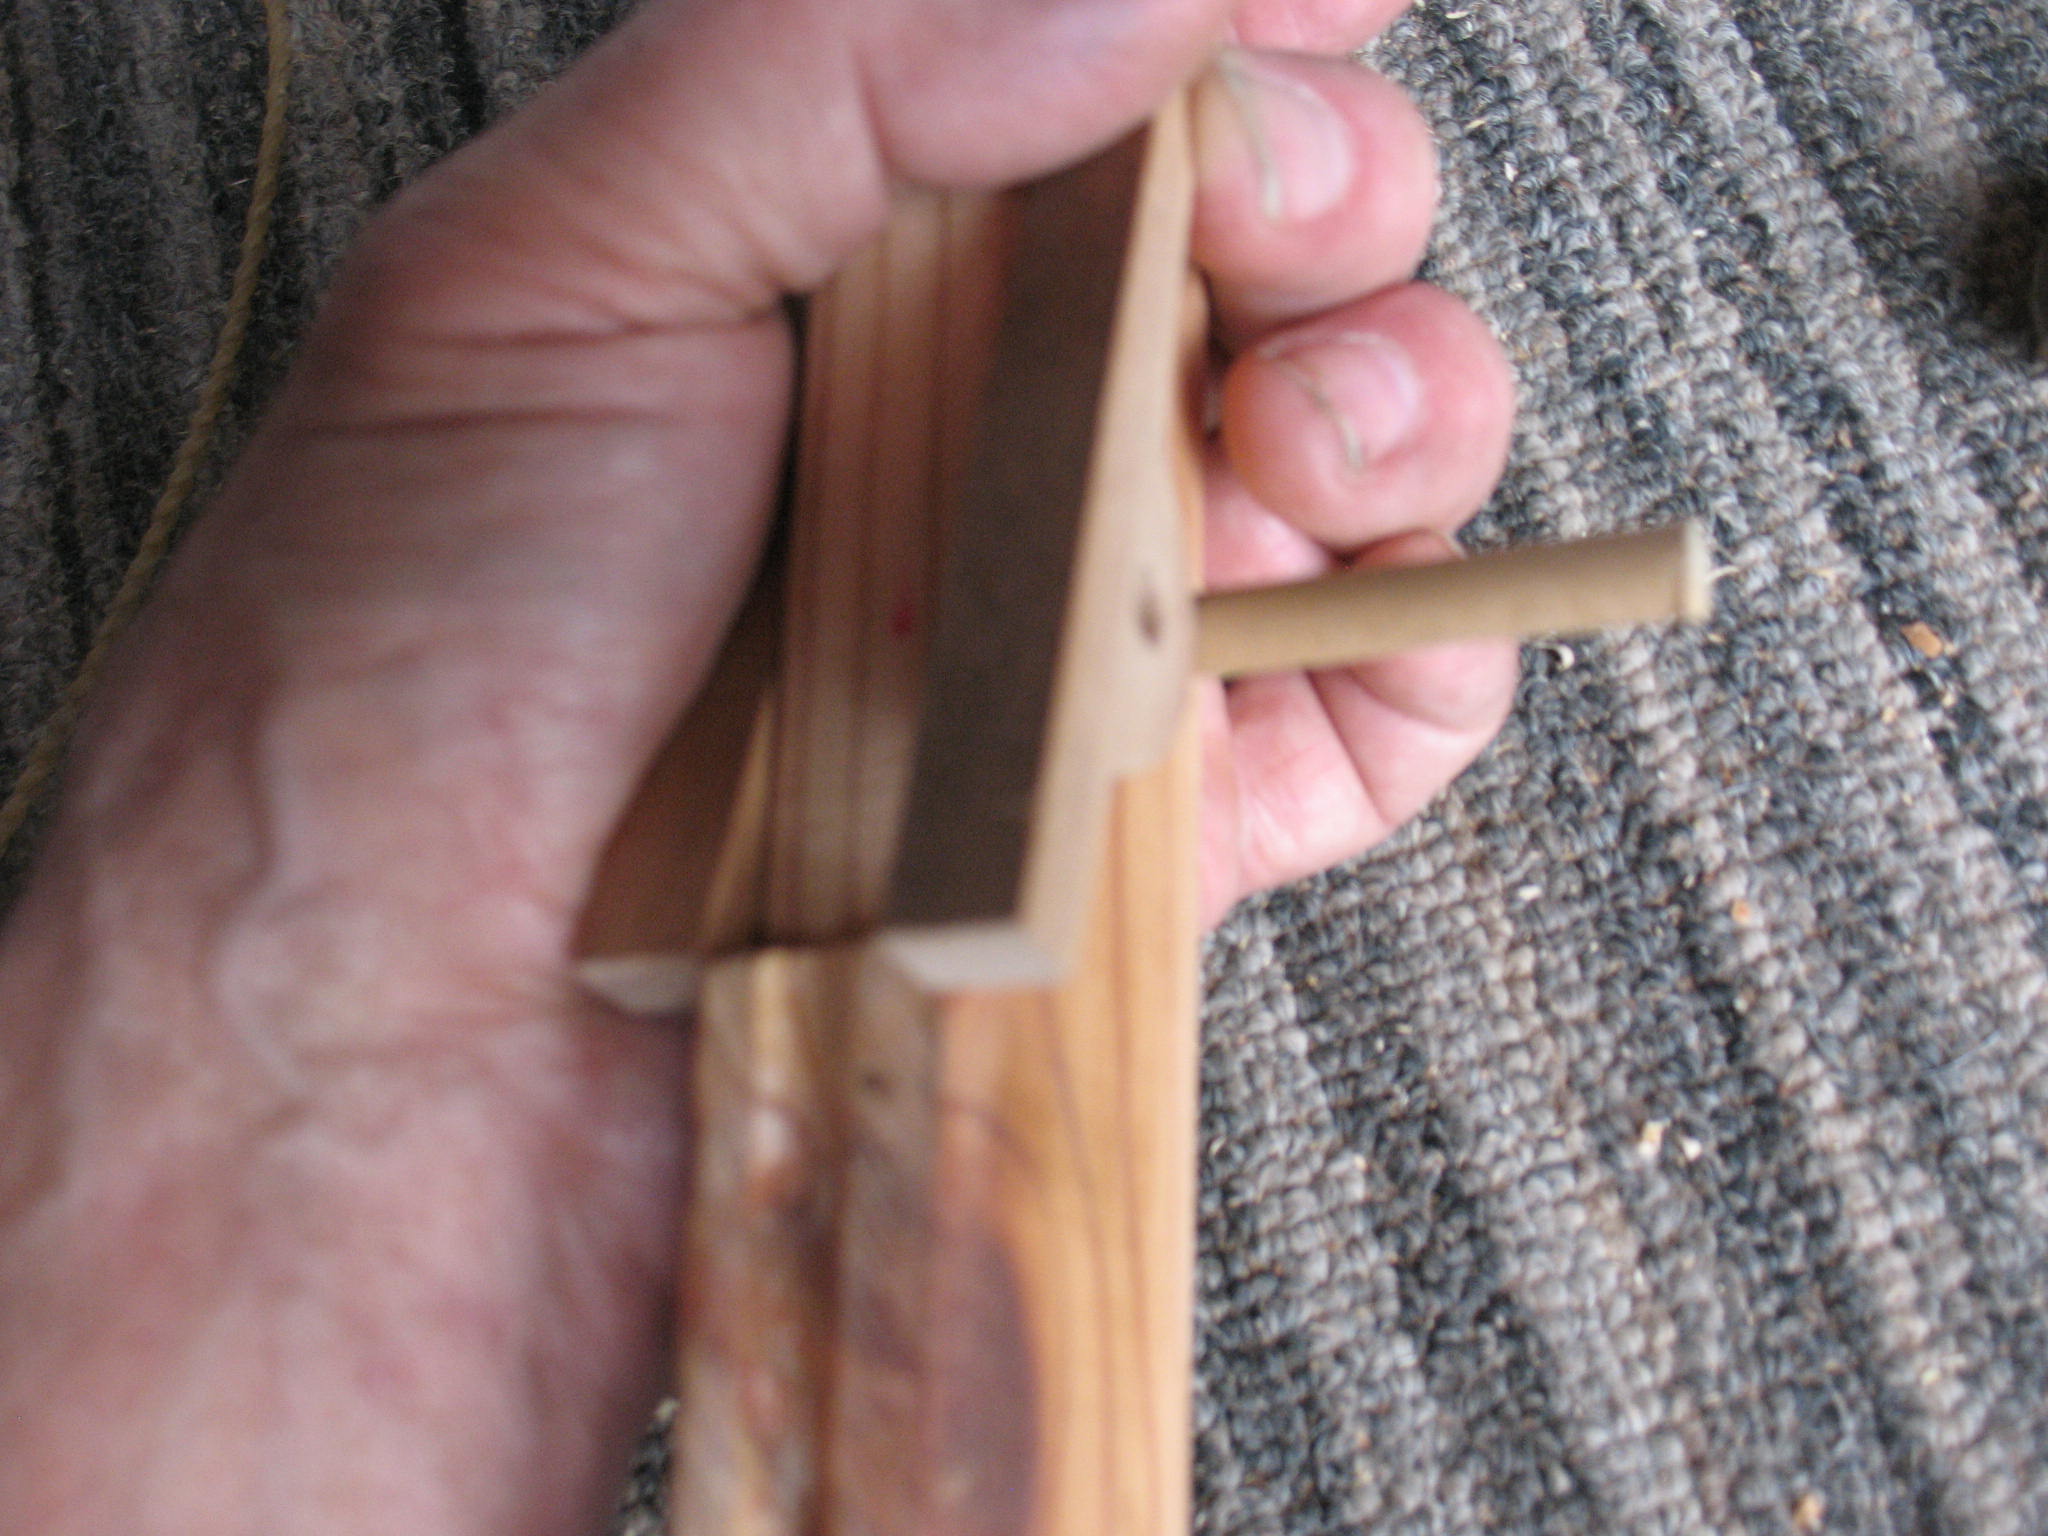
I drilled a hole in each lever, making sure that the holes lined up perfectly. The holes in the levers are a little smaller than the dowel so that the dowel can be trimmed down and wedged tightly into the levers.
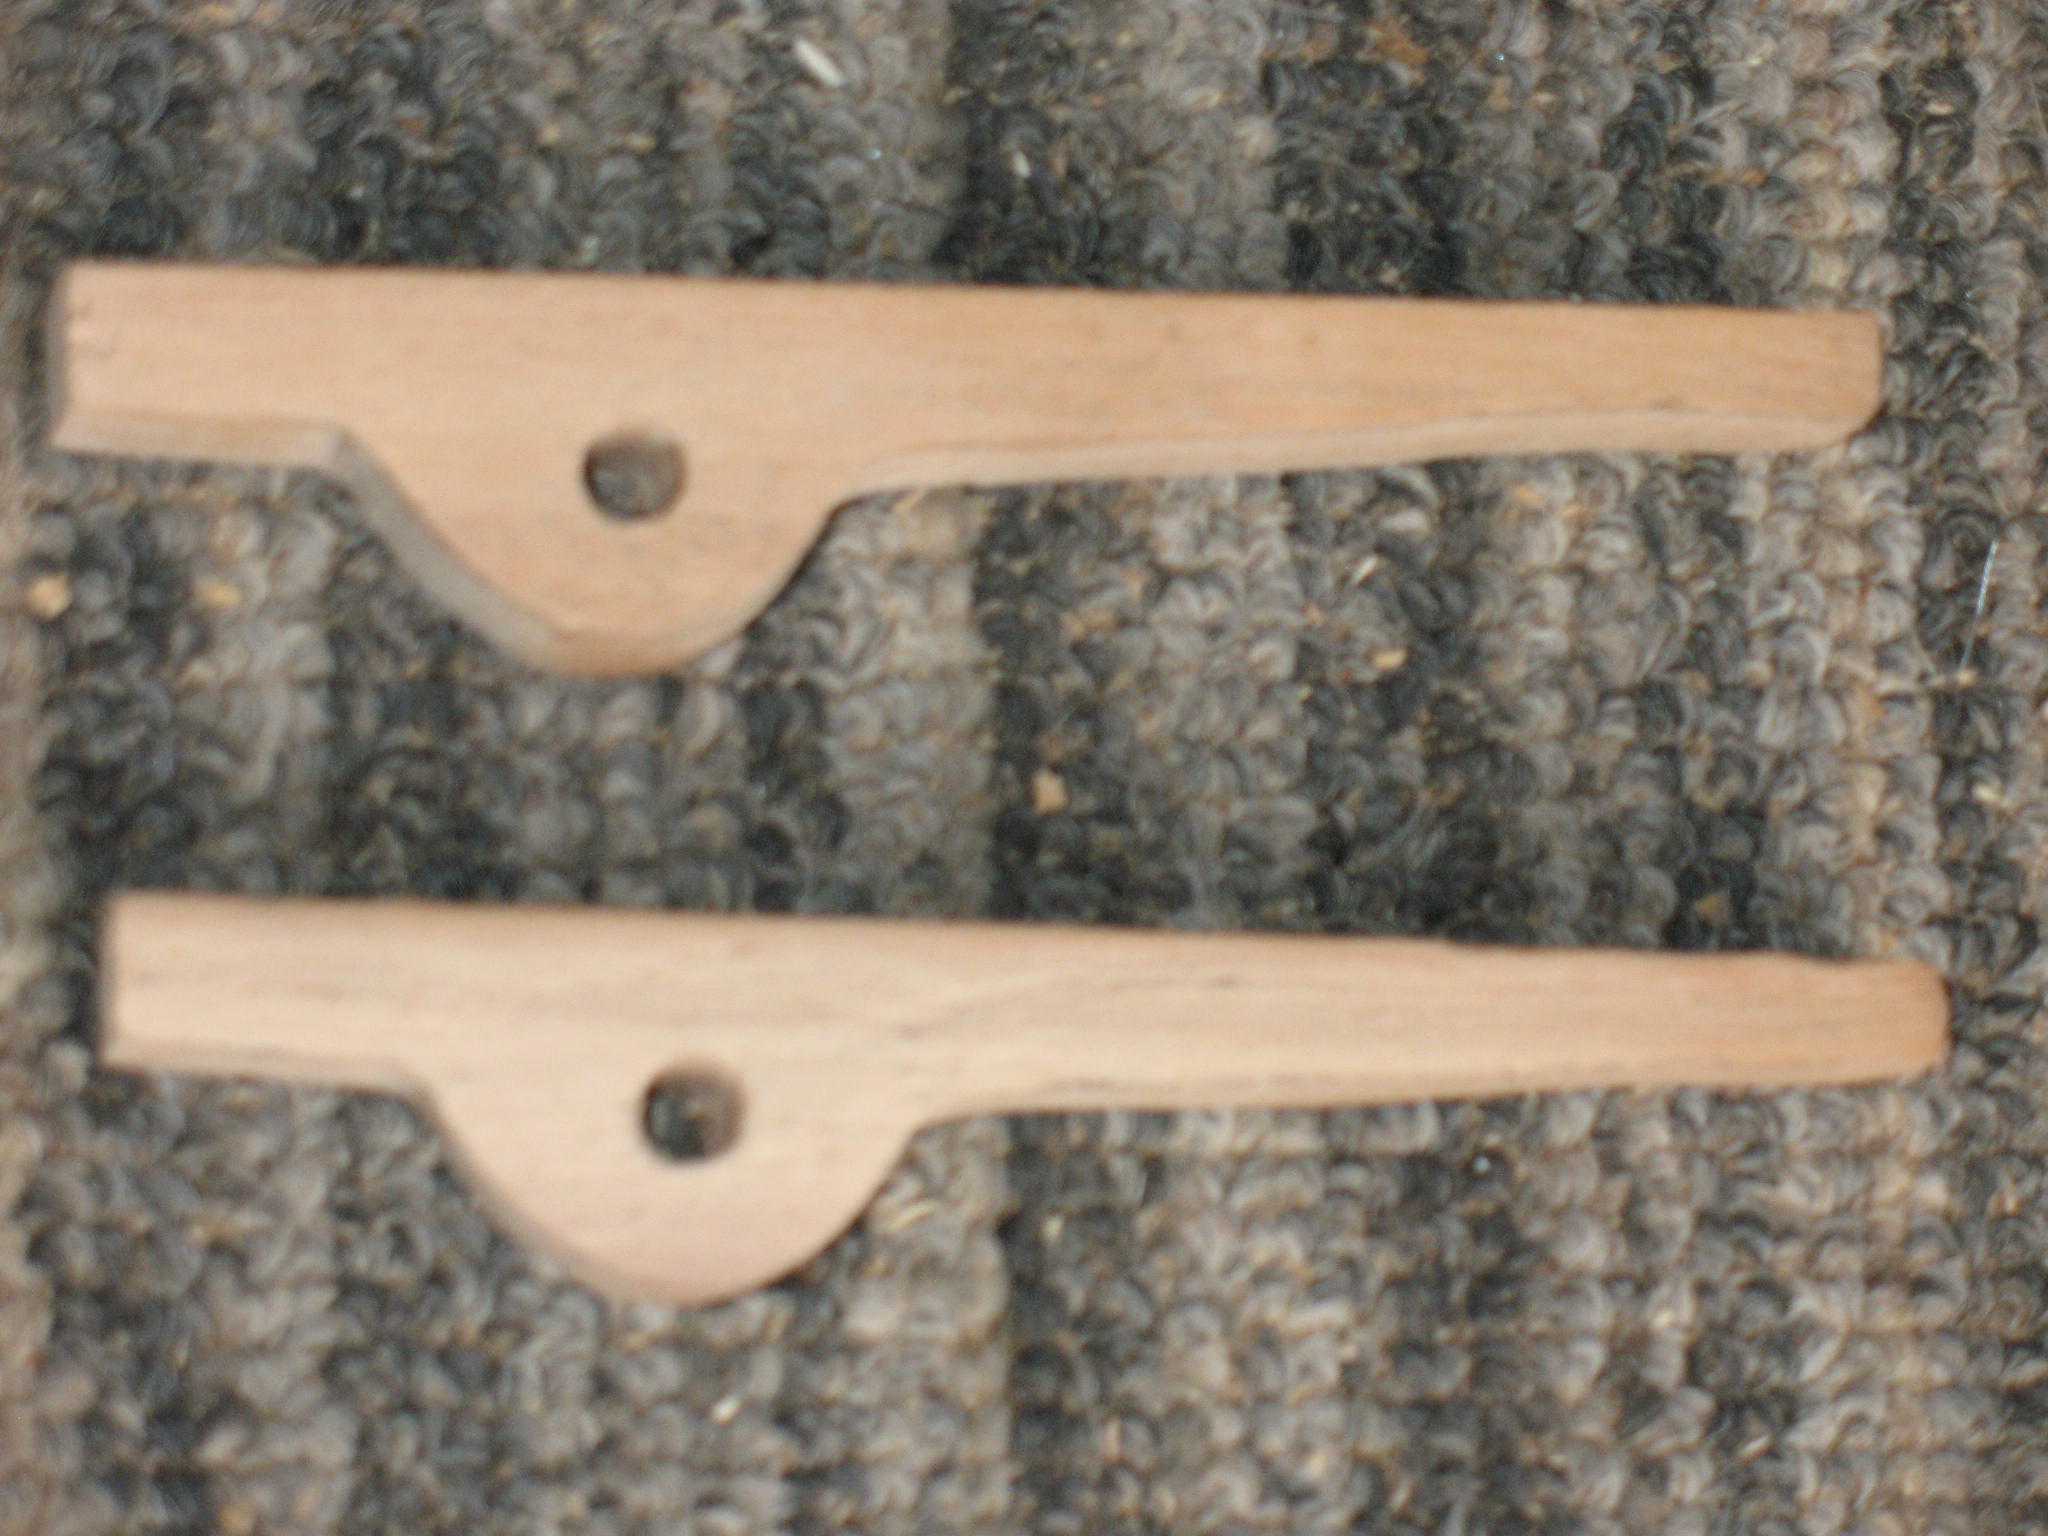
I positioned one of the levers where it will need to be on the tiller and marked the tiller where I could drill a hole through it for the dowel. I drilled this hole a little larger than the dowel so that the dowel will turn easily in it.

I put a little wood glue on the dowel and inserted it into the right lever, then I stuck the dowel through the hole in the tiller. I held the other lever up to the dowel and marked the dowel so that I could cut it to the correct length. I removed the dowel from the tiller and trimmed down the other end until it would fit in the left hand lever, but I did not glue it. Repeat, DON’T GLUE ON THE SECOND LEVER YET.

Now I paused in construction to give everything a nice coat of stain and took a break to make some arrows while it dried.
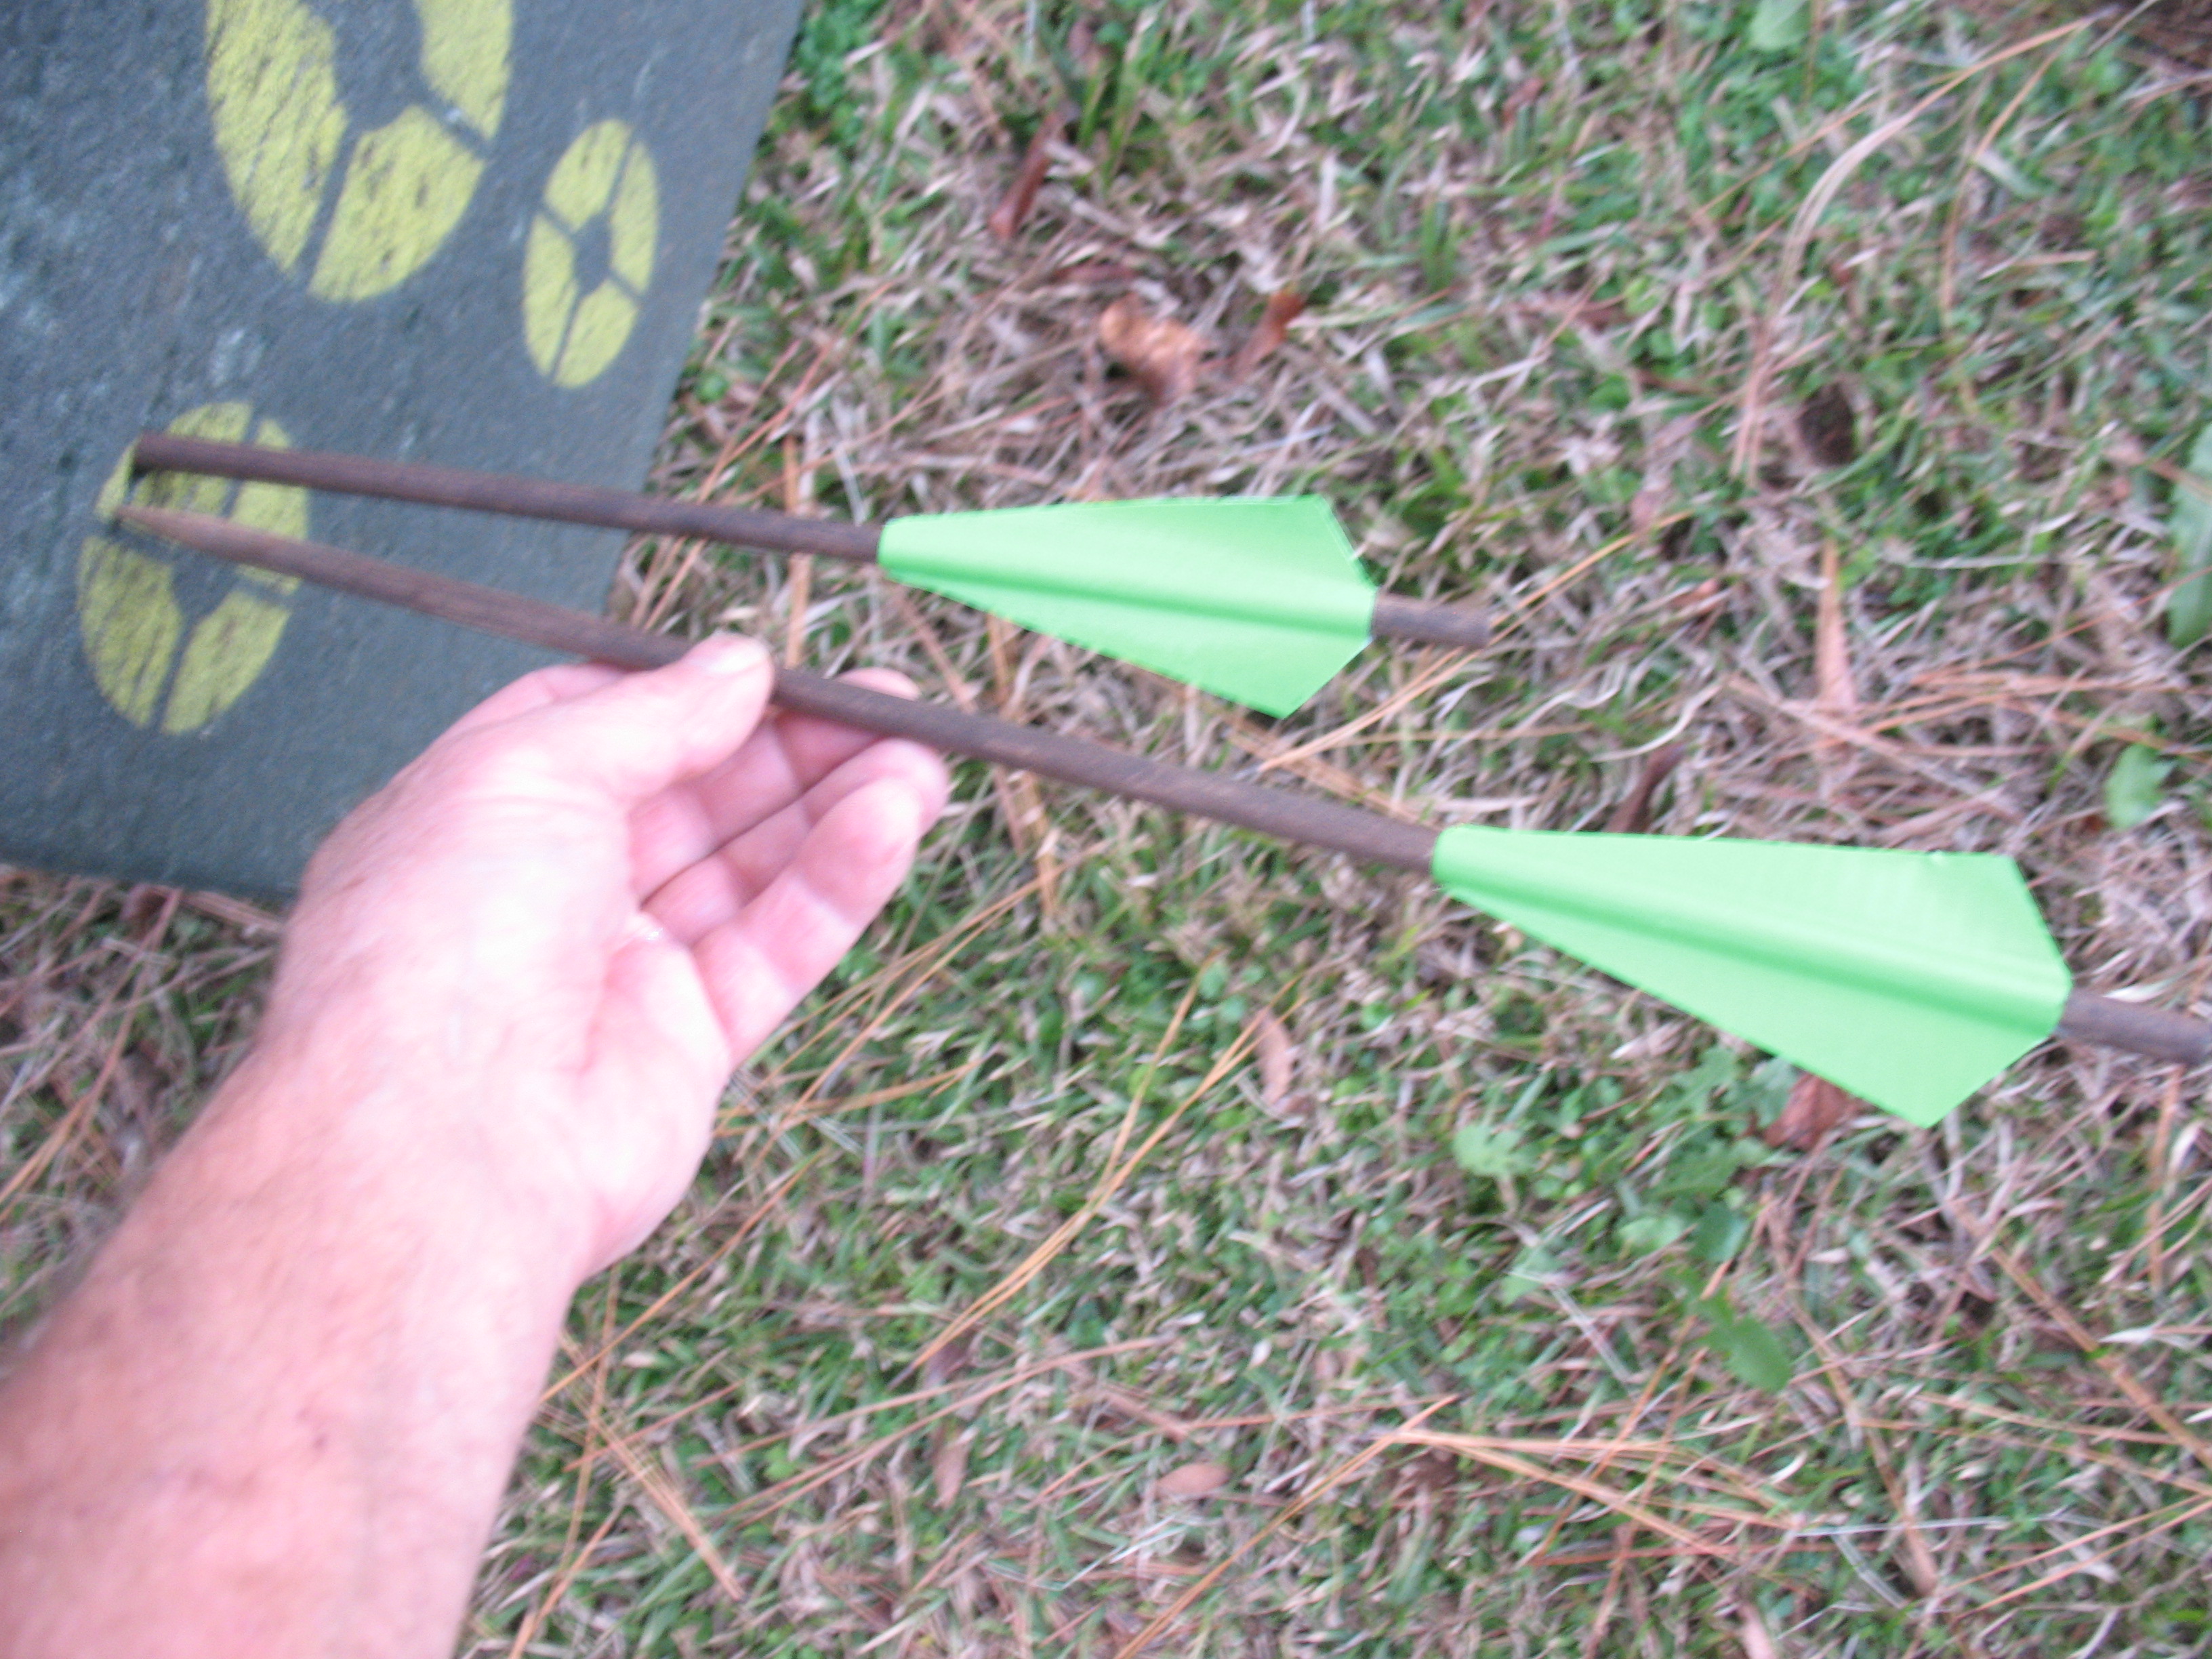
Montagnard arrows are made of straight, round shoots or bamboo splits. They are split on one end, and a folded bamboo leaf is inserted for a fletching. The split in the shaft is then glued back together and wrapped with thread to reinforce it.

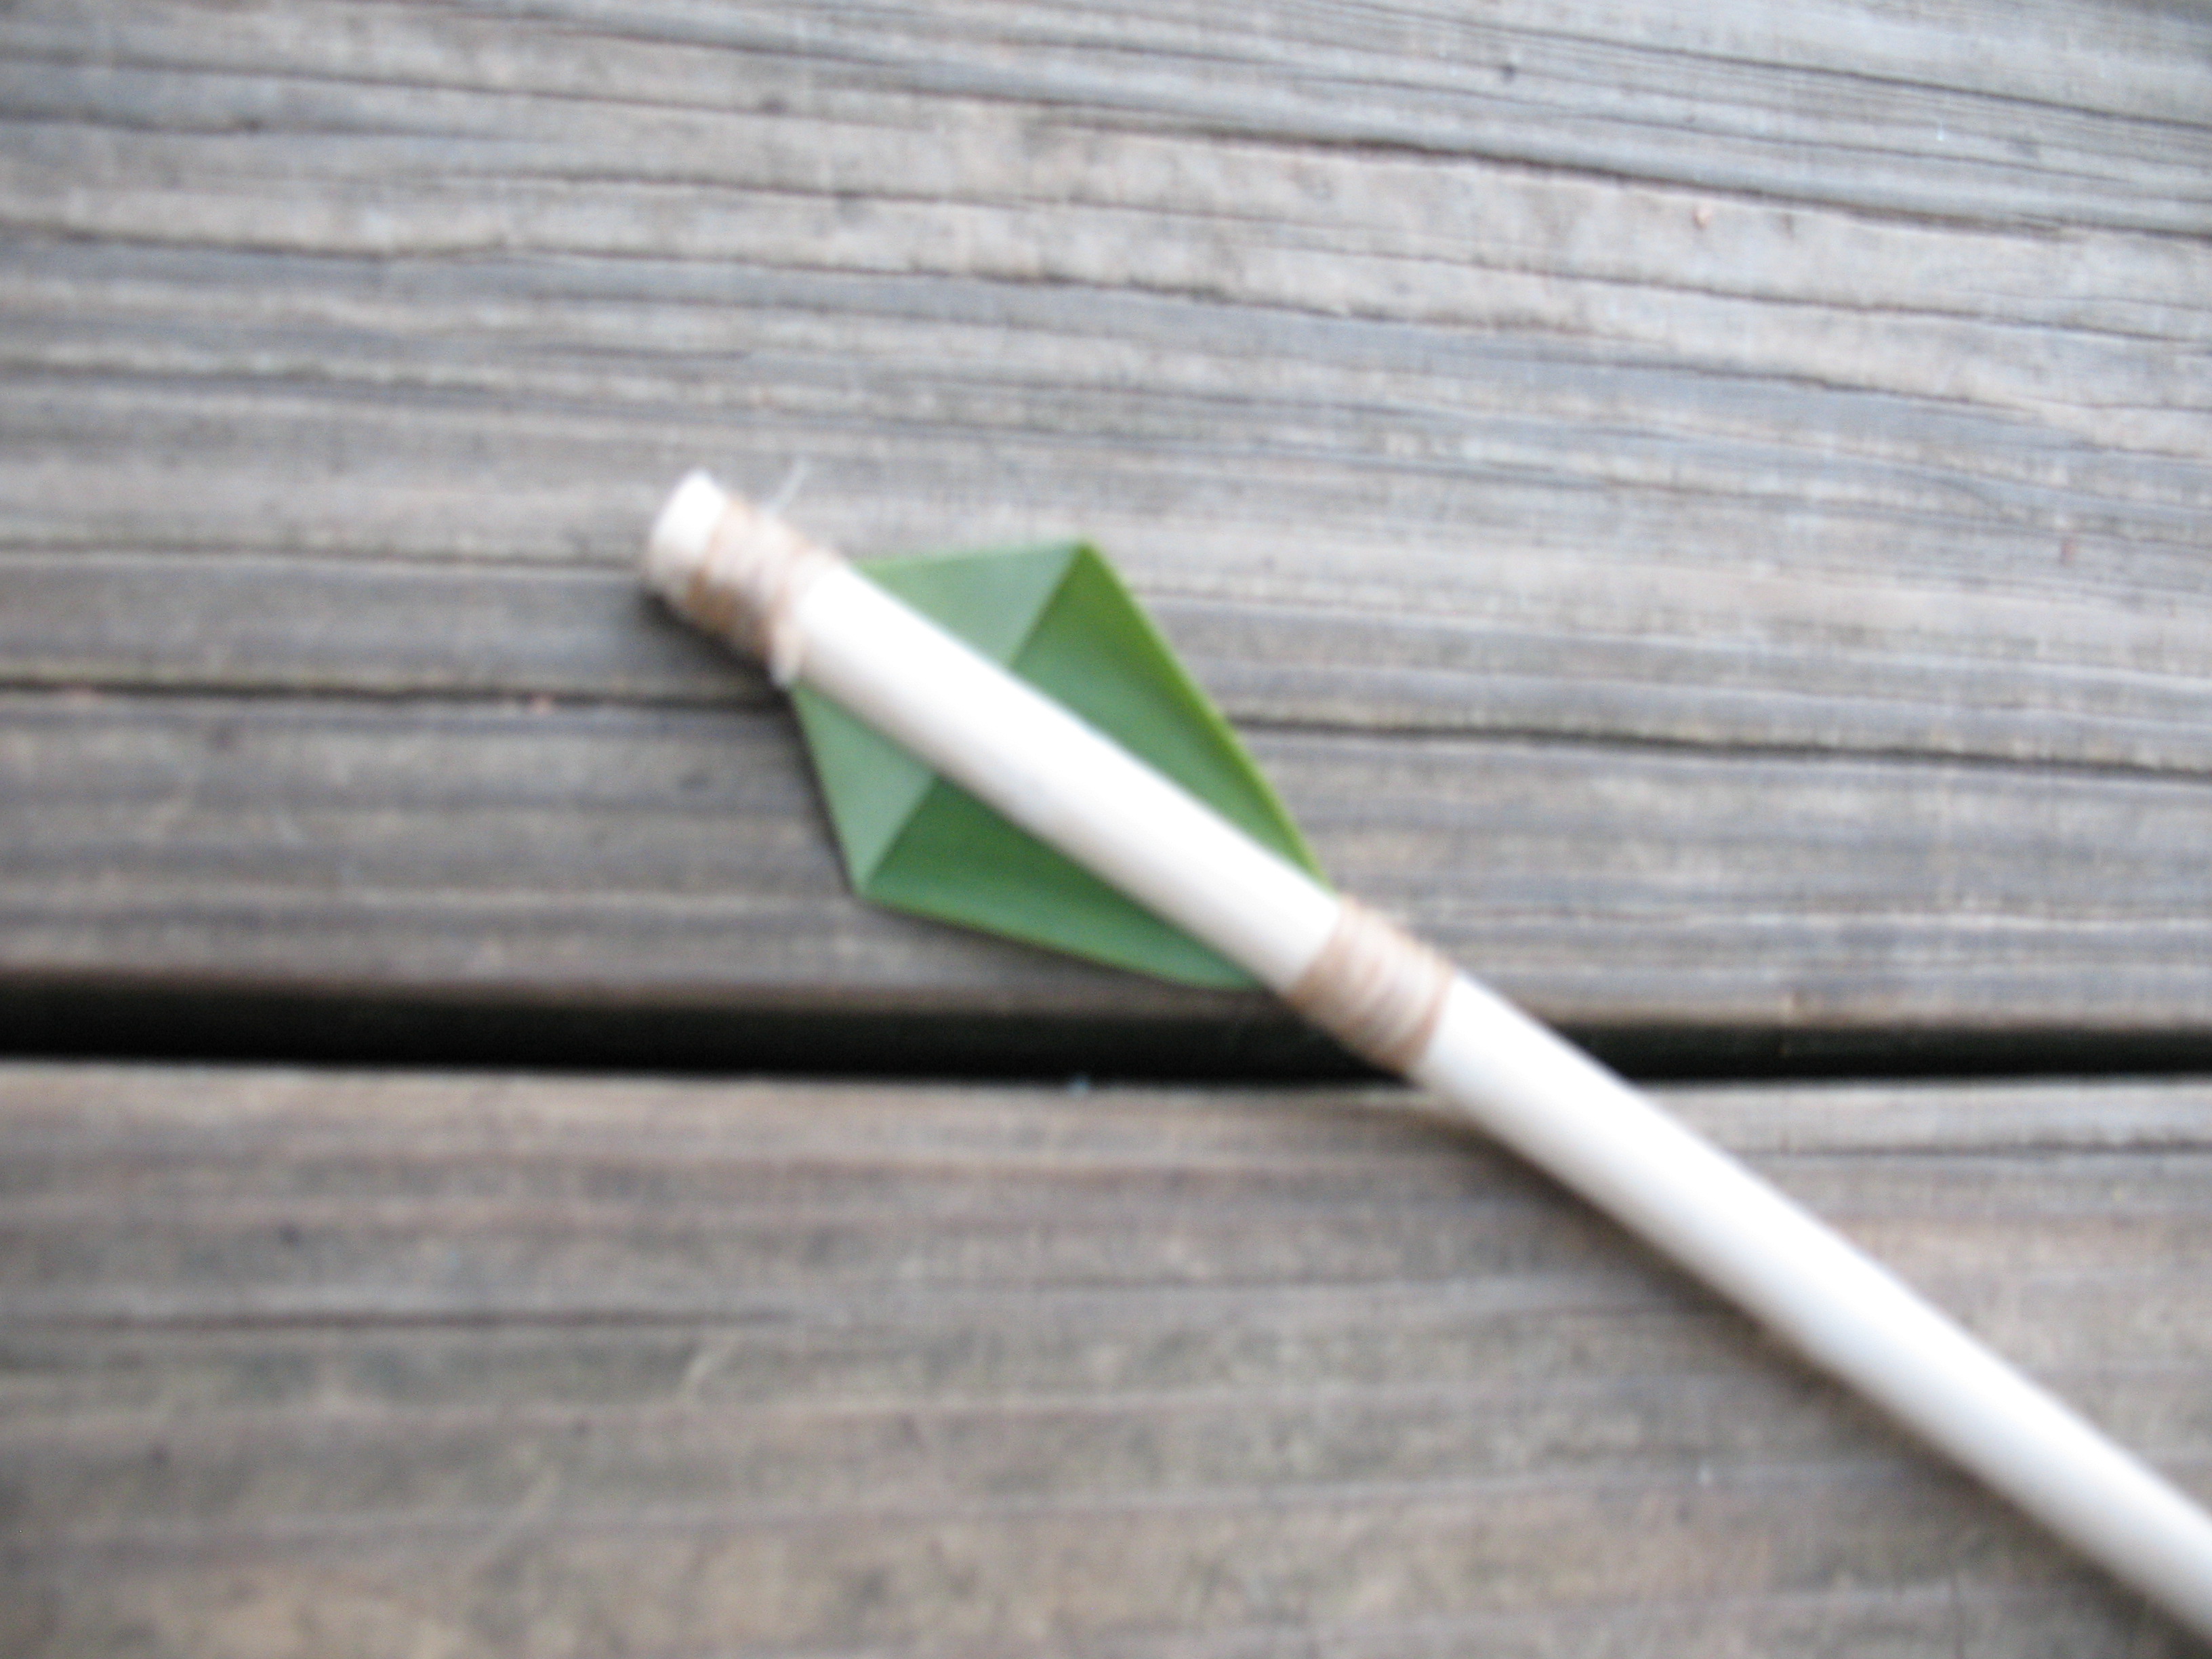
I made a traditional arrow, but it didn’t perform very well and the bamboo leaf tore up after about three shots. I guess I need a Montagnard to show me how this should be done, because I obviously did something wrong. As an alternative I cut some 5/16” dowels about 14 inches long and fletched them with duct tape. They performed much better.

When the stain had dried I inserted the trigger assembly and very carefully glued the other lever on. You want to make sure that you don’t get any glue on the inside of the lever or you may end up with it permanently, and immovable, glued to the side of the tiller. Also make sure that the two levers are dead even so they will both lift the string at the same time. Now I have to set it all aside until tomorrow so the glue can dry.
OK, the glue is dry and it’s time for a little test firing.
Using a pointed dowel and duct tape arrow I shot at a dense foam target from 30 feet. The arrow still shot a little to the left, but the penetration was about five inches. Not bad.
I shot it for distance, and boy was I surprised. The arrow flew 82 yards which was about twice what I was expecting. The crazy thing is that the arrow hit a treated post in front of my shop at the end of its flight and the sharpened wooden point stuck 1/2 “ into the post.
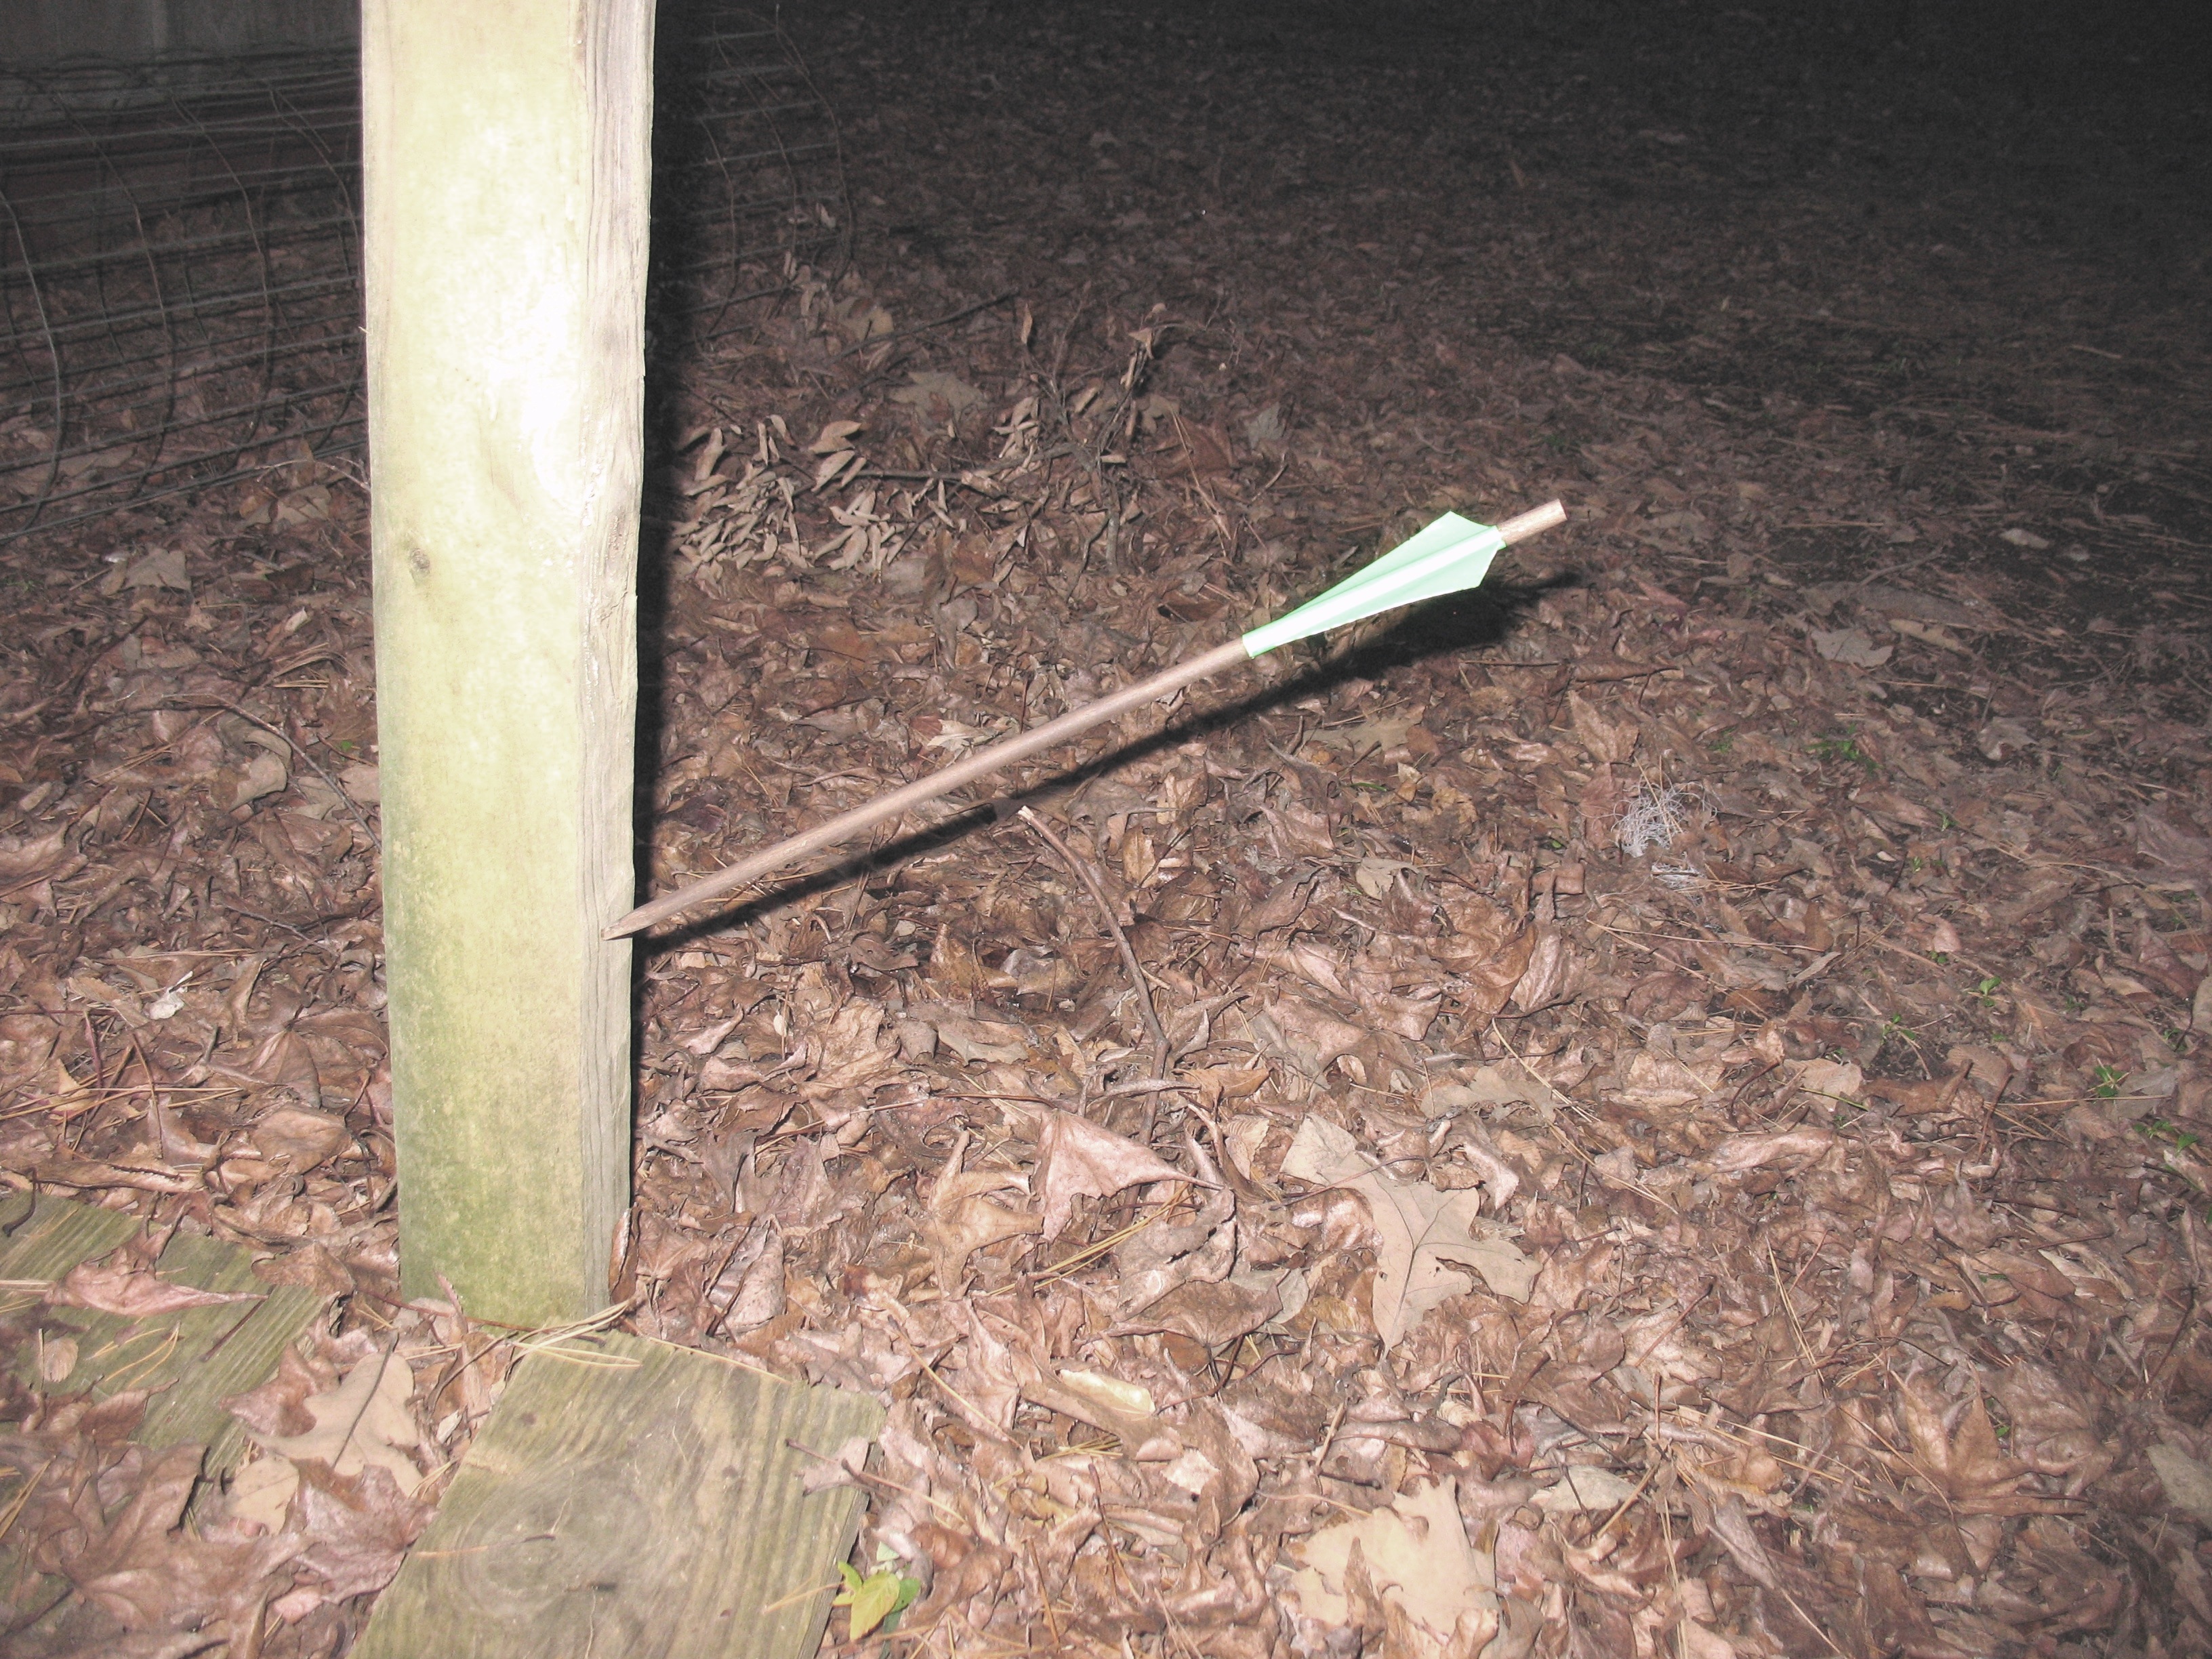
This is definitely not a toy. I believe that with a little practice you could easily hunt small game with this crossbow.
If you live in the southern United States, and if you raise asparagus, then it is probably time for you to winterize your asparagus beds. After the weather has turned cold and we have had a freeze or two, your asparagus ferns will begin to yellow and die. To keep your plants vigorous and to avoid disease it is best to cut down these dead ferns and either burn them, or dispose of them well away from your asparagus bed.

I start off by taking a pair of pruning shears and cutting off all of the ferns right at ground level.


I gather all of the cut ferns in a trash can and haul them out into the woods on the other side of my yard from the asparagus bed. I would prefer to compost them, but my compost bed is right next to my asparagus bed so I haul them off.

After I get rid of the ferns I gently rake the dead leaves and such out of the bed.

Next I go through the bed and hand pull any weeds that have grown there. I don’t use a turning fork or any kind of mechanical cultivator for fear of damaging the crowns which are right below the ground.

When the bed is all cleaned up I cover it with about two inches of good compost. I prefer to use my own compost, but I didn’t have any ready, so I was forced to buy six bags. This cost me a wopping $9.00, but I’ll get my money back many times over when I harvest this bed next spring, so I didn’t complain too much.

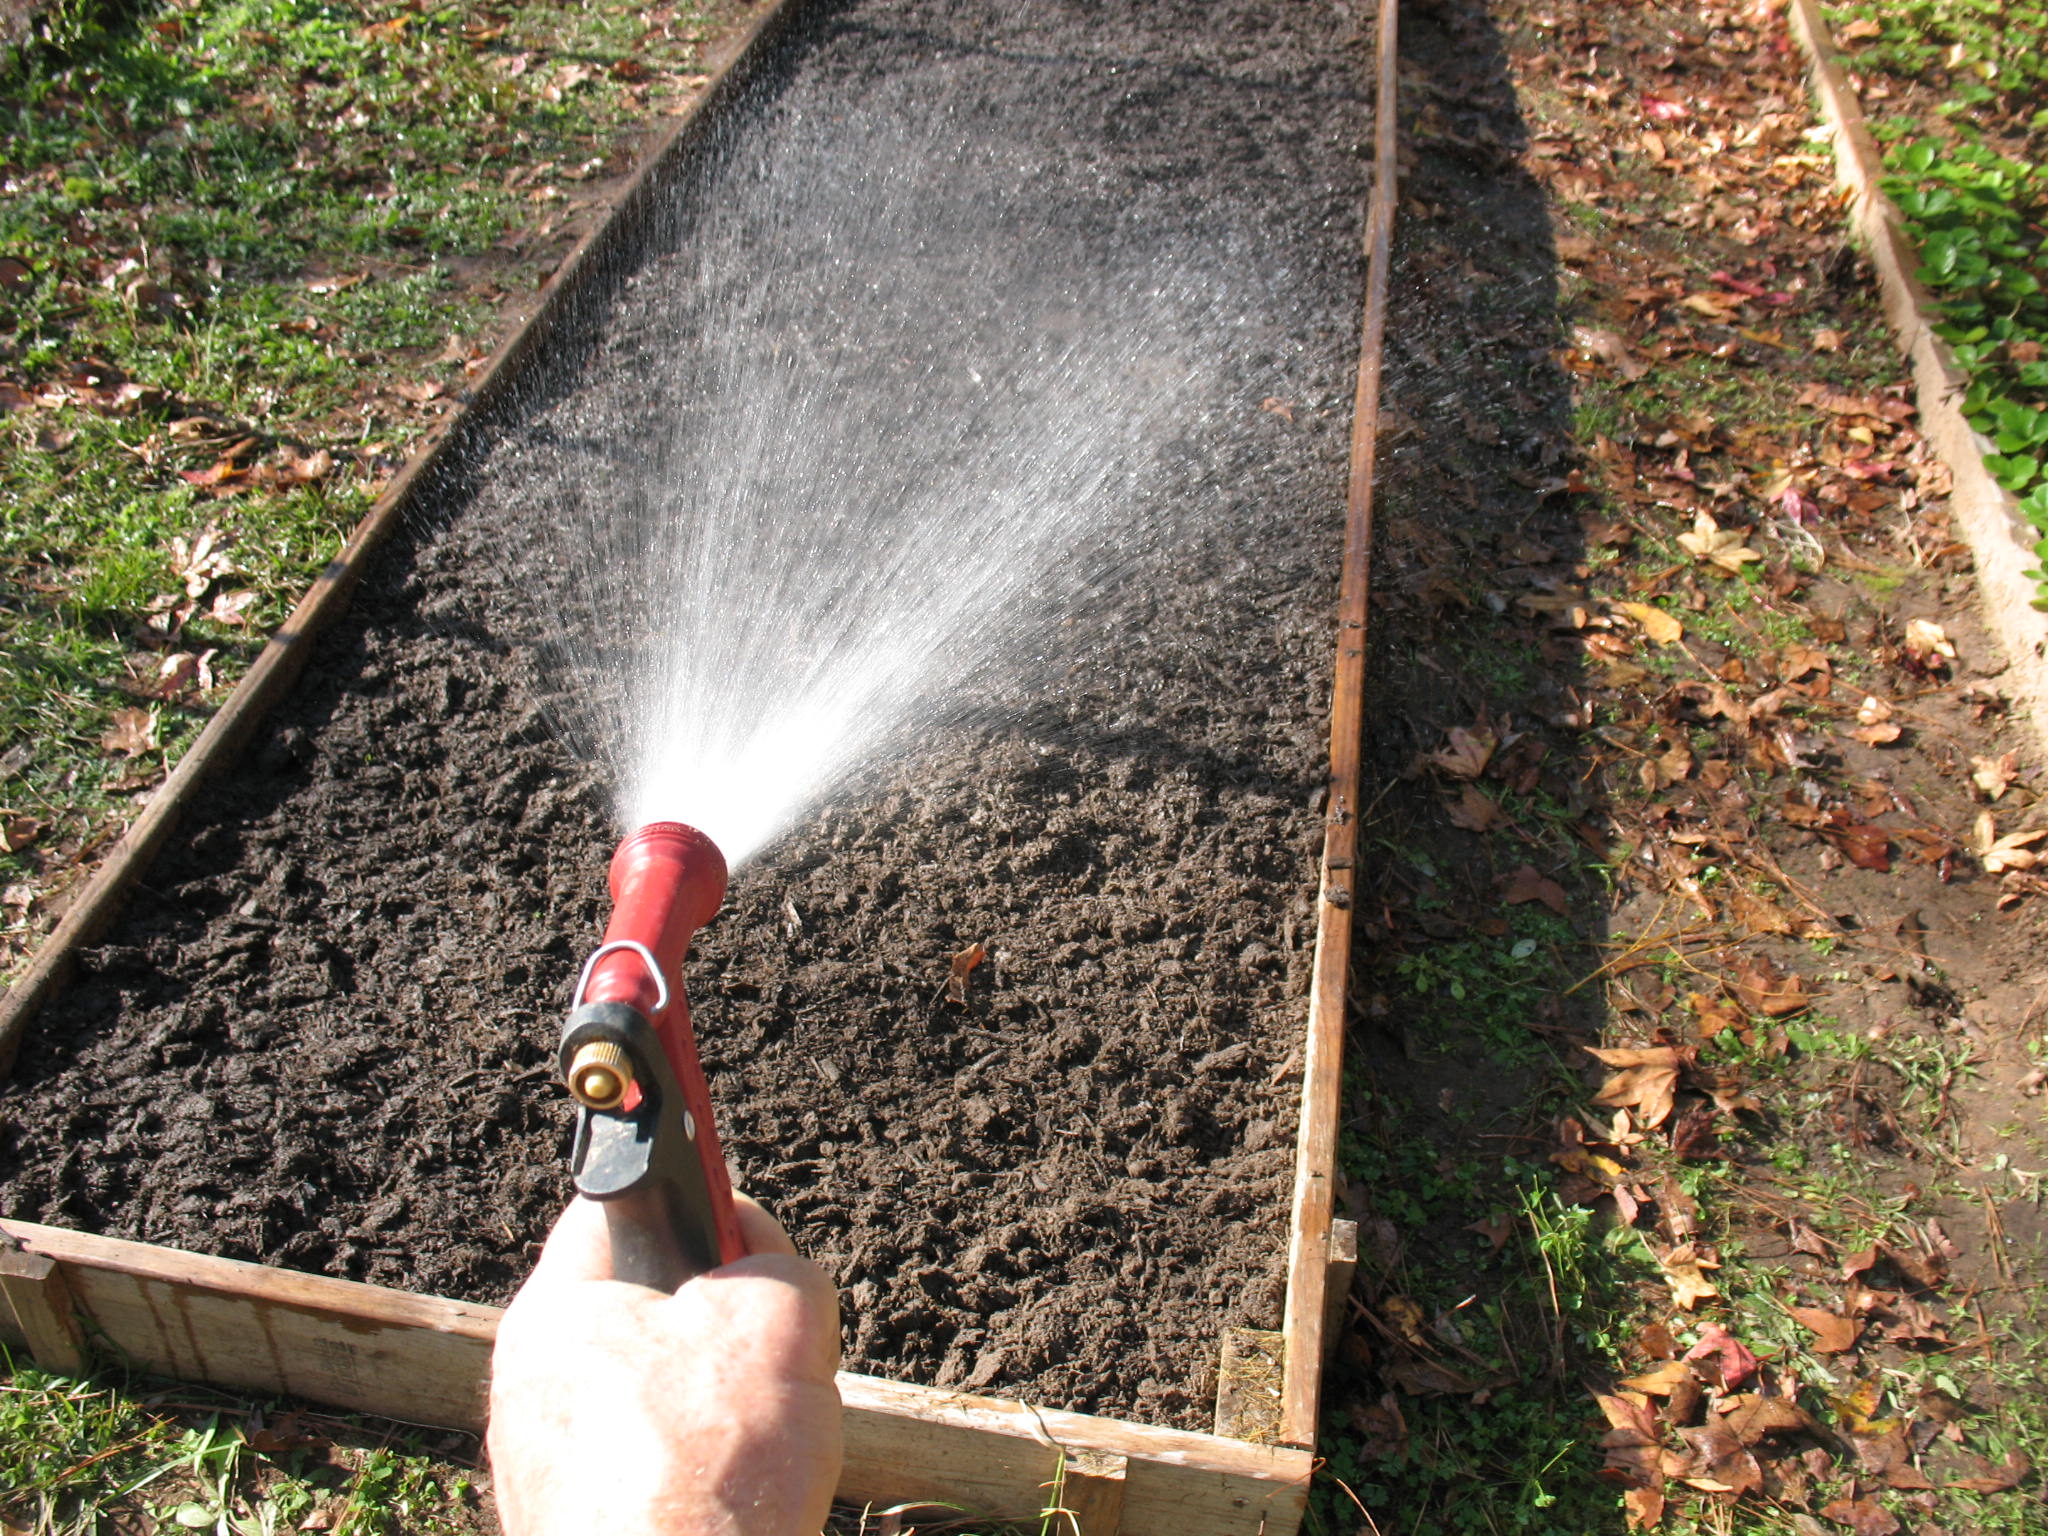
I water the bed thoroughly at this point. Remember, just because you can’t see anything growing doesn’t mean there’s nothing there. Your asparagus still has a massive, living root system down there and it needs regular watering throughout the winter.
A little general weed eating and clean-up around the bed, and it’s good to go for the winter.

In late winter/early spring, just before the asparagus shoots start coming up; I’ll broadcast a little 13-13-13 fertilizer on the bed and water it in. I hope to have a good crop this year, and I hope you have one too.
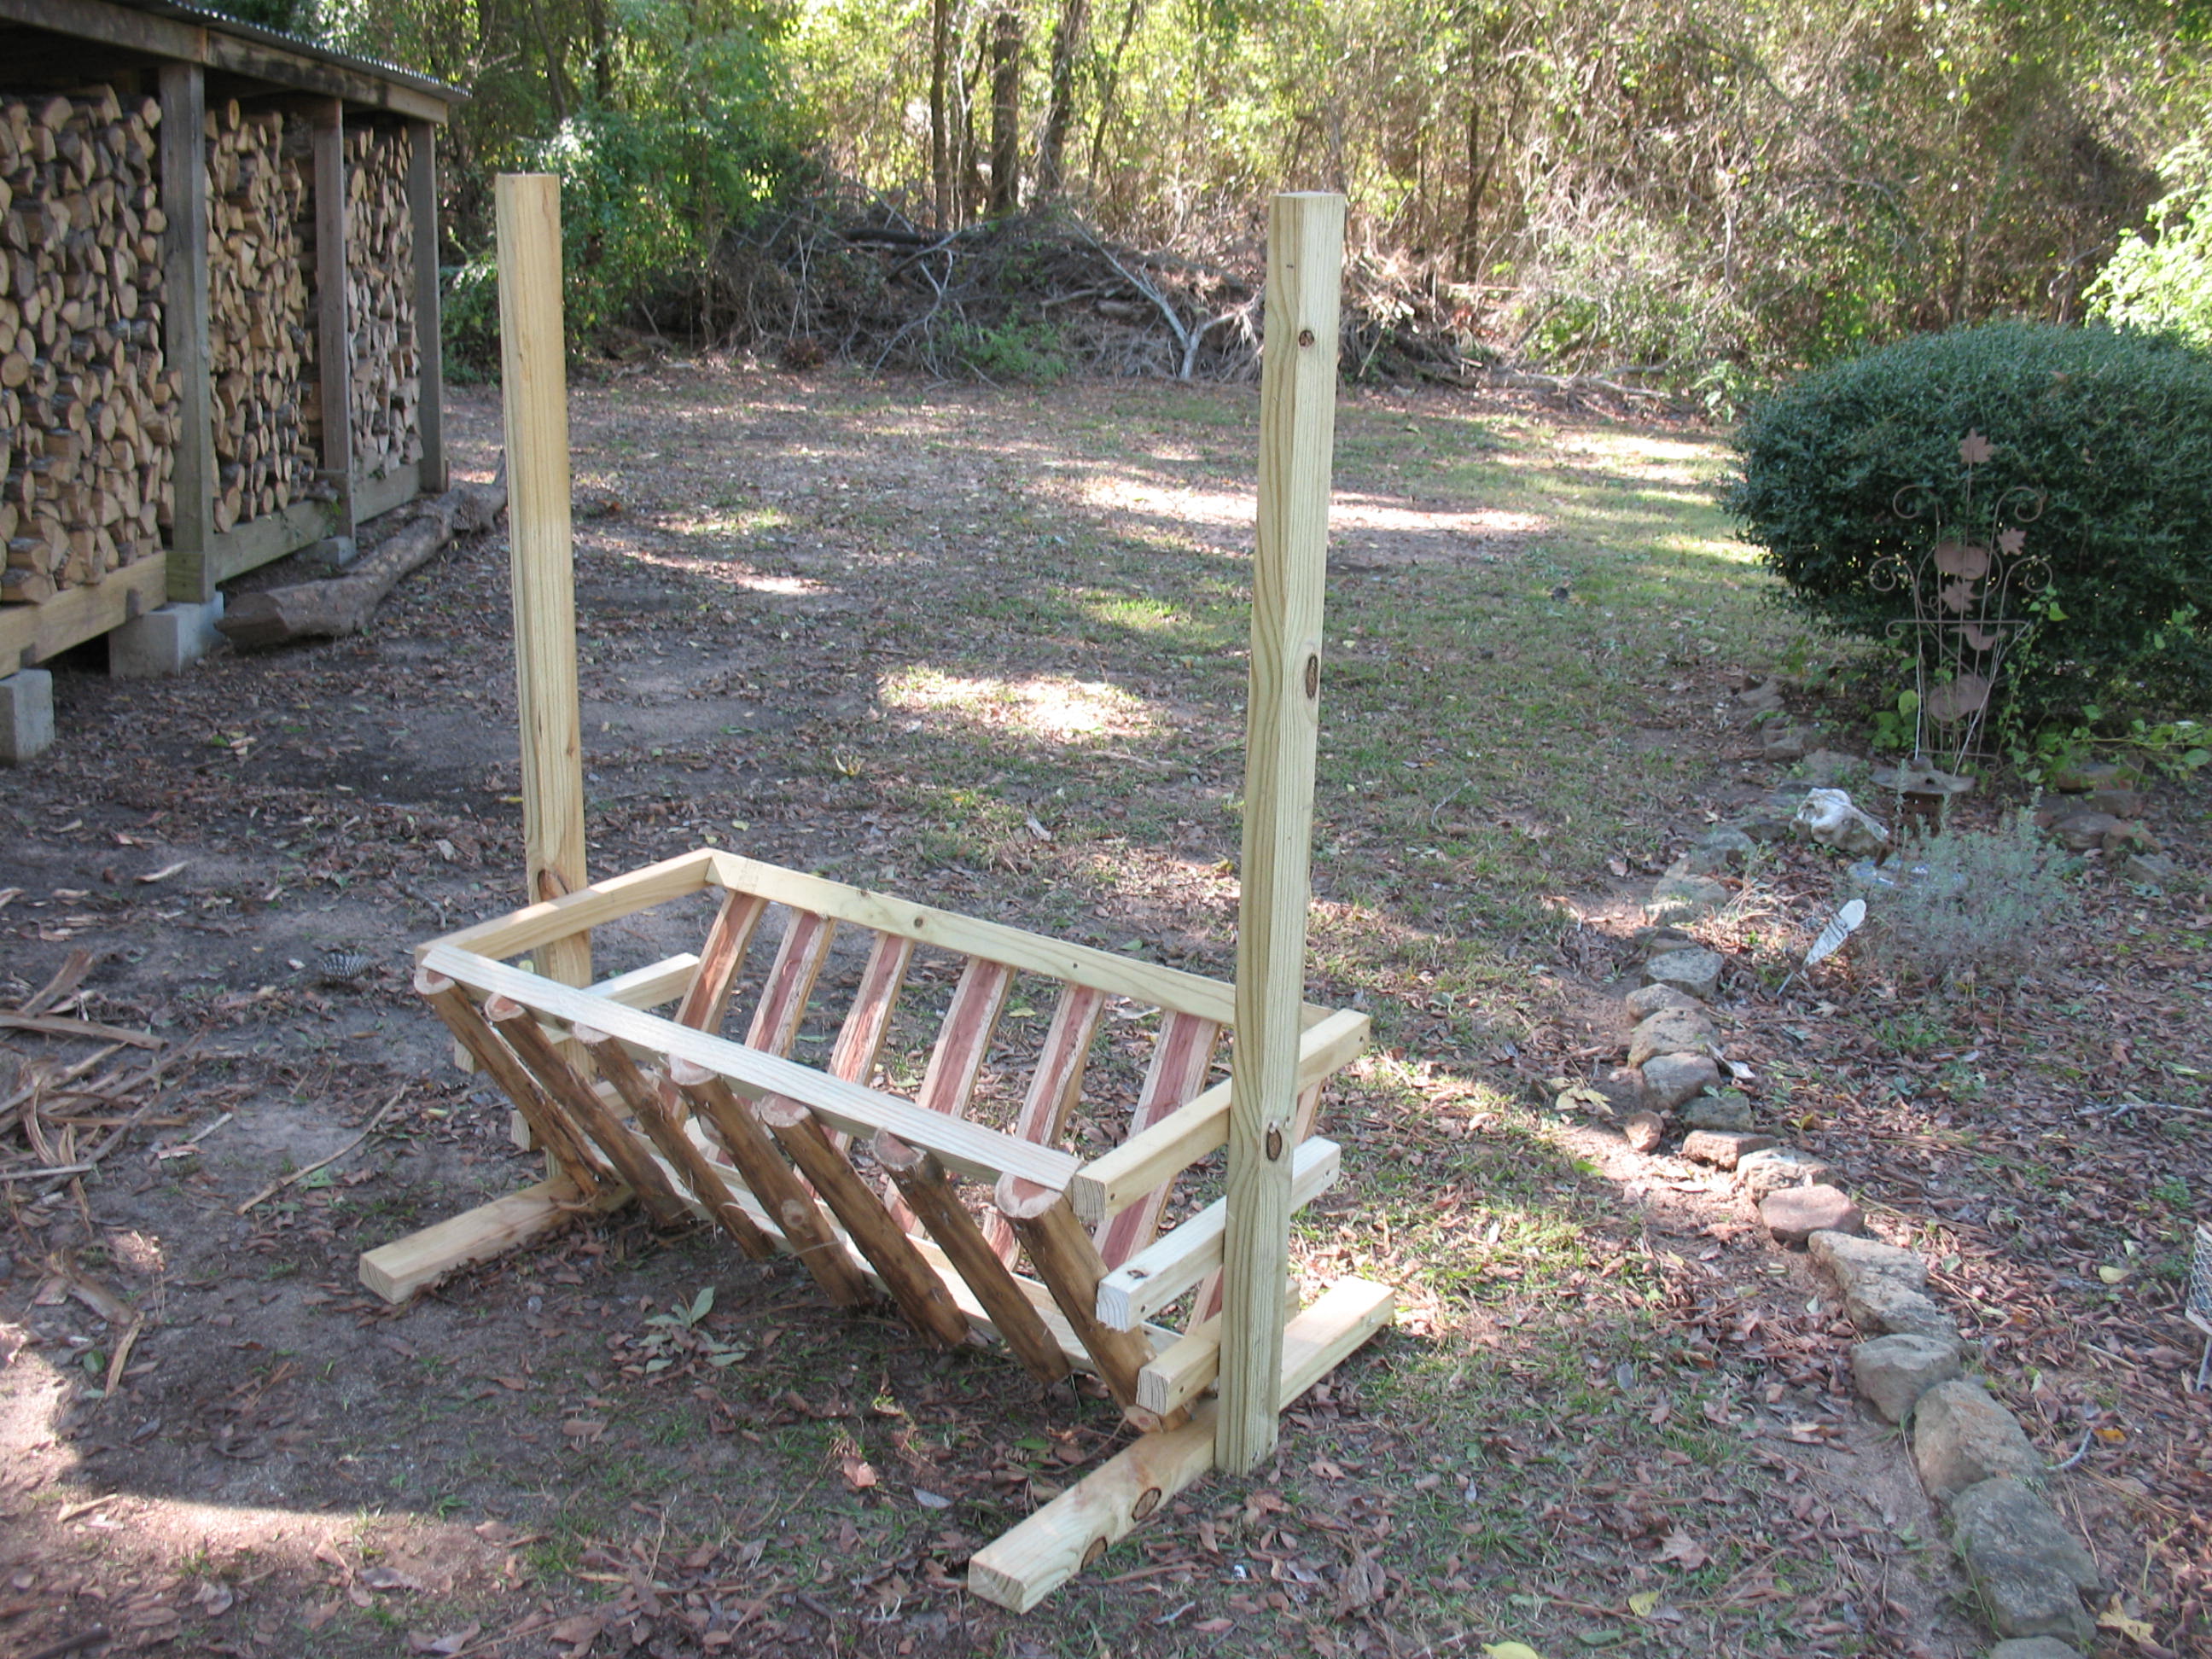
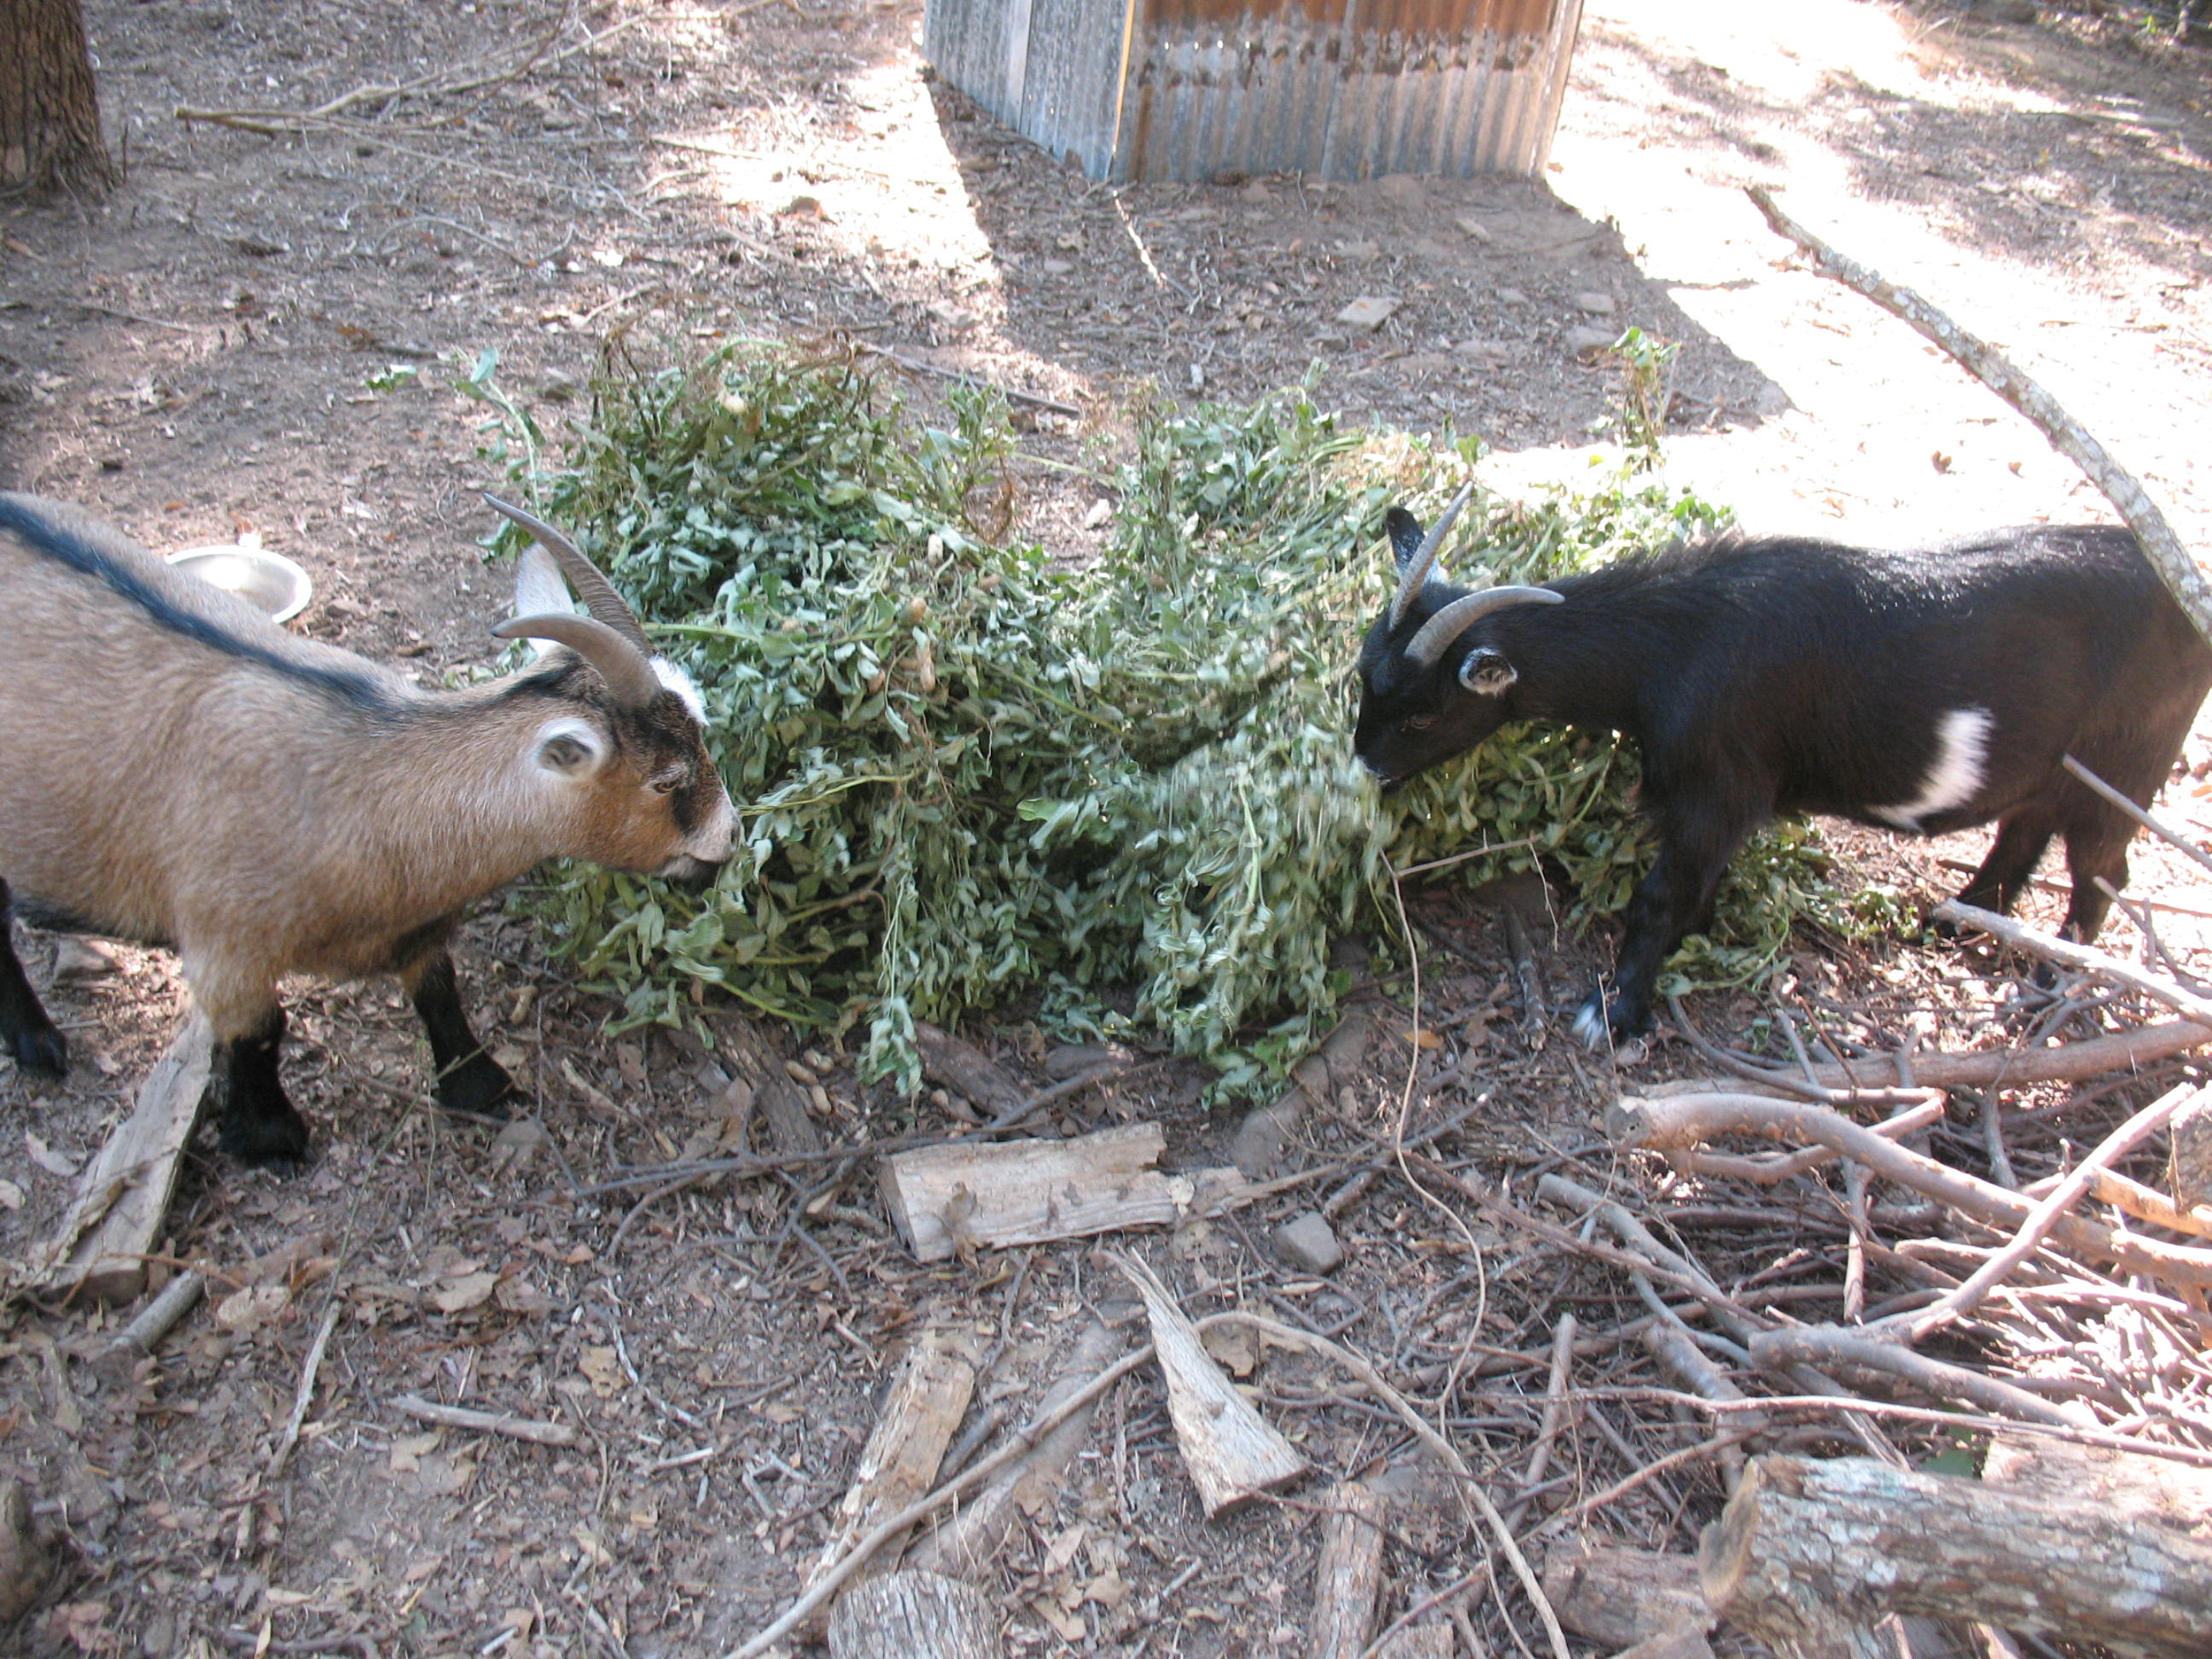
For most of the year I feed my goats brush from the woods along with a little all-stock feed. Goats love leaves, bud, and shoots; and it’s a simple matter to cut down a good load of greenery for them. The problem comes in the winter when there’s no greenery to be had. So, in the winter I have to feed my goats hay. Hay is not cheap, and goats are messy eaters. As much hay ends up on the ground as ends up in the goats. So I decided to build my goats a manger to try and cut down on the wasted hay. As usual, I used a lot of scraps that I had laying around the farm, but I did end up having to buy a few boards for this project. Here’s how I built the manger.
First I assembled what scrap lumber that I could find along with some cedar posts left over from a fence project.
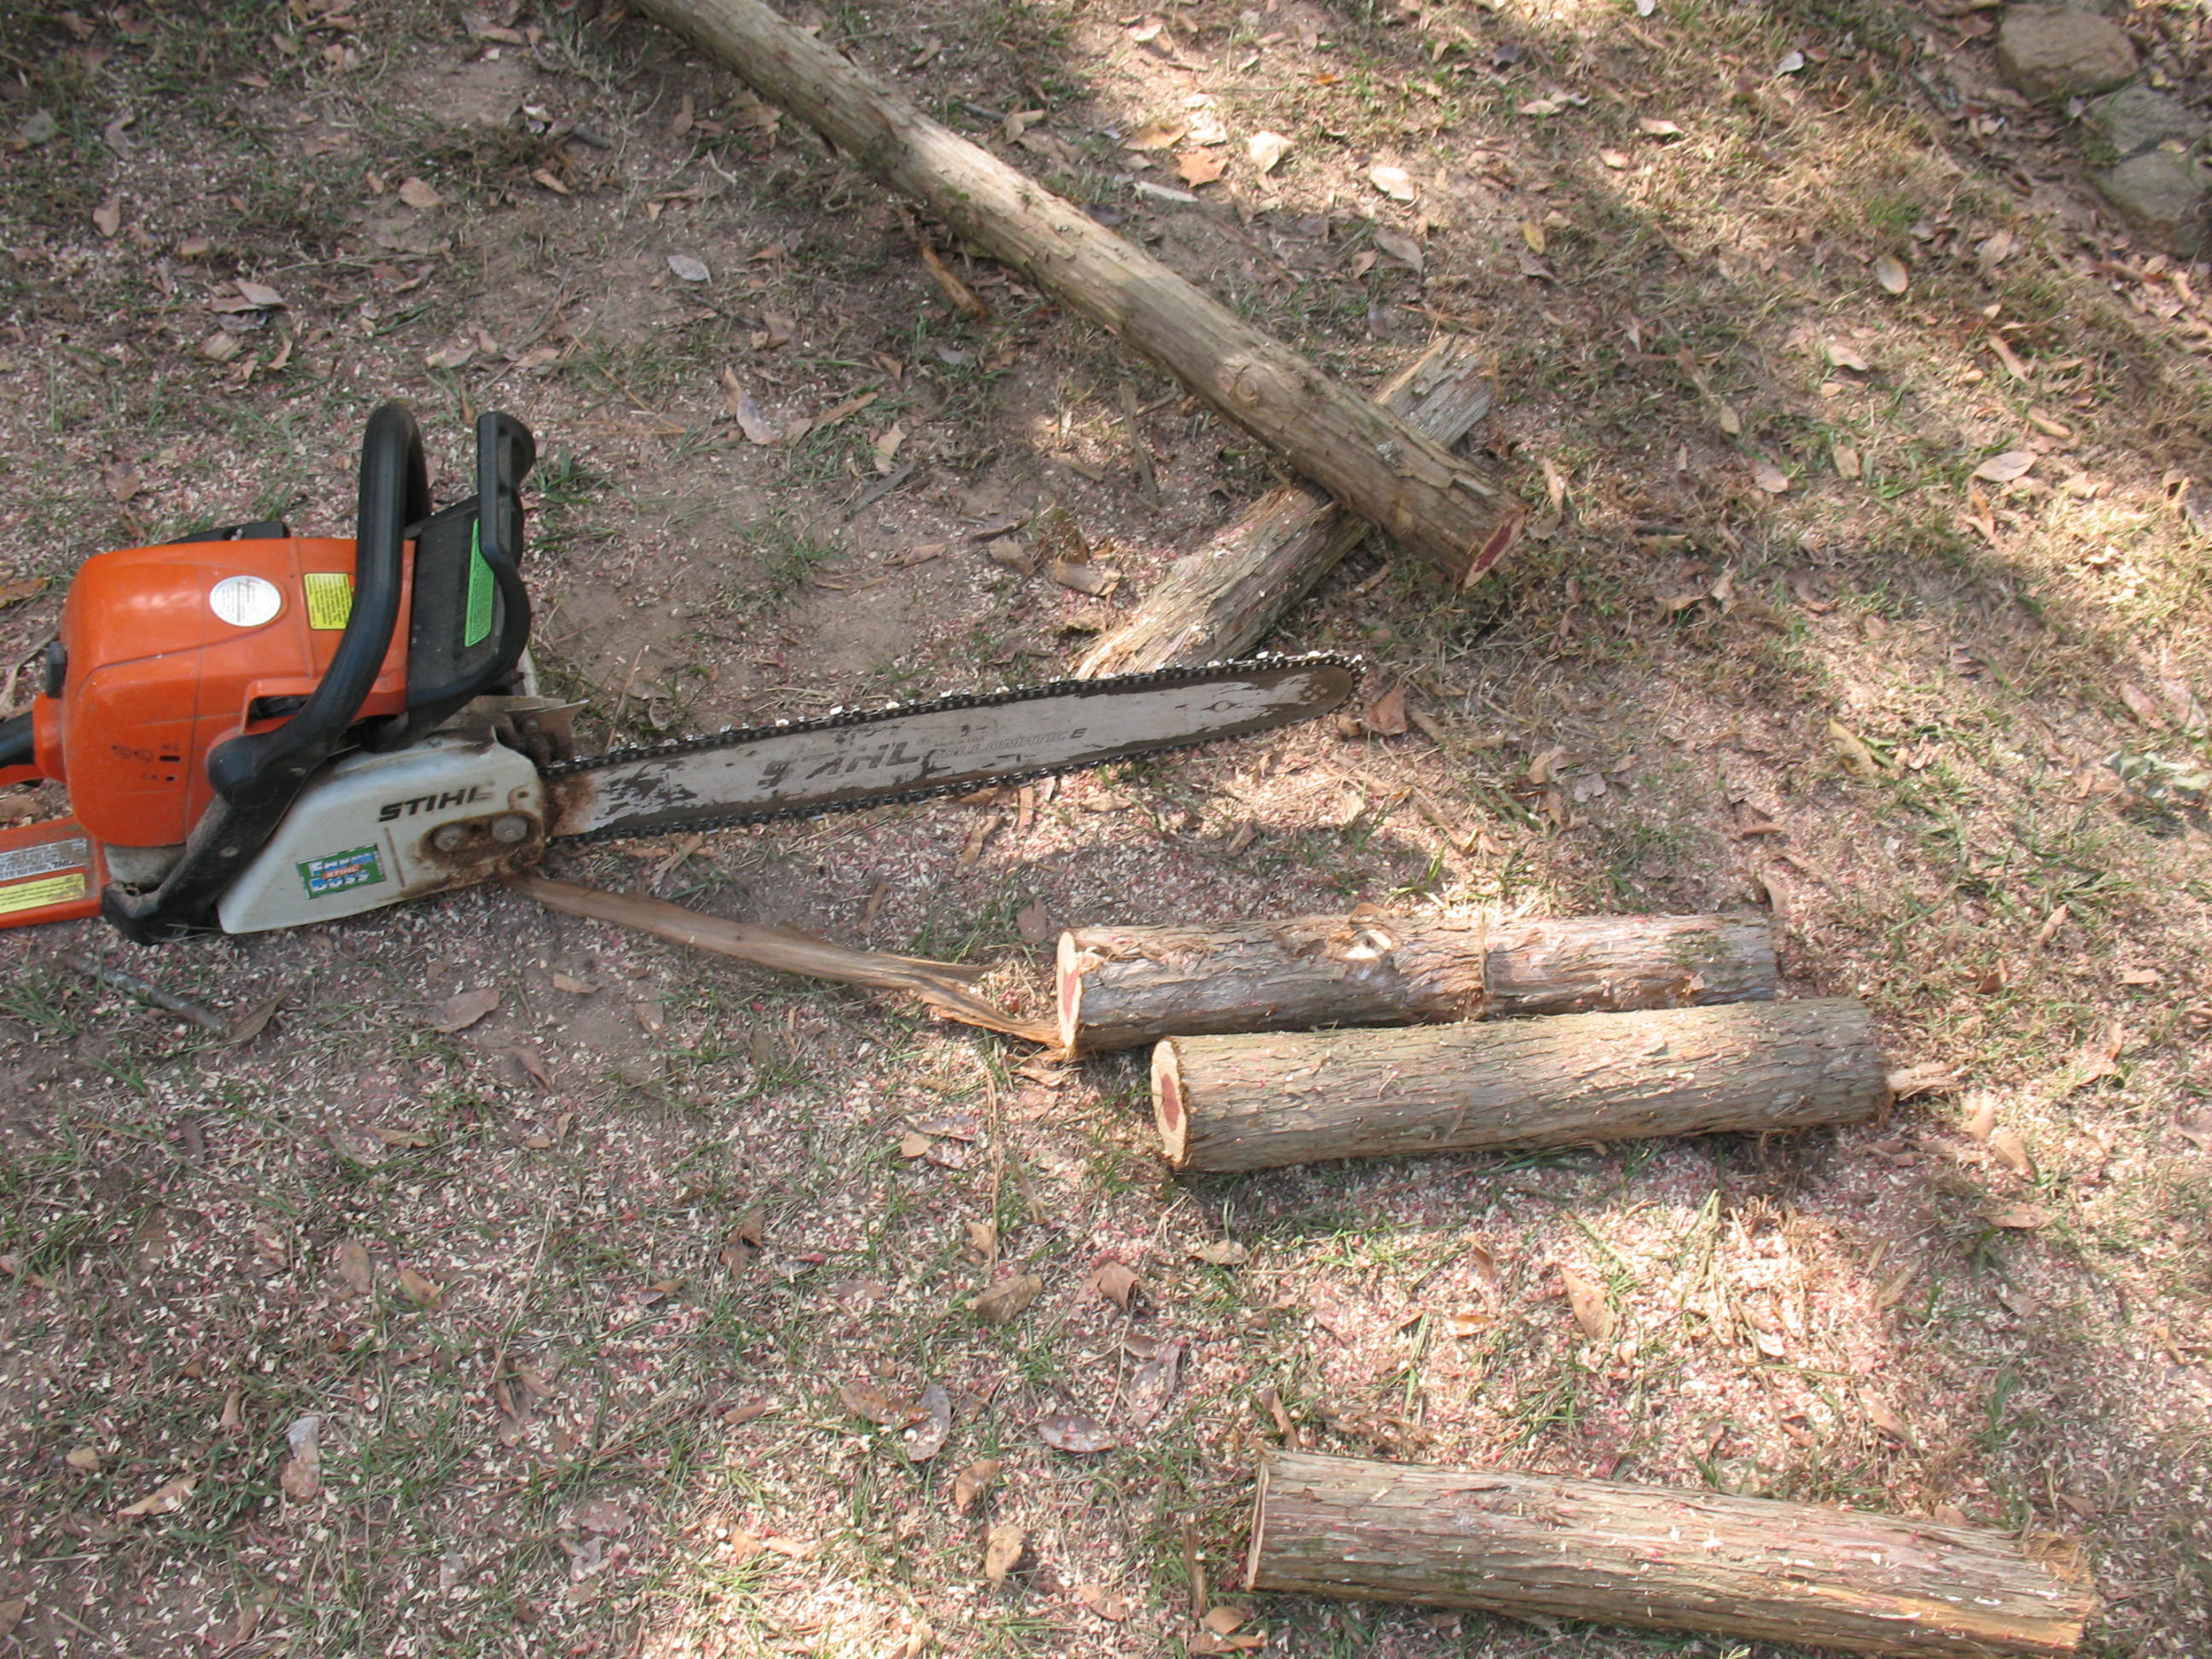
 I used a chainsaw to cut the cedar into two foot lengths and split the logs in half with a splitting wedge.


I took an eight foot 2×4 and sawed it in half length-wise then cut these in half so I ended up with four 2×2’s that measured four feet long.

Next I nailed the cedar splits to the four foot 2×2’s so that they looked like two short ladders. These will be the sides of the manger.

I cut some more 2×2’s to use for end pieces then nailed the sides and ends of the manger together.


To complete the bottom portion of the manger, I cut two 2×4’s about four feet long as a base and screwed the manger down to the base with some long dry-wall screws.
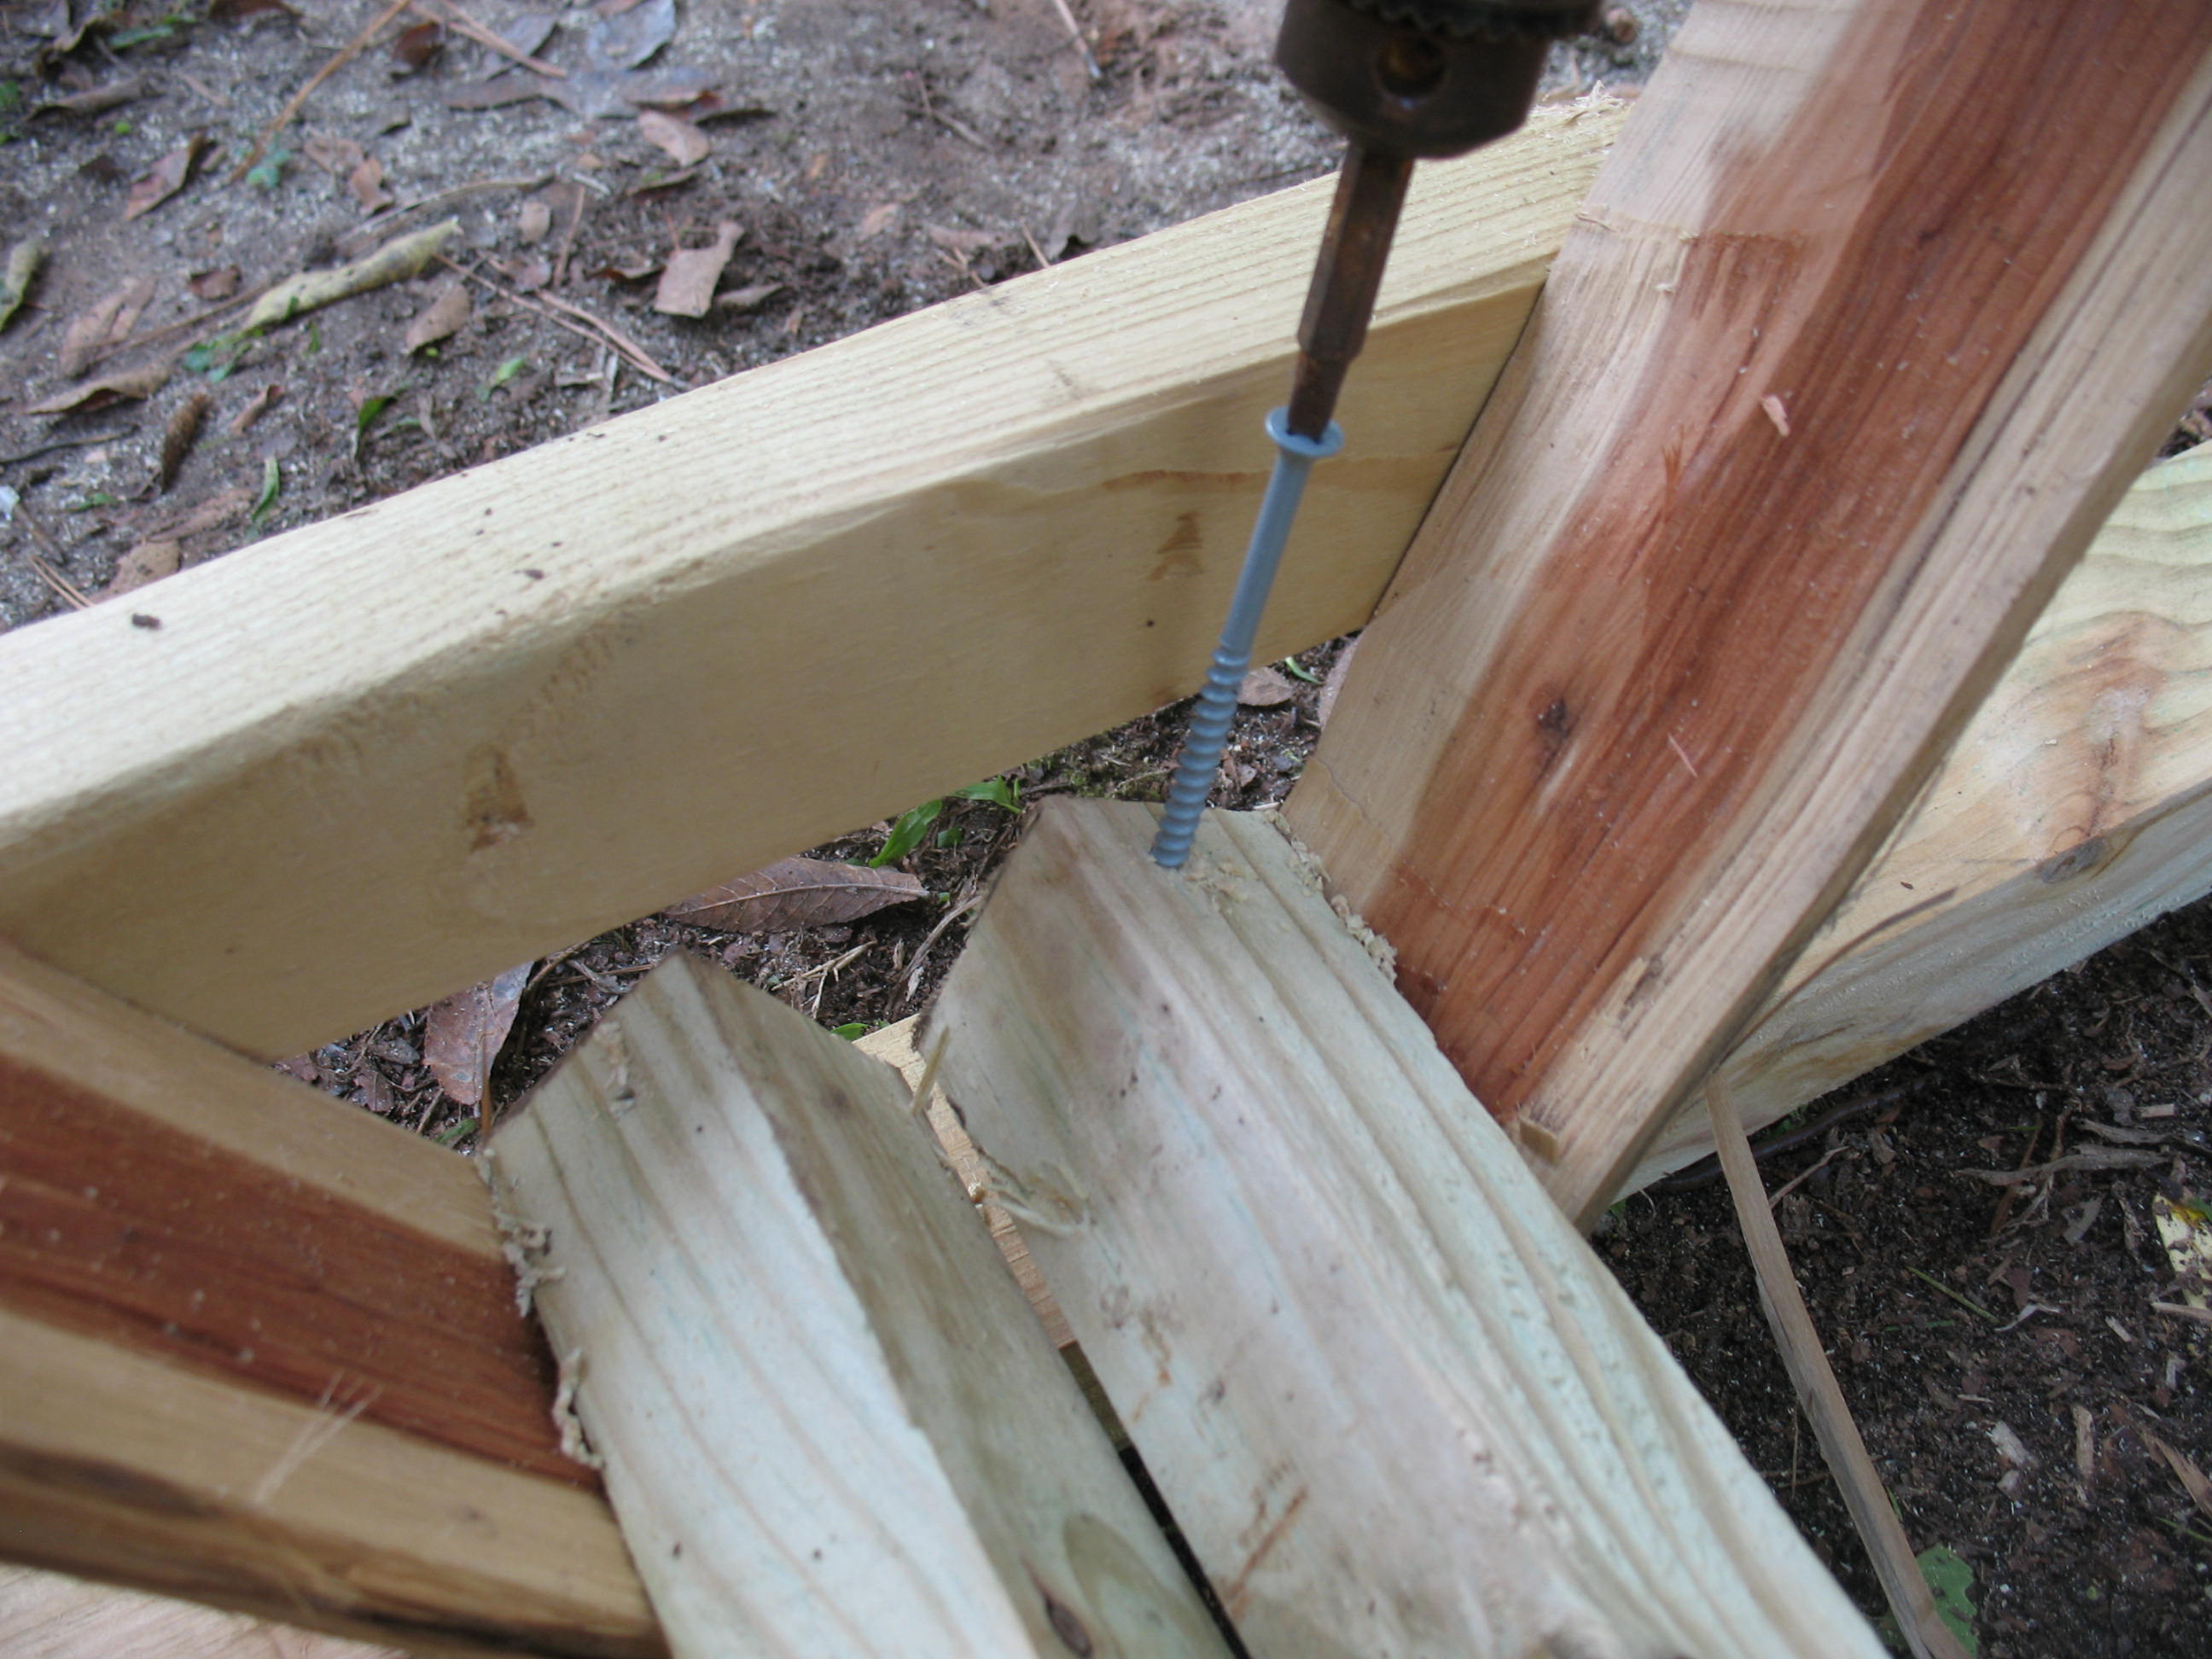


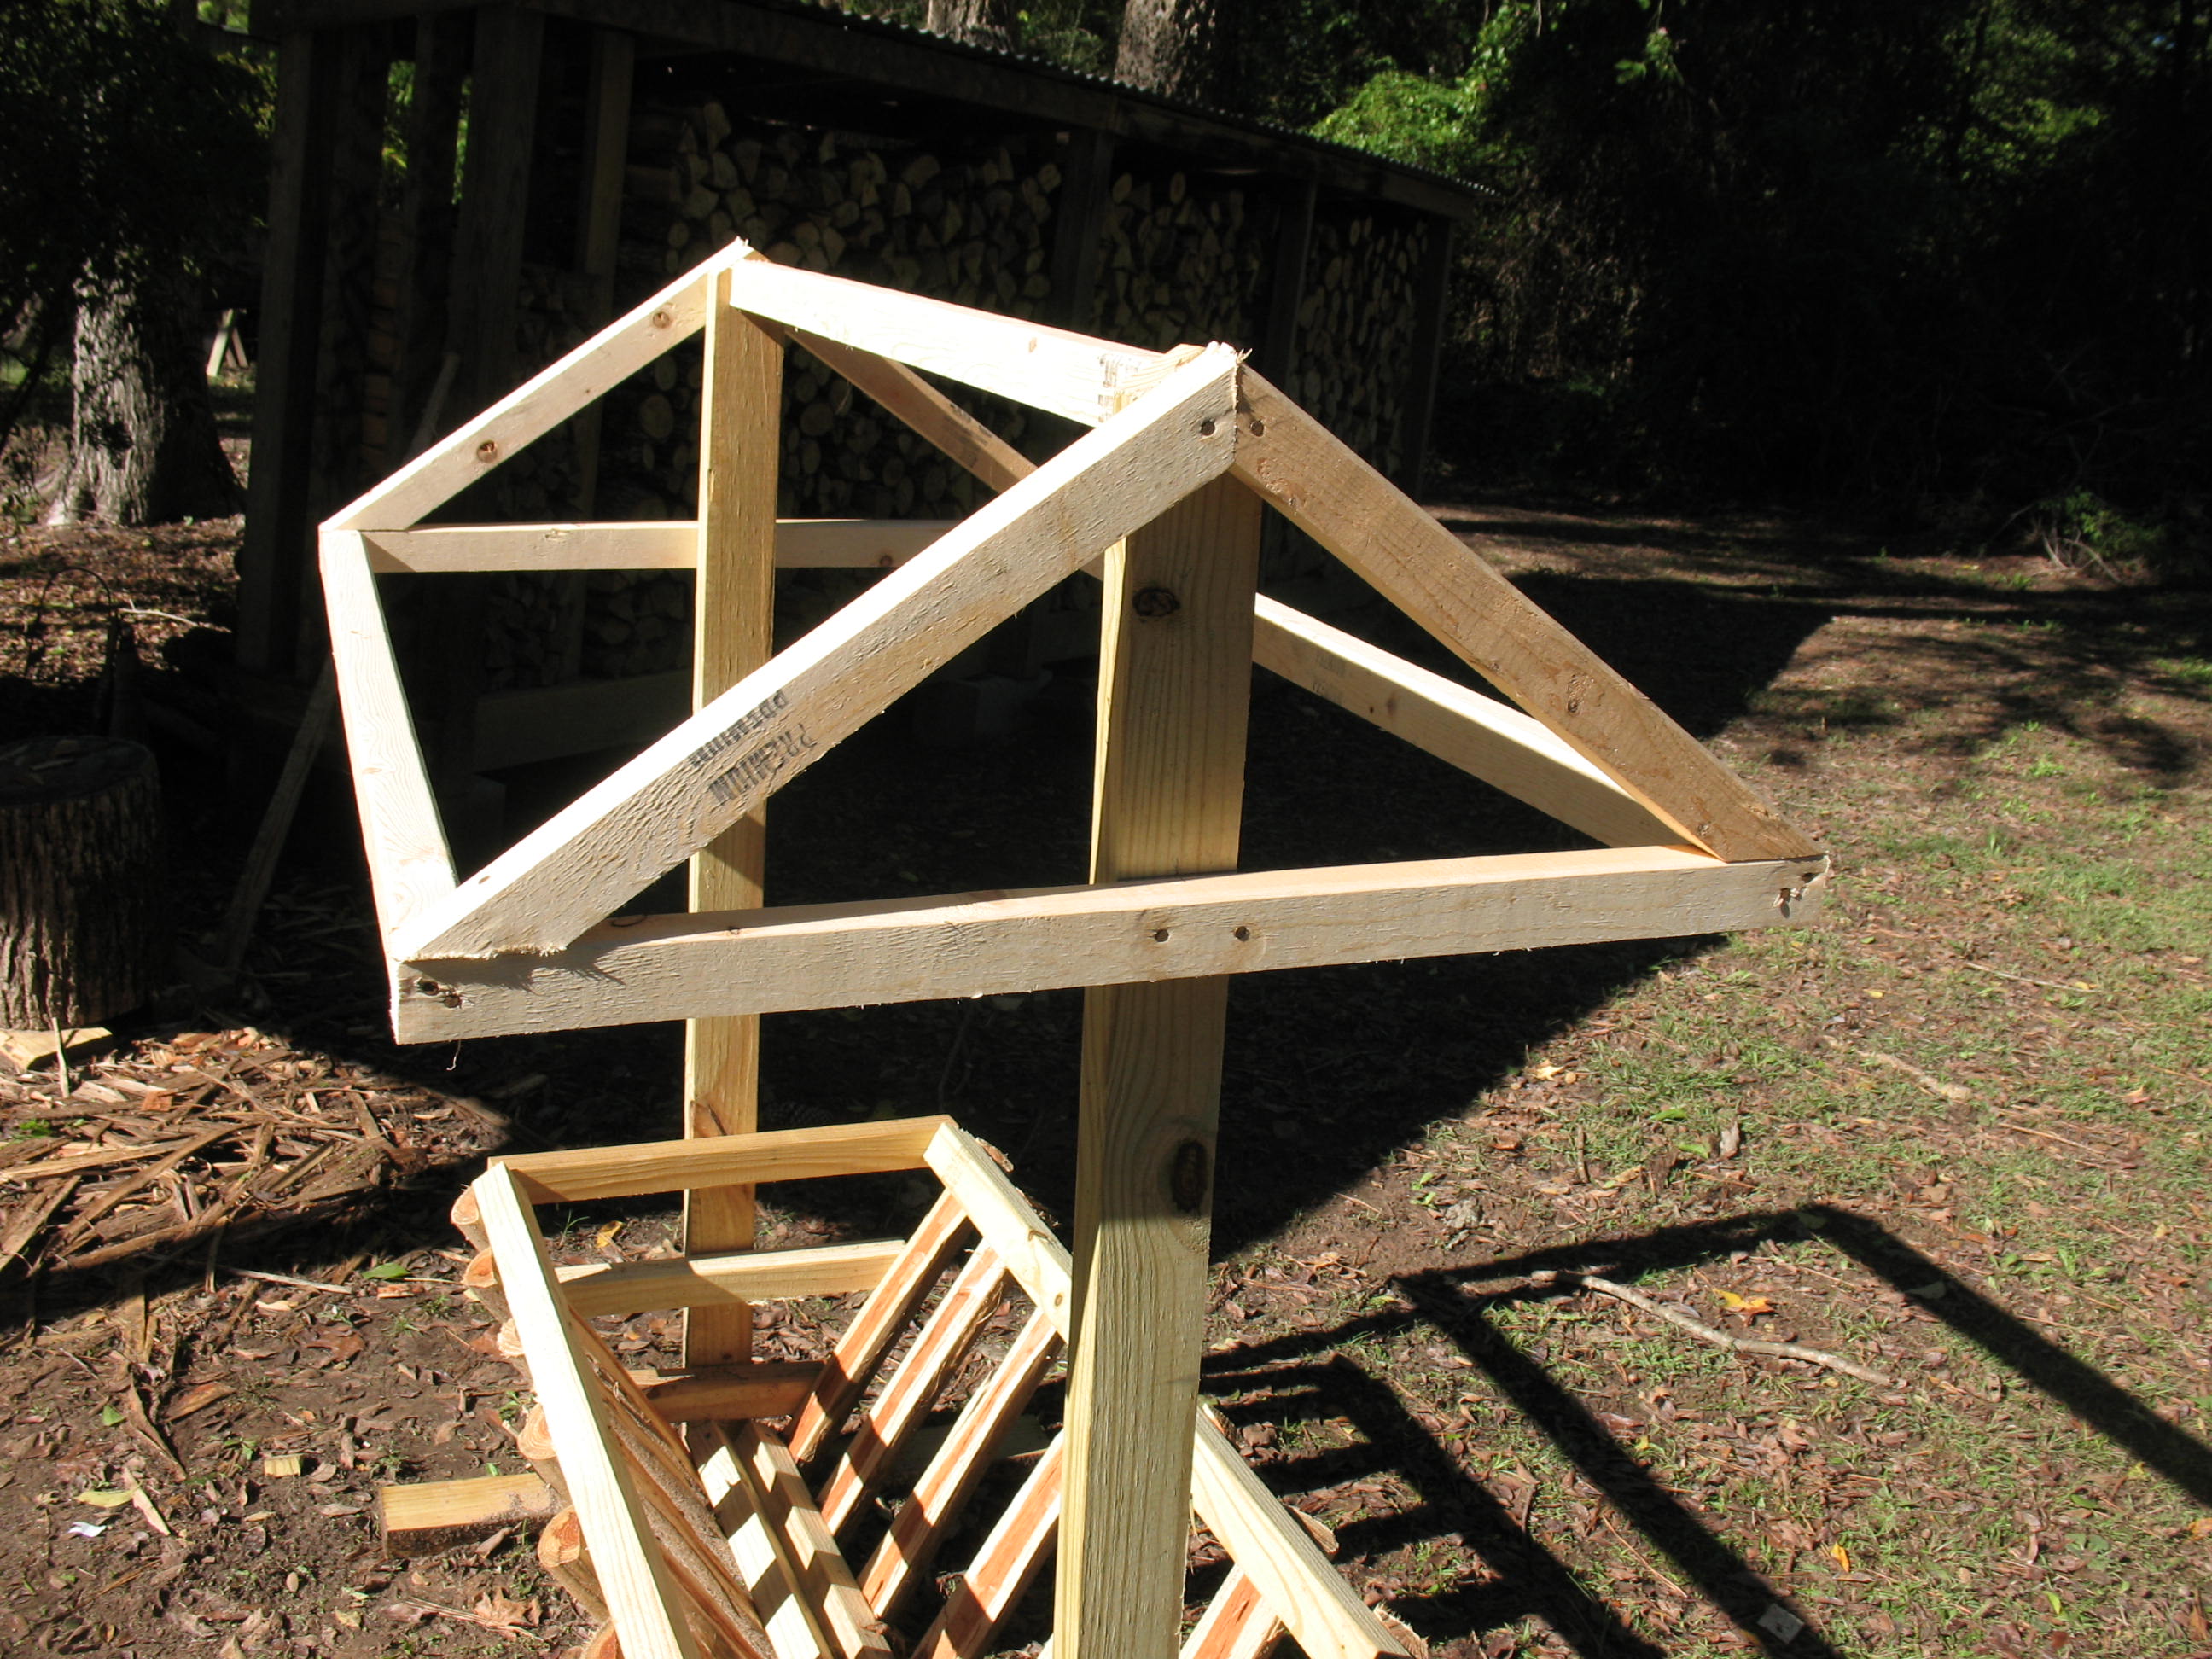
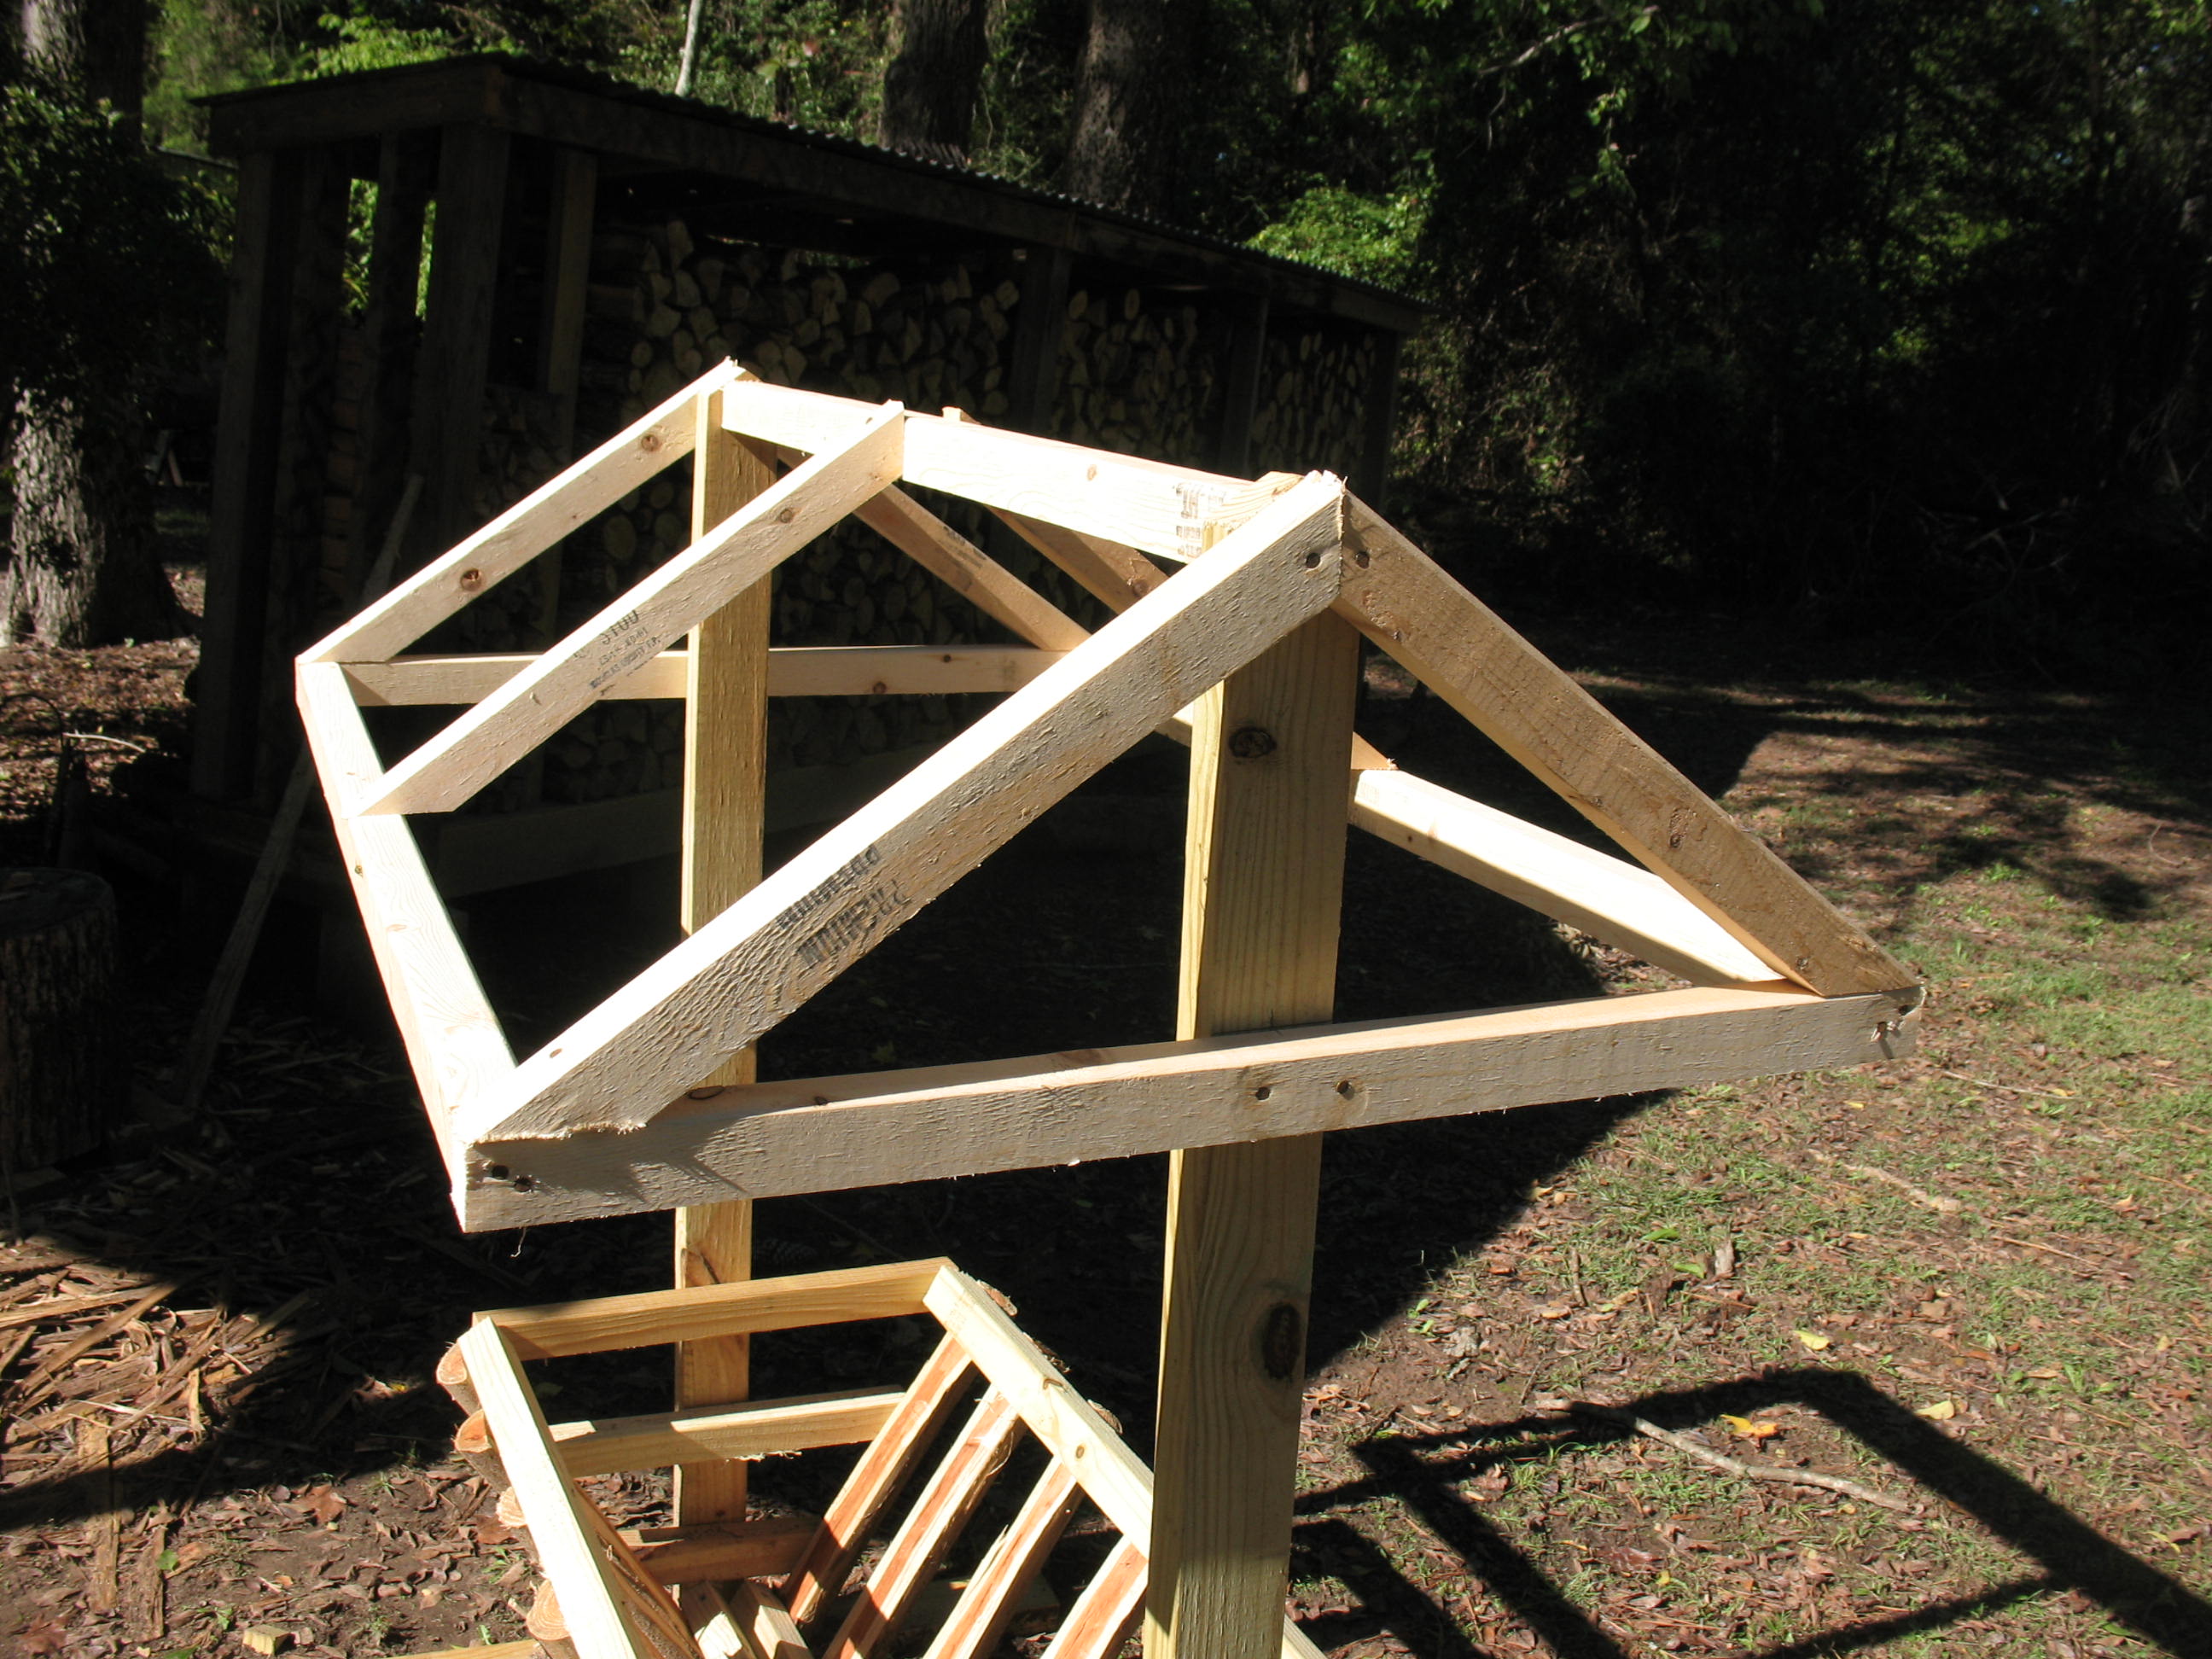
I wanted to put a roof over the manger to help keep the hay dry, so this is where I had to buy a few extra boards. I nailed a couple of four foot long uprights to the ends of the manger to support the roof.
Rather than go into a lengthy explanation of how I built the framing for the roof, I will let you look at the pictures below. They are pretty self-explanatory.


To cover the framework I cut two sections out of an old toneau cover that had come off of my truck. It’s made of heavy plastic, and it worked really well.


I used some old rubber weather-stripping to cover the ridge of the roof.

When I moved the manger into the goat pen, I drove four stakes next to the base and nailed the base to them. This is to keep the goats from tipping the manger over.

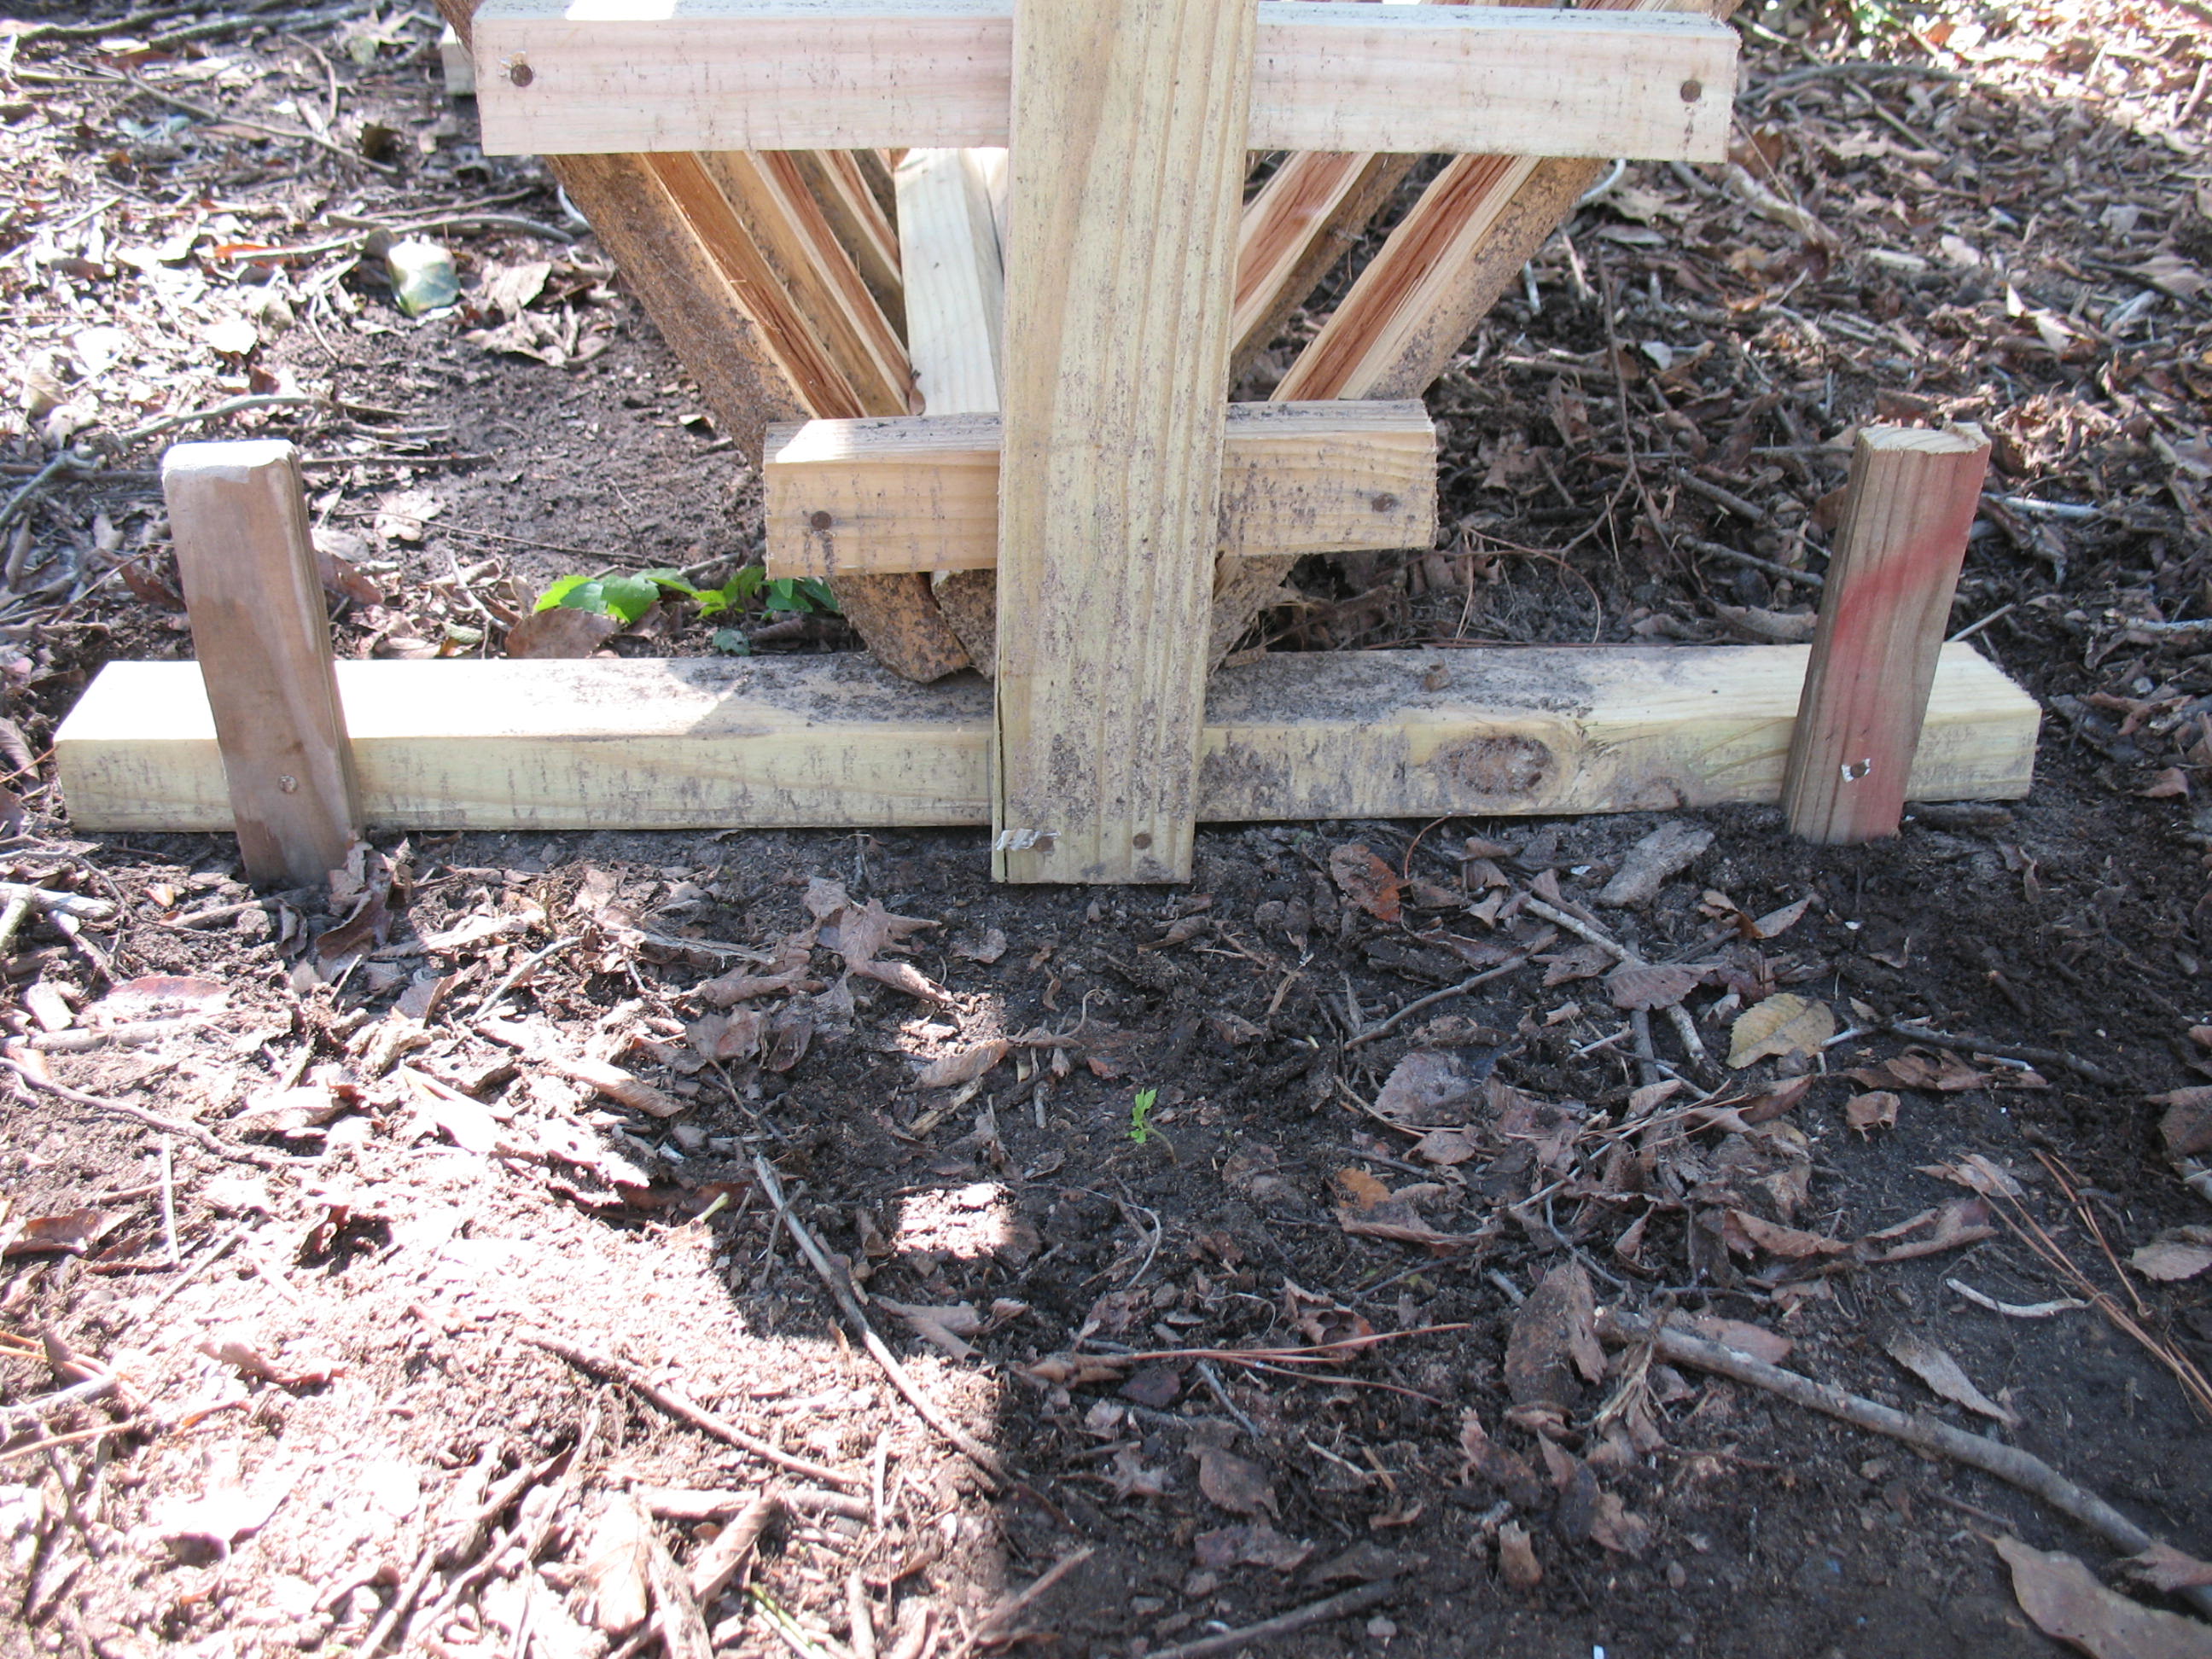
As a final measure I nailed a couple of angle braces between the base and the uprights to make the manger more stable.

The goats seem to like their new manger, and they haven’t been able to knock it over yet.
Deer have a highly refined sense of smell. If you are going to be a successful deer hunter, you must cover up your human smell. You can go to a sporting goods store and spend from four to twelve dollars on a bottle of scent blocker; or you can, like me, make your own. Since juniper trees are common in my area, I like to make scent out of juniper berries.
First gather a double handful of juniper berries and needles.
 Drop the juniper in a blender along with about 20 ounces of hot water.
 Blend the mixture for a few seconds.
 Strain the mixture through a coffee filter to remove the solids. This can take a while.
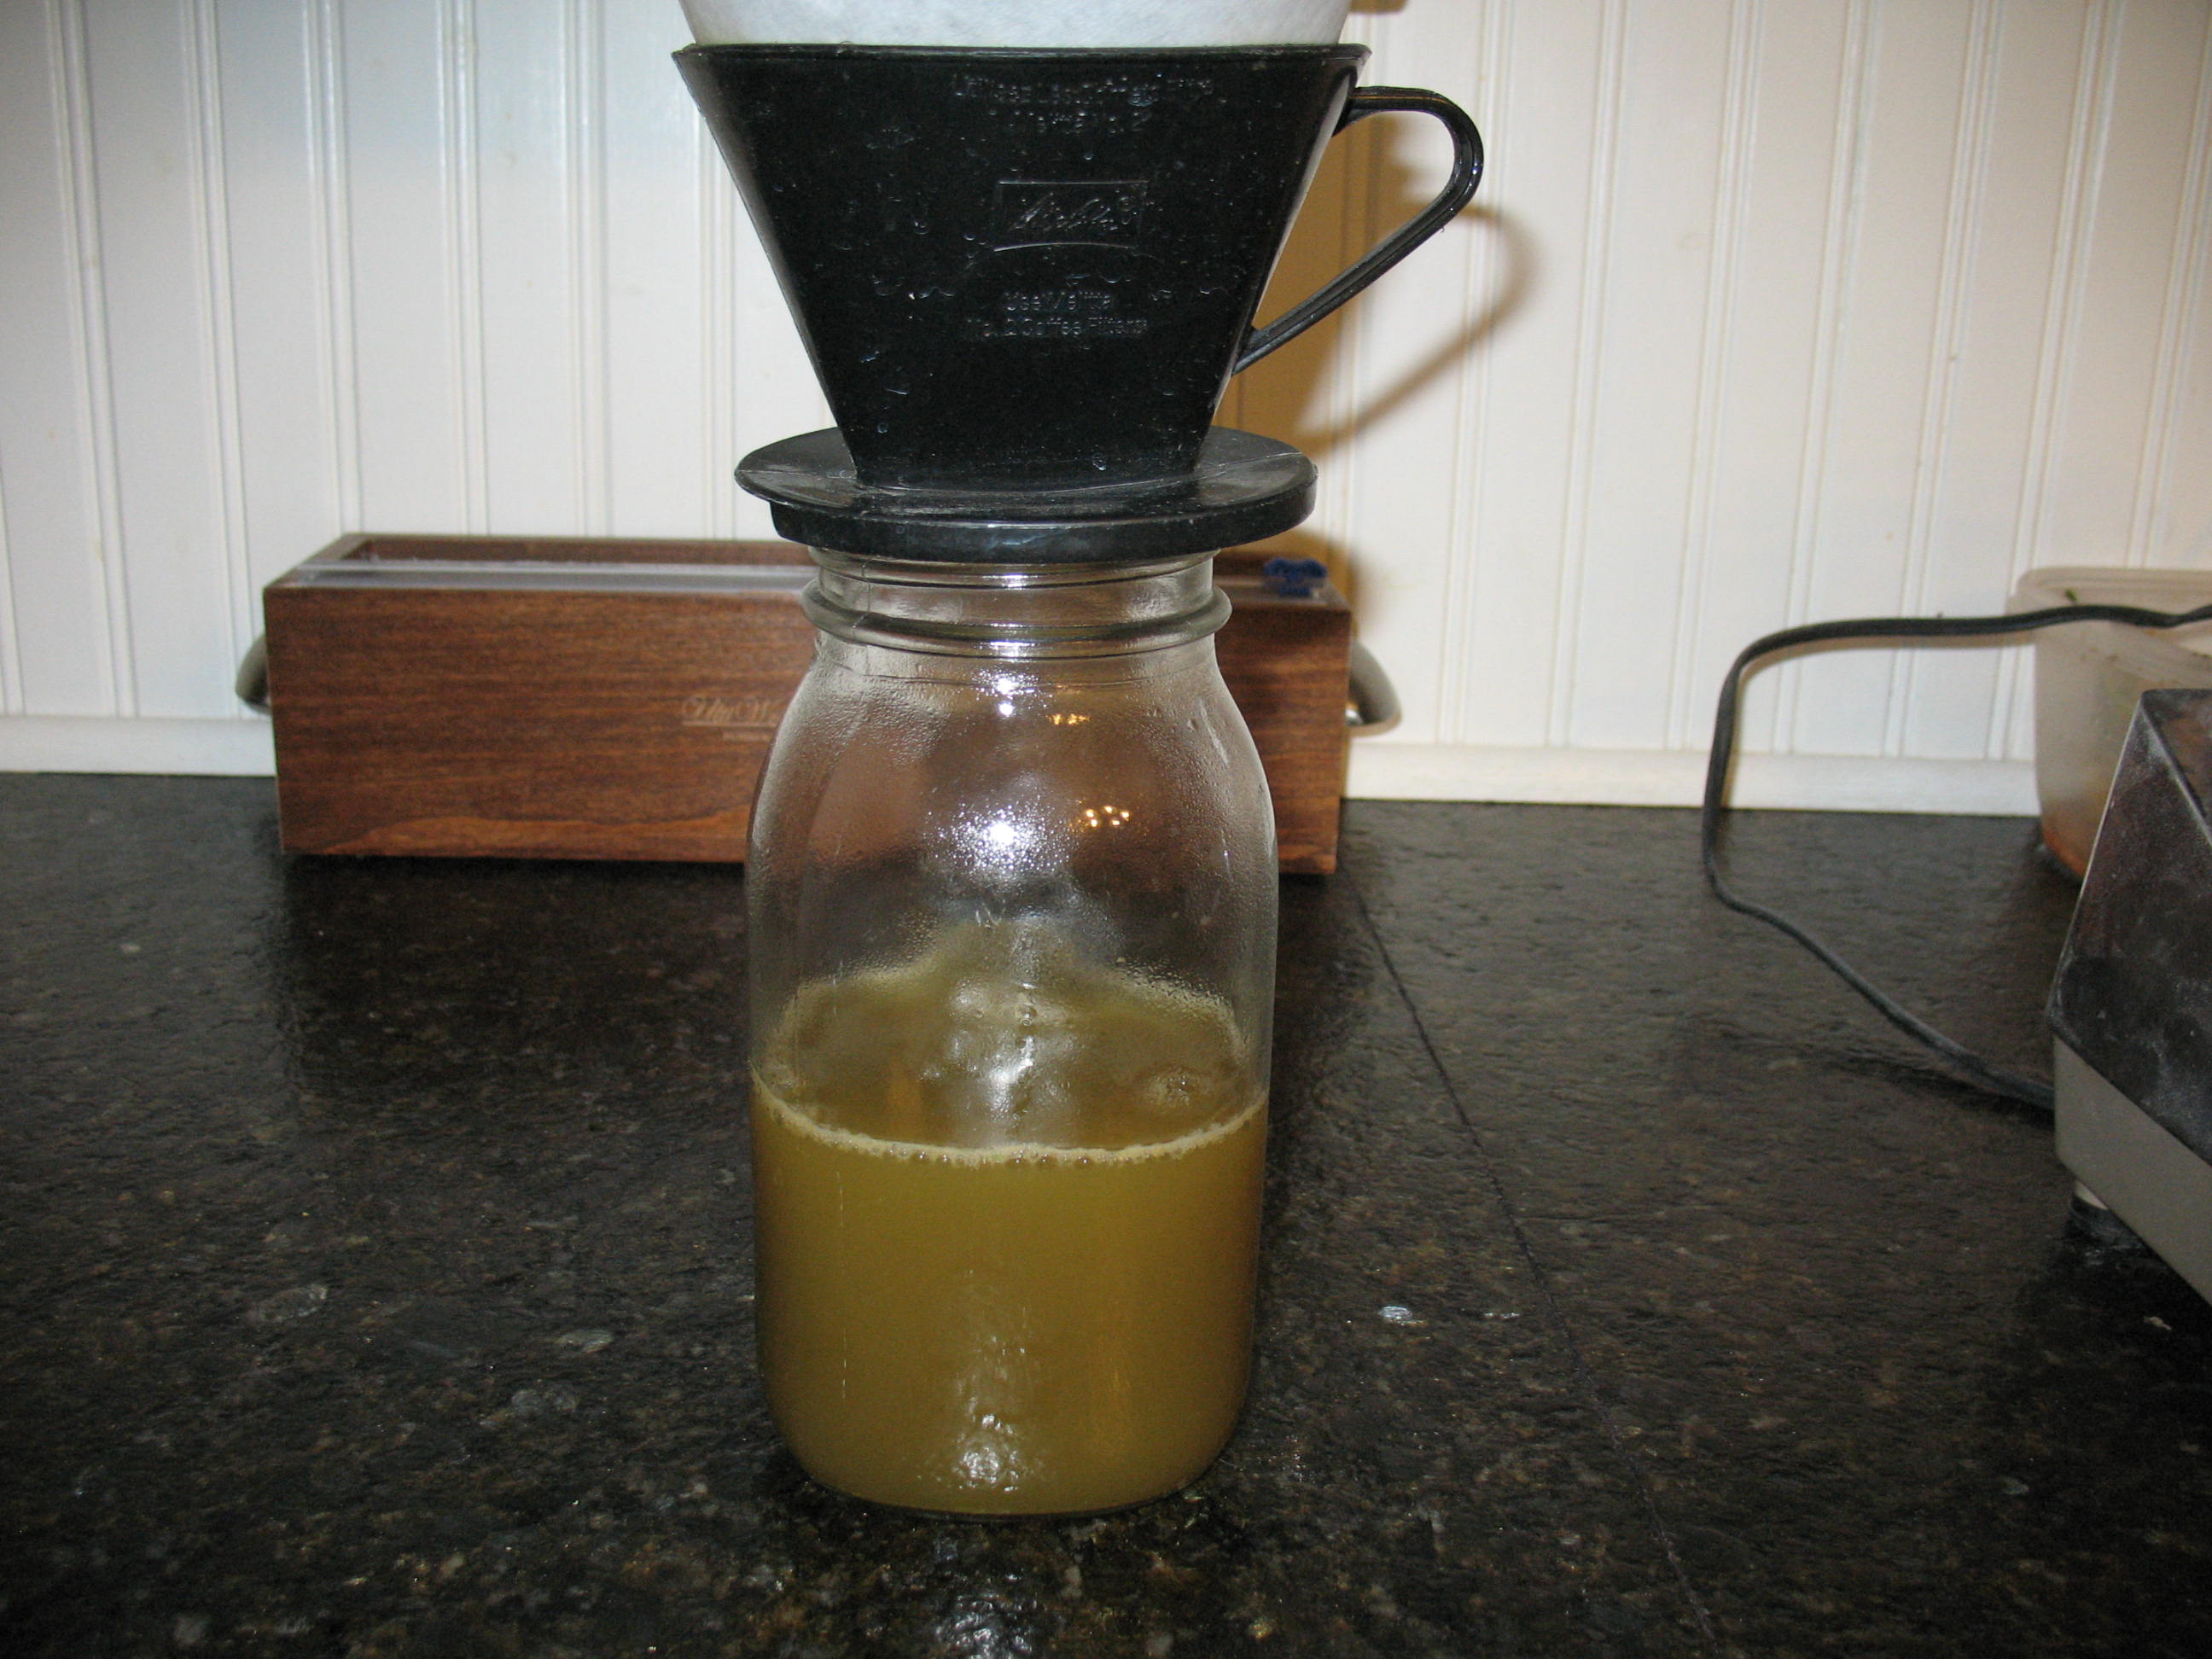 Now pour the green, aromatic liquid off into a spray bottle.
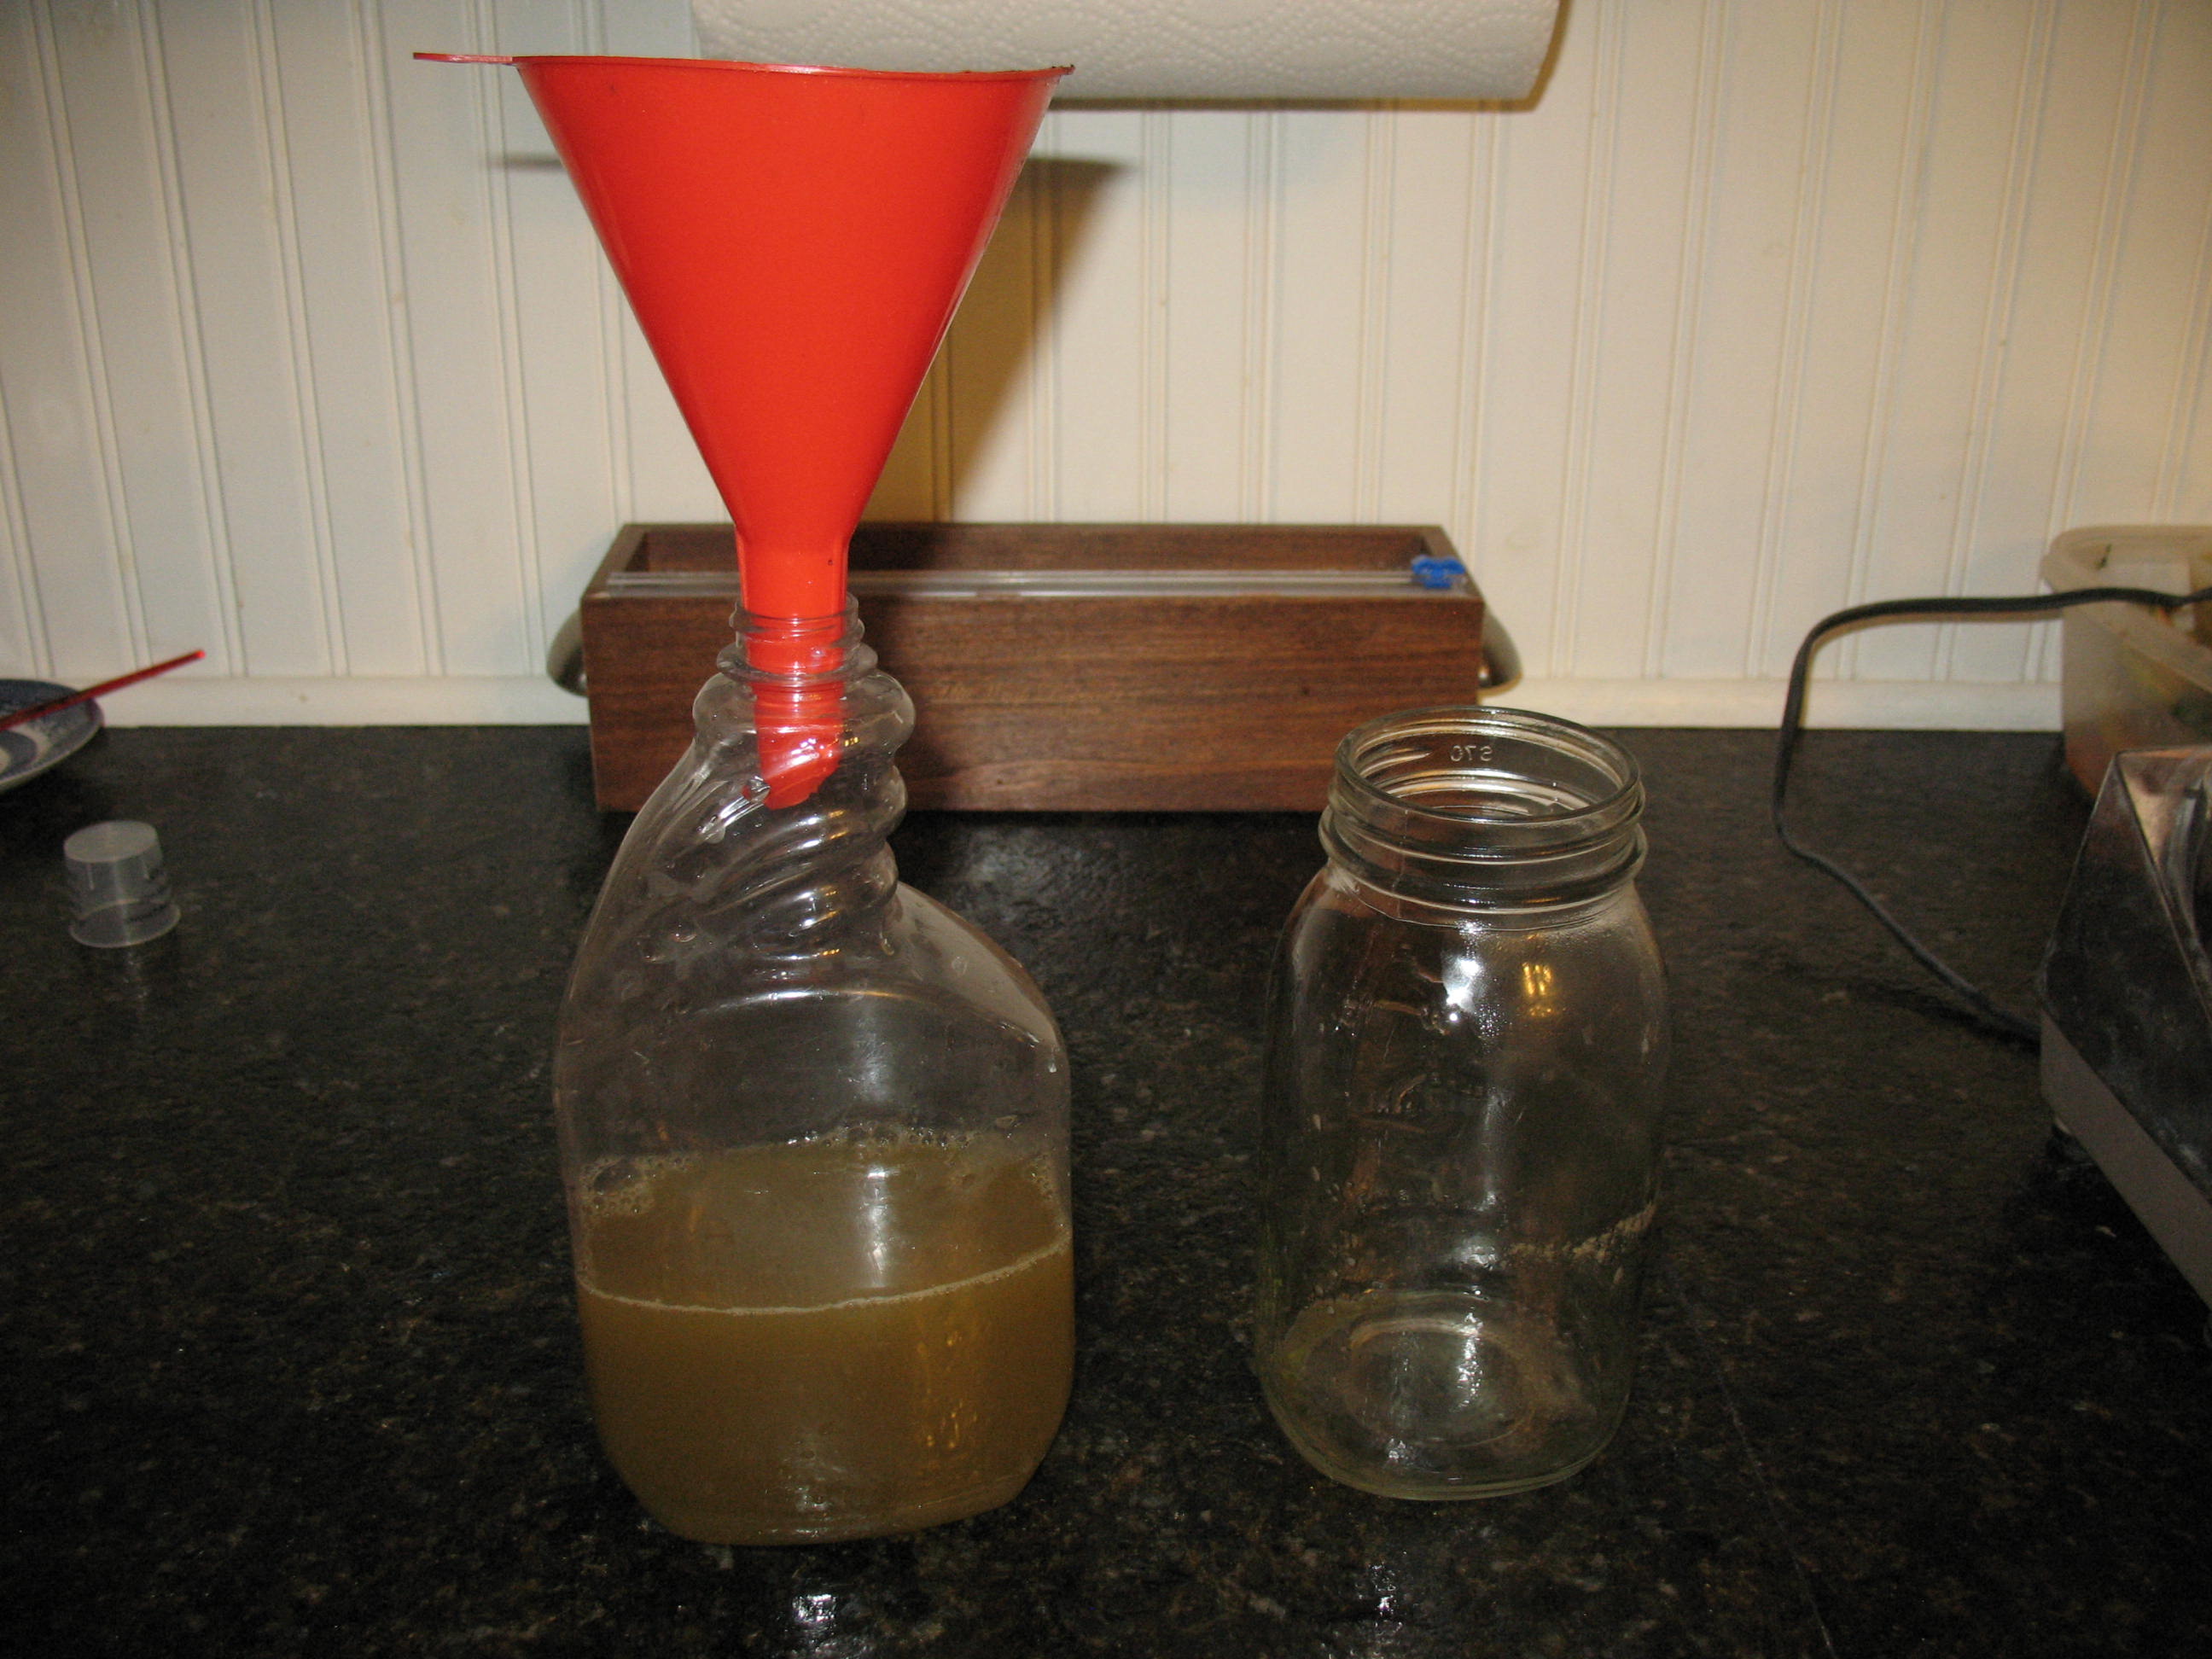 Voila, you’ve made scent blocker. Just spray it on your clothes, boots, and boot soles. This mixture will start to mildew in the bottle after a couple of days, so don’t bother making a big batch. If you need more it’s easy to make.
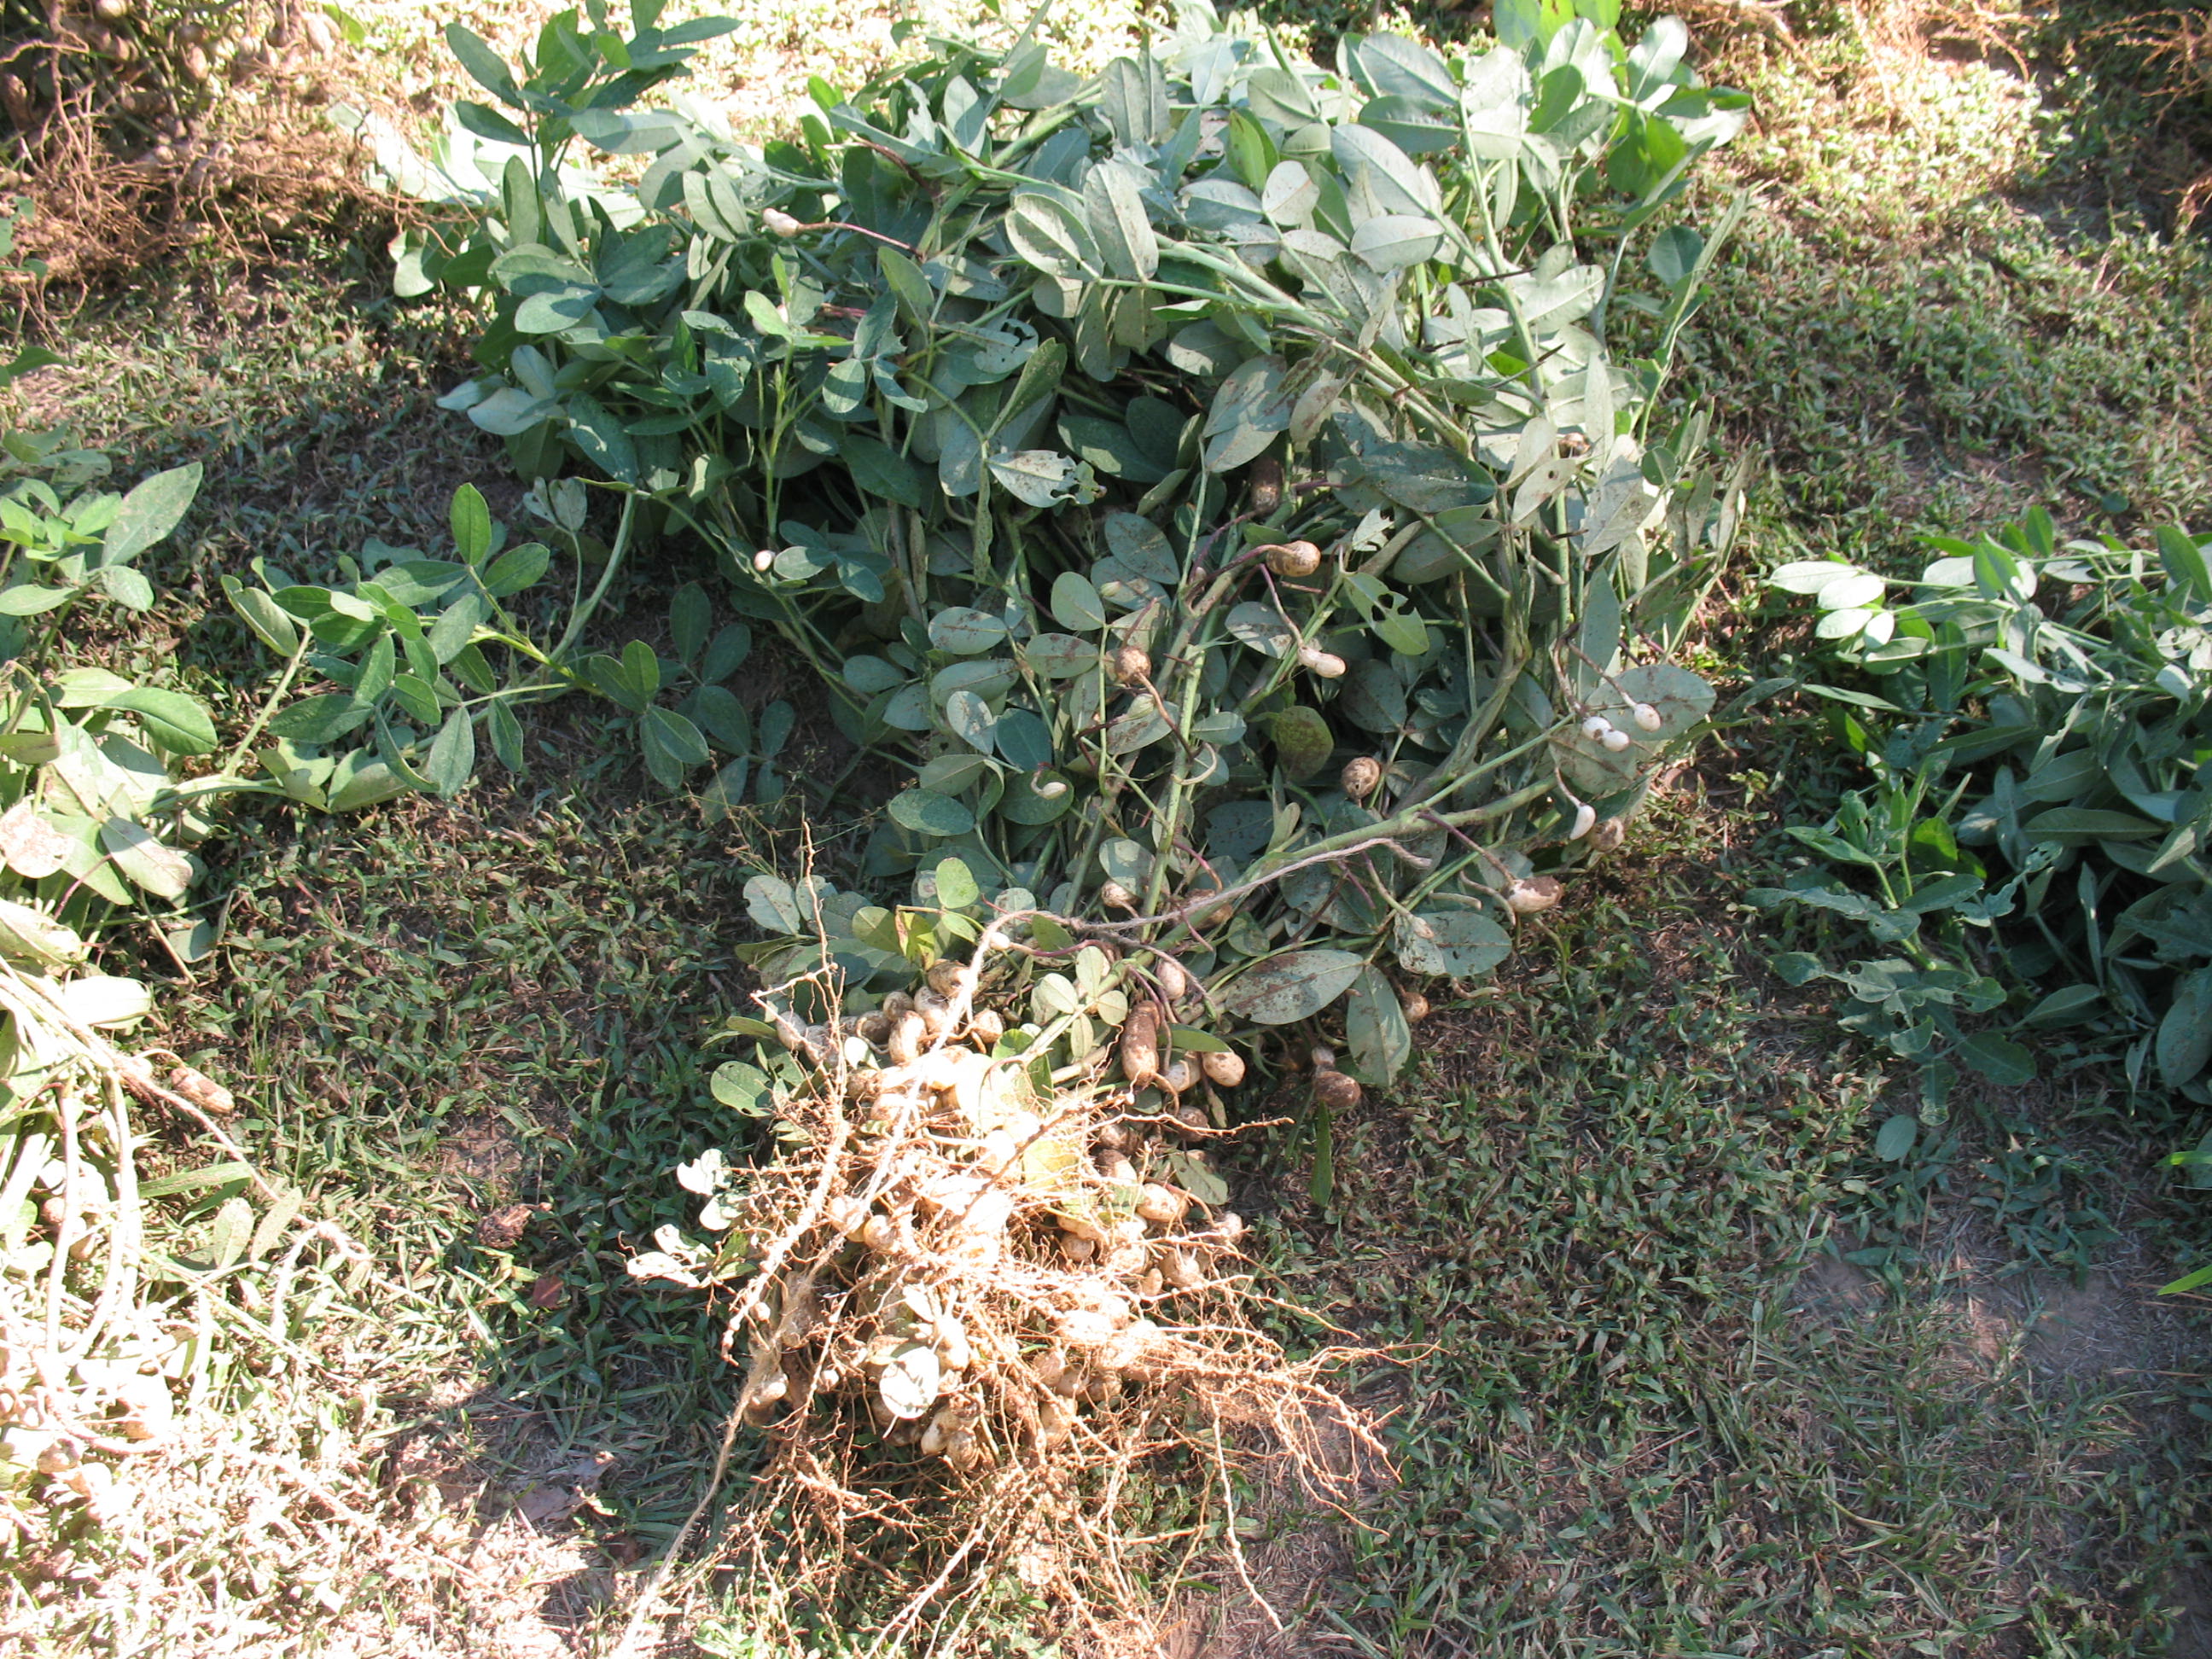
If you live in an area where peanuts will grow; you must learn how to plant, raise, harvest, and cure them. Peanuts are an outstanding survival crop that has long been raised in the southern United States, that’s right Virginia, they’re not just a snack or an ingredient of candy bars. They are highly nutritious.
So what’s so great about peanuts? Well for one thing they are loaded with protein. Peanuts have about 6.7 grams of protein per ounce, more than eggs or milk. Peanuts are also loaded with fat. Not such a good thing if you are trying to watch your weight, but remember, in a survival situation fat is one of the hardest food substances to come by, and the human body must have fat.
Peanuts are really not nuts at all. They are a legume like field peas and beans. And like other legumes, peanuts actually improve the soil that they are planted in by adding valuable nitrogen.
The first step in raising a good crop of peanuts is to make sure that you have your soil right. Peanuts like a really light sandy soil, so if you have heavy clay you will need to amend the soil before you plant. In my part of the world you can buy planting peanuts at the feeds stores and many hardware stores.

What you are buying is raw peanuts in the shell. They look just like the ones that you buy at the circus, but they are not roasted. The peanuts that I bought this year were $3.50 US per pound, and a pound of peanuts will plant a pretty good size bed. This year I planted a small bed of about thirty-five plants, so I only used a handful of seed. It yielded about a gallon and a half of peanuts in the shell.
To plant the peanuts all you have to do is shell them out and stick them in the ground.

I plant mine about an inch deep and a foot-and-a-half apart in each direction. No fertilizer is necessary, but peanuts do like heat and a lot of water. Don’t drown them, but do keep the ground moist. In a few days they will break the ground and start growing.
 Peanuts will grow about eighteen inches to two feet tall and put on small yellow blooms, and then they will do something really unusual. The stems of the plants will bend over close to the ground and put off small dark tendrils called pegs. These pegs will actually grow down into the ground and a peanut will form underground at the end of each peg.

 Peanuts will also form in a cluster around the main roots of the plant.
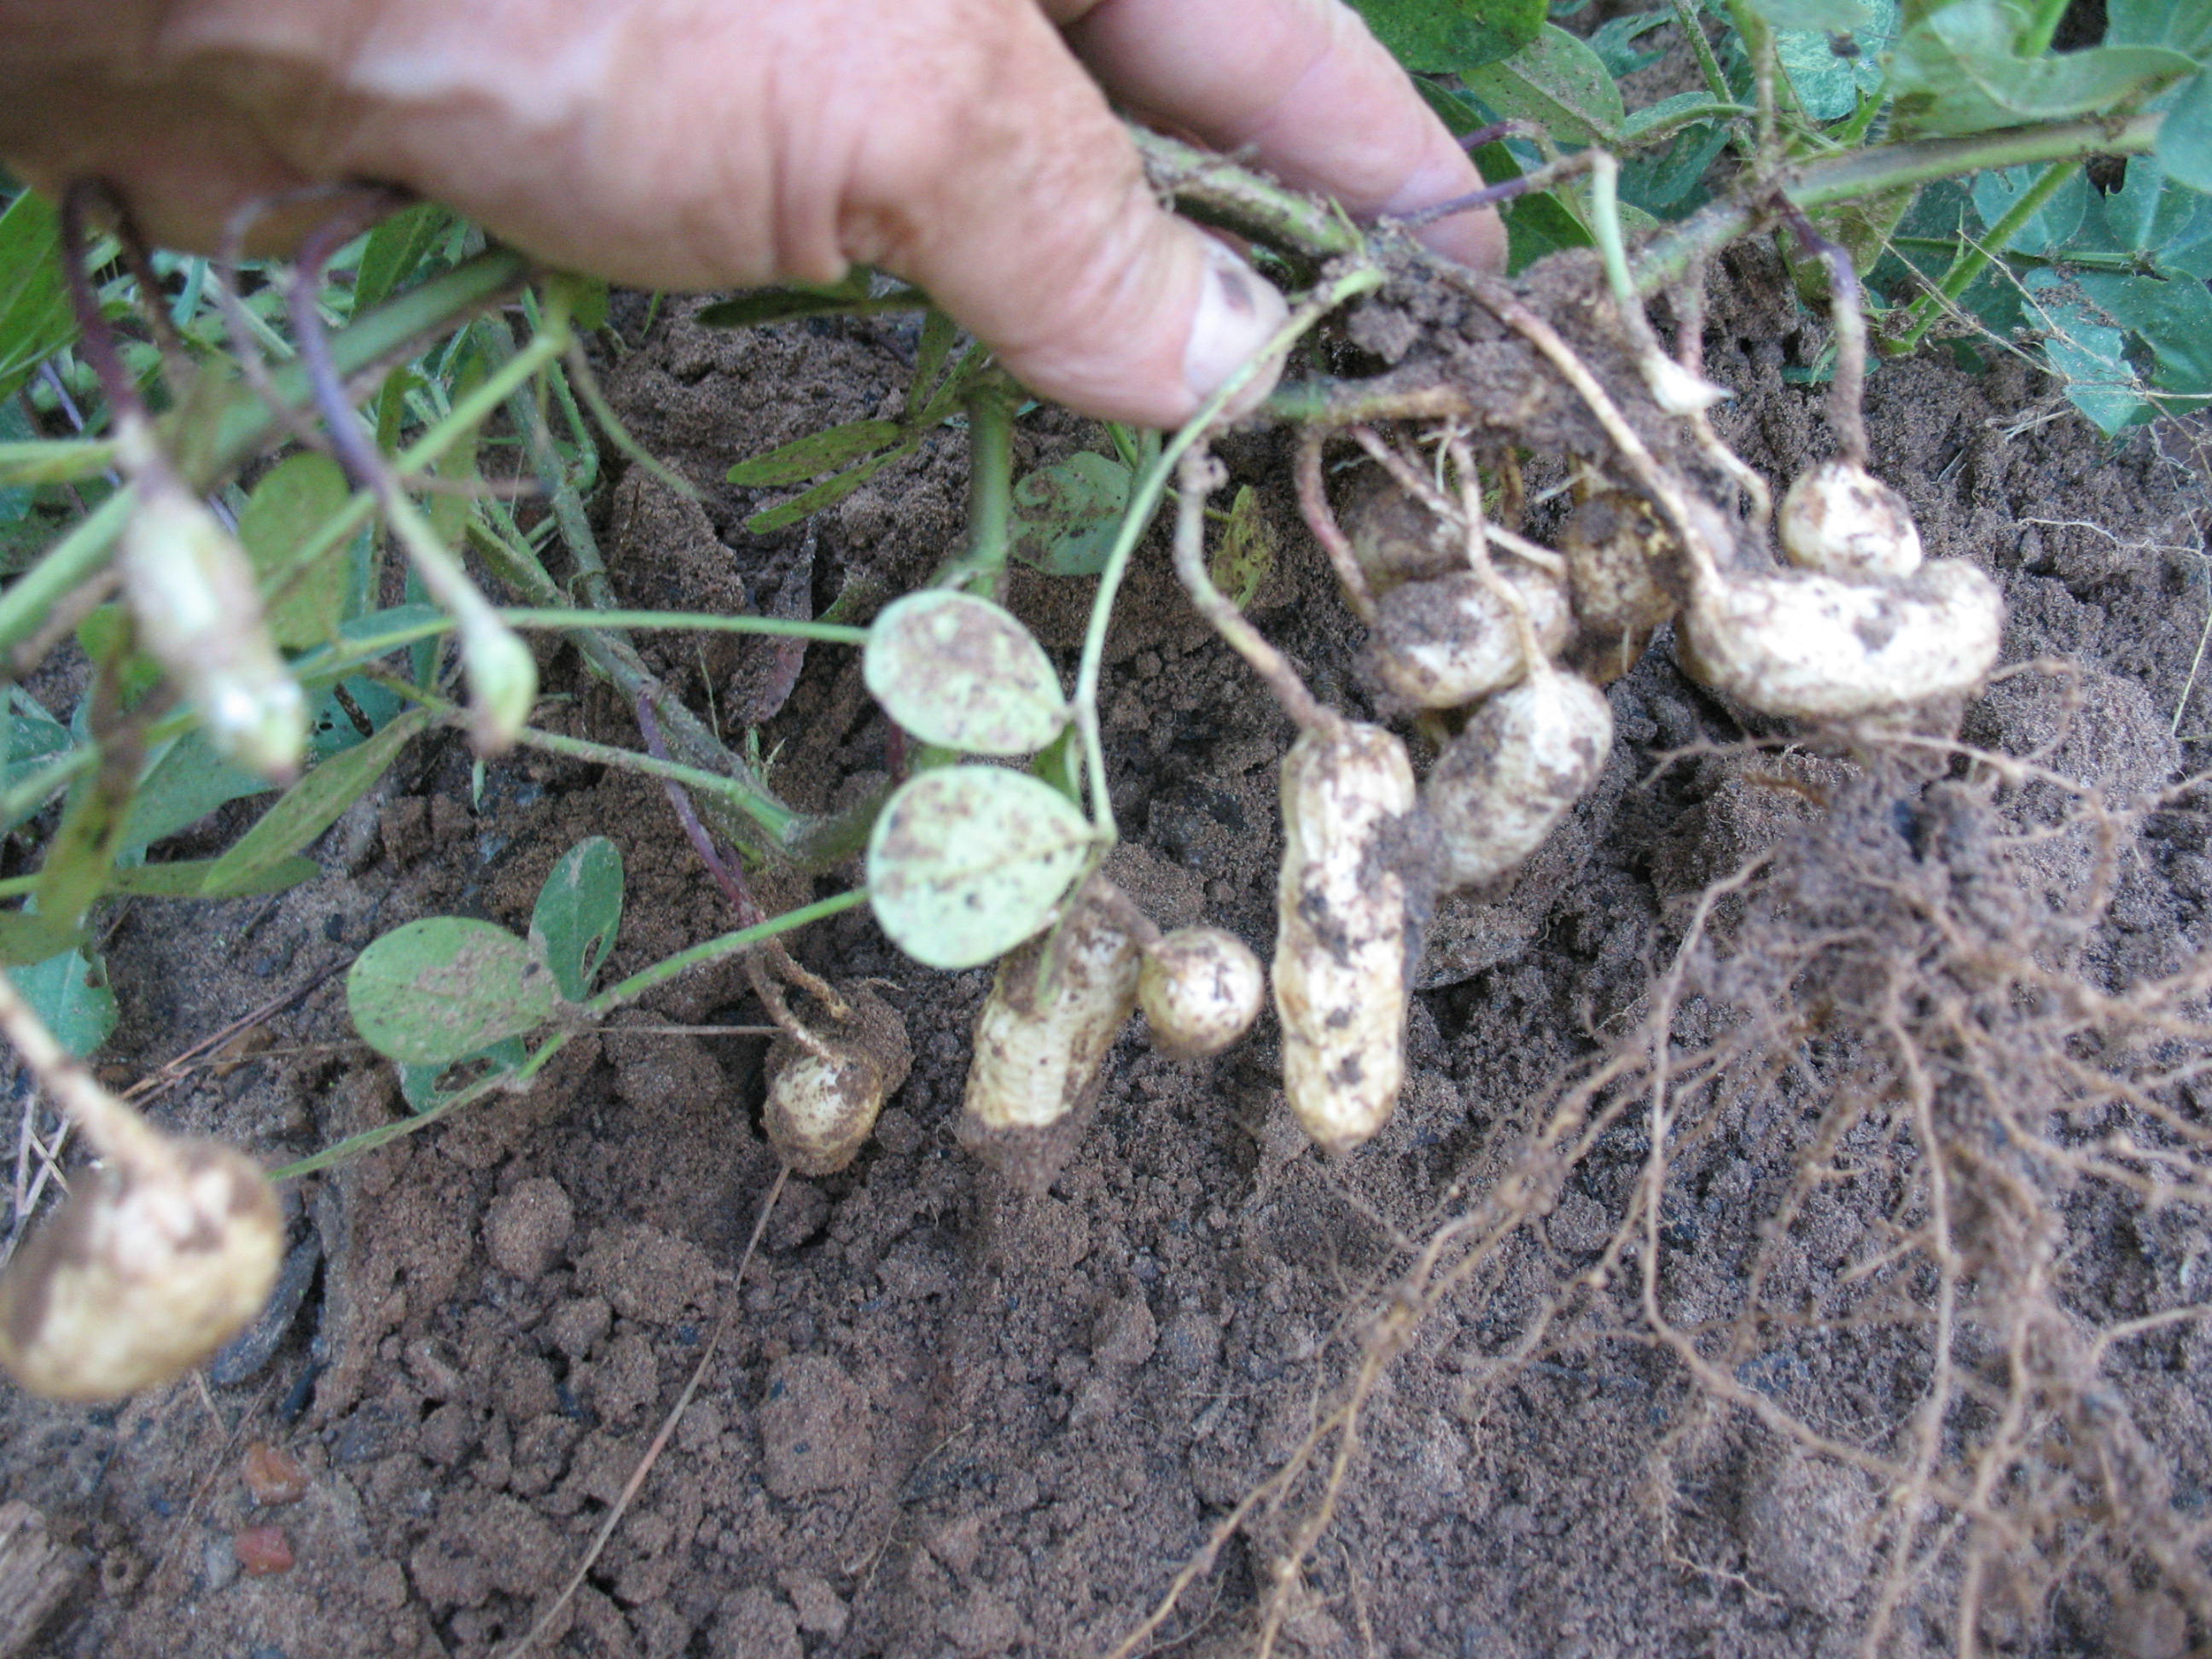
You want to pull you peanuts when the vines first start to yellow. Pulling the peanuts at the right time is a little tricky. If you pull them too early, the nuts will not have completely formed. If you squeeze the shell and feel that it is not filled out inside, you will know that the peanuts are not ready. If you pull the peanuts too late, some of them will already have sprouted underground. This is easy to see. The problem is that you can not pull the plants at a time when all of the peanuts will be perfectly ripe. It’s like trying to pull a tomato plant when all of the tomatoes are ripe. It just doesn’t happen. So you need to pull the peanuts when most of them are ripe. You may have a few that aren’t filled out, and you may have a few that are over ripe; but that’s OK.
If the ground is too hard, use a fork to loosen it a little; but stay well out from the plant and be careful. Pull the whole plant and don’t remove the peanuts. When you have a bundle of plants about as big around as your arm, use a string to tie them in a bundle (shook).

When you have collected all of your shooks hang them up under cover to dry. You can shake them a little to remove some of the dirt but don’t wash them.

Leave the shook hanging to dry for a week to dry.

When the shooks are dry take them down and remove the peanuts. Again, don’t wash the nuts. If they are dirty just rub off what you can with you fingers.
The vines are very rich in nutrients so you need to either compost them are feed them to your stock. If you use them for feed, go easy as animals can founder on too much at one time.
Spread the picked peanuts out in a dry shady spot and let them cure for another two weeks.

At the end of the two weeks they are ready for use. You can shell them out and eat them raw or you can roast them in the shells for snacks. Be sure to save some for next year’s seed.


At the risk of alienating some of my readers I make the following statement, “I do not use any chemical pesticides, fungicides, or herbicides on my garden, but I do use some chemical fertilizers.” I use chemical fertilizers as part of what I like to think of as a balanced approach to soil amendment. Some people will only use organic methods of soil amendment, while other people think that organic growing is a waste of money and is more of a philosophical statement than an actual gardening method. Let me explain my reasoning for a balanced approach to soil amendment and then you can decide if you think it makes sense or not. Here are my reasons for using both natural and chemical soil amendments in my garden.
Reason 1: You can’t raise food without putting nutrients back in the soil.
Everything that grows in your garden represents nutrients that have been taken out of the soil. If you save every non-edible part of the plants that grow in your garden and all of the peels, cobs, rinds, etc from the food that you harvest; and compost all of that and return it to the soil; you will still be removing the nutrients that are contained in the food that you eat. You can rotate your crops so that you plant legumes that add nitrogen back into the soil, but this alone will not be enough to make up for the nutrients that you remove. You can bring in outside organic materials and compost them, as I do; but consider this. My garden is about 3000 square feet. To cover my garden with a three inch layer of compost would require about 750 cubic feet of compost. This would be a 10 foot by 10 foot pile that is 7 ½ feet tall. And since organic material shrinks down by as much as 75% as it decomposes, this means that I would have to start off with as much as 3000 cubic feet of compostable material. Who has the time to do this? So the alternative is that you have to bring in some kind of concentrated soil amendment to add to your garden, which brings us to fertilizer.
Reason 2: Organic fertilizers are not all that organic
So I think I’ve made a reasonable case for having to add some kind of amendments to the soil, but the question is, “What kinds of amendments?” Many people who follow the totally organic method of gardening use natural sources of nitrogen, phosphorus, and potassium. Some people use animal manure for a balanced fertilizer. Blood meal is often used as a good source of nitrogen; bone meal and rock phosphate are used as sources of phosphorus; and hardwood ashes or granite dust can help provide potassium. Let me address these one at a time and tell you my feelings on each of them.
Manure
I use manure on my garden, but only the manure that I rake up out of my goat pen. I am about to get back into raising chickens, and I will also use their manure in my compost pile. I don’t buy manure. The bagged manure that you buy at garden centers and big box stores is usually packaged and sold from feedlot operations. The cattle that produce this manure have been injected with steroids and antibiotics. They have been treated with worm medicine and sprayed for ticks and flies. They have also been fed large amounts of salt to increase their weight by water retention. All of this stuff finds its way into the animal’s manure. Doesn’t sound all that healthy or organic to me. If you are going to use manure I would suggest that you use manure from unvaccinated, grass fed animals only. Ditto to everything above as it applies to factory raised chickens also.
If you have a neighbor that ranges cattle you can get some good manure from them but be sure that you compost it in a good hot compost bed to kill the grass seeds. I made the mistake of gathering up a truck load of manure from one of my neighbor’s pastures and throwing it straight onto my garden without composting it. I am still fighting Bermuda grass ten years later.
Blood Meal and Bone Meal
Both blood meal and bone meal are by-products of the slaughter house. The animals that are slaughtered are typically raised in industrial animal operations. This means steroids, growth hormones, antibiotics, etc. All of these unnatural products make their way into the blood and bones of the animals before they are slaughtered. Again, this doesn’t sound healthy or organic to me.
Rock Phosphate
I have no problem with rock phosphate. Rock phosphate is a mined product that contains about 20% phosphorous whereas the phosphorous in chemical fertilizer is also a mined product that has been chemically treated to extract a more concentrated phosphorous from it.
Granite Dust
I have no problem with granite dust as a source of potassium. Well, I do have one problem. If you don’t have access to some kind of free granite dust, it can get pretty pricey. A bag of granite dust costs about $25.00. If applied at the recommended rate, and depending of the condition of your soil, this will treat about 500 sq, ft of garden. For me, that would be about $150 to amend my entire garden. That’s not horribly expensive, but it is a little steep. One advantage of granite dust is that it releases the potassium slowly, so you don’t have to make an application every year.
Hardwood Ashes
Hardwood ash can contain up to 10% potassium, and hardwood ash raises the pH of soil; so it is a good fit for my garden which has very acid soil. I cut hardwoods off my farm to burn in my wood stove, and every time I clean out the stove it is a simple matter to take the ash out and sprinkle it on the garden. Wood ash should be applied at a rate of one to two pounds per 100 sq. ft. depending on your soil. If your soil is already alkaline you may want to stay away from wood ash or be sure to balance out the alkalinity with a lot of compost.
Reason 3: Chemical fertilizers are cheap, convenient, and easy to use; but they won’t solve all of your problems.
Let’s face it, to obtain the same amounts of nitrogen, phosphorus, and potassium found in one bag of chemical fertilizer from natural, organic sources would cost a minor fortune. For example, I looked at a bag of cow manure at one of the big-box stores. It was rated at .5-.5-.5. In other words it would take 26 bags of cow manure to equal the amount N-P-K in one bag of 13-13-13. And here’s the thing, plants absorb nitrogen on a molecular level. They don’t know if the molecules are coming from manure, blood meal, or chemical fertilizer.
Blood meal is rated at 12-0-0, but a 50 lb. bag of blood meal costs around $50.00. Bone meal is rated at 3-15-0; but a 50 lb. bag of bone meal costs nearly $60. Granite dust is rated at about 0-0-5, and a 50 lb. bag costs from $20 to $25. If you add it all up, it would cost about $160 to purchase natural, organic fertilizers that would contain approximately the same amount of N-P-K that is contained in one $20 bag of 13-13-13 chemical fertilizer. Now do you see why the grocery store price of organic produce is so high?
Of course chemical fertilizers are not the be all and end all of good gardening. One of the big arguments against chemical fertilizers is that they only supply the three macro-nutrients (N-P-K) necessary for plant growth, while plants actually require an additional 12 or 14 elements known as micro-nutrients if they are going to have healthy growth and production. I agree with this argument 100%, and I would go on to add that these are only the micro-nutrients that we know about at this time. The scientific study of plant growth is still in its infancy, and I would be willing to bet that, over time, we will find many other things that are necessary for healthy plant growth. So, the bottom line is that you have to do something beyond basic chemical fertilizers to address the need for micro-nutrients.
It is also argued that chemical fertilizers don’t add any bulk to the soil. This is also 100% true. If you have heavy clay soil, adding chemical fertilizers won’t change that. If you have loose sandy soil that loses moisture too quickly, chemical fertilizers won’t change that either. You have to do something else to add bulk to your soil and address proper water retention.
There is much debate over whether chemical fertilizers kill/repel earthworms and soil micro-organisms. It has been my personal experience, using the methods that I use, that I have an abundance of earthworms in my garden. I think that if you use nothing but chemical fertilizers, and if they are applied at a high rate; then this might have an adverse effect on earthworms and micro-organisms, but I don’t know this for a fact. I wonder if the lack of earthworms and micro-organisms in some chemically fertilized soils might be more related to a lack of organic mater in the soil. Again, I don’t know; but I would sure like to see some good scientific data on the subject.
The final argument against using chemical fertilizer, especially from a preparedness perspective, is that it is not sustainable. This is also true. If everything collapses, you will no longer be able to run down to the feed store and buy a bag of 13-13-13 or anything else. But the good news is that chemical fertilizers can be stored indefinitely if they are kept away from moisture. I raise around a hundred ears of corn using a total of about 6 lbs. of chemical fertilizer. I use more fertilizer on corn than on any crop I raise. If I continue raising this amount of corn, two 40 lb. bags of fertilizer would last me for over 13 years. By the way, a 40 lb. bag of fertilizer fits almost perfectly into a 5 gallon plastic bucket with a water-tight lid. After the fertilizer runs out I, and everyone else, will go all organic, but by then I will, hopefully have plenty of time to compost, gather manure, etc. I guess if I need potassium I can always bust up my wife’s granite counter tops, but then survival would probably take on a whole new dimension.
A Brief Summary of How I Amend My Soil
In summary: My soil has a lot of clay in it and it is very acid. I bring in sand to help keep the soil loose, and I turn in home-made compost and uncontaminated manure. I use a pre-plant application of dolomatic limestone, Epsom salts, and borax. I turn in a light broadcast of 13-13-13 fertilizer before planting unless the bed is to be planted in legumes. I rotate my plantings and try to plant all beds in nitrogen fixing legumes every other year. I mulch every year, allow the mulch to decompose, and turn it in. I use targeted side dressings of chemical fertilizers to boost the N-P-K content of the soil. I use 10-20-10 for my root crops like onions, turnips, and sweet potatoes, and I also use 10-20-10 for my cucumbers. I use one application of 13-13-13 around peppers, squash, tomatoes, etc just before they bloom. I side dress my corn with 33-0-0 when it is knee high and again when it tassels. I find that this program works great for me, and I get wonderful yields.

I mentioned in passing to a friend of mine that I was looking for an old-time hand operated corn sheller, and that I had seen a couple on the inter-net but, since they are made of cast iron, the shipping was outrageous. He called me about a week later and said, “I’ve got something in the back of my truck that you might be interested in.” It seems that he had come across his late uncle Wallace’s corn sheller out in the barn, and it was just sitting their getting rusty. He offered it to me on loan saying that it was just going to ruin in the old barn and that if he needed to use it he would know that I had it. I told him that it sounded like a great deal to me, so I went over the next day and picked it up. It was a Blackhawk sheller; patented in the late 1800’s and probably came into uncle Wallace’s possession in the early 1900’s. It was rusty, but not real, real bad; and, to my surprise, it was mounted on a really nice collecting bin that would funnel the shelled corn kernels into a waiting bucket. I dissembled the sheller, worked it over with a wire brush, oiled it good, replaced a couple of bolts, and re-mounted it on the collecting bin. The collecting bin itself was very well crafted (uncle Wallace had been carpenter), and all I had to do was repair a broken leg and give it a good coat of paint.


Shelling corn by hand is a pain, and since every little farm grew their on corn for food and livestock feed, these shelling machines were very common back in the day. The way it worked was that farmers would grow a good size crop of field corn and let it dry out on the stalk. For animal feed you would carry the corn, cobs, and stalks to the local co-op and have it all ground up into feed. The corn alone was too rich, so you had the cobs and stalks ground up with it. For people food you shelled the dried corn off of the cobs and carried the corn to the local grist mill to have it ground into meal. You could pay the miller to grind your corn, but it was more common to pay a toll by allowing the miller to keep a portion of your cornmeal. The miller would then turn around and sell the cornmeal to city folks or people who didn’t raise a corn crop. There was a little mill still in operation close to my farm as late as the early 1980’s; but, sadly, it is now gone. Turns out that this was the very mill that my friend’s uncle used to carry his corn to.
If you’ve never seen one of these shellers in action, they are really very ingenious. They will shell an ear of corn and then spit the cob out in a heartbeat; much, much easier than doing it by hand. I’m going to try out a little new (for me) technology here and attach a brief video of the Blackhawk Corn Sheller in action.
Well the video worked on my preview, so maybe it will work for you also. Geez, I’m just getting to be a technology wizard. Next thing you know I’ll learn how to work an ATM machine.
One of the things that I promised myself that I would do after I retired was to start grinding all of my own wheat and baking all of our bread. I have owned a small Victorio grain mill for a couple of years, and I have used it occasionally with good results; but I felt that if I was going to grind two to four pounds of wheat every week that I needed to have a better mill. I have wanted a Country Living Grain Mill for a while, and my wife finally took the hint and bought me one for Christmas. I unpacked it and set it up about a month ago and started grinding away, so I thought I would do a post about my impressions of this mill.
First of all, everything that you have heard about the quality of this mill is true. It is super well made. You can look anywhere on the net and get all the specs about the materials and design of this mill, so I won’t belabor all of that.
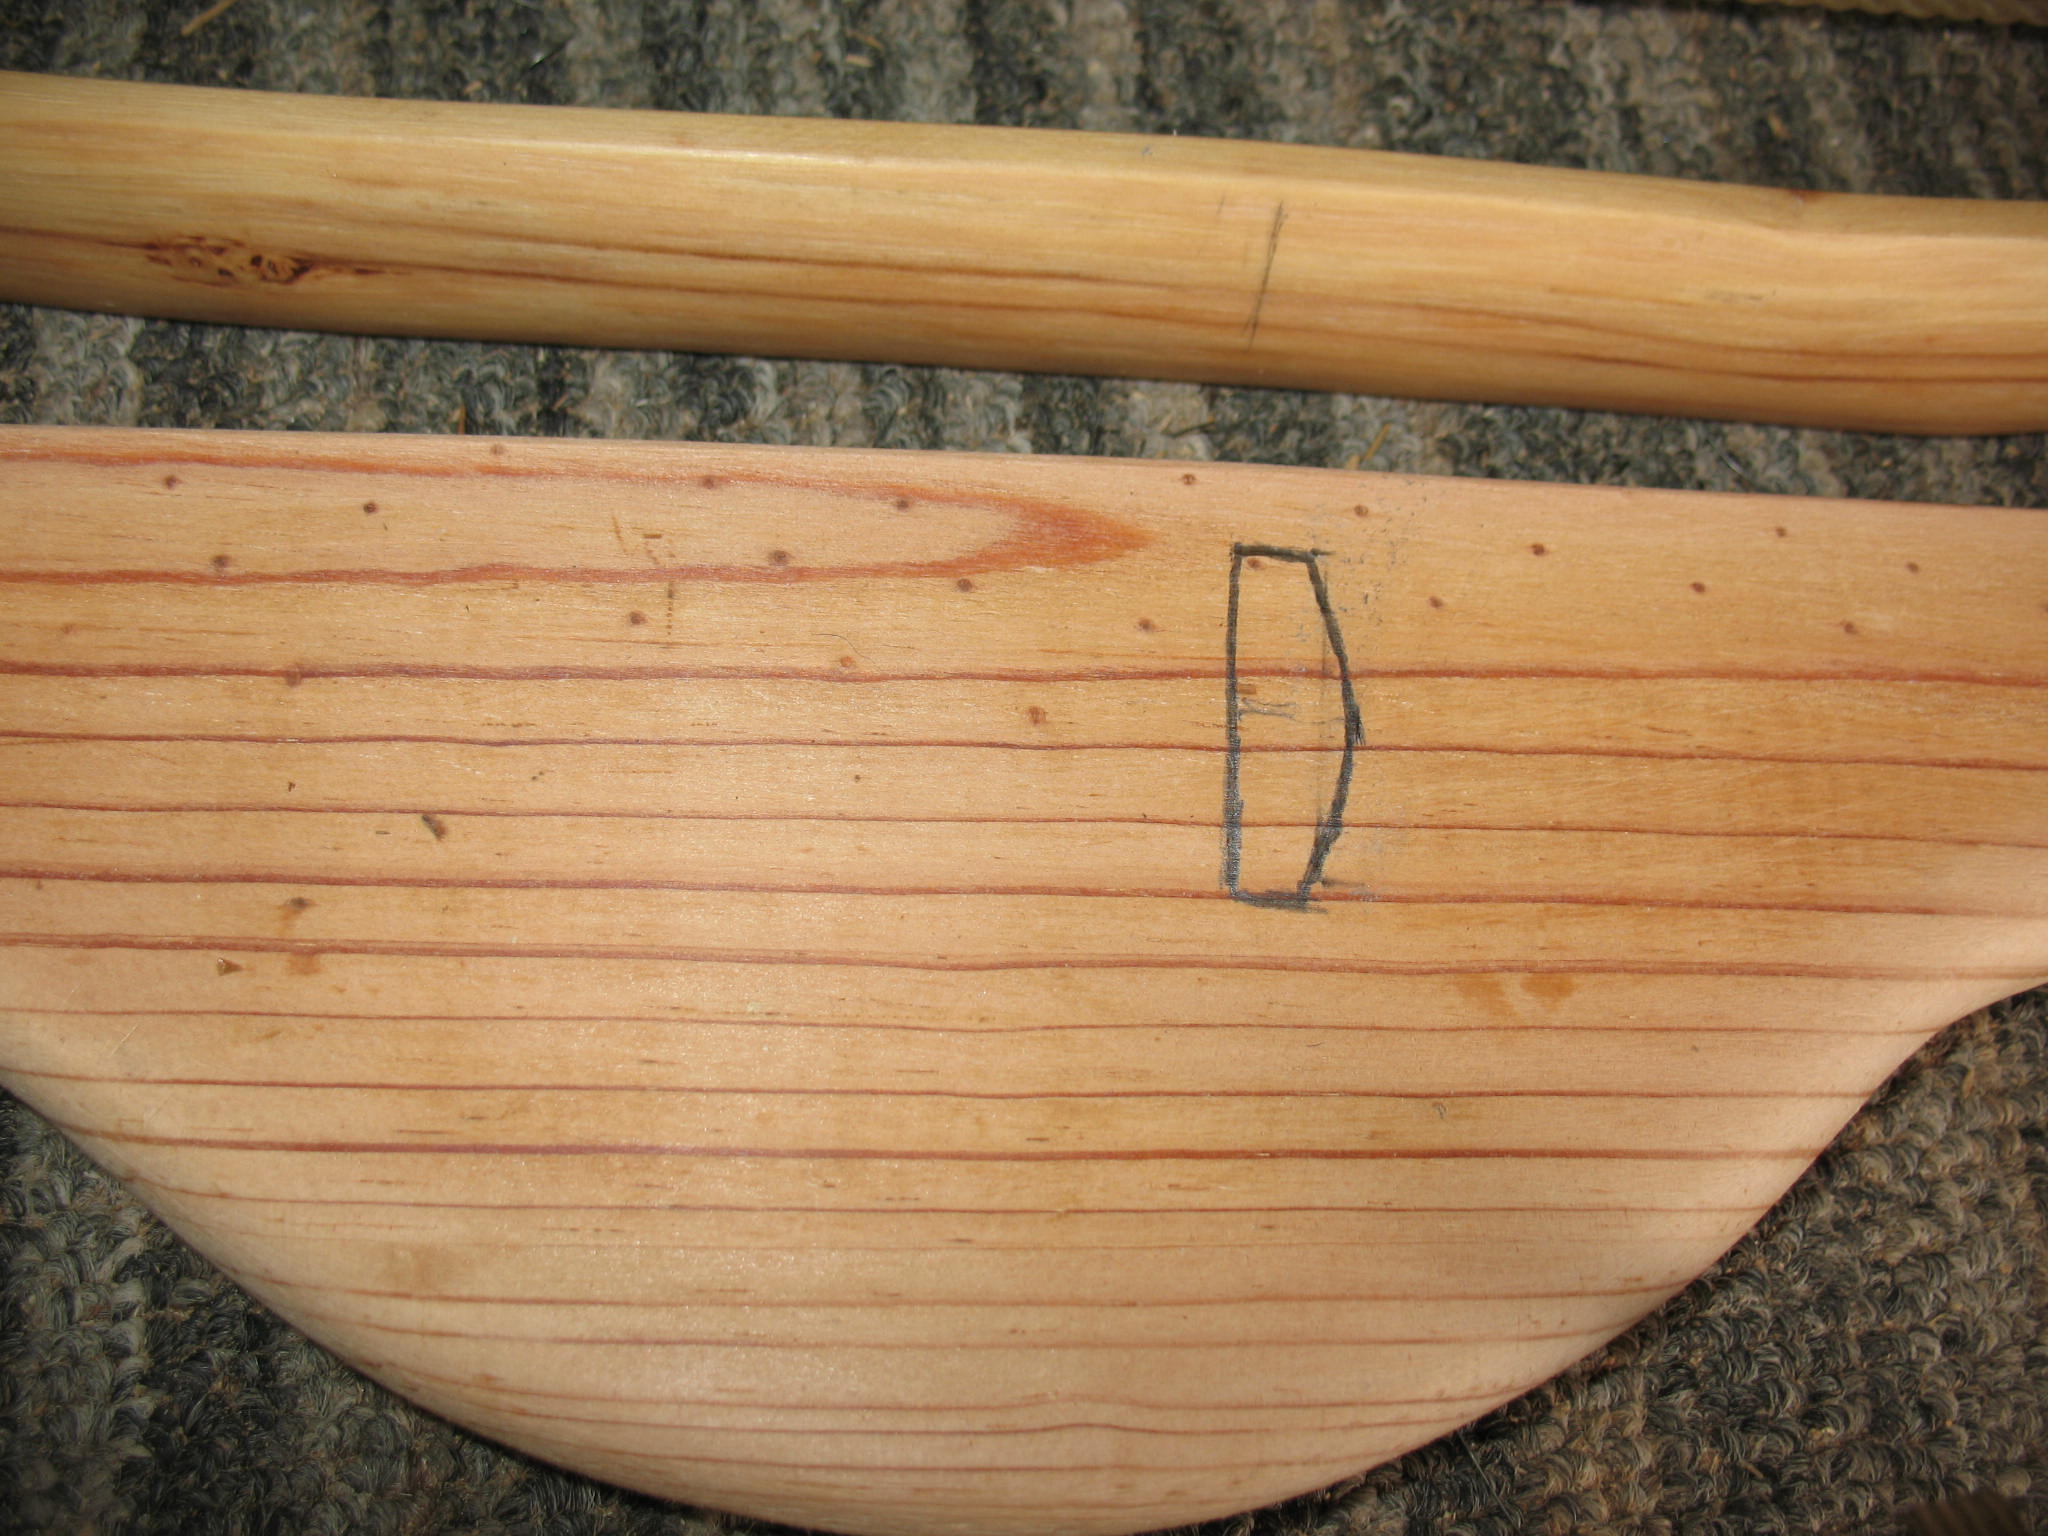
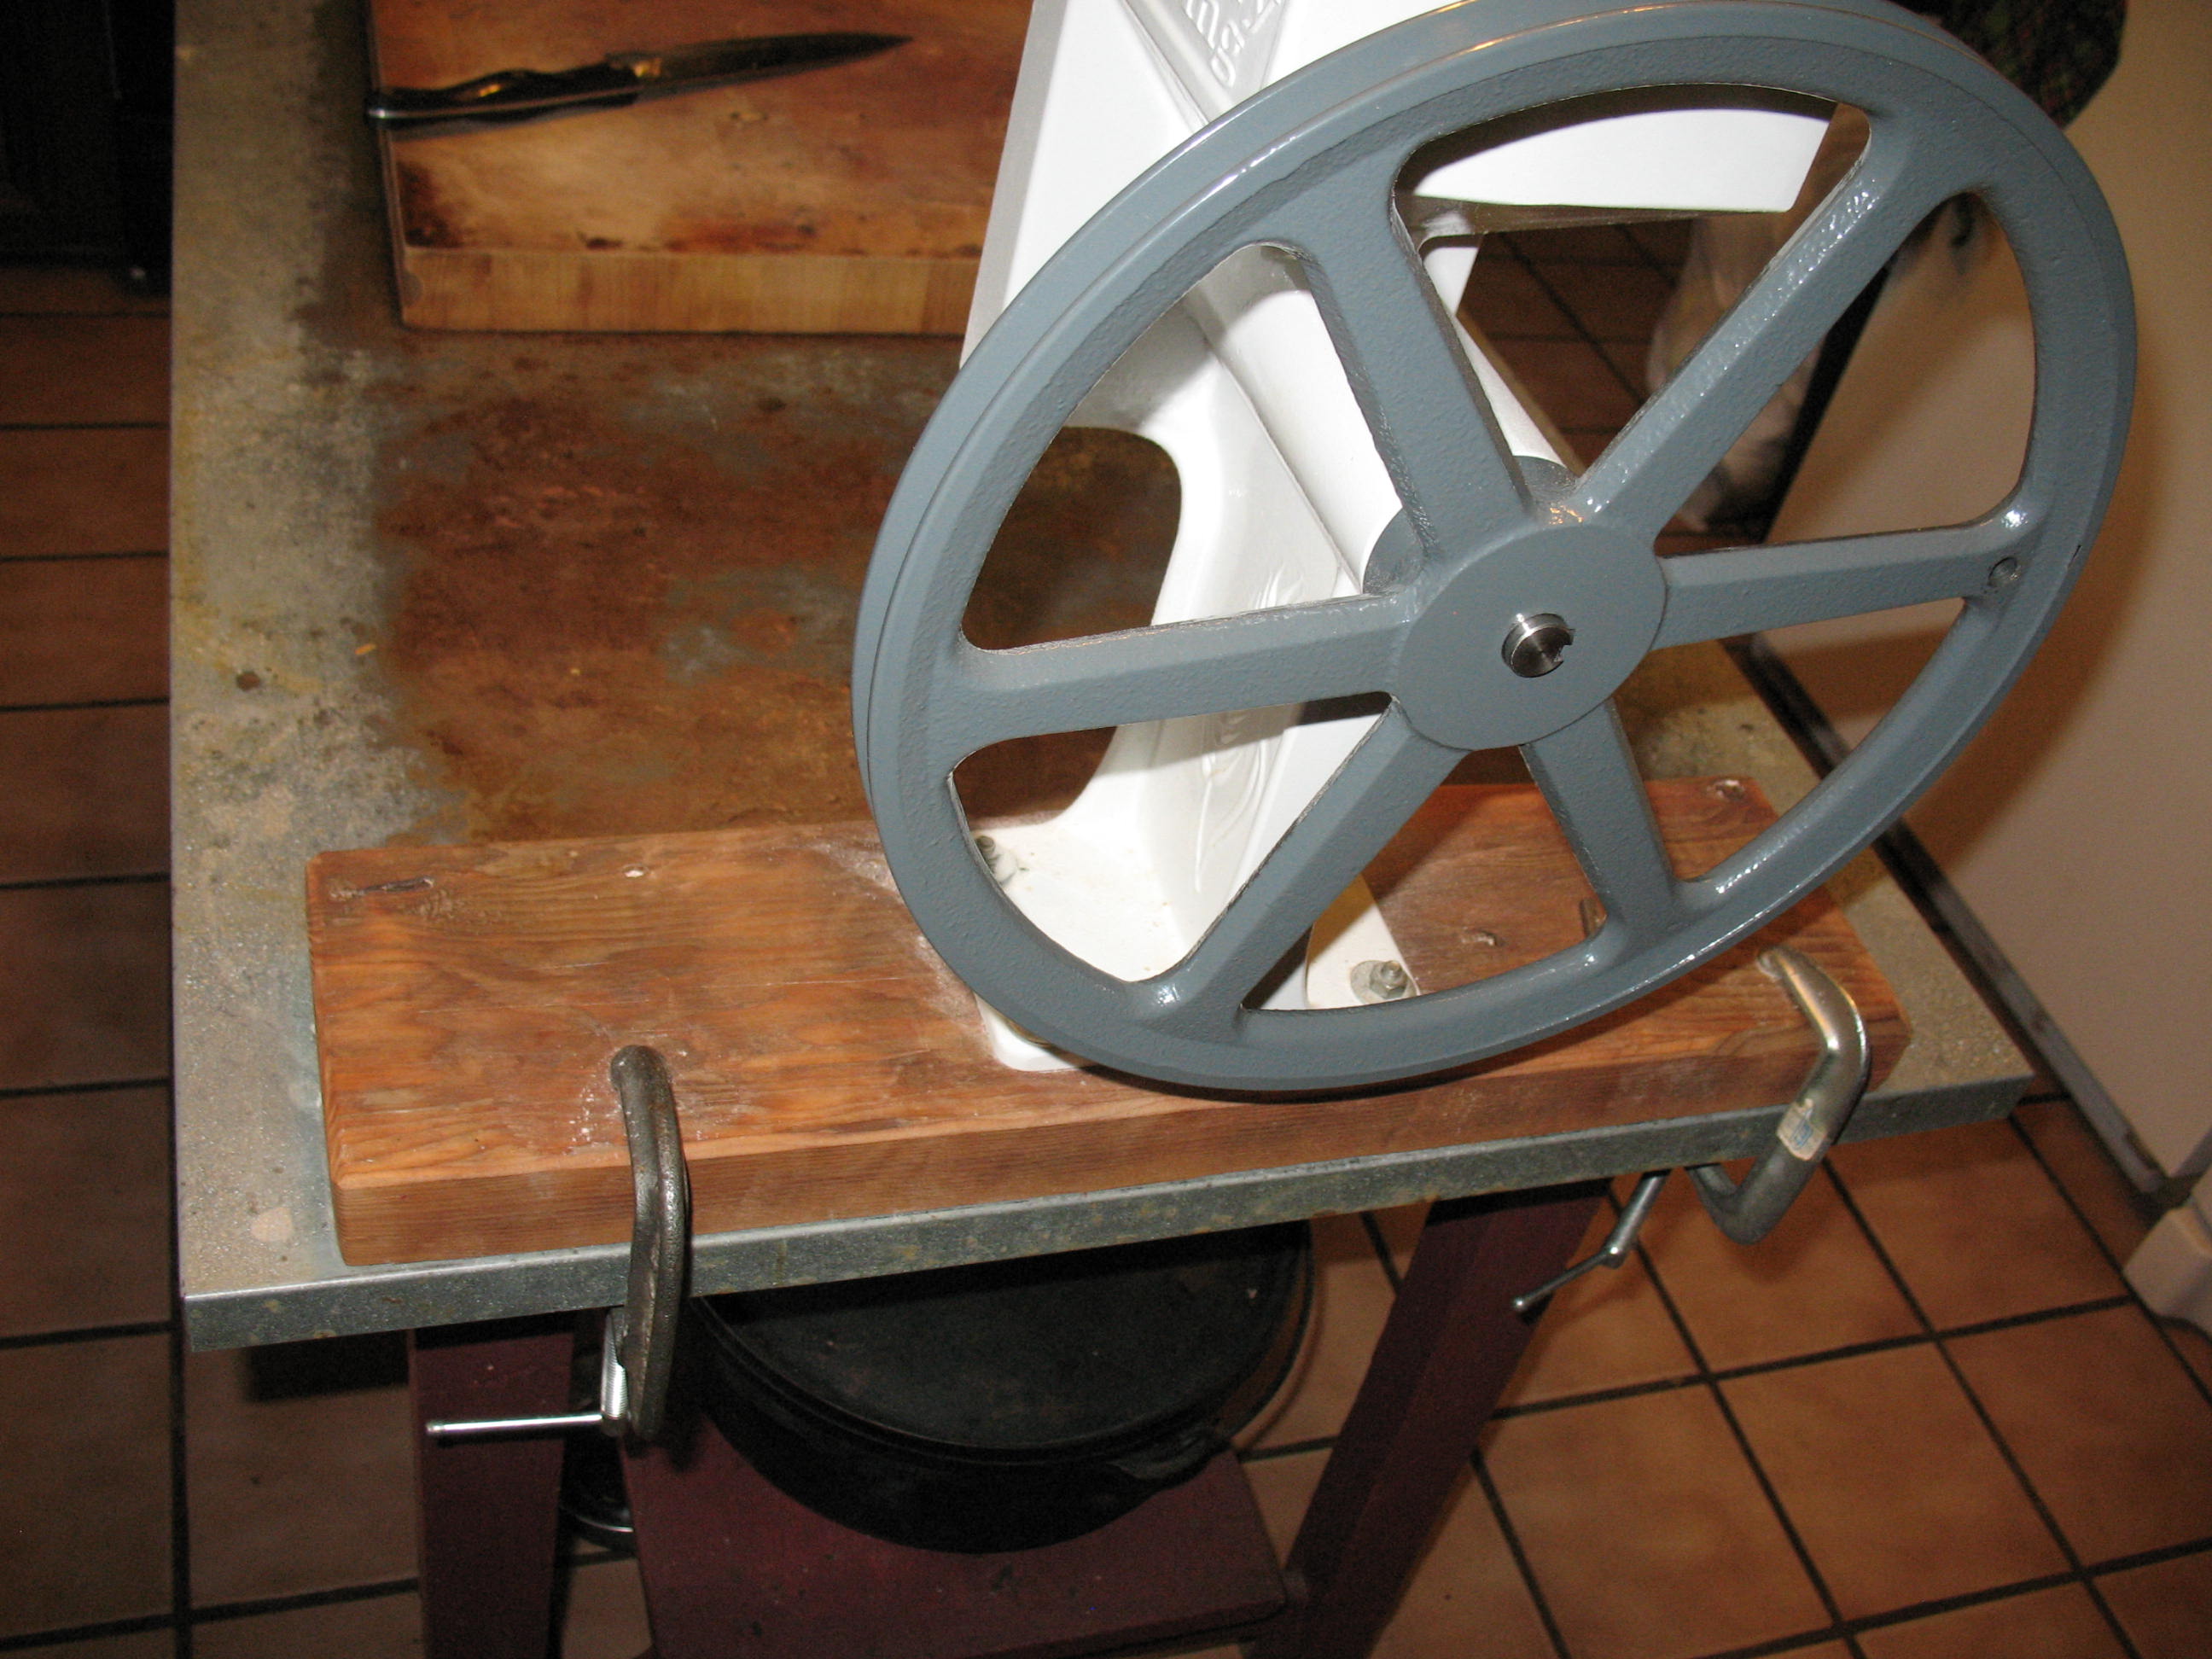
I will make one comparison between the Country Living Mill and the Victorio Mill. The grinding plates on the Victorio Mill are approximately 1 3/8 inches in diameter, whereas the grinding plates on Country Living Mill are approximately 4 5/8 inches in diameter. So turning at the same revolutions per minute the Country Living Mill will process way more grain than the Victorio Mill. But, here’s the drawback; the turning radius of the handle on the Victorio Mill is 6 inches. That’s a 6 inch long handle turning a 1 3/8 inch diameter grinding plate. The Country Living Mill has a handle with a radius of about 5 ½ inches. That’s a 5 ½ inch long handle turning a 4 5/8 inch diameter grinding plate. Guess which one is easier to turn. But remember, it’s a trade off. The Victorio is easier to turn, but you have to turn it a lot more times to grind the same amount of grain. Top, Victorio grinding plates; bottom, Country Living grinding plates.

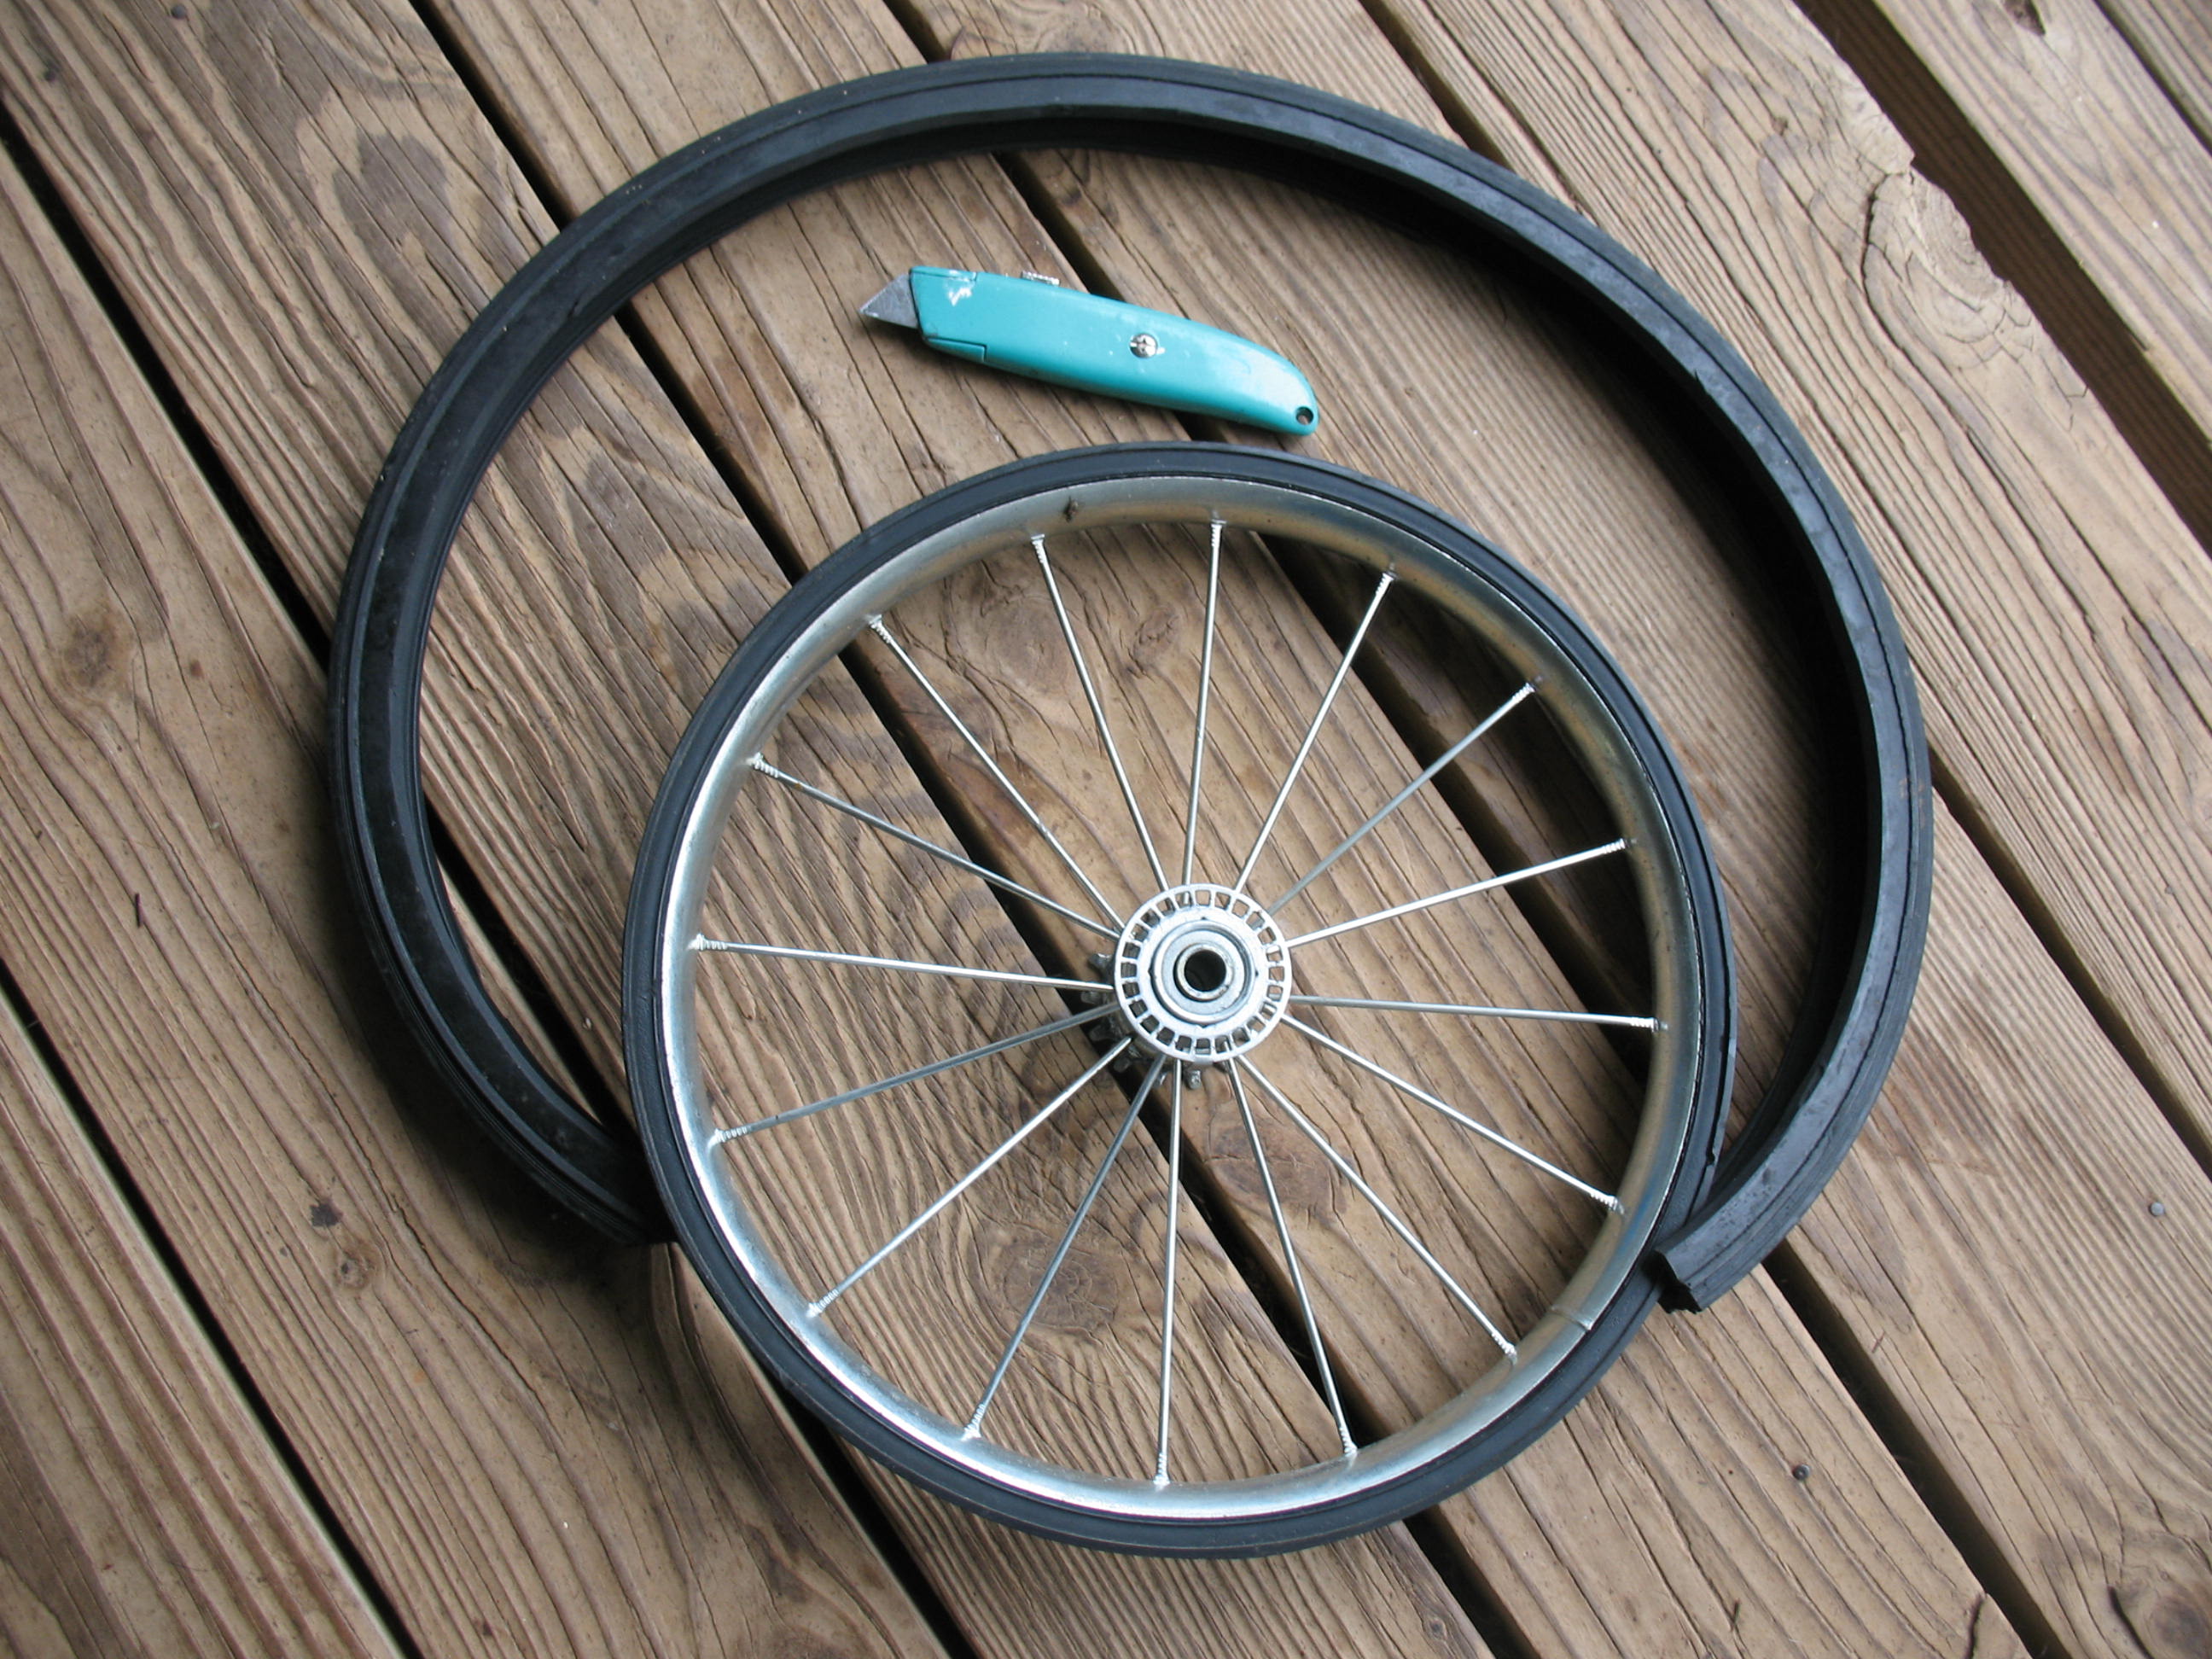
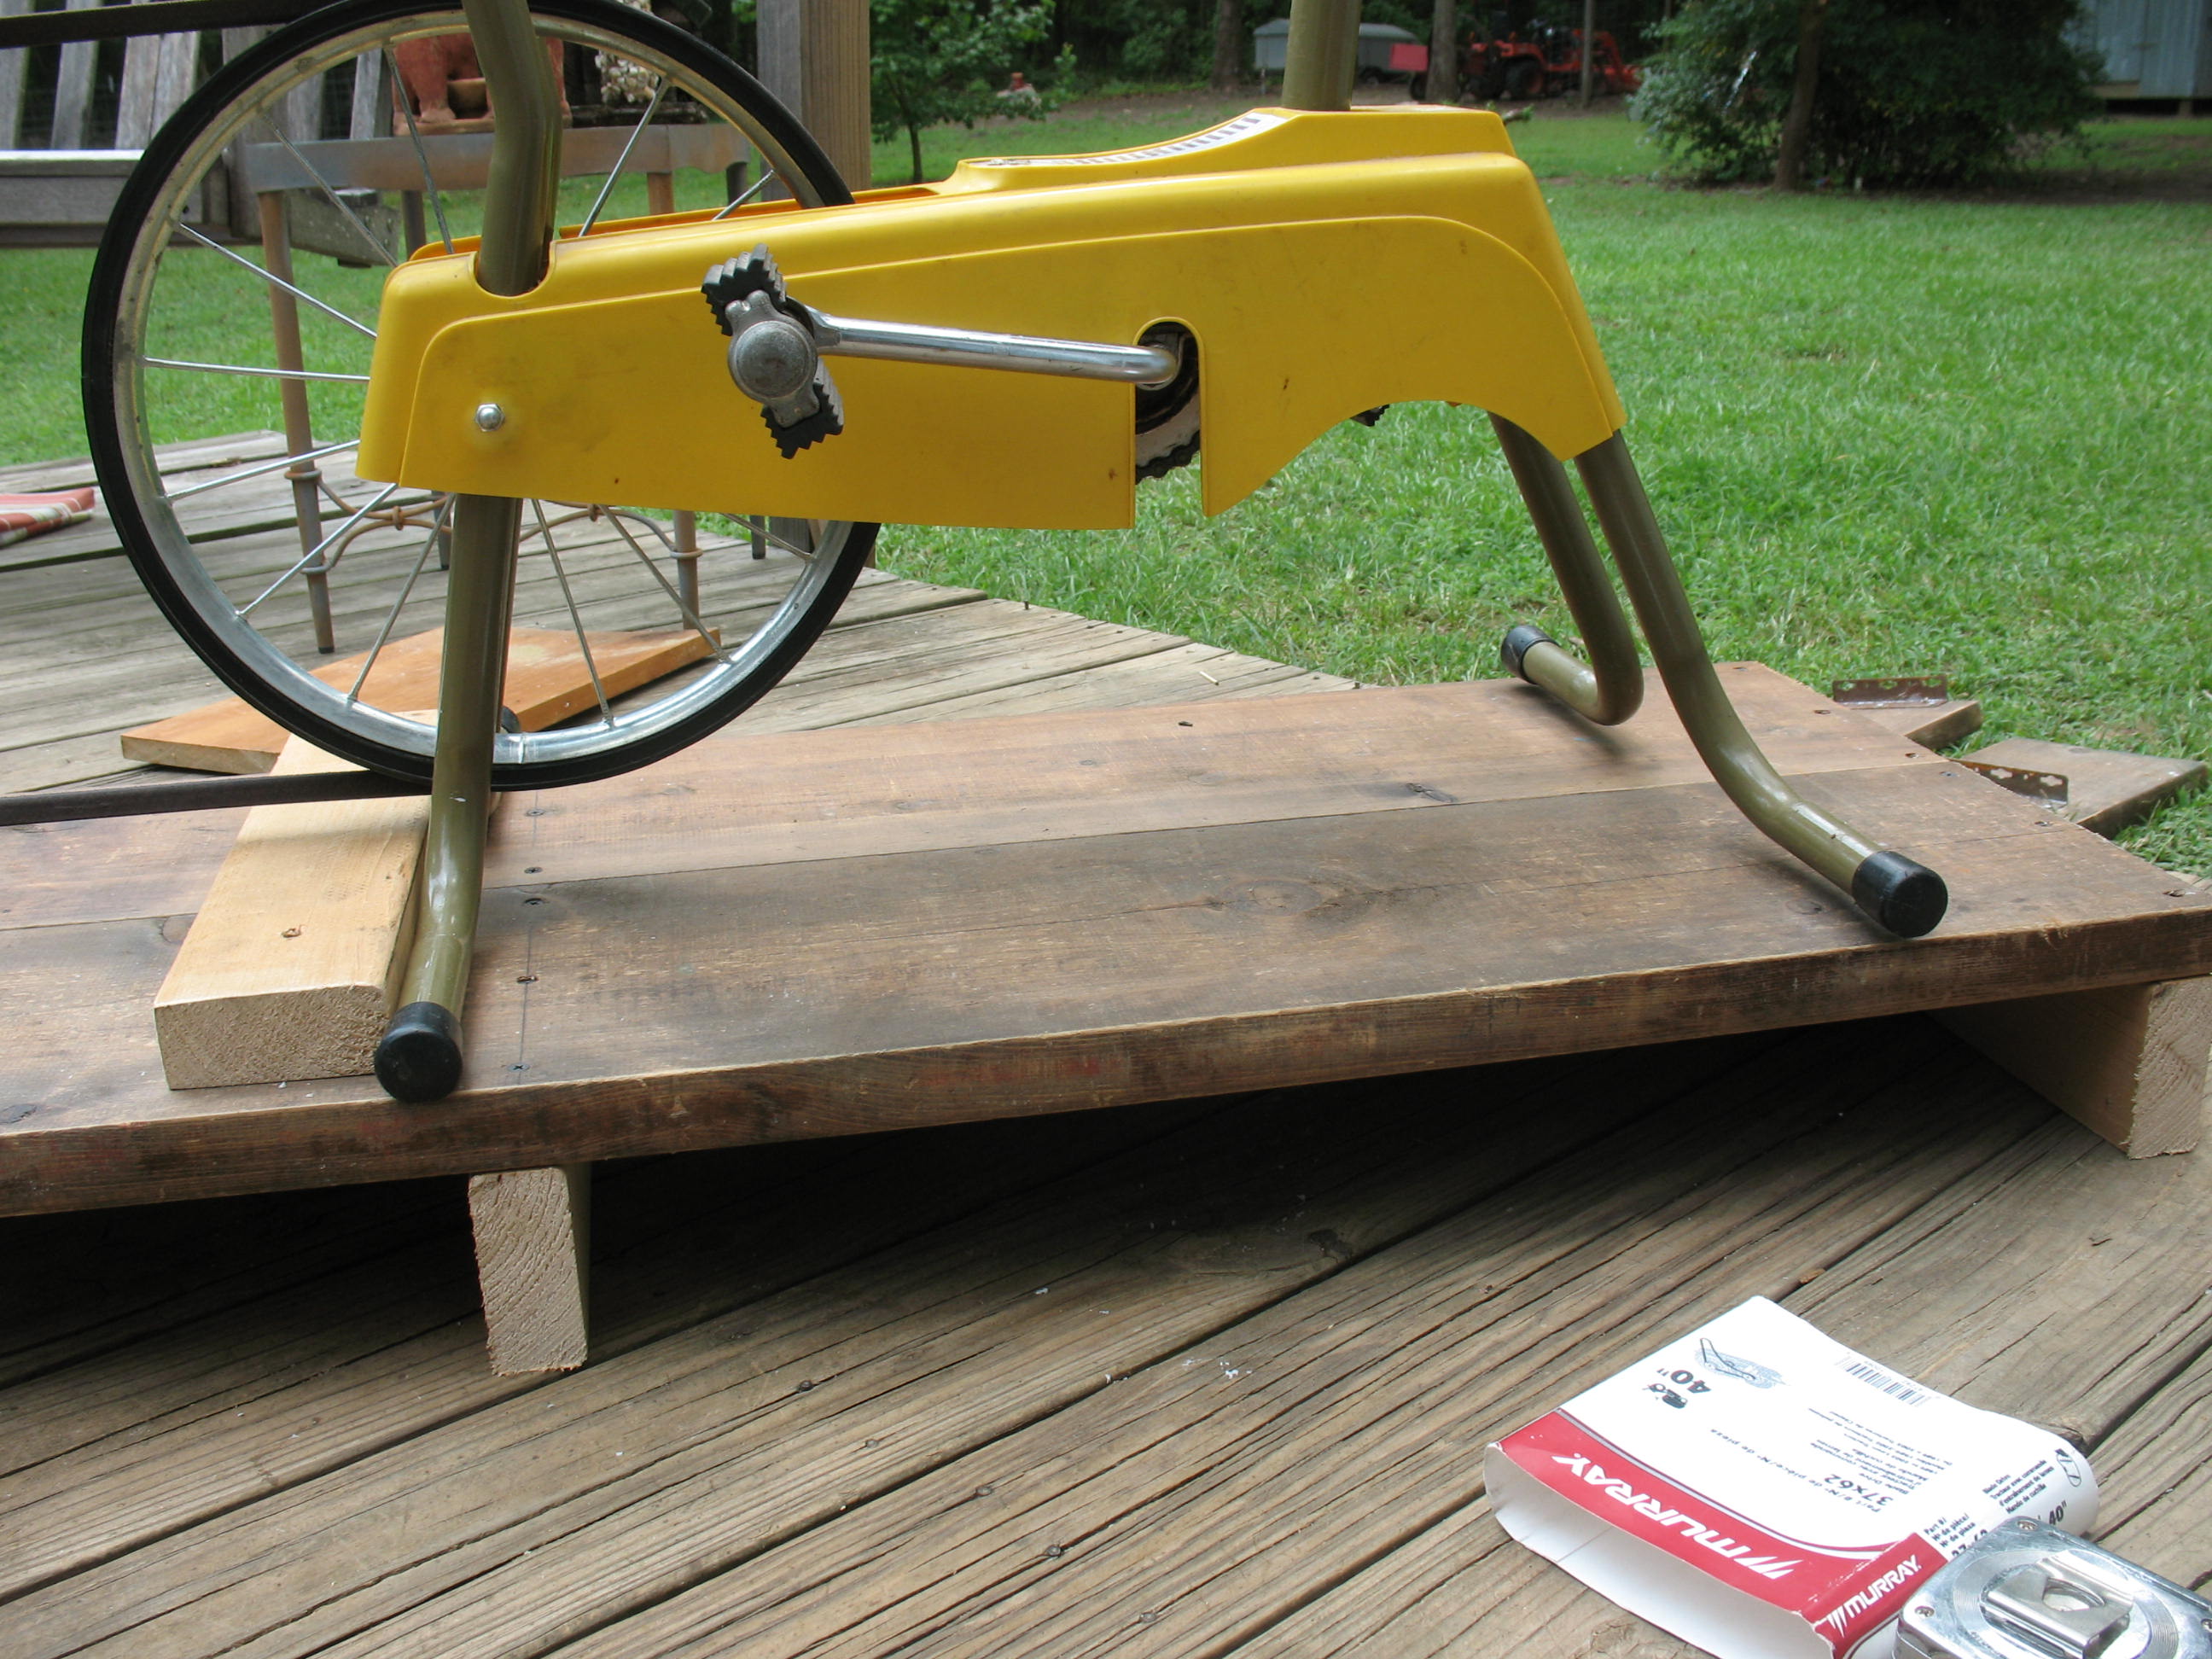
Country Living sells an extension handle that gives you a little bit better mechanical advantage when hand turning the mill, but I decided to skip right past all of that and go straight to peddle power. I kept my eyes open at the local thrift stores for a few weeks until I came across an old Sears exercise bike. This is a super basic machine. Just a seat, handle bars, peddles, and a wheel. I picked it up for $9.99, and it was perfect for what I needed.

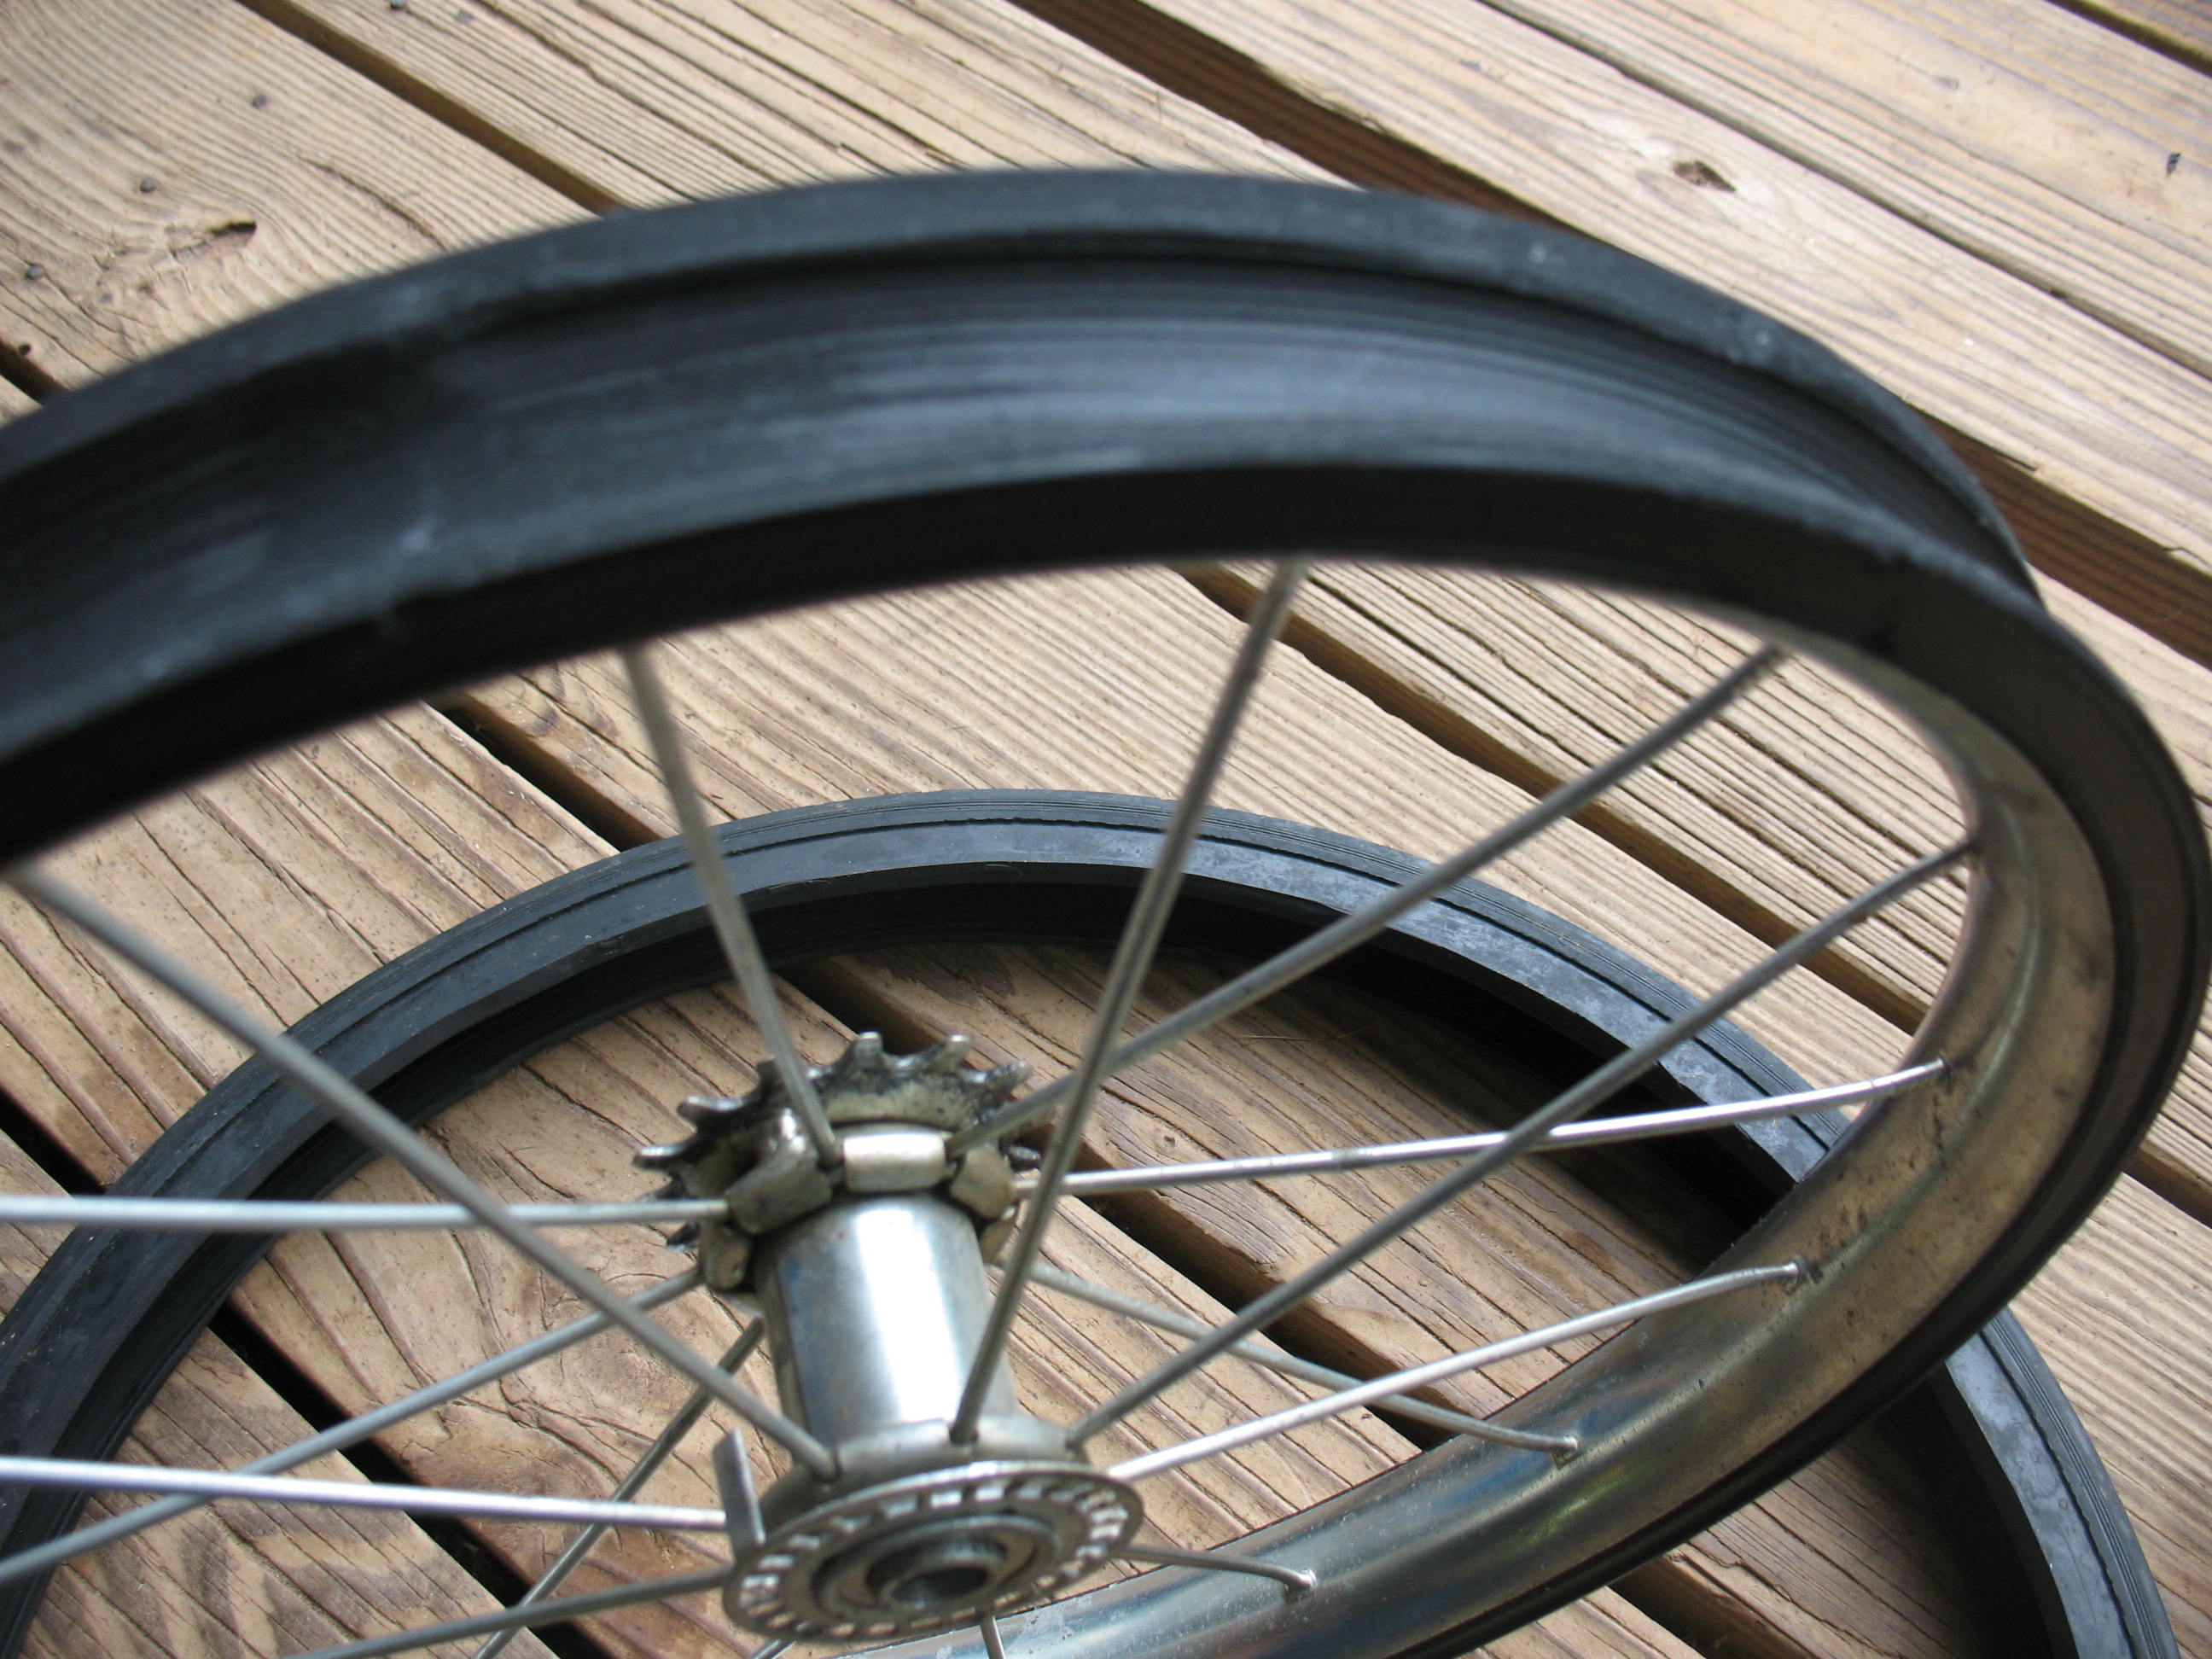
The wheel has a hollow but rigid tire on it. I was able to use a utility knife and trim off the outer half of the tire. The inner half of the tire remained firmly fixed on the wheel and since the tire was hollow, it left a nice groove to slip a V-belt around.
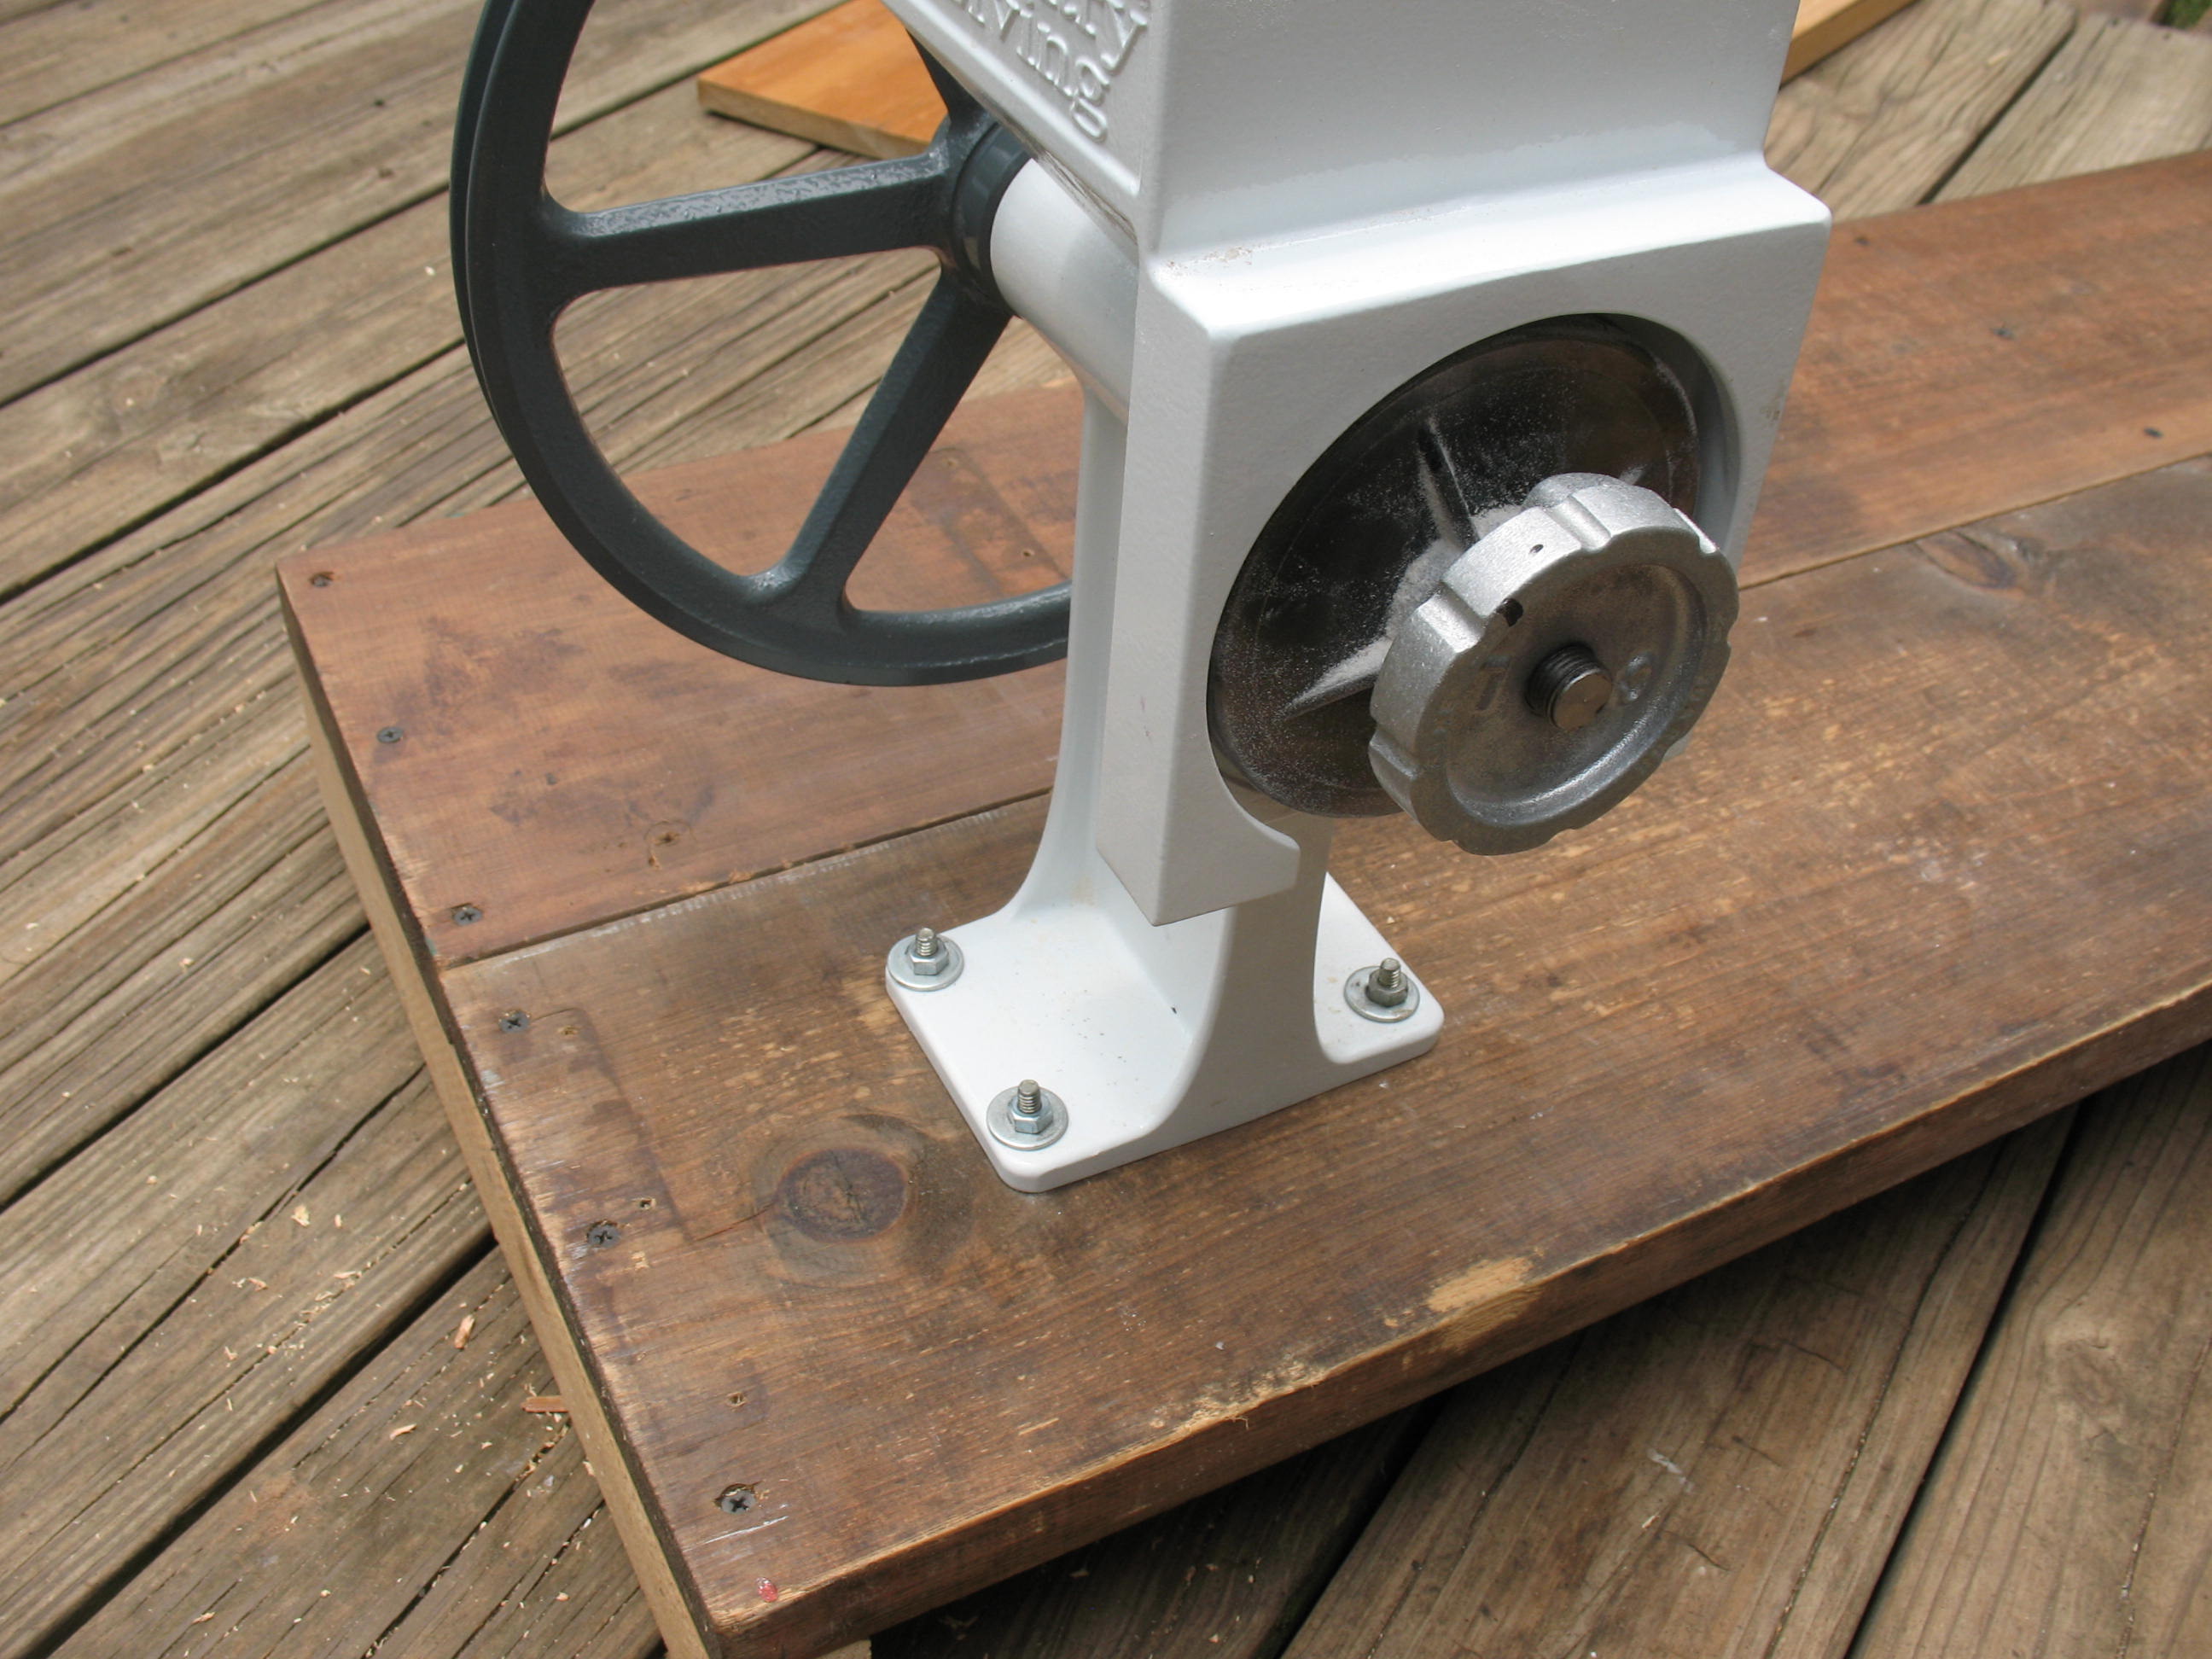
The Country Living mill has a large pulley on it that is already set up for a V-belt, so it would be a simple matter to link the bicycle to the mill once I had them both mounted on some kind of a platform.
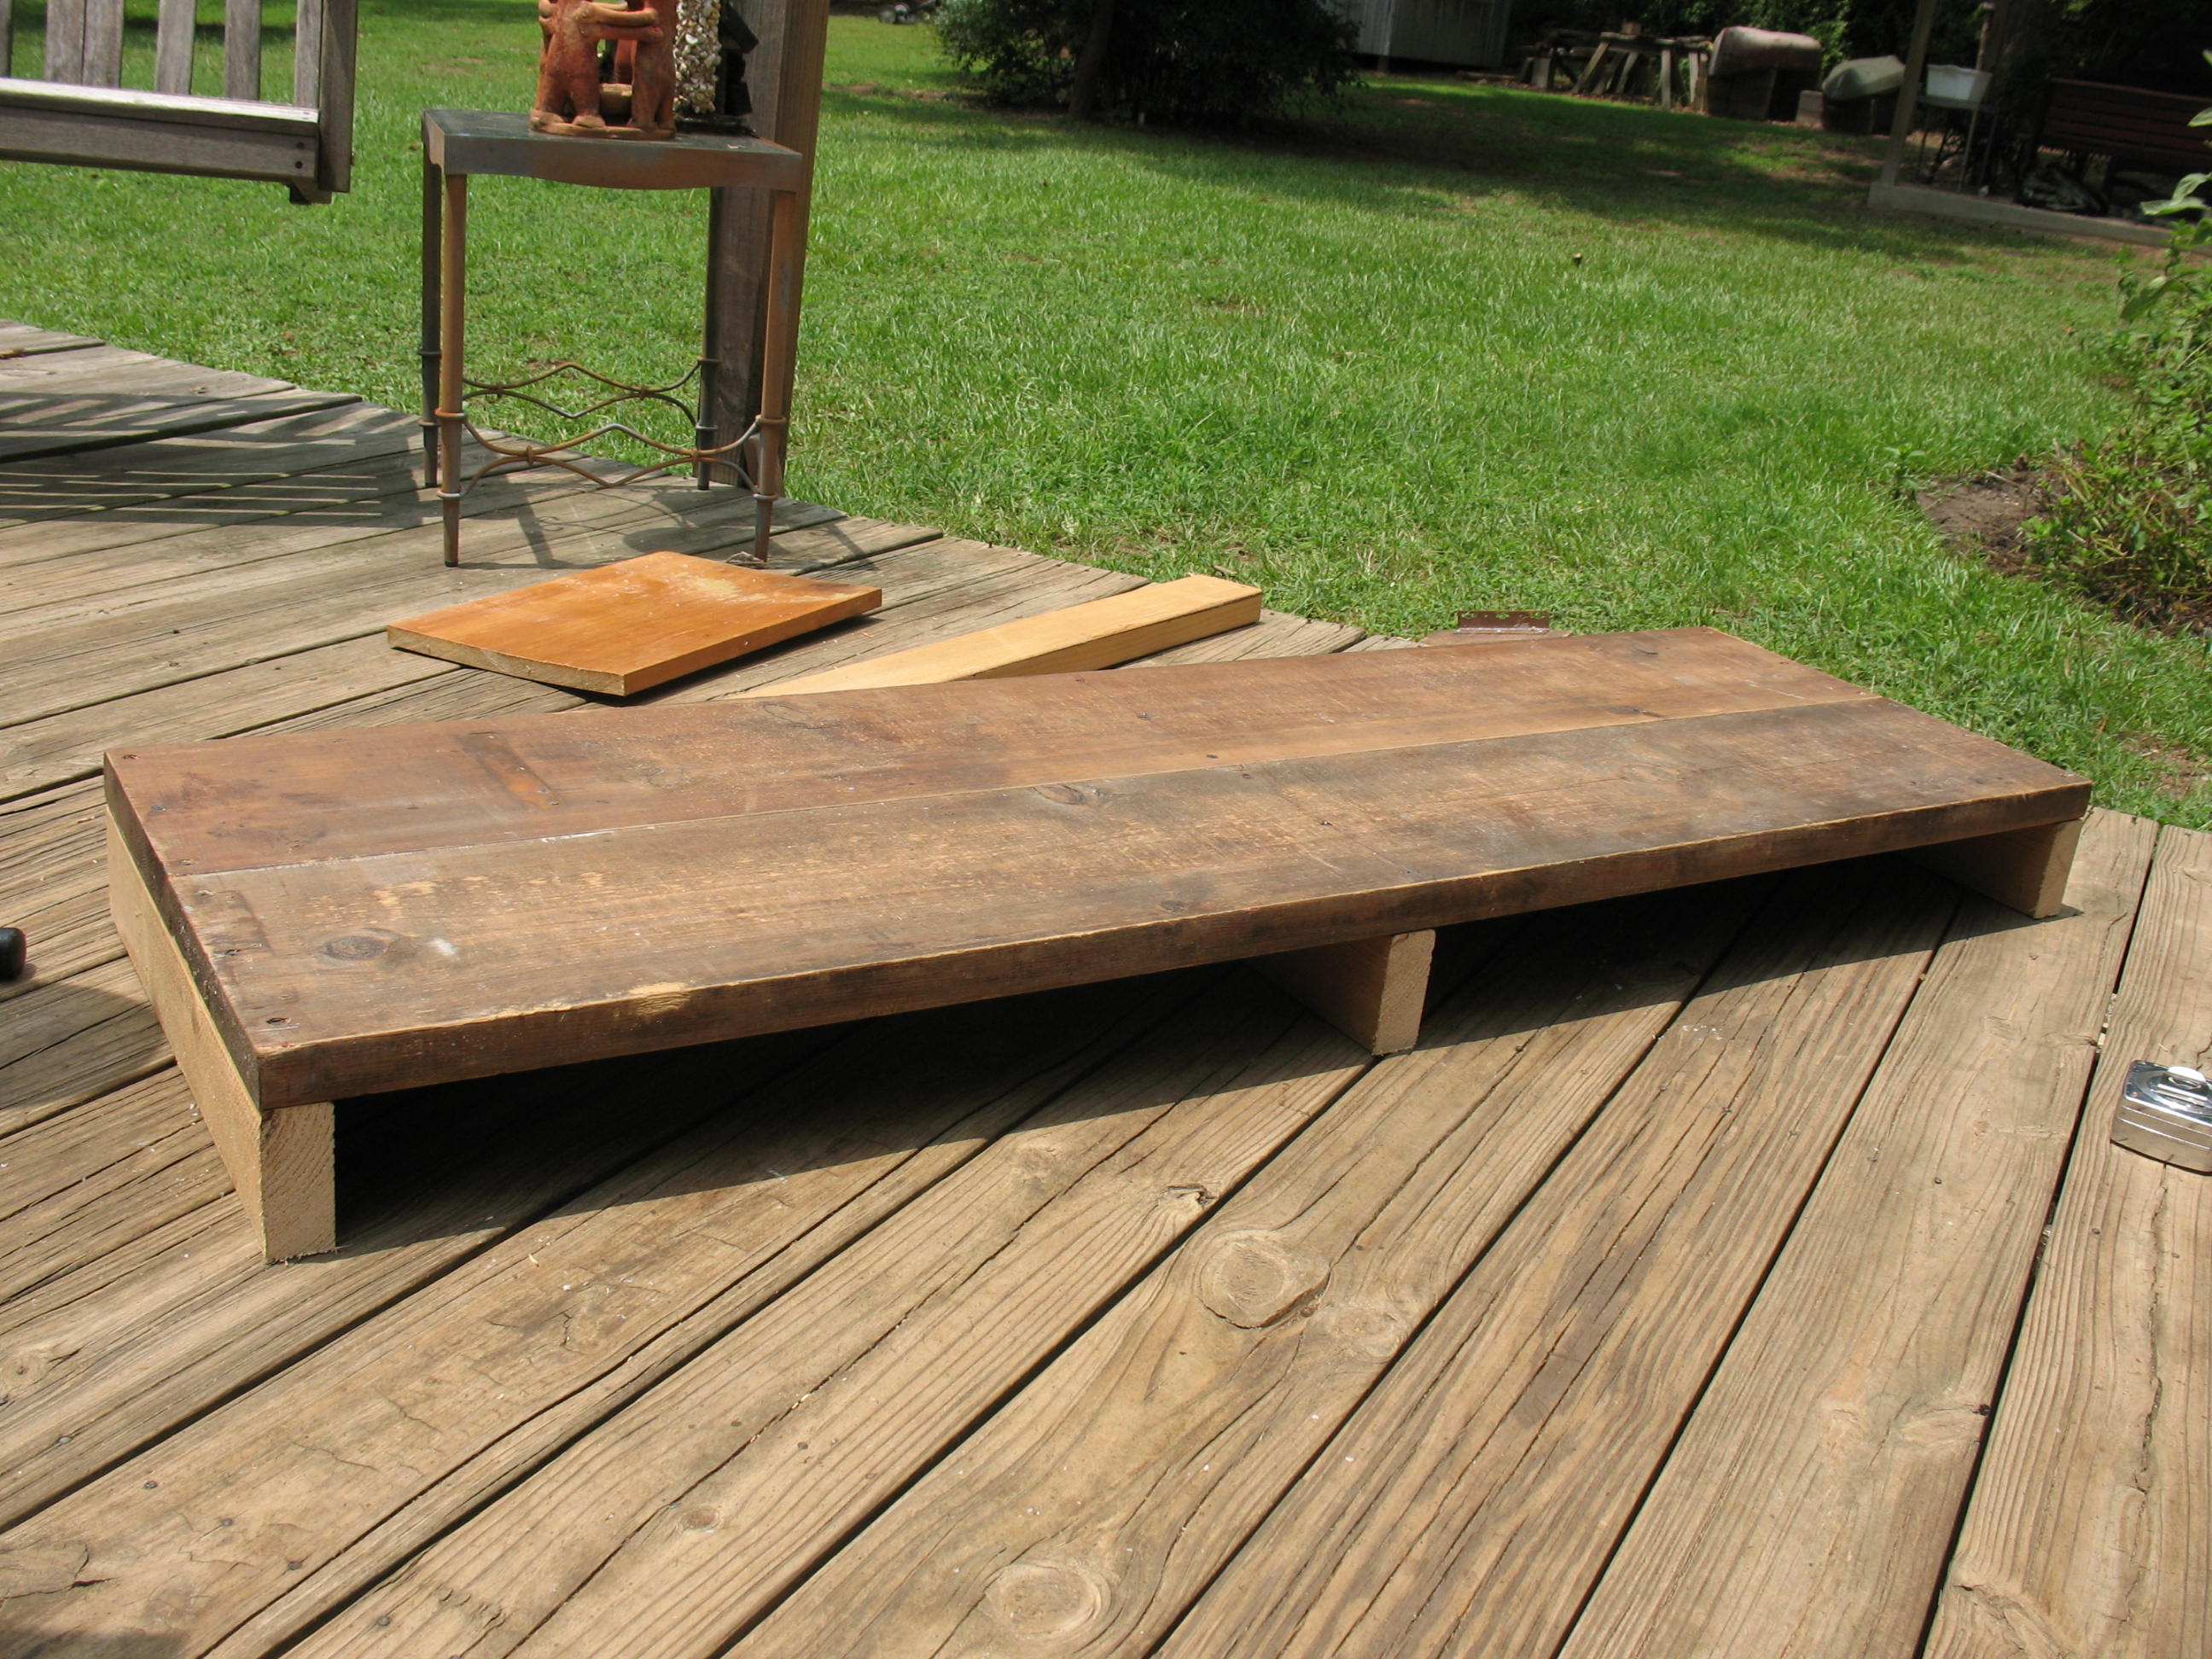
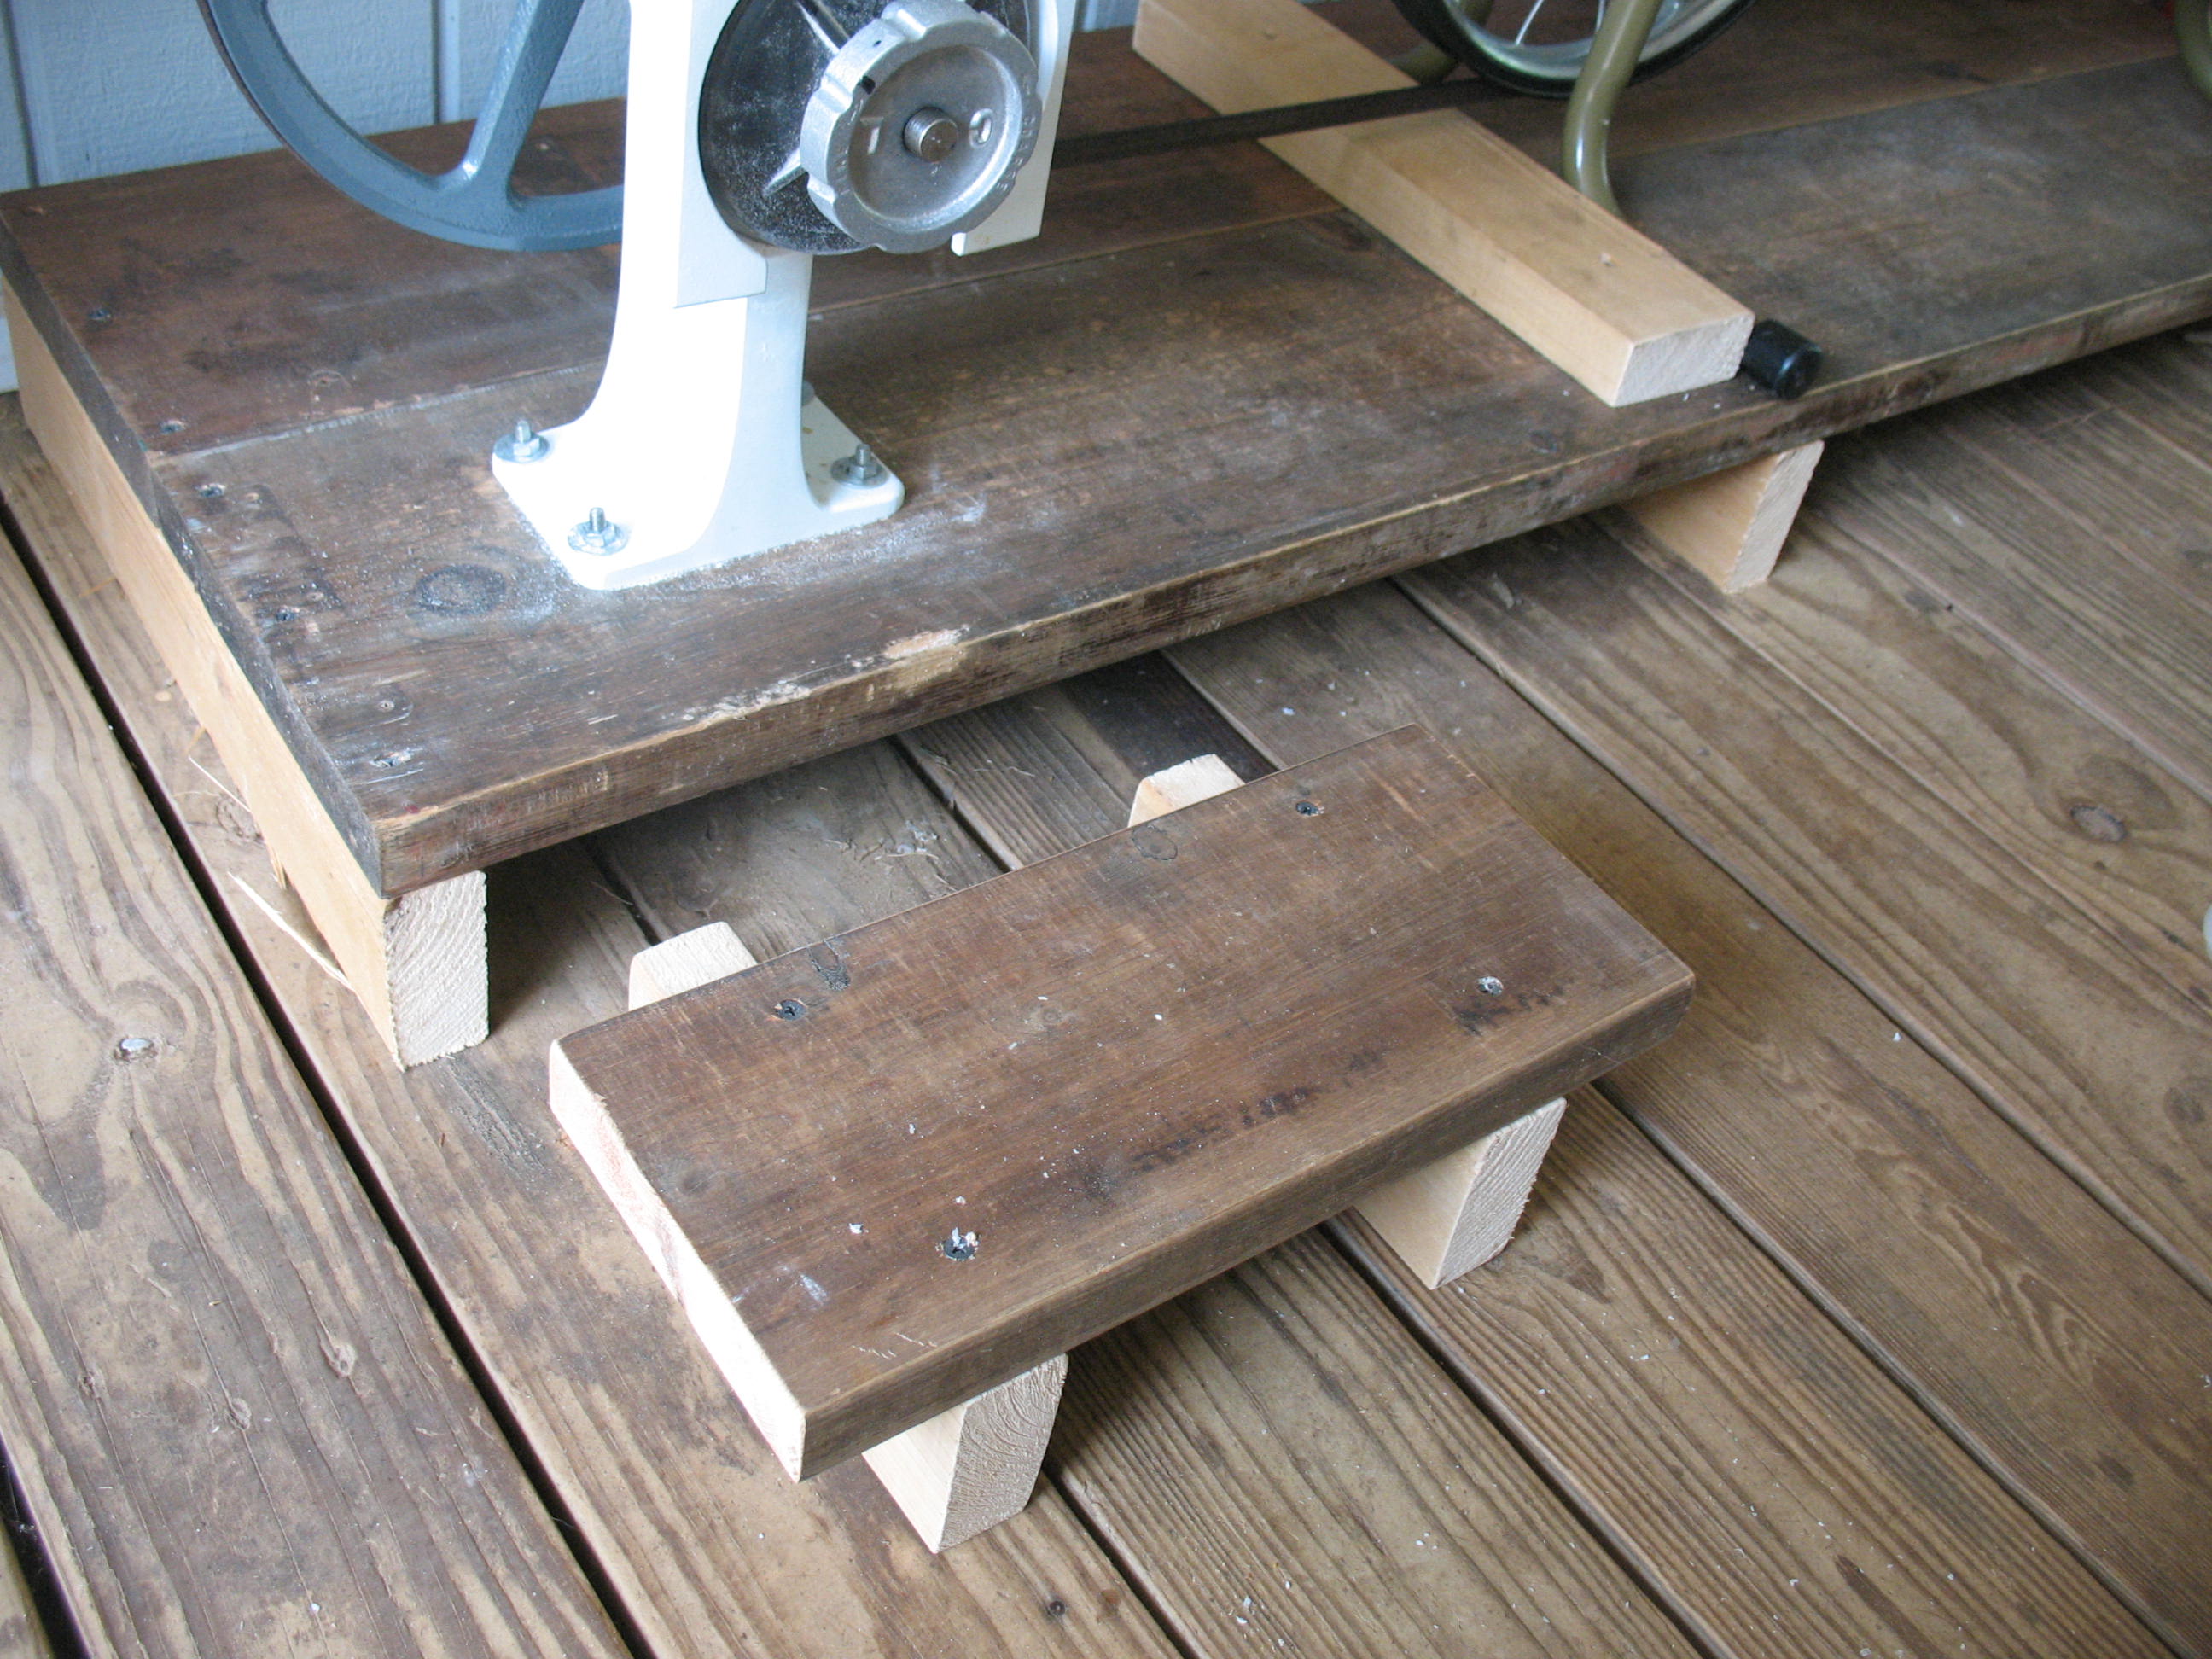
Never one to waste a dollar, I dug around in the shop and came up with a couple of old two-by-tens and a two-by four that I could re-purpose to make the platform.

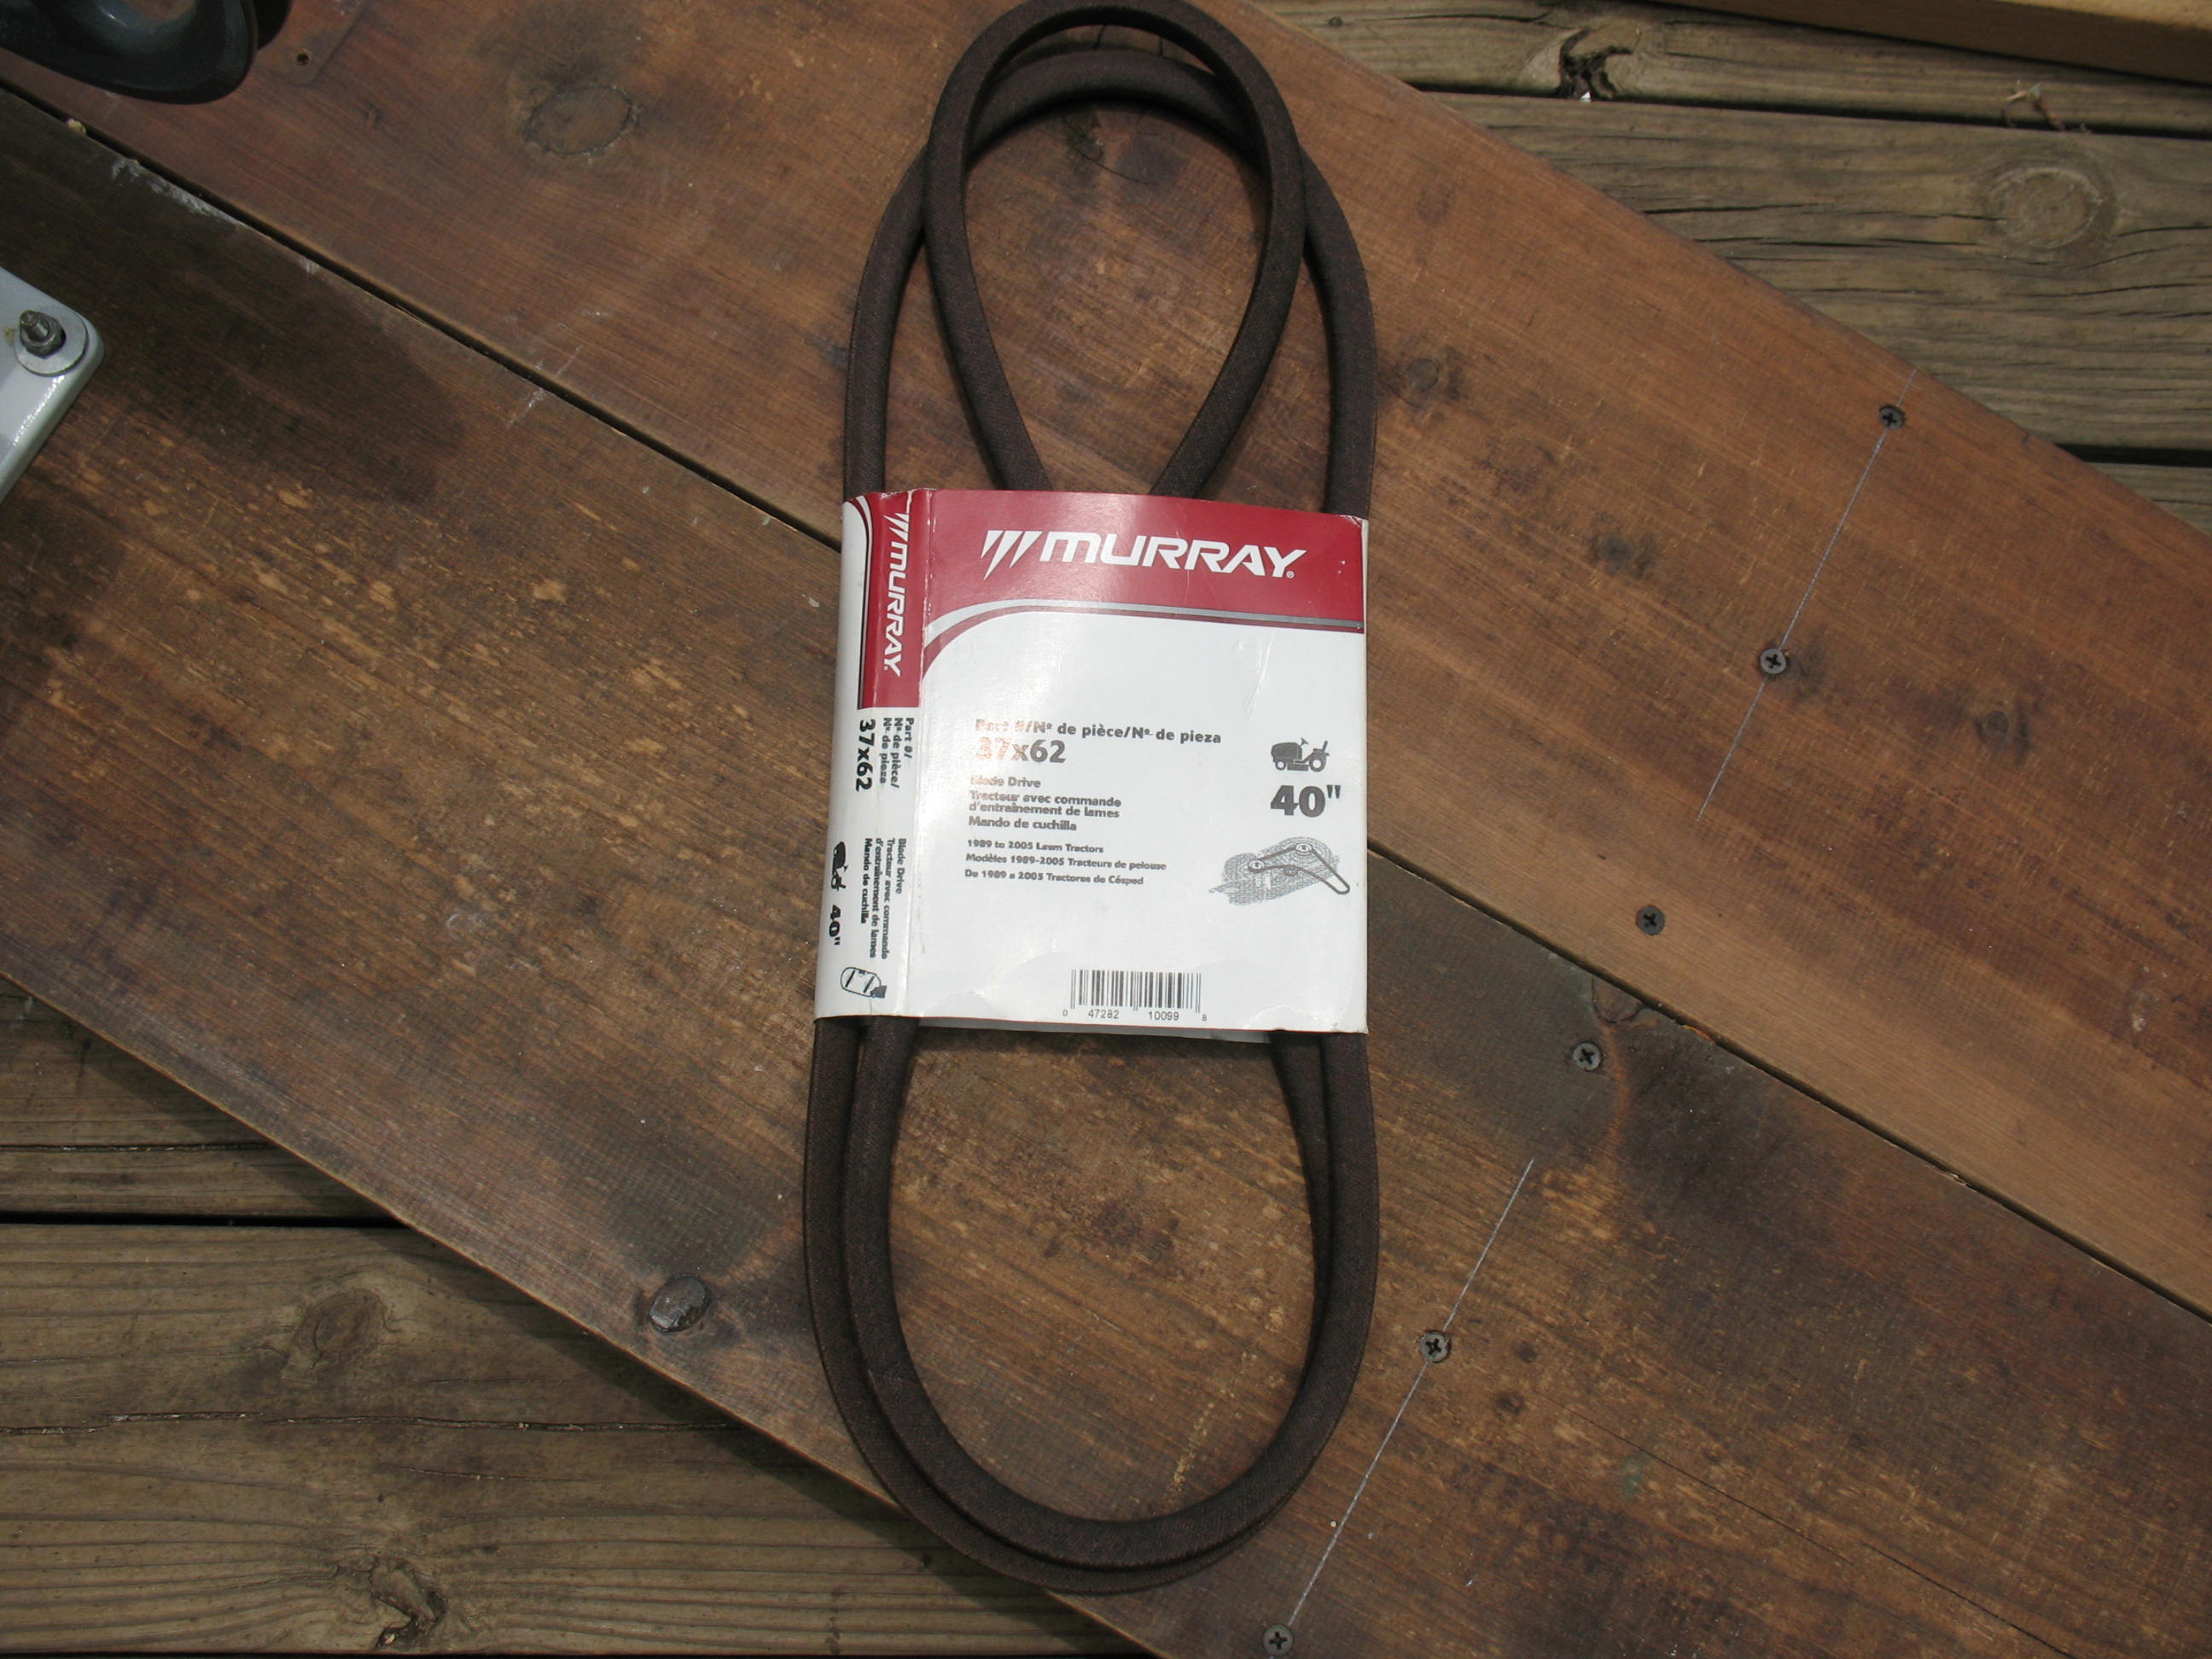
Before I could start cutting and building, I had to find a V-belt that would be long enough to go around the mill pulley and the bicycle wheel/drive pulley. This ended up being my biggest expense on the project. I bought a V-belt that is used to drive the blades on riding lawnmowers. It cost me $21.00 and change at Home Depot.
Once I had obtained a V-belt, I did some rough calculations as to how long the platform would needed to be, cut all my lumber, and screwed everything together with some old dry-wall screws.

When mounting the mill it is important that the mill pulley is in the center of the platform where it will line up evenly with the drive wheel on the bicycle.
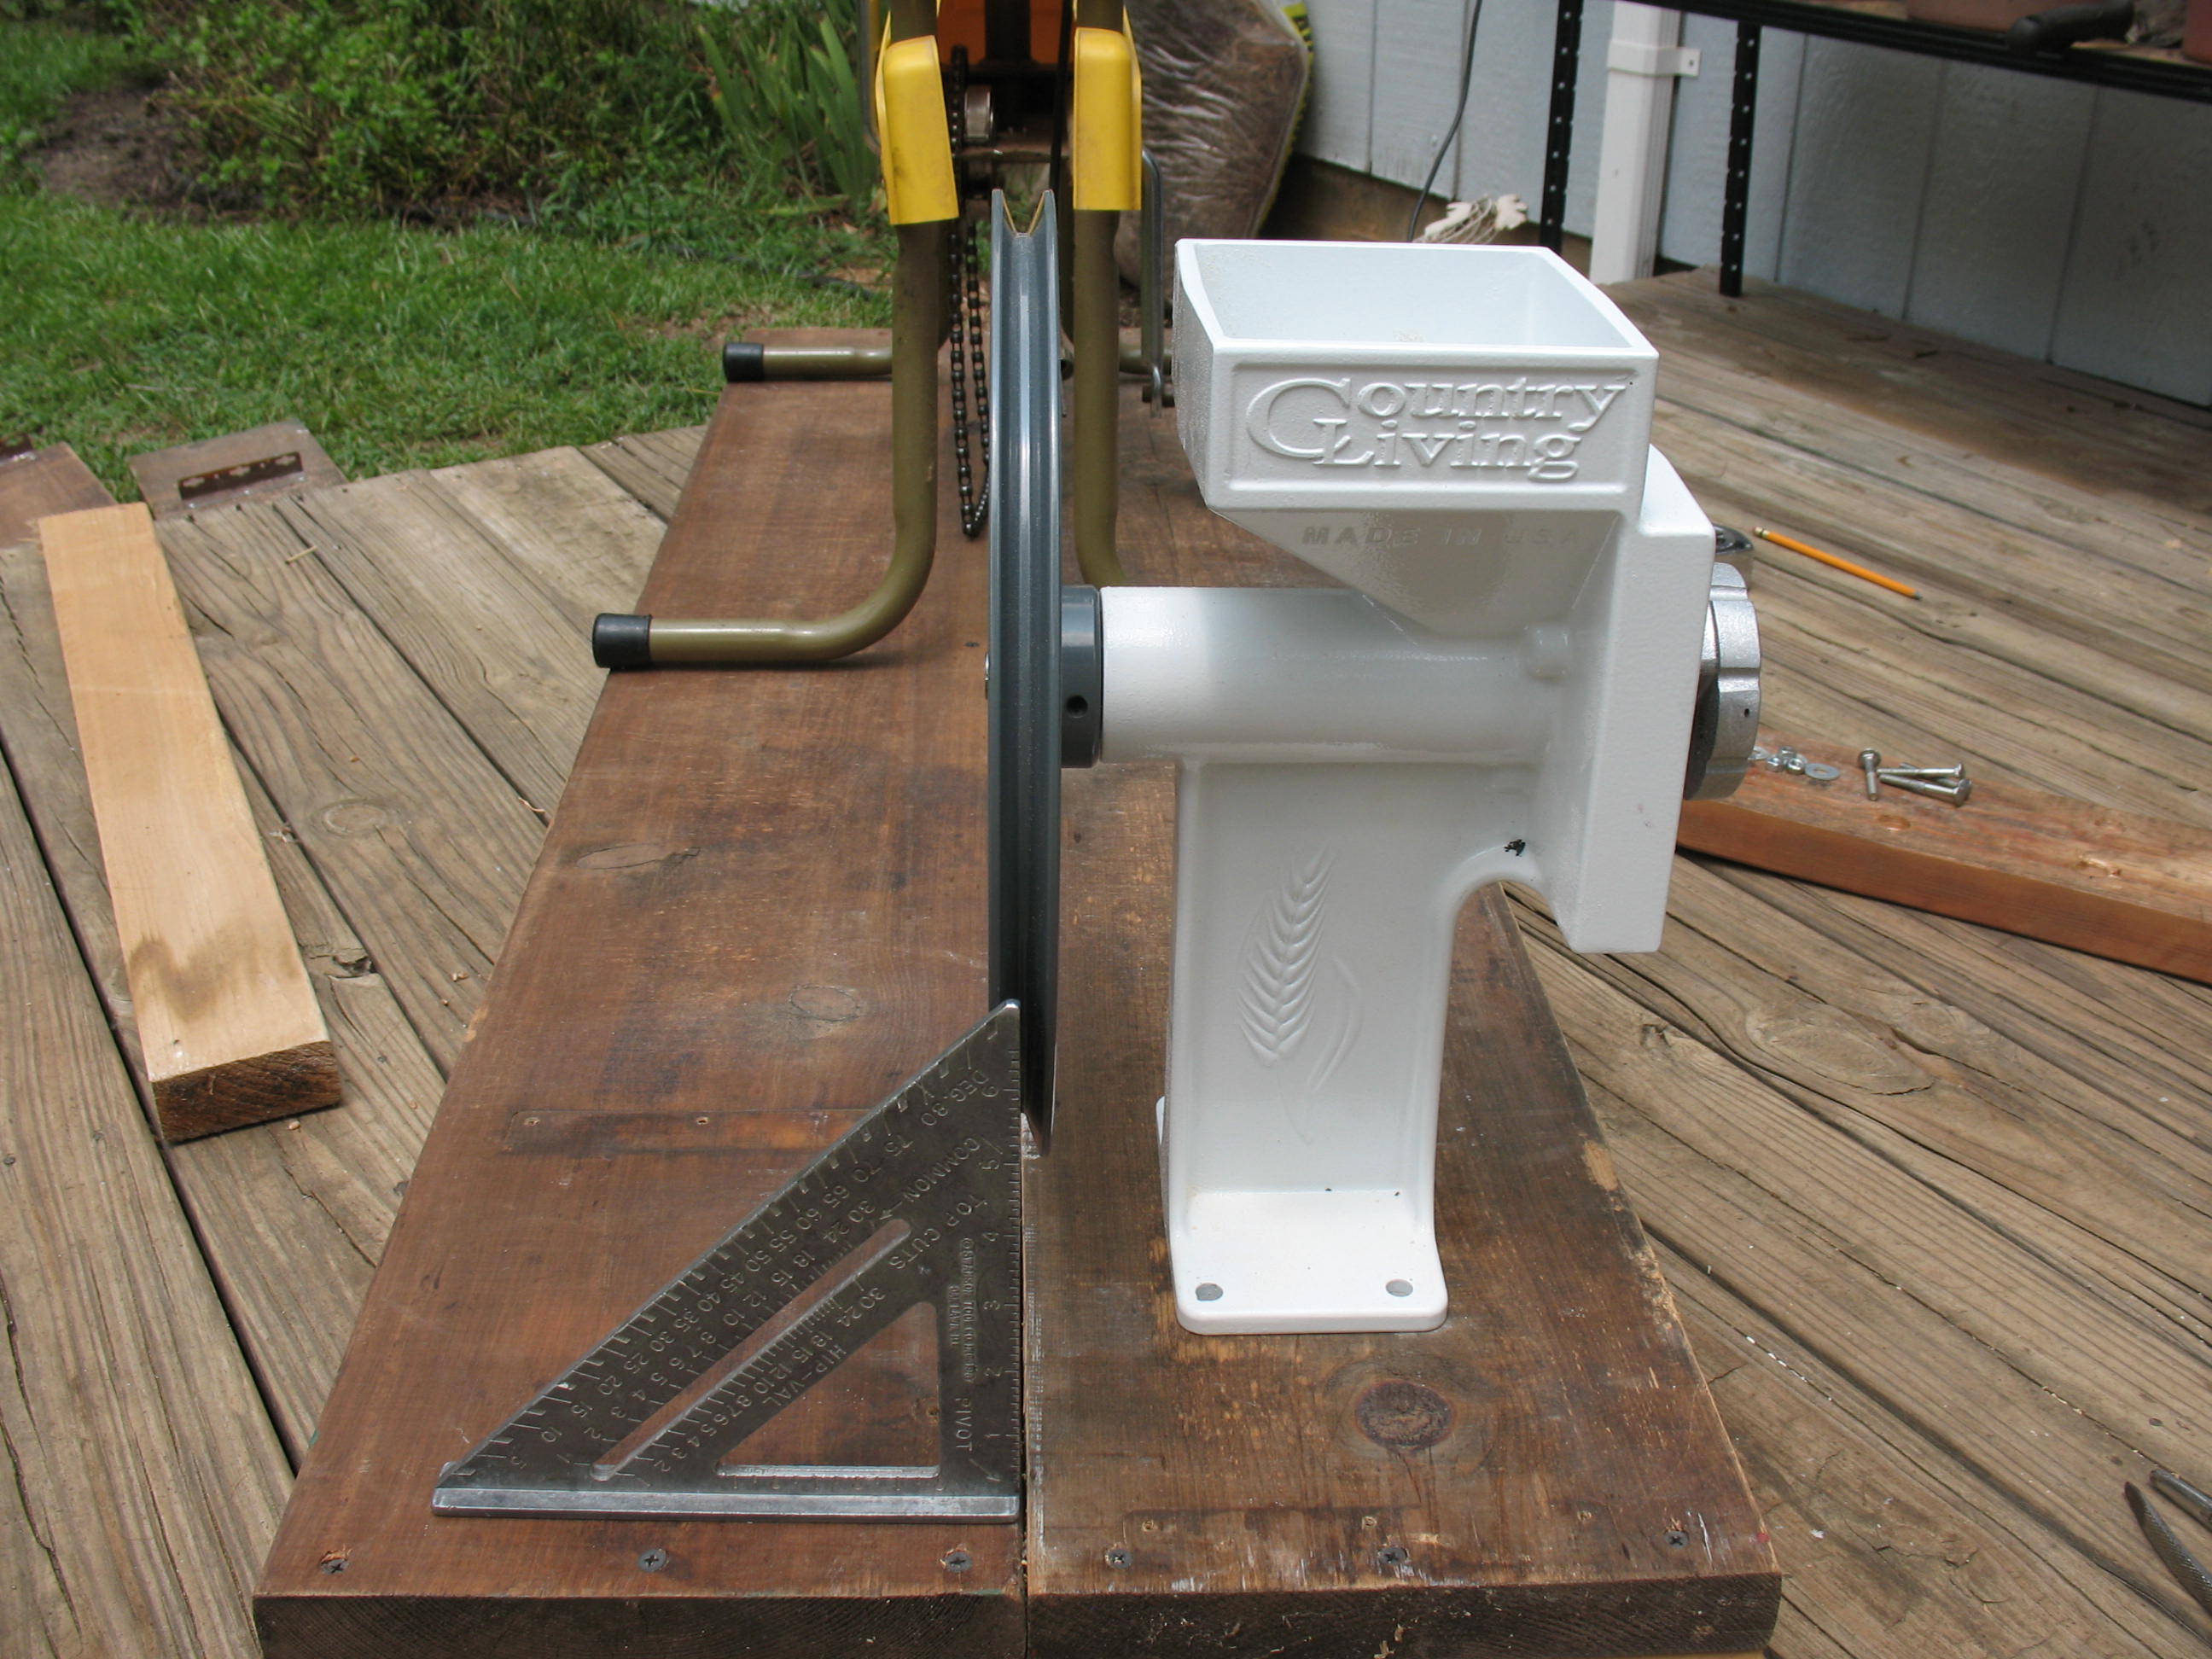
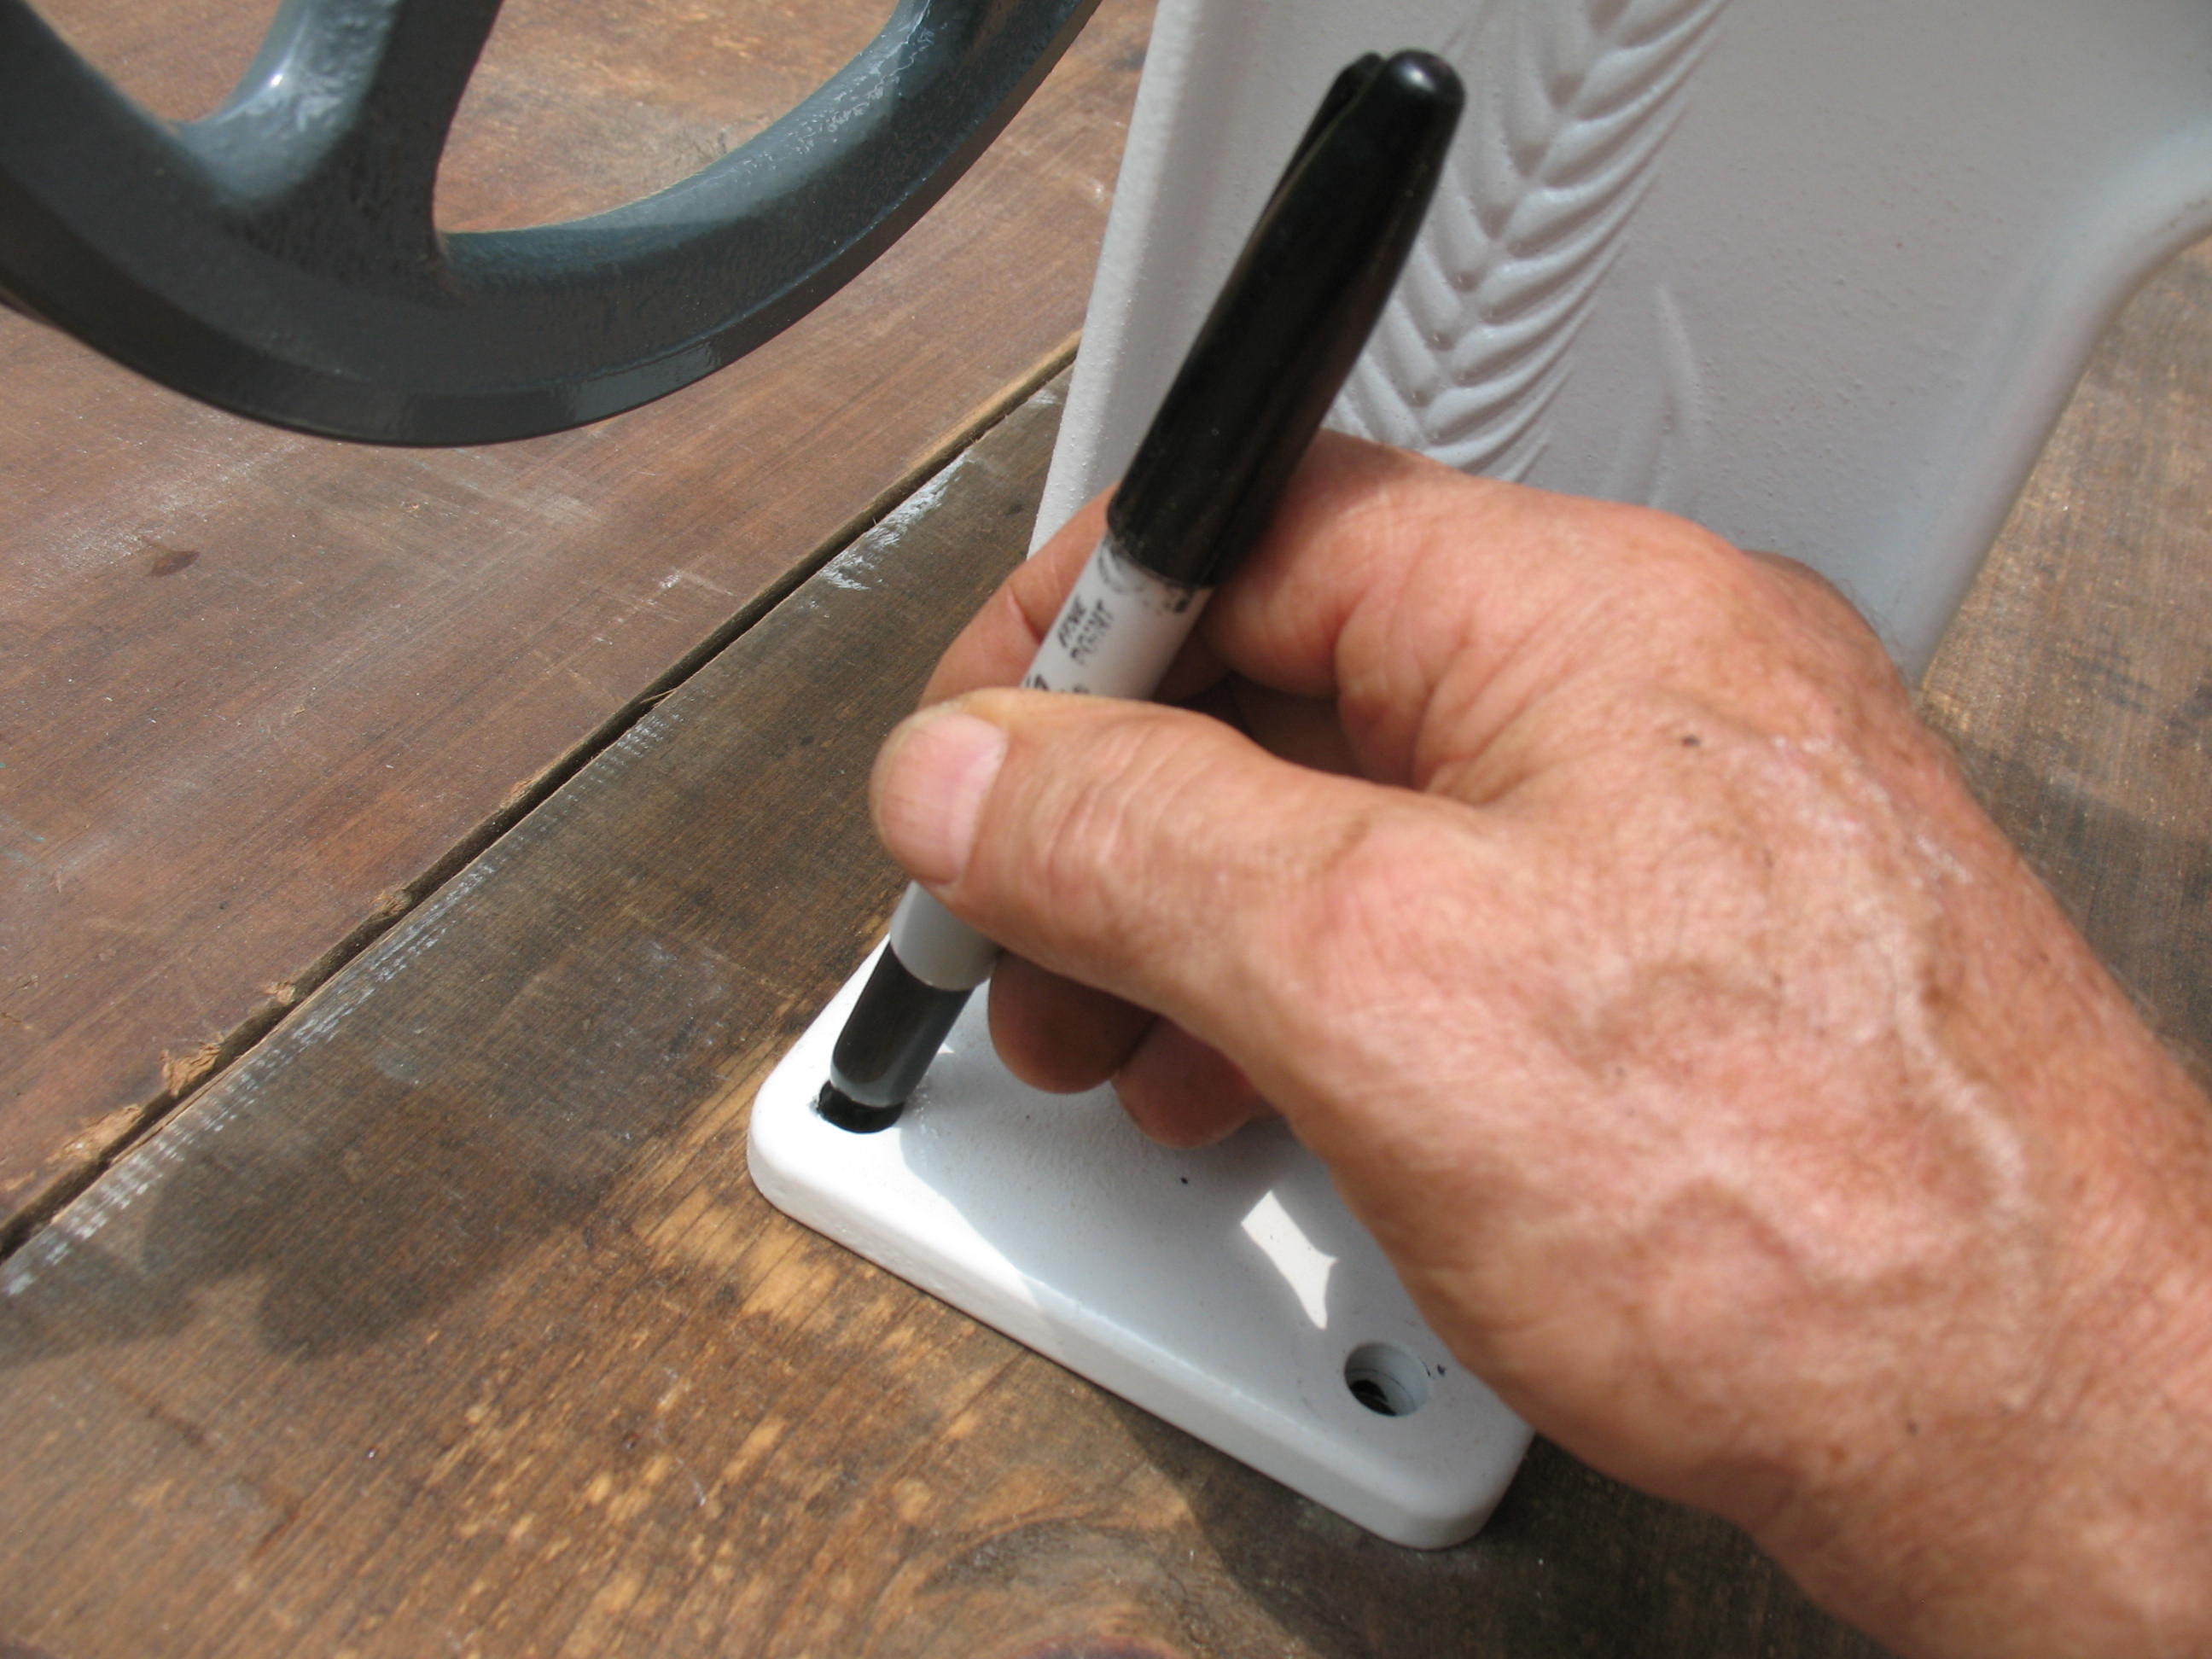
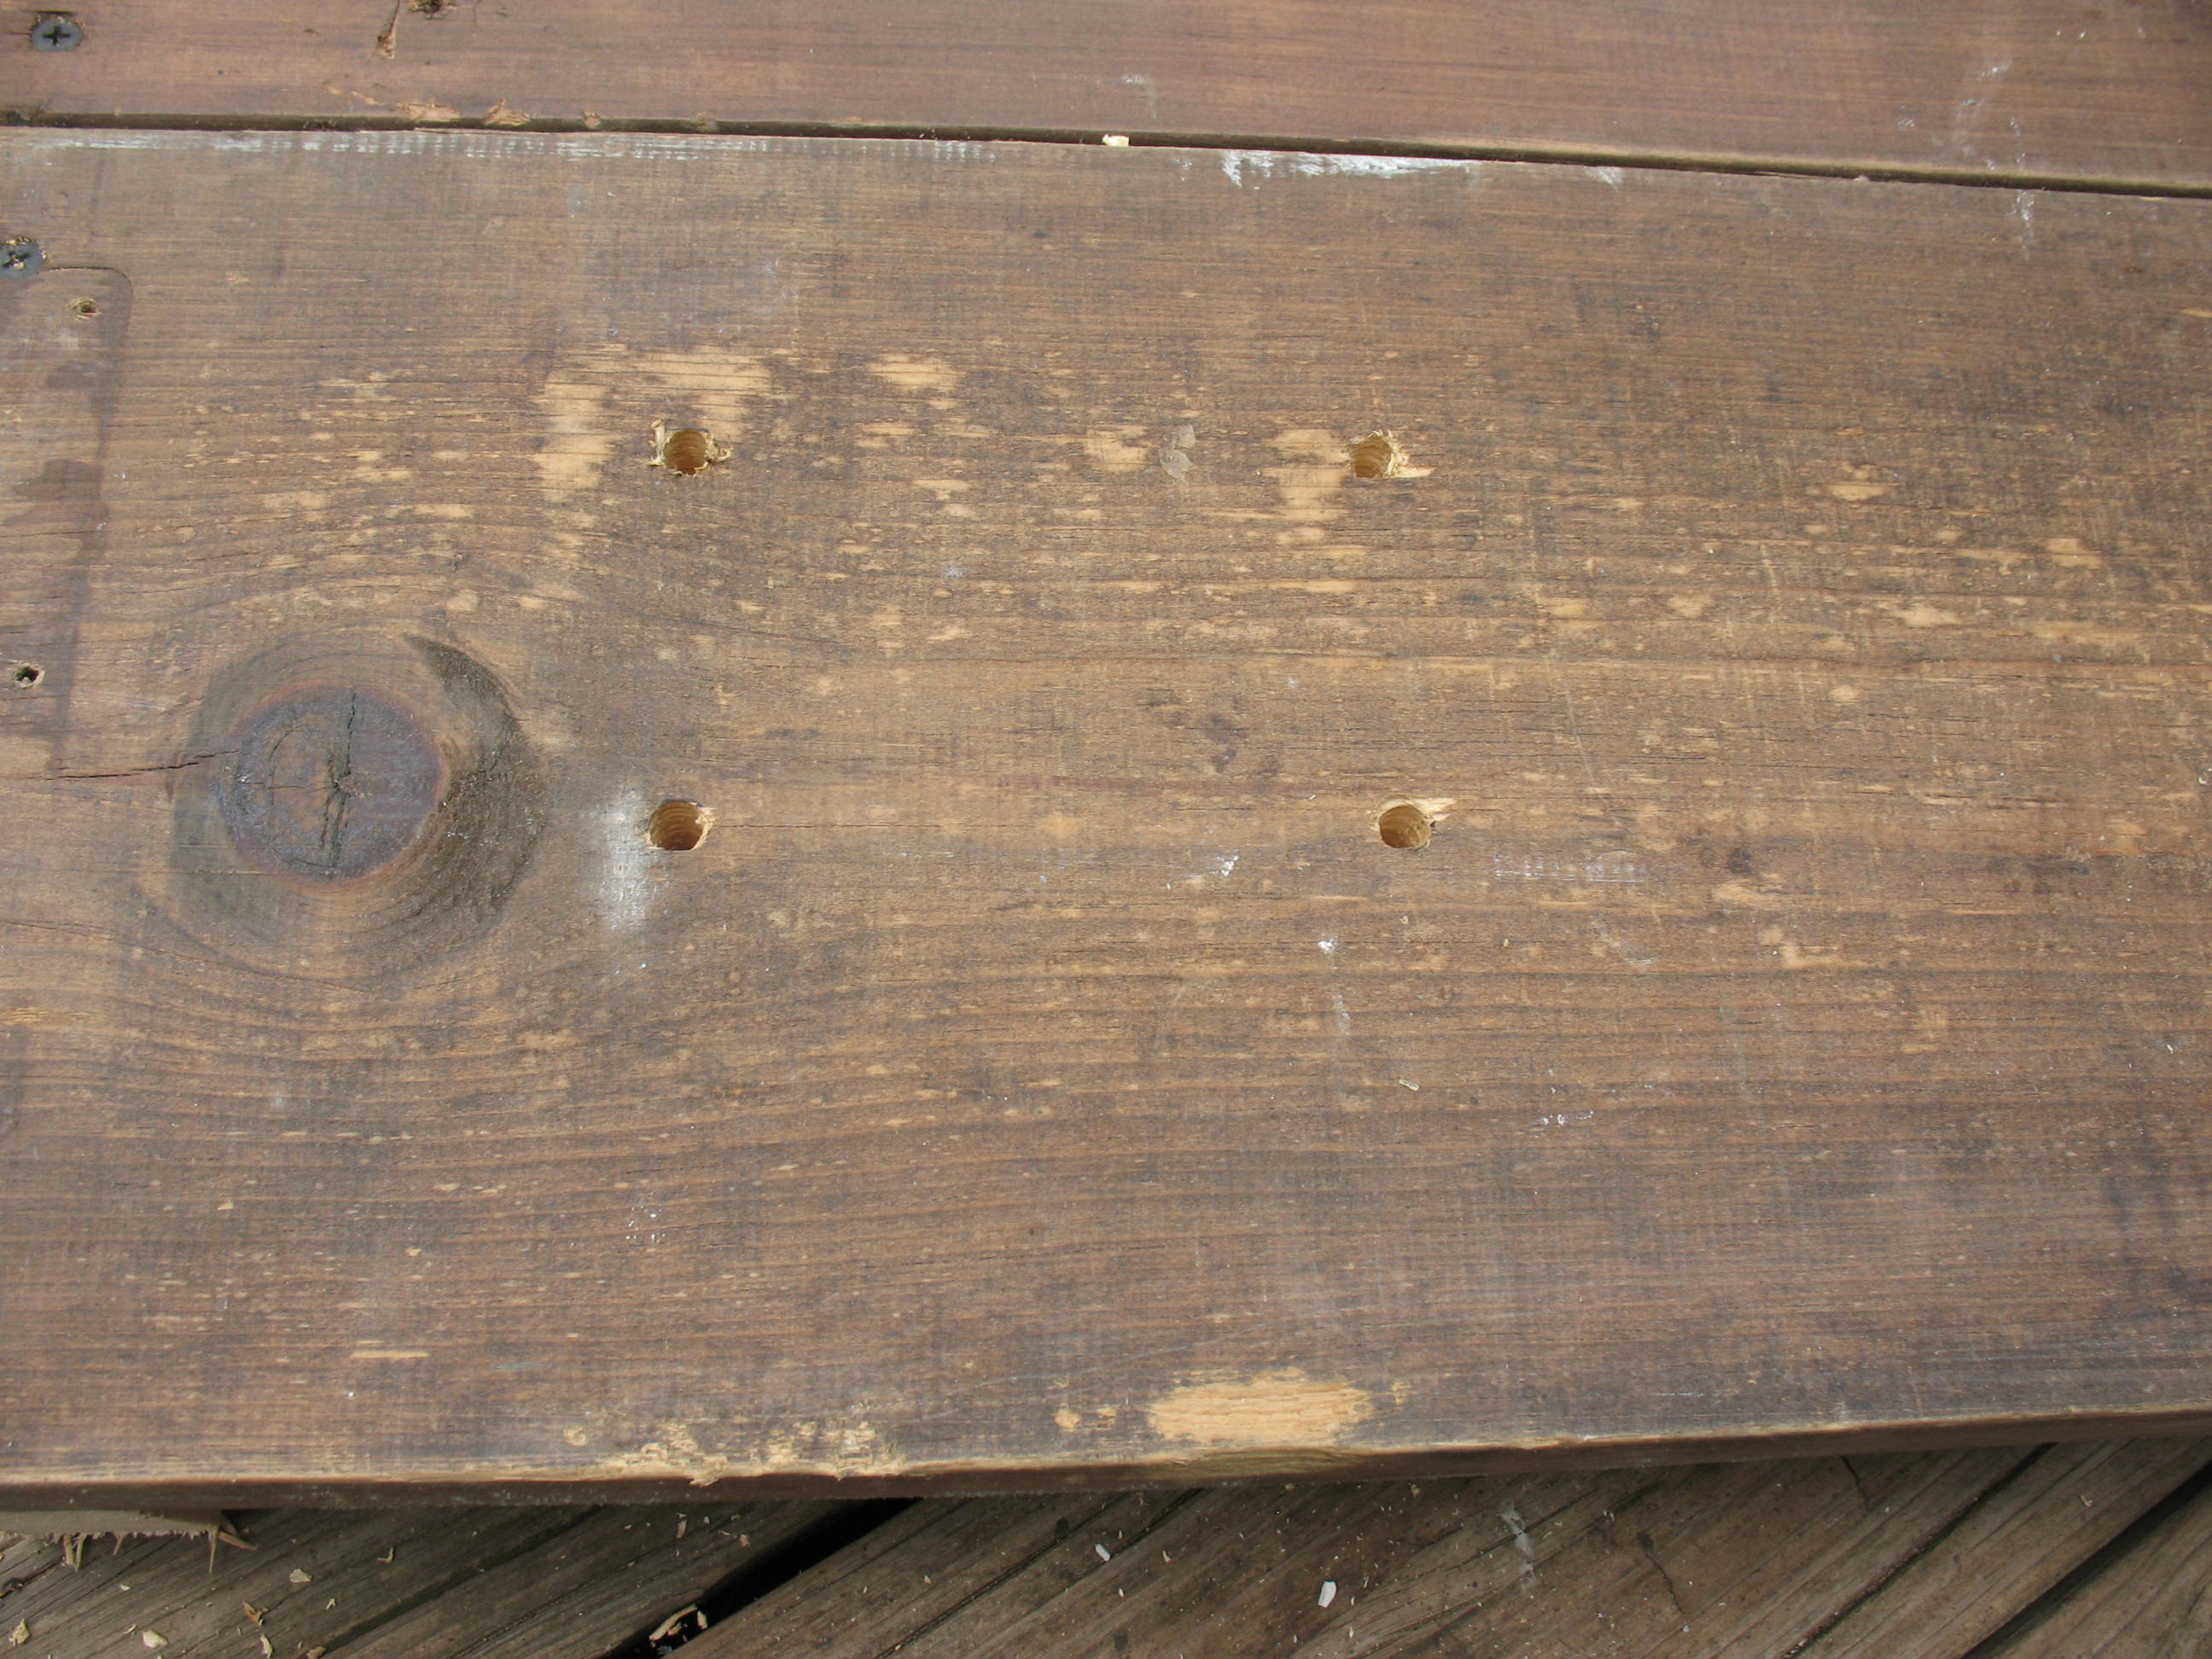
I used the mill as a template to mark where I needed to drill mounting holes, and bolted the mill down.
I wanted to mount the bicycle so that it would keep good tension on the V-belt, but I didn’t want it to be so tight that it would cause undue wear on the bearings in the mill. I decided to nail a board across the platform that would hold the front feet of the exercise bike in place and keep the bike pulled back tight away from the mill. What I ended up doing was putting the belt on the mill and the bike, laying the loose board across the platform, and then pushing the board (and bike) back as hard as I could by hand, and marking the position of the board. I then unhooked the belt and moved the bike out of the way. Now I scooted the loose board 3/8” farther away from the mill than my mark and then screwed the board down. When I positioned the bike behind the board and reattached the belt, the belt was tight enough that it actually held the back end of the bike about an inch up off of the platform. When I sat down on the bike it snugged the belt up nice and tight so that when I peddled the bike, the mill hummed right along. It was not necessary to make any kind of permanent attachments to hold the bike down on the platform.
That pretty much completed the project.
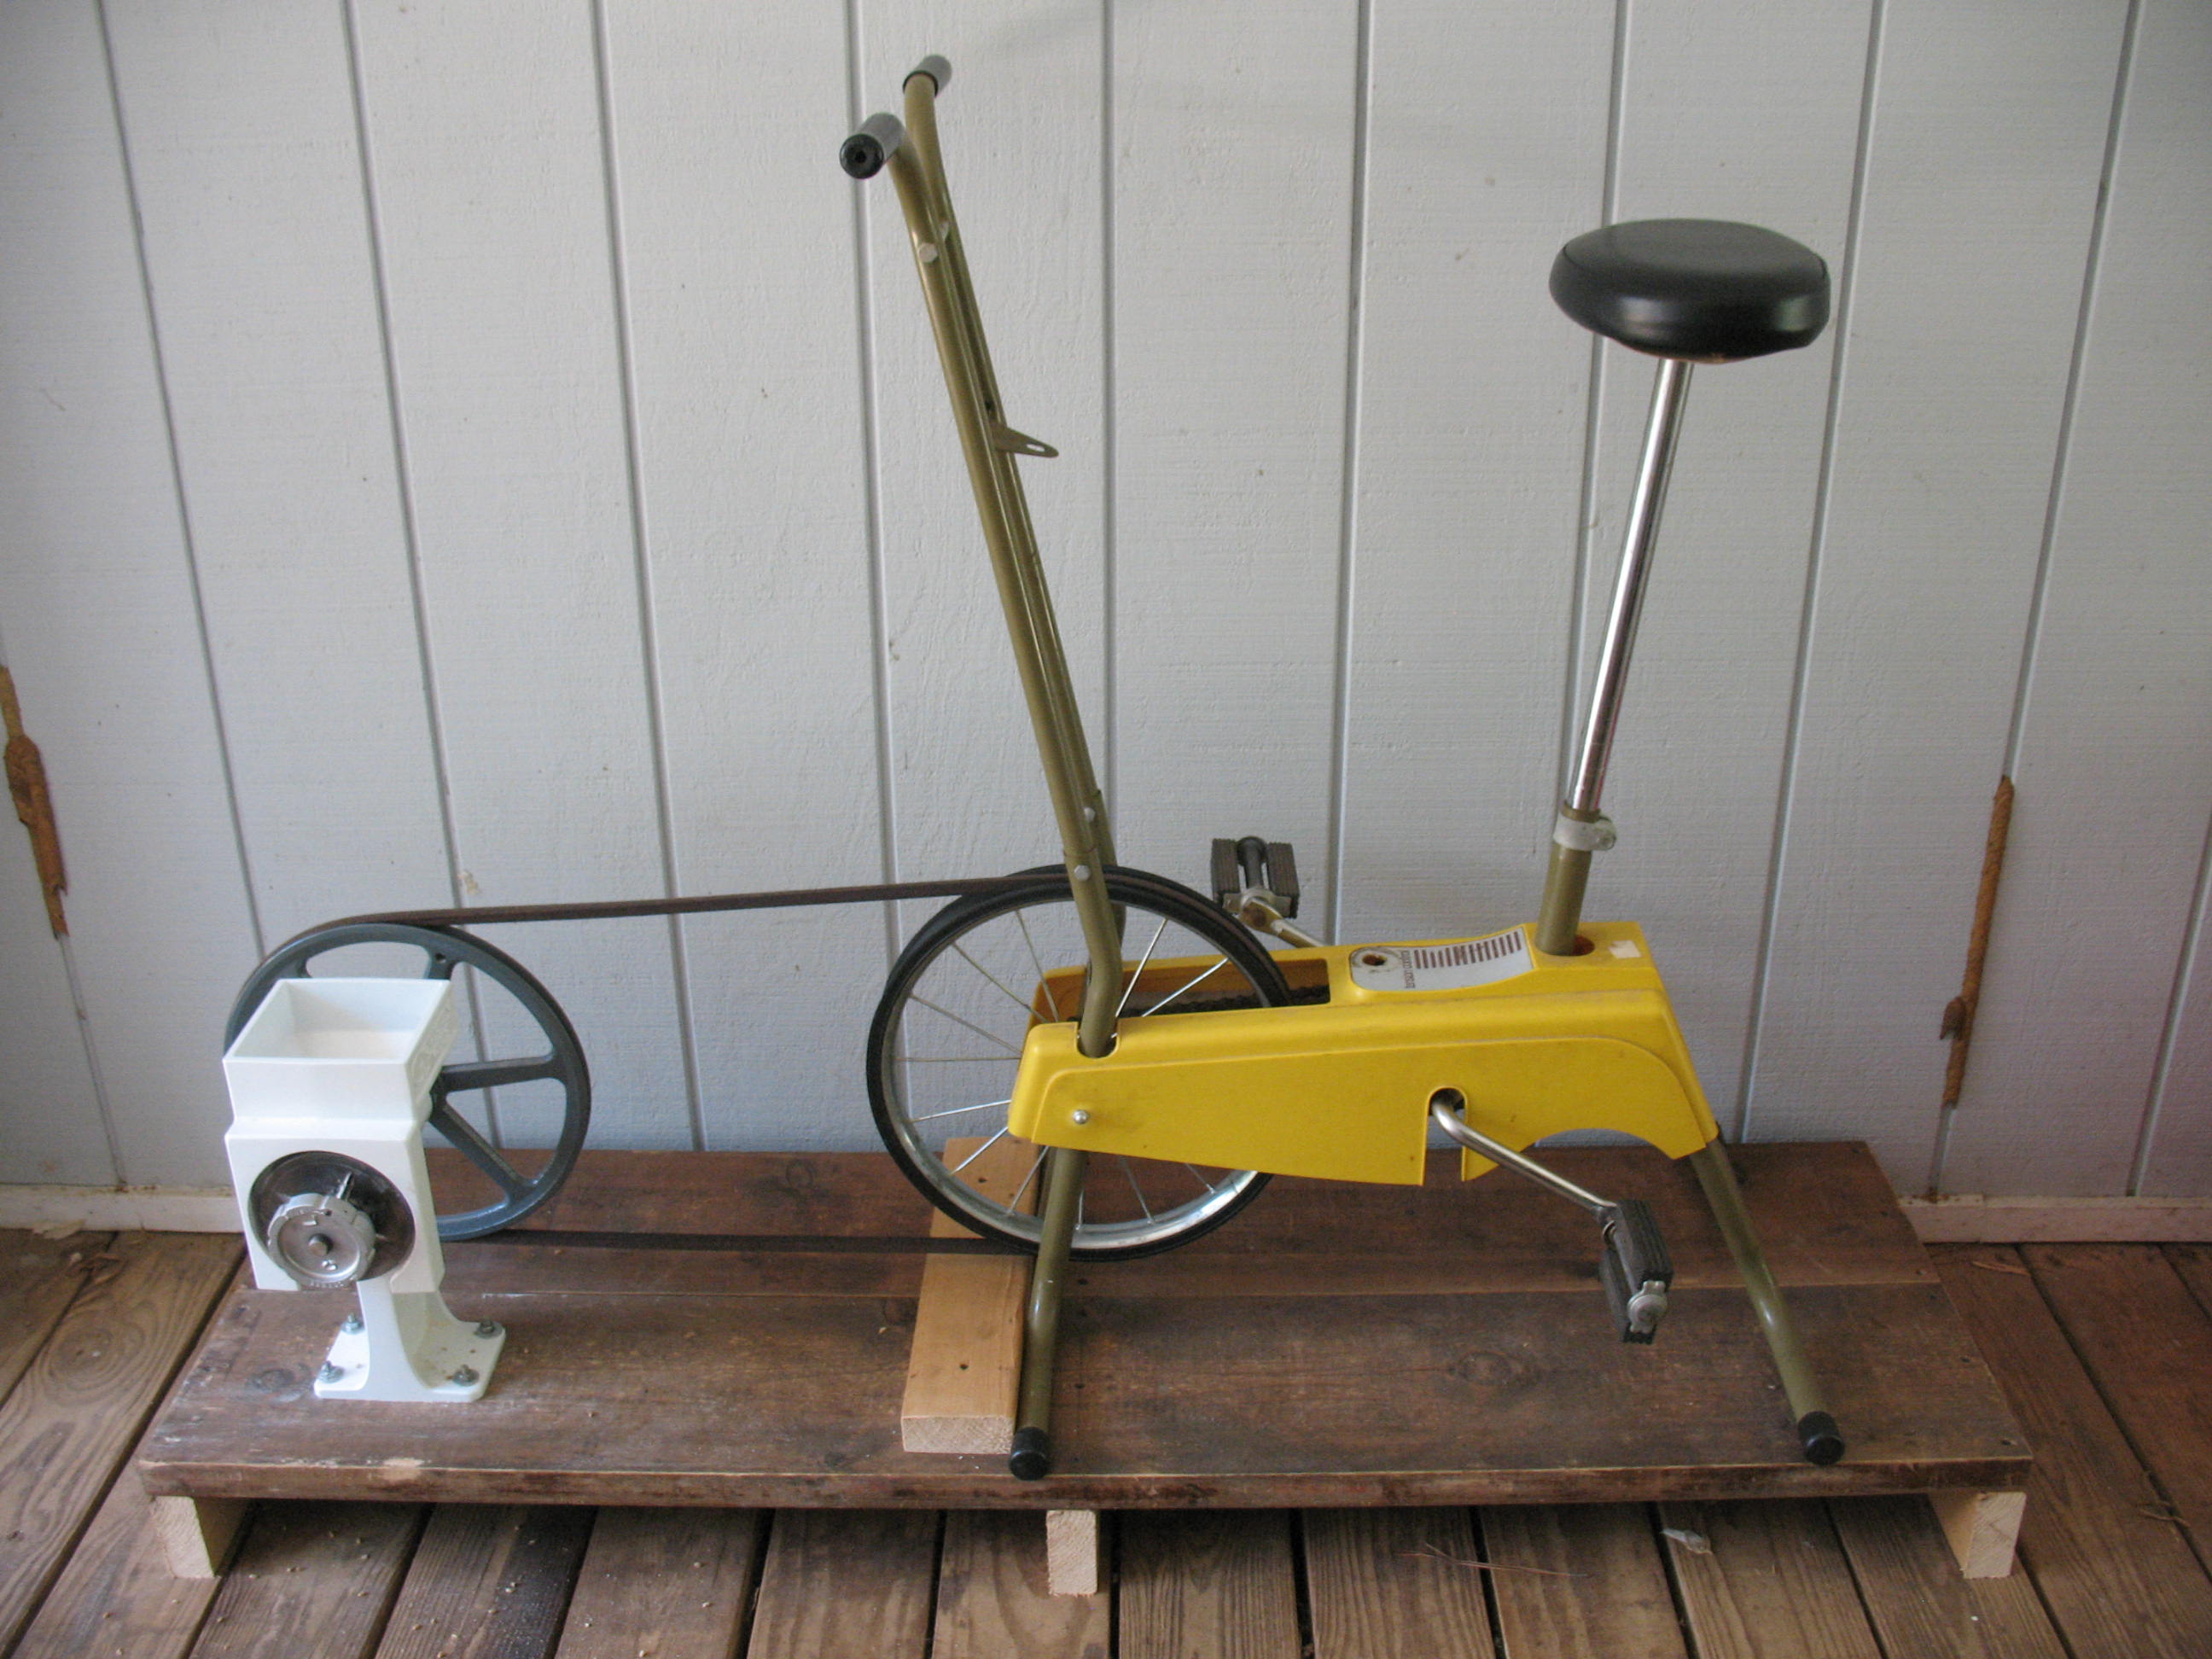
I did build a little removable platform that holds my flour bin under the grinding plates of the mill.
I loaded up the hopper on the mill and did a little test run.
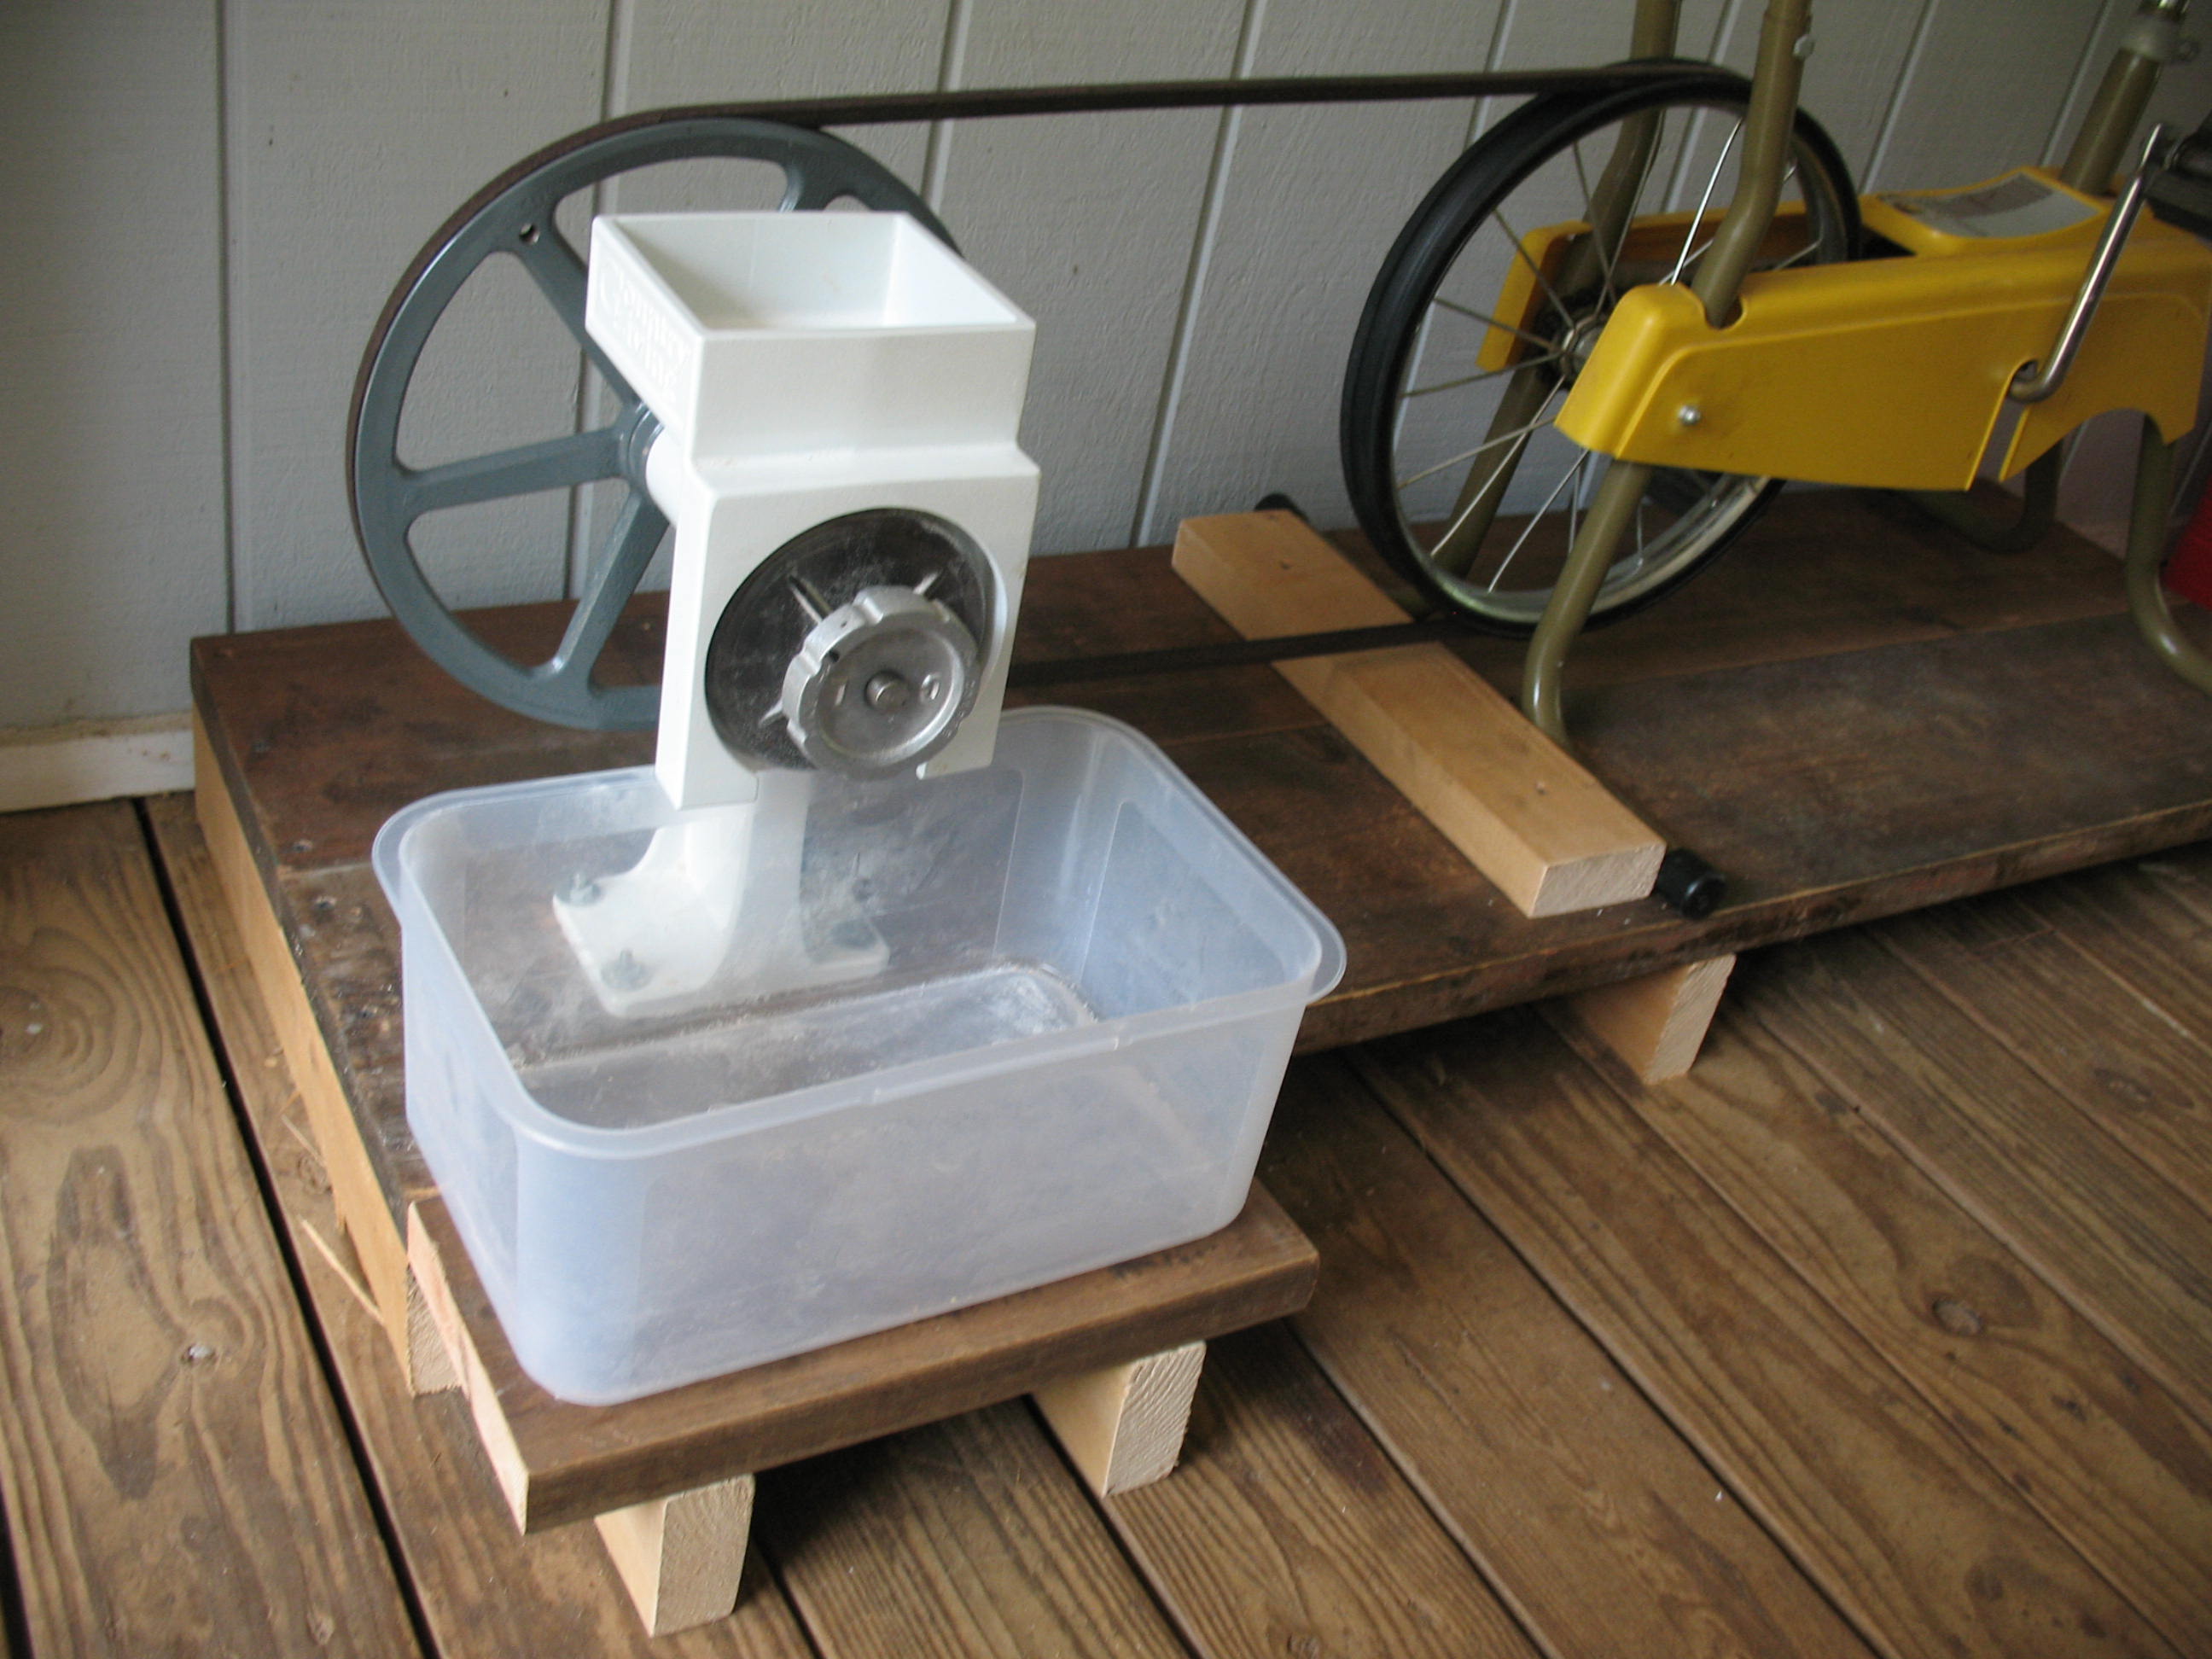

It worked fine. Much easier than turning by hand, but still a pretty good workout. Speaking of workout, be sure and remove the tensioning knob from your exercise bike if you build a set-up like this. The mill will give you a good workout without adding any more resistance to the peddles.
