As I’ve mentioned previously, the food we store is the food we eat; and this is one of our favorite recipes. We eat this pretty often in the winter, and we’ve even served it to company. Nobody seemed to notice that they were eating “survival” food. Check the list of ingredients below and make sure to add them to your food storage if you like this recipe. You probably already have most of the stuff.
Ingredients:
1 can all white meat chicken
2 chicken bullion cubes
2 cups water
pepper to taste
1 16 oz. can mixed vegetables (Veg-All)
2 cups flour
1 tablespoon baking powder
1/2 teaspoon salt
1/2 cup vegetable shortening (Crisco)
1/2 cup water
Directions:
• Break up the chicken into bite-sized chunks and place in a large cook pot along with the liquid from the chicken can
• Add 2 cups of water and 2 chicken bullion cubes
• Add 1 can of mixed vegetables including liquid
• Add pepper to taste (about 1/4 tsp.)
• Bring all ingredients to a boil then reduce to a simmer while you make the dumplings
To make dumplings:
• Place 2 cups of flour in a medium size bowl
• Add 1 tablespoon of baking powder and 1/2 teaspoon of salt and mix together
• Cut in 1/2 cup of vegetable shortening
• Add 1/2 cup of water and stir ingredients together
• If the dough seems too sticky add a little more flour
• Turn the dough out onto a floured cutting board and roll until it is 1/8 to 1/4 inch thick
• Cut dough into 1″ squares
• Dredge dumpling in flour and drop into simmering chicken and vegetables
• Cook for about 10 minutes or until dumpling are done
• Do not overcook or the dumplings will fall apart and you’ll have a pot of chicken and goo.
Not a bad meal to come out of your storage closet. If you like this recipe keep your eyes open and I’ll have some more in the future.
I really enjoy knowing about the wild plants in my area. I have studied them for years. I had one really good teacher who actually lived for nine months by foraging, hunting, and fishing just to see if he could do it. He did do it, but it wasn’t easy. He, like our ancient ancestors, devoted nearly every waking hour to searching for food. If you think about it, man never really was able to advance himself until he developed agriculture. When you live a hunter/gatherer lifestyle, starvation is always at your door. It’s a nice romantic notion that you can just take off to the wilderness with your rifle and an axe and live off of the land, but the reality of the situation is harsh rather than romantic. Native people had an intimate knowledge of their environment. They learned to hunt, fish, and gather wild plants from birth. They learned to live with hunger, and they learned to eat things that would disgust a cat. And please note that their average life expectancy was about 35 years. Also, the hunter/gatherer lifestyle requires a vast territory. Even the most productive wilderness will only support about 1 person per square mile. That means over 2500 acres to support a family of four. That’s a lot of land, and remember that the starving hoards will be looking for a meal too. The same family of four could raise a one acre garden and feed themselves well.
The most successful and numerous Native American tribes were the ones that developed agriculture in addition to hunting and gathering, and I highly recommend this as a sensible approach to long term survival. Learn how to hunt with gun and bow, learn how to fish, learn how to trap, and learn about the edible wild plants in your area; but if you want a reliable source of food, learn how to garden and raise small livestock. I’ve gone bird hunting and come home empty handed, but I’ve never gone out to my chicken pen and failed to come back with a chicken. Keep your romantic notions, they’re fun to have; but be sensible at the same time and learn how to produce what you need.
The cattail is widely known for the edibility of its starchy root, but this is not really my favorite part of the plant. I much prefer the green, sausage shaped flower heads that can be harvested in the spring. Break the entire flower head, including the stalk, off of the plant and boil it for 15 minutes. Put butter, salt, and pepper on the heads and eat them like corn-on-the-cob. Unfortunately the flower heads are only a good edible for a couple of weeks in the spring.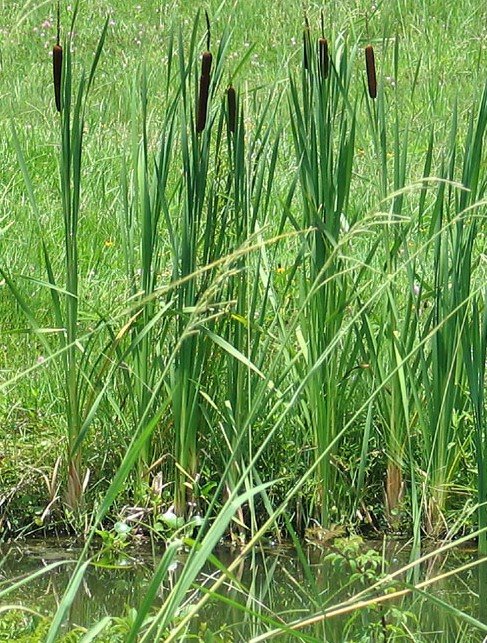
There are few wild plants that are more versatile and more useful than the common cattail (Typha latifolia). The cattail provides food, shelter building material, cordage making material, medicine, and fire starting material; a pretty impressive array for such a common, wide ranging, and easily identifiable plant.
The starchy root is available year round but don’t buy into the myth that you can dig it up and cook it like a potato. You will be disappointed at the tough, fibrous nature of the root. The best way to take advantage of the starch in the cattail root is to peal of the outer layer off the root, wash the root thoroughly, and then pound it into a mush. Add water to the mush and you will be able to separate the root fibers from the starch. The starch will settle to the bottom of your bowl, and the excess water can then be carefully poured off. You can boil the remaining mush until it firms up a bit and then add butter, salt, and pepper to create a dish that is somewhat like mashed potatoes. Alternatively, you can use the starchy mush as a thickener for stews, or you can let it dry out completely to form a kind of cattail flour.
If you cut a green cattail stalk down near the root, you can peel off the green outer layer; and you will find a clear, slimy liquid between the inner layers of the plant. This slime makes a soothing burn ointment.
The leaves of the cattail are very useful for making cordage and baskets, but they cannot be used directly from the plant. The large amount of moisture in the leaves will cause them to burst if you try to twist them when they are still fresh. Pull or cut the leaves and lay them out in the sun for a day or two. This will remove enough moisture from them so that they can be twisted into cordage or woven into baskets. Cattail cordage is not strong enough to support much weight, but it is useful for tying together shelters, lashing items onto a pack board, or etc. Photo below: Cattail basket.
The dried fluff from the flower heads can be used for insulation, and it also makes a good addition to fire starting tinder. Cattail fluff will not flare up by itself, but it will catch a spark very well. Work some fluff into your shredded cedar bark tinder and it will catch a spark quickly and spread it through the tinder.
Cattail stalks and leaves make good covering for a shelter. Gather the leaves and stalks into a three or four inch bundle and tie together with a wrap of cordage about six inches from the root end. Leave a few extra inches of cordage handing lose off of the bundle. Tie each bundle to the crossbars of you shelter frame with the points of the leaves hanging down. Start at the bottom of the framework covering the bottom completely, and then work up, overlapping the bundles like shingles. A well built shelter covered with these bundles will stay warm and dry.
Dried bundles of cattail leaves can be tied together to form a sleeping mat that will insulate you from the ground. Instructions and illustrations for making a cattail sleeping mat will be included in a future post.
A dried cattail stalk can be used as a hand drill (along with a yucca stalk fire board) for starting a fire by friction. I have started a fire using this method on a couple of occasions, and I can guarantee that once you’ve done it, you will never leave home without a disposable cigarette lighter again.
What will a post apocalyptic economy look like? Nobody can really know. It will depend to a great extent on what the precipitating event is. If it is an economic meltdown we will be left with one type of situation, a pandemic, or a nuclear war would both leave very different situations. No matter what the event, the first few months will be chaos. Think hurricane Katrina. I think that if a powerful government response is not forthcoming, we will probably see the development, over time, of a kind of decentralized group of independent communities based on an agricultural economy, something akin to the many small feudal kingdoms of medieval Europe. I think that without the ability to provide power, water, and sanitation; the large cities will be doomed. I believe that most human effort will be directed toward producing food and the other very basic necessities of life. There will be little call for occupations that do not produce tangible goods or necessary services. At first, independent communities will have to be highly self-sufficient, producing all necessary the goods and services within the community; but, over time, trade in goods and services will develop between communities. Banditry and inter-community conflicts may be a problem, calling for the establishment of community protection organizations.
I feel that once some sort of trade develops it will probably be based on a barter system. Without a strong central authority, currency and coin will have no value. Some say that gold and silver will be used, but I don’t agree. The only way that gold and silver have value is if we agree that it has value. There are so many people today, and so little gold and silver, that most Americans have probably never even owned a gold coin and only a few more have probably had silver coins. Gold and silver have been out of common usage in this country for so long that I don’t think most Americans have the proper mind-set to see it as having any intrinsic value. There is a long list of things that most people would probably rather have than a silver coin.
So what kinds of things would make good barter items in a post apocalyptic society? To answer this question let’s look at some trading systems from the past.
The Salt Trade
Salt is a mineral that we basically take for granted today. Most of us get too much salt in our diets. Salt is in all of our foods, it sits in shakers on our tables, and every time we get take-out food they hand us packets of it; but it hasn’t always been this way. You see, a certain amount of salt is necessary for human health, and in the past salt has sometimes been a hard commodity to come by. Roman soldiers received part of their pay in salt. This is where the saying that a “man is worth his salt” comes from. It is also the Latin root for our word “salary.” Salt caravans still make their way into equatorial Africa where natural sources of salt are scarce. There are places in Africa where if you give a man a handful of sugar and a handful of salt, he will throw the sugar on the ground and eat the salt. When it was discovered that salt could be used to preserve meats and vegetables, this only increased salt’s value. Many early American settlements developed because of their proximity to salt licks of salt springs. Boiling down water from salt springs to obtain the salt was a common colonial industry. So I would put salt high on my list of valuable barter items, and at about $10 for 50 pounds it is far more affordable than gold.
The European Trade with the Far East
In the Middle Ages when Europe began to develop trade with the Far East, many of the items imported were luxuries. Today many of those luxuries have become virtual necessities to us. Many of the spices that we use in cooking today were rare and valuable in the Middle Ages. Pepper, for example, was valued at its own weight in gold. Most of these spices are relatively inexpensive today, but that is only because of global trade and cheap transportation costs. If trade and transportation were interrupted you would once again see the price of spices soar. Who can imagine cooking any kind of meat, these days, without pepper to put on it. Other spices that can only be obtained by import include cinnamon, cloves, nutmeg, and turmeric. Try to make a decent jar of pickles without these. You will want to lay in a good supply of spices for your own use, but some extra for trade items would not be a waste of your money.
The Western Fur Trade
Before the white men came in search of furs, the Native Americans of the far west had a perfectly functional society. Nature provided them everything that they needed and had been doing so for thousands of years. This makes the Western Fur Trade a perfect laboratory to answer the question of what items an already self-sufficient society would like to add to its economy, if they could get them; and it is an interesting list. Some of the items are to make their daily lives easier, some items are luxury foods, some items are for self adornment, and some items are purely recreational.
In the make life easier category we have things like guns and ammunition, metal traps, metal cookware, blankets, cloth, thread, needles, fish hooks, knives, and axes. Luxury foods would include coffee, sugar, flour, dried fruit, and spices. Beads, ribbons, and jewelry were for self adornment; and recreational items included liquor and tobacco. Quiet an interesting list. Most of these same items will probably still be in demand, although standards for self adornment have changed somewhat over the years.
Two other important trade items will probably be food and medicine. I believe that food will probably be the first important export item of communities that can produce a surplus. Heirloom seeds, bedding plants, herb plants, and breeding animals will also be in demand. Medicines will be hard to come by since most of our modern medications depend heavily on manufacturing and transportation. Medicines would be a very good item to stockpile, especially if they have long expiration dates. Medicines for pain, diarrhea, and infections will always be in demand. Many medicines are viable for much longer than the listed expiration date. In general, dry powder or tablet medicines will store longer than liquids. Check with your physician to see how long you can safely store medicines.
One final word. Skills will be a valuable trade item. Learn how to do something that people will need. It may be making pottery, carpentry, blacksmithing, sewing, wine making, or any number of similar skills. It could be a fun hobby now and a valuable skill in the future.
We’ve all heard the old saying that the government doesn’t have to outlaw guns; they only have to outlaw bullets. Well, what if I told you I have a deer rifle that will never run out of ammo? Would you believe me? Would you believe that my grand-children will probably be able to keep shooting this gun? You probably think I must have a warehouse full of ammo, but that’s not the case at all. What I have is a .45 caliber flintlock rifle, the ultimate long-term survival weapon. Sure a flintlock is a little slow to load, and it only fires one shot at a time, but I can make my own primers, cast my own bullets, and even make my own gunpowder for it. Photo below: .62 caliber smoothbore, shooting bag, and powder horn.
For those of you not familiar with how a flintlock works, I’ll provide a very brief description. The flintlock is a muzzle loader, meaning that you load the powder and bullet down through the front of the barrel. You pour a measured charge of powder (I use 60 grains) down the barrel, and then you place a small greased patch of cloth over the barrel. Next you place a round, lead rifle ball on top of the patch and use your thumb to push the ball just below the crown of the muzzle. You cut of the excess patching, and then use a long stick called a ramrod or wiping stick to push the powder, patch, and ball to the bottom of the barrel and pack it all down tight. Remove the ramrod. The “lock” or hammer assembly is on the side of the gun just above the trigger. The outside of the lock has four main parts: (1) the hammer, which has a clamp holding a small piece of flint-rock, (2) the powder pan, which is a small pan that holds priming powder, (3) the pan cover, which is a small, hinged lid that closes over the top of the powder pan, and (4) the pan spring, which keeps a little tension of the pan cover to keep it closed. There is a small hole, called the vent hole that runs from the powder pan through the side of the barrel. To “prime” the rifle you pull the hammer back to half cock, open the pan cover and sprinkle a small amount of gunpowder in the powder pan, and then close the lid. You then thumb back the hammer to full cock and you are ready to fire. When you pull the trigger, the hammer falls and the flint rock strikes the upturned portion to the pan cover, called the frizzen. The pan cover is knocked open and a shower of sparks from the flint falls into the powder pan. The sparks ignite the powder in the powder pan. The fire from the powder pan flashes through the vent hole and sets off the main charge of powder inside the gun barrel which propels the rifle ball out of the gun. Now this all sounds complicated and time consuming, but a good rifleman can load and fire a flintlock in 20 seconds. And, these rifles are deadly accurate. Photo below: Close-up of lock mechanism.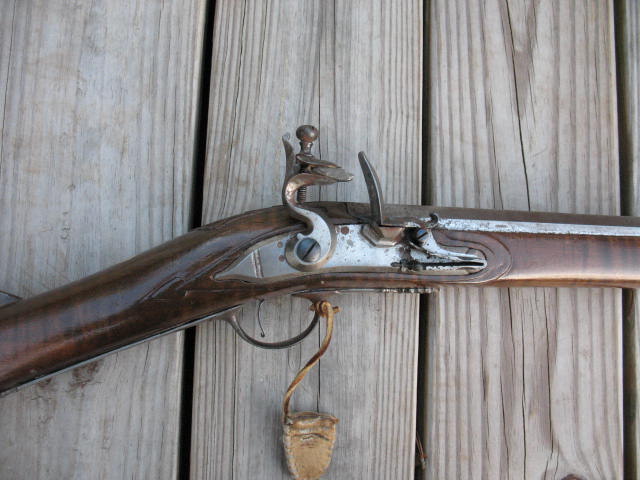
But how is it that you can shoot a flintlock forever without having to buy ammo? Well, let’s look at what’s required to fire the rifle. First you need a primer. In this case that’s going to be a piece of flint rock that has been shaped, or knapped, into a rifle flint. Even a person with only moderate skills can pick up a flint rock, knock a flake off of it, and shape it into a rifle flint. This is why the old mountain men carried flintlocks even after the more modern caplock was available. When you’re a thousand miles from the store and run out of caps, your gun is nothing but a club. If you have a flintlock you can always just make a new rifle flint. Lead rifle balls are easy to cast. I use a combination of old wheel weights and plumbers lead to make mine. The lead can be melted on a kitchen stove or over a campfire. The little single-ball mold that I use will fit in the palm of my hand. The old-timers always tried to recover their rifle balls from any animal that they shot so that the balls could be melted and recast. I’ve even read of individuals who tried to only shoot an animal if it was standing in front of a tree so that if the ball passed all the way through the animal, the hunter could dig the spent ball out of the tree. That’s carrying recycling to the limit in my book. Personally, I think that the fifty pounds of lead that I have will last me long enough. On the question of gunpowder I am going to yield to other sources. There are hundreds of sources telling how to make black powder. Some use saltpeter, sulphur, and charcoal; some use saltpeter and sugar. Do some research. One good source is book number 5 of the Foxfire series. Whatever formula you use, exercise common sense. Black powder is an EXPLOSIVE. Take all possible safety precautions and never make a large batch all at one time. Photo below: Rawhide shot bottle, round ball and shot, lead ladle, and bullet mold.
There are several makers of quality reproduction flintlocks. Pedresoli and Lehman both make good guns. In addition there are dozens of makers of custom flintlocks. A good, off the rack, flintlock rifle will cost you about $700 to $800. A custom built rifle will run from $1200 to $2000 or more. That’s a pretty steep hit for an old country boy, but it’s not a bad deal when you stop to consider that you now own a gun that you can shoot forever.
There is a lot of talk these days about genetically modified seeds. Most of the talk, or argument if you will, centers around whether genetically modified seeds produce plants that are safe for you to eat. One side argues that genetically modified crops produce higher yields, are more disease resistant, and take less time to mature. The other side argues that we don’t know what the long term effect on humans might be. Well let me tell you about a very sinister gene modification that has prompted me to only plant open pollinated, heirloom seeds in my garden. Some of the big agri-business seed producers have started inserting what is known as a “terminator gene” into their seeds. If you plant a seed with a terminator gene you will get a lovely plant that produces lovely fruit, but the seeds from that plant will be sterile. The time honored tradition of saving seeds from one crop to plant next year’s crop will no longer work. So where does the seed for next years crop come from? Well naturally you have to go back to your favorite agri-biz seed supplier and buy more seed. Sure works good for them; not so good for you. When it comes to the point where just a few companies can control the food supply like that, well it’s scary. So there’s been this whole movement develop that is seeking to preserve the old heirloom seed varieties that can be planted for generations without having to buy new seed. Most of the people involved in seed saving are like you and me. They are independent type folks that don’t what to hand their lives and their freedom over to multi-national corporations. If you are interested in planting heirloom seeds you can join a group like Seed Savers Exchange or you can order seed directly from a number of different companies. I have obtained some of my heirloom seeds from individuals, and I have bought some from seed companies. Baker Creek Heirloom Seeds has a nice variety and their shipping is reasonable. I have ordered several things from them on-line at http://www.rareseeds.com. I have also run into seeds from some unexpected sources. I bought a bag a Anasazi Beans at a grocery store in New Mexico that grew just fine in my garden and produced a good crop. I have also discovered that some of the seeds that I used to buy at the local feed store were apparently non-hybrid and non-modified, because I have planted several generations of seed from them without ill consequence. The problem with this is that it takes a couple of years of experimenting to find out if you have good seed, whereas you can go online and buy seed that you know for sure is open pollinated, non-modified. By the way, one big advantage of heirloom seeds is the flavor of these old time varieties. Modern agri-biz is interested in producing crops that will all mature at the same time, that can be mechanically harvested, and that will hold up well to shipping. The old homesteaders were interested in growing stuff that tasted good. If you want to learn more about heirloom seeds just do a Google search. You will come up with about 300,000 hits.
Saving Bean and Field Pea Seeds
Probably the easiest seeds to save are beans and field peas (purple hull peas, black-eyed peas, cream peas, etc). Just leave some pods on the plants when you are picking beans or peas. In a couple of weeks these will be thoroughly dried on the vine and you can pick them to save for seed. I usually shell out the dried beans/peas and put them in pint Mason jars. I place the jars of beans/peas in the freezer for 2 or 3 days to kill any bugs that might be on them, and then I label and date the jars and transfer them to my storage closet. You need to keep your seed dry and relatively cool to make sure that it is viable for planting the next season. If you skip a season of planting some of the seeds will fail to germinate, so it is best to plant your seed every year even if you only plant enough to make another crop of seed for the following year.
Saving Tomato and Cucumber Seeds
Tomato and cucumber seeds require a little bit different handling due to their slimy nature. Be sure to use only the seeds from fully ripened fruits. Cut open the fruits and remove the seeds. Place about a quarter cup of seeds in a pint canning jar. Fill the jar half full with clean water and stretch a clean piece of plastic over the top (I use half of a plastic sandwich bag. Screw a jar ring on to hold the plastic in place. Take a knife and poke about a 3/4 inch long slit into the center of the plastic. Set the jar aside at room temperature for two to three days. Shake the jar gently each day to help break up the slime. By the end of the third day the slime around the seeds should have fermented and disintegrated. Remove the ring and plastic and carefully pour off most of the water including any seeds that are floating at the top. Pour the remaining seeds into a tea strainer. Run cool water over the seeds and manipulate them gently to remove any remaining slime. Turn the seeds out onto a dish towel and place in the sun to dry. Turn the seeds daily and allow them to dry thoroughly. When seeds are dry break up any clumps, place the seeds in paper packets, label, and store.
Saving Squash Seeds
Squash seeds are fairly easy to save. Just remove the seeds from fully ripe, mature fruits and let them dry completely. Place in paper packets, label, and store.
Saving Pepper Seeds
Saving seeds from bell peppers, jalapenos, and chilies is not hard, but you must make sure that the fruits are fully ripe (this means red). Yes, even bell peppers and jalapenos will turn red if left on the vine long enough. Just split open the ripened fruit, remove the seeds, and dry thoroughly. Place the seeds in paper packets, label and store.
These are the main seeds that I save. Of course, you can save the seeds from greens, onions, carrots, and many other crops; but I won’t comment on these because I have not personally saved any of them. There is, as usual, a ton of information about saving seeds on the Internet. One good site on seed saving is the International Seed Saving Institute home page at http://www.seedsave.org/issi/issi_904.html. Give it a look.
Anyone who has ever tried to start a fire when everything in the woods is soaking wet knows the value of a good fire starter. An experienced woodsman can usually locate a pitch pine stump to get a fire started with, but it sure is a lot easier to reach in your pocket and pull out a ready-made emergency fire starter. I have experimented with several different fire starters over the years and have settled on four that I consider the best.
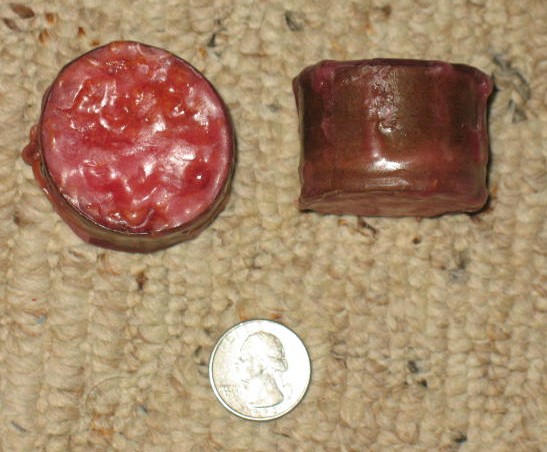
A super simple way to make a fire starter is to take a regular cotton ball and rub petroleum jelly (Vaseline) into it. The cotton ball acts as a wick, and the petroleum jelly is what actually burns, so keep rubbing and pressing until you get the absolute maximum amount of jelly worked into the cotton. I’ve nick-named these jelly balls, and they really work. I timed one of these little beauties to see just how long it would burn. It burned with a flame for 6 1/2 minutes, and then the cotton continued to burn without a flame for several additional minutes. Six and a half minutes of flame could give you a good edge when it comes to igniting some damp tinder, like shredded cedar bark or very small sticks. I keep six of these jelly balls in a plastic 35mm film can, and drop the can in my pocket every time I head out into the woods. 
Another of my favorite fire starters is the paraffin/sawdust fire starter. The paraffin/sawdust starter is more difficult to make than the jelly ball starter, but it burns hotter and longer. In fact, the paraffin/sawdust starter could almost be called a fuel tablet. One of these starters will actually burn long enough and hot enough to boil two cups of water, or you could use it to heat up a dehydrated meal. To make a paraffin/sawdust starter you will need the following materials:
· 1 cardboard toilet paper tube
· 1 sheet of cardboard (tag board, index card, or something of similar
thickness)
· Several inches of masking tape
· 1 cup of sawdust (hardwood is best, pine will do, never use sawdust from
treated lumber)
· 2 cups melted paraffin or candle wax
· Scissors
· A pencil
· A coffee can or old bowl
· A spoon
· A double-boiler
Directions:
1. Cut the toilet paper tube into 4 smaller tubes each about 1″ long
2. Set one of the tubes down on the sheet of cardboard and trace a circle
around the outside of the toilet paper tube. Repeat this three more times
until you have traced out four circles on the sheet of cardboard. Use the
scissors to cut out these four circles.
3. Use 4 short pieces of masking tape to tape one cardboard circle to the
bottom of each tube
4. Place the sawdust into a bowl. Put water in the bottom pan of your double-
boiler and place the paraffin in the top pan of your double boiler. Melt
the paraffin.
5. Slowly pour part of the melted paraffin into the bowl of sawdust. Stir the
sawdust as you add the paraffin. The idea is to saturate the sawdust with
paraffin until it is the consistency of very thick oatmeal.
6. Spoon the sawdust/paraffin mixture into the cardboard tubes until it is even
with the top of each tube. You may want to use the bottom of the spoon to
press the mixture down into the tubes. This helps eliminate air bubbles in
the mixture.
7. Set the filled tubes aside and let them harden for a few minutes.
8. When the mixture in the tubes is fairly firm, dip each tube into the
remaining melted paraffin to coat the outside and bottom of the tube. Dip
them fairly quickly. If they sit in the melted paraffin for too long it can
re-melt the sawdust mixture, and you end up with a big mess. I dip each
tube several times to build up a good layer of wax on the outside.
9. Set the finished tubes aside to dry over-night
Your fire starters are now ready to use. To light one all you need to do is peal back part of the outer cardboard tube and set match or lighter to it. I carry three of these in my backpack when camping, and I keep a couple in the glove box of my truck.
You can make a quick and easy fire starter out of corrugated cardboard, cotton string, and paraffin. Cut strips of corrugated cardboard about 1 1/2″ wide by 9″ long. Roll the cardboard up into a fairly tight cylinder and tie cotton string around it to hold it in place. Hold the end of the string and dip the cardboard cylinder into melted paraffin. Hang the cylinder up to dry for a minute, then dip again. Repeat this process until the cardboard is well coated with wax. I usually leave about an inch of paraffin covered string attached to the fire starter as a wick.
The last fire starter that I want to tell you about is a variation of the corrugated cardboard/paraffin fire starter. This is my own little invention that I call the self-lighting fire starter. To make this fire starter, begin by cutting several squares of corrugated cardboard that are 2 1/4″ by 2 1/4″. Roll each square into a fairly tight cylinder and tie with string, as above. Take one cylinder and dip it into melted paraffin. Hold it in the paraffin for several second so that it is thoroughly soaked. Now lift it out of the paraffin; and, while the paraffin is still soft, push a strike-anywhere kitchen match down into the center of the cylinder. Leave just the head of the match exposed above the top of the cylinder. Now dip the cylinder along with the match head end back into the melted paraffin. Remove quickly. You don’t want a heavy coat of paraffin over the match head; just enough to waterproof it. Dip several more times to coat the cylinder thoroughly, but try not to get too much more wax on the match head. Make several of these and store them in an old metal band-aid box. To use these fire starters, just take one out of the box and strike it like a giant match. One SAFETY WARNING: Don’t store these fire starters loose in a pack, your clothing, a glove box, or etc. You don’t want one of these to rub against something and accidentally ignite.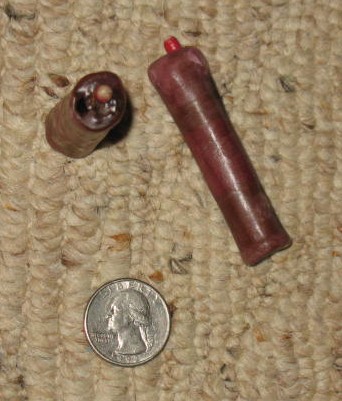
Well, there you have it. Four simple to make and highly effective fire starters. There’s no excuse not to get that fire started now, so go out and enjoy your time in the woods.
Back in the early days of our country, when the fur trade was flourishing, one of the most sought after trade items by Native Americans was the Northwest Trade Gun. The trade gun was not a custom built Pennsylvania rifle; it was a mass produced smoothbore, usually in 20 gauge. The reason Native American hunters wanted the Trade Gun was that it was a far more versatile weapon than the rifle. It could be loaded with a solid .62 caliber ball and used to hunt deer, elk, black bears, and buffalo. Loaded with shot it was good for turkeys, ducks, rabbits, or squirrels. I have even read tales of Native Americans shooting gravel out of these guns when they ran out of lead ammo. The Trade Gun was truly a gun for all occasions, much like the shotgun is today. That’s right we’re talking about that old 12 gauge you’ve had since you were a just a lad. If you stop and think about it, what gun in your gun closet can do as much as your shotgun? You can load it with slugs and take down a deer or elk at 40 yards with no problem. Loaded with No. 4 shot you can take turkeys, ducks and geese. With No. 6 shot you’re good for rabbits, squirrels, coons, and other small game, and with No. 7’s you can take doves and quail (although they don’t have enough meat to justify a spent shell in my book). And from a home defense standpoint I’d rather be holding a 12 gauge loaded with 00 buckshot than any gun I can think of. You can be shaking like a leaf and still hit your target no matter which side of the door he’s on.
Shotguns come in basically 5 different styles; the single barrel break action, the double barrel break action, the bolt action, the pump, and the auto-loader. Each of these has its advantages and dis-advantages. The single barrel break action forces you to think about your shot since you only get one. The disadvantage is you only get one. Also you have to preload your shell and hope you picked the right one, or you have to carry it empty and hope you can load it with the appropriate ammo before your quarry gets away. I’d hate to be loaded with No. 6 shot and jump a nice fat doe. The double barrel break action is really the only shotgun that does not suffer from this handicap. You can have one barrel loaded with a slug or 00, and the other barrel loaded with No. 6 shot and then it’s just a matter of shooting the correct barrel. Of course if you’re in a home defense situation it would be nice to have more than 2 shots without reloading. I have a bolt-action slug gun but I don’t think I would use it for home defense. Bolt actions can be a little cranky and I’d hate to hang up a shell in the middle of a critical situation. My personal preference is a double for hunting and a pump for home defense. I had an auto-loader at one time, but I really didn’t like it that well. I found myself taking shots I should have passed on and then blasting away with a second and third shot; but that’s just me. An auto-loader may be just the ticket for you.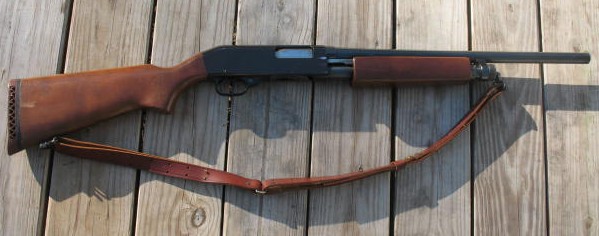
There’s always the question of what gauge you should choose. The .410 requires some seriously good shooting skills and the ammo is expensive. The 16 gauge and 28 gauge are almost obsolete. Ammo is very hard to find. The 20 gauge and the 12 gauge are the most common sizes in use today. You can find shells for these at almost any country hardware store and at all of the big box and sporting goods stores. I prefer the 12 gauge because of the slightly heavier load, but many people swear by the 20. I wouldn’t waste the extra money on a 3 inch magnum unless you are in bear country or you are a serious goose hunter. Of course you can always buy a 3 inch magnum gun and then just shoot the cheaper 2 ¾” shells except on special occasions when you need more knock-down power.
Whichever style and gauge of gun you choose, the important thing is to learn to use it well. There’s no substitute for practice. I went to a sporting clays event recently and was embarrassed at how out of practice I was. Of course, I was using a borrowed gun, or that was my excuse anyway. Guess I’ll have to get the old skeet thrower out this weekend and burn through a couple of boxes of shells trying to get my edge back.
A good food storage program is a must for anyone who is preparing for a possible disaster in the future. But what sort of program should you adopt? There are companies that will gladly sell you cases of nitrogen packed, freeze-dried foods that will keep for 10 years. Another option is to stock up on MRE’s so that you have a supply of pre-packed individual meals.
I took a different route when I started my food storage program. I had noticed that several of my friends who purchased freeze-dried storage programs never use the food that they bought. They just leave the food in storage and presumably will replace it all before it expires. I consider this wasteful, but I also think it’s not a good idea for another reason. If you are suddenly thrown into a survival situation, I feel that a sudden and complete change in diet will only add to your stress level. Being able to have a little continuity from your former life, even if it’s only the food that you eat, might make life a little more bearable. For this reason I developed a storage program based on the foods that my family already eats. Granted we had to make a few changes in products and storage methods; but for the most part, I could live off of my stored food and not change my diet much at all.
Here is how my program works. I have a kitchen pantry in which I keep cans of fruits and vegetables, jars of grains and dried beans, jars of rice and pasta, bags of dried fruit, canned nuts, canned meat, spices and condiments, vinegar, cans of soup, dried soup, large jars of flour and cornmeal, large jars of sugar and salt, cooking oil, powdered milk, cake mixes, boxes of pudding, canned baking powder, baking soda, yeast, tea, coffee, pickles, olives, home canned cheese, home canned hamburger, home dried fruits and vegetables, and canned juices. This pantry is not huge, so there are rarely more than one or two cans of any one item.
In another part of the house is a walk-in-closet that we refer to as the “grocery store.” This closet is equipped with industrial steel storage shelves, shallow wooden shelves, and stackable plastic storage units with pull out drawers. In the “grocery store” we keep the same items that we have in the kitchen pantry but in much larger quantities. Where I have two cans of stewed tomatoes in the kitchen pantry, I may have sixteen cans in the “grocery store.” Where there are two cans of tuna in the kitchen pantry, there might be twenty cans in the “grocery store.” Dried beans, flour, cornmeal, sugar, and salt are stored in plastic bags that are sealed inside of food-grade 5 gallon plastic buckets.
Now one of the most important aspects of the “grocery store” is the grocery list. This is a computer-generated list of all the items in the “grocery store” and a par level of how many of each item we like to keep on hand. When we remove an item from the “grocery store” we put a hash mark next to that item on the list. Every week or two we take the list to town and buy all the items necessary to bring our storage up to par. When we get the items home, we use a permanent marking pen to write the date of purchase on each item. We then place these items on the shelf, pulling the older dates to the front and putting the new purchases at the back. This way we keep constantly rotating our stock. Nearly any grocery item that you buy these days has a “use by” date on it, and these dates are very conservative. Most canned goods are stamped as being good for a year, but they are actually good for a lot longer than that. The food doesn’t automatically go bad at the end of a year. Instead, it gradually loses its nutritional value. Most canned goods lose about 20% of their nutritional value in a year’s time, so if you have a canned good that is two years old, it will still be edible and will have about 60% of its originally listed nutritional value. We find that most of our canned items rotate through in eight to ten months. Dried goods like pasta, rice and beans move much slower, but if they are kept dry, air tight, cool, and dark they will last for several years. Heck, I read about some archeologists that sprouted some 4000-year-old wheat that they found in an Egyptian pyramid. Now that’s long-term storage.
We have found that using this food storage program makes the best use of our food dollars. Nothing gets thrown out, and we are eating the same basic foods as always. Of course we still buy fresh fruits, vegetables, meat, and dairy products, but we know that we can get by without them if we have to, and we won’t have to make any major changes in our diet.
The Bug-Out Bag or 72 Hour Pack is something that ever truly prepared individual should have. For those of you who don’t already know, a Bug-Out Bag is a compact survival kit that hopefully contains everything that you would need to survive for 72 hours. It is intended to be something that you can keep in your vehicle, or grab as you head out the door. It is packed, ready, and near at hand at all times. There is no hard and set rule as to the size of a Bug-Out Bag or what its contents should be. For some people it is a full-size backpack; for others it is a daypack, or a fanny pack, or a large purse. I personally use a 35mm camera bag. It is comfortable to carry, lightweight, rigid (so things don’t shift around), it has several side pockets, and it does not attract much attention.

What you carry in your Bug-Out Bag is a matter of personal choice, but some things are common to nearly every bag. Fire making tools, a compass, a knife, a few medical items, water and/or water purification tools, and an emergency solar blanket are fairly common to all Bug-Outs. Some people include much more.
Here is a list of items that I keep in my personal Bug-Out Bag:
· disposable lighter
· metal match fire striker
· 3 emergency fire starters
· compass
· multi tool knife
· emergency solar blanket
· disposable plastic poncho
· 50′ of parachute cord
· collapsible metal cup
· 1 bottle Halazone tablets
· small sponge
· hand crank LED flashlight
· fishing kit containing 5 hooks, 5 sinkers, 20’line, and 3 small floats
· first aid kit containing band aids, Tylenol tablets, Benadryl tablets,
Imodium tablets, tincture of iodine, a needle, and a small mirror
· compact snake-bite kit
· 10′ of snare wire
· .22 cal. semi-auto pistol
· 100 rounds .22 LR hollow point ammo
