I came across this recipe for preserving hamburger meat on the End Times website a couple of years ago and I have been using it ever since. It is a great way to store meat without having to rely of your freezer, and the meat is always ready to use, no waiting for it to thaw out. I usually buy ground chuck in the five pound logs. You are going to cook and drain all of the fat away, so the leaner meat you start off with the less waste you will have. If you are going to can the meat for long term storage, you will need to sterilize your jars and jar lids before, or at the same time as, you prepare the hamburger. Five pounds of ground meat will fit in 2 to 3 pint jars, or 4 to 6 half-pints; depending on how fatty the original meat is.
Directions for preparing hamburger:
• Thoroughly brown the meat in a large cast iron skillet.
• When meat is browned, pour off the grease and transfer the meat to a colander.
• Rinse the meat thoroughly under hot running water to remove any remaining grease
• Wipe any remaining grease out of the skillet and place the drained hamburger back in the skillet.
• Heat the hamburger in the skillet until steam quits rising from the meat. Use a spatula to turn the meat and keep it moving so that it doesn’t burn.
• When the hamburger quits steaming, spread it out in an even layer on baking sheets and place in a 200 degree oven. Leave the oven door propped slightly open and let the hamburger dry for about 2 hours.
• Place the, still hot, dried hamburger in hot sterilized jars, and cap tightly with sterilized lids and jar rings. In about 15 minutes the lids will ping and you will know that you have a good seal. Label and date the jars, and place them in storage.
I don’t know how long the hamburger will keep when stored this way, but I can attest from personal experience that it is at least 2 years. To reconstitute the meat all that you have to do is put 1 cup of dried meat in 2 cups of water and let it soak for a while. I usually keep a pint can of dried hamburger in the kitchen pantry and when I make spaghetti sauce or vegetable beef soup, I grab a handful of meat and toss it in. It will re-hydrate as the other ingredients are cooking. You can use this meat in tacos, lasagna, chili, or any other recipe where you would normally use loose hamburger.
What to Plant, What to Buy at the Store
Like me, you may have limited garden space. Maybe you live in the city. My problem is that I live in the middle of the forest, and to make more garden room I would have to cut down trees. I do have one area that I’m slowly clearing so that I have the potential to have a much larger garden, but for now I’m limited to about 1600 square feet. So, I can’t plant everything I would like to. I’ve had to make some decisions about what to raise in the garden and what to buy at the grocery store. I take mainly three things into consideration; flavor, price, and storability.
Take bell peppers for example. I was at the grocery store the other day, and one green bell pepper was $1.19. I bought it (stir-fried pepper beef doesn’t taste right without the pepper), but it ticked me off. Last Spring I bought 6 bell pepper plants for $1.79. I turned up a little patch about a foot across for each pepper, planted them inside of a little PVC collar to keep the cut worms away, sprinkled a handful of 8-8-8 fertilizer around each plant, and laid down a good bed of mulch to keep the weeds down. That was it. Total work time about 45 minutes. I had to water occasionally, and when the plants got bigger I staked them up for support. What I’m saying is that there was no intensive labor involved here. I figure that at $1.19 each I must have harvested 75 or 80 dollars worth of bell peppers off of theses 6 plants. I picked bell peppers from June to November. Now that is a good return on investment.
Onions are another good example. A good onion at the grocery is $0.75 to $1.00. I can grow 300 onions for $5.00. We pull them, braid them, and hang them from the ceiling beams, and have onions all winter. Again, a good return on investment.
Now pinto beans are another story. I could plant my whole garden in pinto beans and not harvest as many as I can buy at the store for $10. It just doesn’t make sense to take up garden space for pinto beans. I plant a few just to enjoy a meal or two of fresh picked beans, but that’s all.
I plant purple hull peas for flavor. Dried peas or canned peas just don’t come close, so I plant bed of purple hulls and get enough for ten or twelve meals of fresh peas.
Tomatoes are a good example of planting for taste and to save money. Eight or nine tomato plants will yield hundreds of tomatoes. My Arkansas Travelers yield all summer; even in the heat of August. I eat fresh tomatoes that are so much better than store-bought that it can’t be described. I can tomatoes, can spaghetti sauce, and can hot sauce. I also dry tomatoes, and I give a lot of tomatoes to friends. All of this for the price of about 5 tomatoes at the grocery store.
I plant Black Seeded Simpson Lettuce, a type of leaf lettuce. It is fairly heat tolerant, and a dollar’s worth of seed will yield many bunches of lettuce. A good return on investment here, plus you know it’s not loaded down with DDT or contaminated with ecoli.
Boston Pickling Cucumbers are great for making pickles. I plant about a dollar’s worth of seeds along a trellis and get pounds and pounds of cucumbers. Last year I planted a trellis about eight feet long by 4 feet high and put up about 30 pints of pickles. Of course there’s some additional expense and labor involved in canning pickles, but man are they good. You can also eat these cucumbers fresh, but I’m not a big fan of fresh cucumbers. They give me heart burn, but if you can tolerate them, the taste is good.
I can’t understand why squash is so expensive in the grocery store. I plant about 4 or 5 hill of it (7 seeds to the hill), and I get sick of squash I end up with so much. I eat it, I freeze it, I give it to friends until they run when they see me coming, and I still have squash. I like Yellow Crook Neck, Zucchini, and in the fall I plant Butter Nut. Squash seeds are super easy to save. Plant one good crop and you’ll have squash for life.
Potatoes are good when they’re fresh from the garden, but when they’re planted in the traditional way they take up a lot of space relative to the yield that you get. I’m trying a new method of potato planting this year where you plant the potatoes inside of wooden frames and add more frames and mulch as the potatoes grow up through successive layers. The yield is supposed to be huge for a very small area. We’ll see. If it works I’ll do a post about it; in the mean time, potatoes remain on the buy-it-at-the-store list.
I currently buy flour and cornmeal at the store, but this year I will be trying my first corn crop in my new garden area and we’ll see how that works out. I would love to be able to raise a good crop of Country Gentleman each year and grind it on a home grist mill.
Well these are just a few of my thoughts that may be of some help if you are planning a garden and wondering what to plant. By the way, if this is your first garden, plant some radishes. I don’t really like radishes, but they come up so fast its almost like an instant reward. A good confidence builder.
One of the most common mistakes that beginning gardeners make is plow up a huge garden and plant rows and rows of crops, then they spend the rest of the spring and summer fighting weeds. You will get higher yields from a smaller area and do lots less work, if you plant in beds. Many people think that crops are planted in rows because the plants need a certain amount of space between them in order to grow. It’s true that plants do need room to grow, but they don’t need near as much as is usually recommended on seed packets. Row planting was developed as a system when man first started using plows. Space was left between each row so that the plow animal would have a place to walk during cultivation. When mechanical agriculture came on the scene, the rows were spaced even wider. So unless you are using a mule or a tractor to cultivate, you don’t really need the space between rows. Look at your typical seed packet of bush beans. It will probably say something like, “Plant seeds 6 inches apart in rows 2 feet apart.” If you are doing hand cultivating using beds you can forget about the 2 feet apart. I plant bush beans in beds that are 4 feet wide, and I plant the seed 6 inches apart in each direction. Now think about it, I am planting 500 plants in a 100 sq. ft. bed. To plant the same amount of beans in rows that are 2 feet apart would take up 500 sq. ft. of your garden. And guess what’s going to grow in that empty 400 sq. ft. You got it,—WEEDS. The way I plant, the beans are close enough together that the weeds don’t have anywhere to grow. So while I’m sitting on the porch drinking iced tea, you’re out in your garden hoeing weeds. Doesn’t seem fair does it? Pictured below: A bed of different kinds of greens in early March.
Another advantage of planting in beds is that once a bed is established it takes way less effort to keep your soil loose and workable. I have permanent beds in my garden. I plant different crops in them each year, but I keep the same beds. My beds are about 4′ wide and I leave an 18″ walking path between the beds. I pile about 6″ of pine needle mulch on the paths to keep weeds from growing in them. I hand turn the beds with a turning fork to a depth of ten to twelve inches; and once a bed has been established, I never walk on it again. All planting, cultivating, and harvesting is done from the paths. By staying off of the beds, the soil does not become compacted and is easy to turn for the next planting. I do fudge a little bit by stepping into the beds when I re-turn the soil each season, but that’s about the only exception to my “don’t walk on the dirt” rule. My garden is about 1200 sq. ft. I have been gardening the same patch of land for over 25 years, and I have never used a tractor or garden tiller on it. I couldn’t do this if I was row planting, but by planting in beds it is easy to keep the garden up with nothing more than a turning fork, a rake, and a hoe. Pictured below: A bed of garlic and onions. This bed has 25 garlic plants and about 300 onions in about 100 square feet. 
The one concession that I make to mechanical gardening is that I use a gas powered weed-eater to cut down bush bean vines after I have picked them clean. I tried cutting them down with a yoyo but this tended to pull the roots up along with the vine. I want the roots, with their attached nitrogen nodules, to stay in the ground and enrich the soil; so I yielded to modern technology in this instance.
Bed planting cuts way down on the time you will spend weeding. As mentioned above, I don’t have to weed bush beans or field peas at all because of the dense planting. My walking paths are kept mulched so there’s no weeding there either. I mulch around my tomatoes, squash, peppers, and cucumbers so that I only have to weed a very small area right at the base of the plants. I do have to weed a little along my pole beans; but here again, mulching right up close to the vines keeps weeding to a minimum. The only thing that I just flat out have to weed is my onion patch. I haven’t figured out a way around this one, but if you have tried anything that works I’d sure like to hear about it.
I can’t for the life of me understand why everyone is so mad at poor old Bernie Madoff. I read that he is accused of perpetrating a Ponzi scheme. The way I understand it, a Ponzi scheme is where you get people to give you money and promise them that you’ll give them their money and more at a later date. Apparently the illegal part comes in when you don’t invest the money in anything tangible; but instead, you pay back the early investors with money that is given to you by later investors. As long as you can keep bringing more and more people into the scheme everything works out great. The problem is that eventually you run out of people to bring into the scheme, and the whole pyramid collapses.
How, I ask you, is this any different from the whole American economy? Think about it. Our whole economy is based on consumption. You have to have more and more people consuming more and more goods in order to keep the economy working. Years ago people bought what they needed and saved the rest of their income against a rainy day. The U.S. economy grew because the increasing population kept moving West, opening new land to agriculture and ranching, and discovering vast new mineral wealth. When the westward expansion grew to a close, no new real wealth was being created or discovered so businesses and financial institutions had to come up with a new way of keeping the economy rolling. “Presto!” they said. “Let’s just get the people to buy more. That way we can continue to increase production and continue to grow richer.” And there, my friends, is the birth of advertising. An entire industry dedicated to convincing you to buy things that you don’t need. They convinced you that you’re wife wouldn’t love you if you didn’t buy her a diamond. They convinced you that you’re “friends” would think you were are loser if you didn’t drive an expensive car. They made up holidays like mother’s day and Valentine’s Day and secretary’s day so they could sell you more. And they perverted holidays like Christmas to turn them into two month long buying sprees. And it all worked great. You spent more and more, and saved less and less; and the economy grew like a Brontosaurus. But then a tragedy occured. You were spending everything you had. You couldn’t spend any more, and the economy couldn’t keep growing. “But wait'” the businessmen and bankers said. “All they need is more money. Let’s loan them the money. Then they’ll keep buying our stuff that they don’t really need, and they’ll have to pay us interest for the money that we loan them. Brilliant!!” And so now you really went to town. A mailman could live in a 16 room house. A barber could drive a exotic sports car. A secretary could vacation in Europe. A school teacher could buy a vacation home. All you had to do was take out a loan or put it on the card. So you consumed more and more. And the economy grew like a super nova. And then another tragedy struck. One day you woke up and realized that you could never pay it all off. The bankers kept loaning you money, even though they knew that you could never pay it back. You see the bankers had also loaned money to the businessmen so the businessmen could buy more machines to build more stuff for you to buy to keep the economy growing. And the only way they could get their money back from the businessmen was to loan you more money to buy the stuff that the businessmen were making. So they loaned you more money even though they knew you could never pay it back, and incidentally, they sold your loans off to investment groups. One of those investment groups was probably your retirement fund. You know, the thing that you were counting on in your old age. So, those clever bankers actually sold you your own loan. And then another tragedy struck. Your neighbor couldn’t pay his loan back, so he gave up. He told the bankers, “I can’t pay for it. You can have it back.” And then another neighbor did the same thing, and another, and another. And the dominoes feel, and the pyramid collapsed. And that’s where you are today. The whole thing was one big Ponzi scheme, and it finally fell in.
So why are they persecuting poor old Bernie? I’ll tell you why. He made the mistake of stealing from the thieves. They’ve been doing it to us for years with their banks, and their investment firms; and they’ve packed it all away in the form of trust funds, and non-profits, and foundations. And Bernie broke the code and turned on them. Now they’ll have their pound of flesh as surely as a South American drug lord would deal with his accountant ripping him off. The people that Bernie ripped off own the law, bought and paid for; and they own the media that’s reporting on it. They will bring the full fury of these institutions to bear on him. Personally I care about this whole Madoff thing about as much as I care about rival gang members killing each other. Where has the outcry been about the Ponzi scheme that’s been perpetrated on the American public for the past 100 years?
Will the economy recover? Yes. Will the powers that be want you to keep consuming? Yes. Take my advice. Don’t be a sucker again. Live within your means. Don’t buy it if you don’t need it. And if I may contradict the words of our former illustrious President, “Don’t go shopping.”
I buy onion sets every year and plant them in my garden. I don’t save onion seed because it’s kind of a pain. Maybe after I build my green house I will try saving onion seeds and starting my on sets, but for right now I just buy the sets and put them out. This usually gives me a good crop of onions to harvest, and then my wife braids them into long strands which we hang from the ceiling beams in the living room. Yes, in the living room; we are definitely country folk. Anyway, they look kind of nice, and throughout the winter when we need an onion we just cut one off of the braid. It used to worry me though that our supply of onions might be interrupted if sets are no longer available. That is, it worried me until my sister in Arkansas gave me a start of multiplying onions. These are also known as walking onions or Egyptian onions, and they will actually propagate themselves and spread on their own. The way it works is, instead of going to seed, these onions produce small onion bulbs at the top of their green shoots. You can break these bulbs off, separate them and plant them just like onion sets. If you don’t break them off, the weight of the bulbs will eventually bend the onion shoot down to the ground where the bulbs will then take root on their own. If you let the onions propagate on their own, however, they will grow very densely and it will inhibit good growth. Also once the onions have been allowed to form new bulbs, the old onion is past its best flavor. I pick some of the onions to eat, and let some of them produce new bulbs. I then harvest the bulbs and re-plant them like onion sets. If you use this method, you can move the onions to a different part of your garden each year. Multiplying onions do not produce a large bulb. They are more like a scallion, but they are perfectly edible, and the green shoots can be used like chives. If you don’t know someone that can give you a start of multiplying onions, look on the internet. There are several places that sell them. Once you get a bed of multiplying onions started you will have onions from now on. This site offers walking onions for sale http://www.asparagusgardener.com/index.html. I have never ordered from them so I can’t vouch for this outfit, but they might be worth checking out.
Now let’s make a bowstring. Remember that you are using either wet rawhide or artificial sinew for your first attempt. All cordage is twisted up using the same basic technique. It is called the reverse wrap. Using the reverse wrap takes only a few simple steps, but it will take a fair amount of practice to prefect the technique. Yucca leaf fibers are used in the following description, however the same basic steps apply to wet rawhide or artificial sinew. The only difference is that you won’t have to worry about splices, so there is no need to stagger your fibers as outlined in step three below.
If you are using artificial sinew, just start out with four pieces of sinew that are three times the length of your unstrung bow and proceed to step 4. If you are using rawhide, start with a single strip that is three times the length of you unstrung bow and proceed to step 4.
1. Decide how thick you want your finished cord to be and use half that number of fibers to start with. For example, if you want your finished cord to be as thick as 12 strips of yucca fiber, you will start out with 6 strips of yucca fiber laid out on the table in front of you. All of the big ends of the fibers are on the left, and all of the small ends point to the right.
2. Now take 3 of your 6 strips and turn them so that the big ends are on the right and the points are to the left.
3. ext you will need to take all six strips and place them so that the ends are all off-set from each other. This is very important. Everywhere that one fiber ends, a new fiber must begin, and this obviously creates a weak spot in your cordage. If all of the fibers ended at the same spot and new ones began, you would have a tremendously weak spot that would come apart when the first stress was applied. By off-setting all of the fibers, you make sure that you will have no more than one splice occurring at any point on the cord.
4. Now pick up all of the yucca fibers and fold them into a
“U” shape with the points of the “U” facing to your right and the rounded part of the “U” pinched between your left thumb and index finger. (Note: these instructions are for a right handed person)
5. Keeping a tight grip with your left thumb and index finger, grasp the upper bundleof fibers with your right fingers and twist them up and away from you several times so that they form a tight strand.
6. Now pull this upper strand of fibers toward you and down so that it crosses over the lower bundle of fibers. Shift your grip with your left thumb and index finger so that you are now pinching the two different strands where they cross.
7. Use your right fingers to grasp the bundle of fibers that is on top now (the ones that you haven’t twisted yet). Twist them up and away from you several times until they form a tight strand.
8. Now take this newly twisted strand and pull it toward you and down so that it crosses over the lower strand of fibers.
9. Shift the grip with your left thumb and index finger so that you are pinching the two strands where they cross.
10. Repeat steps 5 through 9. That’s all there is to it.
After you’ve made a few strings with solid material you may want to try putting one together using yucca fibers or real sinew. This requires a lot of splicing to make a proper string, and if you’re going to try this let me recommend that you read Jim Hamm’s chapter on the subject in his very excellent book, Bows and Arrows of the Native Americans. Pictured below: (1) Rawhide bowstring (2) Linen bowstring and artificial sinew bowstring.

Now you have a good bow. In the future I will post about three articles on how to make primitive arrows, but for now I will return to posting on sensible modern survival topics.
You should now have a good shootable bow, so let’s just add a couple of little touches to finish it out, and then we’ll make a string.
To put an extra fine finish on your bow, use steel wool (Native Americans used fine sand sprinkled on a piece of damp leather) and rub both limbs down thoroughly. Try to remove every little scratch. A scratch may not look like much of a threat; but when a bow is at full draw, even the smallest imperfection may allow the wood fibers to begin separating. When wood fibers start to pull apart it is only a matter of time before the bow breaks.
When you have the bow as smooth as you can get it, rub more oil into the wood. You cannot overdo this. I have a small supply of bear grease that I use to oil my bows, but before I obtained it I used vegetable oil. The vegetable oil worked fine.
Although most Native-American self bows do not have grips on them, many modern shooters feel more comfortable if they do have a grip. A nice piece of brain tanned leather can be glued and stitched around the handle of your bow to form an attractive primitive looking grip.
And now to the question of bowstrings. Most surviving Native-American bows have strings made of sinew. Twisted rawhide was also used. The Cherokee, I am told, used twisted squirrel rawhide. Some Southwestern tribes used yucca fibers to make strings for their lighter weight bows (40 lbs. draw weight or less). All of these natural materials make good strings, but there is one problem with making strings of sinew or yucca. The fibers of both animal sinew and yucca fiber are shorter than a finished bowstring, so to make a string from these materials you will have to create a number of splices. The splices have to be off-set from each other to avoid weak spots, and the fibers must be spliced in only a few at a time in order to avoid thick spots in the string. All in all, it is a pretty complicated process to go through the first time you make a bowstring. For this reason I am suggesting that you use rawhide if you want to make a natural string or artificial sinew if you prefer a more modern material. Waxed linen can also be used to make a good string and was, in fact, the material of choice in Medieval England. Be aware, however, that many primitive competitions will not allow the use of artificial sinew or linen strings.
To prepare rawhide for string making you will need a dried deer hide with the hair and inner membrane removed. Lace the hide in a rack or nail it to the side of your house to dry so that it stretches tight and flat. Be sure to use a deer hide and not an elk hide. Elk rawhide is much weaker than deer raw hide.
It does not take much rawhide to make a string. A round piece about the size of a dinner plate will be large enough. Start at the outside of the piece of rawhide and cut a strip about 1/4″ wide completely around the edge. As you approach the point where you started your cut, angle in a little and keep right on going. Spiral round and round until you have reached the center of the hide. You should now have a very long, curving strip of rawhide. Soak this strip in water over night to soften it. A little stretching will straighten out the curves, and you will have a long piece of wet rawhide that you can start twisting into cordage.
If you are going to make your string from artificial sinew, all you have to do is cut four pieces of sinew that are three times the length of your unstrung bow.
Next time we’ll talk about how to actually twist up the string using a technique called the reverse wrap.
Now it is time for the most important part of building a bow; the part where more bows bite the dust than at any other phase of construction. It is known as “tillering”. Tillering is the cutting and scraping of the bow limbs to their final thickness and the balancing of the limbs so that they bend evenly when the bow is drawn. It’s tricky, but if you follow a few basic rules and don’t get in a hurry, you will end up with a good bow. Pictured below: Front profile of bow cut out.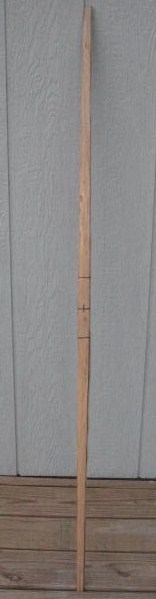
You already have the back of your bow laid out and trimmed to shape. Now it is time to turn the bow on its side and draw in the side profile. For the plains style bows that I prefer to make, I do not draw in a distinct handle. I prefer to just make the handle area the thickest part of the bow (about 3/4″ thick) and then taper down gradually into the limbs. You may wish to make a thicker and narrower handle. This is perfectly fine. It’s just a matter of what suits you. It is usually best to use a ruler and measure the thickness of the handle first, then move to each end and make a mark to indicate the thickness of the tips (about 3/16″ to 1/4″ thick). Now you can go back and lay a straight edge from the mark at the end of the handle to the marks at the tip and draw in a straight line the tapers evenly from handle to tip. Please note that this will only work if your bow stave is perfectly straight, and they never are. You will probably have to draw in a very light straight line and then go back and make free hand corrections where the stave has slight bends in it. The idea is to keep the taper uniform. Any thin spots will bend too much and weaken the bow. I generally lay out my side profile on both sides of the bow due to the irregularities of any natural wood stave. Pictured below: Side profile laid out.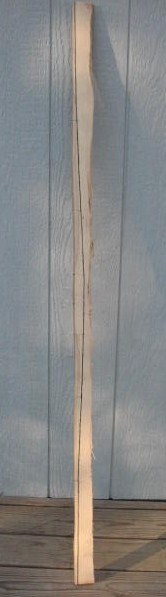
Now that you have the sides laid out, it is time to start removing wood. If you have a lot of wood to remove you can start with a hatchet, but be careful!! Keep turning the bow constantly and looking at both sides to make sure that you don’t take off too much. When you start getting close to your lines, it’s time to get out the ol’ wood rasp. Work the limbs down carefully until you reach your lines. Pictured below: Side profile cut out.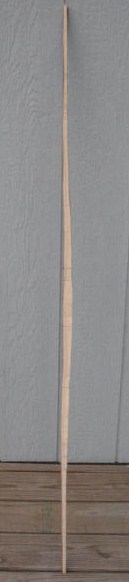
At this point you will want to cut your nocks so that a string can be attached. I usually use a small rat-tail file for this and cut a nock on each side of each end. Some plains style bows have two nocks at the end where the string is permanently attached and only one nock at the end of the bow where the string slips on and off. Do it however you like. Pictured below: One style of nock.
If we lived in a perfect world you could now slip a string onto your bow and with the exception of a little sanding, it would be ready to shoot. But alas, the world ain’t perfect, so rub a good coat of vegetable oil into your bow and let it soak in overnight before you string the bow for the first time.
When you do string the bow for the first time you want to be very gentle. Make sure that the bow is warm. Don’t hold it over a fire or anything, just make sure that it isn’t cold. Rub it briskly with your hand and flex it gently over your knee to loosen up the wood fibers a little. You will need to string the bow very carefully with a heavy string to prepare it for the final tillering, or balancing of the limbs. Don’t pull the bow yet. Just string it so that there is about 5″ distance between the handle and the string and then take a good long look at it.
Unless you are very lucky, one limb of the bow will probably be bending more than the other limb. In some cases it may be bending a lot more. The straighter of the two limbs is not bending as much because it is thicker than the limb that is more flexed. Obviously you can’t add wood to the more bent of the limbs, so the only alternative is to remove wood from the limb that is thicker. Study the curve of the two limbs. Look at the straighter limb. Where does it need to bend a little more in order to look like the more flexed limb? Mark that spot with a pencil. I usually shade the whole width of the belly at the point that needs to have wood removed. Remember that the belly is the part that is facing you when you shoot the bow, and that this is the only side of the bow that we ever remove wood from. Picture below: Untillered bow. This one came out pretty close on the first stringing, but you can still see that the upper limb is not bending quiet as much as the lower limb.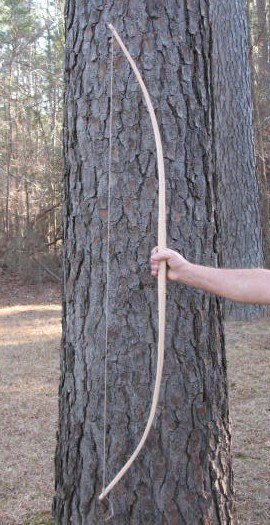
Now take a sharp knife and, holding the blade perpendicular to the surface of the wood, begin scraping on your pencil mark. Scrape a fairly wide area. Don’t dig a hole. When the pencil mark is gone, the limb will not have moved at all, but you must resist the urge to remove more wood. The actual results of your scraping will not become apparent until the bow has been drawn several times. Absolutely do not pull the bow back to full draw. Just flex it gently pulling the string back six or eight inches. Flex the bow at least ten times then stop and take a look at it. The straight limb should now be bent a little more, maybe not as much as it needs to be, but it is better. Now repeat the whole process; looking, marking, scraping, and flexing. Don’t get in a hurry or you may wind up in the yo-yo syndrome. This is where you remove too much wood and now the limb
that was too straight is bent more than the limb that was too curved. So you have to work on the other limb and thin it down. If you’re not careful you can end up with a bow that has a 10 lb. Draw weight. Pictured below: Laying the bow on a tile floor makes it easier to see where it is out of tiller.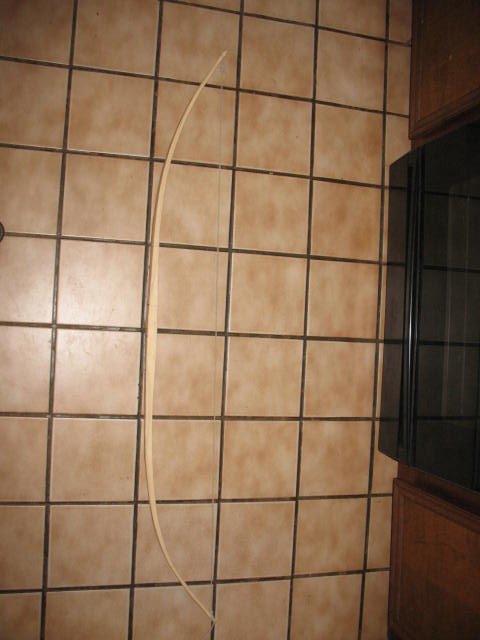
Just take your time and do a lot of looking and a lot of flexing. As the bow approaches balance you can begin flexing it a little more with each pull, but you may want to stop and rub in a little more oil before pulling it too far. When you have the bow well tillered it is time to finish it out, which we will talk about in the next post. Pictured below: The bow is now tillered and ready to finish out.
Now that you have a cured log to work with, it’s time to split it up into staves or the rough pieces from which you can make a bow. But before we start splitting, let’s take a moment to get an idea of what we’re working towards. What you are wanting to end up with is a one piece wooden bow often called a “self bow.” If you look at the end of a log, you will see a series of concentric rings starting with a small circle in the middle and working all of the way out to the bark of the tree. Each of these rings is a layer of wood that represents one years growth of the tree. The wood fibers in any given layer are tightly inner twined with each other to form a strong but flexible ring of wood, however the separate rings are not tightly attached to each other. If you want to test this statement, take a peeled hickory log and start banging on it with another heavy stick. After a while the wood will start to separate and you can peel it off in strips that are exactly one growth ring thick. Now try and tear one of these splits in half. You will find that it is very hard to do. By the way, this banging on the log to split it into layers is one method of producing hickory splits for basket weaving. So what does all of this have to do with bow making? Well, the back of a bow (that’s the part that is away from you when you are shooting the bow) is under tremendous stress when the bow is drawn. If the back of your bow is one unbroken growth ring from end to end, it will hold tightly together even under the stress of being bent. If, however, you cut across the growth rings when you are shaping the back of your bow, the growth rings will separate from each other when the bow is bent. Where the growth rings separate the bow will break. So we want to produce a bow that has an unbroken growth ring for the back. The easiest way to do this is to use the outside of the log for the back of your bow.
Now let’s take a good look at your log and see where we want to split it in order to produce four staves that can be worked down into bows. First check and see if the log has stayed fairly straight while it was drying. If it has become badly bent you can still probably get one good stave out of it, but if it stayed straight you may get several. Let’s assume that the log is still straight. Look at it. Where can you get the best bow out of it? Are there knots or scars on the log? If there are, it would be best to avoid them. If you can’t avoid them then it is best to try and keep them in the middle of the bow. The handle is not under nearly as much stress as the limbs, so if you have a knot in the handle it probably won’t weaken the bow. Small knots on the limbs will not weaken the bow too badly as long as they are in the center of the limbs and not on the edges. We will talk more about knots when we start shaping the bow. Pictured below:straight five foot long log of American elm.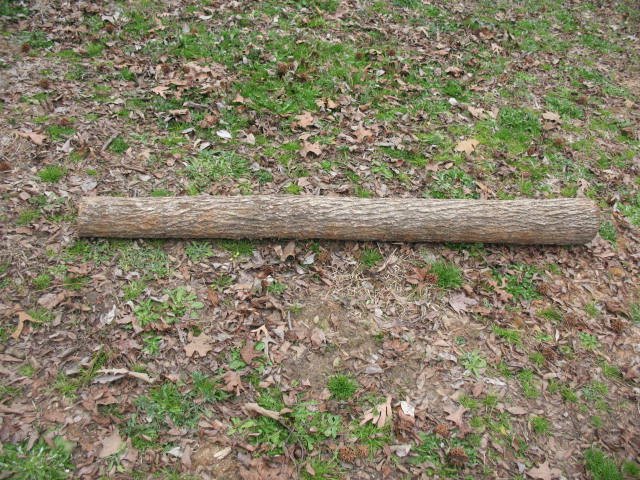
Now that you’ve decided where you want to split the log, take a look and see if that is where the log wants to be split. Are there any checks in the log? If it has already started splitting on its own you might want to reconsider and see if you can’t just extend those splits rather than starting some new ones. If you left plenty of extra length to work with a few end splits probably won’t bother you, but if you’re running short on wood you may have to go with the natural splits even if it means losing a stave or two. Whatever you do don’t ruin your log by trying to force it to give up four staves. Its far better to have one really good stave than to have four third rate ones. Pictured below: Splitting the log with sledge and steel wedges; and log split in half.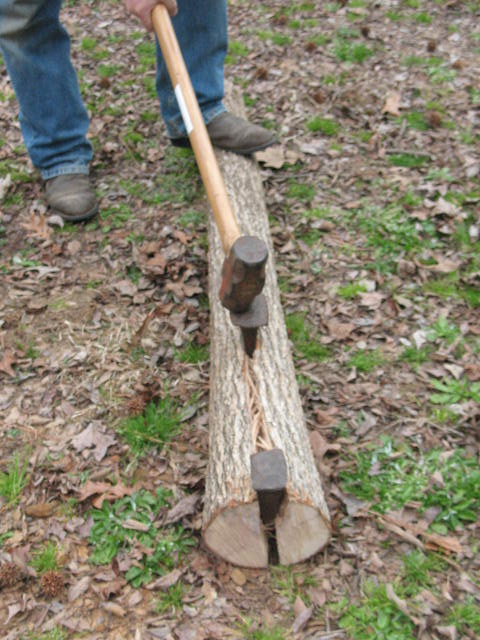

Once as an experiment on doing it the old way I used some wedges made of elk antler and a hickory club to split out a bow stave. It worked fine, but under normal circumstances I use steel wedges and a sledge hammer to split out my staves. Just stand your log up on end, pick the place that you want to split it, lay the blade of one ax across the end of the log, and use the other ax to start hammering it down. Once the log starts to split it will usually split pretty straight down the center, but don’t count on this. Go slow and make corrections where necessary. When you have successfully split your log in half, take each of the halves and split them in half. You will now have (maybe) four staves to work with. Pick the best one and you can begin laying out your bow on it. If you removed the bark before seasoning your log you may go directly to laying out the bow. If you seasoned your log with the bark on, you will need to carefully remove the bark before laying out. Be sure to not cut into the whitewood that will become the back of your bow. Pictured below: two staves, one with the bark peeled and ready for layout.
Now let’s lay out the bow. First you will need to decide on the shape of bow that you want. I usually make plains style bows that are 48″ to 52″ long and taper evenly from about 1 1/2″ wide at the handle to 3/4″ wide at the tips. You may want to make a bow that is narrow at the handle, widens out on the limbs, and then tapers down at the tips. Or you may want to make an English longbow. The choice is yours and the procedure is basically the same. The following directions are for laying out a plains style bow.
Use a pencil or charcoal and draw a line across each end of the stave where you want the ends of the bow to be (we will call these the end lines), then draw a straight line down the center of the stave from top to bottom (we will call this the center line). Now measure from your two end lines to determine where the center of the bow is. Make a small mark here that crosses the center line (we will call this the center mark). I lay out my handle by measuring about three inches up from the center mark and three inches down from the center mark and drawing a line across the stave at these two points. I then measure out 5/8″ on each side of the center line and draw two lines that run from the top of the handle to the bottom. The handle is now laid out. It is a rectangle 1 1/4″ wide by 6″ long and centered on the stave. Now go to where your center line meets the end marks. Measure out on the end lines 3/8″ on each side of the center line and make a mark. These will be your bow tips. Pictured below: handle layout and tip layout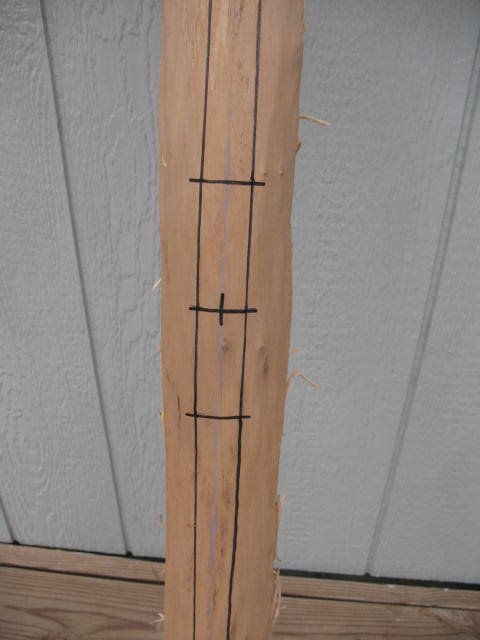
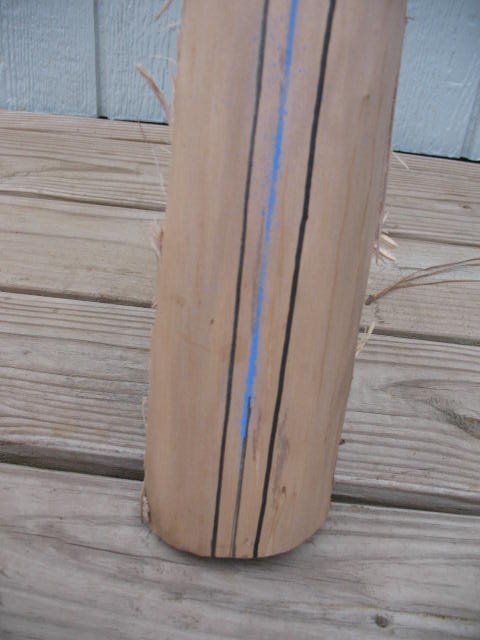
To lay out the limbs you need only draw four lines. Each line will start at a corner of the handle and extent up or down to its corresponding mark on the bow tip. You now have the front profile of your bow laid out. We will not worry about the side profile until we have cut out the front profile. You may use your ax, knife, and/or draw knife to carefully trim away the side wood leaving only the front profile of your bow. Be sure that you leave the sides of the bow straight up and down. You don’t want the sides of the bow to slant in or out from the back to the belly (the belly is the part of the bow that faces you when you are shooting). Pictured below: handle and limbs laid out and ready to start removing wood.
In the next post we will discuss laying out the side profile of your bow, and the all important tillering of the bow.
I have had a couple of people express some interest in primitive bow making which is a long-time hobby of mine. This is the first of a series of posts that I’m going to do on bow making and arrow making. This will comprise a total of about nine posts. I usually try to vary the topics that I write about, but this really needs to be posted as a series and in order; so if this isn’t a topic that appeals to you, please accept my appology in advance. I will return to other topics as soon as this series is through. So if you’re still with me, let us begin………….
In primitive times, when people lived close to the earth, any individual could produce the ultimate weapon of his or her culture, the bow and arrows. The ability to produce powerful, reliable, and accurate bows and arrows was a skill that meant meat on the table and protection for one’s family and clan; and not just by the native people of the Americas. The bow was developed and played a major role in cultural evolution on every inhabited continent in the world except Australia. The bow is the natural weapon of choice of anyone who is living off the land. It can be made entirely from native materials and manufactured using only stone tools. Of course we won’t go quiet that primitive, but you will be able to produce a high quality bow and arrow using nothing more than an ax, a knife, a drawknife, and a wood rasp.
The first step in building a good bow is to select the proper raw material to work with. There are several good bow woods that grow in East Texas, including Bois d’arc which is considered by many to be the best, but I am going to strongly advise you against using bois d’arc for your first bow. Bois d’arc is very difficult to work with, and the least mistake in construction will cause the bow to shatter under use. I have been making bows for many years and just two weeks ago I had a nice bois d’arc bow blow up in my hands. On close examination I had left a tiny cut (really more of a scratch) across the back of the bow when I was removing the sapwood, and in time this weakness allowed the fibers to separate and the whole growth ring let go snapping the bow limb like a pencil. It’s a shame to think of the hours of work that go into a bois d’arc bow only to have it splinter in your hands. If this were my first bow I don’t know if I’d every even try to make another one.
For your first bow you really should use one of the white woods; hickory, ash, elm, or white oak. I always recommend hickory because you can make every mistake in the book and still end up with a good, serviceable bow. It may follow the string a bit (that means it still stays a little bent even after you take the string off) but it will make a strong and dependable shooter, capable of downing a whitetail with ease.
So let’s get out in the woods and collect a good tree to make our bow from. Since it’s Winter time and the sap is down, this is an ideal time to cut bow wood. But, what are we looking for? Well, there are three main qualities that we want to consider. First, the tree needs to be relatively straight; second, the tree needs to be as knot and scar free as possible; and last the tree should be from five to eight inches in diameter. If you can find the perfect eight inch tree, and if you can do a perfect job of splitting it into staves, you can make four bows from this one tree. Yea, I’ve never done it either.
I usually cut my hickory from a place in the woods where the trees grow close together. This makes them grow tall and straight in an effort to reach the sunlight, and it also reduces the number of limbs found on the lower trunk. This also does the least damage to the forest since you are thinning trees that are already over crowded. Cut the tree with an ax or chainsaw as close to the ground as possible, then cut as long a straight section as you can. If you are only going to make a four foot bow and you have eight feet of straight tree trunk in front of you, cut all eight feet. There are so many things that can go wrong. There may be a hidden knot under the bark, or a bad twist in the grain, or the ends might split badly while you are curing the log. It’s just a good idea to have as much wood to work with as you can. And by the way, don’t waste the rest of that tree. Take it home to burn in the fireplace, or better yet use it to barbecue or smoke jerky.
Once you have collected a good log it is time to take it home and let it cure. There are many theories as to how to cure a log and how long it should take, and bowyers love to argue about these things; but let’s keep it simple. If you cut your hickory in the winter when the sap is down you will probably be safe to go ahead and remove the bark for curing. The bark should peel off easily in long strips. You want to remove both the outer and inner bark, and be sure not to cut or otherwise damage the wood itself. This is very important since this outer layer of wood will be the back of your bow (the part that is away from you as you are shooting), and any cut in the back of the bow can lead to breakage when the bow is placed under stress.
When the bark is removed, stand the log as nearly vertical as possible in a dry, covered storage area. You don’t want the log to dry out too fast as this will lead to checking (splits in the log that run in the same direction as the grain), so it’s best to avoid storing your log in a heated or air-conditioned area or in a really hot place like an attic in the summer time.
Now it’s just a matter of waiting until the log is cured. But how long is long enough? Another source of argument among bowyers. The Turks aged their bow wood for five years, but who wants to do that? There are many who would call this hearsay, but I believe that you can make a serviceable bow from hickory that is dried for one month. I have even made bows from hickory that was fresh cut and they turned out OK. Maybe not great, but who wants to eat wood rats for a year while you’re waiting for a bow stave to cure. Bois d’arc, on the other hand, must be cured for a minimum of six months and it’s really better if you can cure it for a year.
So go on out and cut a good log and set it up to cure, and in the next post we’ll split it into staves and start shaping a bow out of it.
