It is a common misconception that the woods are a barren place in the wintertime, and that anyone lost in them is doomed to starvation. In our southern forests at least, nothing could be farther from the truth.
Yesterday I went for a short walk in the woods to cut some arrow shafts while the sap is still down. During my walk I was amazed, as always, at the abundance that is available if we know what to look for.
One of my favorite arrow woods is Huckleberry. Huckleberry is a shrub that rarely exceeds ten feet. It has a shaggy but close fitting bark that is gray brown in color. Huckleberries usually grow in thickets and they have an interesting, gnarled appearance like oversized Japanese bonsai trees. Pictured below: A Huckleberry Bush 
They have no thorns. The leaves of the huckleberry are about an inch long, shinny green, and oval shaped with smooth edges. There are male Huckleberry bushes and female Huckleberry bushes. Even in mid-winter the female bushes are loaded with small pea-sized blue/black berries. The Huckleberry is in fact a relative of our domestic blueberry. So while you are cutting some of those nice straight shoots for arrow shafts, it is only the work of a few minutes to fill up your hat with these tangy little fruits. Pictured below: Huckleberries, notice how they look like small blueberries. Pictured below: Huckleberries in Early Fall
Another abundant winter fruit is the Hackberry which is found on the Hackberry Elm tree. Hackberry Elms are similar to other elms except that the Hackberry Elm has an extremely knotty, wart like appearance to the bark. Pictured below: Hackberry Elm Bark 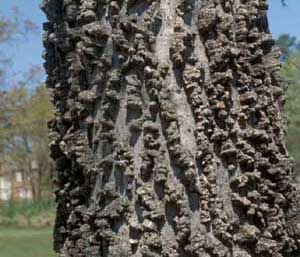
The Hackberry Elm is covered with pea-sized black berries throughout the winter. Hackberries have a black outer skin, a thin layer of yellow/brown pulp, and a large seed. Eat the skin and pulp and spit out the seed. There is not much pulp in each berry, but the pulp is very sweet; and if you have located a good sized tree you will have thousands of berries to munch on. Pictured below: Hackberries in Winter
Improvised traps fall into three main categories:
(1) Deadfalls
(2) Snares
(3) Pits
Some would include an additional category of box and pen traps, but the triggers for these traps are basically the same as the triggers for deadfall traps.
All deadfall traps’ and many snares, require a trigger to spring the trap. Traps and their triggers can be extremely complex, but as with most things, simpler is better. Your chances of securing food are better if you can set six simple traps as opposed to one complicated one. Three of the simplest and most reliable trap triggers are:
(1) The figure four trigger
(2) The Paiute trigger
(3) The rolling snare trigger
The Figure 4 Trigger
The figure 4 trigger gets its name from the fact that it looks like the numeral 4 when it is set. It can be used as a trigger for deadfall or box traps. It can be baited or set as a contact trigger (a contact trigger is a trigger that is set without bait and relies on the animal brushing against the trigger to spring the trap). The figure four trigger is made from three sticks that can vary in size according to the size animal that you are hoping to catch.
Before collecting the materials for your figure four trigger, it is a good idea to de-scent your hands as much as possible. The entire trigger will be de-scented before it is set, but de-scenting your hands is a good additional precaution to take. Hands can be de-scented by rubbing them with aromatic plants such as juniper or sage. This will help mask the human smell. Also, do not gather trap building materials in the vicinity where you are planning on setting the trap. The trap location needs to remain as undisturbed as possible.
No matter what size trigger you are building, it is important to select your materials carefully. Dead, but solid sticks are the best. Rotten sticks will not support the weight of a deadfall, and green sticks may bend and bind the contact points of the trigger. Shape the components of your trigger carefully, making sure that all contact points are clean and smooth. Make sure that all of the contact points on your trigger fit cleanly and that they release quickly with a minimum of pressure. It is not as easy as you might think to make a trigger that will support the weight of a heavy deadfall, but will let that same weight come crashing down with only minimal pressure on the trigger. Make sure that the diagonal stick (the one that actually supports the deadfall) extends well beyond the upright post. If the diagonal stick is too short, the deadfall may hit the top of the upright stick. This can slow or even stop the descent of the deadfall, and mean a lost animal. After you have shaped all of the trigger components do not remove the bark from your sticks, and be sure to go back and rub mud or dirt on the white wood that has been exposed by your carving. This white wood, if left untreated, will be like a neon warning sign to any animal that approaches the trap. 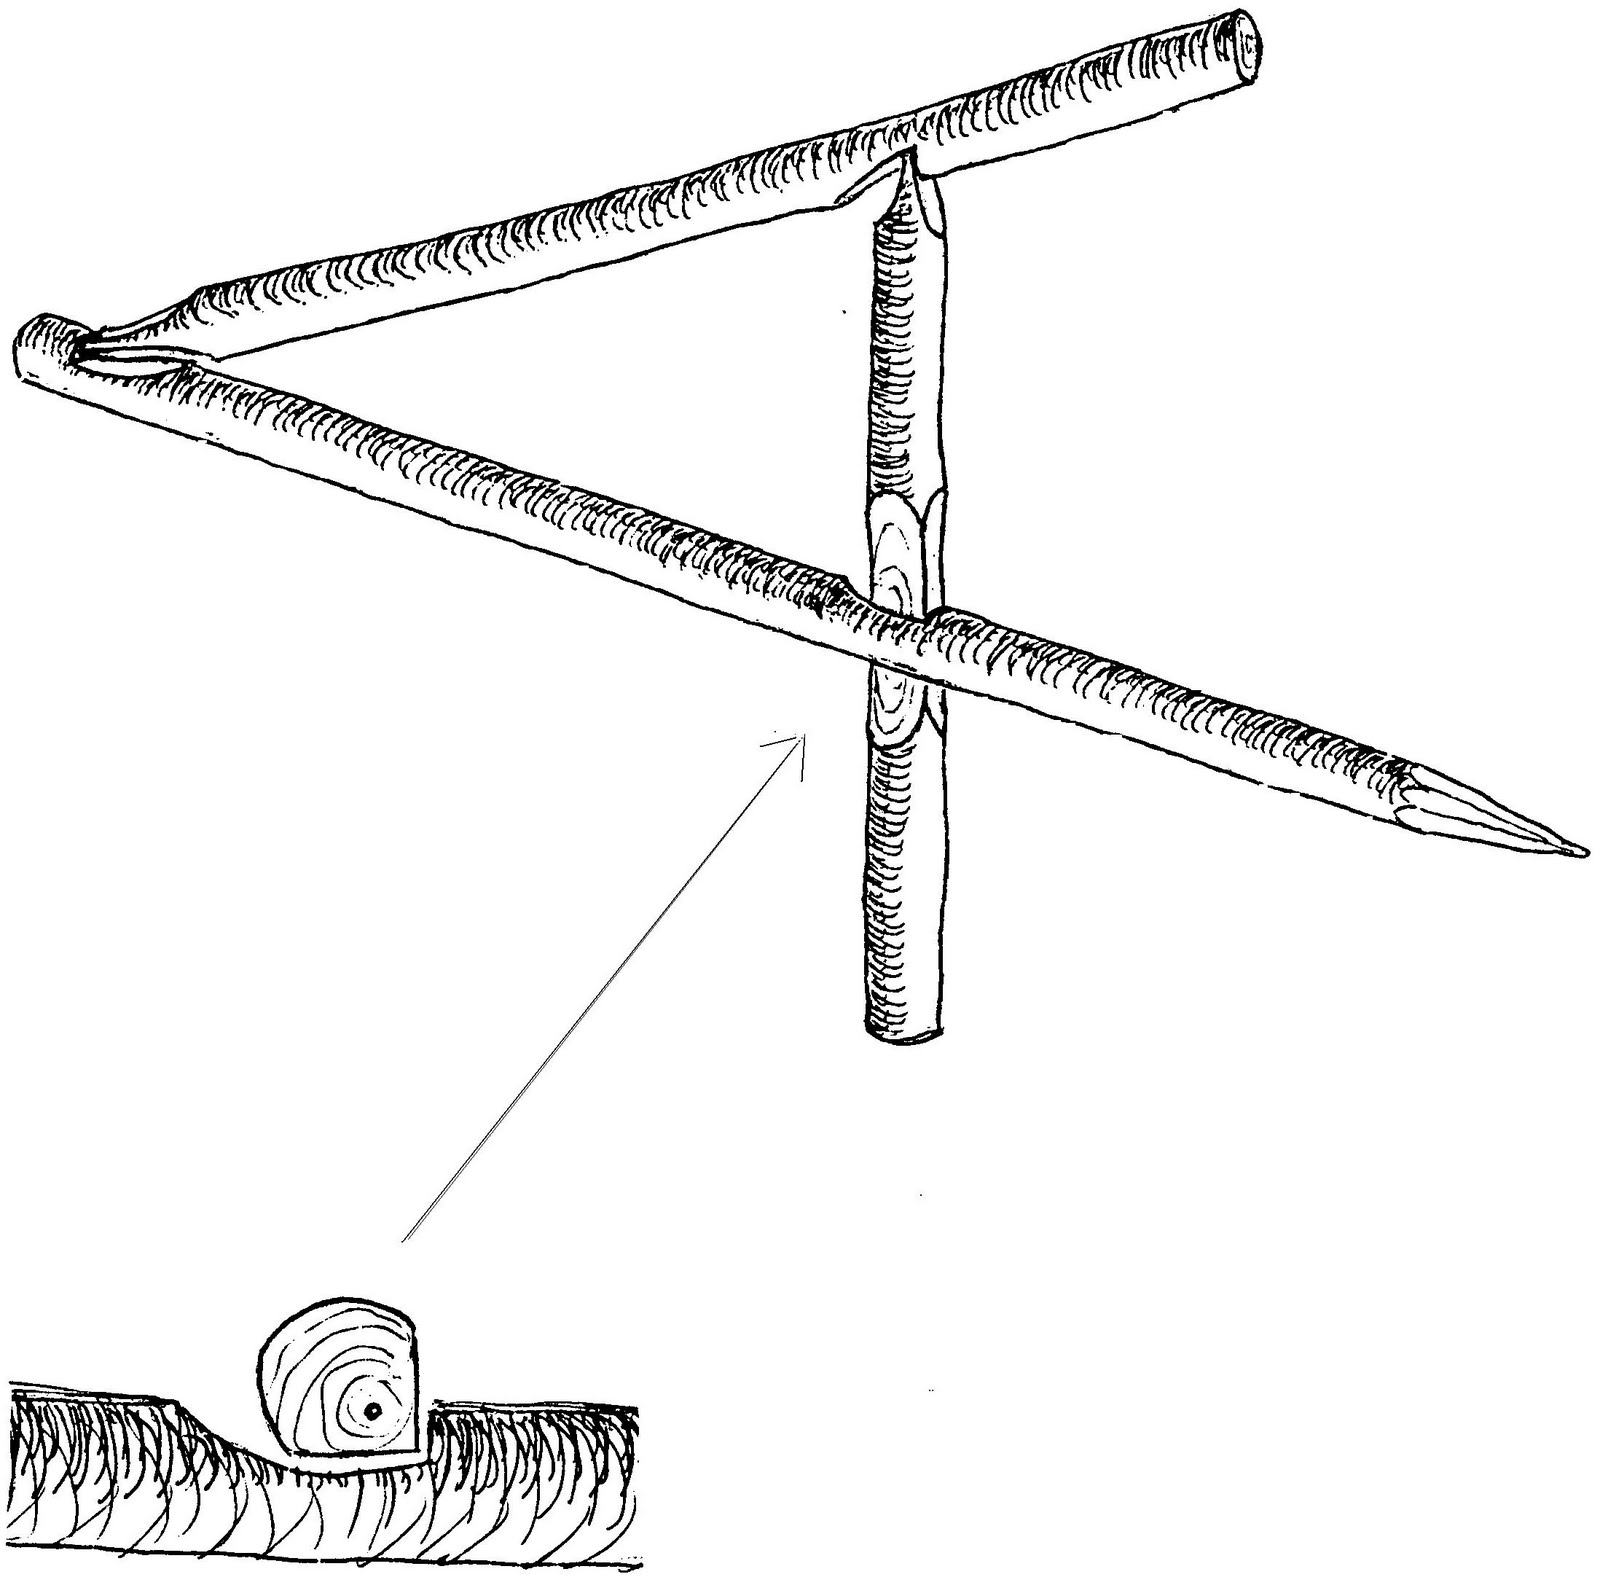
The upright and diagonal sticks of you trigger will remain the same no matter what kind of trap you are setting. The horizontal stick will vary according to whether you are setting a baited trigger or a contact triggeu take your completed trap to the selected trapping location, you need to de-scent all of the trap components. The best way to do this is to smoke the components over a smudge fire. The smell of burned wood is generally not an alarm signal to animals, and it is a very effective covering for any human smell that may remain on your trap components.
The Paiute Trigger
The Paiute trigger is extremely fast, and it is fairly simple to build. Its only draw back is that building it requires a short piece of fairly strong cordage. If you do not have any cordage with you, you can twist some up out of yucca leaf fibers or other natural materials. The Paiute trigger resembles the figure four trigger in that the diagonal member of the trigger supports the deadfall. An upright stick supports the diagonal, just as in the figure four triggers. The difference is in the horizontal member. 
Instead of a solid stick, the Paiute trigger uses a piece of cordage tied to the bottom of the diagonal. The cordage, which has a small cross stick tied to the other end, is then wrapped once around the upright stick, and braced in place with a bait stick. 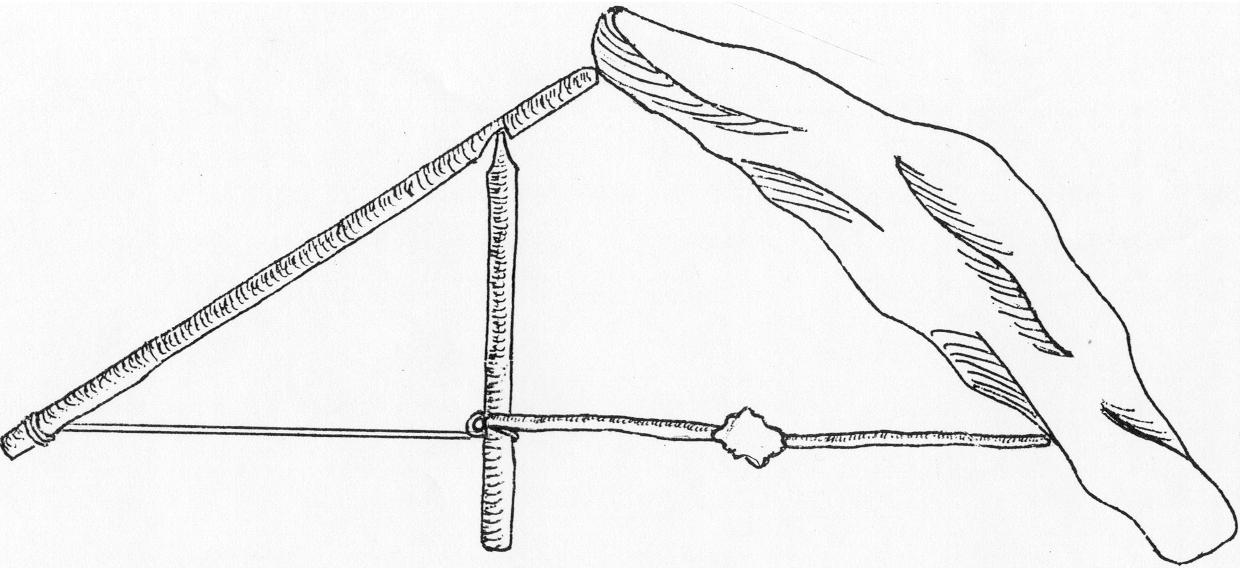
The bait stick is wedged in between the small cross stick and the deadfall itself. When an animal disturbs the bait stick, it slips off of the small cross stick and allows the deadfall to drop. All pieces of the Paiute trigger should be prepared following the same procedures as for the figure four trigger. That is:
(1) De-scent your hands
(2) Select dead and seasoned, but solid materials
(3) Construct the parts carefully
(4) Leave the bark on all parts
(5) Cover any exposed white wood with dirt or mud
(6) Check the trap parts for fit and speed of release
(7) Smoke all trap parts to de-scent them
The Paiute trigger is best for small game like squirrels and other rodents. It can be used for game up to the size of possums and raccoons, but be careful making a trap of this size. A large deadfall will put too much pressure on the small bait stick, and the trap may spring on its own. The Paiute trigger will work most effectively as a baited trigger. It is not well suited as a contact trigger.
The Rolling Snare Trigger
The rolling snare is one of the easiest and most effective trap sets that you can make. The rolling snare requires several feet of good cordage that can be made from native plants if you do not have any string with you. The way that the rolling snare works is fairly simple. A noose of cordage is attached to a bent sapling. The sapling is held down by a rolling snare trigger. When the target animal walks into the snare, it springs the trap. The sapling snaps back up to its original upright position, and the noose closes around the animal. 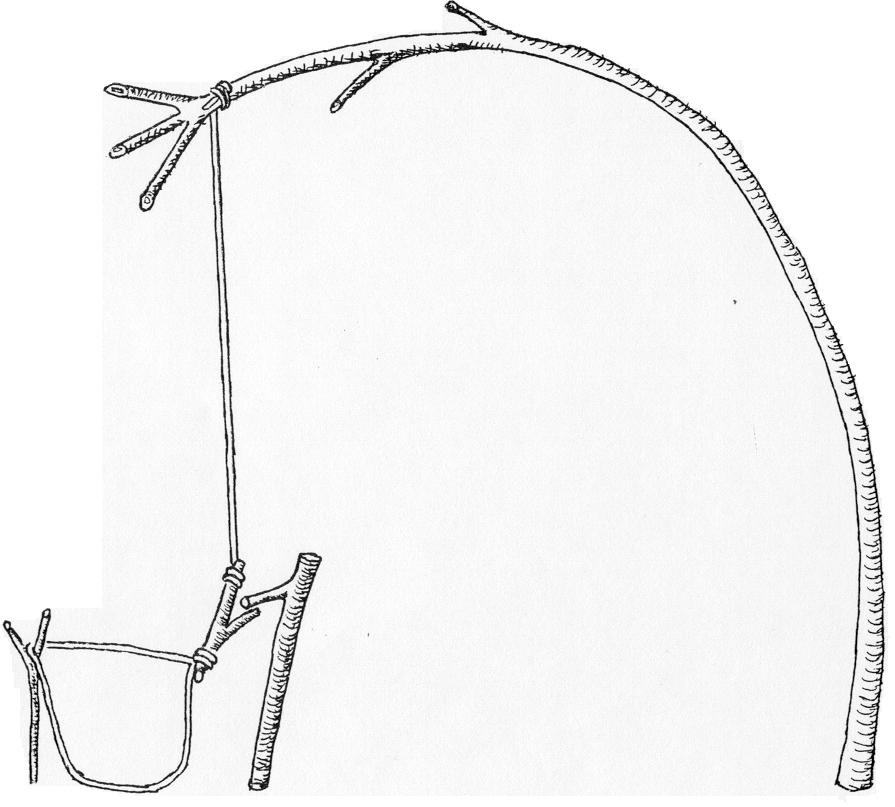
As with other types of traps, the key to a good rolling snare is a good trigger. The rolling snare trigger consists of two sticks with a branch projecting from each stick. One stick is driven firmly into the ground with the attached branch angling down. This is the hold-down stick, and it must be in the ground firmly enough to prevent the stress of the bent sapling from pulling it out. The other stick is called the trigger stick. It has the noose attached to one end of it and the line to the bent sapling attached to the other end. The projecting branch of the trigger stick is locked under the projecting branch of the hold-down stick. This keeps the sapling bent down until the noose is disturbed. The key to a good rolling snare trigger is to make sure that both of the sticks in the trigger will stay firmly locked together, so that accidental tripping of the snare is avoided, but to have the sticks locked together so lightly that the least disturbance of the noose will spring the trap. This is a delicate balance to arrive at, and can only be achieved with practice.
Be very selective about the sapling that you select for your spring-pole (the bent sapling that springs up when the trap is triggered). It should be flexible enough to bend, but resilient enough to spring back to its original position. A sapling that bends easily but will not spring back, does not make a good spring-pole. Also, check the rolling snare often to determine if the spring pole still has enough snap to operate the trap. After a sapling has been held in a bent over position for several days it tends to retain that shape and loose its spring. If this happens you will need to disassemble the trap and move your trigger to a new location.
All of the same rules regarding de-scenting and camouflage of exposed wood apply to the rolling snare trigger just as they apply to other types of triggers.
The best time to practice any wilderness survival skill is when your life doesn’t depend on it, so I would encourage you to practice building deadfalls and snares now. Build and set them many times so that the methods become familiar to you. One word of caution, snaring animals with improvised traps is illegal in many states, so be sure and check your local game laws before you actually leave a trap set in a way that might catch an animal.
There are three reasons that people trap animals: (1) to make money by the sale of pelts, (2) to eliminate vermin and destructive animals, and (3) for food. Trapping, especially with leg hold traps, is pretty torturous; so I’ve never been much interested in trapping for profit. I, like most people, confine my trapping to the elimination of vermin from home and garden; but I am prepared to trap for food if necessary, and I do know how to make improvised traps if my store bought traps are not available. In this post I will attempt to share with you what I have learned about traps and trapping.
Trapping Vermin
When I talk about vermin I am talking about mice, rats, squirrels, rabbits, and other critters that I don’t want in my house or in my garden. Let me say up front that I am no bleeding heart PETA type individual, but I do not like to see anything suffer needlessly. So, I don’t use poison, and I don’t use sticky traps. I use traps that either kill quickly or capture alive. To this end I have a good collection of lock-spring mouse traps and rat traps. 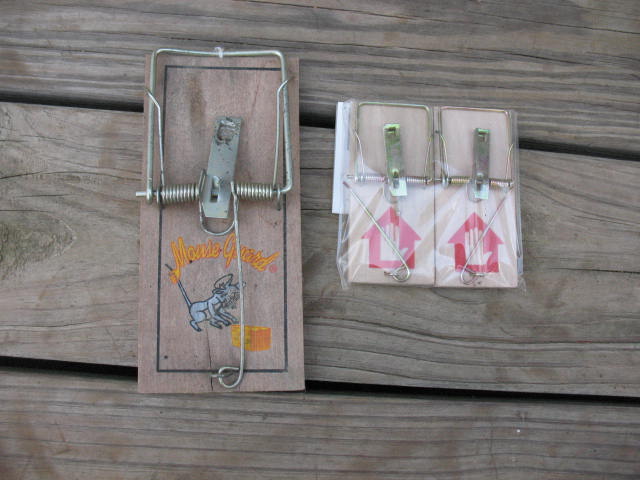
I also have a have-a-heart live trap that I can use to trap and re-locate medium sized animals. 
In good times, having mice in the house, rats and squirrels in the barn, and rabbits in the garden is a nuisance. In hard times it can be a matter of life and death. Mice, rats, and squirrels can wreak havoc on stored food; and rabbits and coons can destroy the garden you are depending on to feed your family. One year I had a nice little patch of corn. I went to check on it one evening and I had about 200 ears that were just about perfect for roasting. I decided that I would go down and start picking the next day. The next morning I grabbed my basket and moseyed over to the corn patch. I had eight ears of corn left and coon tracks everywhere. Unless one of my neighbors was wearing some coon track tennis shoes, I lost my whole corn crop to these furry little bandits. I’m glad I wasn’t counting on this corn crop as the only source of food for my family.
Trapping for Food with Steel Traps
I have about a half-dozen steel leg-hold traps. I don’t use them, but I do know how to use them. A friend of mine who is a fur trapper taught me how to set out traps, and believe me when I tell you it not just a matter of putting the trap of the ground and setting it. There is a procedure that must be followed in preparing the traps, placing the traps, hiding the traps, and baiting the traps.Pictured Below: Three leaf spring traps and three coil spring traps. The coil spring traps are faster and more compact.
Before you set out traps they must be de-scented in order to remove the human smell from them. One method of doing this is to hold the traps in the smoke coming from a campfire. Wear gloves when you do this and do not touch the traps with your bare hands after they have been smoked. Another way of de-scenting traps is to rub them with a scent that will mask the human smell. Many trappers use catnip for this purpose. Just take some catnip and grind it up in a blender with just enough water to make a thick paste. Rub the paste first on your hands, and then on the traps.
There are two basic ways to set up a trap. One is the baited trap in which a bait is used to lure the animal to the trap. The other is the blind set in which the trap is set without bait in a location that the animal will travel through. This might be on an animal trail or at the mouth of an animal den. If you use a blind set you must select a location that the animal will have to step into the trap. Look for some natural feature that will funnel the animal into the trap. For example, you might use a blind set where an animal trail passes between two rocks. If no natural feature is available you may construct a funnel using rocks or sticks, but the funnel must look natural.
You have more latitude in where you place a baited trap, but it is still better to place it near a trail, feeding area, watering area, or den. Bait should be placed where it will cause the animal to step into the trap. Place bait on the end of a twig that arches out over the pan of the trap, or bait the end of a string hanging down over the trap. A mixture of peanut butter and sardines will attract most any animal with a good sense of smell. Cats do not hunt by smell. They are sight hunters. A good bait for cats is to hang a bird wing from a string over the trap. The sight of the wing twisting in the wind will catch the cat’s eye.
When you have found a good location for your trap it is time to build the set. You need to dig a shallow depression for the trap to sit in. The reason for this is so that the ground will still look level and natural after the trap has been set and camouflaged. If it looks like there is a mound on the ground after your trap is set, the animal will probably go around it. To dig the set you will need a small shovel and a coffee can in which to carry the dirt away. You can’t leave the dirt out on the ground as this will make the animal suspicious, and it may avoid the trap. The depression you dig should be just deep enough so that when the set trap is placed in the depression, the top of the trap jaws will be at ground level.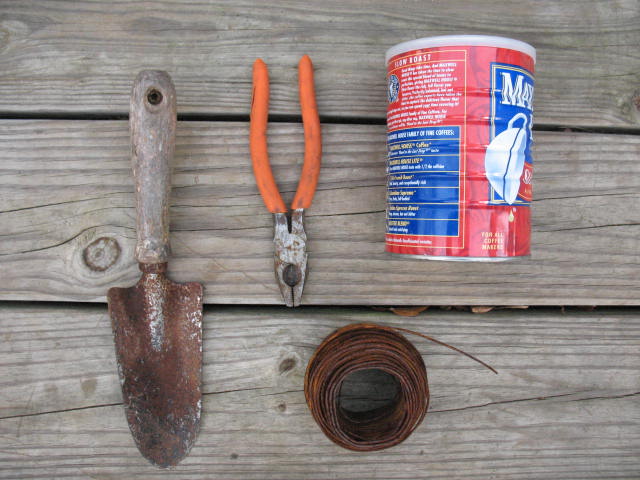
Before you actually set the trap you will have to decide how to secure it. If you set out an unsecured trap, the animal will likely drag it off into the woods or its den where it will then die a slow and needless death. If you secure the trap to a fixed object the animal will not be able to drag it off, but the animal may chew off its own leg in order to escape the trap. Not good. The best method is to secure the trap to a drag. The drag is a rock or log that the animal can pull, but not pull very far. If the animal can move the trap it will think that it is getting away and will not chew its leg off. The size drag to use depends on the size of the animal that you are trapping and is really a matter of experience. I will say that most drags are smaller than what you would first think they should be. Your traps should come with a trap chain and ring attached to them. Most trappers carry a roll of wire and a pair of wire cutters so that they can wire the ring to a drag or a fixed object. You should run your trap-line at least once a day to check for any catches, and if you wire your trap to a fixed object you should check it more often than that.
Once you have the trap wired you can set the jaws and place the trap down into the depression that you have dug. Place the trap so that the jaws are parallel to the most likely path the animal will be walking. The idea is for the jaws to close on the sides of the leg. If the trap is set crosswise to the animal’s path, the jaws will close on the front and back and they may catapult the animal’s leg out of the trap.
Now that the trap is set you need to camouflage it so that it looks completely natural. You will do this by placing a thin layer of leaves and debris over the trap. The problem is that some of the debris may work its way underneath the trap pan and prevent the trap from triggering properly. One way to prevent this from happening is to cut a small circle of paper that will fit down inside the circle formed by the open jaws of the trap. Lay this paper down inside the jaws of the trap then lightly sprinkle leaves over the trap to cover it. Don’t forget to cover the trap chain.
Now step back and look at the set. Does it look natural? Are there any tell-tale signs that it is there? Is the ground level over the top of the trap? Get down to animal level and have a look. If there is anything that is not right, you might as well fix it now. Otherwise you are guaranteed an empty trap the next day. If everything looks good you can put out your bait and head out to make another set.
For my next post I will tell you a little about how to make improvised traps.
When the gas is gone, the car tires are worn out, and the truck parts are no longer available; you can still get around. The most energy efficient form of transportation in the world is the 10-speed bicycle. It hasn’t been that long ago when most Europeans commuted to and from work on bicycles, and the Viet Cong carried supplies from North Vietnam to the Mekong Delta on bicycles. 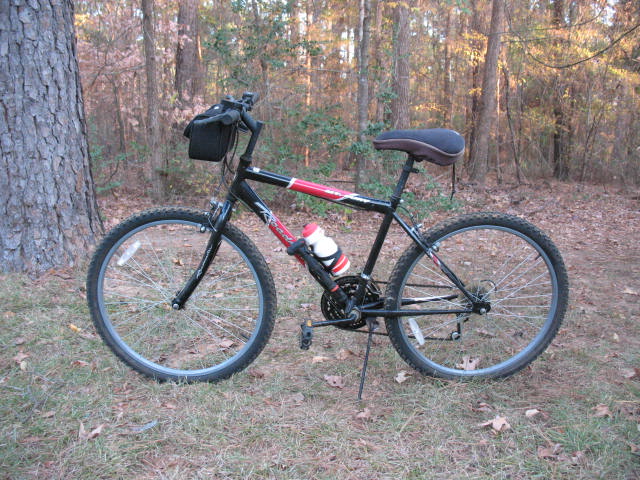
Bicycles have relatively few moving parts, require few tools to repair, and require little in the way of maintenance. A good bicycle costs way less than a poor automobile, and the fossil fuel cost for a bicycle is zero. You can cover a lot of ground in a short time on a 10-speed, and it will improve your health. So there are a lot of good reasons to ride a bike even if it’s not a survival necessity.
I personally have mountain bikes. They are not as fast on the road as a touring bike, but they are more robust and much superior in off-road situations. Riding at a leisurely pace I can make the 10 mile trip into town in an hour.
I don’t have a basket on my bike, although they are available. I prefer to use a backpack for carrying any purchases. I have equipped my bike with a small bag that mounts on the handlebars. In the bag I keep a locking chain, a Philips and a regular screwdriver, vise grips, a pair of pliers, and an Allen wrench. I also carry a spare tube and a patching kit in the bag. A bicycle pump and a water bottle are mounted on the frame of the bicycle. In addition I keep several more tubes, a couple of tires, and a spare chain in my storage building. 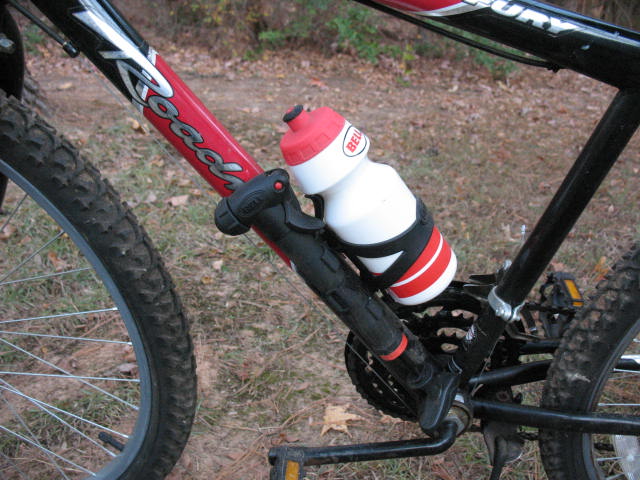
Besides my bike I have two others for family members to use. I don’t use my bike as a primary means of transportation but it’s nice to know that it’s there if I need it.
My wife and I have a booth in one of the local antique malls, so we are always going to garage sales and junk stores looking for things to put in our booth. When we’re out junking, I always keep my eyes open for items that I can use for my survival preparations. At one garage sale I bought over 200 canning jars for $24. A super deal. 
Canning jars can be reused for years, and the rings around them can be reused also if they’re not damaged, but the lids must be new every time you can. I always buy lids at the end of the summer when stores are trying to get rid of them. They always put them on clearance. It’s more profitable for them to sell them at near cost than it is for them to store the lids until next spring. If they are marked low I will buy a lot of them. I probably have eight or nine hundred lids in my food storage. They don’t take up hardly any room.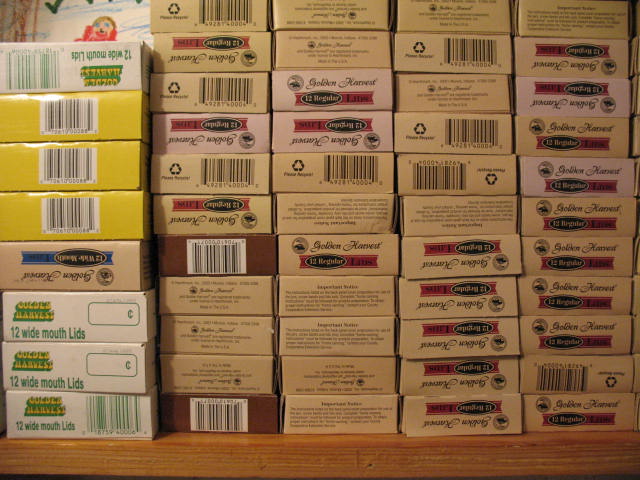
Of course it takes more than jars and lids to can food, so I keep a good supply of other things. I like to keep about five gallons of white vinegar on hand and I also keep at least 25 pounds of salt and 25 pounds of sugar. I buy canning spices in bulk and store them in sealed glass jars. Dill seed, turmeric, cloves, cinnamon, mustard, black pepper, peppercorns, all spice, nutmeg, and bay leaf are some of the spices I keep on hand.
I also keep a lookout for 5 gallon plastic buckets, one gallon glass pickle jars, and the metal cans that pre-popped popcorn comes in. If the 5 gallon buckets are food grade, I use them to store bulk grains, flour, cornmeal, and dried beans. One time I found half-a-dozen plastic buckets that had been used for kerosene. Obviously I didn’t want to store food in them, but I bought them anyway. After a good washing, I used them to store about 240 pounds of 8-8-8 fertilizer. Waterproof and air tight, the fertilizer will stay good for years. 
I use the one gallon glass jars to store grains, flours and beans in my kitchen pantry. Because you can see the contents, it makes them easy to locate; and they are moisture and vermin proof.
The metal popcorn tins do not seal air-tight, so I use them to store stuff that will not spoil. I keep salt and sugar in sealed plastic bags inside these tins.
I also keep a large selection of sealable plastic bags on hand. I do not recommend these for long-term storage unless they are going to be placed inside of a glass or metal container. Rodents (or my cat) can easily chew through plastic bags to get at the goodies inside.
You’re always learning new things. For instance, I recently learned that my normally reliable generator does not like to start in cold weather. It happened like this. It was late in the afternoon on a cold day (at least it was cold for East Texas). The temperature was around 30 degrees. There was a cold North wind blowing, and apparently a tree or a limb blew down on the power line somewhere because our electricity went out. We had a nice fire going in the wood stove, so we weren’t worried about heat; but we were right in the middle of a good TV program, so I decided to fire up the generator. The generator is already hooked up to the house and it has a full tank of gas with fuel stabilizer, so all I should have to do is pull the starter rope and throw the switch that disconnects us from the power grid. I went out and pulled the starting rope for about 15 minutes, and the generator never would start. I was ticked. What good does it do to go to all this preparation and then not be able to get the generator started? So, I got in my truck, drove to town, and bought a can of starter fluid. I drove back to the farm, and as I pulled up in front of the house, the lights all came back on. Typical.
I decided to go ahead and try to start the generator and make sure that everything would be working right the next time. I removed the air filter (about a 30 second job), sprayed one squirt of starter fluid in the carburetor throat, replaced the air filter, and pulled the rope. The generator fired right up. The can of starting fluid now sits right next to the generator patiently awaiting the next cold weather power outage. So be warned by my mistake. Buy a can of starter fluid and have it on hand for cold-weather starts.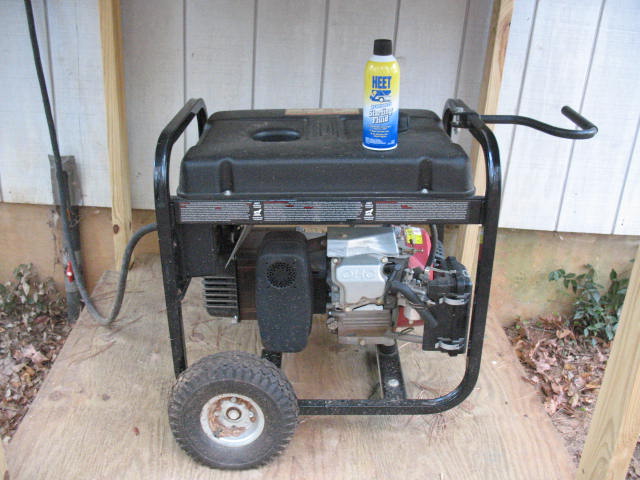
My wife recently received a handy little device from the Dell computer company. It is a portable solar panel that can be used to recharge cell phones, walkie-talkies, and other low voltage electronics. The interesting thing about this device is that you can set it out in the sun and charge it up, and then it will hold the charge for up to three months. At any time during that three months that you need to charge a cell phone, or other device; all you have to do is plug it in and let it charge. It takes about an hour to charge a cell phone, and according to the enclosed instructions you can charge about three cell phones before the device needs to be set out in the sun again to recharge. What a great thing. If you have this little beauty charged up, it doesn’t matter what the weather is outside; you have a source of power to recharge your phone, blackberry, or whatever. Pictured Below: Dell solar recharger, about the size of a cell phone. 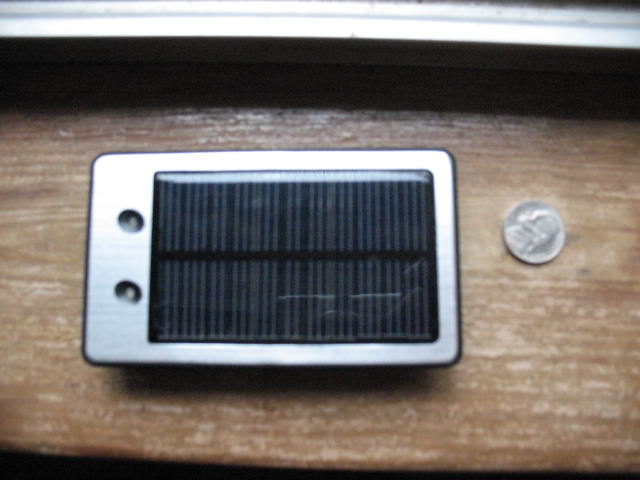
I went to Radio Shack and bought a cable and some connectors so that I could hook up my portable CB radios to this charger. It comes with a variety of connectors that will fit most of the common cell phones to recharge them. Of course there wasn’t one to fit an LG brand phone which is what my wife has. Not the first time that we have run into this kind of problem with her phone. It doesn’t fit any of the connectors on my hand cranked radio either (the generator on this radio can be used to recharge cell phones also). Even Radio Shack didn’t have fittings to go to her cell phone. The salesman there said that LG is a world of their own and that we would probably have to go to them to get a connector. Hey, here’s an idea; it’s about time to upgrade and we just won’t buy an LG phone. Anyhow, check out these little re-chargers. They could be real life savers in a disaster situation. I’ll bet a lot of hurricane Katrina victims wish that they had had one of these. Pictured below: Dell solar recharger hooked up to my walkie-talkies.
It’s mid-October. I know that in some parts of the country there is already snow on the ground, but here in East Texas we think that it is cooling down because it only gets into the high 70’s during the day. So now is the time that I am starting to cut wood for my stove this winter. I hold over a little wood from the previous year so that I will be sure to have some that is already seasoned. By the time I burn it, my newly cut wood will be dried out enough to make good firewood. When possible I like to cut wood that is already dead. That way I’m not cutting any live trees. My second choice is to cut trees that I need to get out of the way. This might be a tree that is in danger of blowing down on a power line, a tree that is shading my garden or orchard, or a tree that might fall and block road or driveway. Of course if these trees are not a good hardwood, I have to find another use for them or just let them lay. I prefer to cut oak or hickory. These split easily and burn hot. I sometimes cut an elm if it’s in the way but they are hard to split. Pine and sweetgum are very common on my farm but are not good firewood.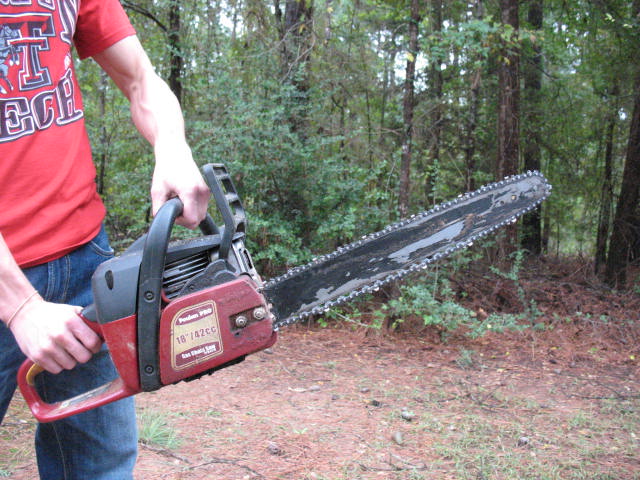
In these times when everything is good, I use my chainsaw to cut wood; then I haul it up to the house where I cut it to stove wood length and split it. I still use wedges and a sledge hammer to split wood. I can’t see the financial advantage to a log splitter. It’s easier to split wood, but those things cost a fortune, they use fossil fuel, and I need the exercise anyway.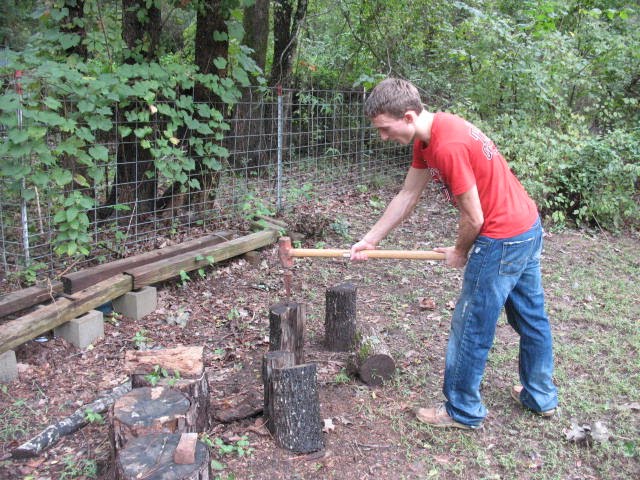
If times were bad (i.e. a total breakdown of the social order) I have my old stand-by, a crosscut saw. Actually I have three crosscut saws of different sizes. I wouldn’t want to make all the noise that a chainsaw does, and believe me; you can hear a chainsaw from a very long way off. A chainsaw would only attract attention that I don’t want, so the chainsaw is out during hard times. 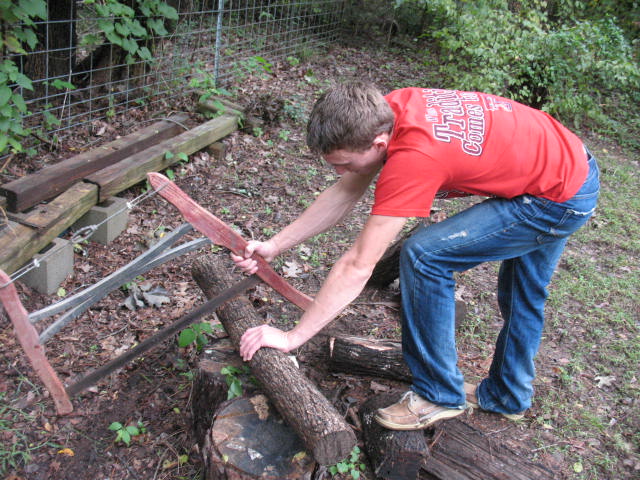
The basic tools that I use are a chainsaw, an axe, a sledge hammer, and some splitting wedges. I use a Poulan Pro chainsaw with an 18 inch bill. Don’t wear yourself and your saw out by buying an undersized chainsaw. Also, learn how to work on the saw yourself. Sharpening a chain, cleaning the air filter, and replacing the sparkplug are easy to learn and will save you a ton of cash. Because of our mild winters, I only need about a cord to a cord and a half of wood to make it through the winter with my wood stove. The difference between burning wood and using my electric central heat is dramatic. When I don’t burn wood my electric bill is over $300 a month. When I use my wood stove religiously, it reduces my electric bill to about $100 a month in the winter. Quiet a difference.
I keep my firewood up off the ground but I don’t cover it. I do keep about 4 or 5 days worth of wood on my covered porch so that I have dry wood. As I burn the wood on the porch, I bring new wood up from the woodpile. I have a kindling box built into the garden shed outside of my back porch where I keep a lot of split pine kindling. Getting a fire started in the stove is usually no problem, but if the wood is too wet and it is hard to get a fire going I use a little rich pine for kindling. This stuff will burn under any circumstances. I have even soaked it in water and then set it on fire with a single match. It is so heavy with pine rosin that it is almost like having wood that has been soaked in kerosene.
Remember, a wood stove is not a good choice if everything has gone bad. That wood smoke might attract attention that you don’t want, so keep the kerosene heater ready for use at first, and wait a while on the wood stove if possible. Still, with that said, there’s nothing that says home to me more than driving up and smelling the hardwood smoke coming out of my stove pipe. It just makes me fell at peace with the world.
This last summer we finally saved up enough pennies to complete a project that we’ve wanted to do for years. We built a green house on to the back of our country home. Some friends of ours had access to some glass that had been cut for patio doors that had turned out to be the wrong size. The glass panel are double glazed and clear so they were perfect for what we wanted to do. Our friends gave us eight of these glass panels as well as a double insulated single-hung window, and we thought we were well on the way to having a greenhouse. We didn’t want a huge greenhouse, just something about 8ft. by 10ft. We figured that we could knock something like that out in short order. Funny how we can always convince ourselves how easy something will be.
I won’t go into all of the gory details of construction but I will give you a brief outline of how we built our greenhouse:
• We removed the sod from the area where the greenhouse would be and replanted it.
• We dug a 14” wide by 9” deep footing, leveled up our form boards, threw in a couple of rebar, and poured about 30 bags of sackcrete.
• On top of the footing we laid a 20” high wall of cinderblocks (the first time I ever laid brick or block, I was amazed that it turned out both level and square to within a quarter inch).
• We dug down to a waterline running under the greenhouse and added a faucet inside of the greenhouse.
• We framed up the wooden portion of the green house and painted everything.
• We screwed on a corrugated clear fiberglass roof and caulked all the seams.
• We installed the single hung window on the East end of the greenhouse.
• We built the potting benches inside the green house out of treated lumber.
• We built an extension of our existing deck over to the greenhouse.
• We built steps down into the greenhouse out of treated lumber.
• We laid patio blocks and gravel on the ground inside of the greenhouse.
• We built a set of double doors with Plexiglas inserts and mounted them in the West end of the greenhouse.
• And last, we installed the glass panels.
Pictured Below: The finished greenhouse.
It was a lot more work than we had anticipated, and the weather was a lot hotter than we anticipated, and we had to spend more money than we anticipated, but we were very happy with the results. The greenhouse looks like part of our house and not just an add-on. We are looking forward to having fresh hothouse tomatoes this winter, and we will be starting a lot of plants for our spring garden in the new greenhouse. 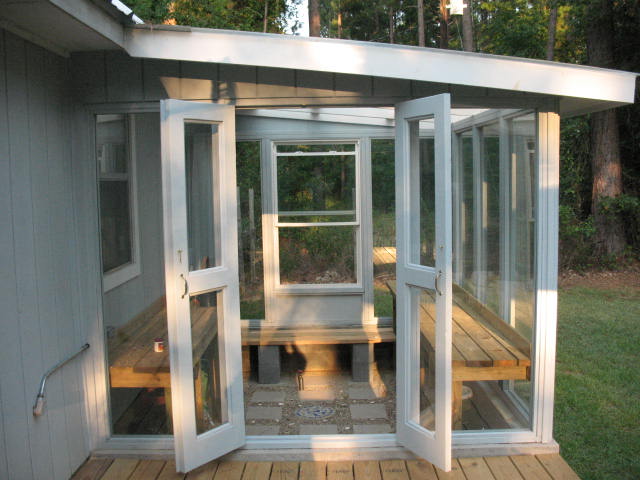
The first thing that you have to understand about gasoline powered electrical generators is that they are not a long-term power source. They are useful during power outages, but even the most efficient units use a lot of gasoline if you keep them running full time. Even during power outages it is wise to use the generator only when necessary. Since I have kerosene lamps, a wood heater, and a propane cook stove; I only really need to run my generator a few hours a day to keep the refrigerator and freezer cold and to pump water for a bath and to flush the toilets. While the generator is running anyway, I take the opportunity to recharge my flashlights, my radio, my wife’s cell phone, and her laptop. These items draw very little wattage.
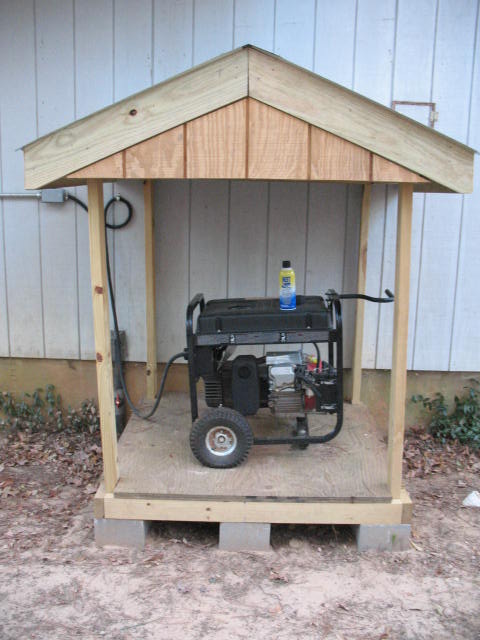
I have had a generator for several years. I did a lot of research and a lot of comparing before I bought my generator. I ended up getting a Black Max Generator from Sam’s Club. It has a surge rating of 6560 watts and regular operating rating of 5250 watts (more about this below). I wanted a generator that had enough power to run my home, but I didn’t want one that would be overpowered and eat up a bunch of gasoline. I also wanted a reliable unit, and the Subaru motor on this generator has worked without fail so far. Pictured Below: My generator ready to be plugged into the house. 
One thing that has always been a pain about operating my generator is stringing out extension cords and plugging and unplugging various appliances. I recently had a plug and switch installed on my house so that I can plug the generator into the end of the house and throw the switch which disconnects me from the grid and switches over to generator power. The switch keeps the generator produced electricity from backfeeding into the power lines and electrocuting some innocent lineman who is working on reconnecting the power lines. Pictured Below: The big gray box to the left of the meter box is the switch that disconnects me from the grid and connects me to the generator. 
Before I plug in the generator I turn off all the breakers in my breaker box and then, after the generator is running, I turn on selected breakers for the circuits that I want to operate. Lights and ceiling fans draw little wattage. The refrigerator and freezer draw significant wattage, but they only need to run for two or three hours a day to keep everything cool. It’s simply a matter of running them during the day when the lights are off. The one-horse 220v. well pump draws a lot of wattage when the motor kicks on, so I try to have the refrigerator and freezer off when the pump is running. Central air conditioning, electric heat, and an electric cook stove are out. They draw far too much energy to be powered by a generator. I do have a small window unit air-conditioner that I can use to keep one room cool in really hot weather. In general, anything that produces heat or has a good-sized motor will draw a lot of wattage. Pictured Below: Small storage building where I keep my generator and a can of fuel. 
If you are considering purchasing a generator, you are probably as confused as I was about what size you need. After all, these things run on gasoline or propane, and the bigger the generator, the more fuel you will use. You don’t want to burn fuel to produce more energy than you will need, but at the same time you want to be sure that you have enough power to run the things that you need. Let me try and save you some headaches by telling you how I finally arrived at a formula for picking the right size generator. The first thing that you need to know is that generators have two ratings. One is the regular operating wattage, and one is called the surge wattage. You see, some appliances, like a light bulb, use the same amount of watts at all times, while other appliances, like a well pump, take a lot of watts to get started but less watts to keep running once they are in operation. These extra watts to get an appliance going are where the surge rating comes in. Your generator’s surge rating tells you how many watts the generator will provide for a short time, but this is not the wattage at which the generator was designed to produce power for an extended period of time. To figure out how much generator you will need, you must add up the total wattage, including surge wattage, of all the appliances that you plan to run at one time. Your generator needs to have a surge wattage rating equal to at least this amount. Now add up the operating wattage of all the appliances that you plan to run at one time. Your generator needs to have an operating wattage equal to two times this number. The reason for this is because your generator will work most efficiently if you only draw on half of the rated operating wattage. More than this will put undue strain on the generator.
If you try to run all of your appliances at one time you will need a huge generator; and you will, consequently, burn a huge amount of fuel. It is much more efficient to use your breaker box to control which circuits you will have on at any one time. I have each breaker in my breaker box marked with the amount of watts that are drawn by the appliances on that circuit (this is somewhat inexact because you may not have all the appliances on a particular circuit turned on, but it gives you a guideline). I have a card tacked up over the breaker box that shows the operating wattage and surge wattage of my generator. When I get ready to turn several circuits on, it’s a matter of simple addition. The total wattage of all the circuits operating at one time must have a surge rating of less than the surge rating of the generator and an operating wattage of one-half of the operating wattage of the generator. If I am about to throw a breaker that will exceed either of these numbers, then I know that I’m going to have to turn something else off first.
Of course it doesn’t do any good to have a generator if you don’t have any fuel for it, so keep some gas on hand (stored well away from your home, of course). I keep about 25 or 30 gallons in five gallon containers. About every 2 or 3 months I pour this gas into my truck and go refill the gas cans. This way I always have fresh gas. I keep a few bottles of fuel stabilizer on hand but it is too expensive to use if you don’t have too.
