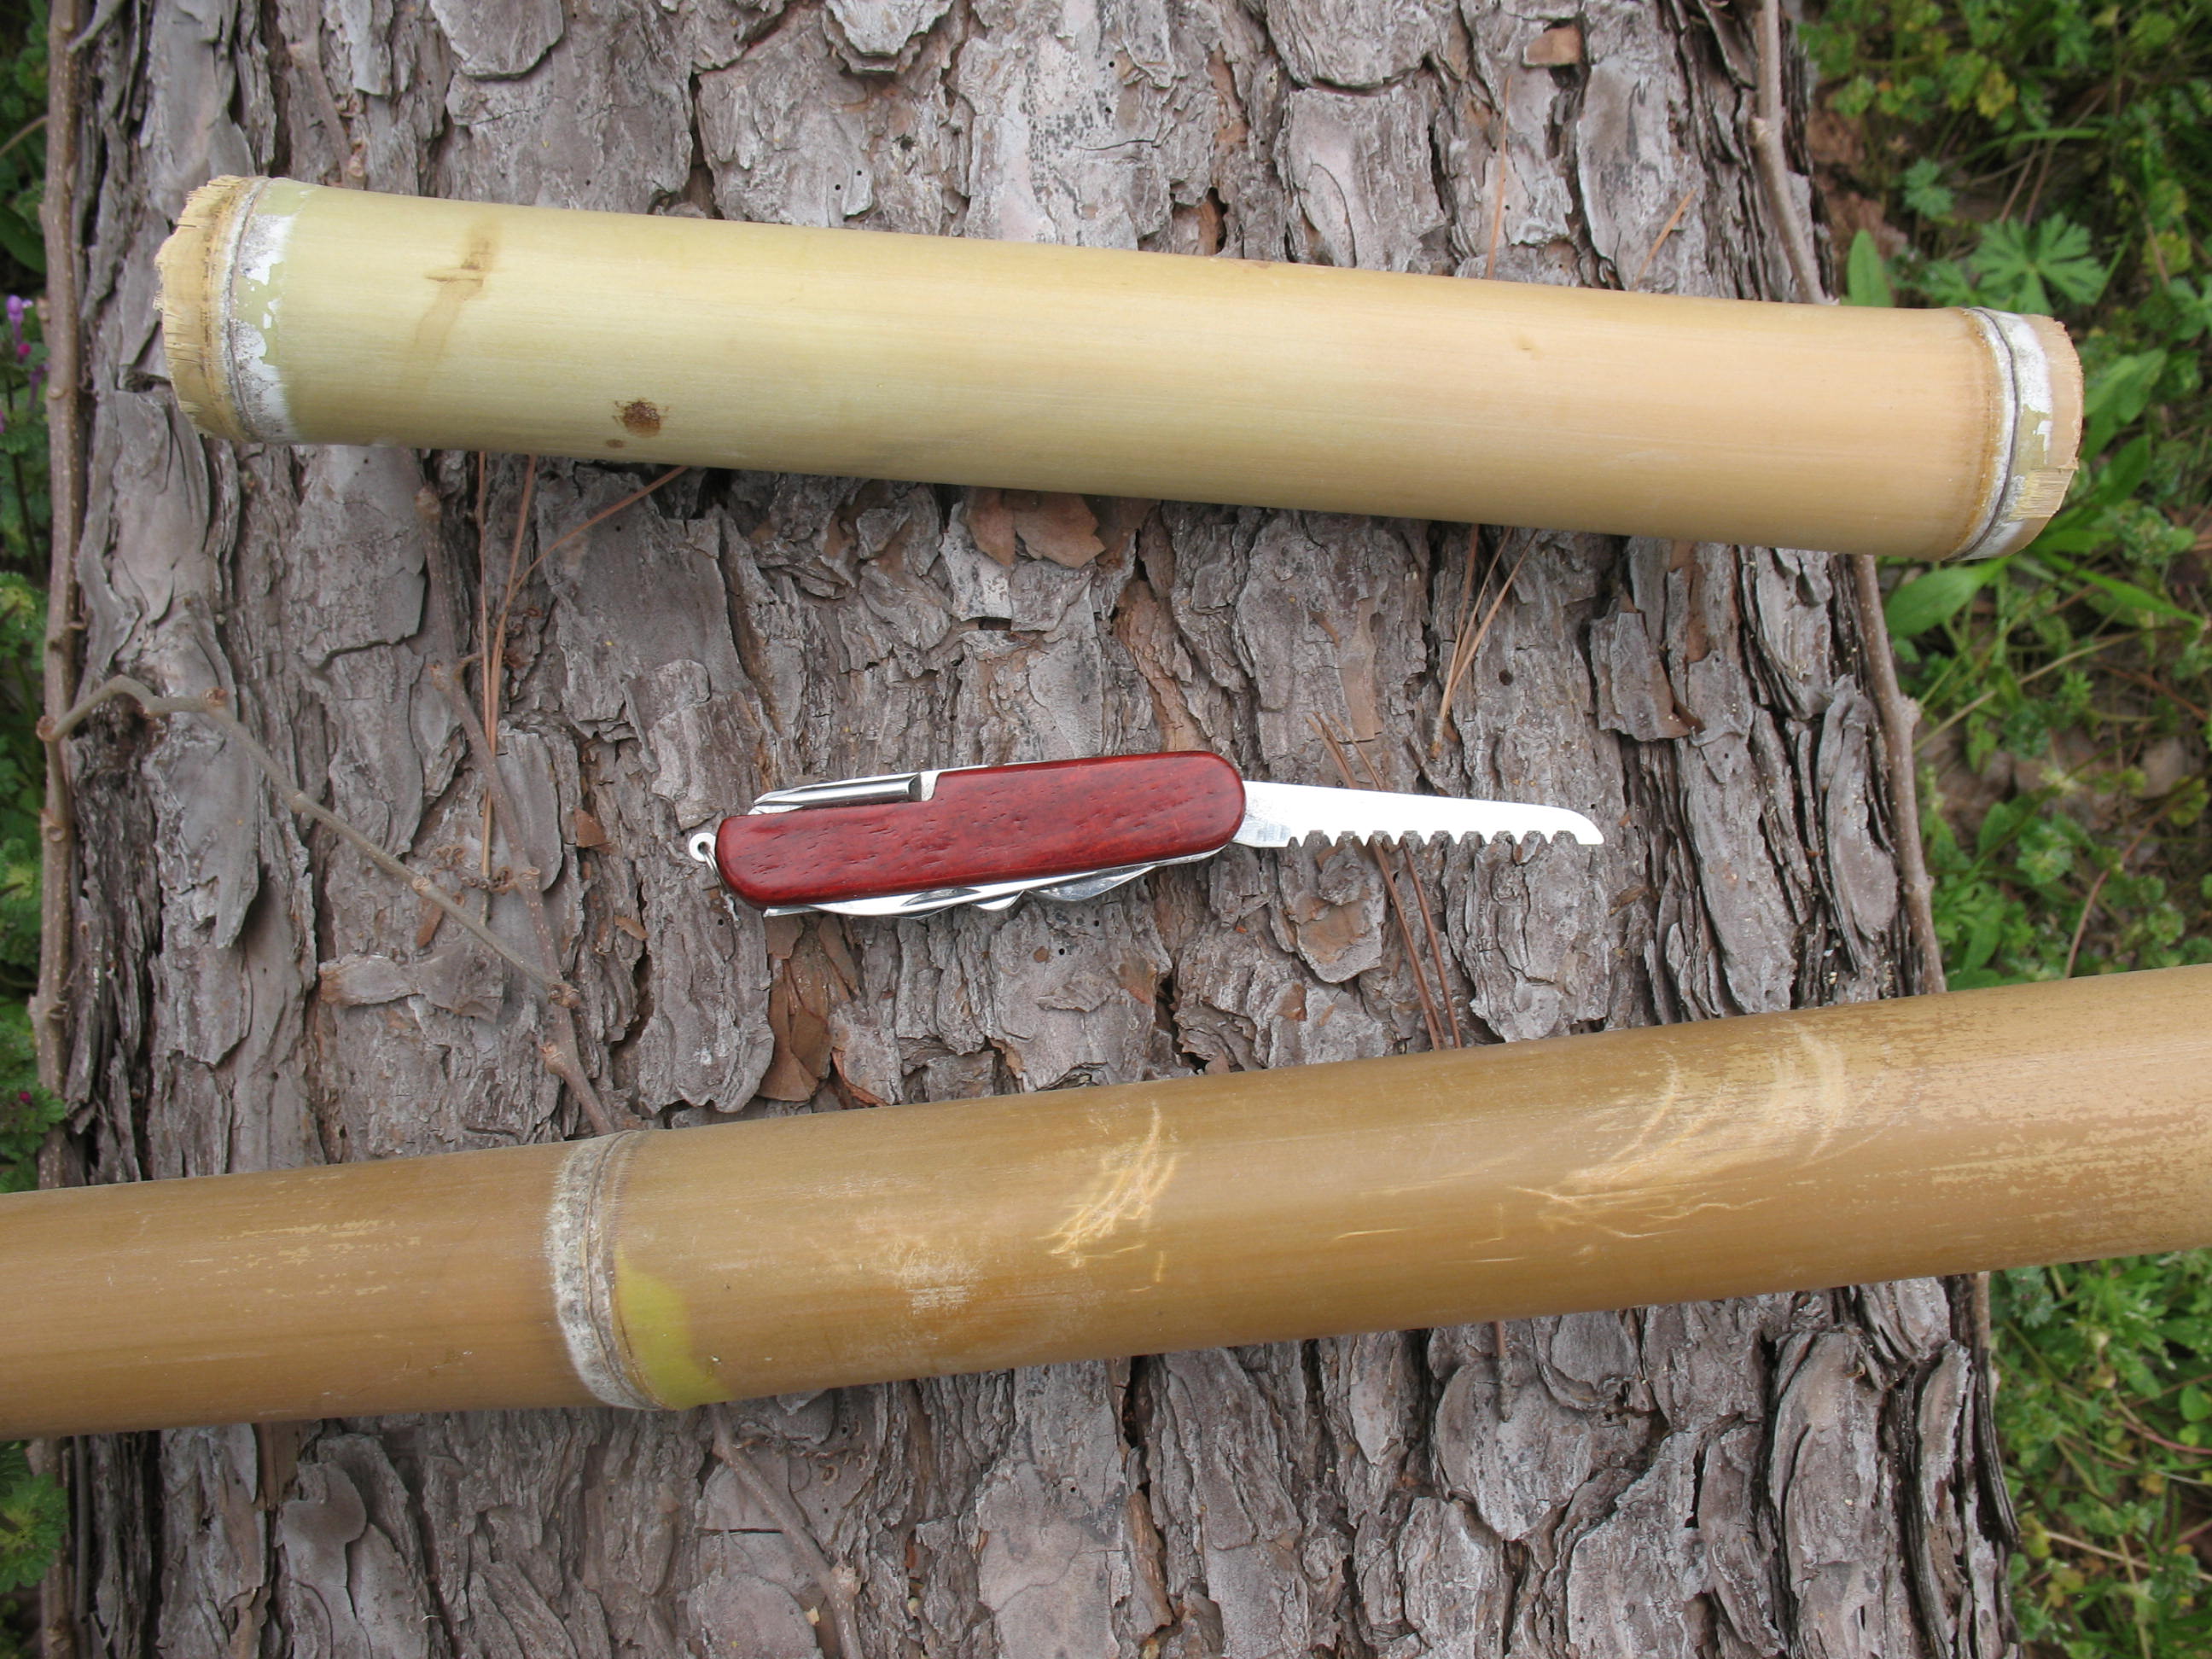
It only takes a little bit of work to turn a bamboo cane into a very practical canteen. To make a bamboo canteen you need to locate the largest bamboo you can find. Make sure that it is not split or damaged. Cut a piece of bamboo down. Cut or saw a section of the bamboo leaving a solid joint on each end. Pictured below: top, large piece of bamboo; bottom, one section cut out with end joints 
Now take your knife point and begin drilling a hole in the side of the bamboo toward one end or the other. Pictured below: hole in bamboo 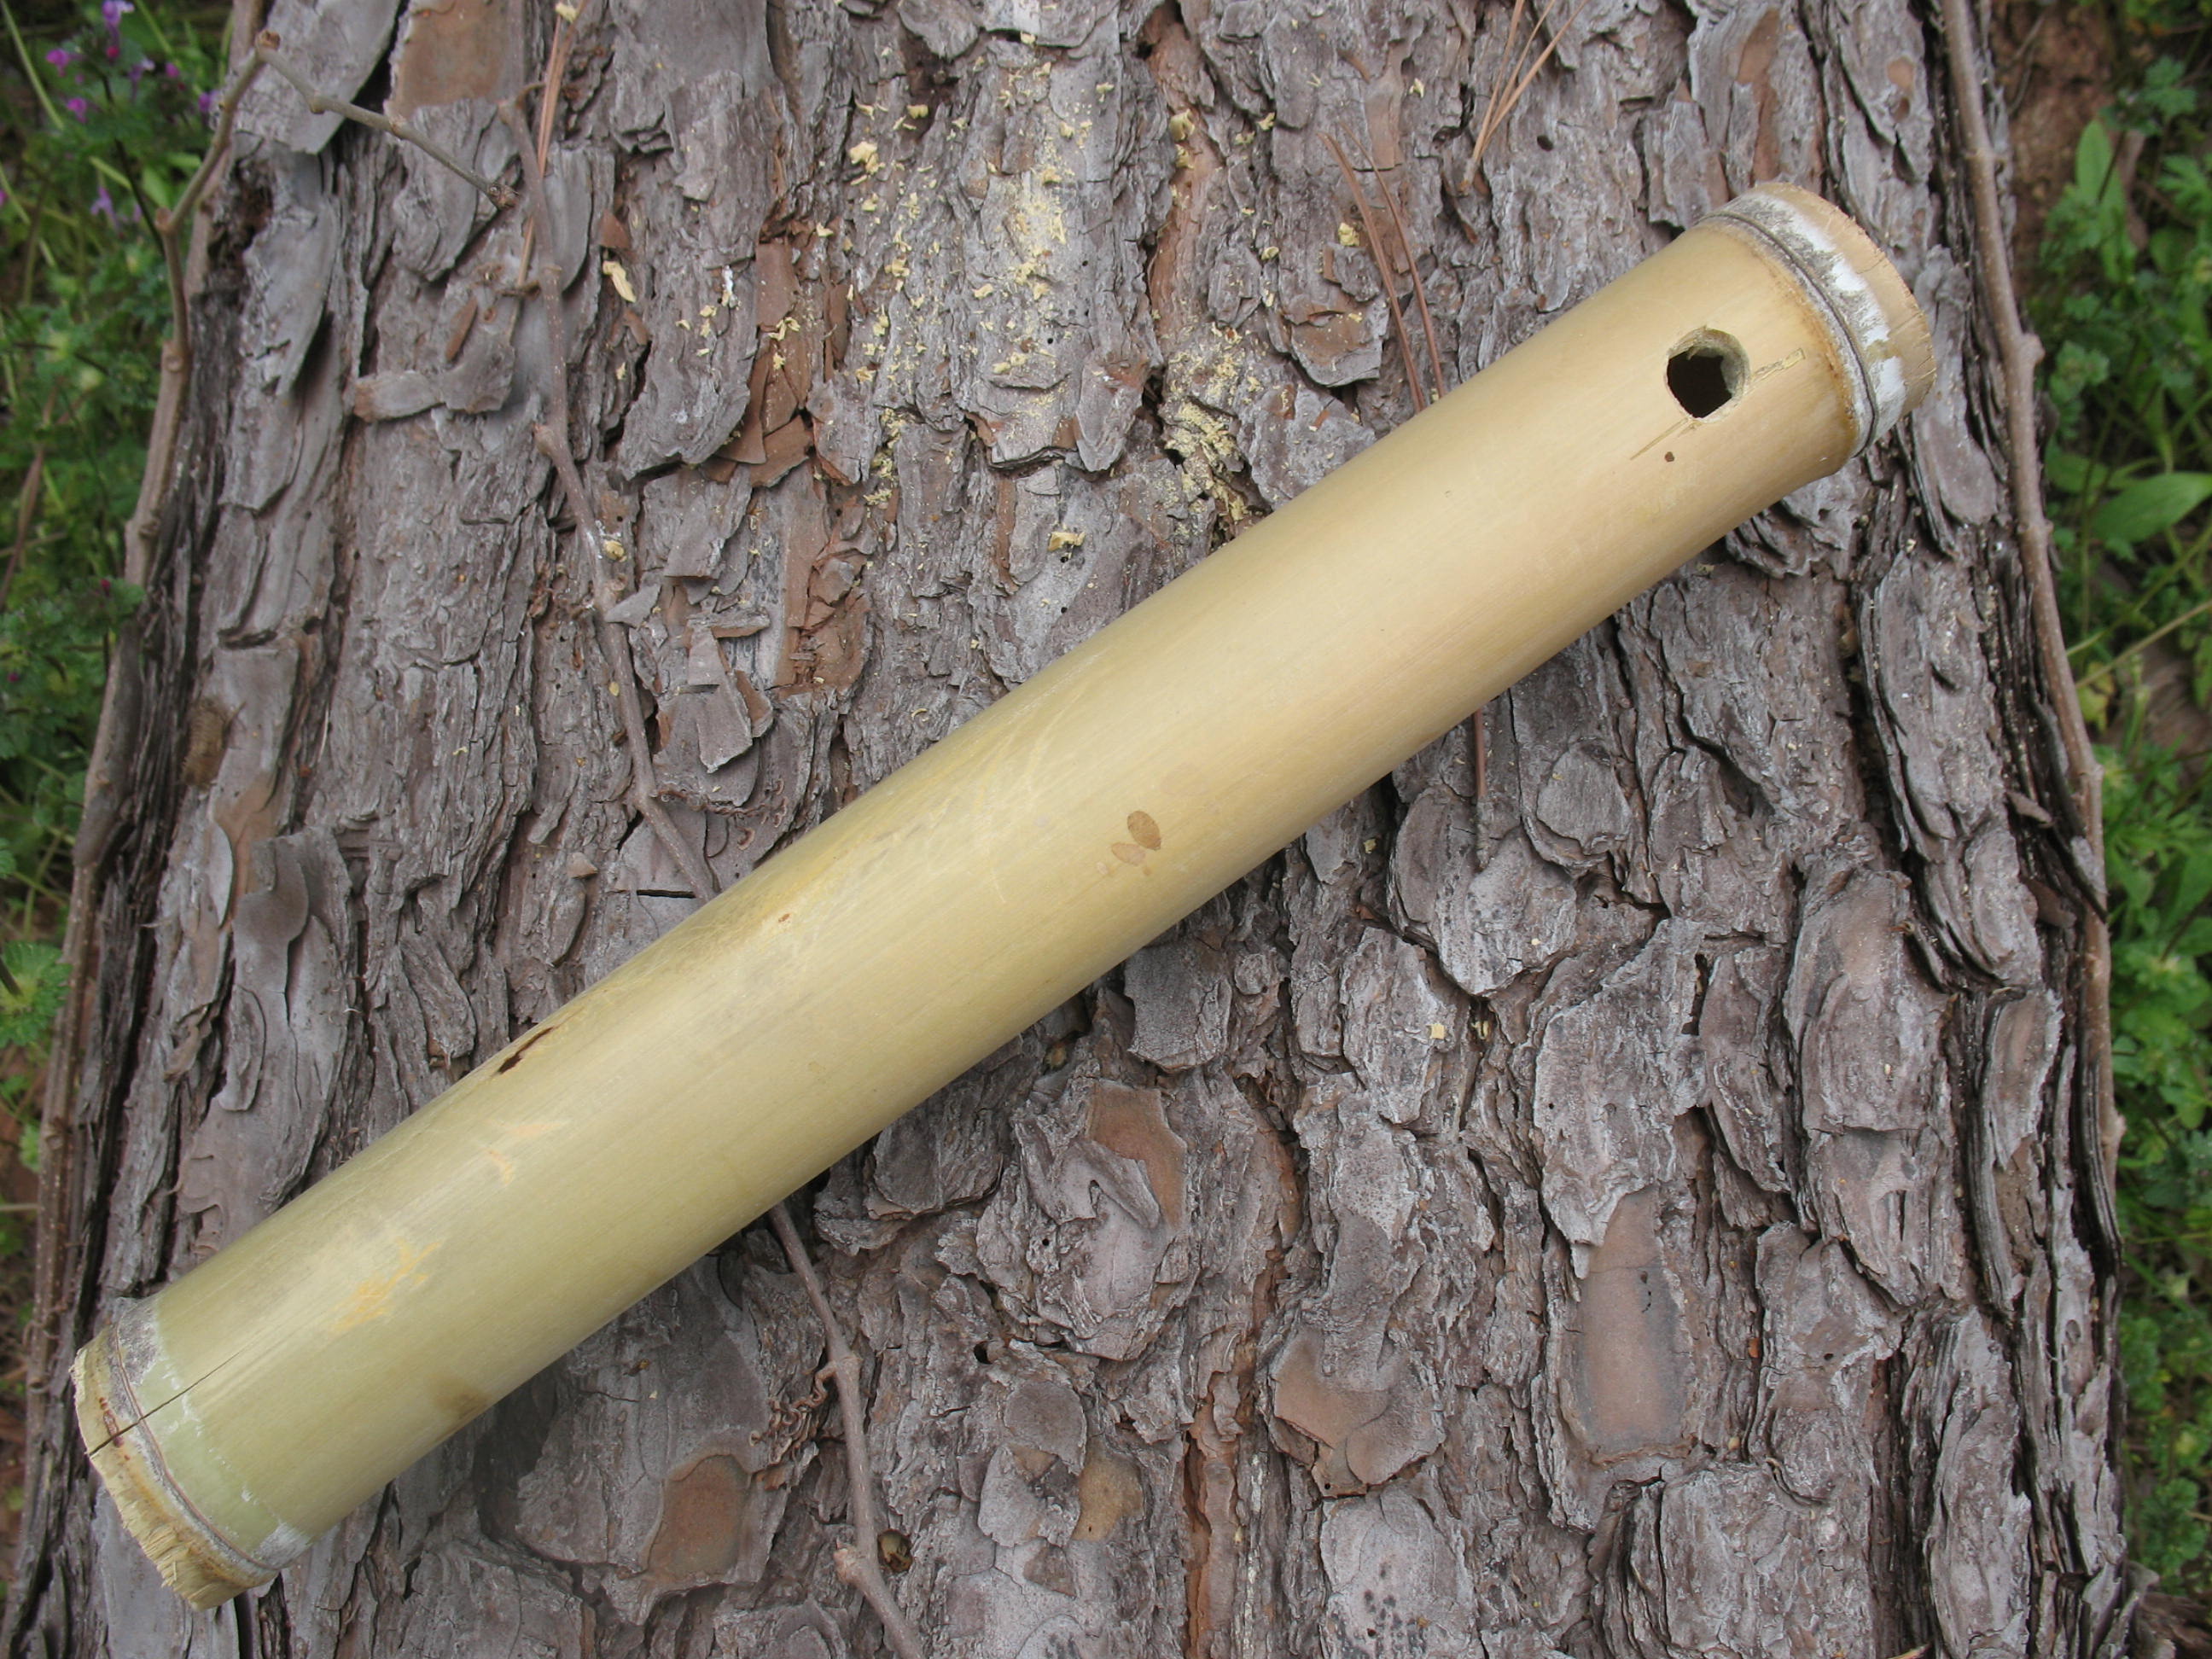
Bamboo has a membrane that grows inside of each section. If the bamboo is dry this membrane will flake of and mix in with any water that you store inside the bamboo. You can remove some of the membrane by dropping a handful of small stones into the bamboo, adding a little water, and shaking vigorously. Pour the water and stones out and rinse. Personally, I don’t bother with this. You will never get all of the membrane out, and you will probably get some of the stones that won’t come out.
Next step is to carve a plug to fit into the hole. Any wood will do. Carve a tapered plug that will make a good friction fit into the hole. Pictured below: plug carved out and ready to insert 
You can call the job done at this point, or you can do as I have done and make a carrying strap. I twisted this one up out of split yucca leaves. Pictured below: canteen with yucca belt strap 
The following flow chart is my attempt to illustrate the thinking process that I go through when I am trying to identify a track. I don’t know if anyone else has come up with anything like this. I haven’t seen it if they have. I am including a link that you can click on to download a printable PDF version of this flow chart if you would like to have one for your own use. I try to freely share knowledge that I have gained over the years, but please do not start printing these off and selling them at the next gun show or what have you. You do not have my permission to do this. If you would like to post a link to this article or include the flow chart on your own web-site, you may do so, but please credit my site. Thanks, Hank.
Click on this link to download a printable copy of the flow chart Track Analysis Flow Chart

I’m going to be adding a post from time to time about tracking. Let me say up front that I don’t claim any extraordinary skills as a tracker. The FBI does not have me on speed dial to track down fugitives from justice. I am a better than average tracker, thanks to the efforts of my teacher; and I will attempt to share with you the things that he taught me many years ago. I will tell you right now that tracking takes a lot of patience and a lot of practice. I, as most folks, don’t have the time available that it takes to become a great tracker; but a little knowledge of techniques and a little practice will improve anyone’s tracking abilities.
Tracking really consists of two main skills. The first is track identification, and the second is tracking itself. That is, the ability to follow a series of tracks and other signs in order to determine the direction of travel and/or location of the critter that made the tracks. This may involve anything from tracking down a wounded deer, to determining the location for a snare trap, to rescuing a lost child.
Track identification is the ability to look at a track and determine what animal made the track. Track identification is to tracking, as knowing the alphabet is to writing a story. You can’t write a story without knowing the alphabet, but knowing the alphabet sure doesn’t mean that you can write a story. I’m not going to include a lot of pictures of tracks in my posts. There are dozens of good books and hundreds of internet sites that have pictures and drawings of animal tracks and these are a good place to start learning about track identification; but be warned, no amount of looking at pictures is going to make you good at track identification. It is rare thing in the field to find a complete and clear track. When I first started learning to identify tracks in the field, my teacher and I would take a canoe down the Sabine River and stop at each sandbar to identify the tracks of animals that had come down to the river to drink. This was an environment where tracks were often very clear. He would have me carry a notebook and draw pictures of the various tracks that we found. Then we would make plaster casts of the tracks to study later.
If you are going to learn to identify tracks I would suggest that you do the following:
1. Get a good book on track identification, like a Peterson Field Guide to Animal Tracks, and learn to identify tracks from the pictures. Don’t worry about learning the different gaits at first. It gets a little overwhelming. Just learn to identify the tracks. You can download pictures of tracks off of the internet and make yourself a set of track flash-cards to help you study.
2. Next, get out into the field. If you have access to a river with sand bars, that’s a good place to study tracks. A pond or lake with a sandy beach or soft soil on the banks is also pretty good. If you don’t have access to anything else, you can build a tracking pit. Building a tracking pit will be the subject of another post. Take a notebook and draw pictures of the tracks that you find. Don’t just draw the full, clear tracks. Draw the partial tracks also. Drawing the track will force you to study them more closely, and little details about the tracks will emerge. Don’t just label the tracks with the name of the animal that made them; record the season, time of day, location, and type of soil that you find each track in.
3. Learn to make plaster casts of tracks and start your own collection of tracks. Record the season, time of day, location, and type of soil that you find each track in. Making plaster casts of tracks will be the subject of another post.
My teacher taught me that different families of animals have similarities between their tracks. For example: rodents have four toes on their front feet and five toes on their back feet, members of the weasel family have five toes on both front and back feet. I have organized this information into a flow-chart that, more or less, traces the mental process that I go through when identifying a track. In my next post I will include a copy of this flow-chart to help you identify tracks in the field.
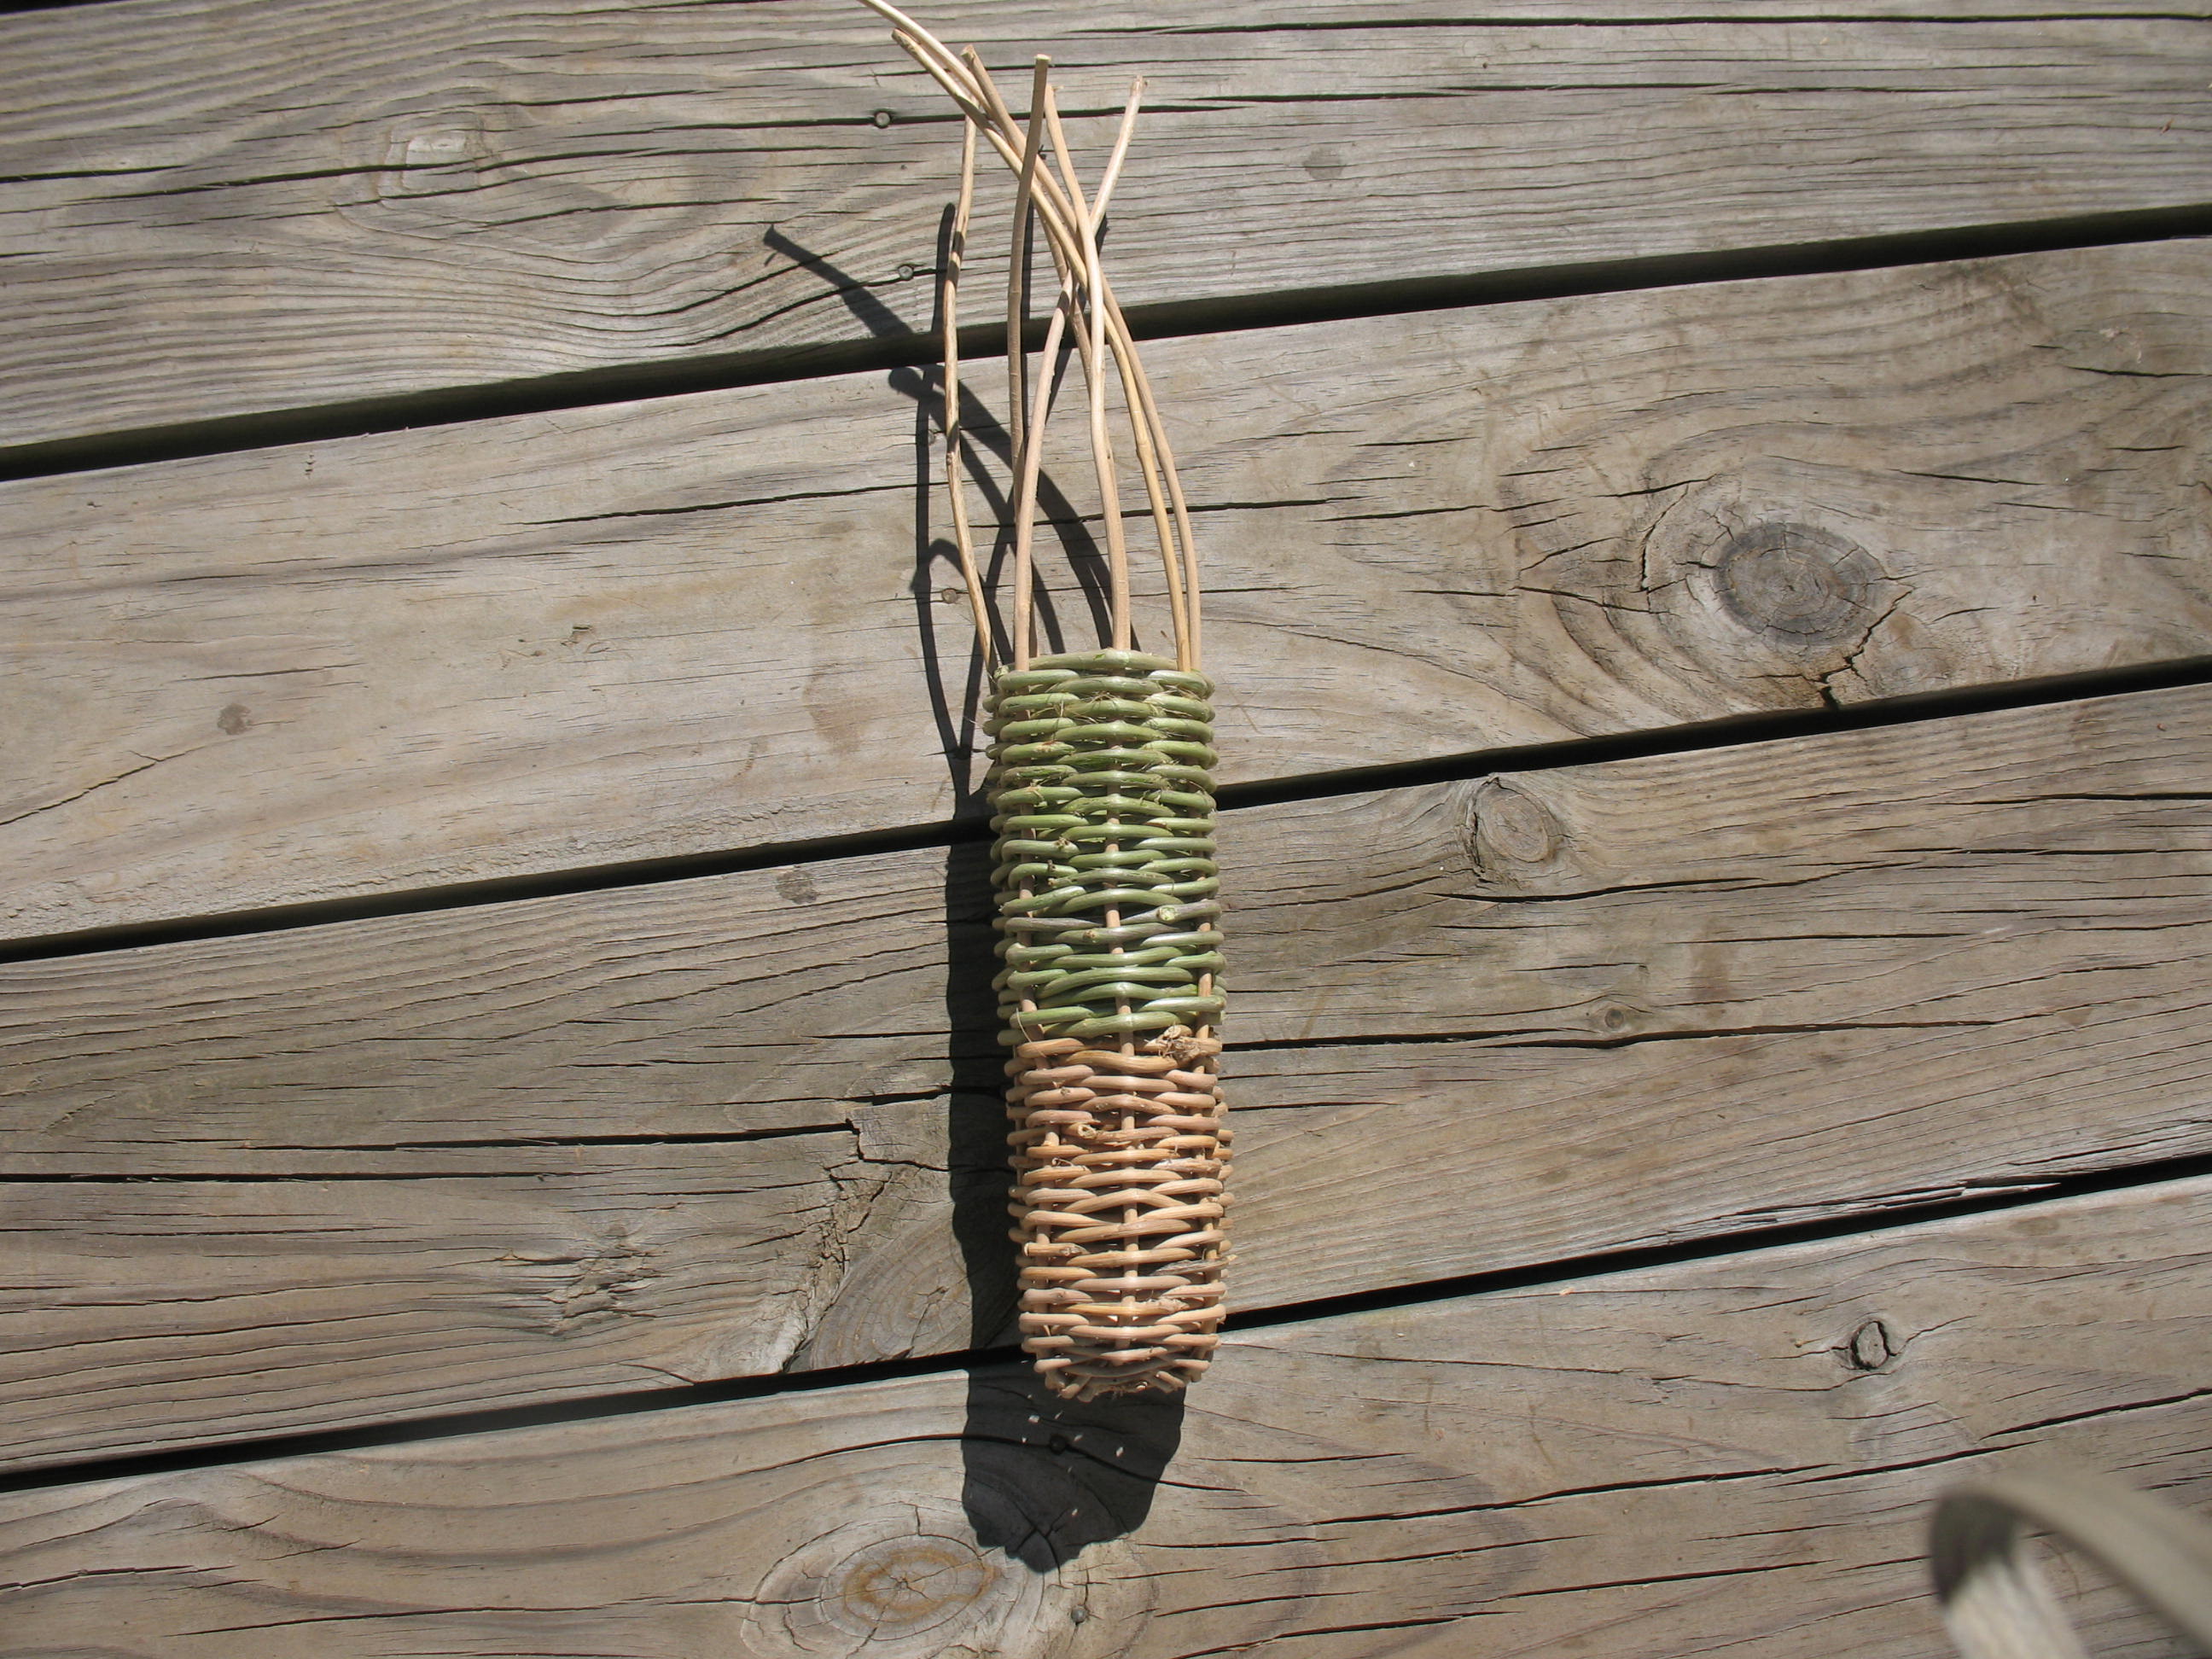
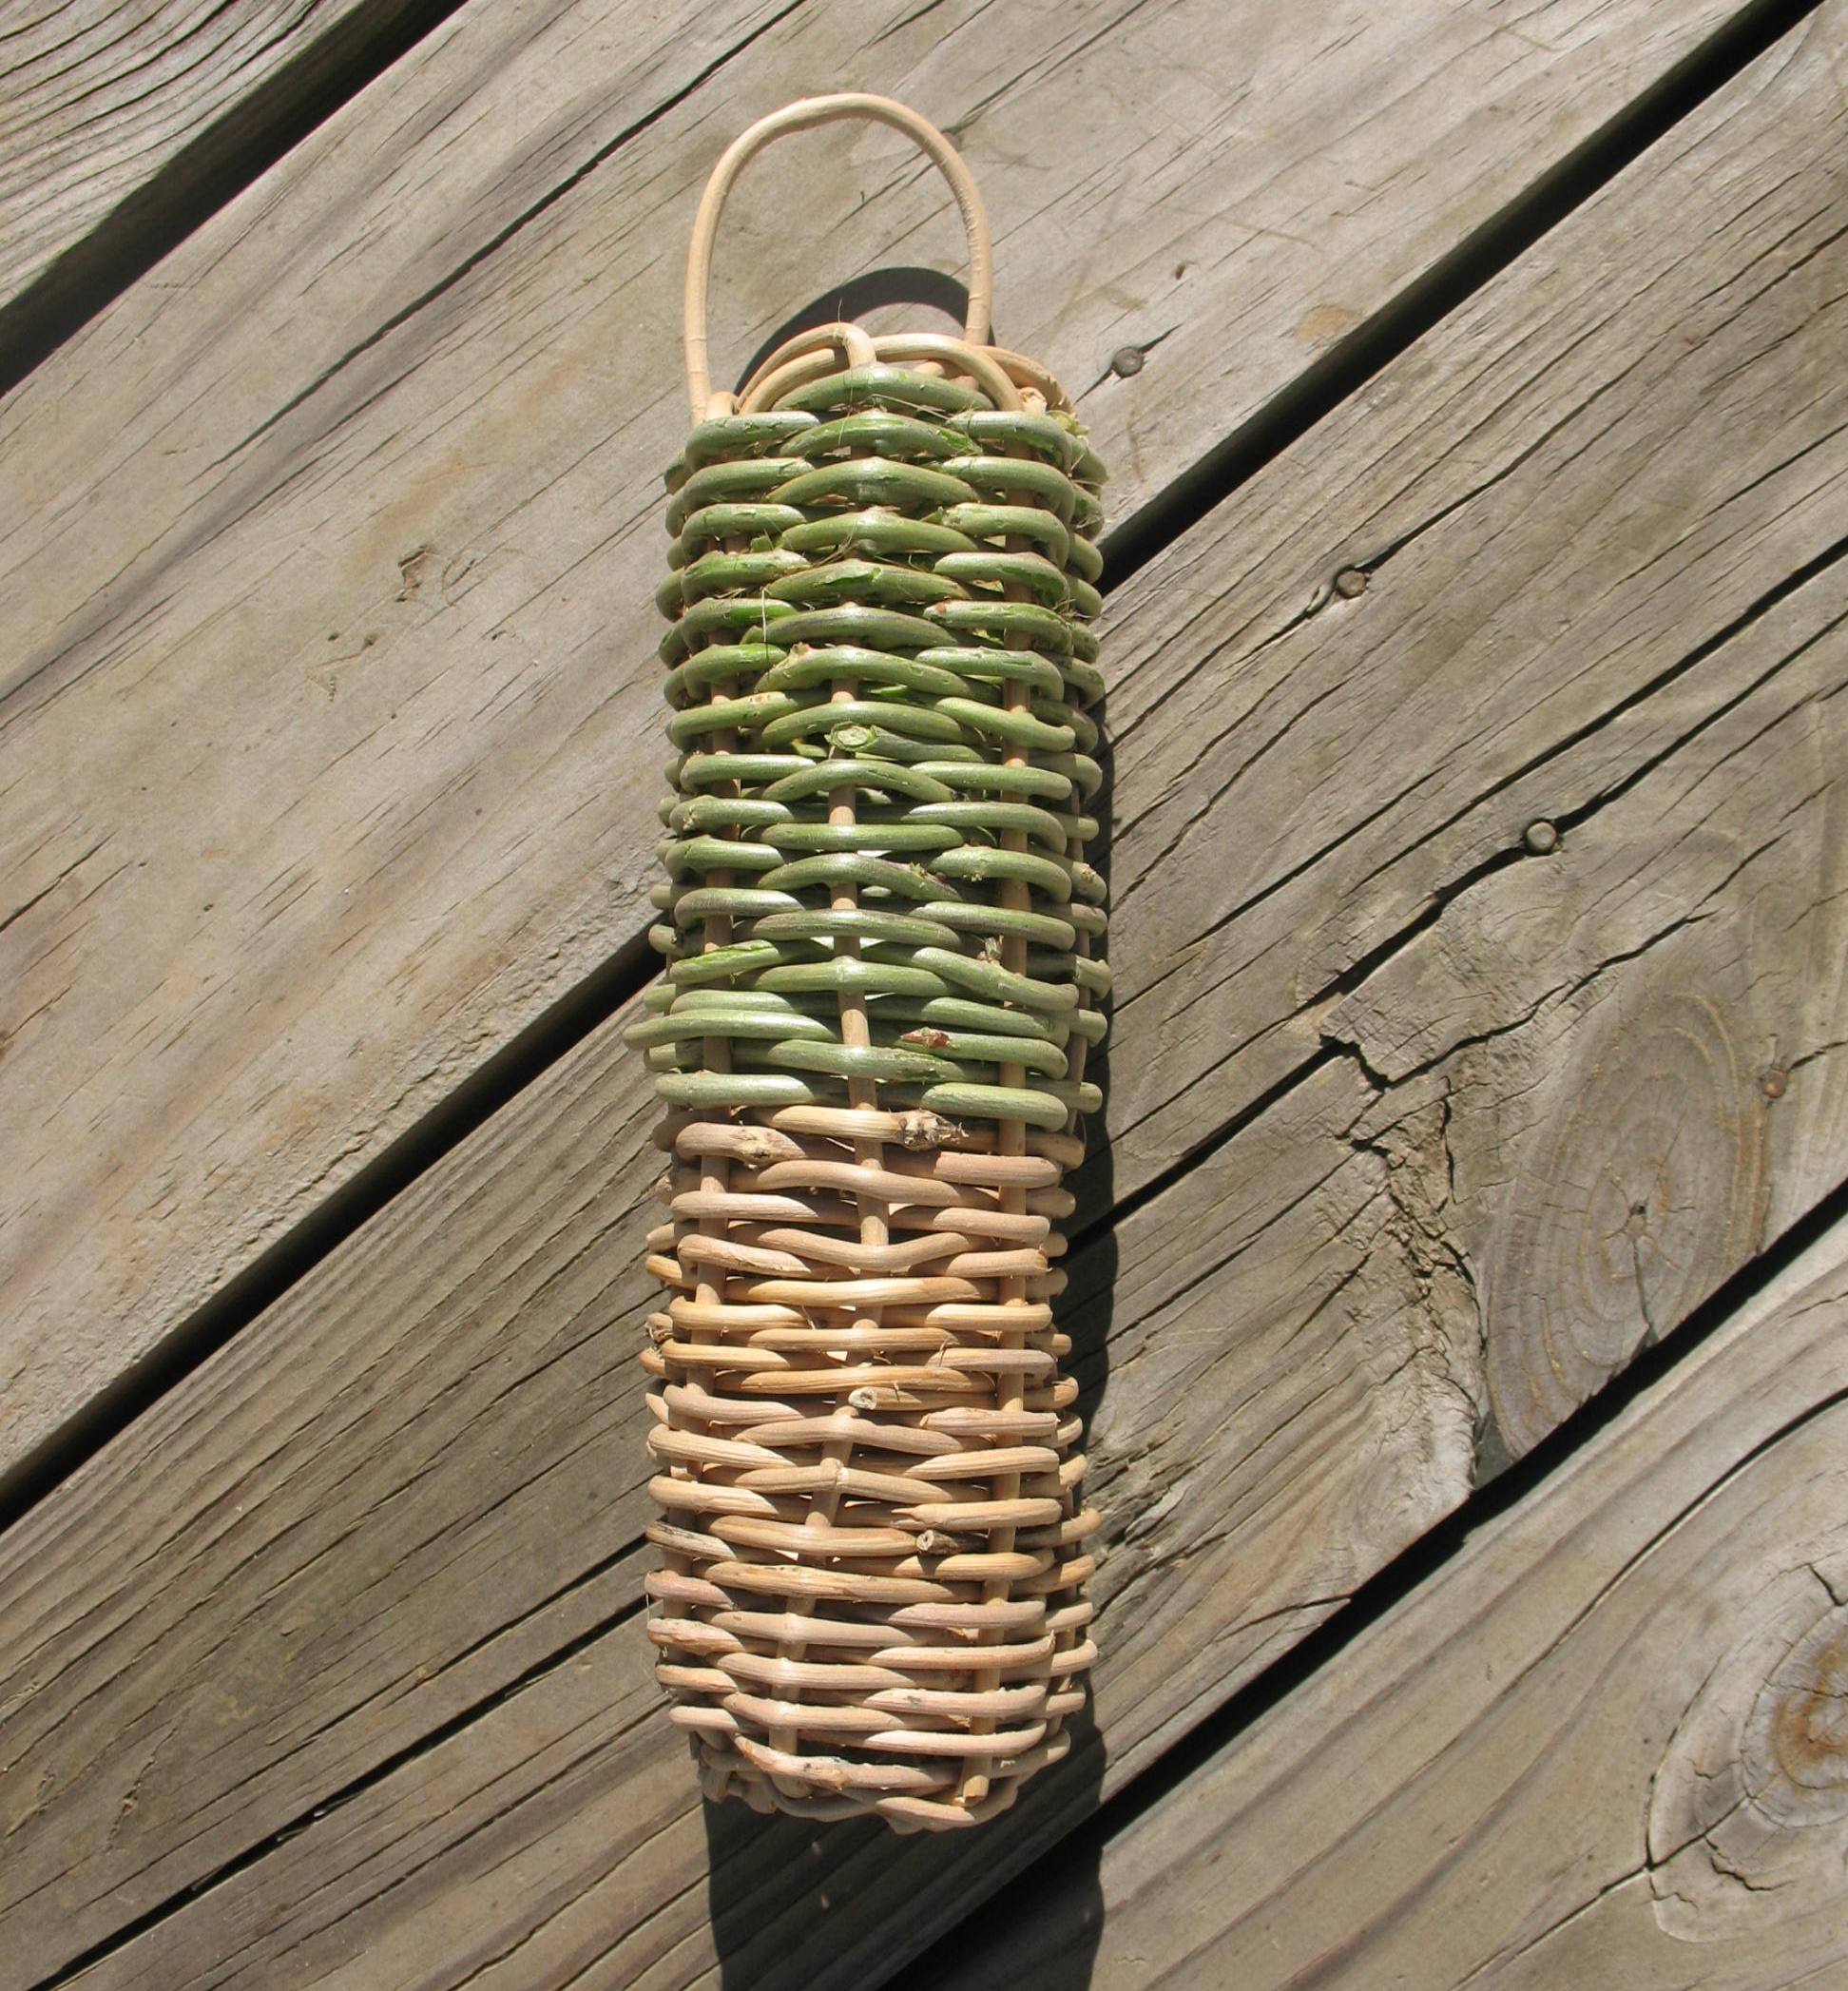
If you are going to take the time to make a handmade river cane blowgun and a nice set of thistle or raw cotton darts, why not take an extra hour or two and make an authentic looking quiver to carry your darts in? Pictured below: Darts in basket quiver

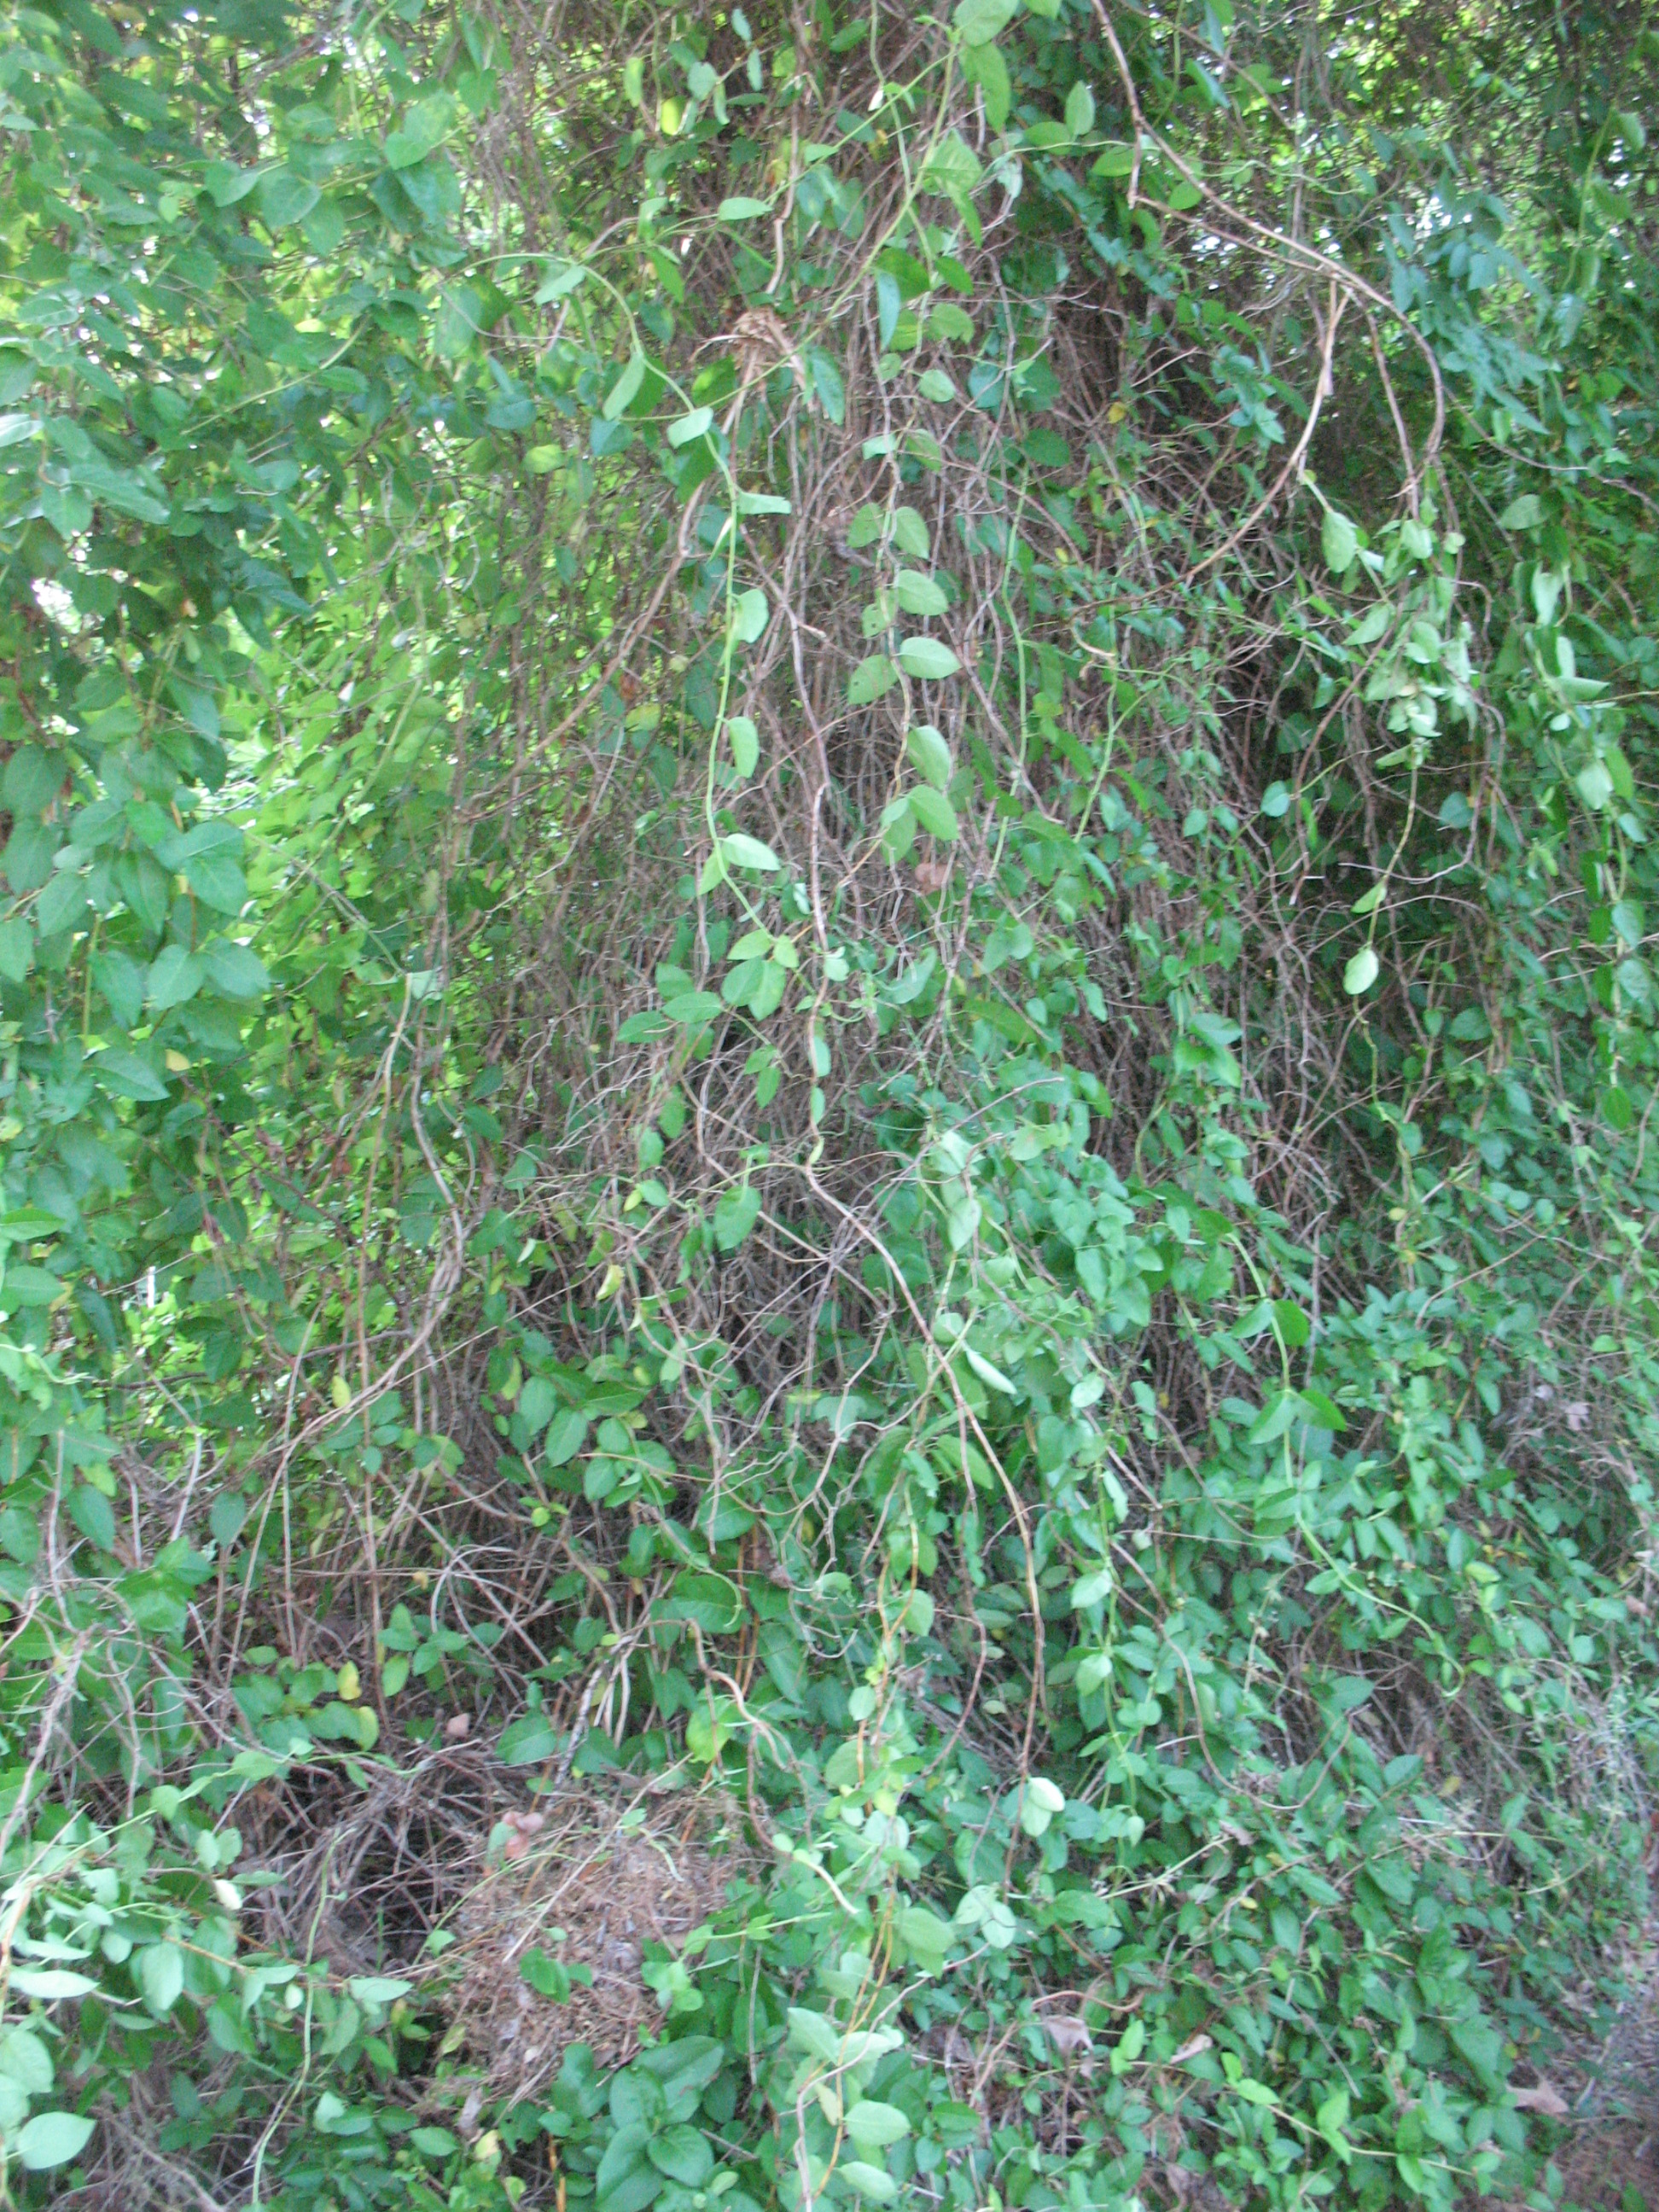
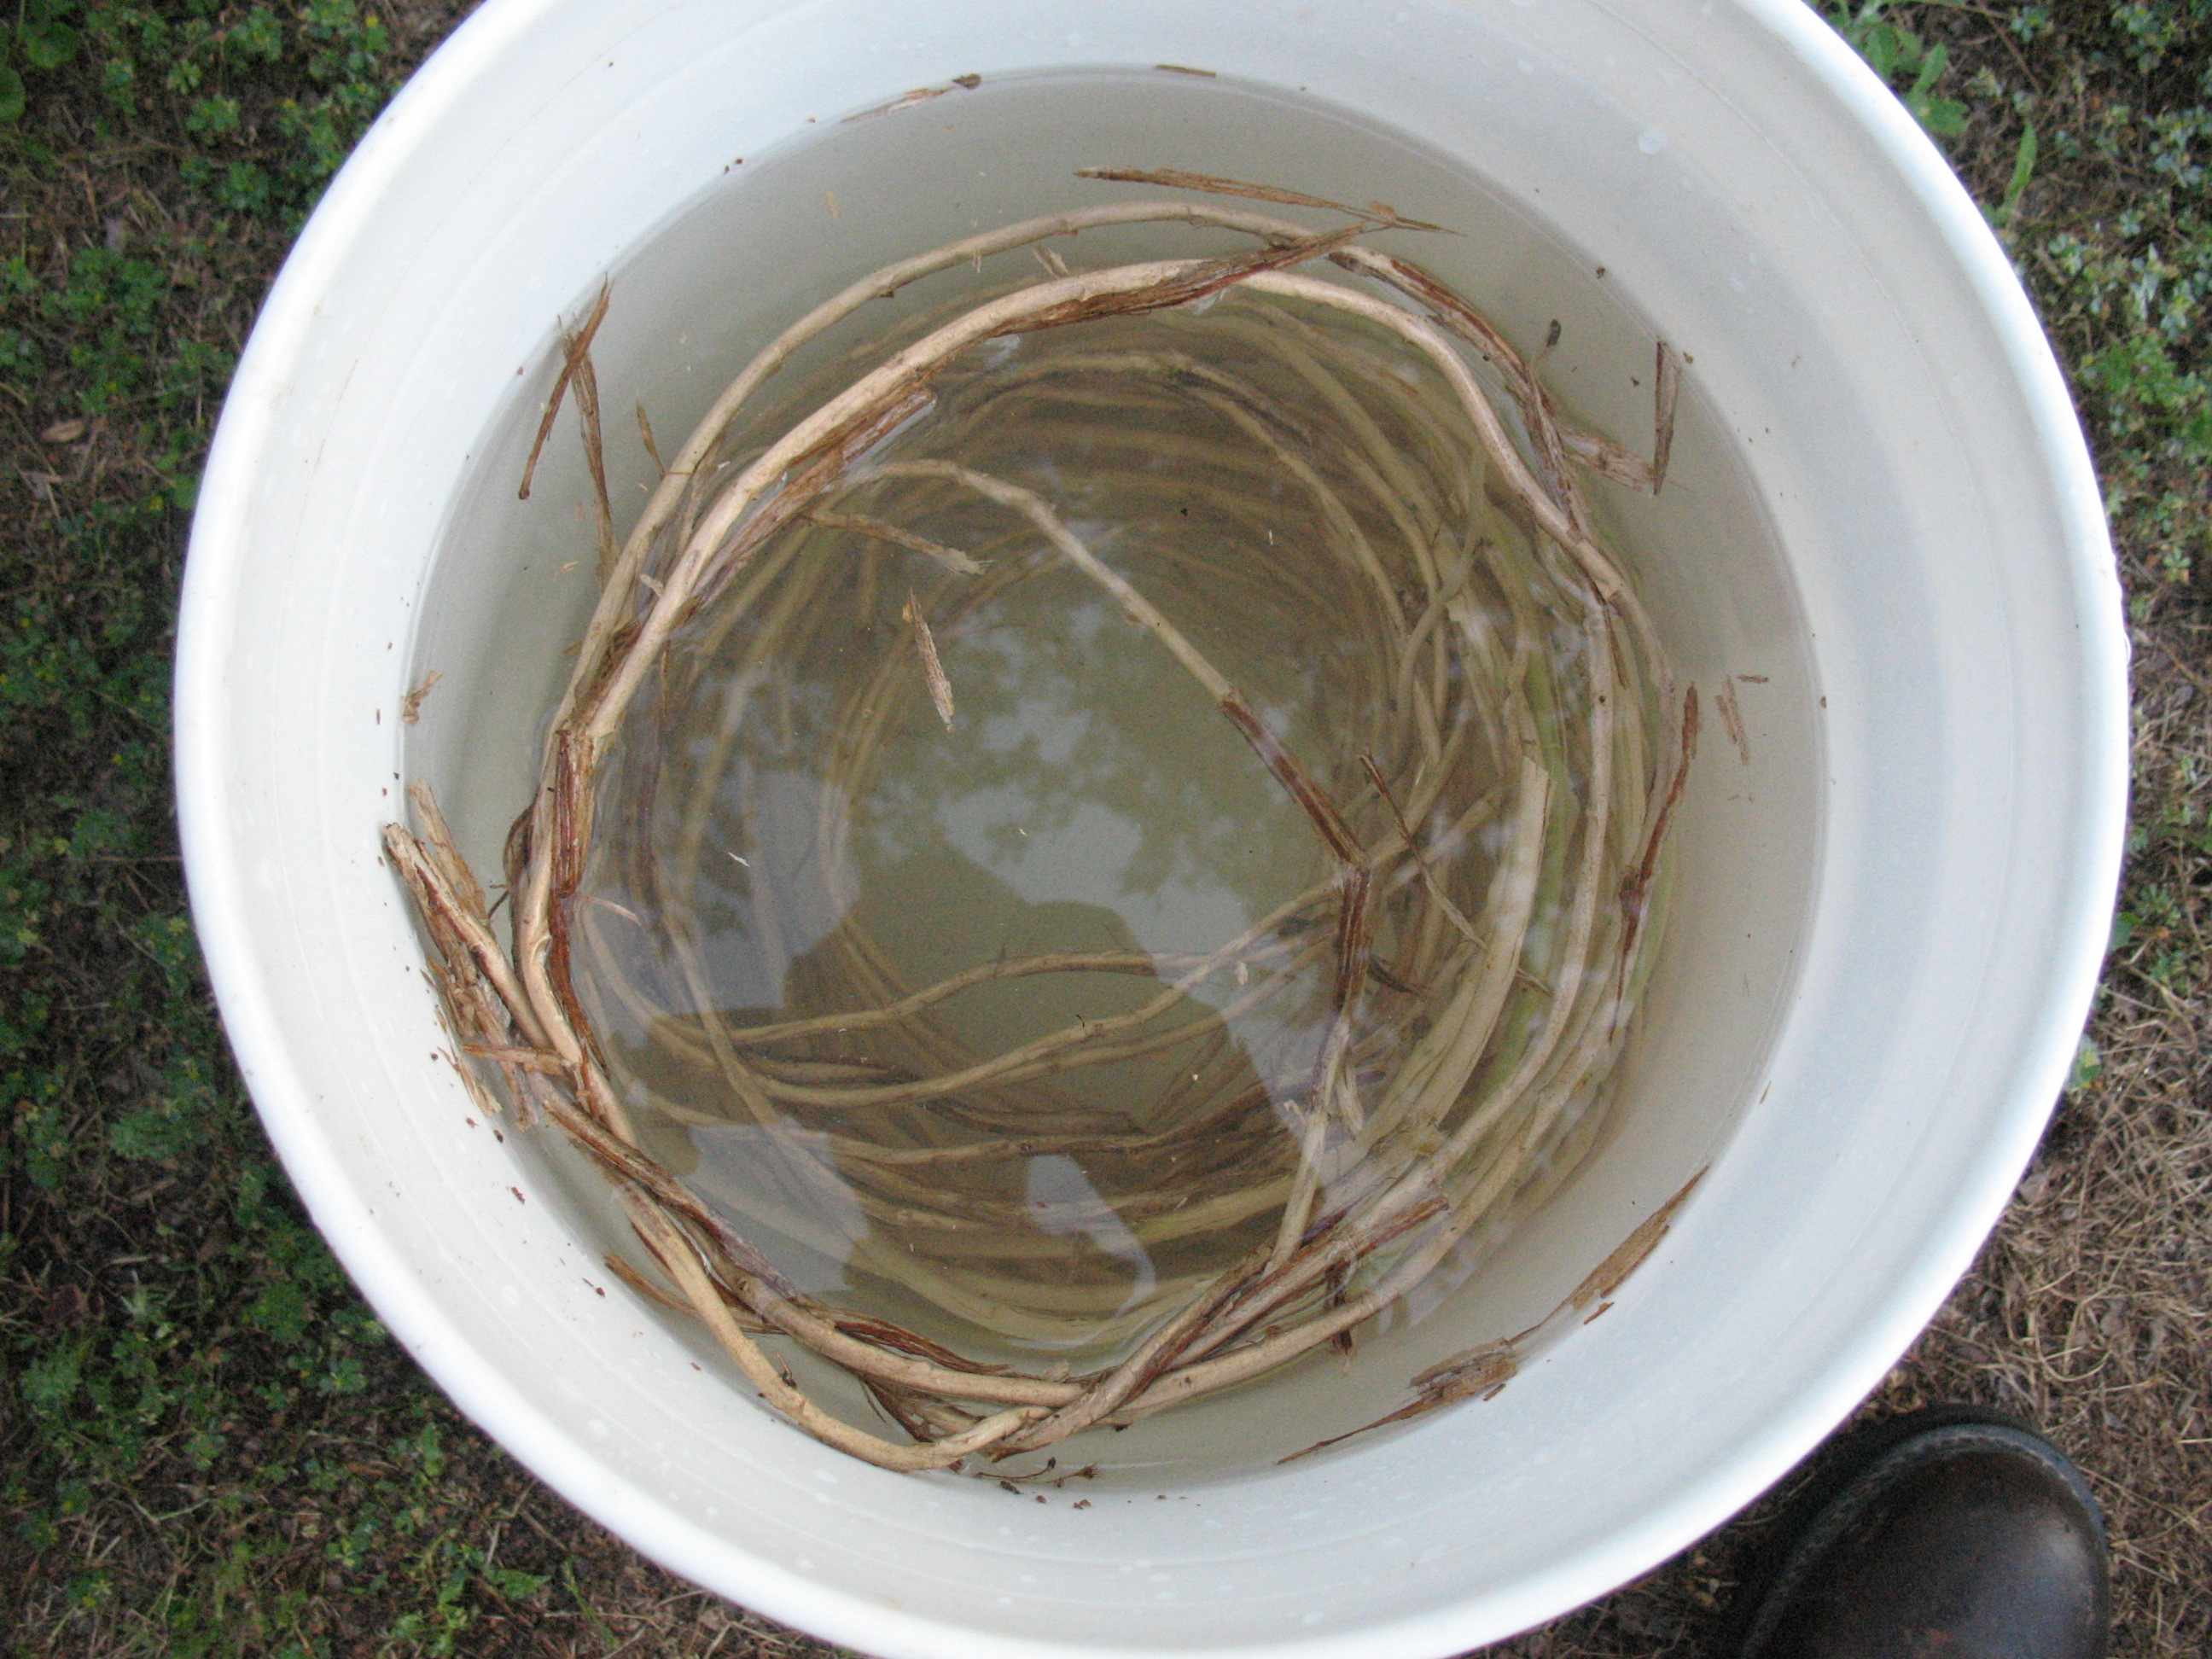
Before you make your quiver you will need to gather the raw materials. The quiver that I am making below is made of honeysuckle vines, so you will need to locate some honeysuckle, pull down the vines, clean them, and put them in water to soak for a day. The soaking will soften the vines and make them more pliable. Pictured below: top, Honeysuckle vines; center, Cleaned vines; bottom, Vines soaking in water.
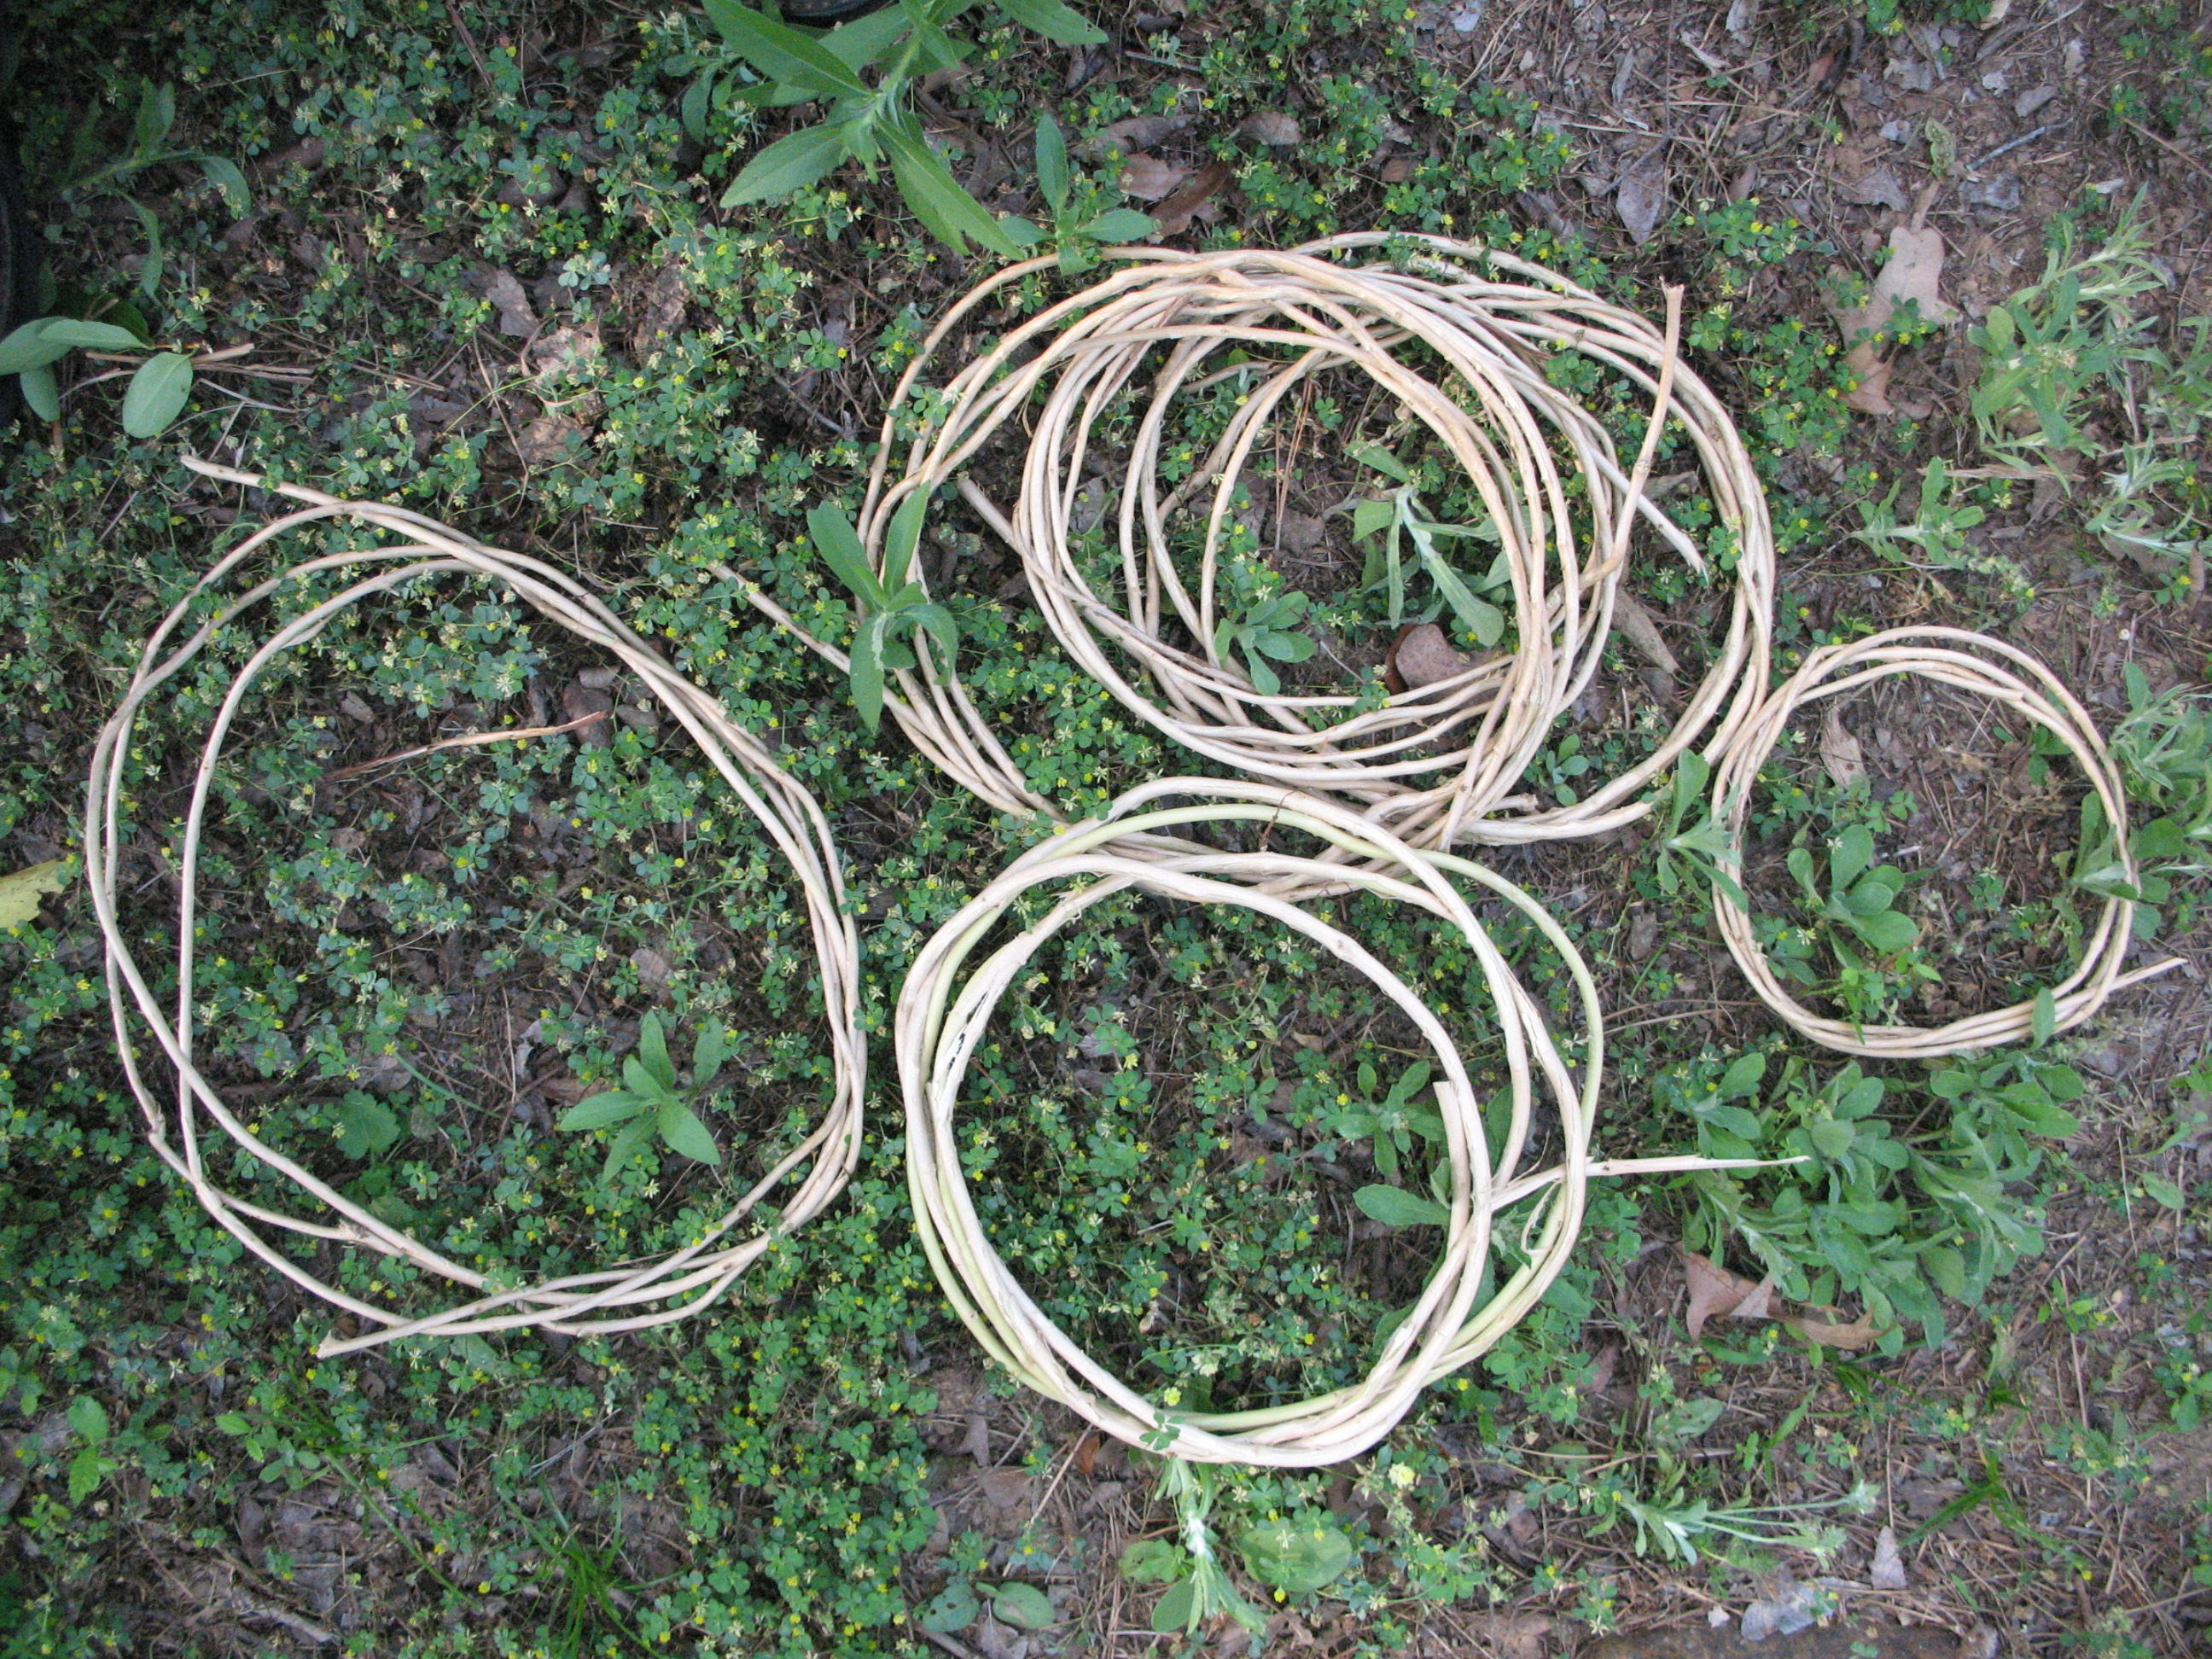
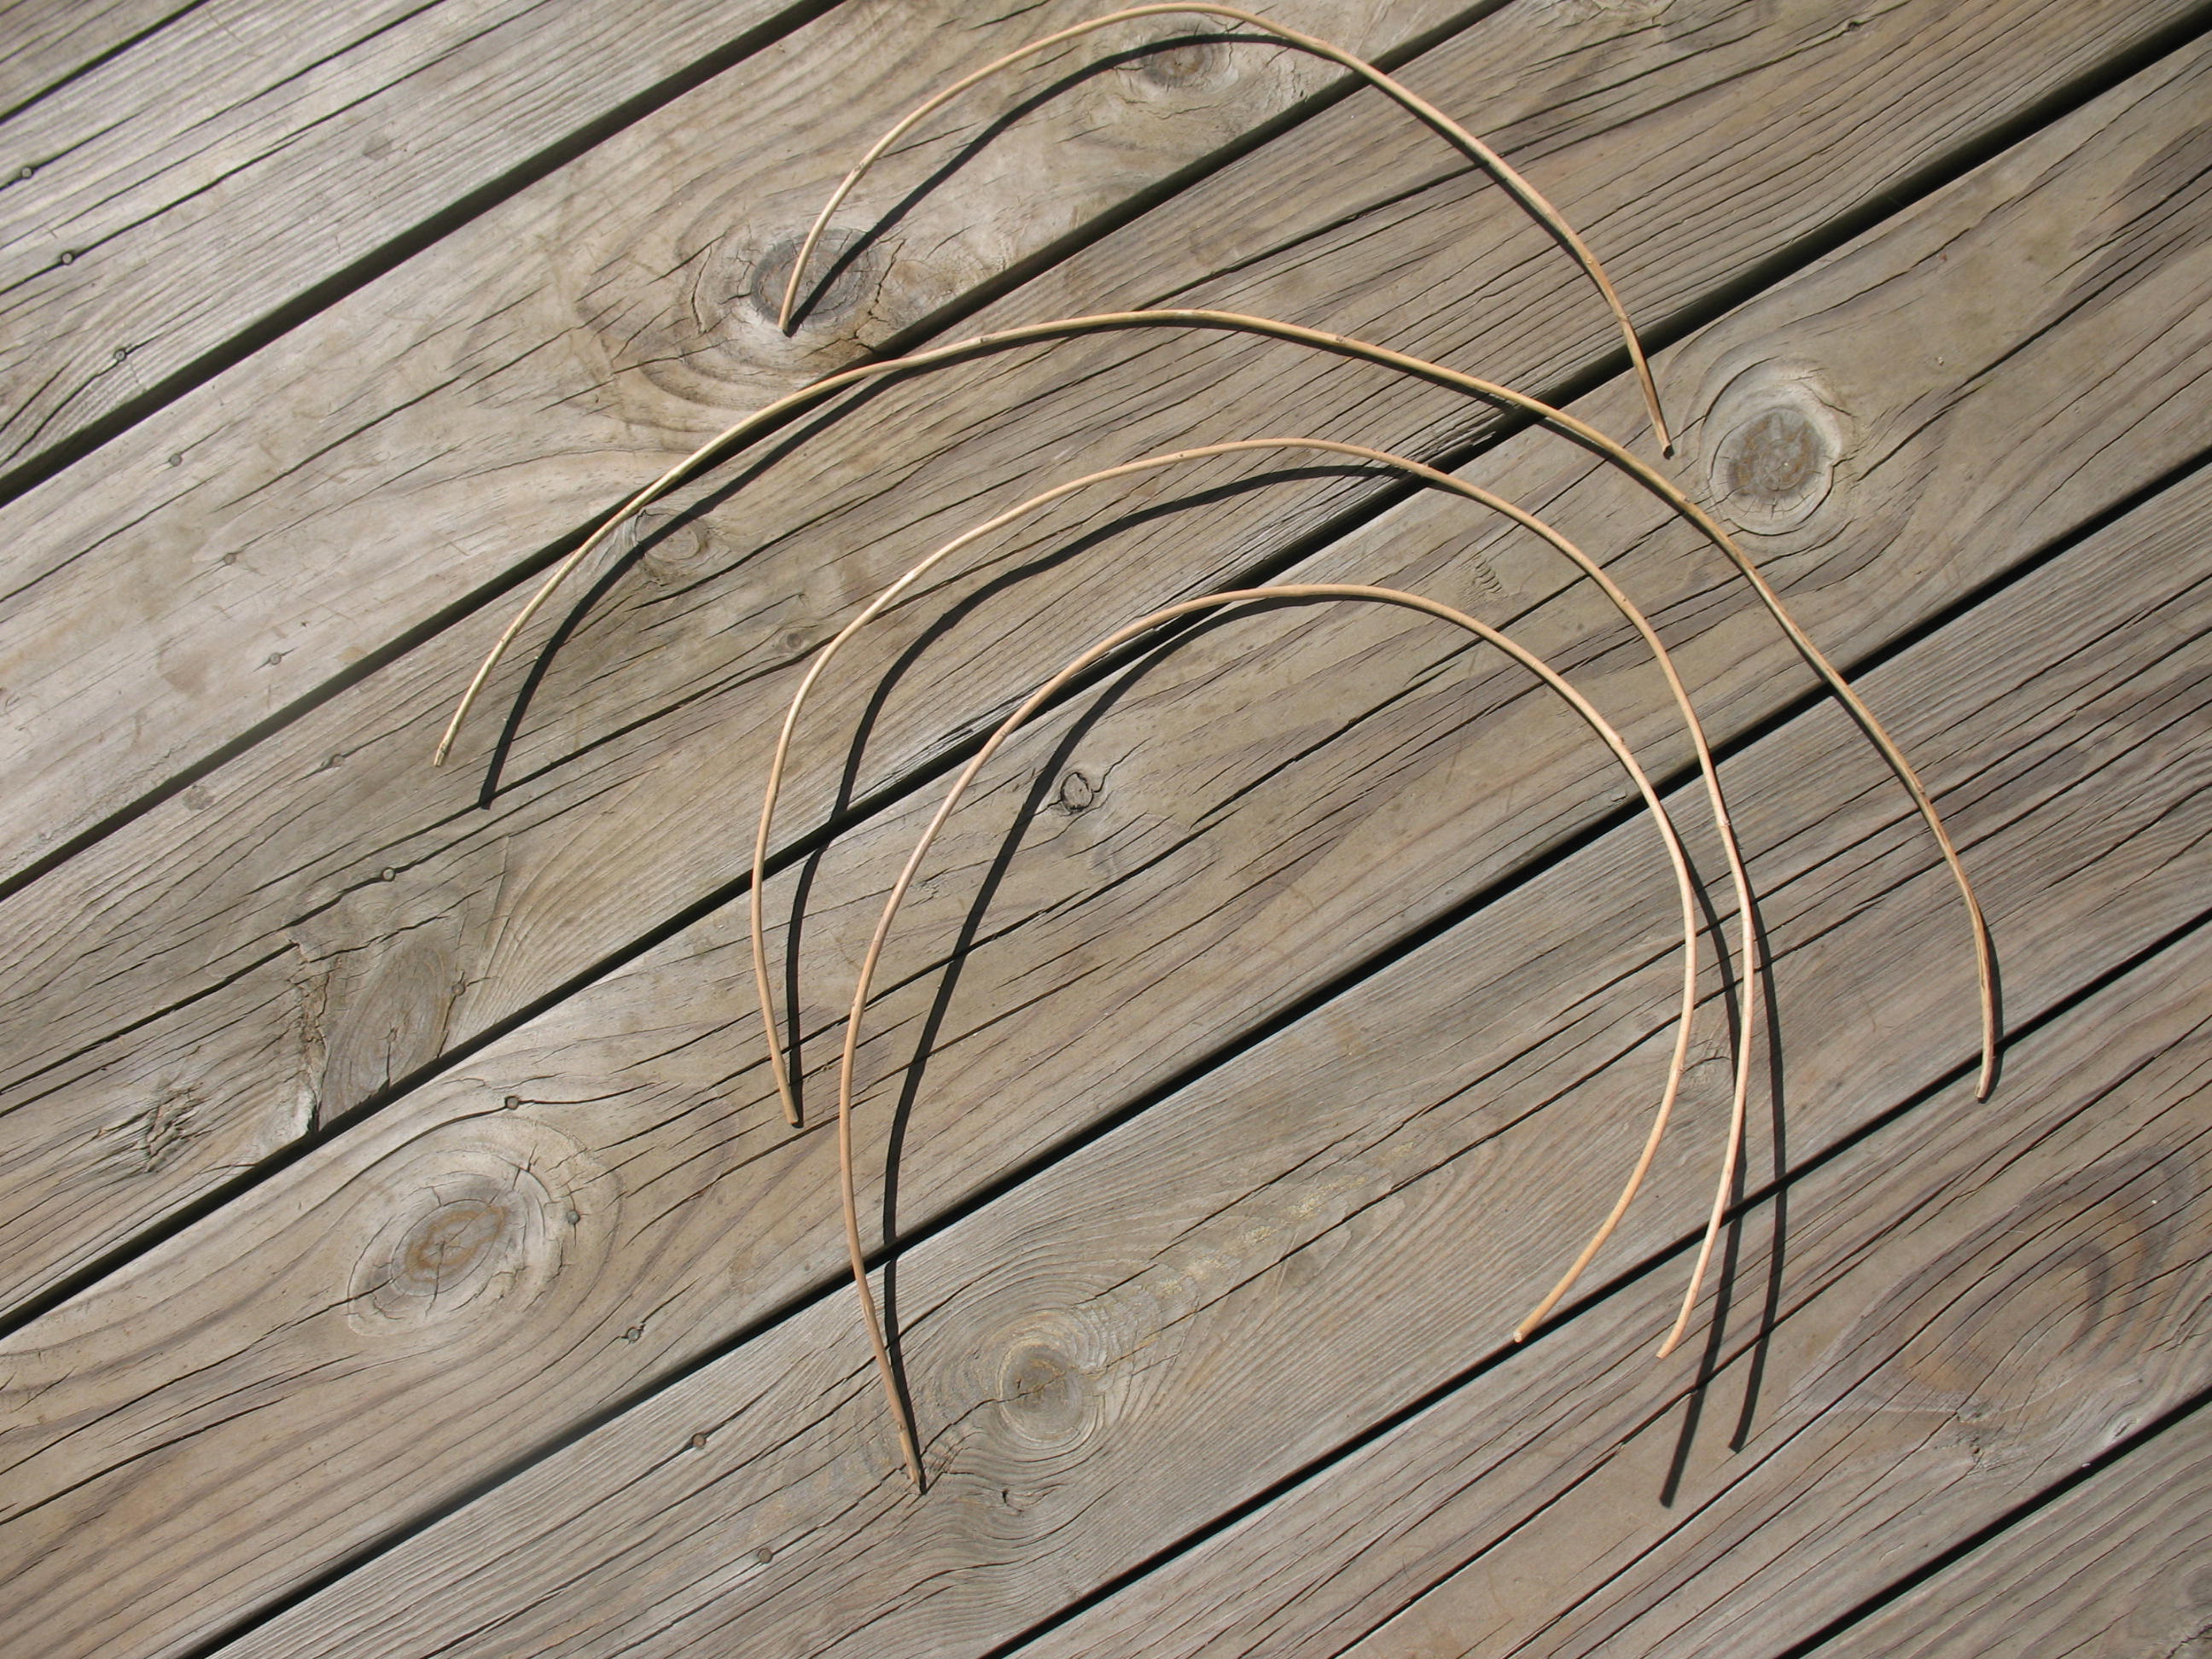
After the vines have soaked overnight cut four pieces for the warps of you basket. Three of the pieces should be about 32 inches long, and one piece should be about 18 inches long. Pictured below: Warps cut to length
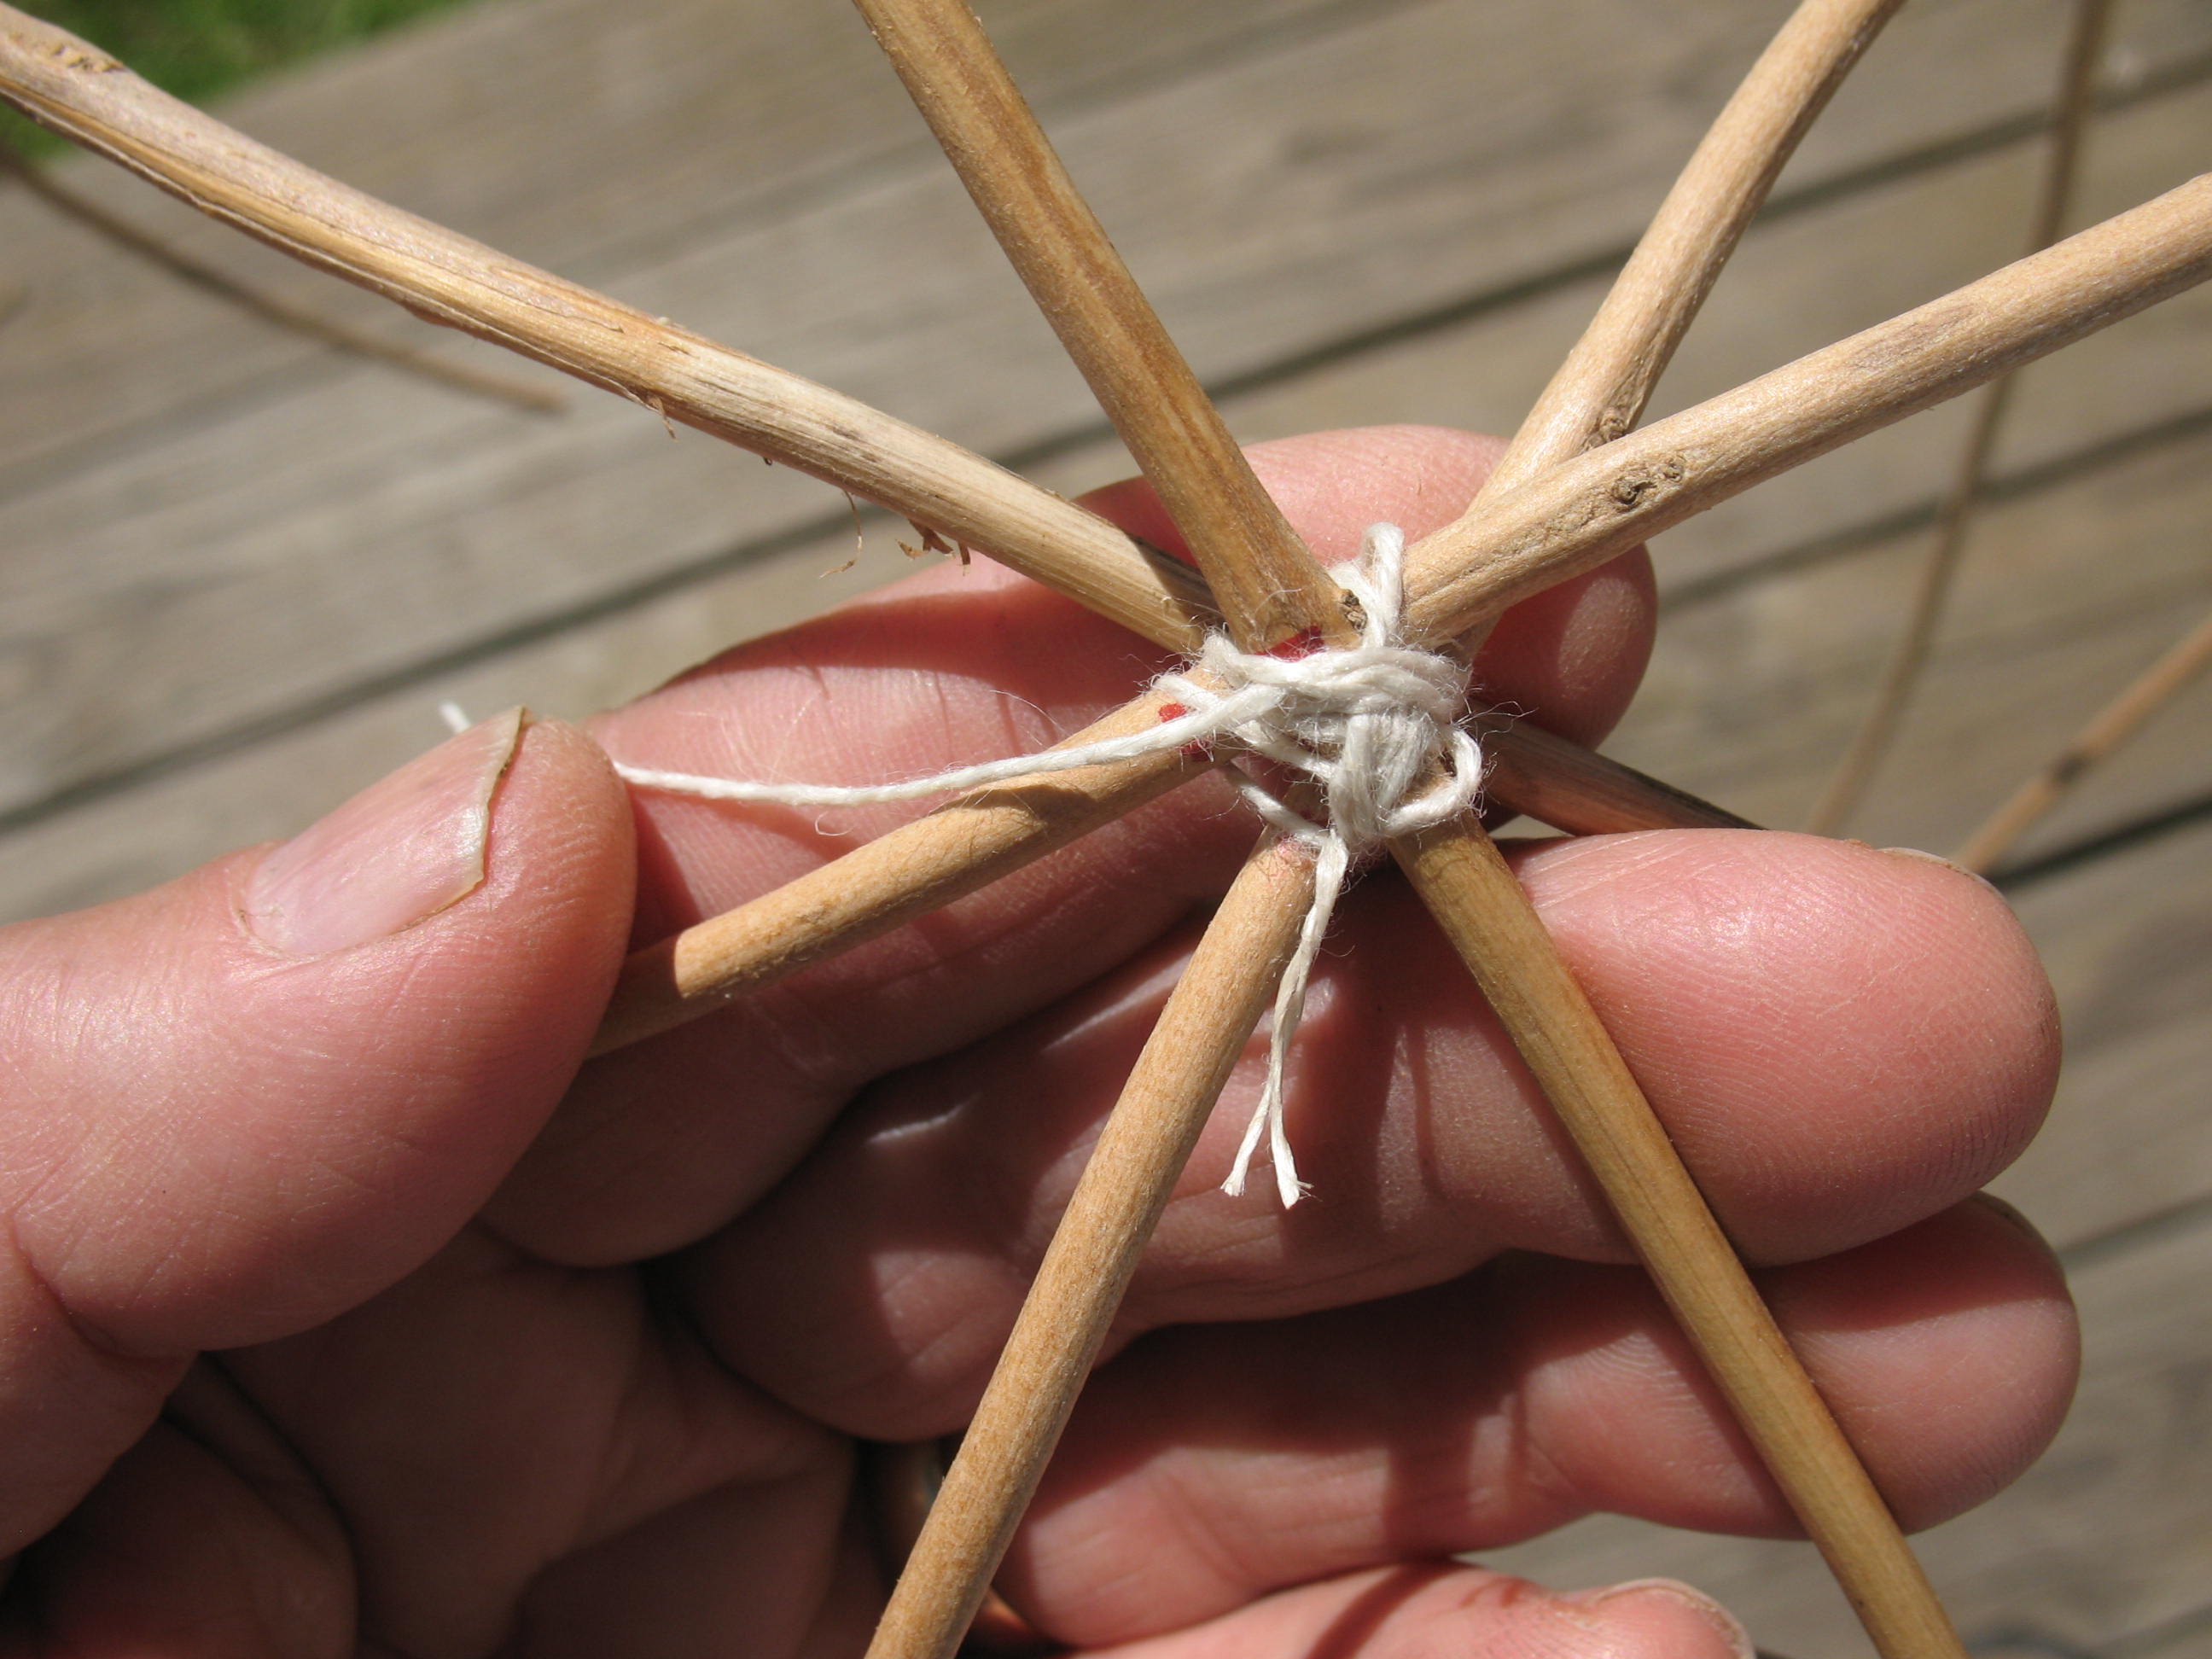
Take the three long warps and tie them together in a start shape using any string that you have available. Tie in the shorter warp with about 2 inches sticking across the point where the other warps are tied together. The knots don’t have to be pretty. This is just temporary and will be cut loose once you have the basket going. Pictured below. Warps tied together
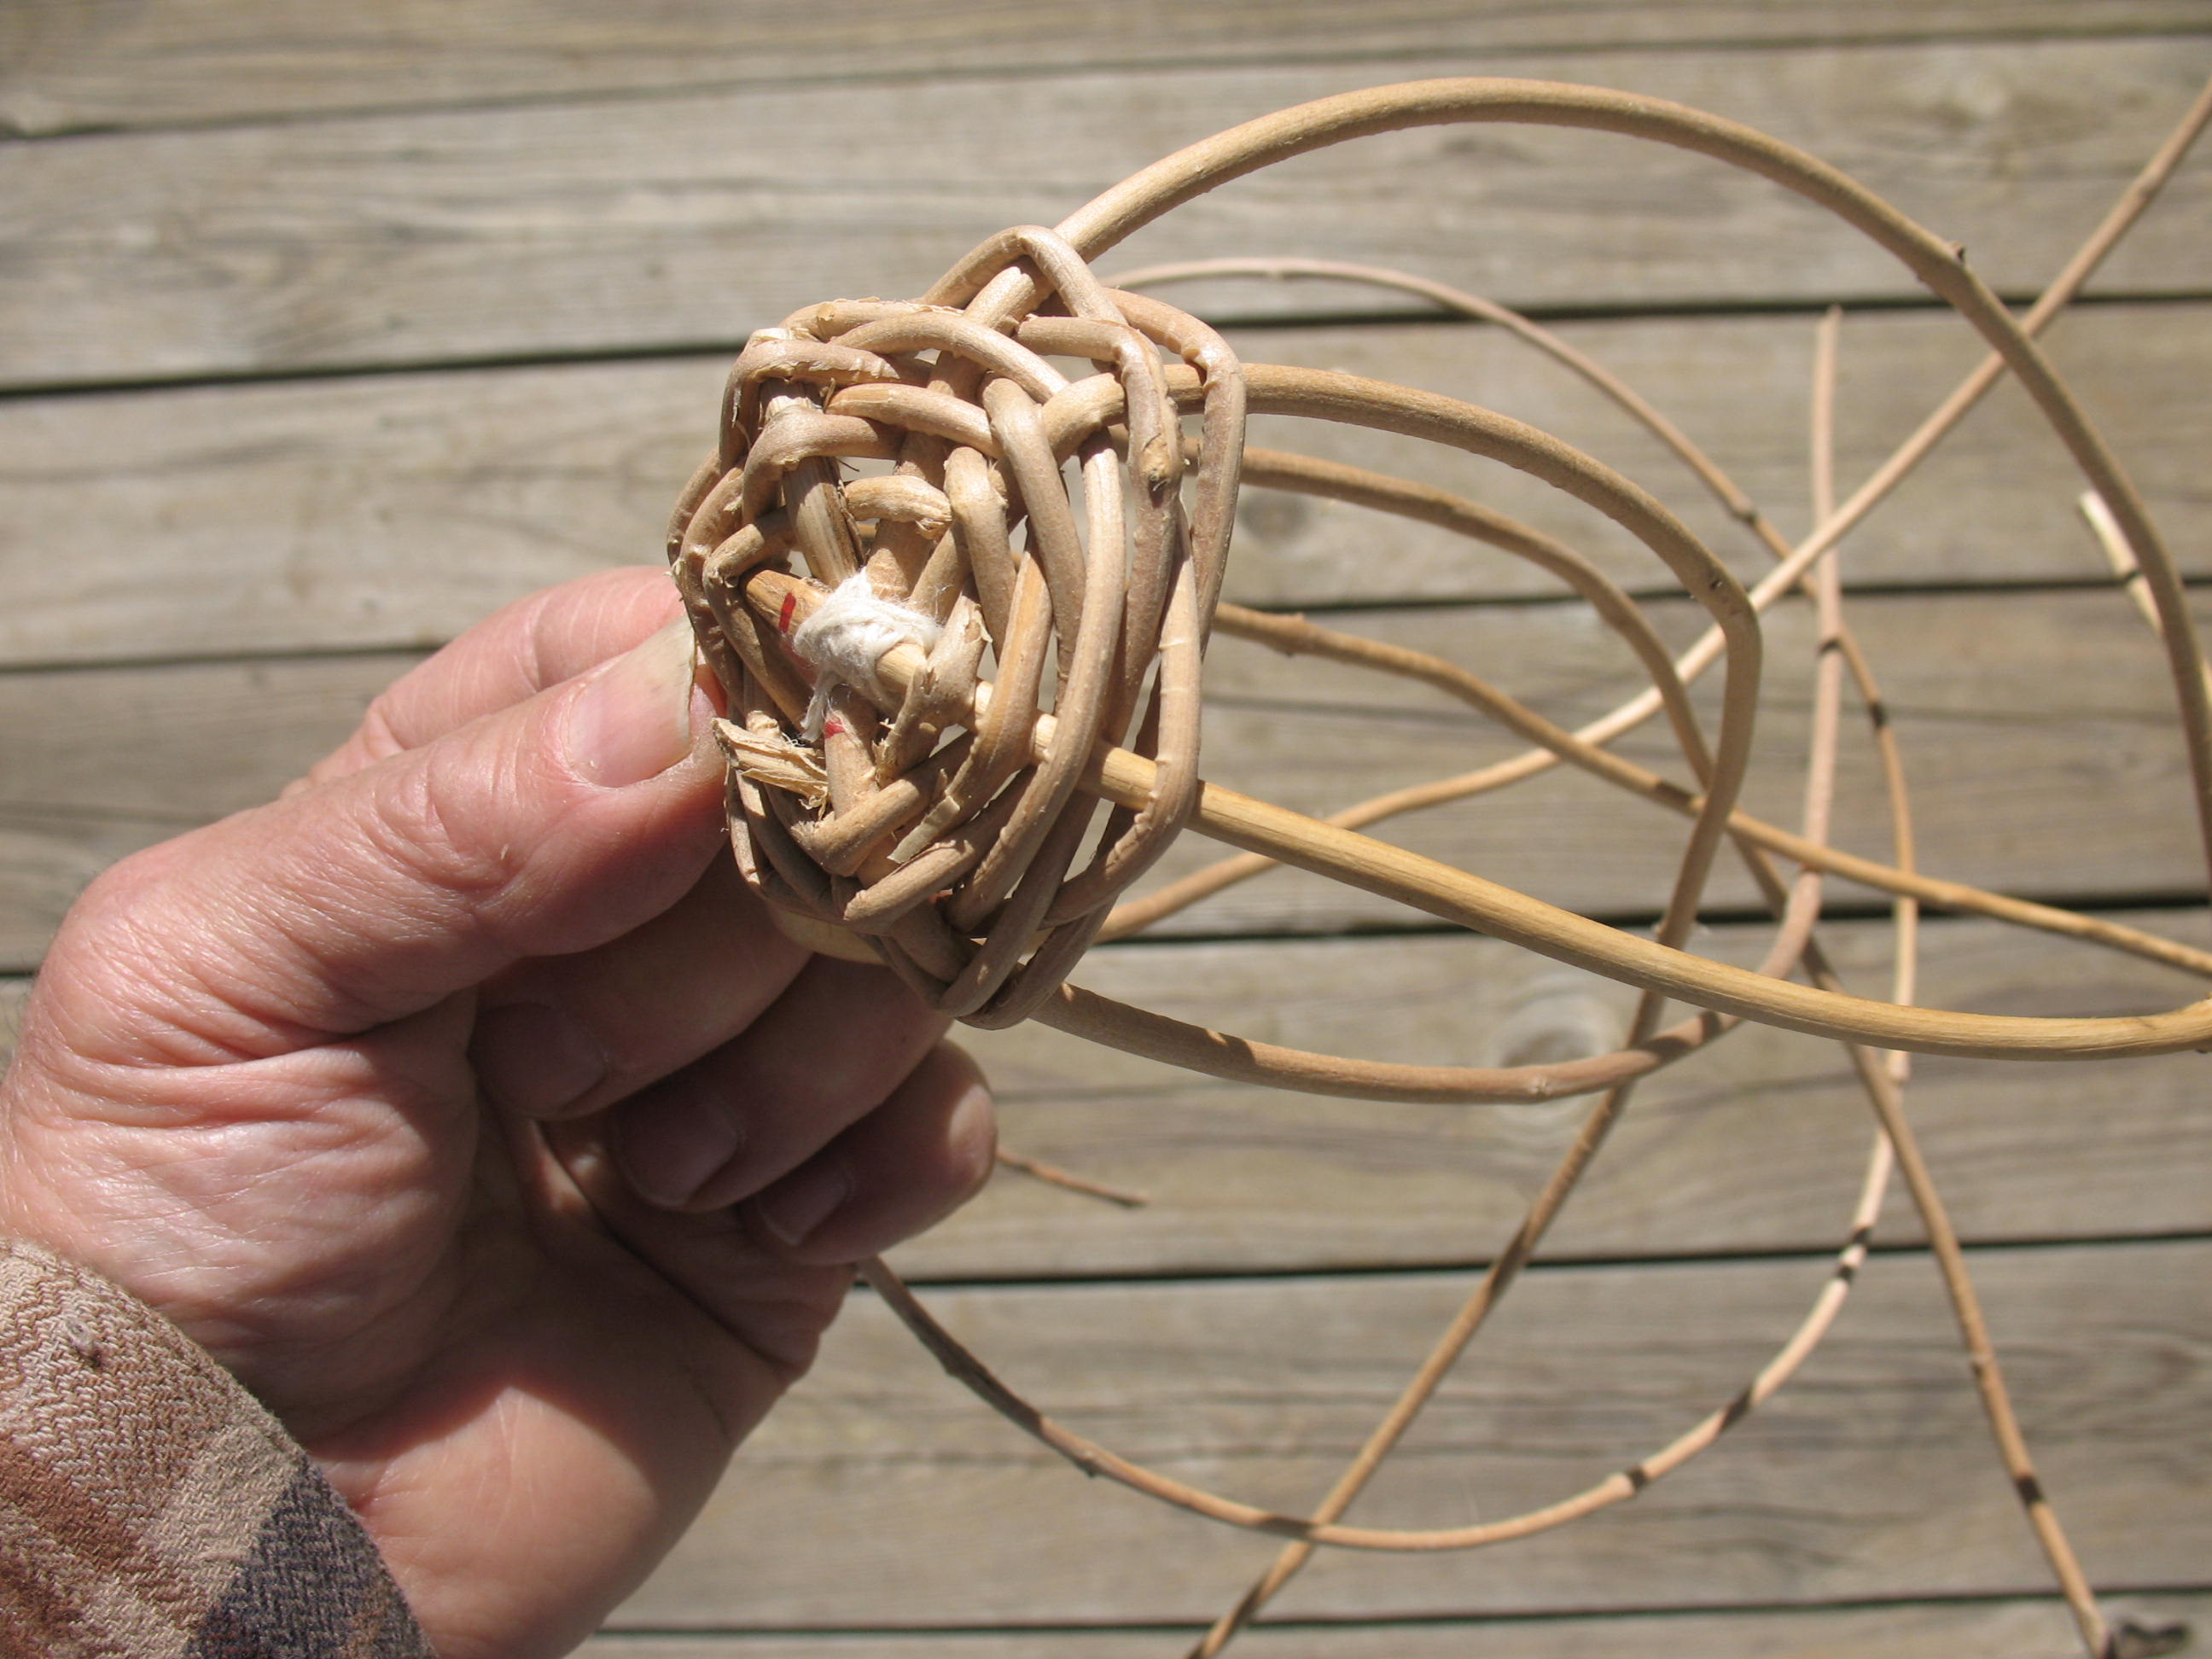
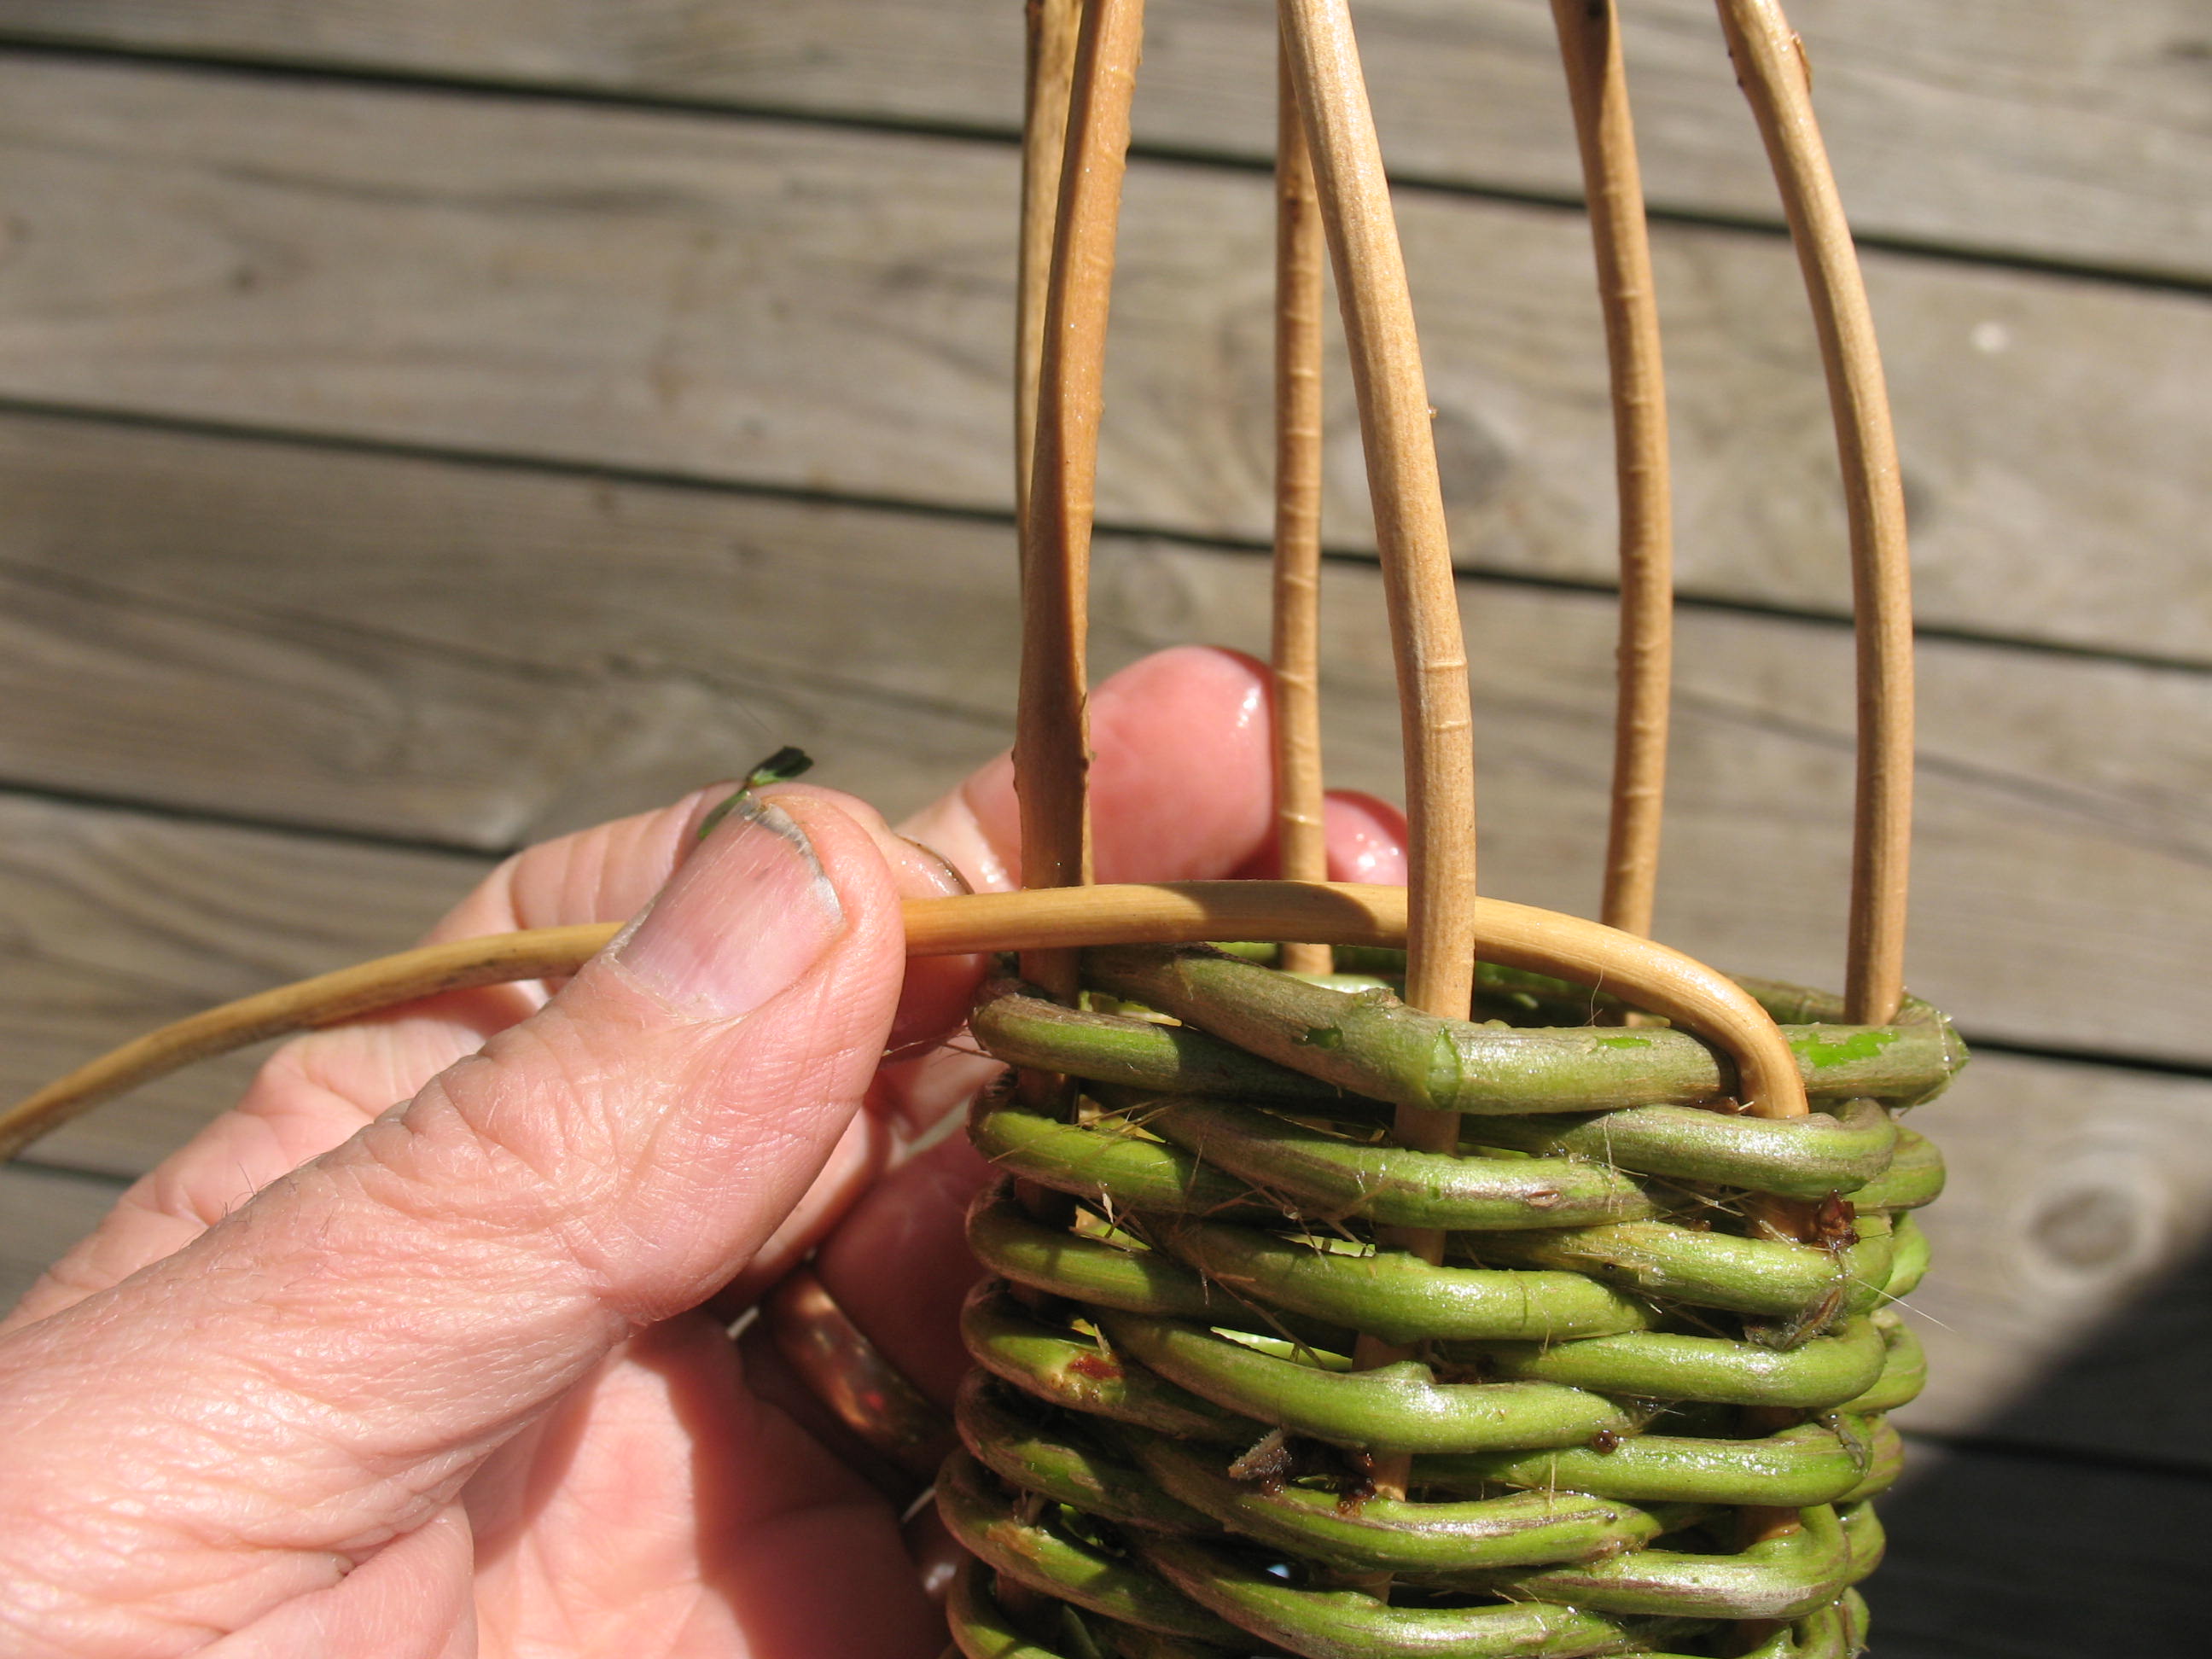
Now we can start weaving in our weft. Select the longest piece of honeysuckle that you have and start your weaving where the warps cross. Push the weft down under one warp and then take it over the next warp. Go under the next warp and over the next warp. Continue weaving around and around the basket. Notice that because of the odd number of warps that your weft will go under a warp one time and then over the same warp the next time around. Keep your weft pushed in tight to the layer below it so that you don’t have gaps in the wall of the basket. Pictured below: Weft woven around warps

After you’ve made a few turns around the basket with the weft, it’s time to start turning the sides of the basket up. Pictured below: Ready to turn the warps up
Continue weaving the weft while bending the warps gently in so that the basket will form a narrow tube. Pictured below: Warps turned up to form sides of the basket

Continue weaving the weft until the basket is tall enough to hold your darts. If the weft ends while you are weaving just cut it off so that it is held in place in back of one of the warps, Then back up two warps, start a new weft in back of this warp, and continue weaving.. Pictured below: This is as tall as this basket quiver needs to be
Now it is time to finish out the top of the basket. The warps are probably pretty dray by now, so you will want to soak the basket in water for a couple of hours to soften it back up again. After soaking, select any warp and gently bend it over as shown below.
Cut the end of the warp off so that you have about an inch and a half more warp the you need to reach to the hole next to the second warp away. Now gently bend the end of the warp down and insert it into the hole next to the second warp away. Pictured below: Ready to push warp down to finish basket top

Do this to all the warps except one which you will use to make the belt loo. Pictured below: Two views of the finished basket rim
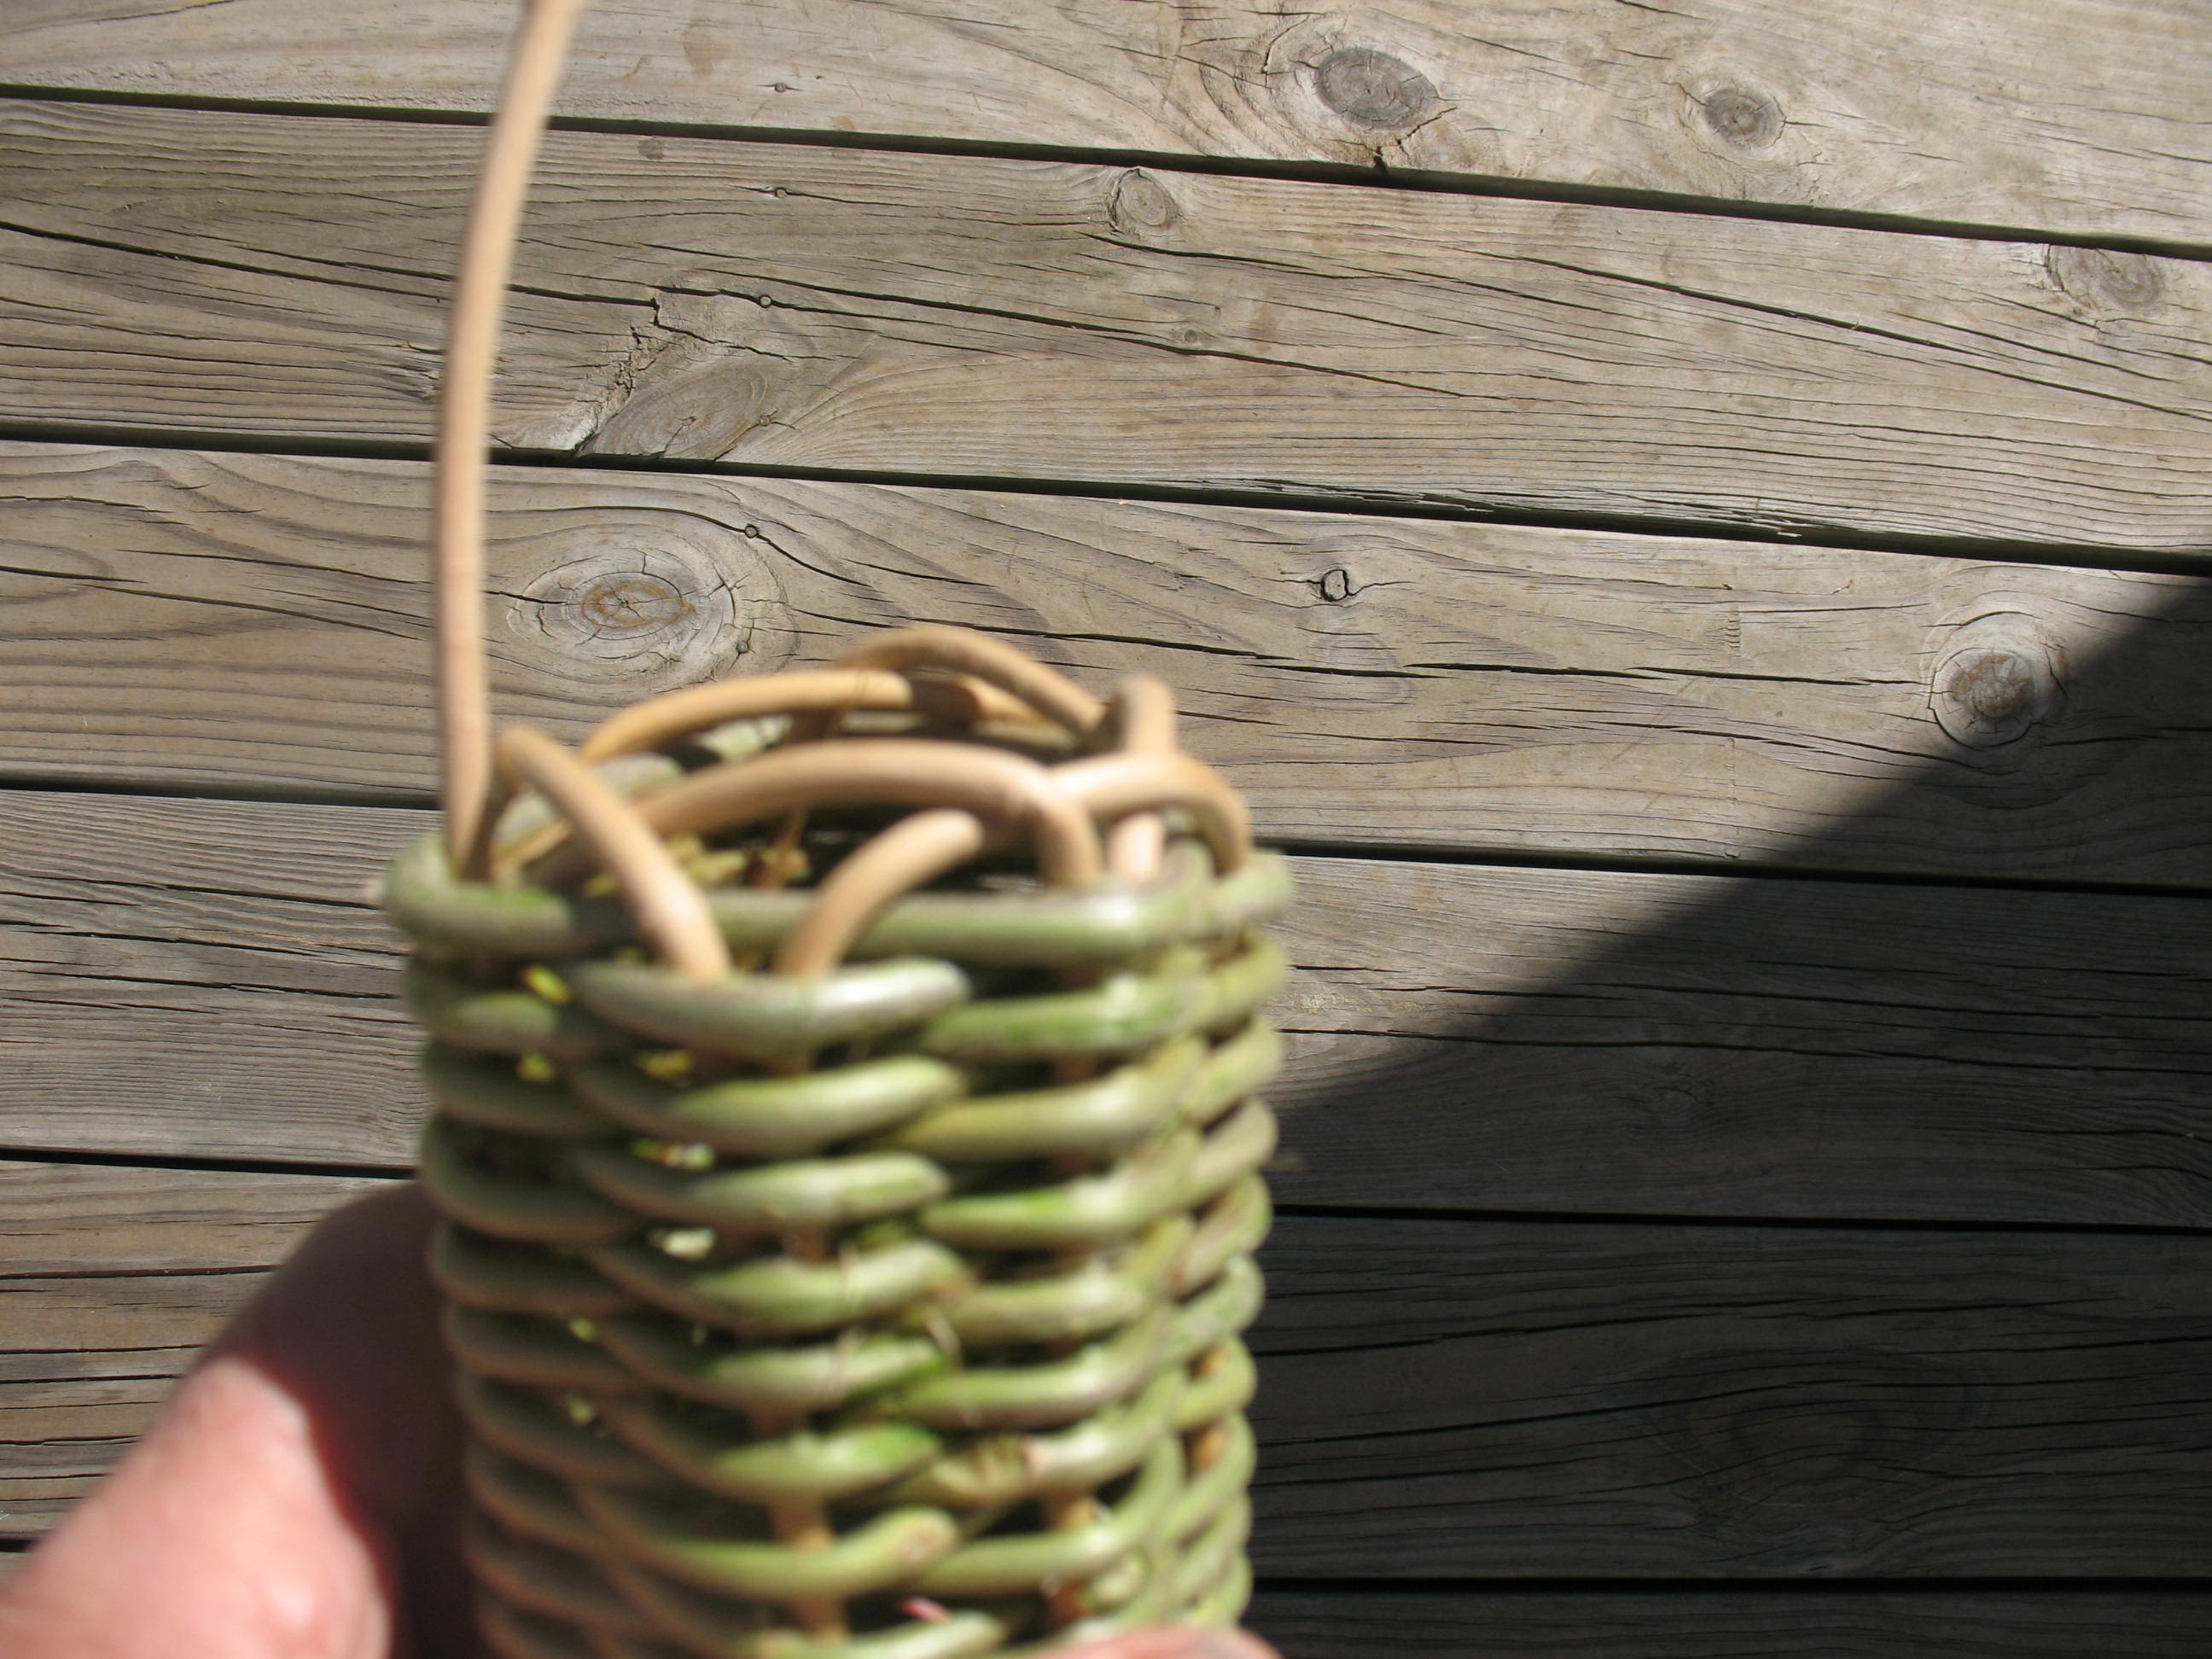
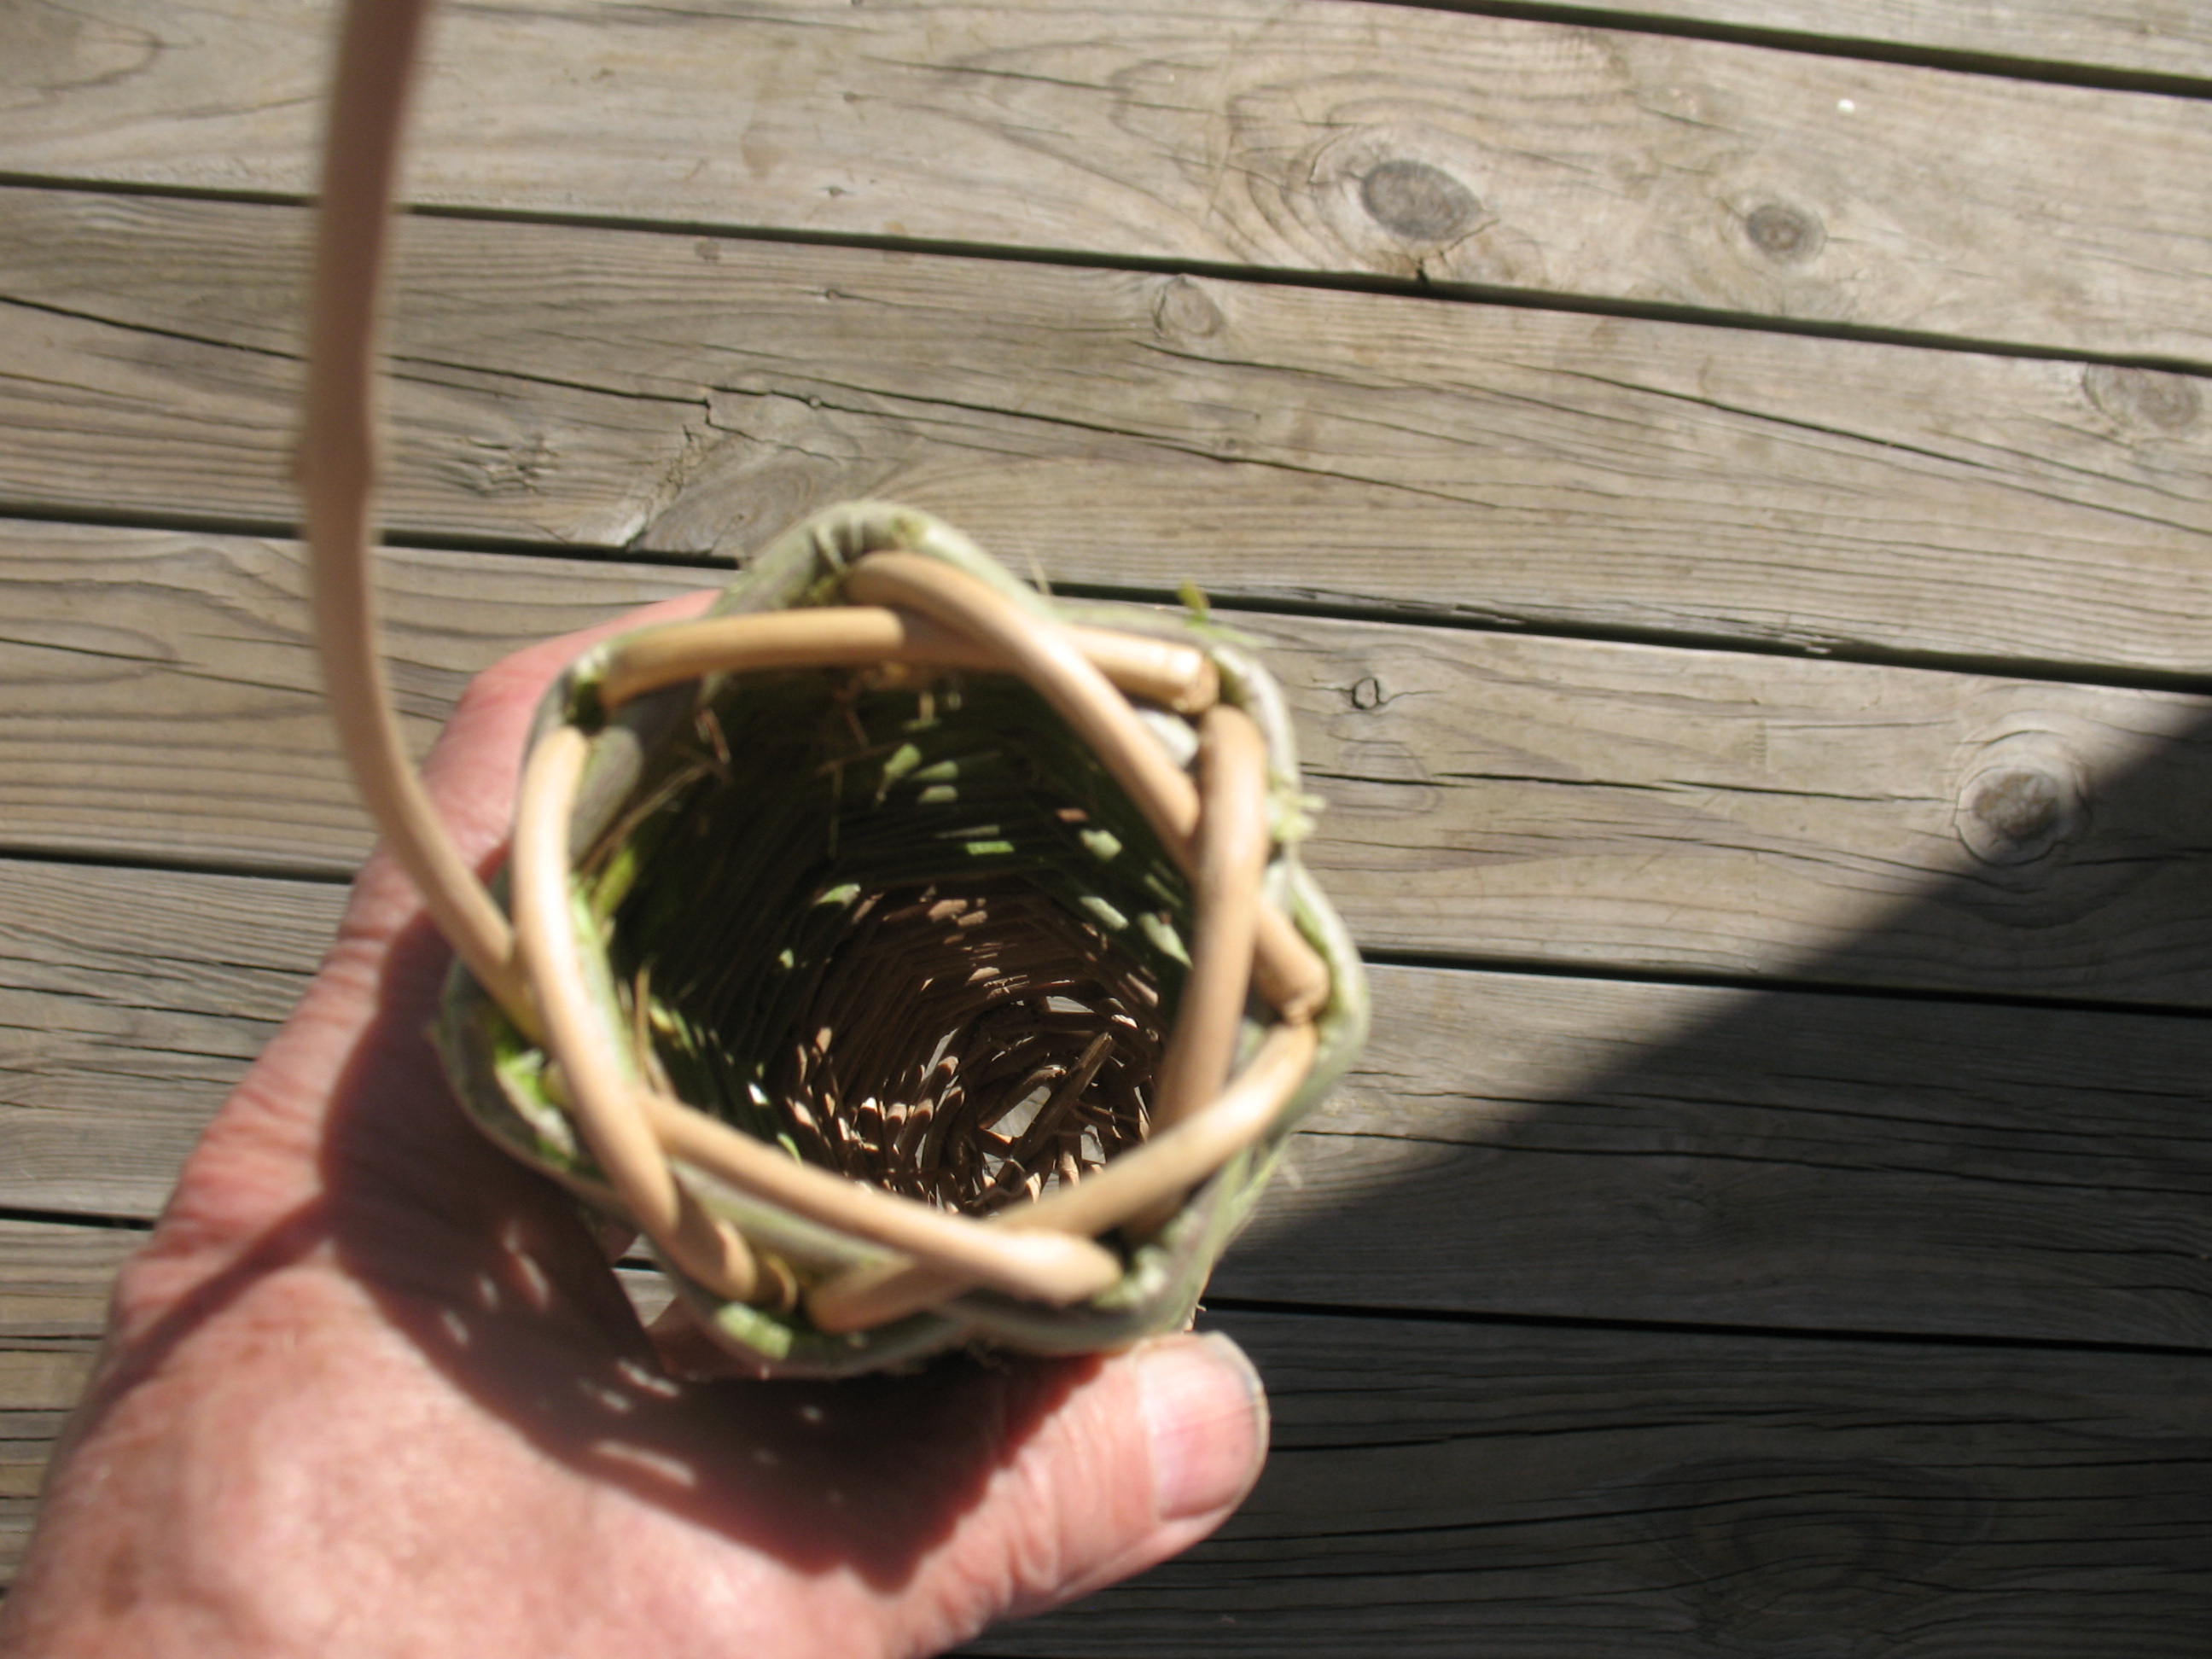
Leave the last wart long enough that you can push it down into the hole about 3 inches and still have a loop sticking up above the basket rim. Pictured below: Belt loop on basket rim
Shred up a little cedar bark and pack it down into the bottom of the quiver. This will protect your dart points and keep the darts from slipping through any holes in the bottom of the quiver.
You’re done. Strap it on your belt, and your blow darts will look great in this authentic looking quiver.
In this post, I am going to show you how to make a compact, multi-purpose survival bracelet that will let you carry fire-starting tinder, snare wire, fishing line, and multi-purpose cordage all in one neat package that snaps around your wrist. Pictured below: Multi-purpose survival bracelet. 
To make this bracelet you will need a package of small split style key rings and another package of lanyard clips. Pictured below: Split rings and Lanyard clips. 
You will also need some jute twine that can be shredded apart to make fire-starting tinder, some light copper wire that can be used for snares, some mono-filament fishing line, and some general purpose hemp cordage. Pictured below: Jute twine, copper wire, mono-filament line, and hemp cordage. 
I found that trying to hold the materials in my hands while I was making these bracelets was a total train wreck, so I built a little jig to hold everything in place while I did the tying and wrapping. It is about seven inches (18 cm) around my wrist, so I set my jig up where it would be seven inches from the end of one split ring to the end of the other. The lanyard clip is about ¾ inch long, so when it is used to clip the bracelet on it creates a little slack and the bracelet is not too tight. Pictured below: My home-made bracelet jig. 
To start the bracelet cut a piece of jute twine about three and a half feet long. Please note; all of the lengths described here and below are for me and my seven inch wrist. You may need to increase or decrease the lengths depending on the size of your wrist.
Run one end of the jute twine through one of the split rings. Then put that split ring over one of the hooks on your jig, and hook the other split ring over the other hook on the jig.
Take the other end of the jute and run it through the second split ring. Loop it back through the first ring, then through the second ring again, then take it back through the first ring, and finally to the second ring and then tie the two ends of the jute together When you are finished you should have six strands of jute connecting the two rings. When shredded up, this should provide enough tinder to start three or four fires using your lighter or metal match. Pictured below: Jute string between split rings. 
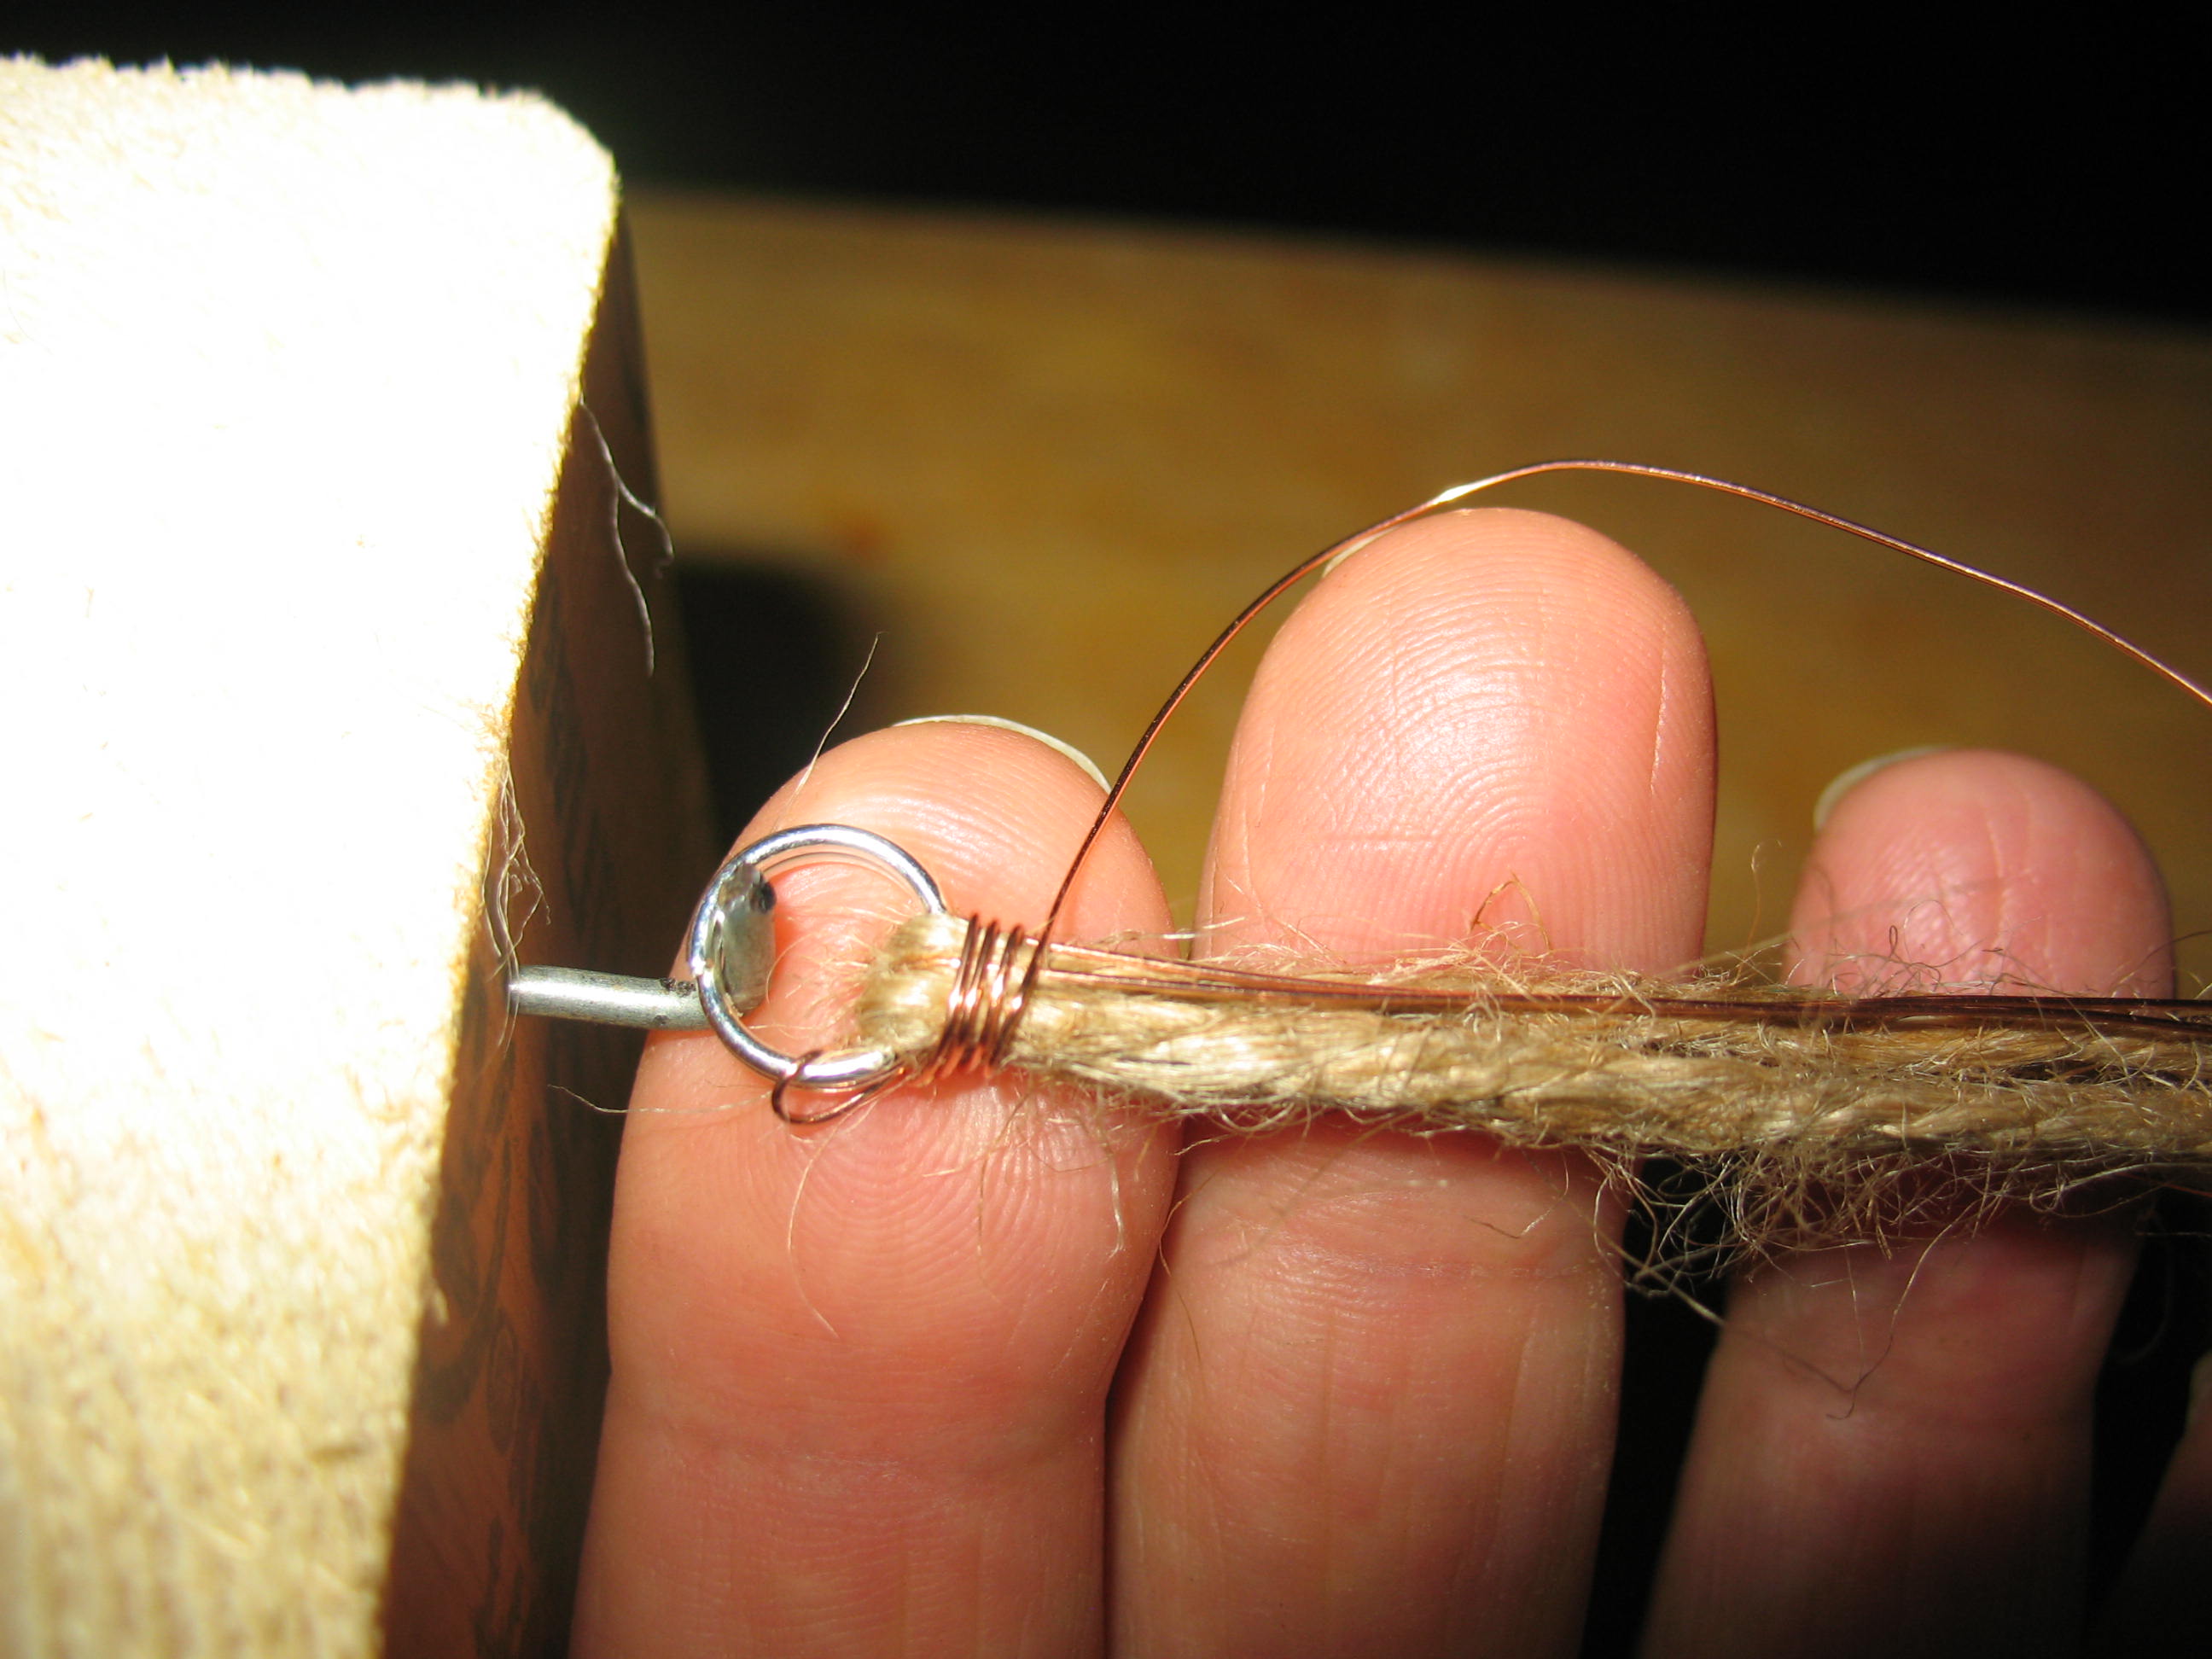
Next we are going to add our copper snare wire. You will need about 12 feet of snare wire. After you cut the wire, take some time to stretch it a little a try to straighten it out. It will want to coil back up, and it can get into a tangle pretty easily. Take about an inch of the wire, run it through the first split ring, bend it back on itself, and twist it together. Pictured below: Copper wire attached to first ring. 
Beginning right next to the first split ring start wrapping the wire around the underlying strands of jute. Keep the wraps tight and try to lay them down neatly, right next to each other. Pictured below: Wrapping the copper wire.
When you reach the second split ring, stick the wire back under itself a couple of times (half-hitches) and clip off the excess. Pictured below: Finished layer of copper snare wire. 
Now we will add a layer of mono-filament fishing line. Cut a piece of mono about 10 feet long. This time, instead of running the line through the split rinds you are going to tie the line on below the first split ring, right above where you started wrapping the layer of wire. Make your tie with a single over-hand knot right in the middle of the mono so that you have two long strands of line hanging loose. Hold these two strands together and begin wrapping them around the layer of snare wire. Try to keep them flat and even (not easy to do, but the mono is so thin that it won’t really matter). Pictured below: Wrapping mono filament line. 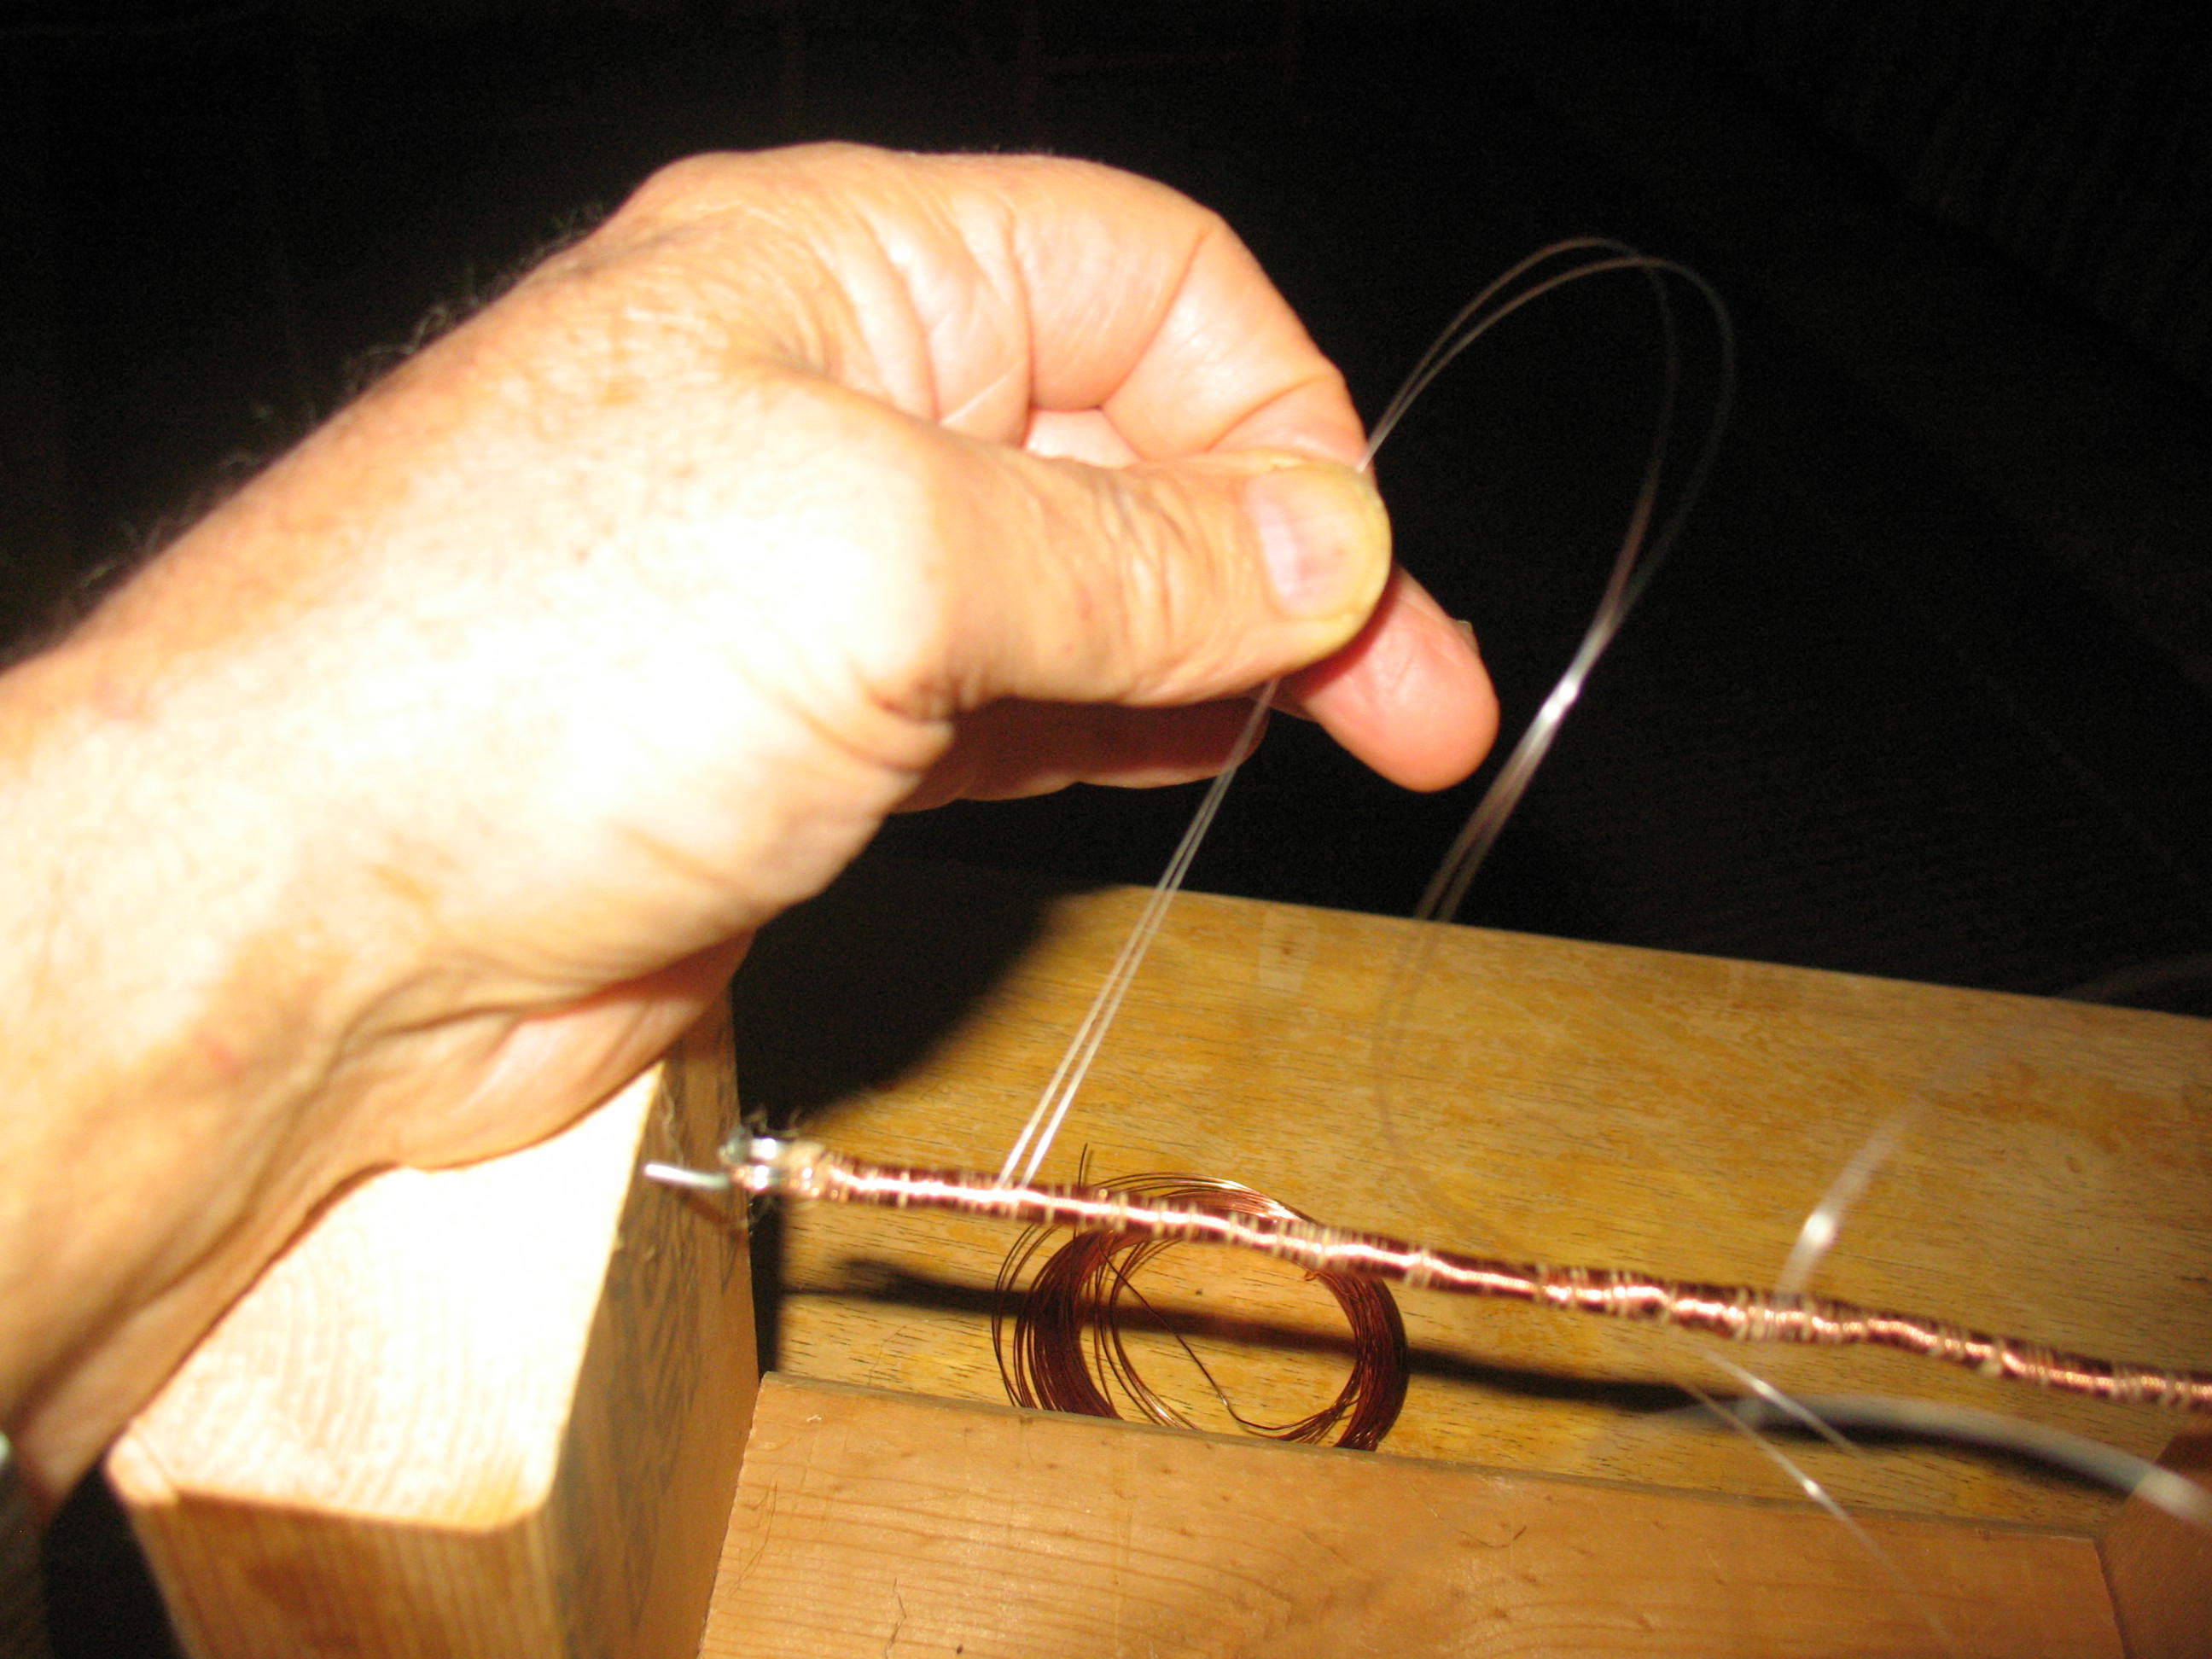
When you reach the second split ring, take a piece of tape and wrap it around the bracelet to hold the fishing line in place.
The final layer of our bracelet will be a layer of multi-purpose hemp cordage. You can buy hemp cordage at any craft store. It comes in a variety of colors. You could actually use any kind of thin cordage that you want at this point. I use hemp because it makes it look like a regular bracelet.
Cut a piece of hemp about 8 feet long. Lay the hemp on the bracelet at the first split ring with about an inch pointing back toward the second split ring. Begin wrapping the hemp, over the top of itself to hold it in place. Pictured below: Starting the layer of hemp. 
Wrap the hemp around the bracelet in tight, flat wraps that are right next to each other. When you are four or five wraps away from reaching the second ring, take a second piece of hemp and lay it down as a small, open loop on top of the bracelet with the closed end of the loop sticking out about a half inch passed the second ring. Pictured below laying down the loop. 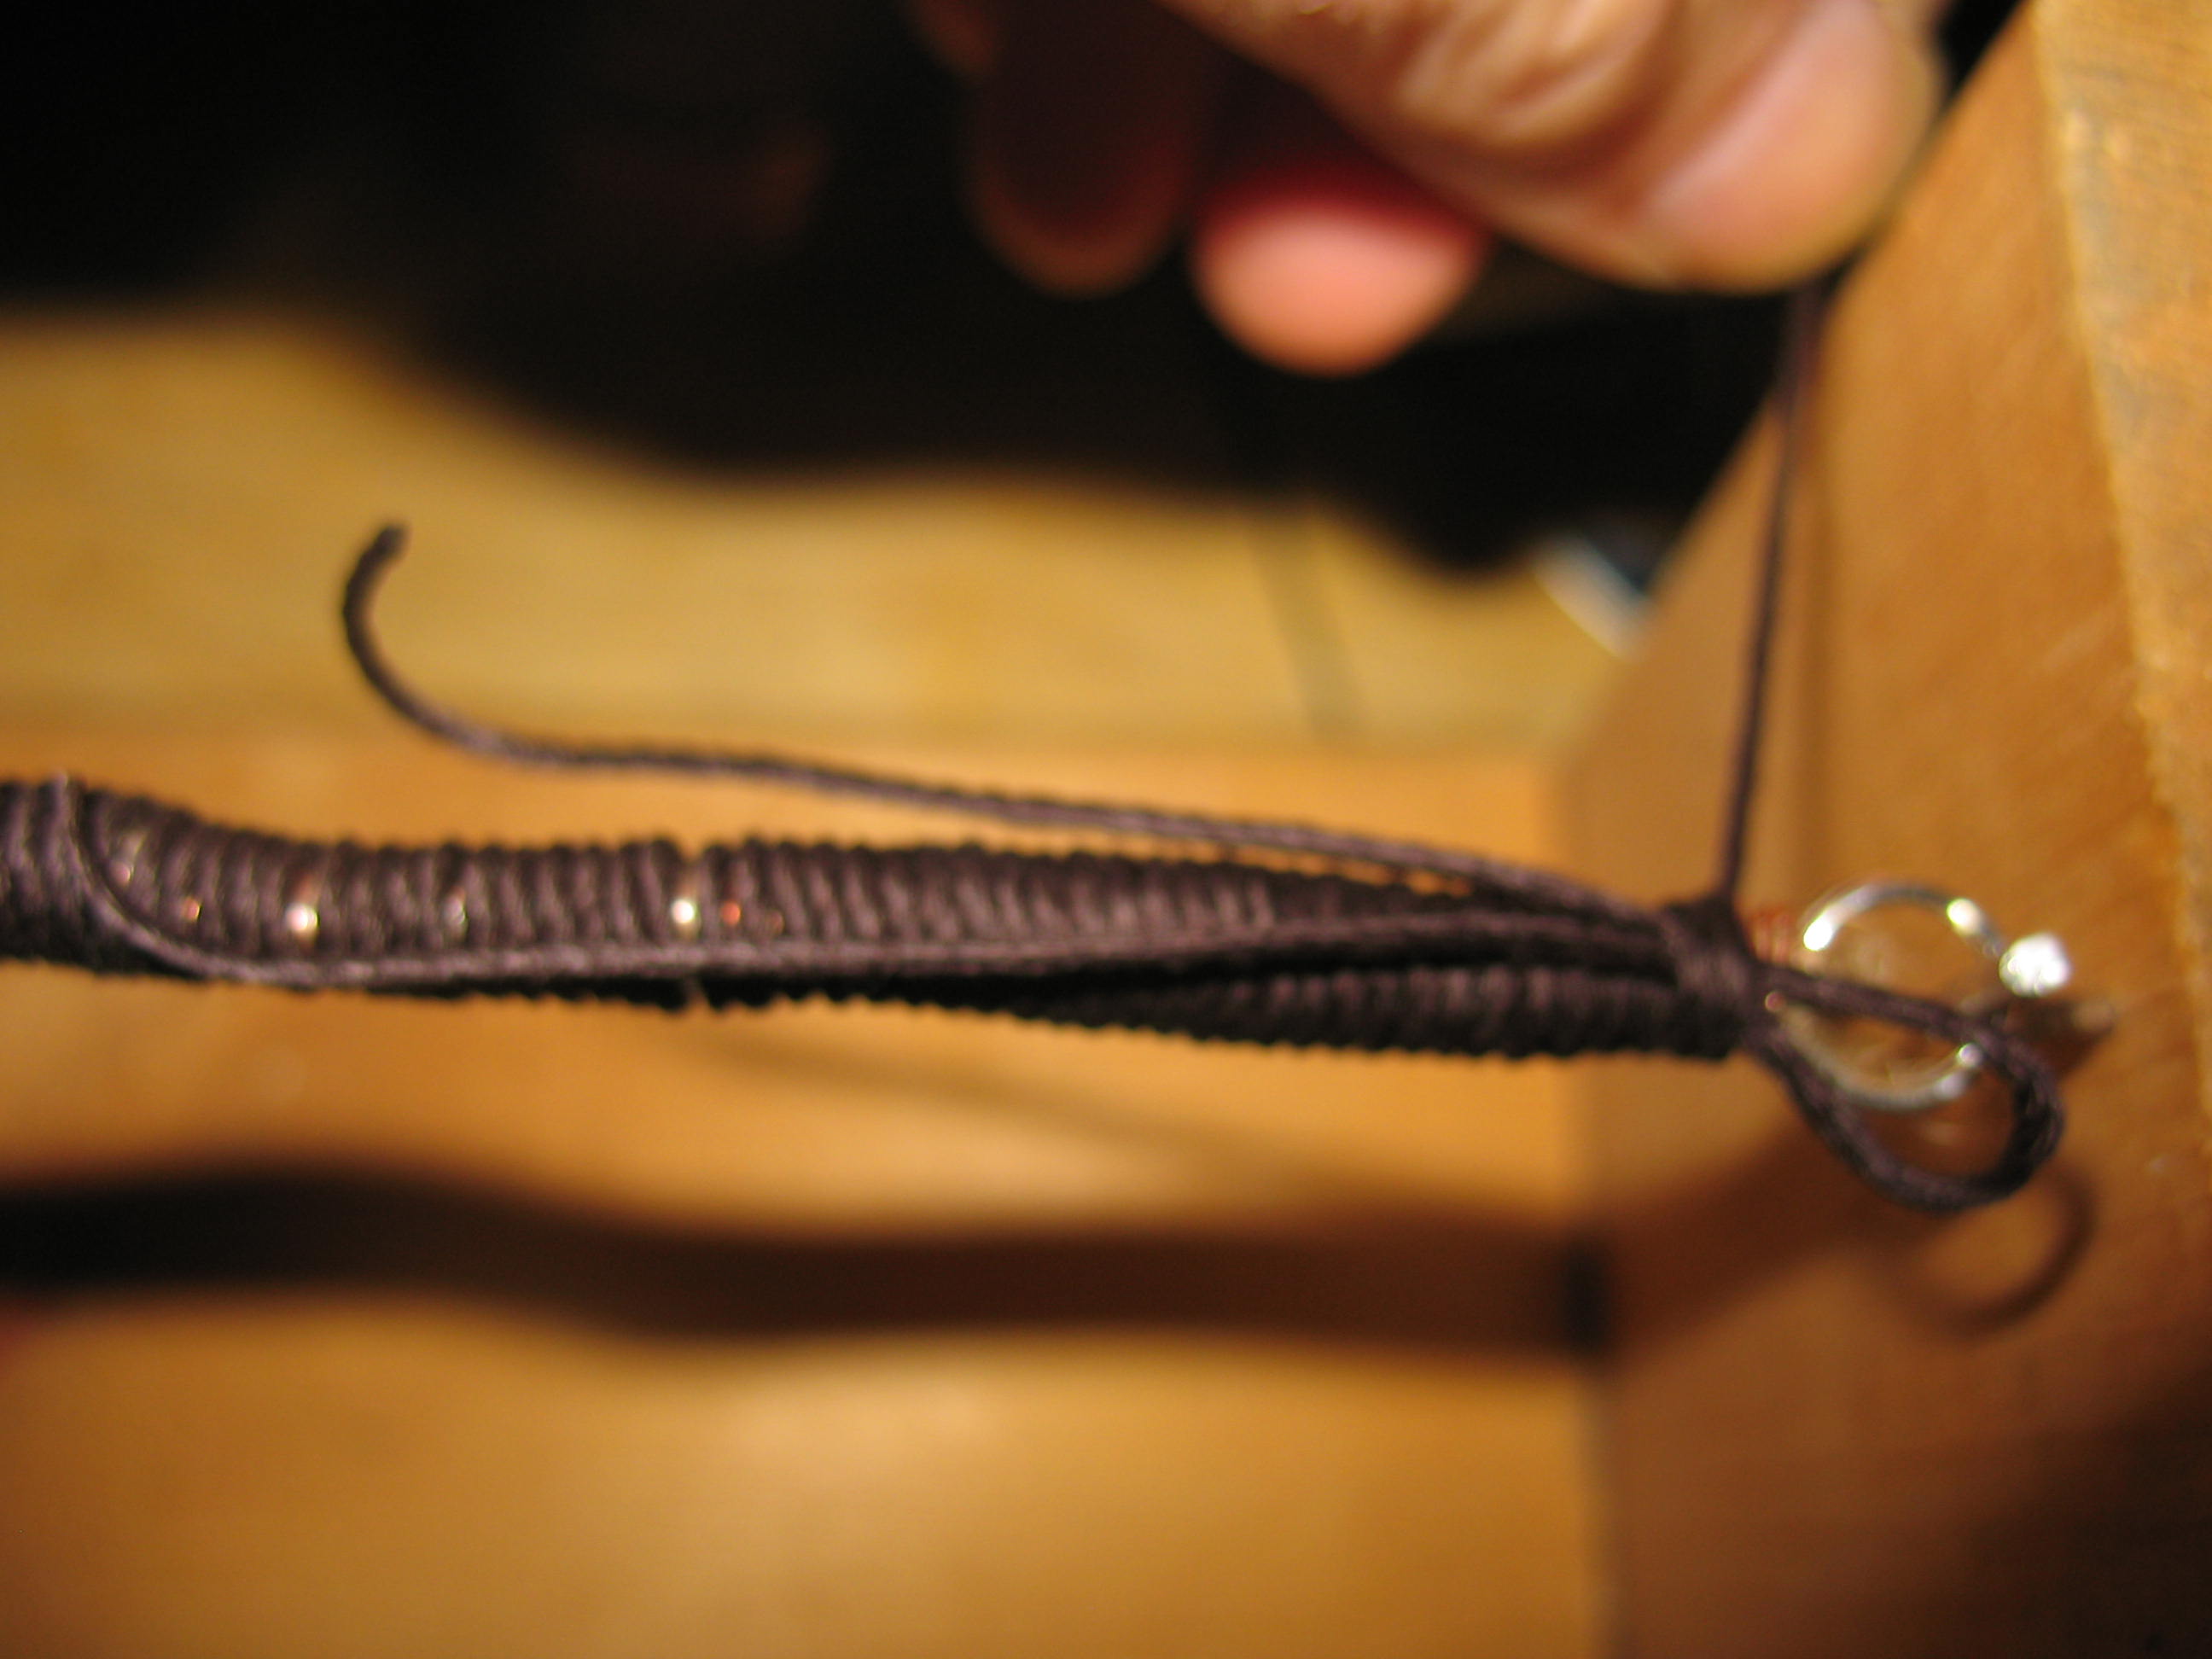
Continue wrapping the first piece of hemp around the bracelet and over the top of the loop at the same time. When you reach the second split ring, cut off the excess hemp leaving about two inches extra length. Push this extra length down through the closed portion of the loop. Pictured below: End of hemp pushed through loop. 
Now pull, gently but firmly, on the loose ends of the loop. This will pull the loose end of hemp wrapping back under the last four or five wraps. Cut of the excess. Pictured below finishing off the hemp. 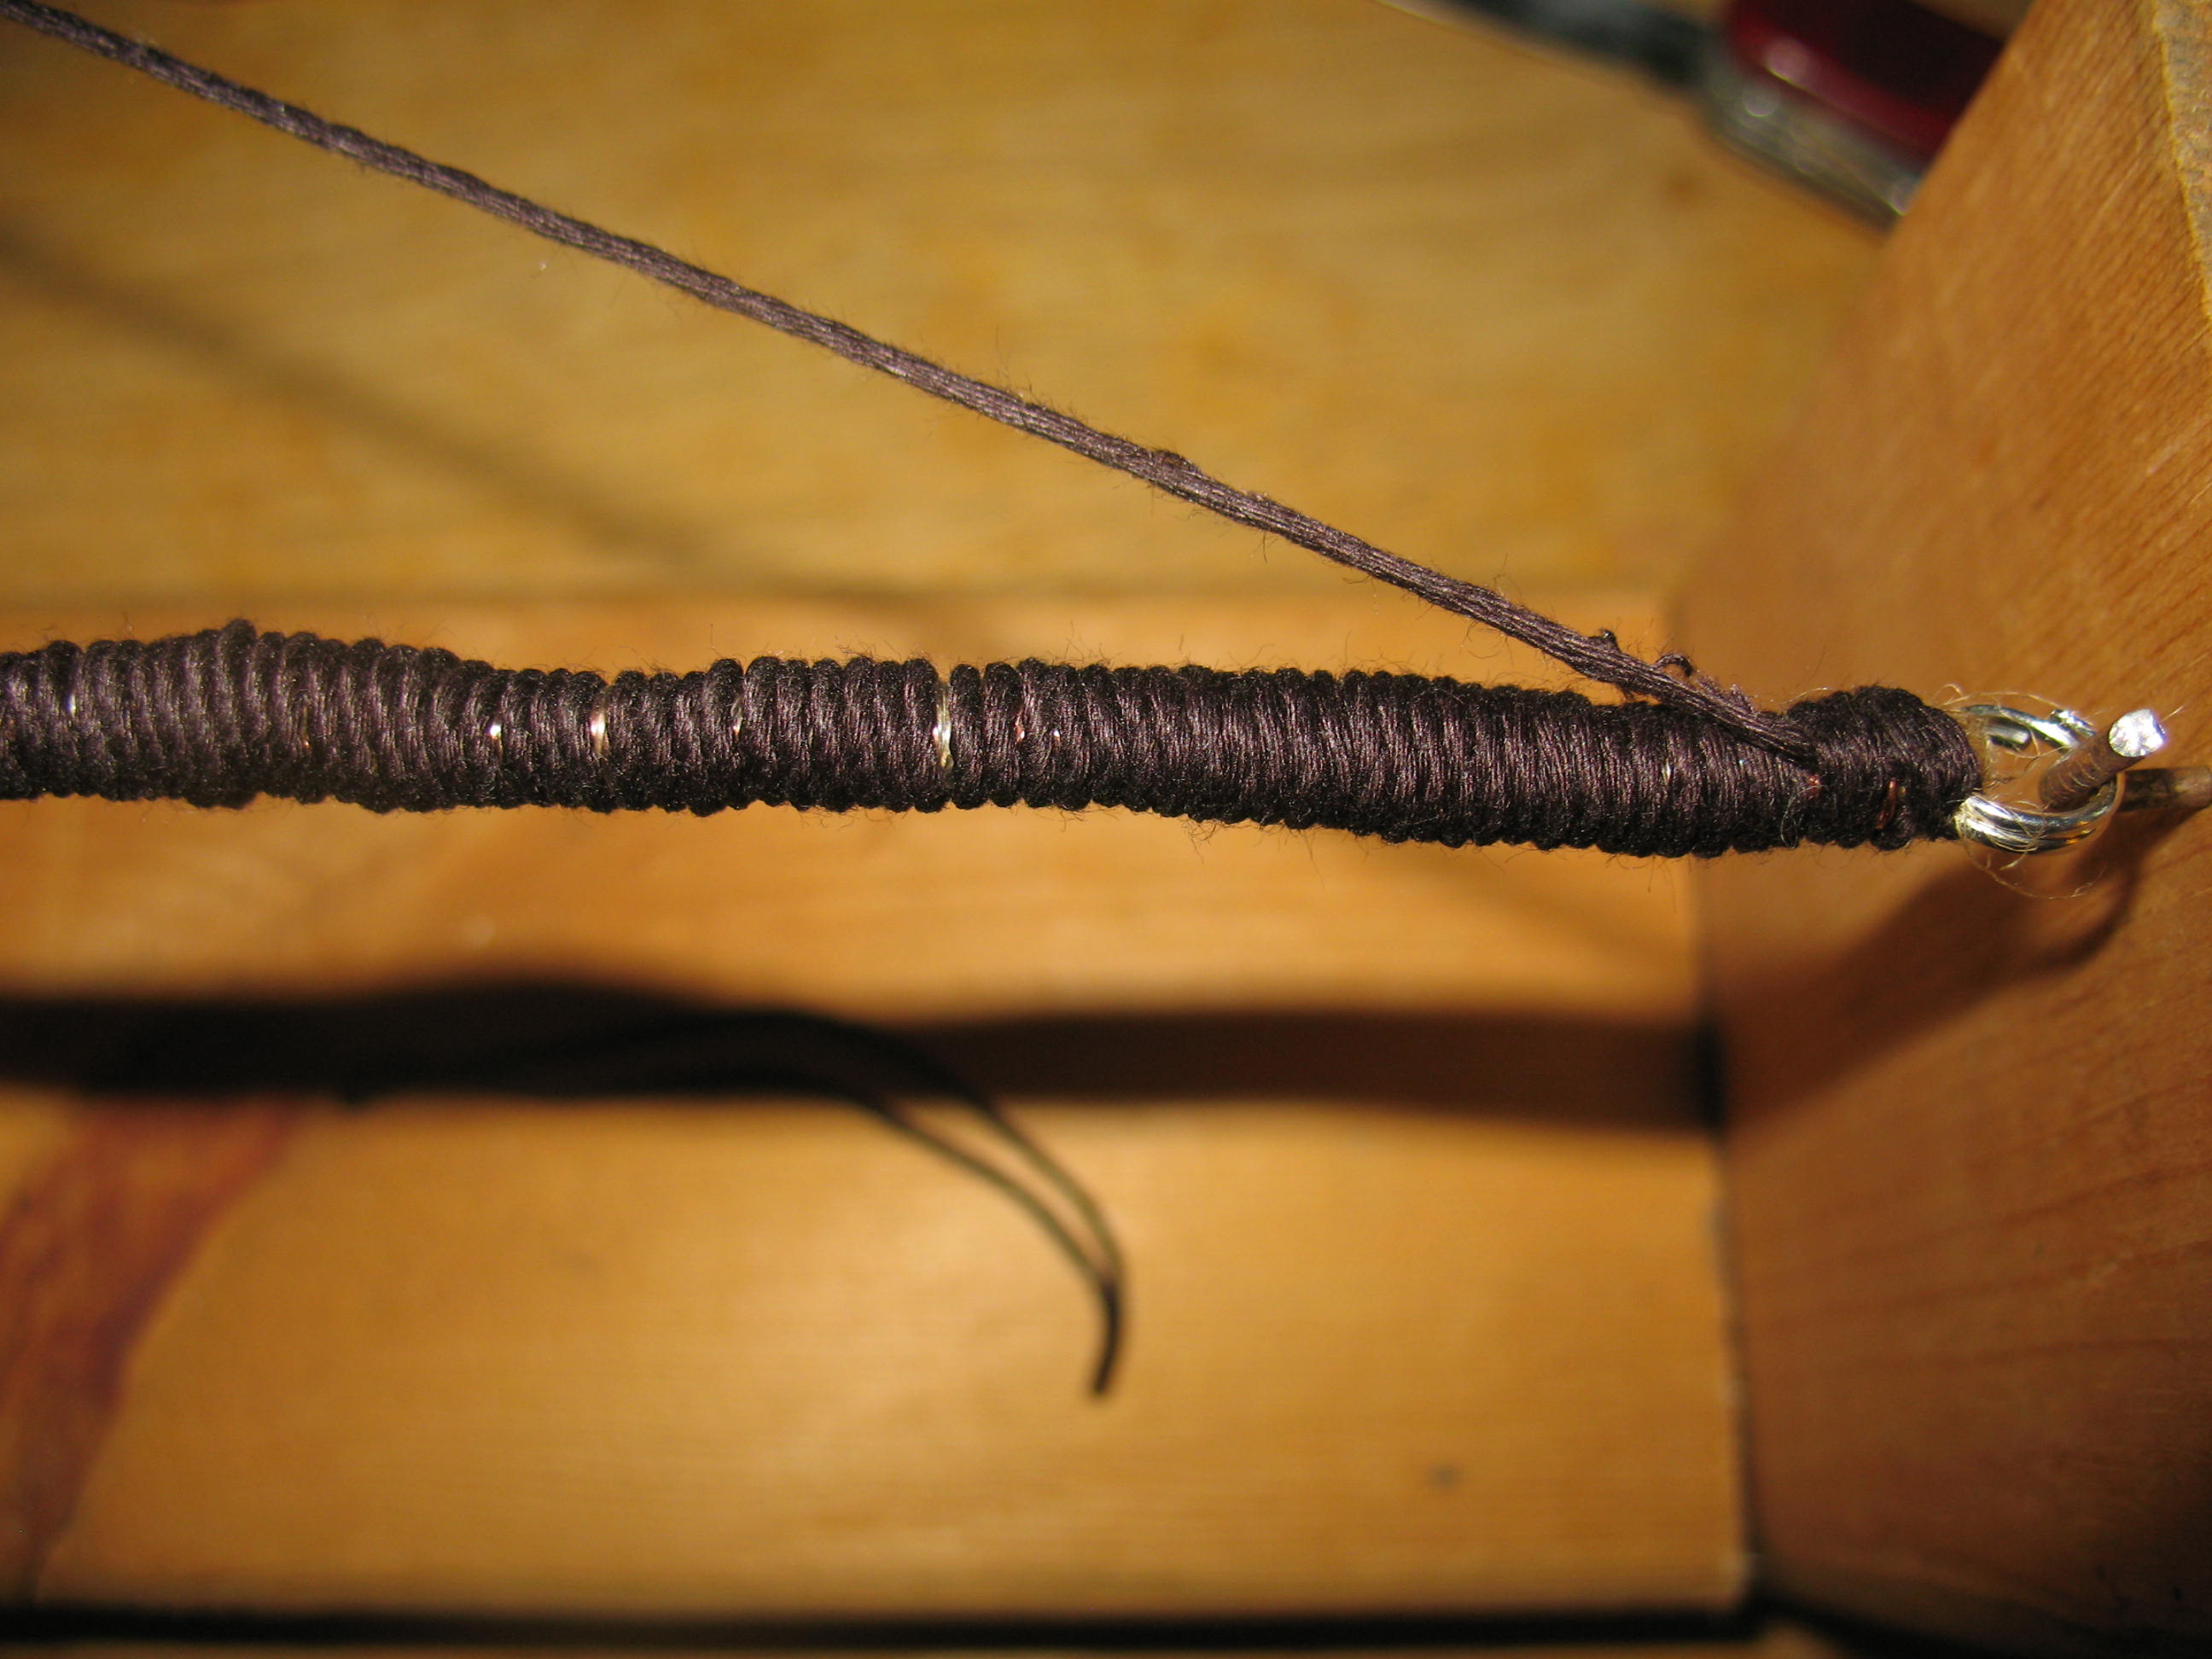
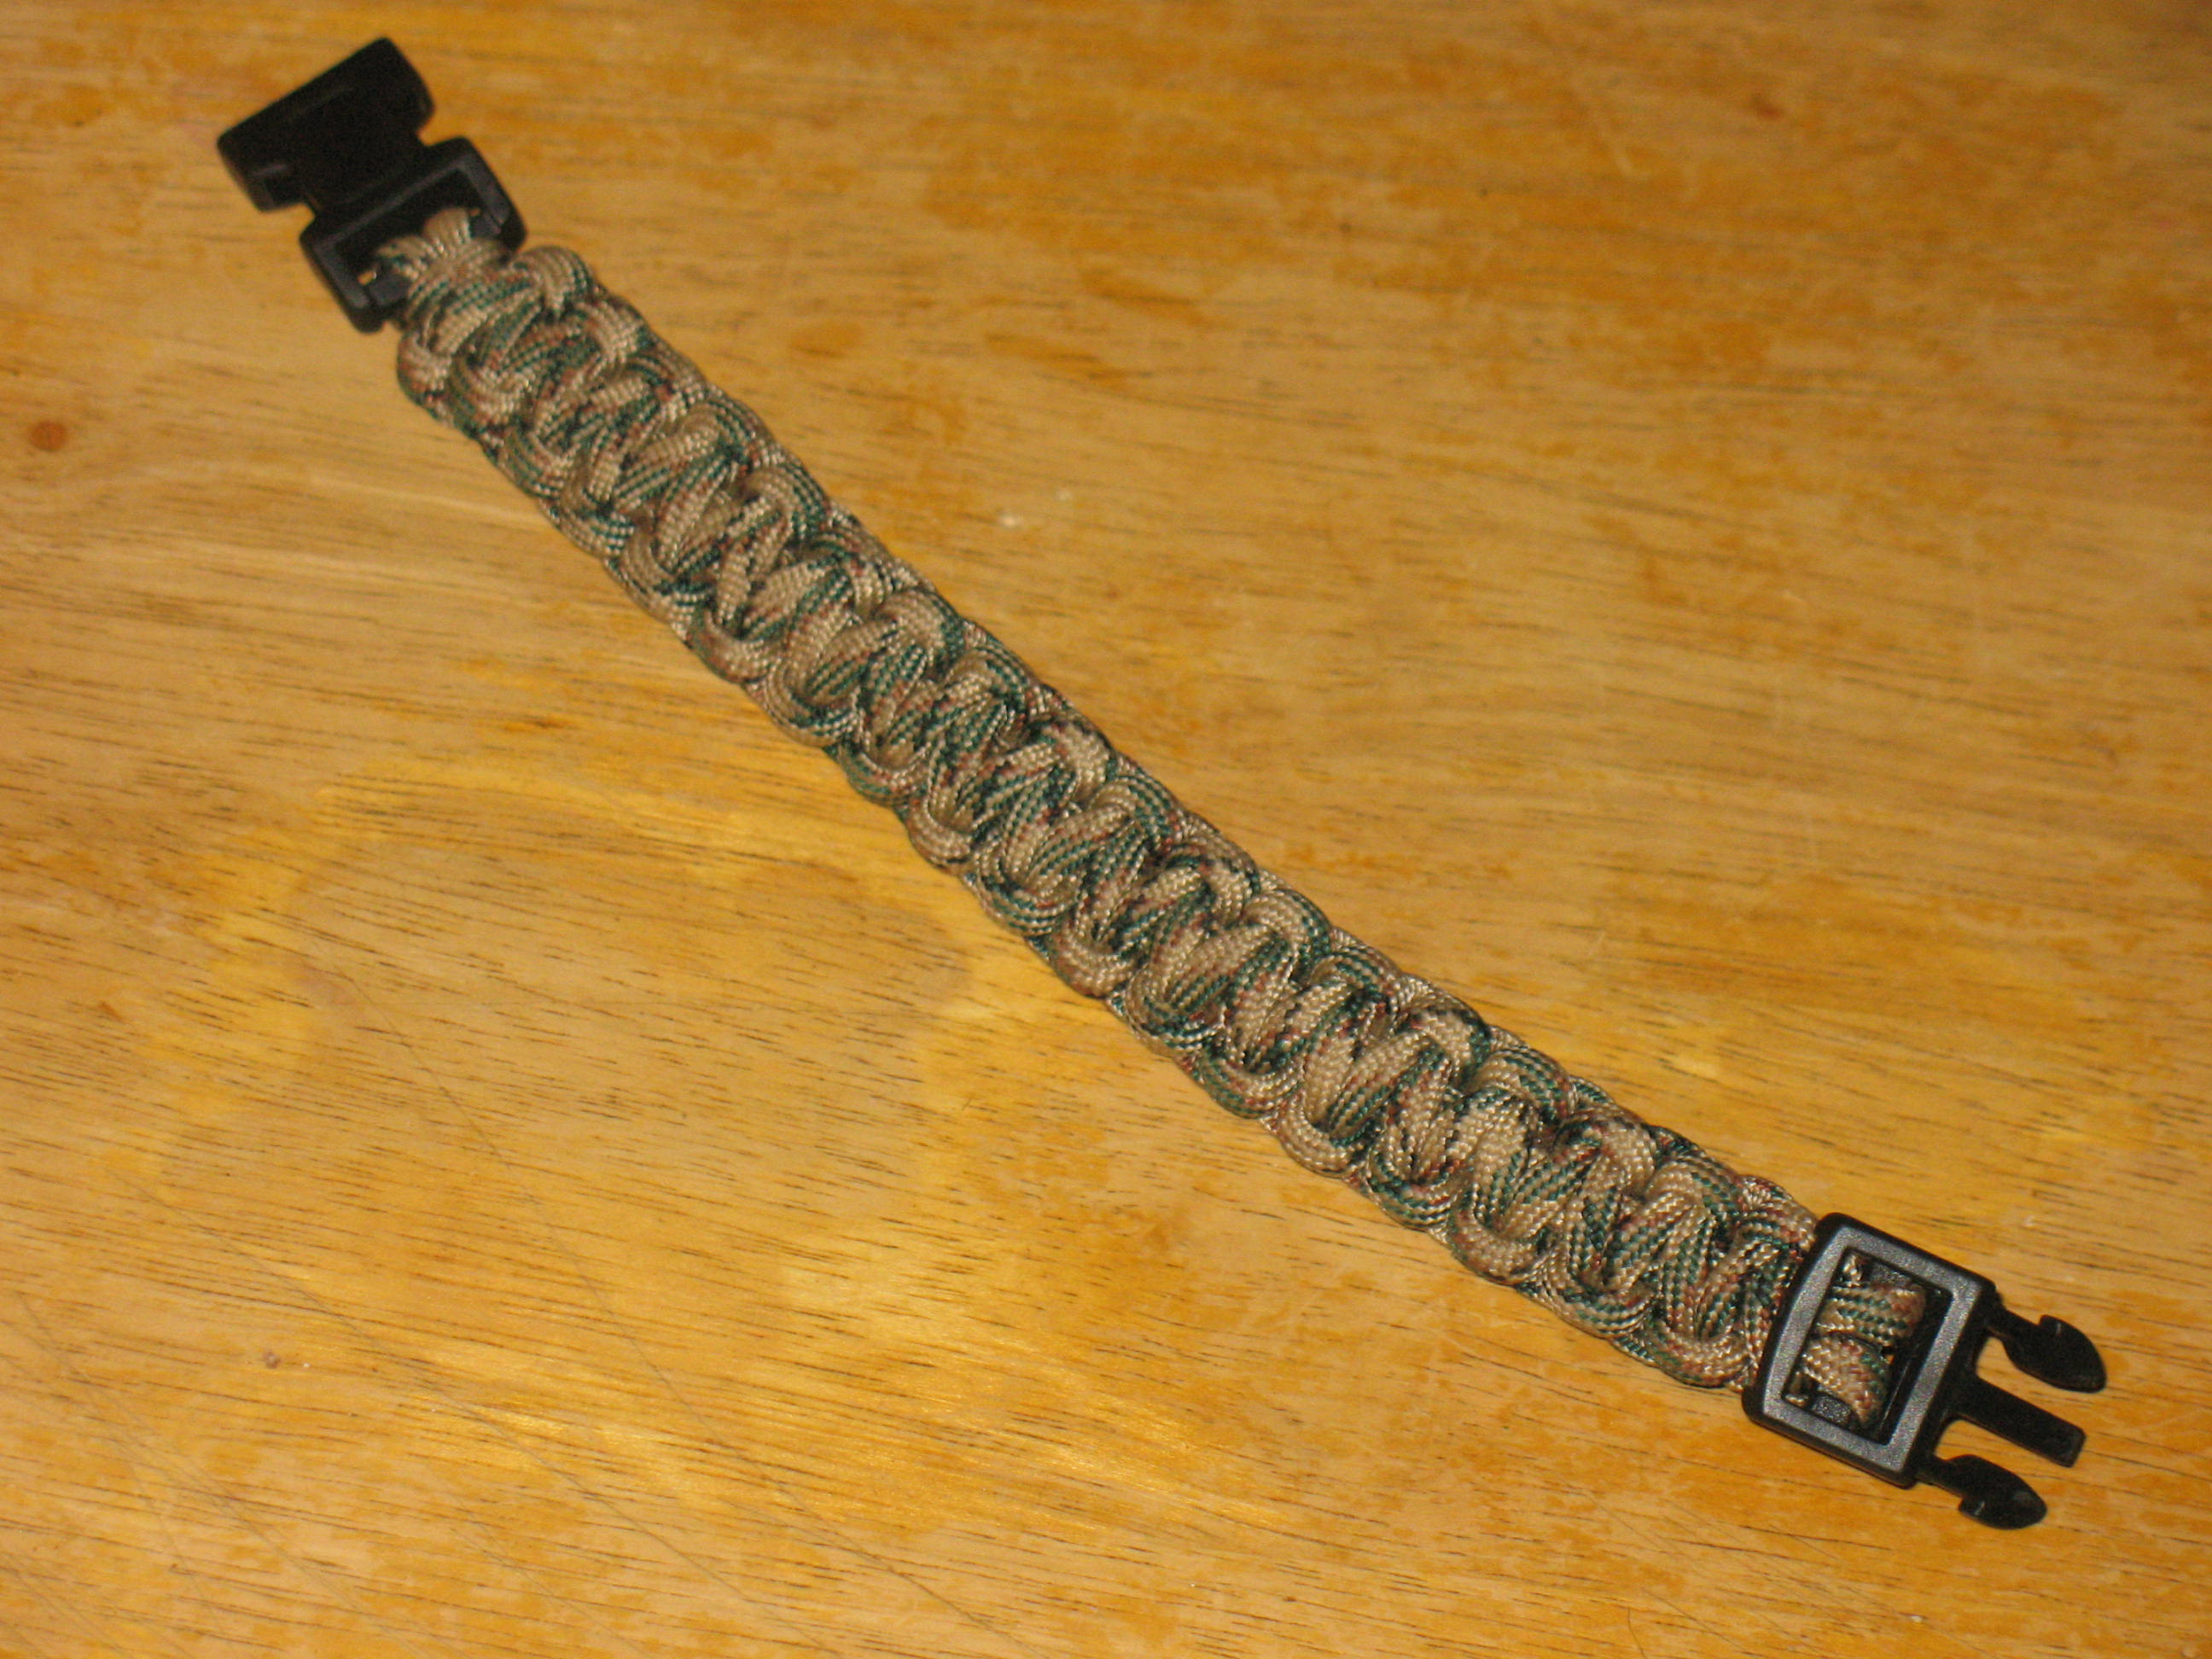
Your bracelet is now finished. Remove it from the hooks (if it is on too tight, you may have to bend one of the jig hooks a little to slip the bracelet off).
Use one of the lanyard clips to hook the split ring together. Pictured below: Bracelet hooked together with lanyard clip. If you ever get in a survival situation you can disassemble your bracelet and have access to several helpful survival tools. This tinder, snare wire, fishing line, and cordage; along with your pocket knife, lighter, and metal match could be the life saving edge that you need in the wilderness.
I have written in previous posts about how I like to always carry a few survival items on my person. Unless you are trying to board an airplane or go into a government building, it is no trouble to add a pocket-knife and a cigarette lighter to the other items in your pocket or purse. I go a little farther than that by carrying a little card with some fish-hooks, fishing line, and snare wire in my wallet. All of these items would be very useful in a survival situation. There is one more item that most people include in survival kits, but that they usually don’t carry with them on a daily basis. That item is some form of cordage. Other than shoe laces (if you happen to wear lace-up shoes), most people don’t carry cordage around with them. Let’s face it, people would probably avoid you on the subway if you walked on with a fifty foot roll of para-cord hanging from your belt. But, there is a way that you can carry some cordage with you and not look like too much of a weirdo. You can wear a survival bracelet.
I first got the idea for survival bracelets when I noticed some of the bracelets that my students at school were wearing. One popular bracelet is called a Cobra Bracelet. The Cobra Bracelet is made by taking about eight or nine feet of 550 para-cord and tying it in a series of knots called cobra knots. The two pieces of a little plastic snap buckle are attached to each end of the bracelet so that it can be clipped on and off of the wrist. Pictured below: Two views of a Cobra Bracelet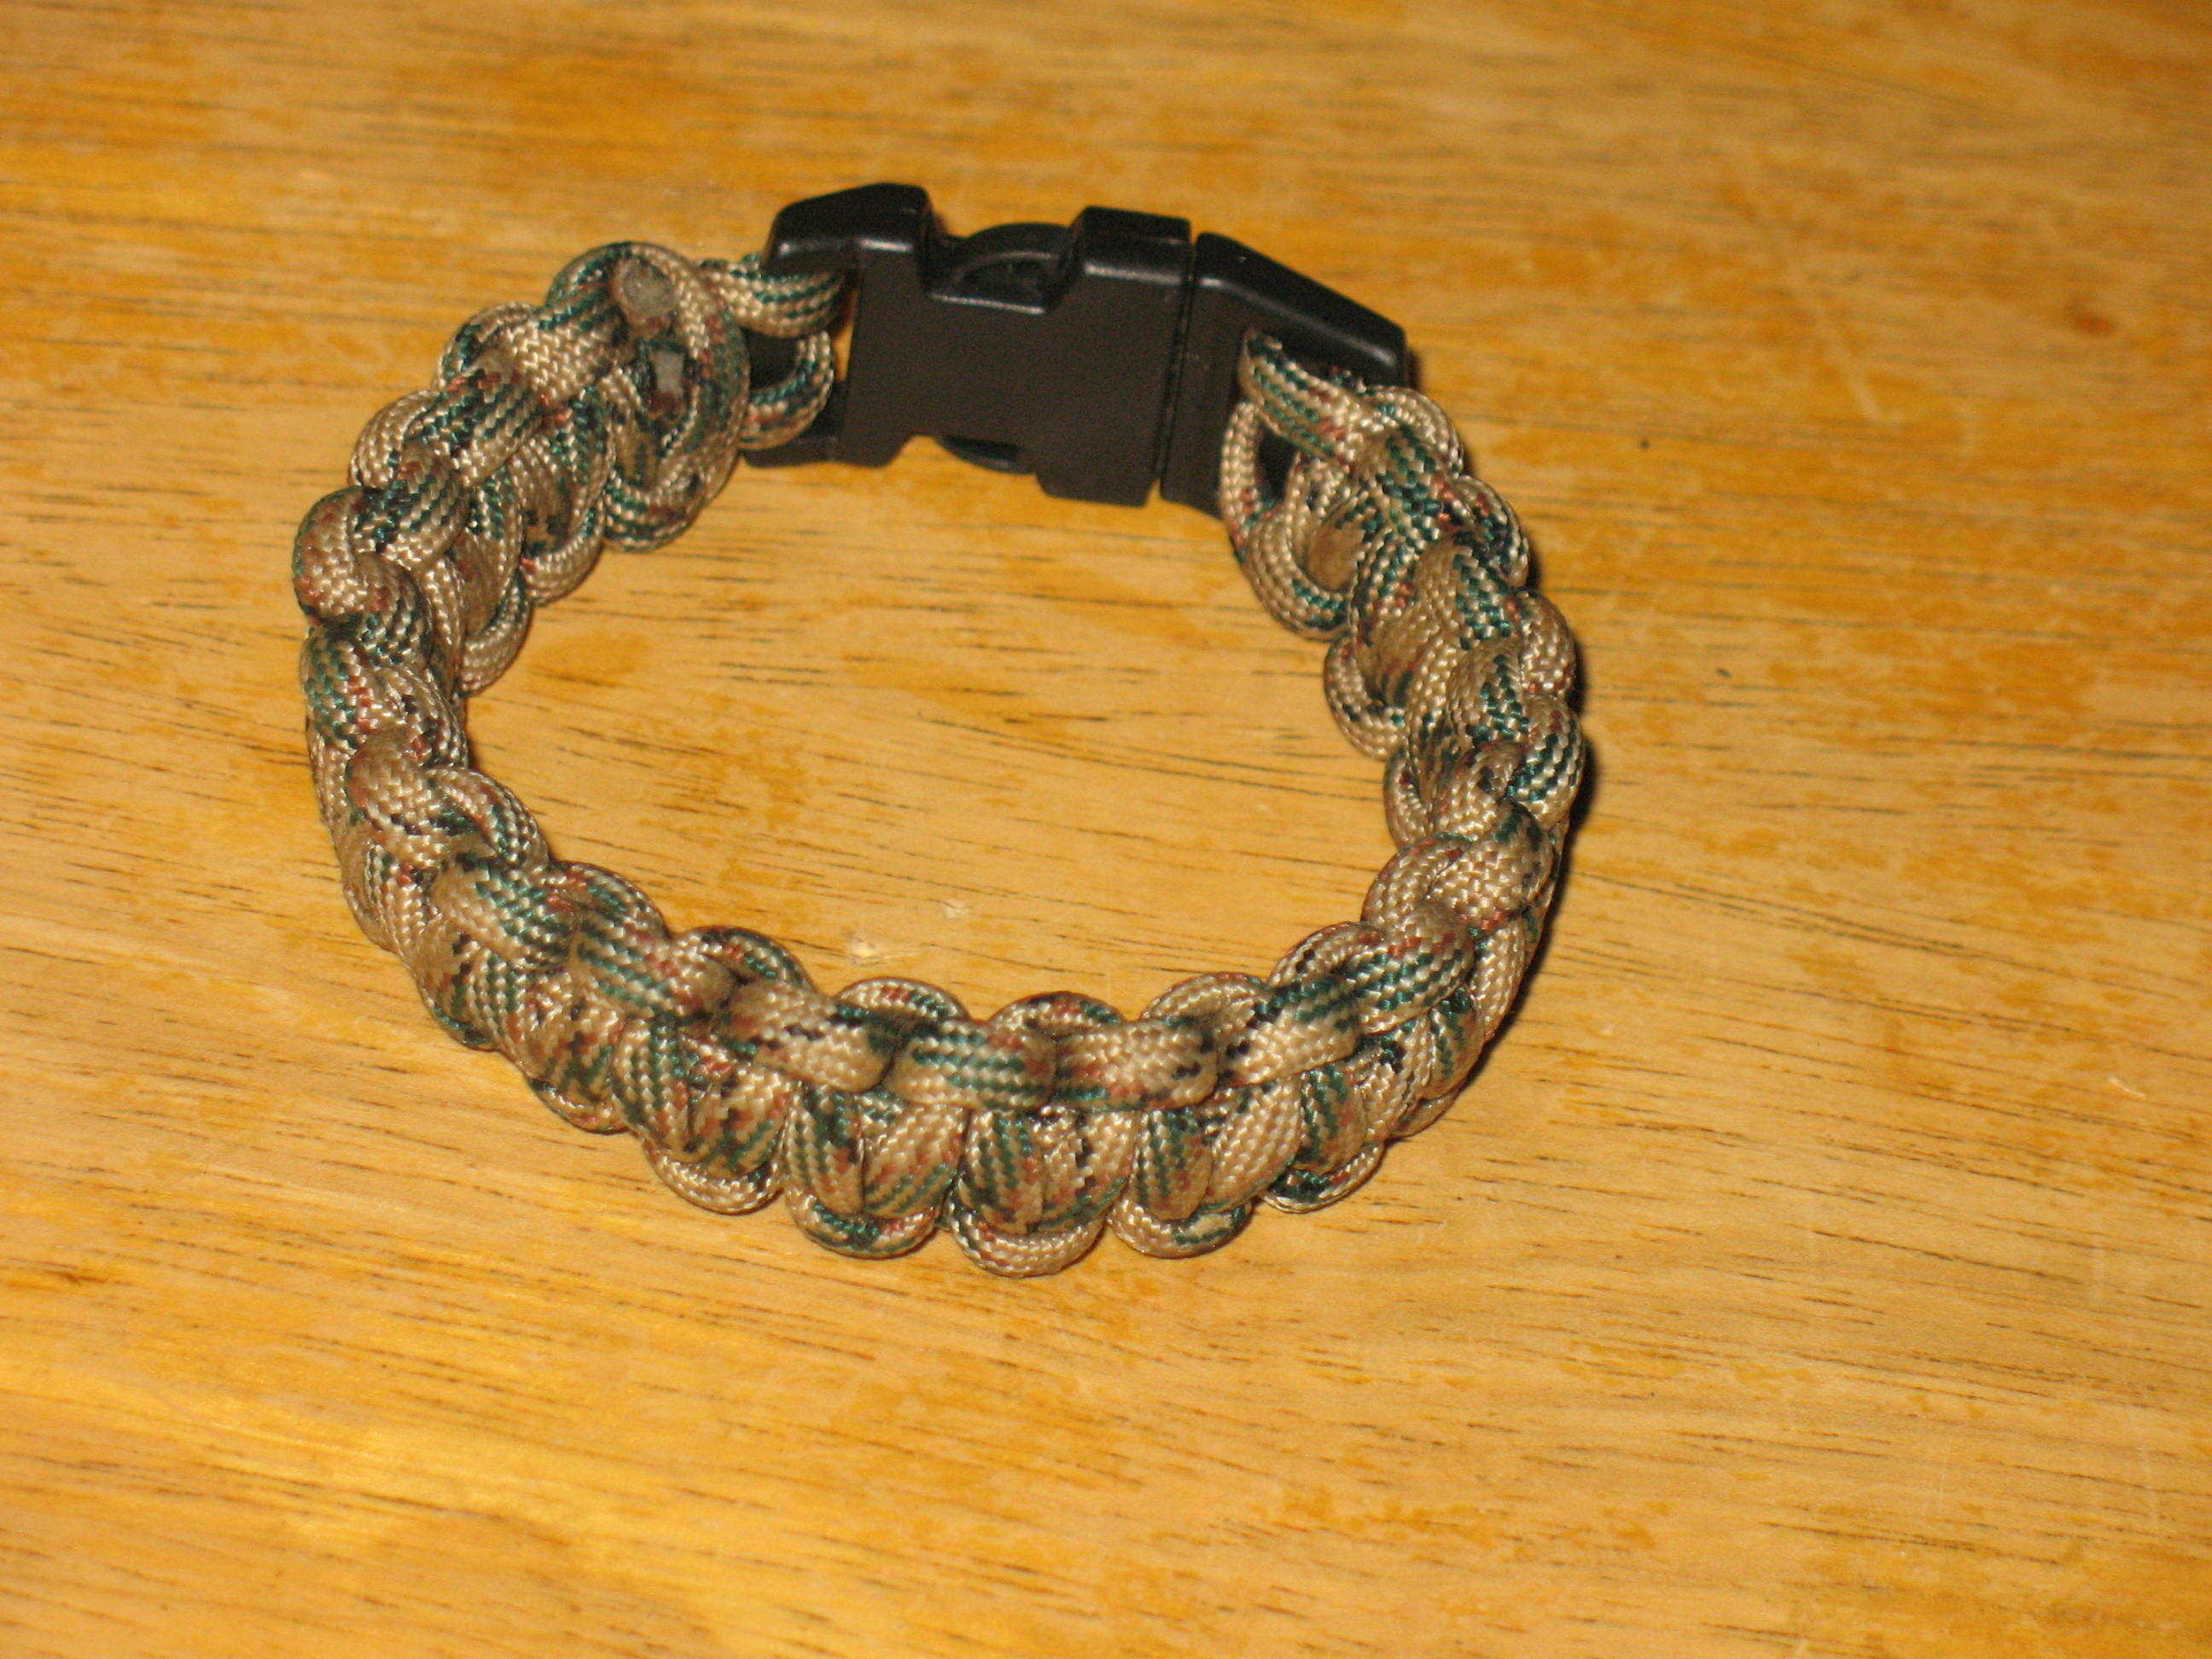
When you unravel the knots you will have about eight feet of good cordage to use as is, or you can slip the woven outer sheath off of the para-cord and you will have 7 eight foot long pieces of 50 pound test nylon twine that can be used for making snares and other items. Pictured below: Para-cord with sheath pulled back to reveal strands of nylon twine. 
Not bad; over 50 feet of cordage worn around your wrist. You can do an inter-net search for “make a cobra bracelet” and you will find several sites with instructions on how to make them, or you can buy them ready made. You can buy them off of the inter-net or you can pick them up at gun shows, craft stores, arts and crafts fairs and many other places. Prices range from $4.00 to $10.00 US. The cheapest ones I’ve found are at a craft store called Hobby Lobby where they sell for $4.00 US. That’s almost cheaper than you can buy the materials to make one.
In my next post, I am going to show you how to make a compact, multi-purpose survival bracelet that will let you carry fire-starting tinder, snare wire, fishing line, and multi-purpose cordage all in one neat package that snaps around your wrist.
This is a skill that everyone should master. I taught my own children how to make a survival shelter when they were five or six years old. They loved it. What could be more fun to a kid than building your own little home in the woods? 
The reason that this is an important skill is because hypothermia, often referred to in news stories as “exposure”, is the leading cause of death among those who are lost in the wilderness. You can survive for several days without water, you can survive for weeks without food, but the loss of your core body heat will kill you in a matter of hours. It doesn’t have to be freezing cold for you to become hypothermic. If you are tired and wet, and the wind is blowing you can become hypothermic at temperatures as high as 55 degree Fahrenheit.
There’s really no reason for this to happen. Your body is constantly churning out heat at 98.6 degrees Fahrenheit. All you have to do is keep this heat from escaping, and you will survive. Follow these simple directions to make a survival brush shelter that will help you retain your body’s vital core heat.
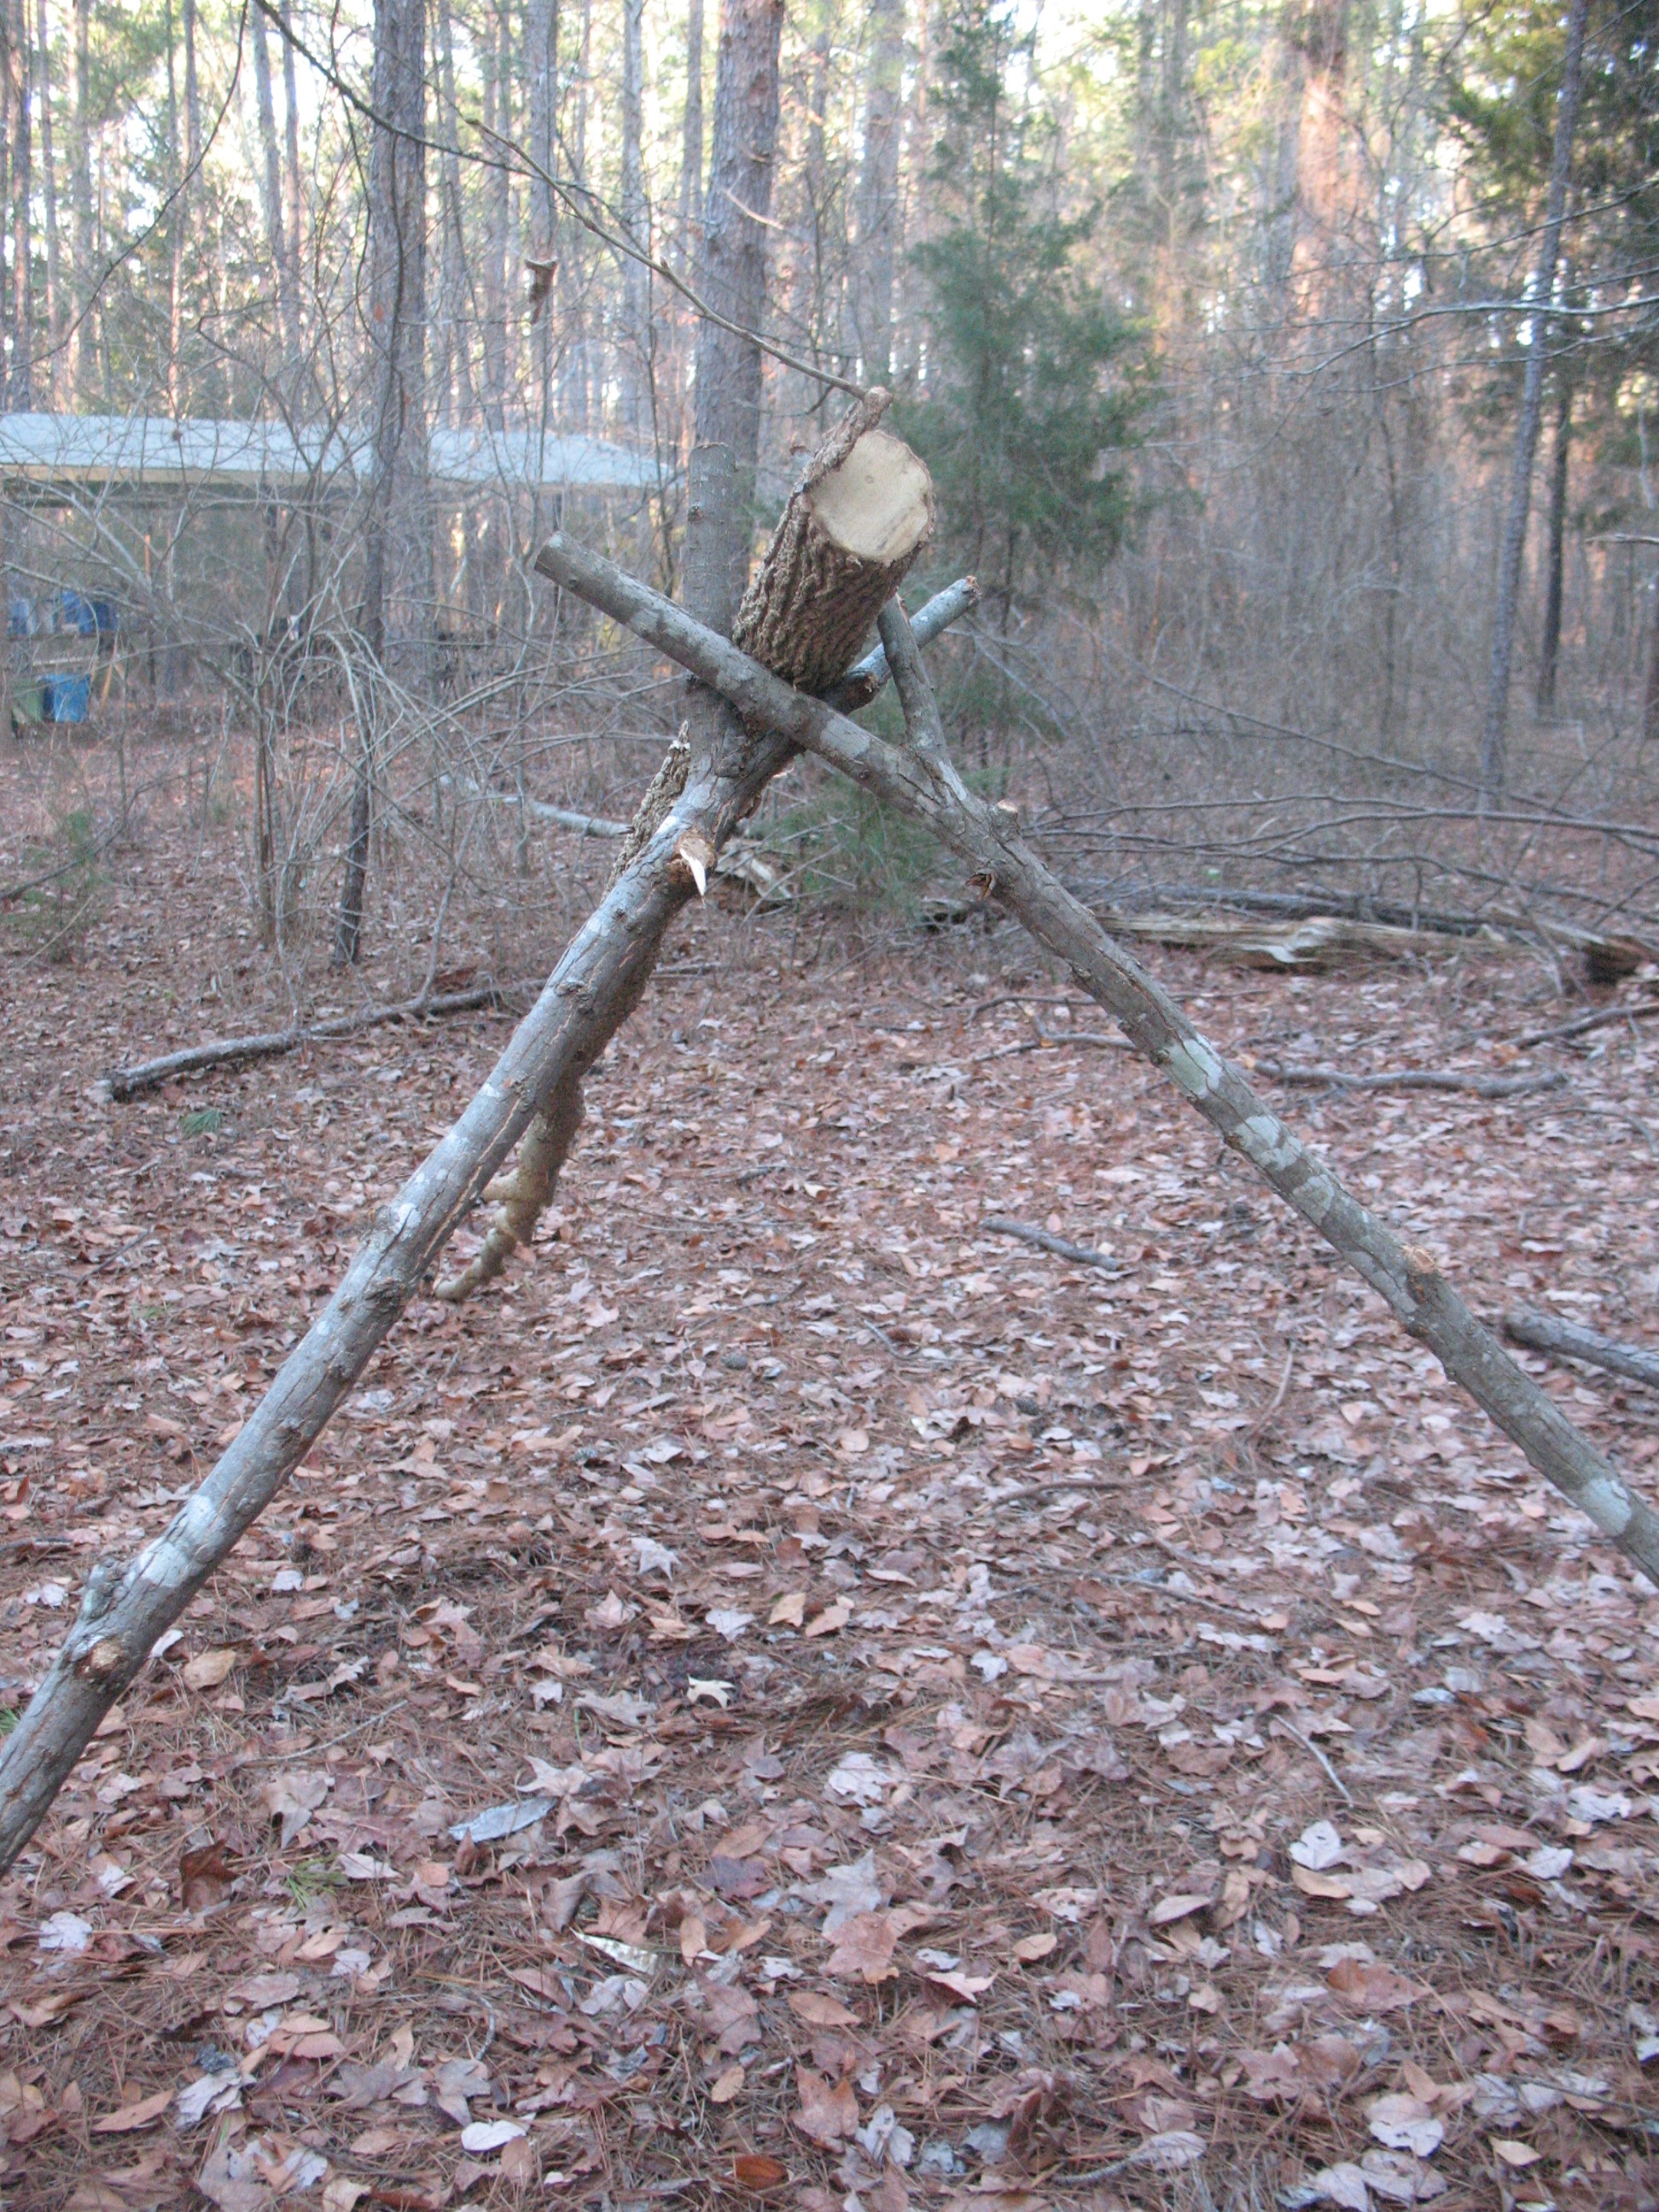
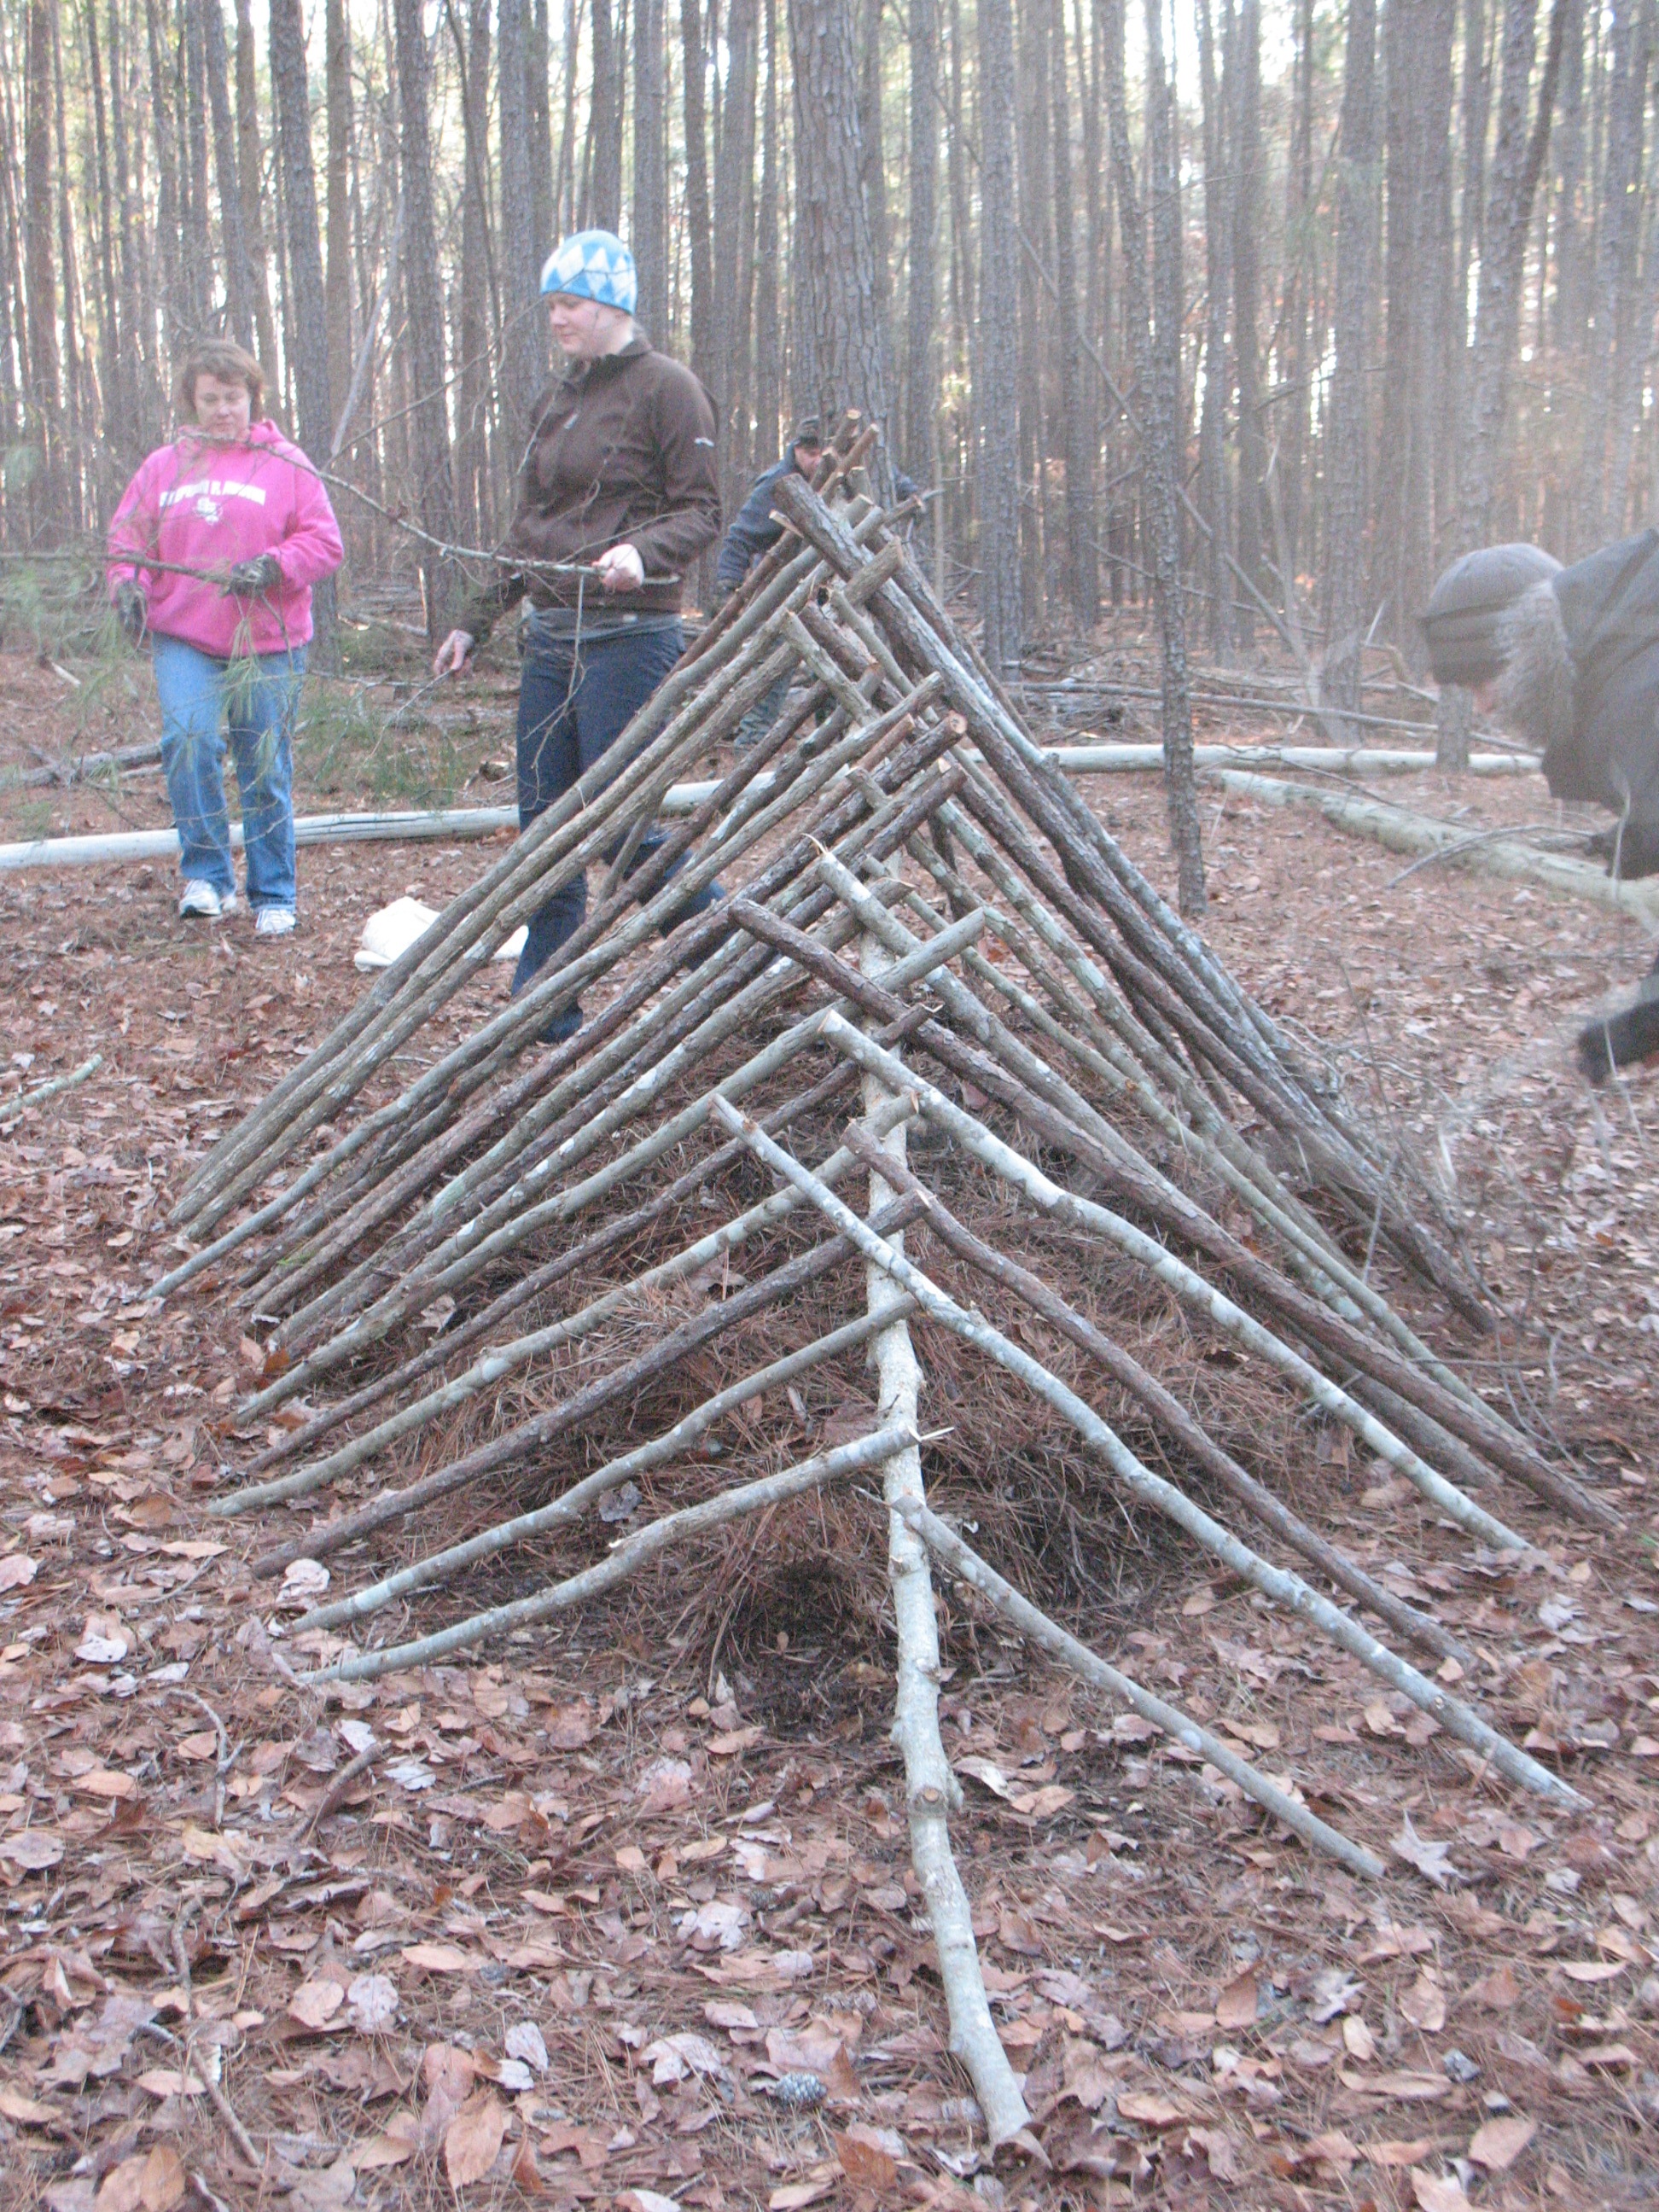
Before you do anything else, look for the right location. You want to build your shelter where raw materials are readily available. You will need an assortment of sticks of varying lengths, and you will need a lot of branches or pine boughs. You will also need piles of leaves, pine needles, or grasses. So don’t build you shelter in the middle of a field where you will have to carry all of this stuff over a considerable distance. Another thing to look for is a tree with a strong, low lying limb, or a tree with a fork that is three or four feet off of the ground. This tree will support the ridgepole of your shelter. If you find a good location, but it doesn’t have a tree to support your ridgepole; you can use two forked sticks and lock them together to support the ridgepole. This is the method that we have used in the pictures below.
When you’ve found the right location, it’s time to gather your materials and start construction. First you will need to set up the main support poles for your shelter. You will need to select a long, solid pole for the ridgepole. This pole should be ten or twelve feet long and three or four inches in diameter. Prop one end of the ridgepole up in the fork of your selected tree or as we are doing here, you can use two forked sticks and lock them together around the ridge pole to support it.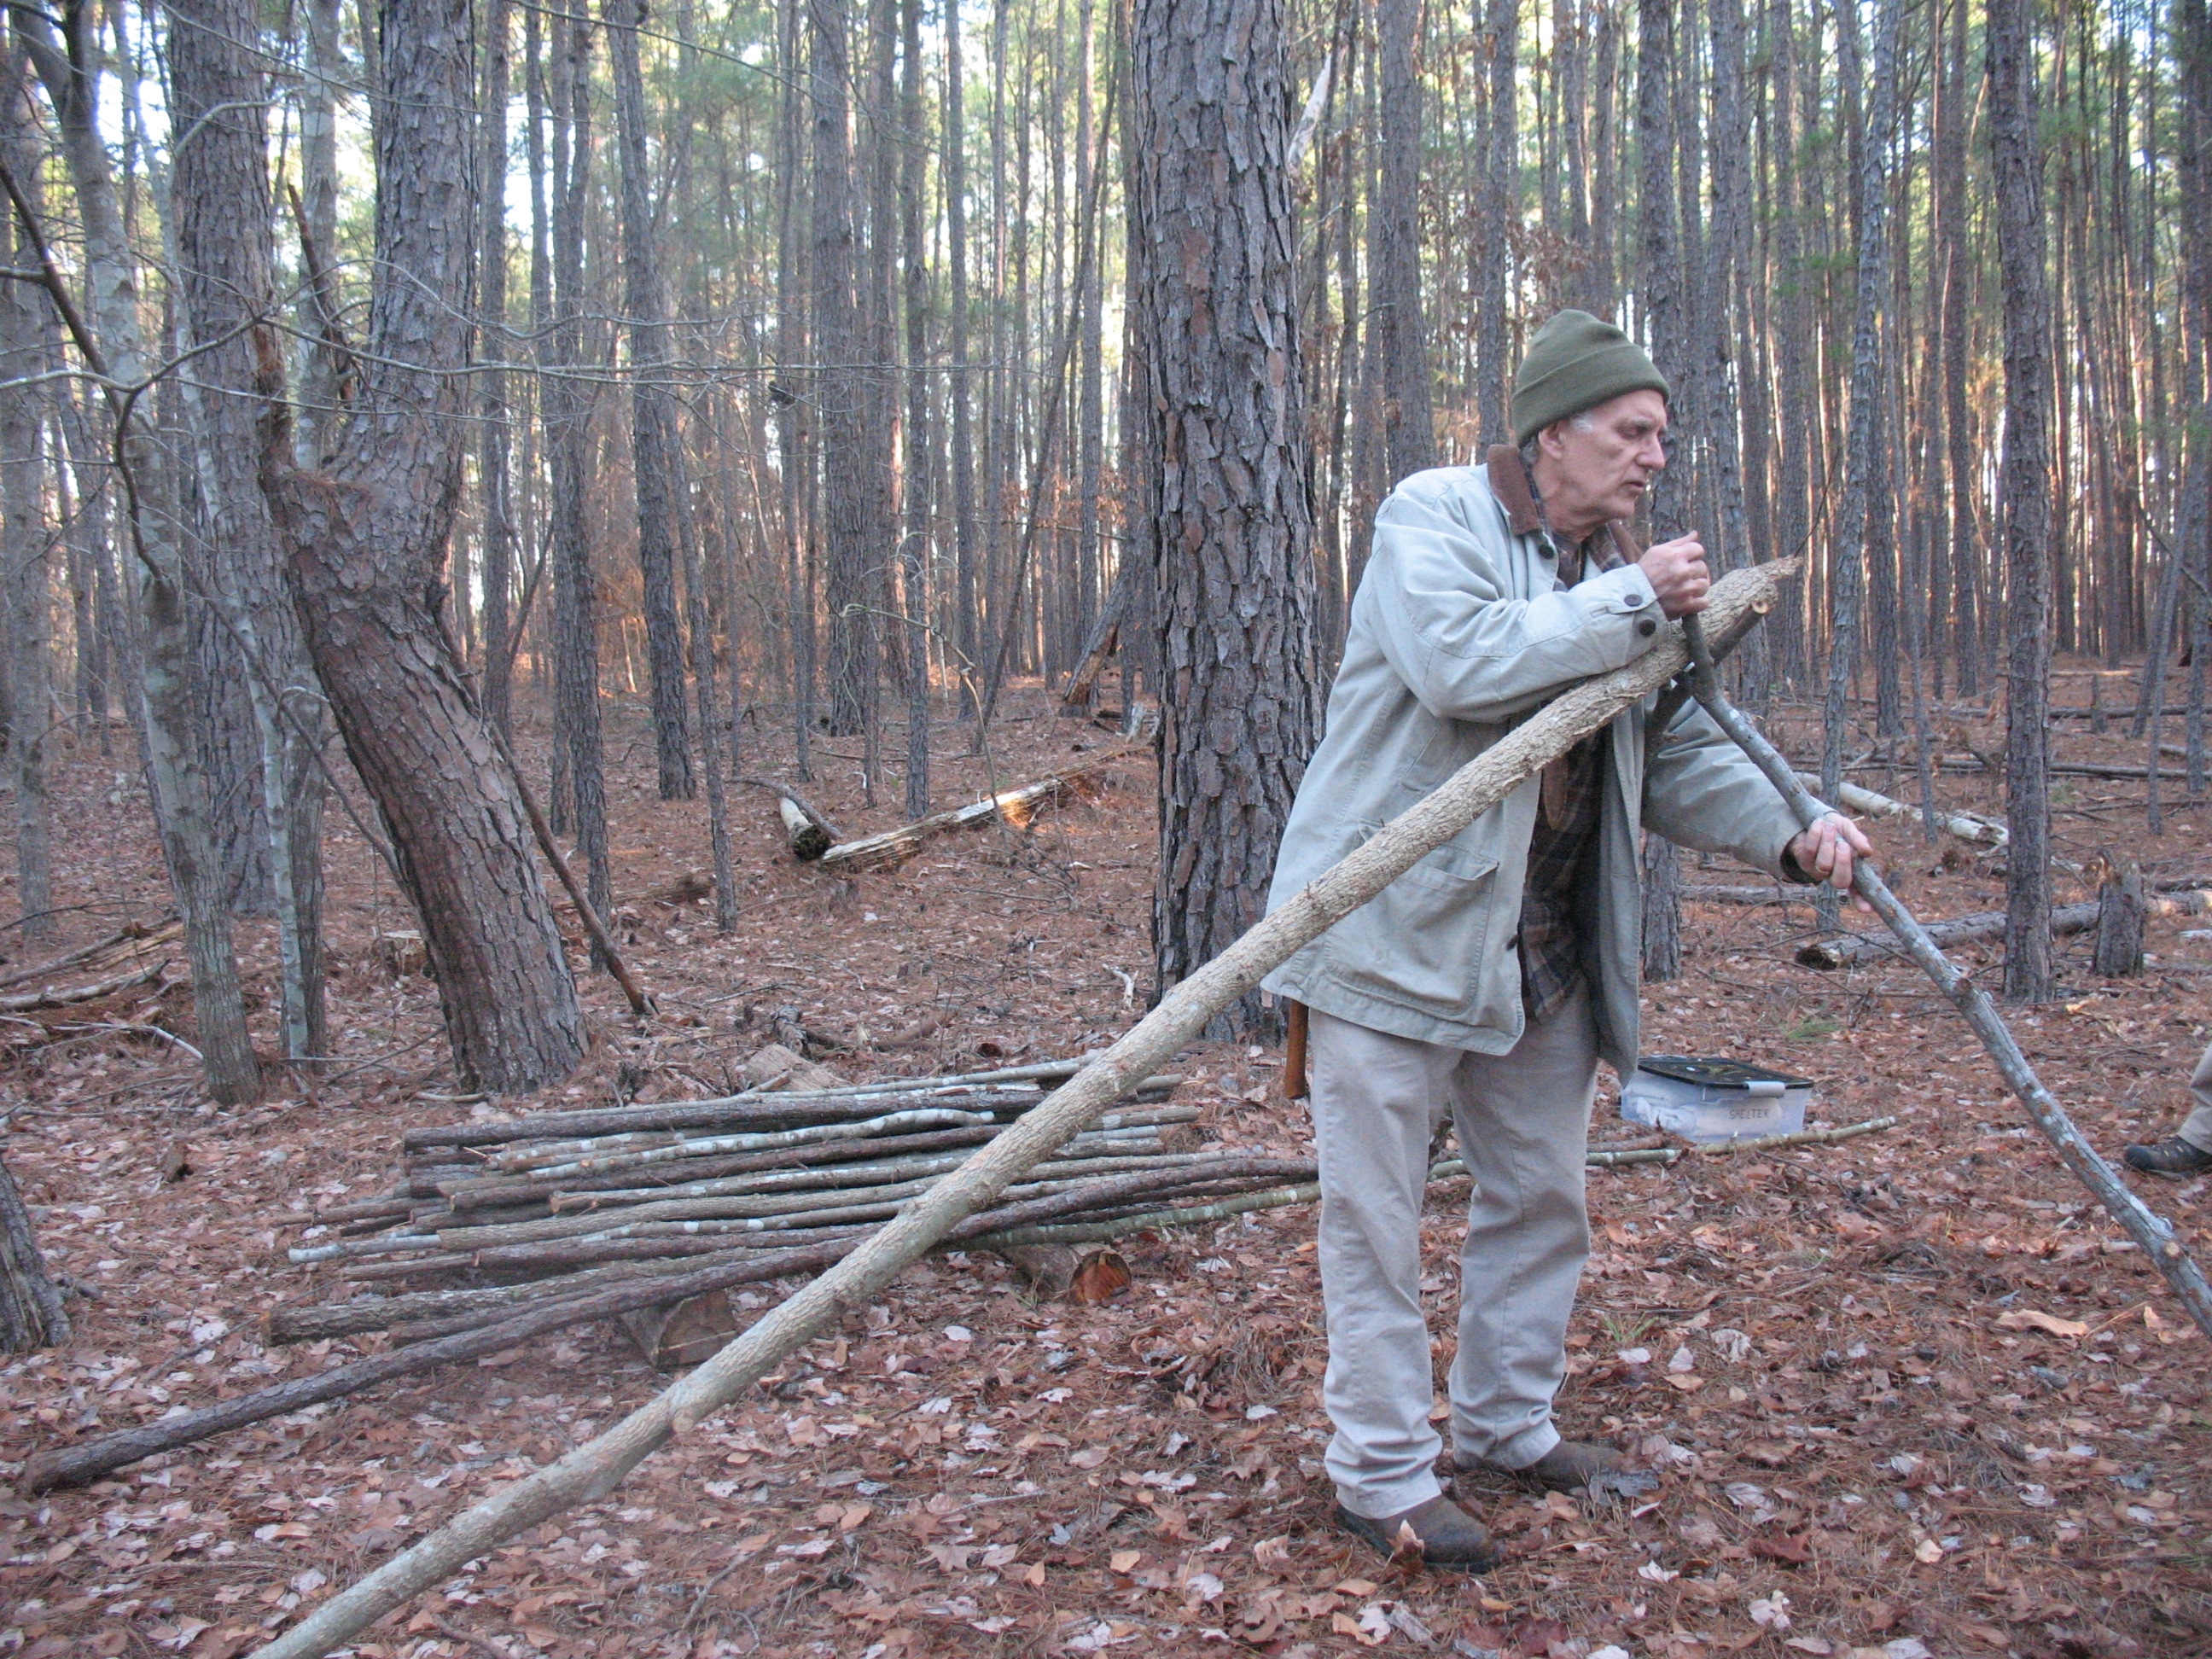
 When you have the main poles up, it is time to gather materials bedding materials. For bedding you will use the driest and cleanest leaves, needle, or grasses that you can find. They need to be dead. Green bedding will have a lot of moisture in it, and being damp will contribute to hypothermia, so no green pine boughs. Lay your bedding materials down next to the tree you have selected. We will be building our shelter over the top of the bed, so locate your bedding accordingly. Make a pile of leaves or needles that is about four feet wide by seven or eight feet long. Pile the bedding up about two feet thick then lay down on the pile to compress it. After compressing the leaves if you’re not at least six inches off the ground, add more bedding.
Now if you have a sheet, a blanket, or a solar emergency blanket, fold it in half lengthwise and lay it down on top of your bedding. This is not necessary for survival, but it will make for a more comfortable night’s sleep. Lying inside of a blanket is not nearly as prickly as lying inside of a pile of pine needles. 
When your blanket is in place, pile another two feet of leaves or needles on top of it. 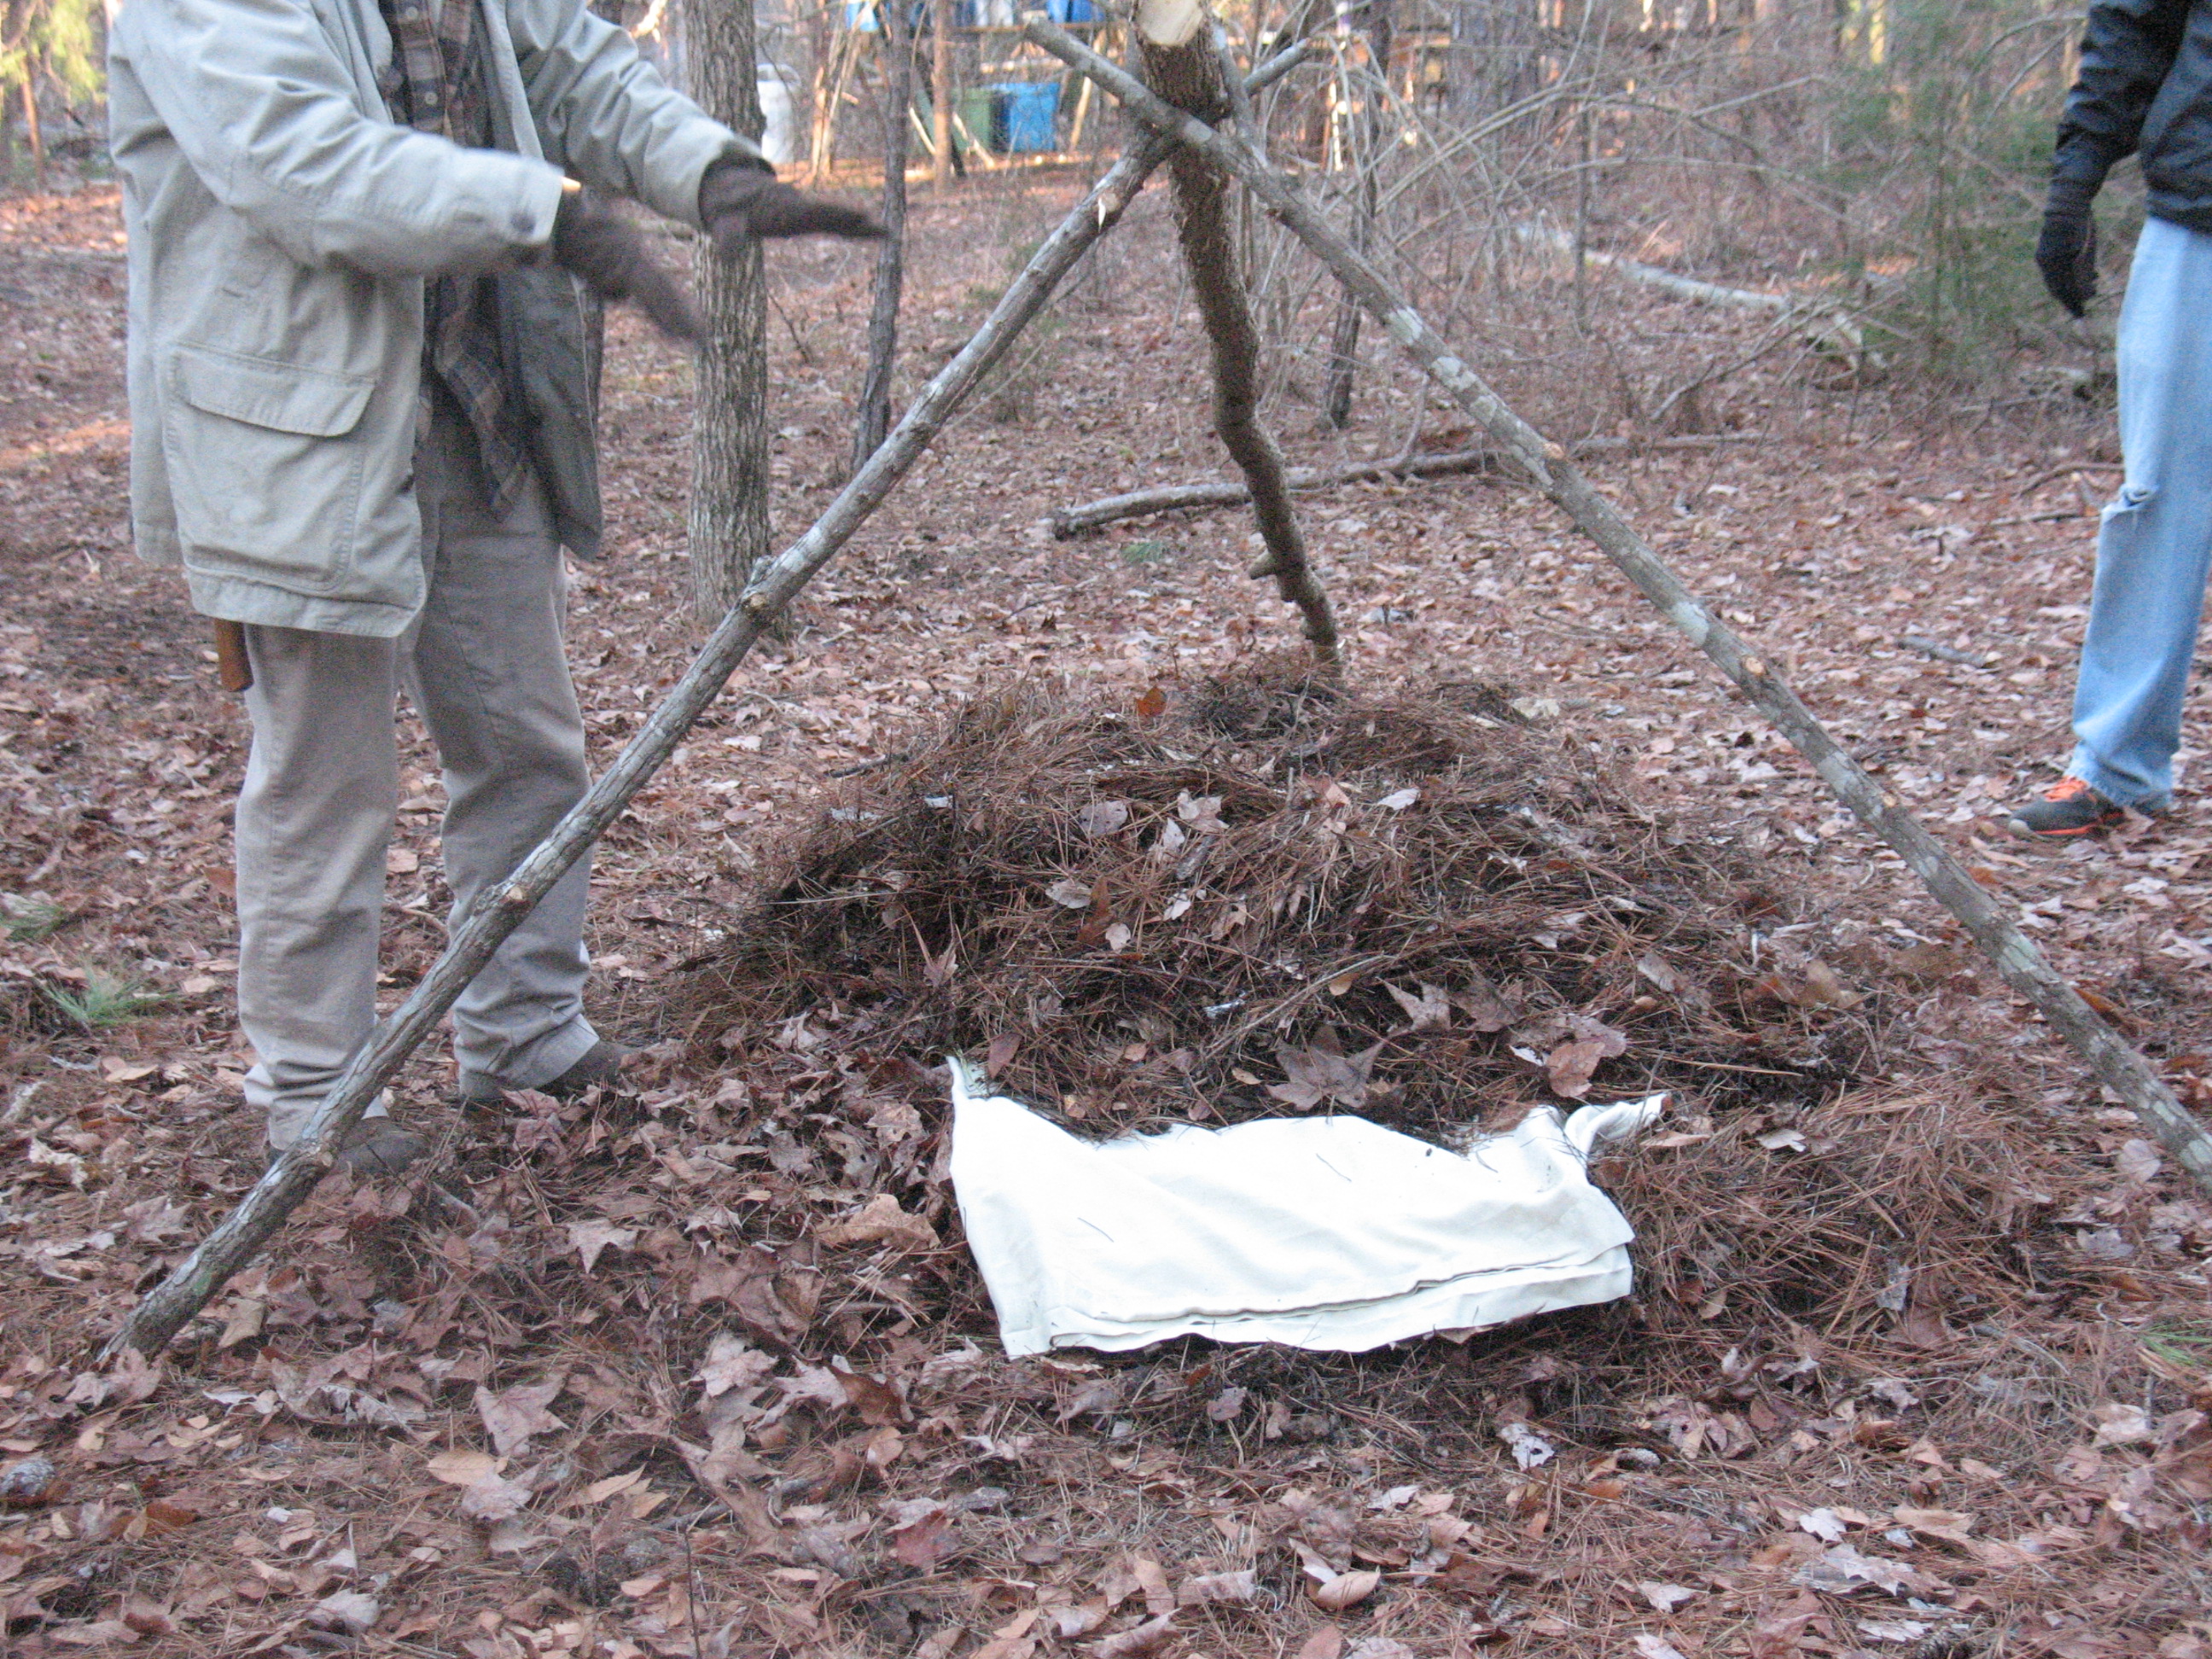
Next you will need to lay a bunch of shorter poles up on the ridge pole. These “ribs” should come out at about a forty-five degree angle and should be about six to eight inches apart. Leave an opening on the high end of the shelter so that you will have a door to crawl inside. 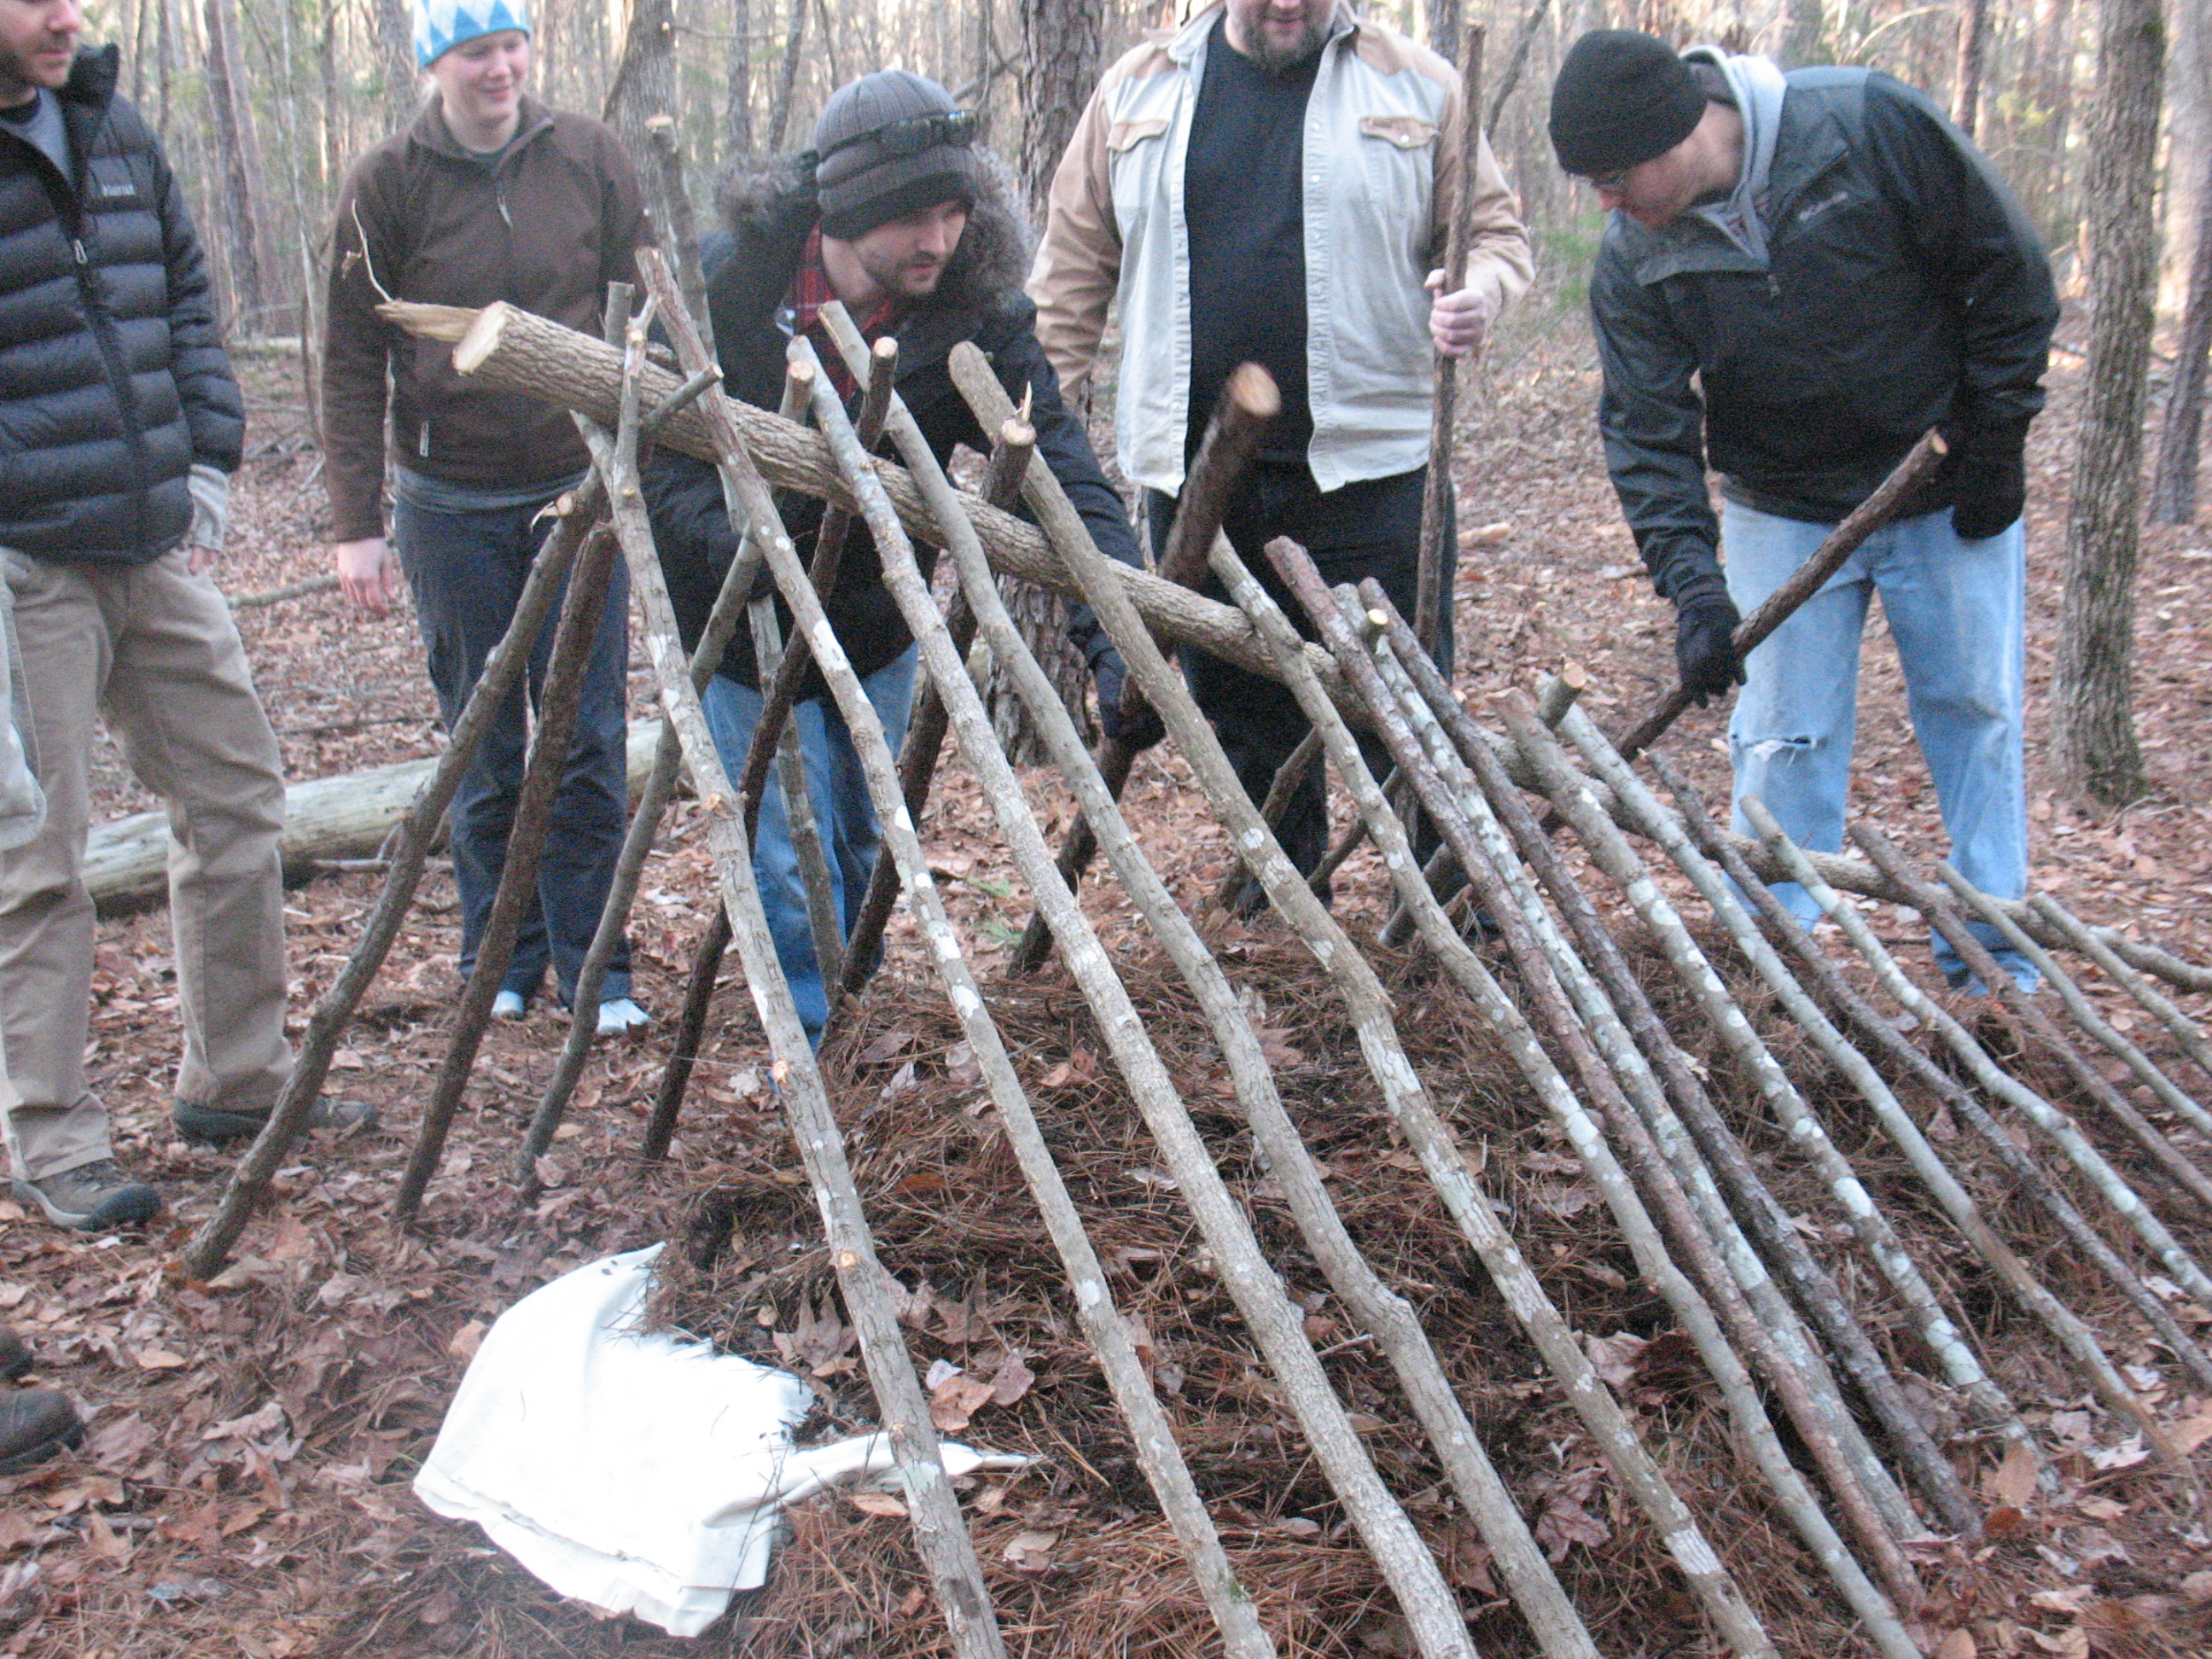
When the ribs are in place cover the whole shelter with a layer of pine boughs or branches. The purpose of these boughs is to hold up the leaves and debris that you will pile on the outside of the shelter.
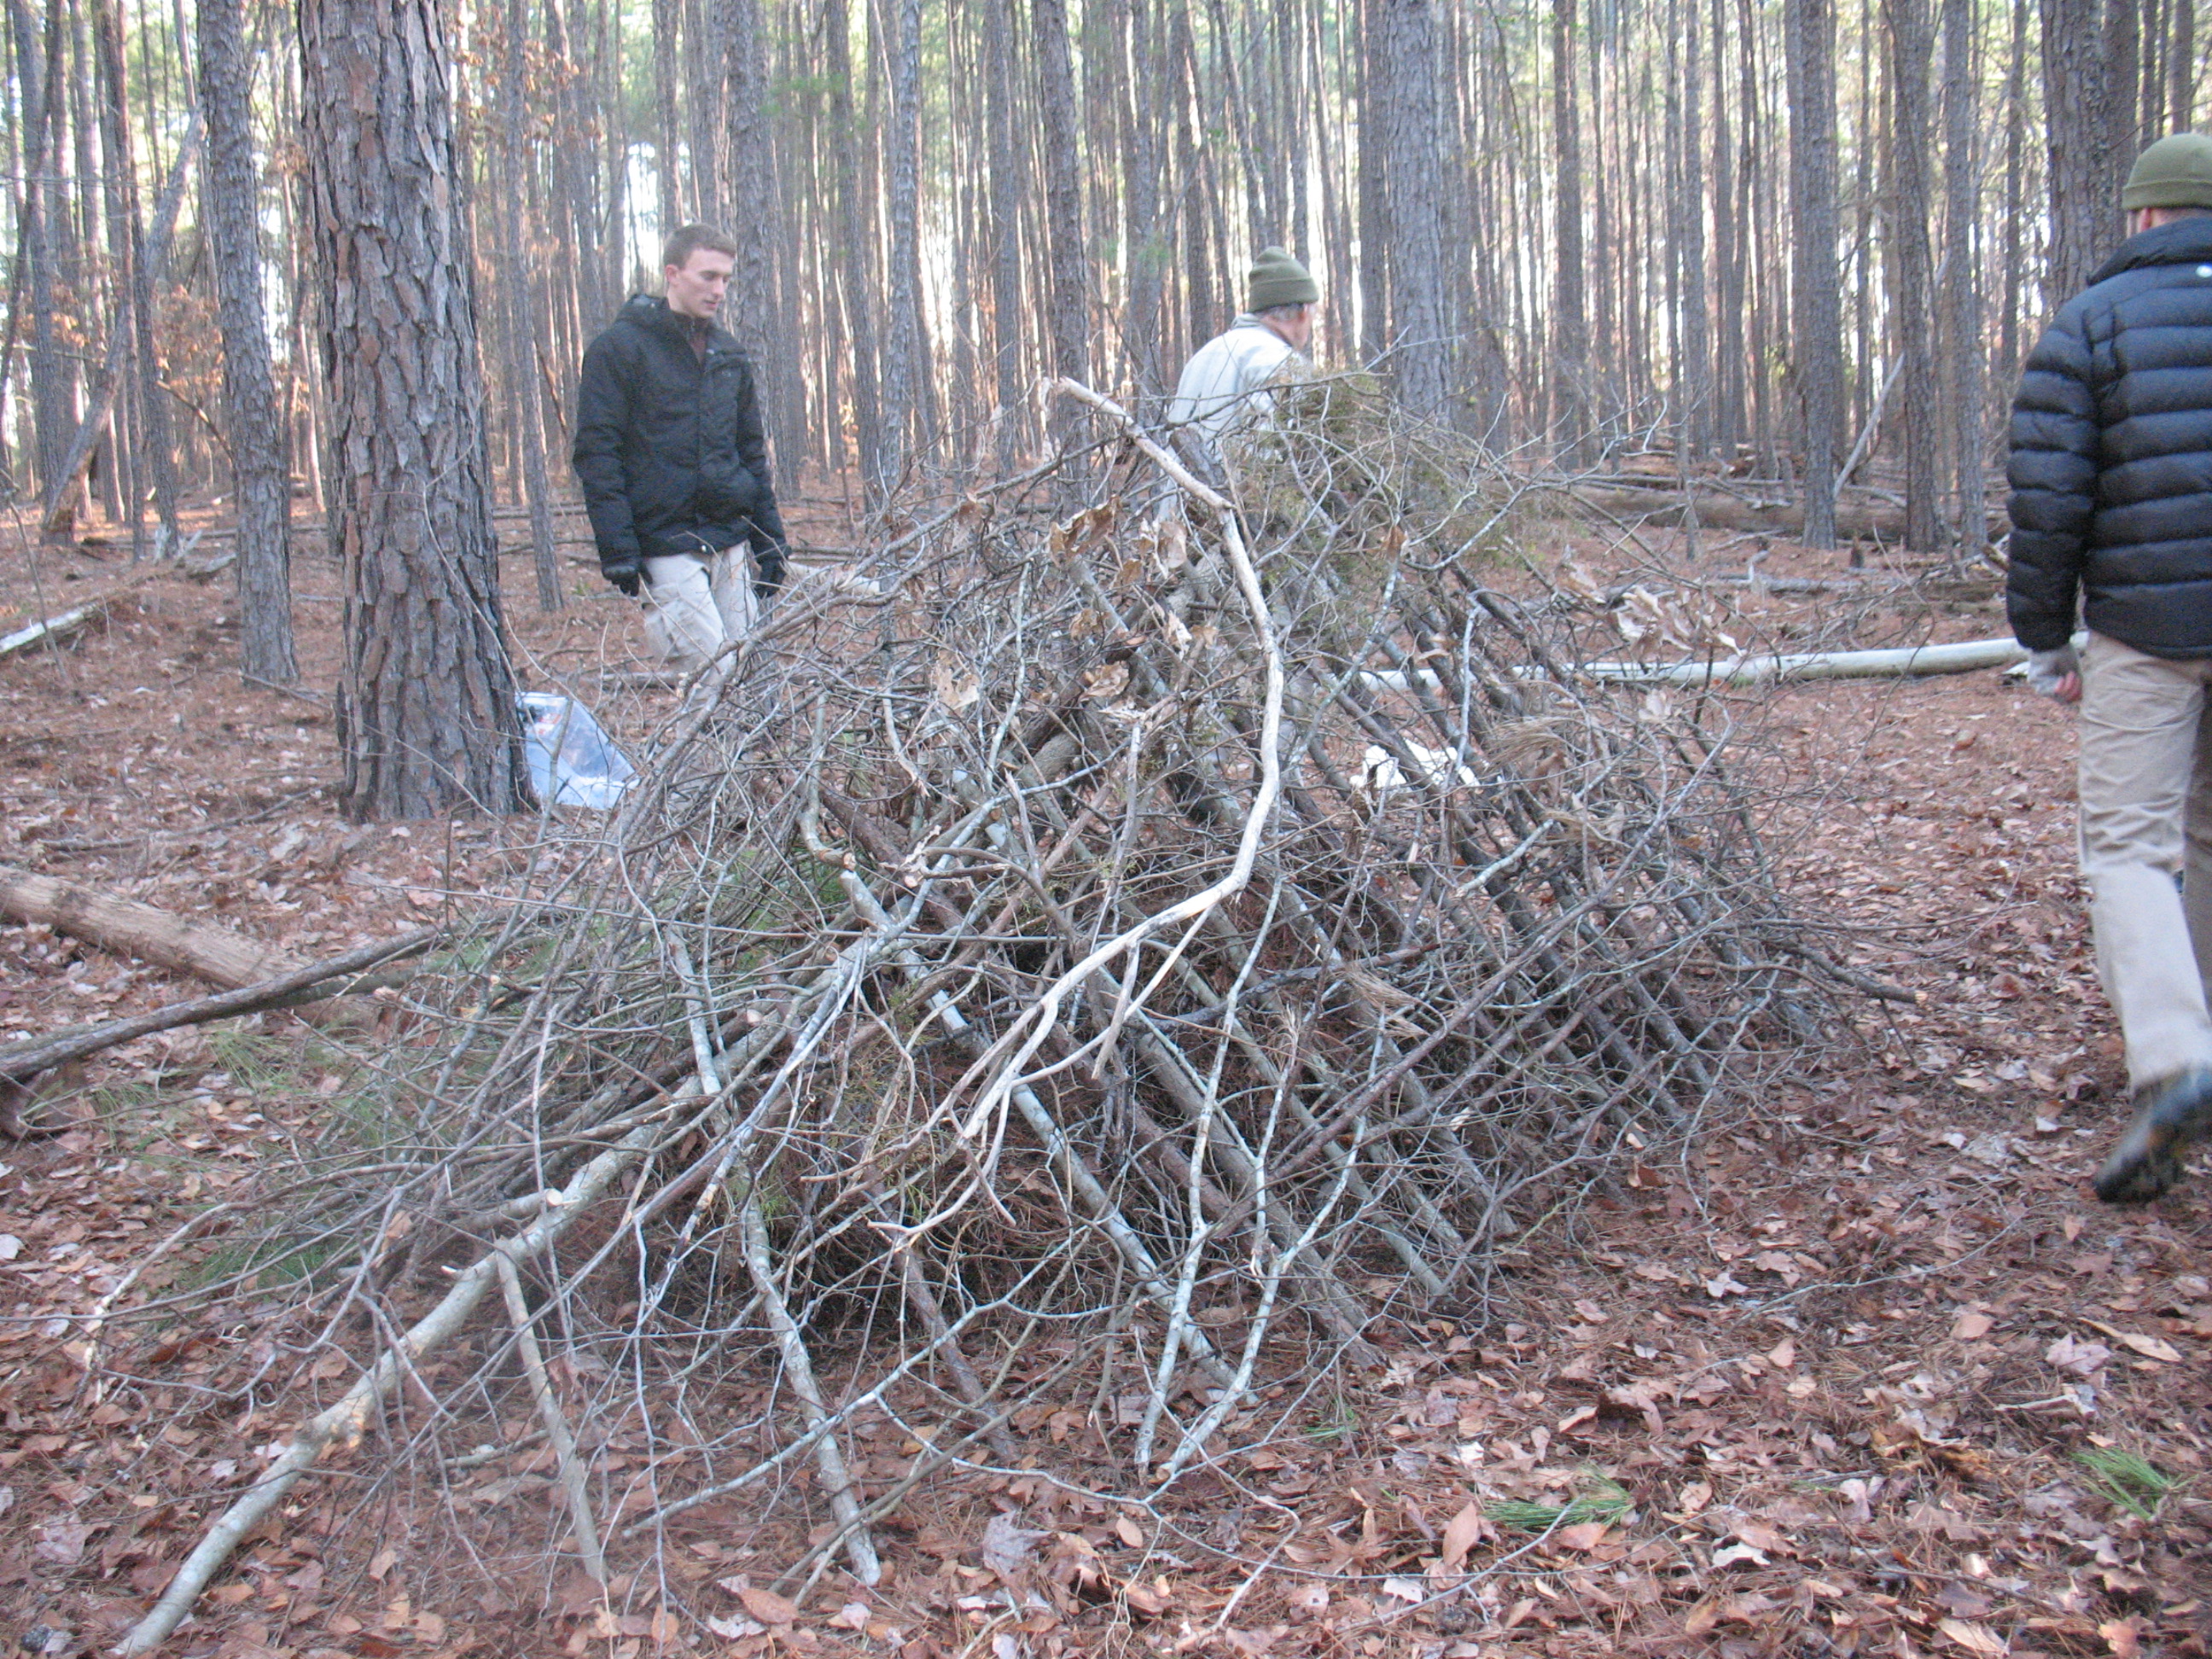
Now you can gather piles and piles of pine needles, leaves, and grasses and pile them up on the outside of the shelter. You want this layer to be about two feet thick or more.
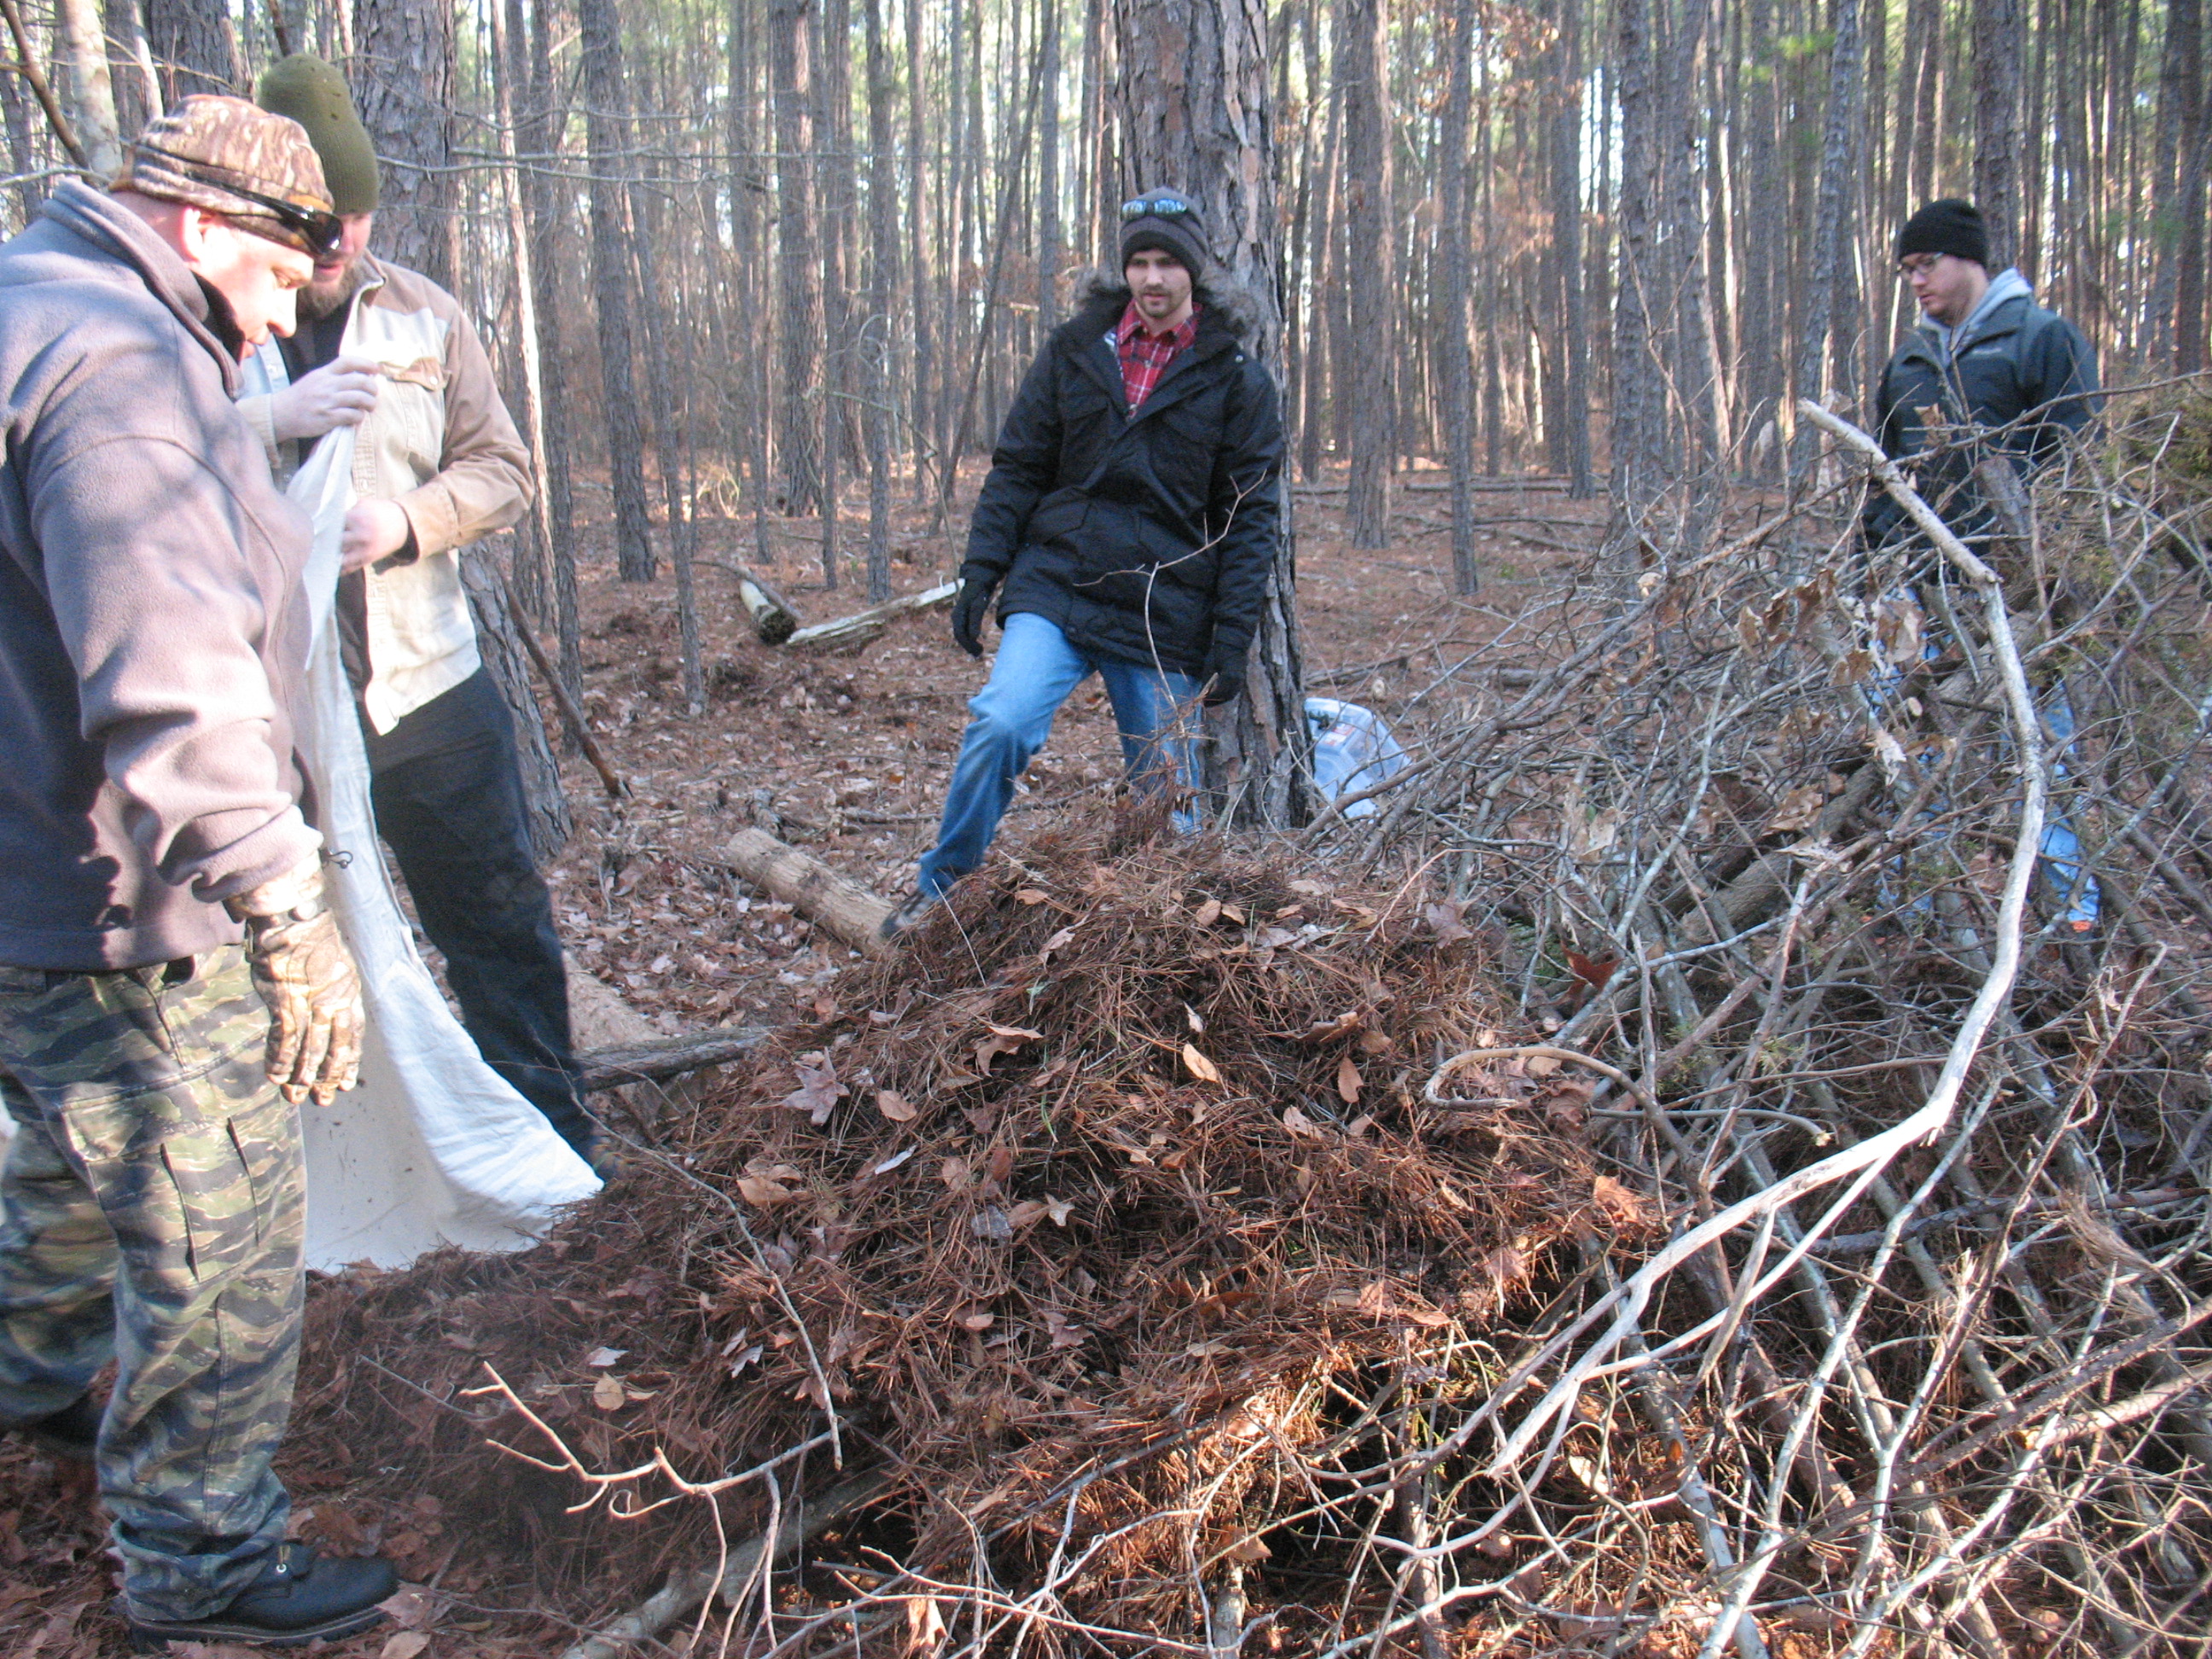
If you are expecting high winds you may want to add another layer of ribs over the top of the debris to keep it from blowing off.
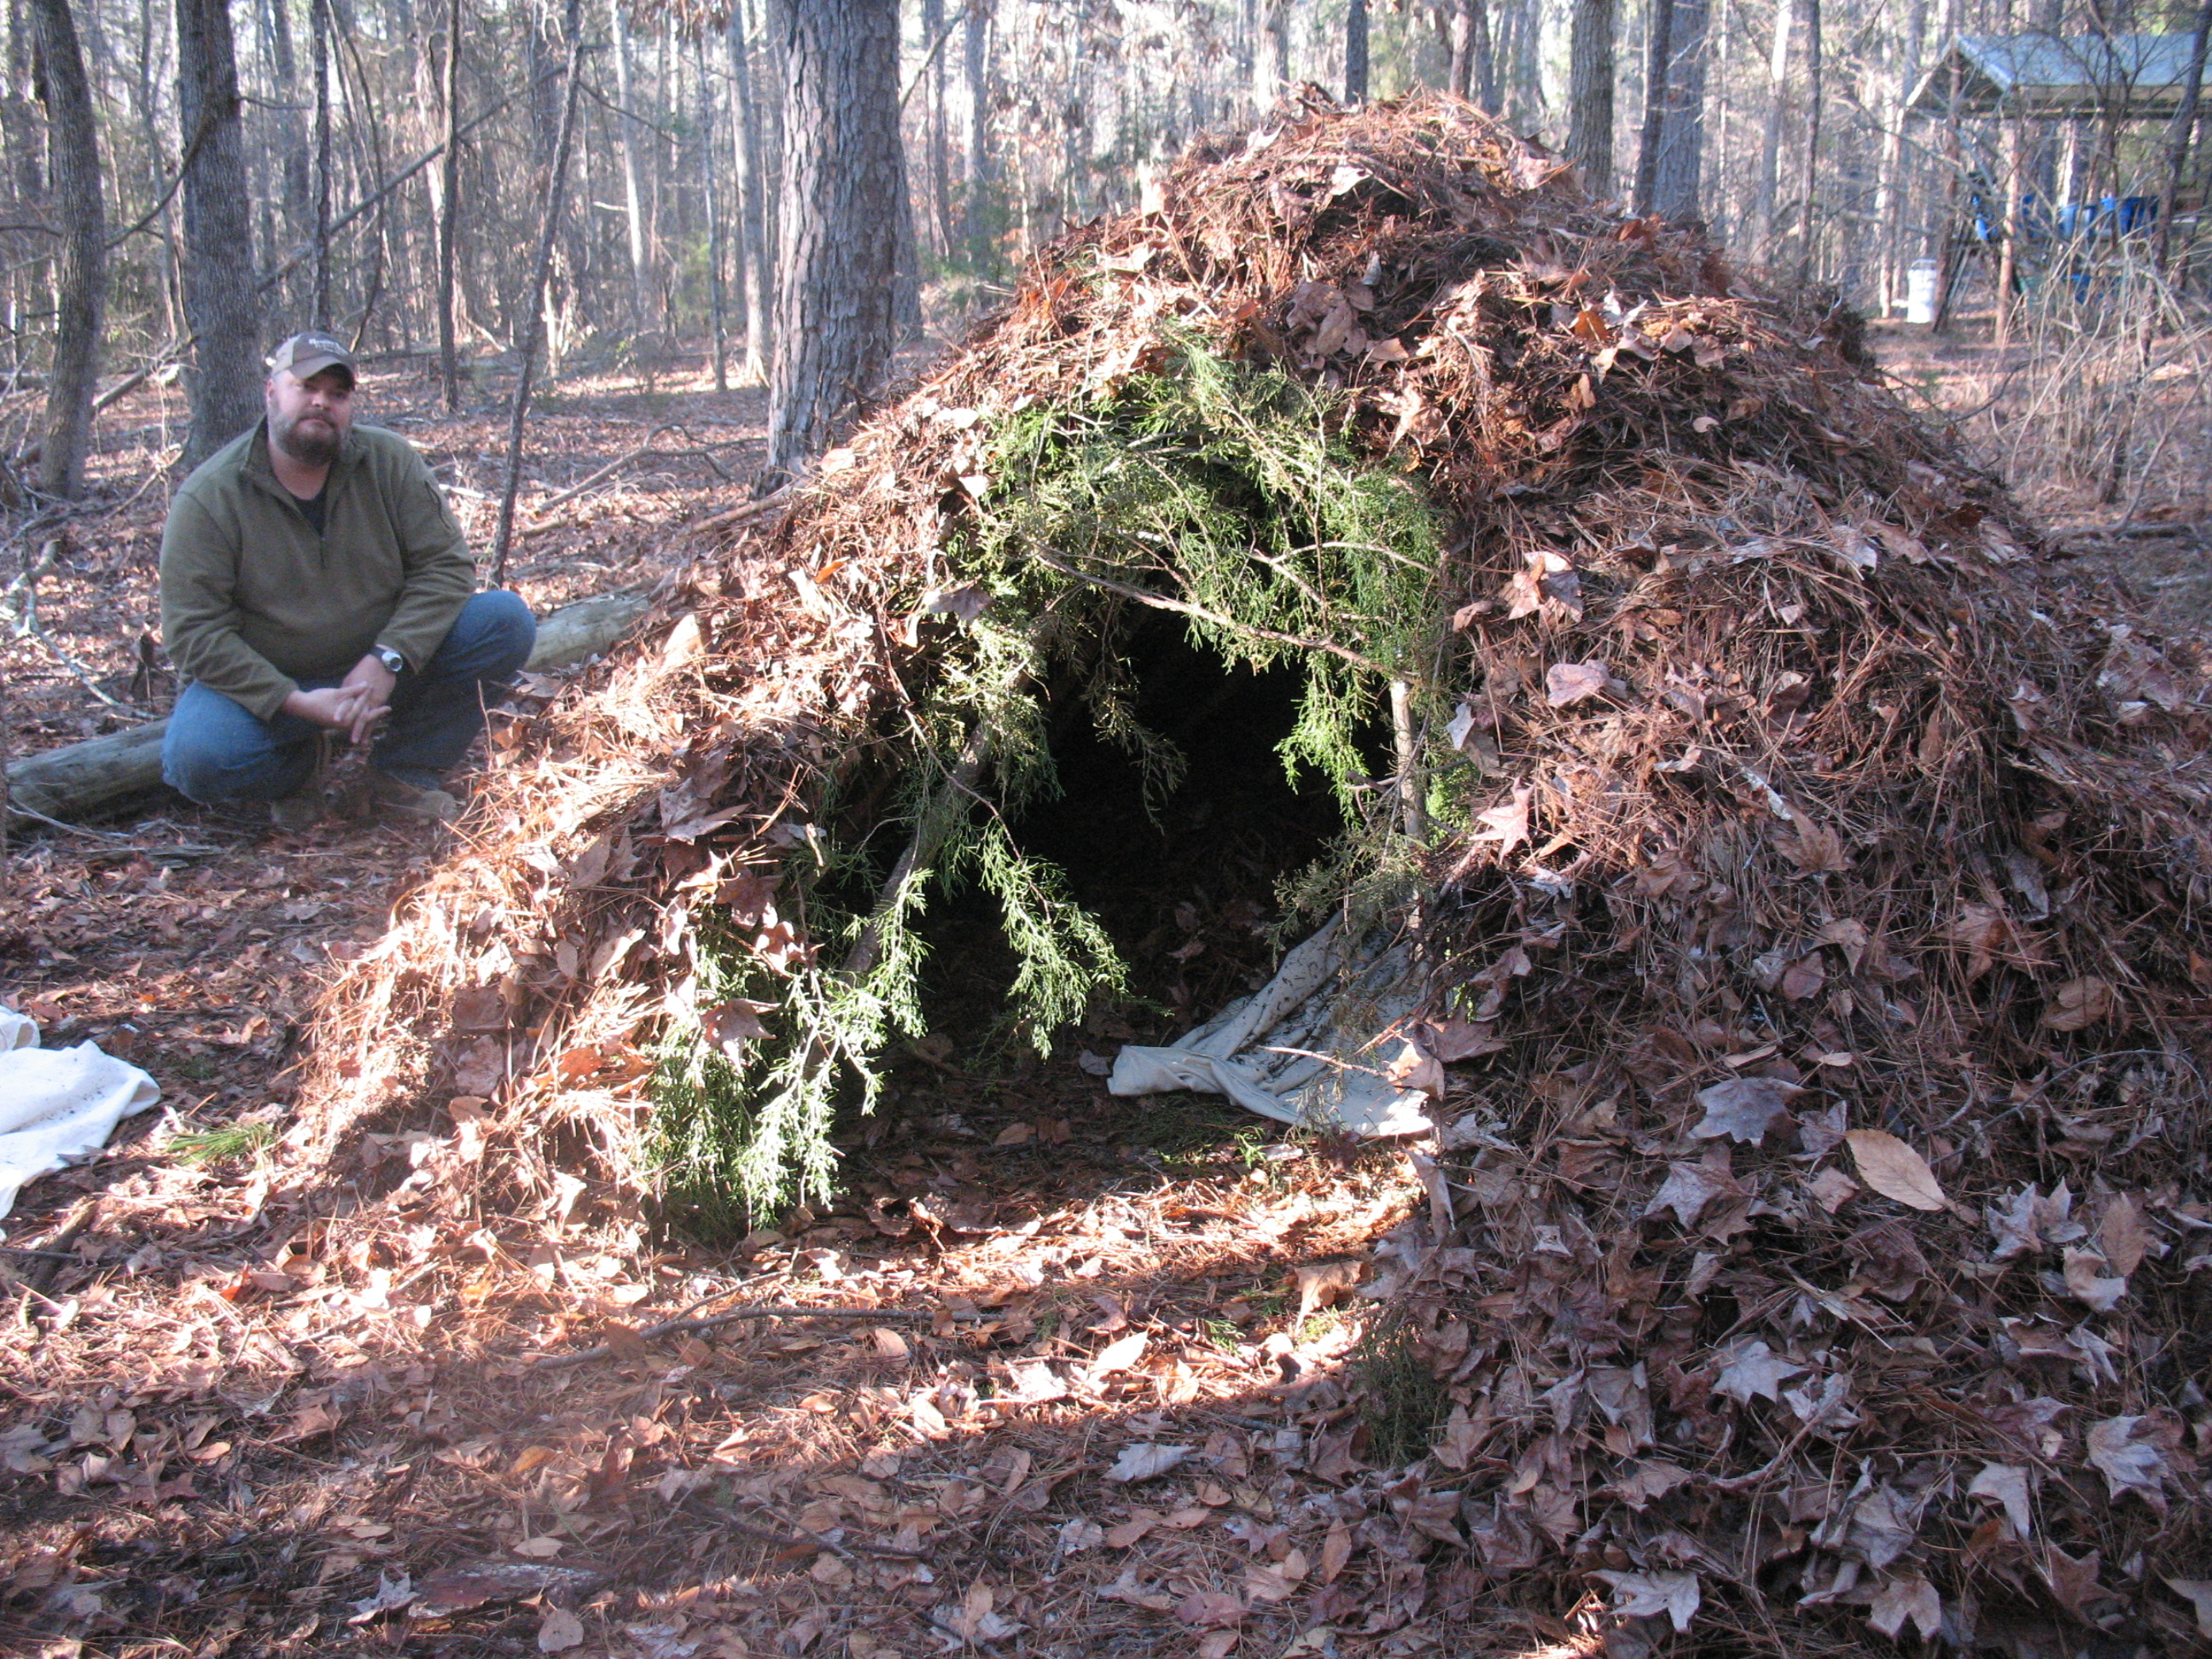
If you have time, you can weave together a door; or you can just use a couple of pine boughs to seal off the entrance after you crawl in. This will help retain more of your body heat within the shelter. 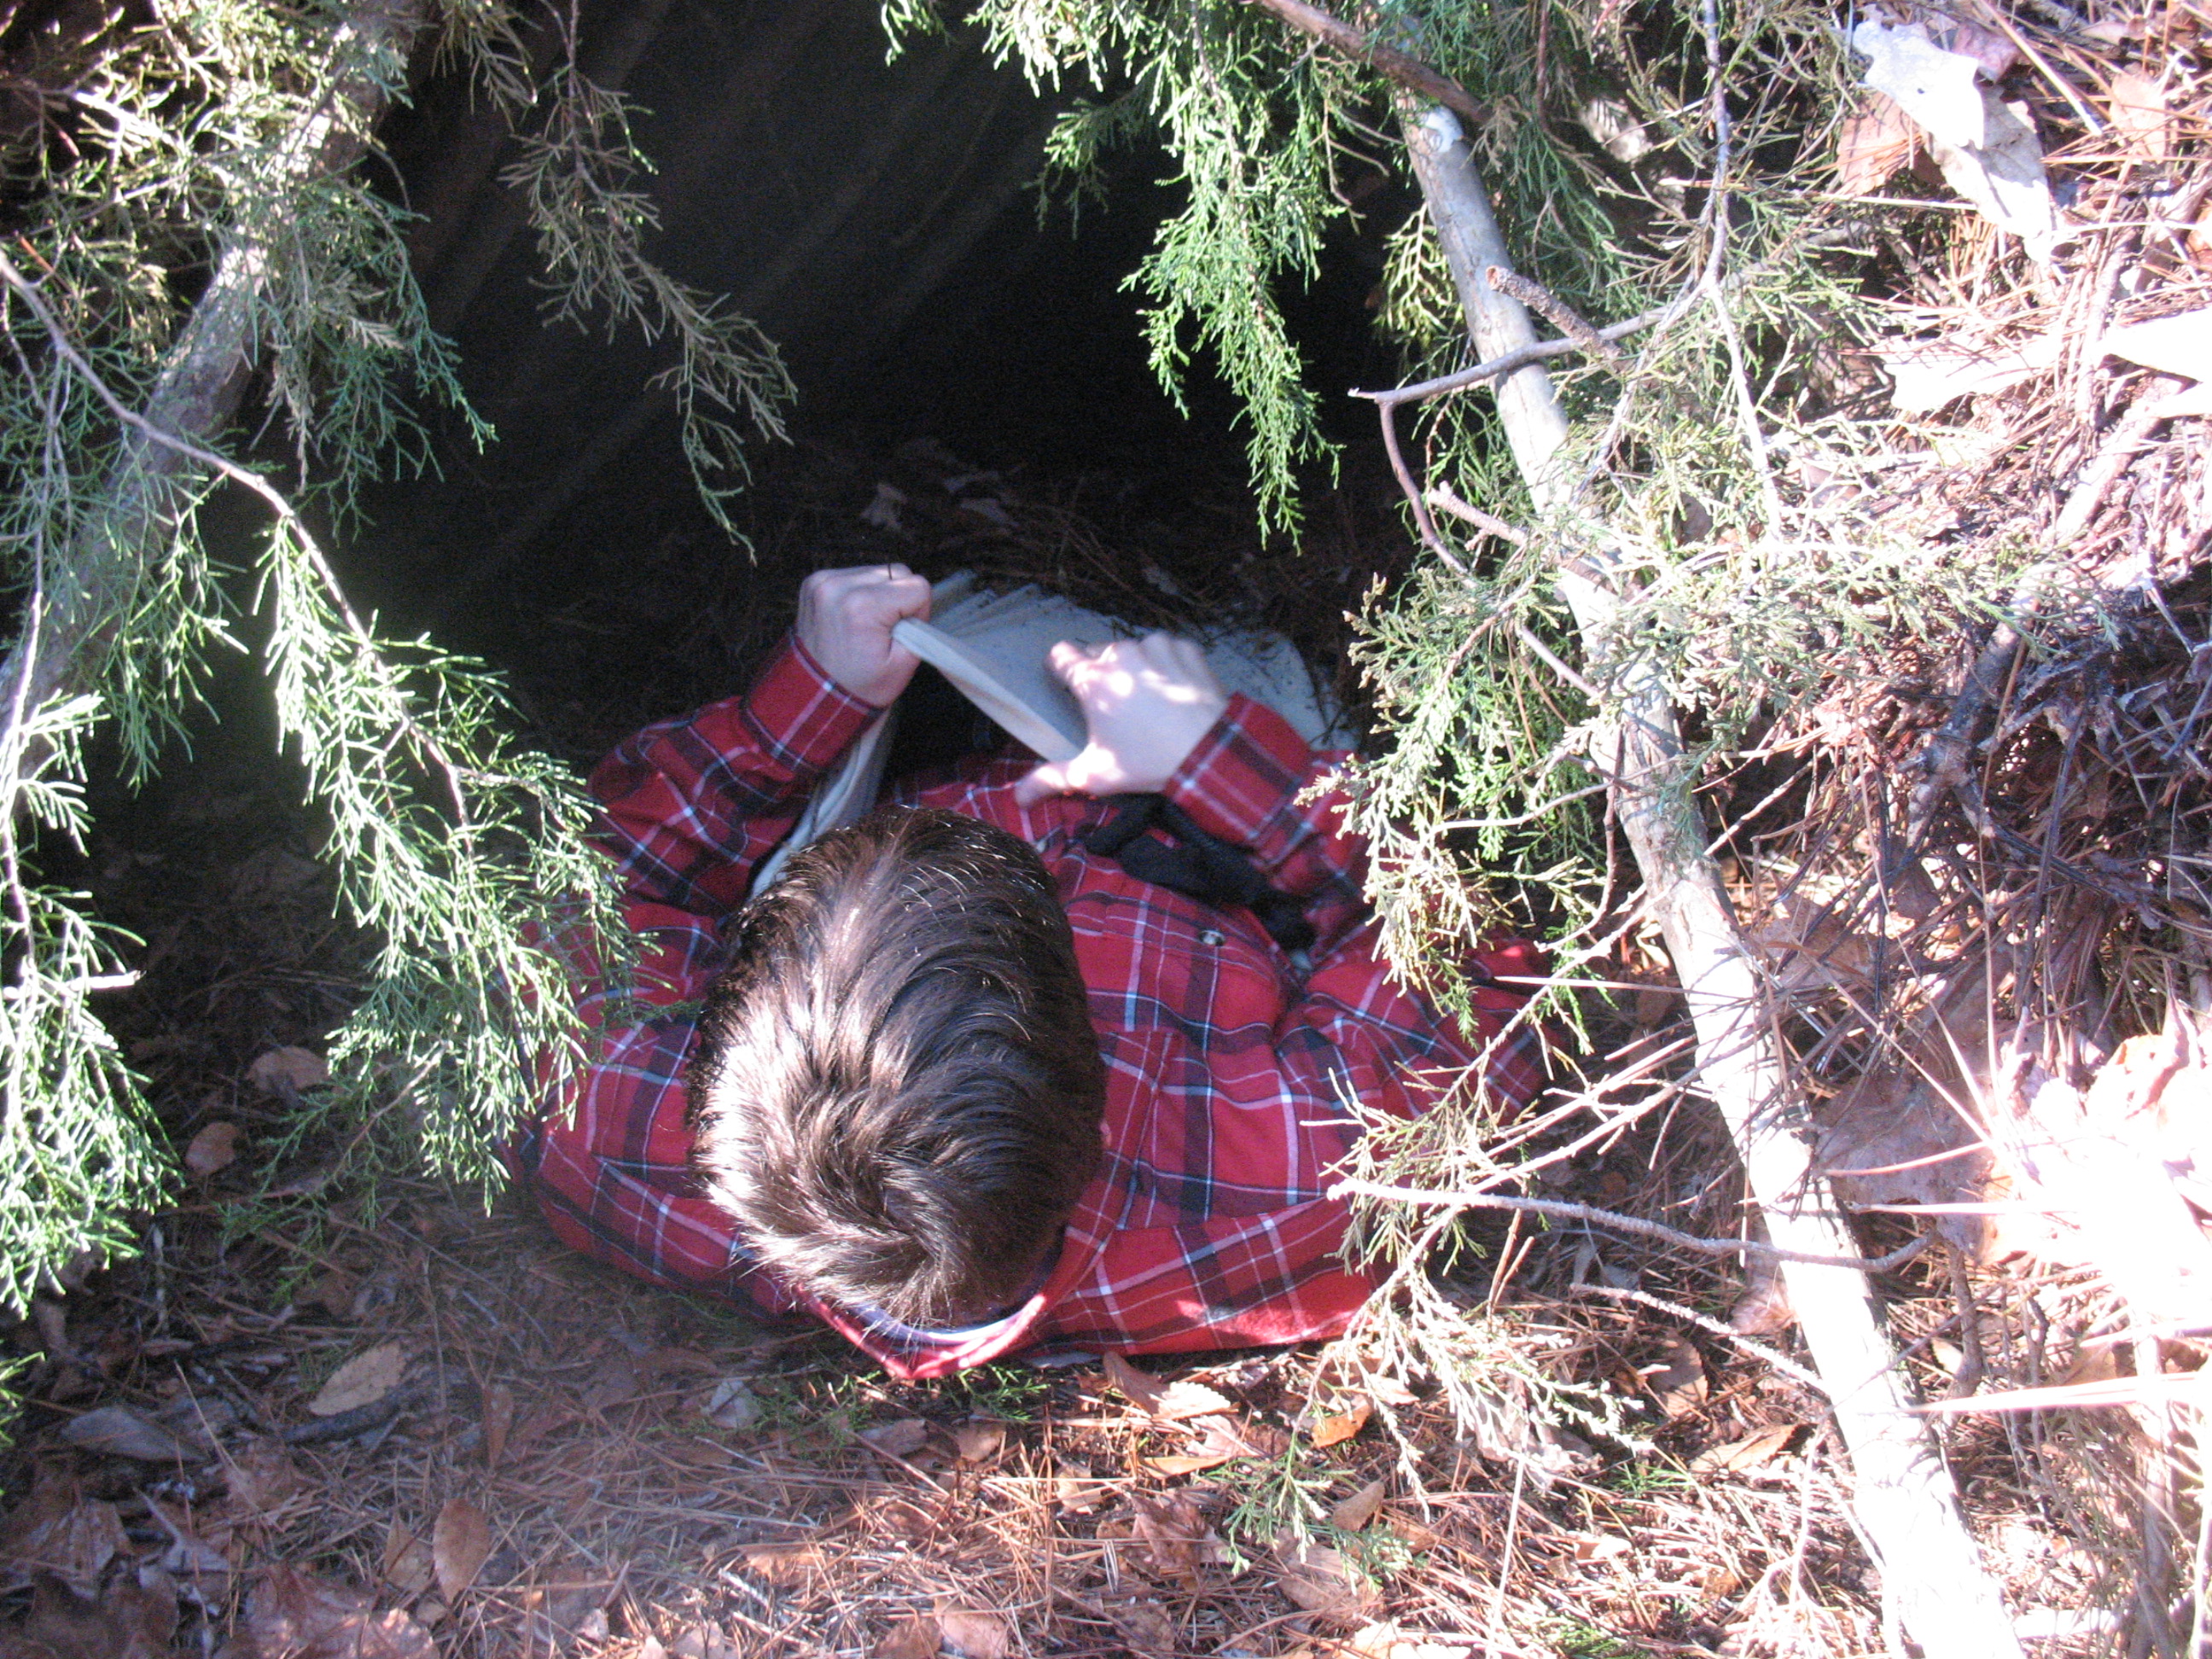
So there you have it. It may not be a four star hotel, but it will keep you alive in a bad situation.
I came across an old slingshot the other day, and it made a little light go off in my head. I had thought before about making a slingshot that would shoot an arrow, kind of like an underwater spear gun, and now here was my opportunity. I thought about it a little while, and decided that the only real change I would have to make to the slingshot would be to put some king of arrow rest on it to hold the arrow. Pictured below: Materials needed to make an arrow shooting slingshot

I dug around in my shop and came up with some heavy gauge solid wire that looked like it would work for the rest. An old piece of wire coat hanger would probably have done just as well.
A few minutes work with some needle-nose pliers, and I had my arrow rest ready to attach. I bent a little dip in the center of the rest to hold the arrow shaft, and I bent down the ends of the rest so that I could attack them to the slingshot with a few good wraps of duct-tape. The main thing I was concerned with was positioning the arrow rest so that it would be the same height as the rubber-bands on the sling shot. This would help to aim the arrow more accurately, and avoid having the arrow leave the slingshot at a downward angle. Pictured below: top, Wire bent to form arrow rest; middle, arrow rest held in position on slingshot; bottom, Arrow rest duct-taped into place.
![]()
![]()
![]()
Now all I needed was an arrow. I used a 5/16″ dowel rod about 30″ long for the arrow shaft, and glued a metal field point on the tip. Pictured below: Field tip glued onto dowel rod arrow shaft.

I made the arrow fletching by cutting a couple of pieces of duct-tape and pressed the duct tape together on opposite sides of the arrow shaft. Pictured below: top, first piece of duct tape in place; bottom, Second piece of duct tape in place.


Then I used scissors to trim the fletching to shape. I decided to go with just two fletchings instead of three like on a regular arrow. Most crossbows that I’ve seen just have two fletchings, and I figured that two fletchings would ride over the arrow rest more smoothly than if the arrows had three fletchings. No need to cut a nock in the arrow because you are going to pinch it in the leather pocket of the slingshot. Pictured below: Fletching trimmed to shape

I took my new arrow shooter out back and did a little field test. It worked great. Pictured below: Shooting an arrow with my converted slingshot.
![]()
I think with a little practice I should be able to bring down small game without any problem. I will definitely stick this little arrow shooter in my bug-out-bag along with a couple of glue-on broadheads. The slingshot doesn’t take up hardly any room, and it would be a simple matter to build a hunting arrow in the field.
All survival kits should include a whistle to signal for help. A whistle can be heard farther away than a human voice, and besides it doesn’t take long to holler yourself hoarse if you are trying to shout for help. To signal for help with a whistle blow three loud, and distinctly separate blasts on the whistle, pause for ten seconds and repeat, pause another ten seconds and repeat. If someone is in the vicinity they will hear the first series of three sounds but probably won’t be able to establish where they came from. The next two series of sounds will allow rescuers to zero in on your location. Perform this nine blast series every ten minutes as it will take rescuers this long to cover ½ mile on foot. That is if they are making good time.
But let’s be honest. How many times do you go out hiking, or hunting or fishing and don’t carry a whistle with you. Probably a lot. So what I’m going to show you here is how to make a signal whistle out of bamboo. No way is it as loud or effective as a 120 decibel survival whistle, but it sure beats hollering yourself hoarse and then having a rescuer pass 200 yards away and never know that you are there.
Here’s how you make the whistle:
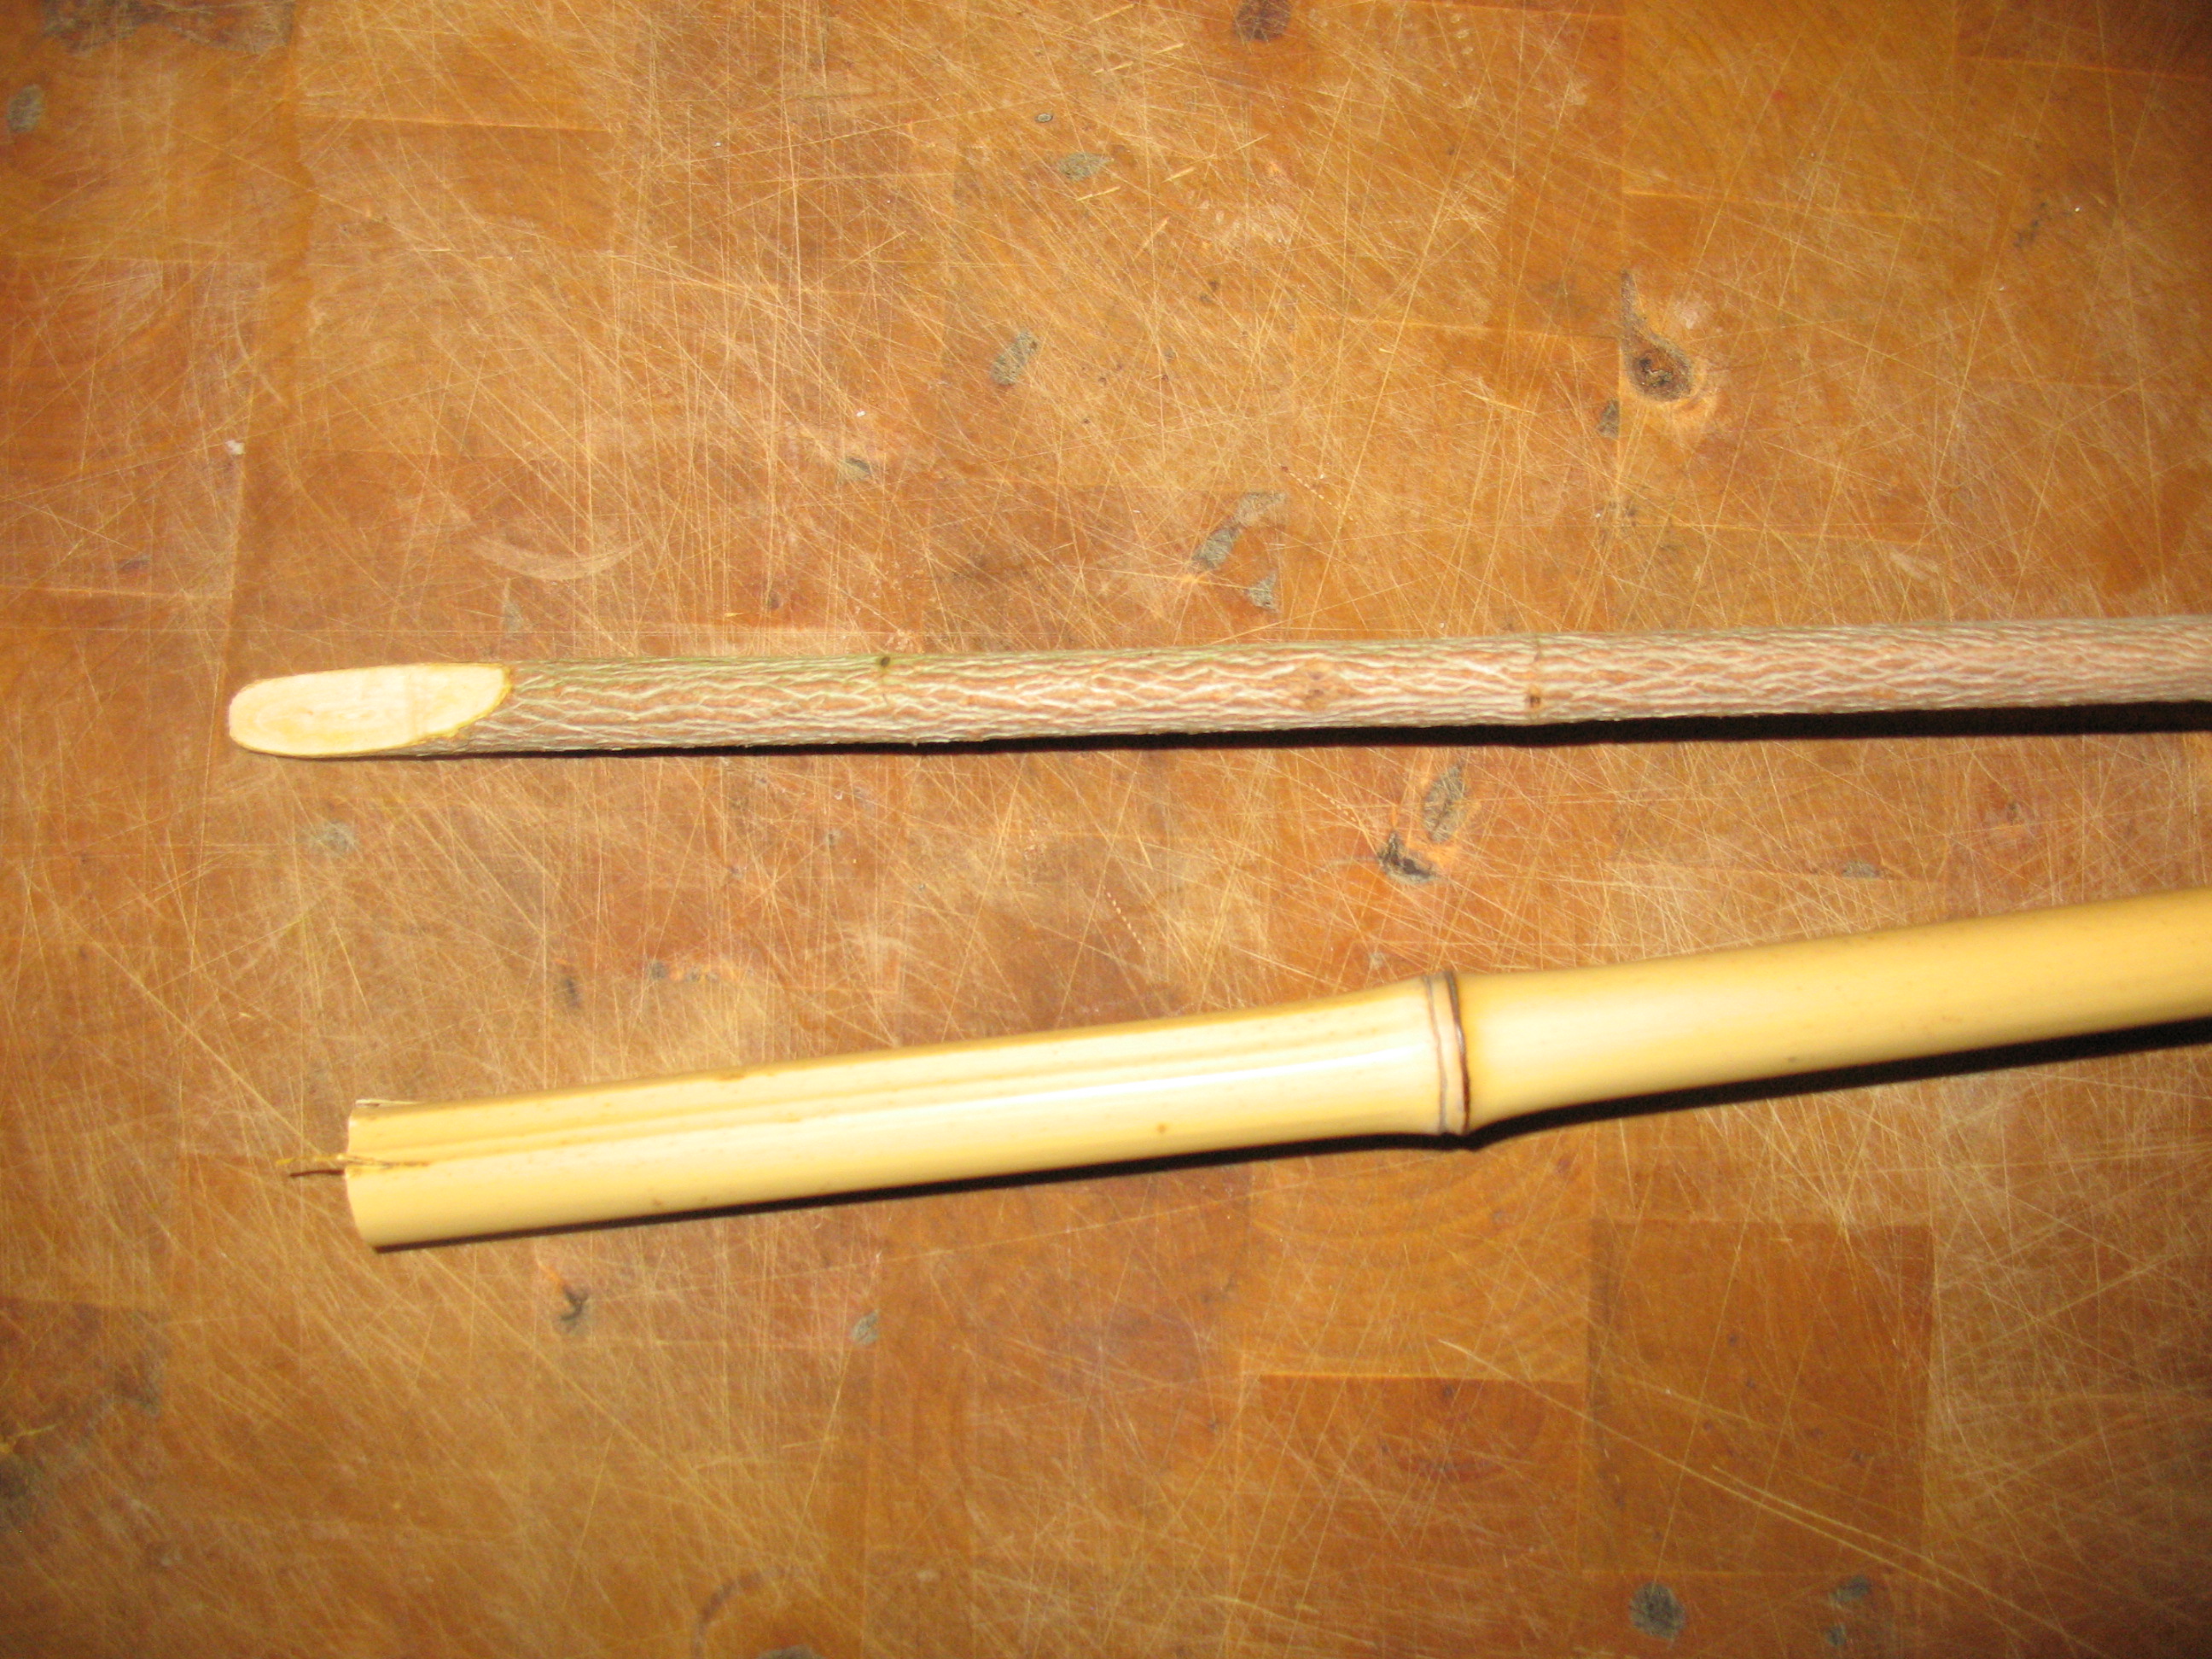
1. Start off with a piece of bamboo or river cane that is about as big around as your little finger and a stick of any kind of wood. The stick should be of a size that will slip tightly into the hole of you cane.
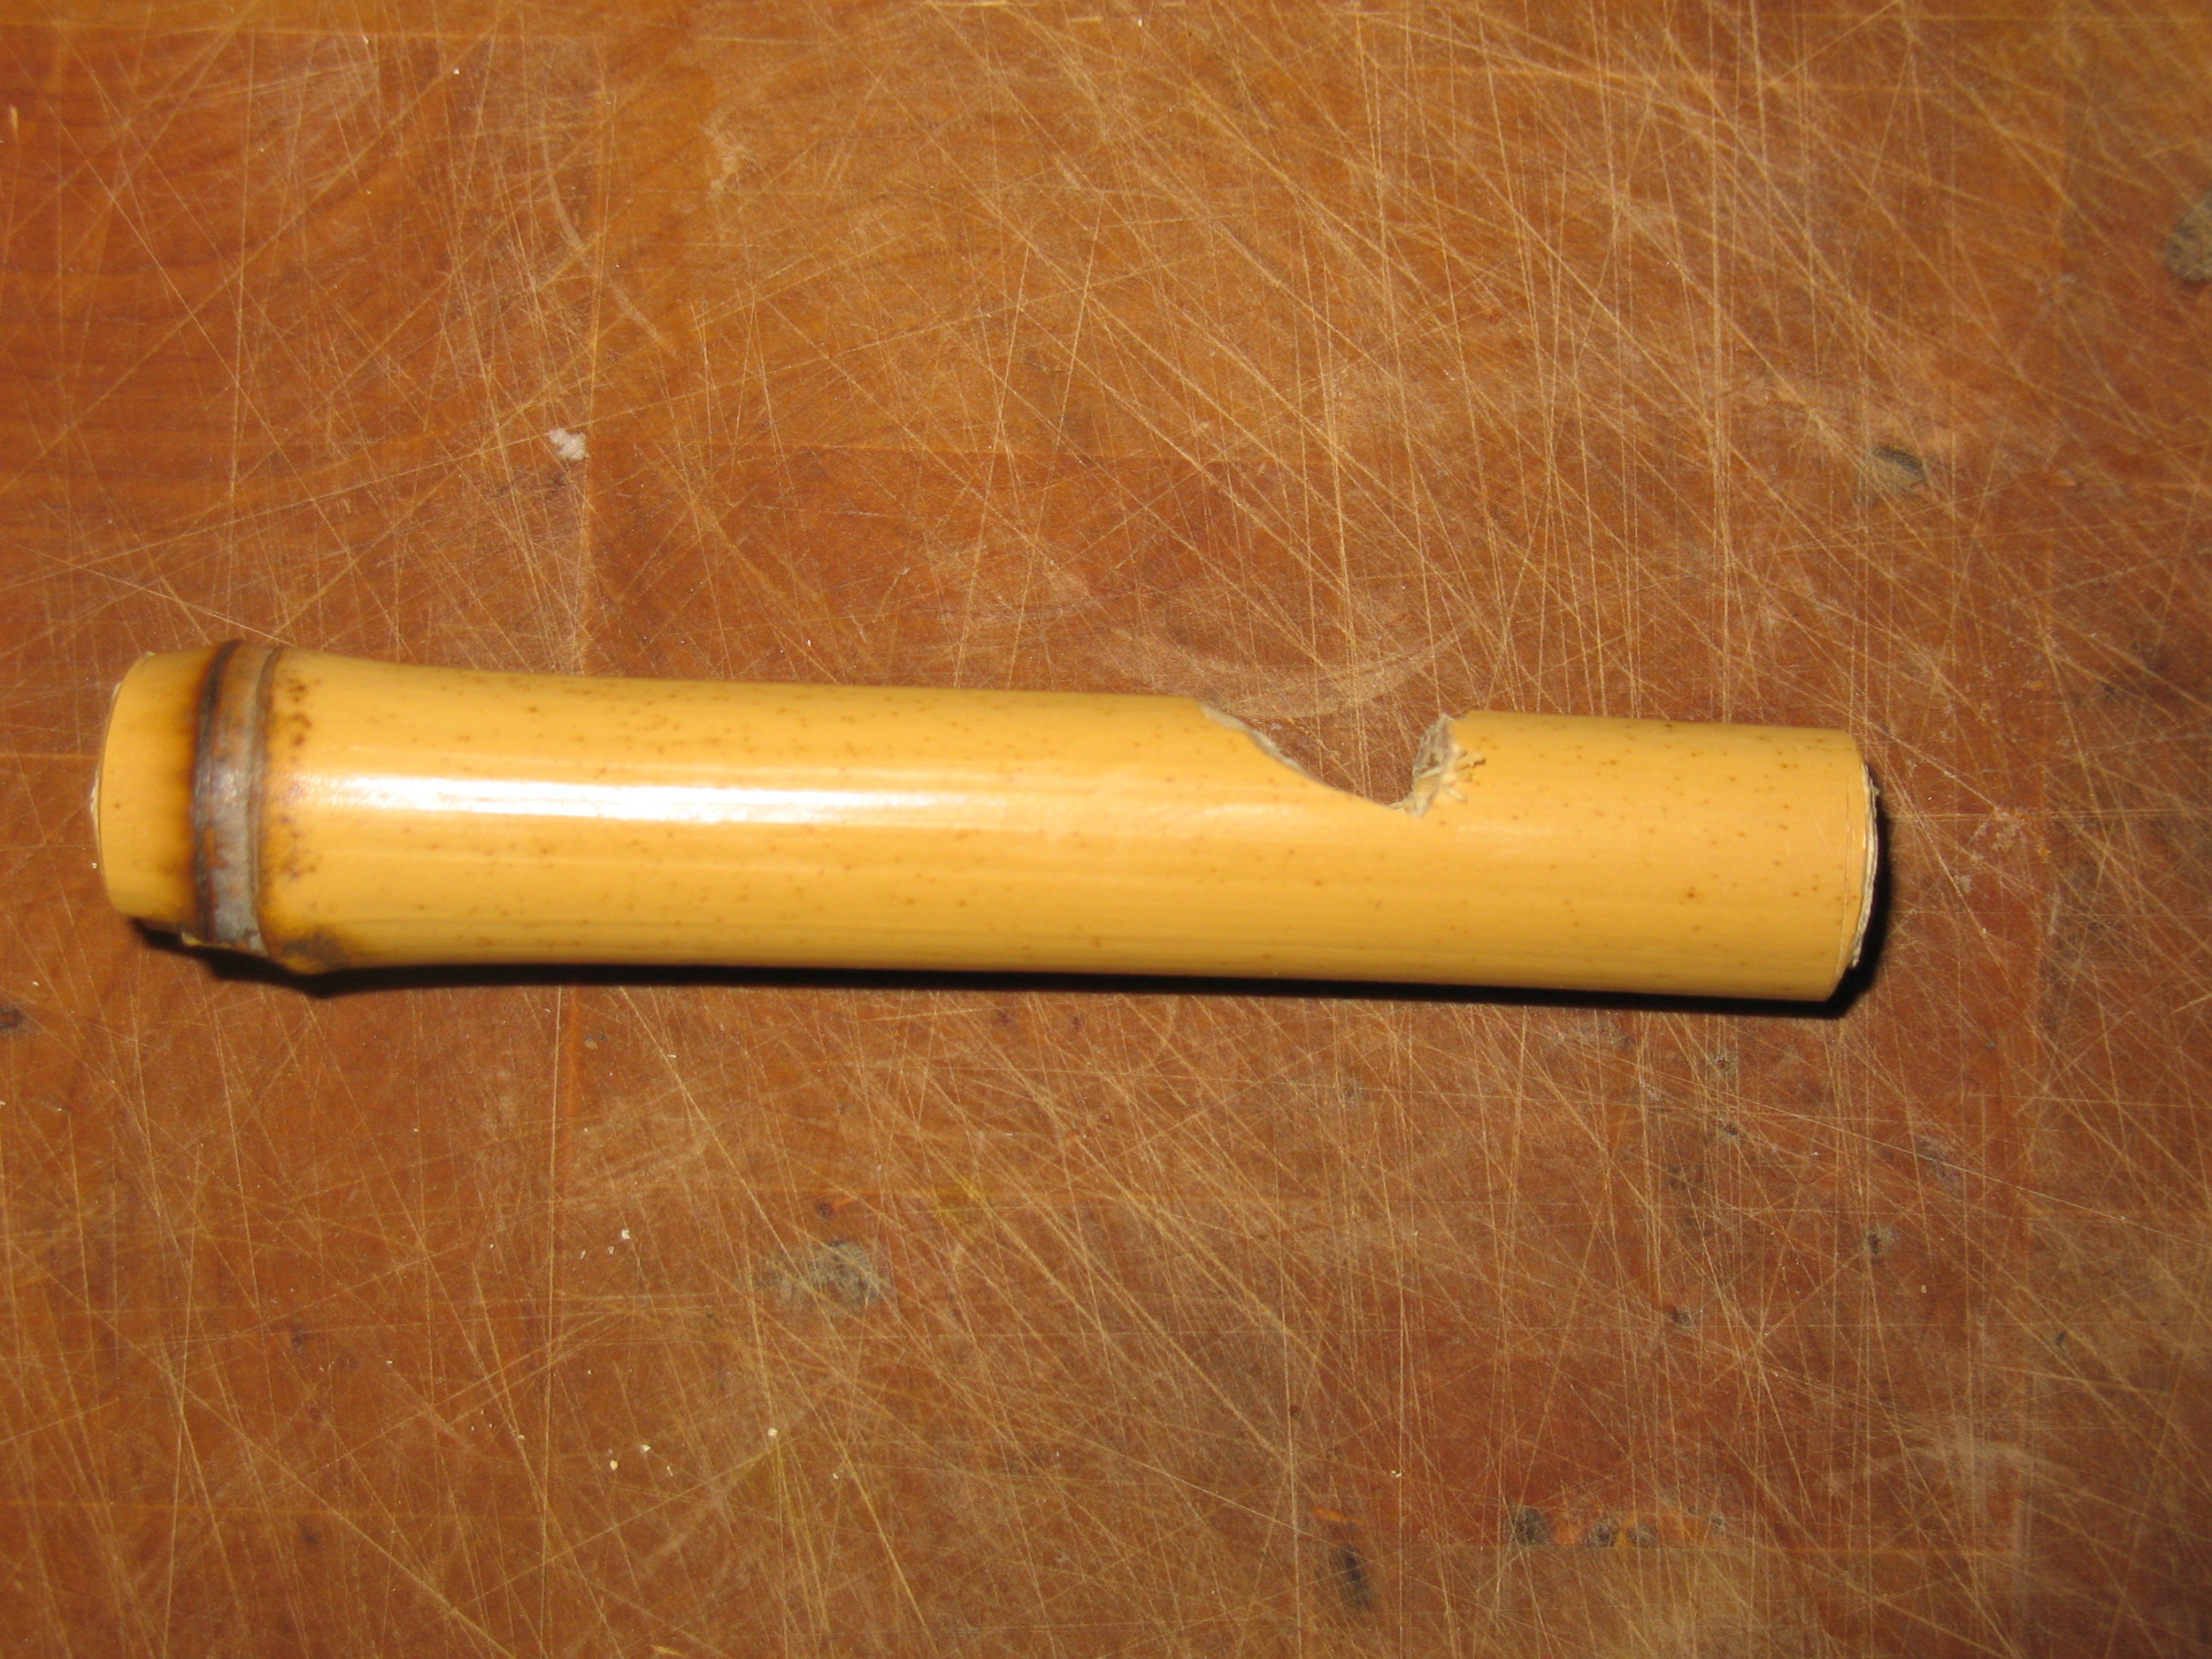
2. Cut a section of the cane that is about three inches long. Leave a solid joint on one end and the other end should be open.

3. Now cut a small stick that will fit tightly into the open hole in the cane. This is a little tricky. The stick needs to fit tightly, but no so tightly that it will split the cane when you push it into the hole. You can leave the bark on the stick. It only needs to be about six inches long because you are really only going to use about an inch of it.

4. Now you are going to carve a notch in the cane. Start the notch by making a vertical cut into the cane about ¾ inch from the open end of the cane. Cut down about half way through the cane. Now working from the closed end of the cane, carve back at an angle to the bottom of the vertical cut. You should end up with about a ½ to ¾ inch hole into the inside of the cane.

5. Cut about an inch long piece of your stick and split off about a third of one side of the stick.


6. Insert the stick into the open end of the cane and push it in flush with the end. The flat side of the stick should be facing up toward the notch. You should be able to look down into the notch and see about 1/8 inch of the stick intruding into the notch.

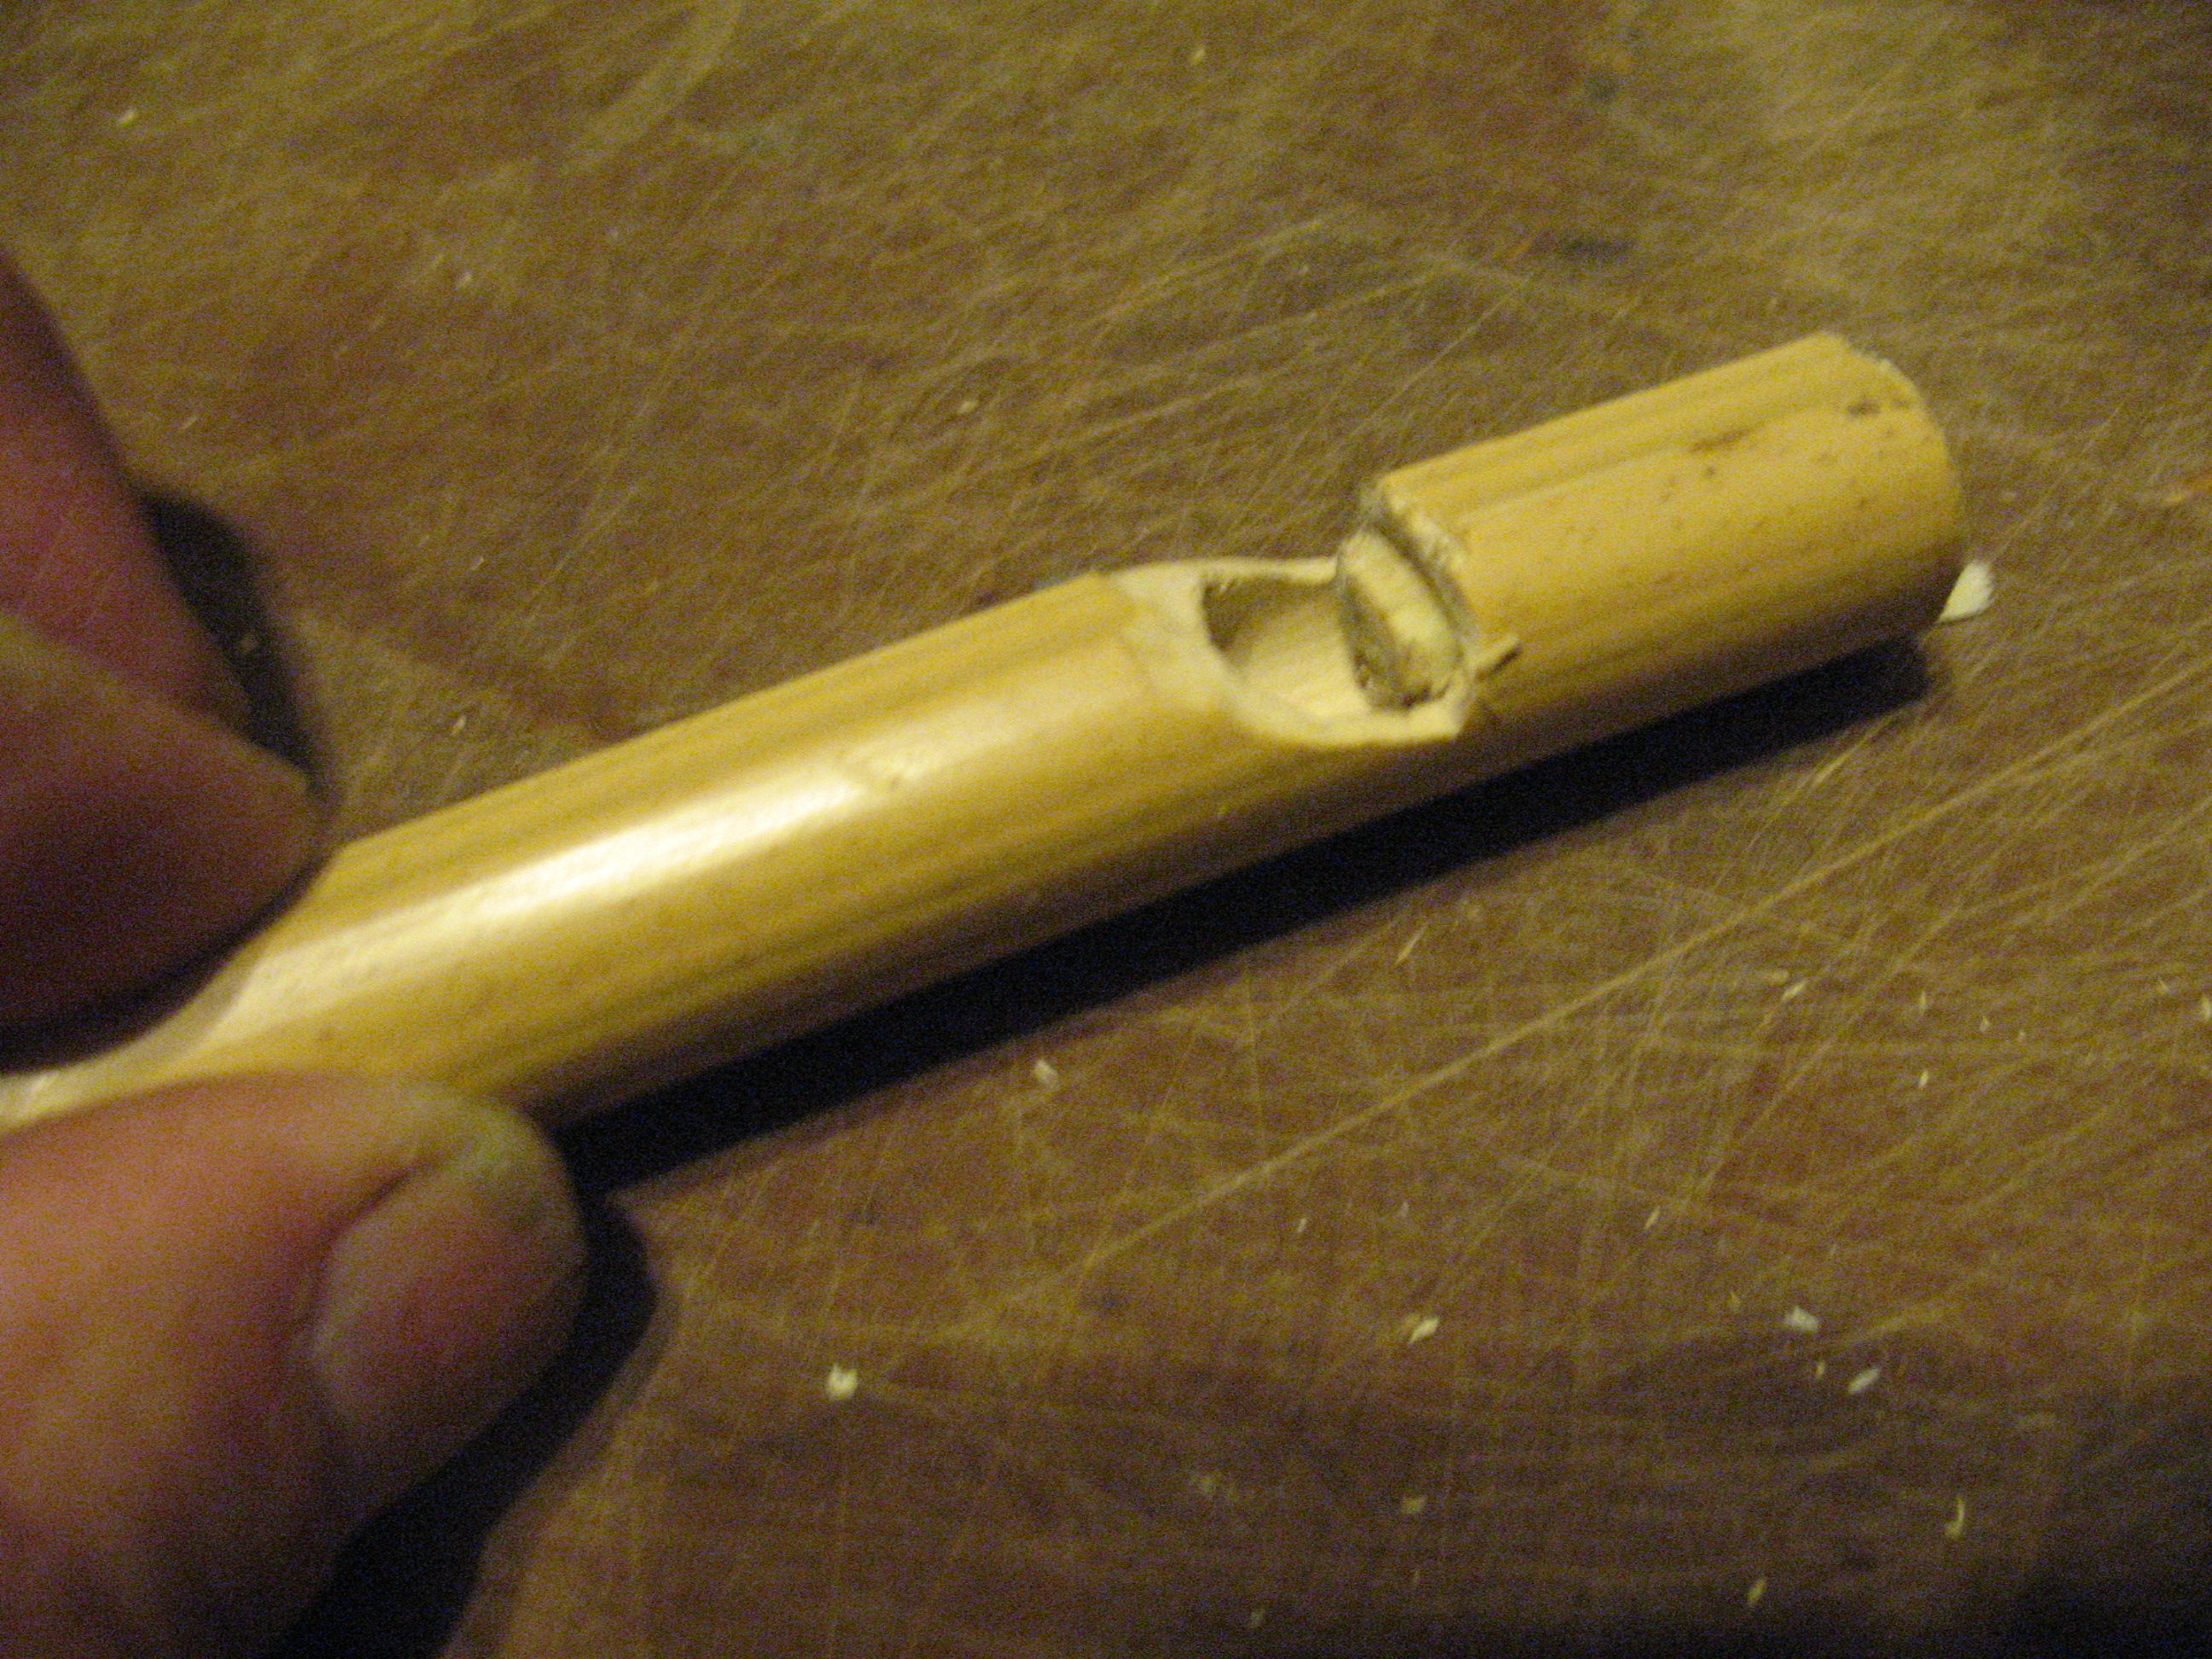
That’s it. Blow into the end of the whistle that you shoved the stick into. It should make a nice loud tone. By making the cane different lengths you can very the pitch of the whistle. The shorter the cane the higher the pitch will be.
We did a little experiment to see how far away you could hear this whistle compared to a regular metal coach’s whistle and a specifically designed survival whistle. Three of my survival students took the three whistles and walked off through the woods. They kept track of their distance using a set of ranger beads and blew all three whistles every two hundred meters. The rest of the class (6 people) stayed in camp and listened for the whistles. Here are the results:
200 meters – all three whistles audible by all listeners
400 meters – all three whistles audible by all listeners
600 meters – cane whistle and survival whistle audible by all listeners with cane whistle being loudest
800 meters – no whistles audible by any listeners
I, for one, was kind of surprised at how well the cane whistle performed. I really expected the survival whistle to do the best. Next time I have a class we will try the same experiment in 100 meter increments.
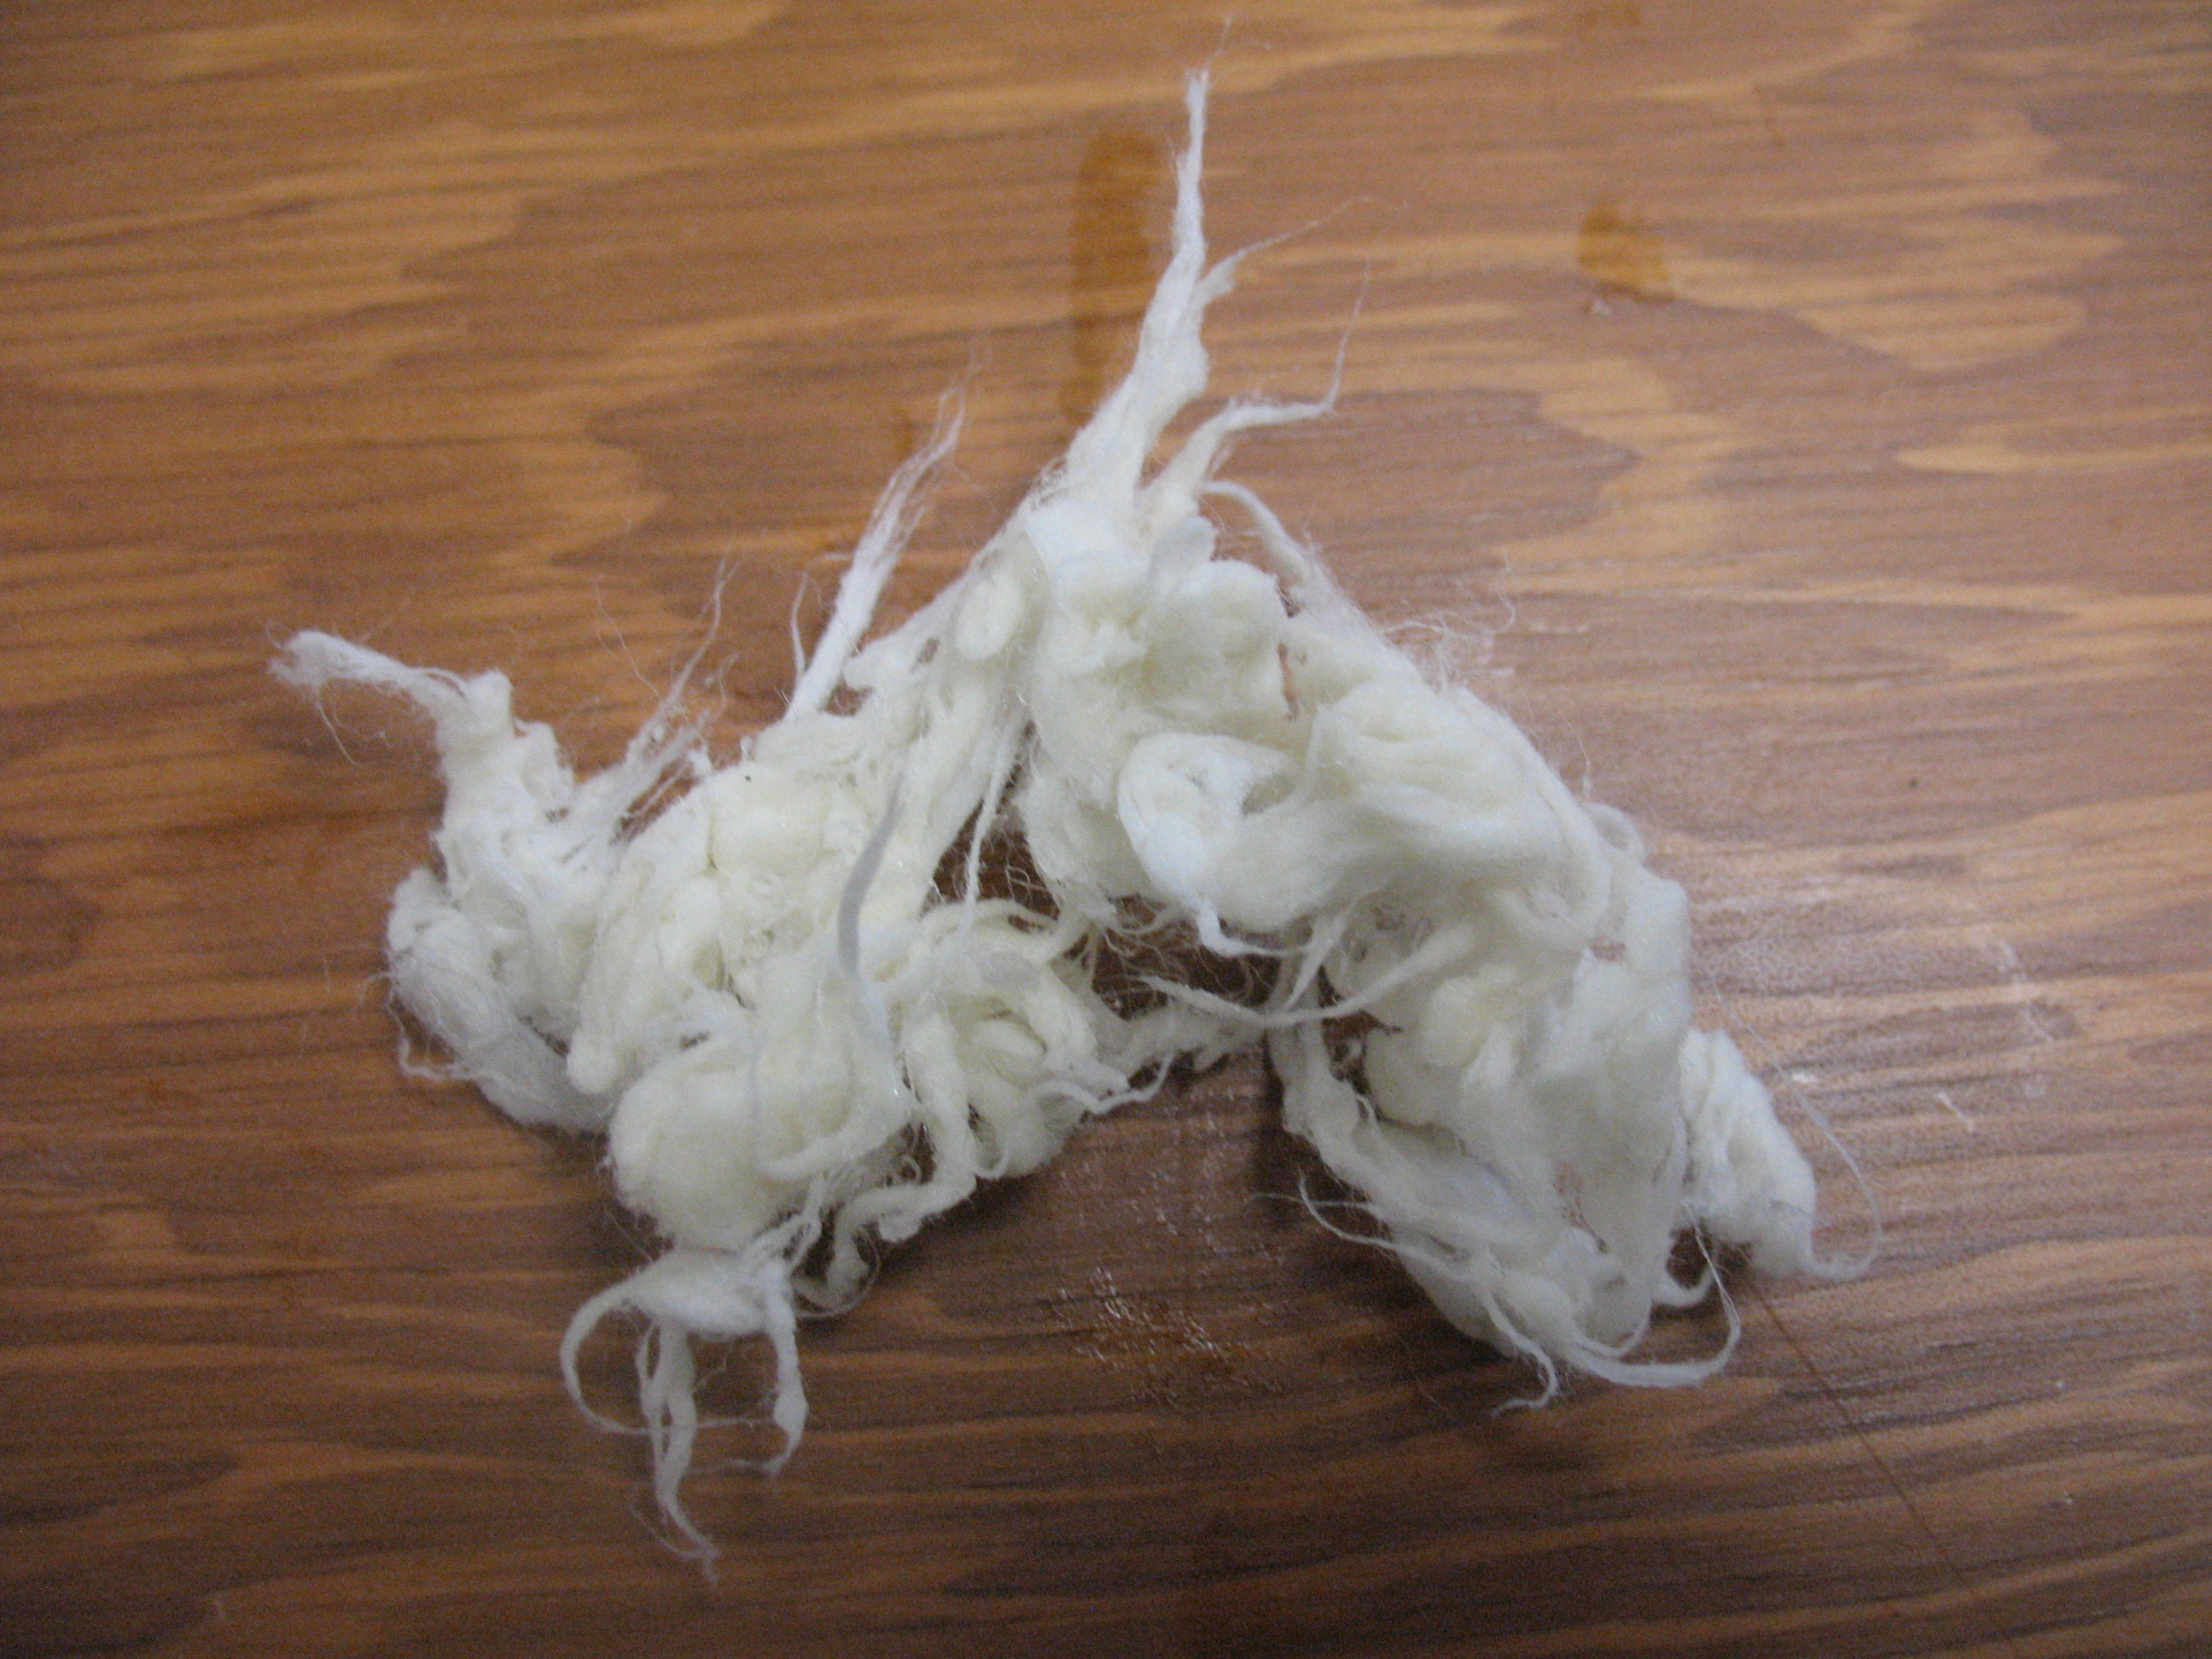
This is one of the best and most convenient fire starters that I’ve come across in a long time. Many of us know that cotton balls rubbed with petroleum jelly make great fire starters, but they are messy and not real convenient to carry. This method makes it easy to carry these little fire balls and they won’t leak and get on your clothing or other gear. All you need to make these is some cotton balls, petroleum jelly, a plastic drinking straw, a pair of scissors, and a small stick. 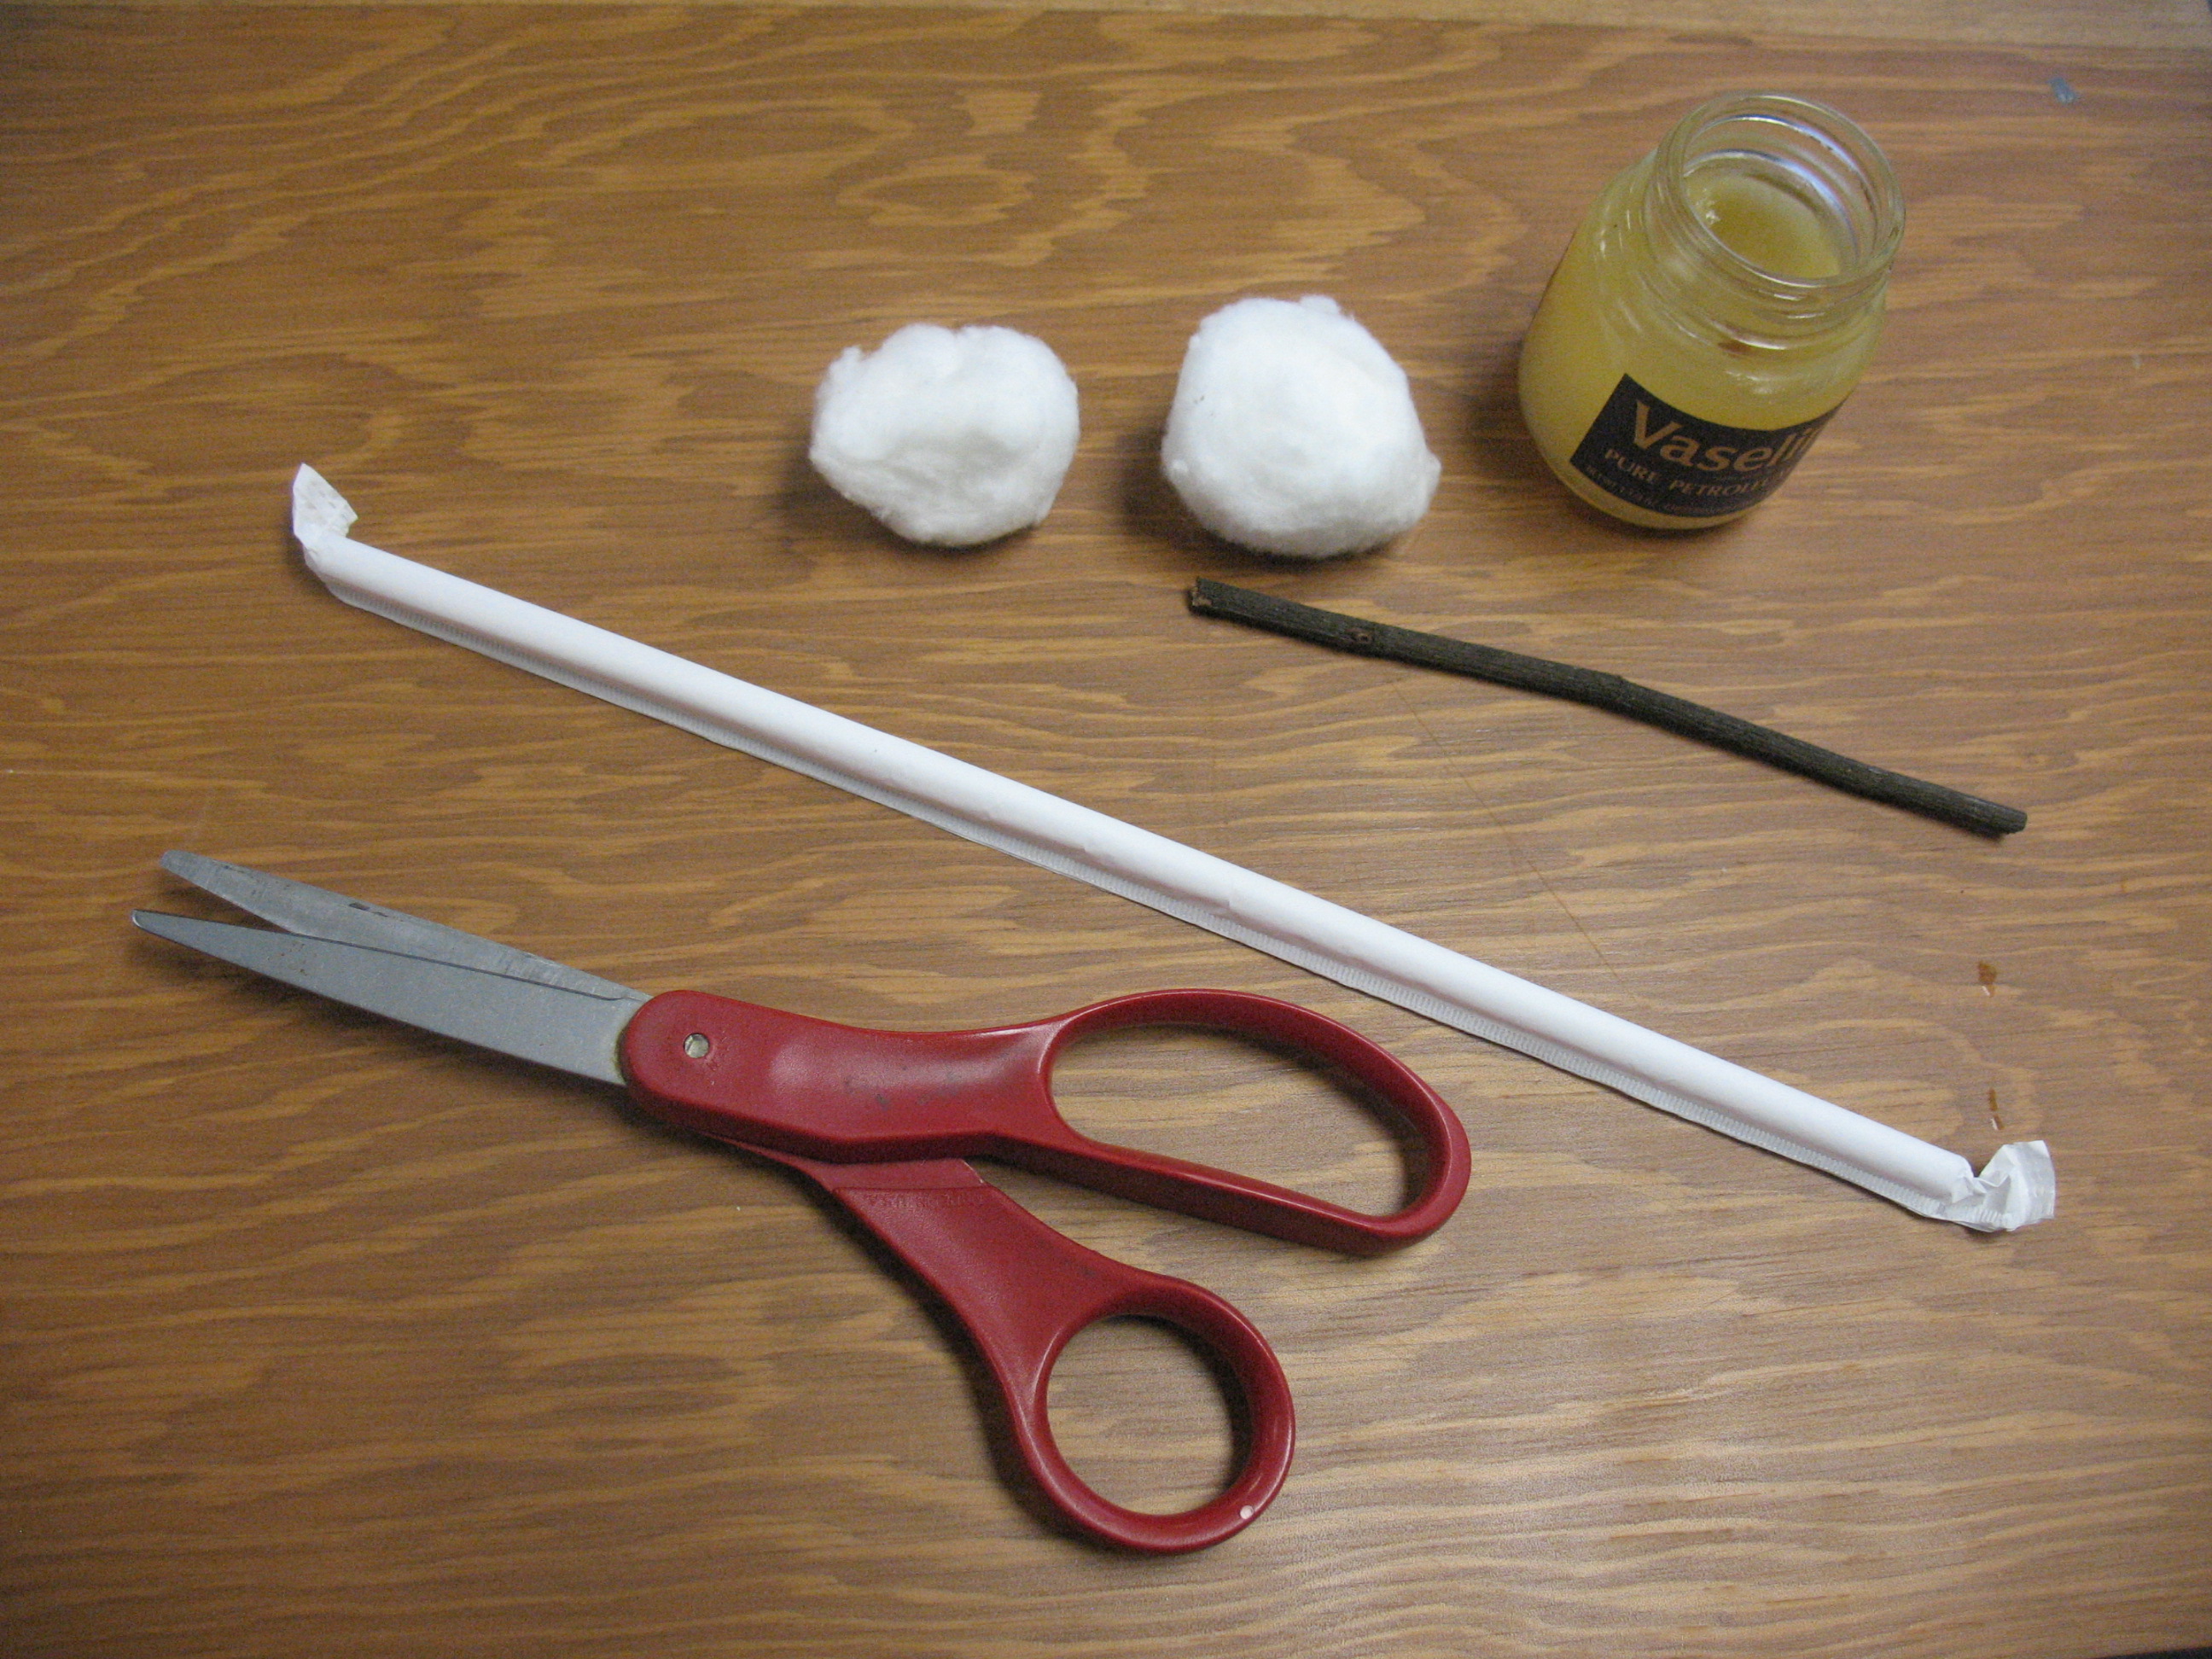 Start off by taking a cotton ball or two and rubbing them thoroughly with petroleum jells. While you’re at it go ahead and pull apart the cotton into thin shreds. Pictured below: top, Rubbing petroleum jelly into cotton balls: bottom, shredded up cotton
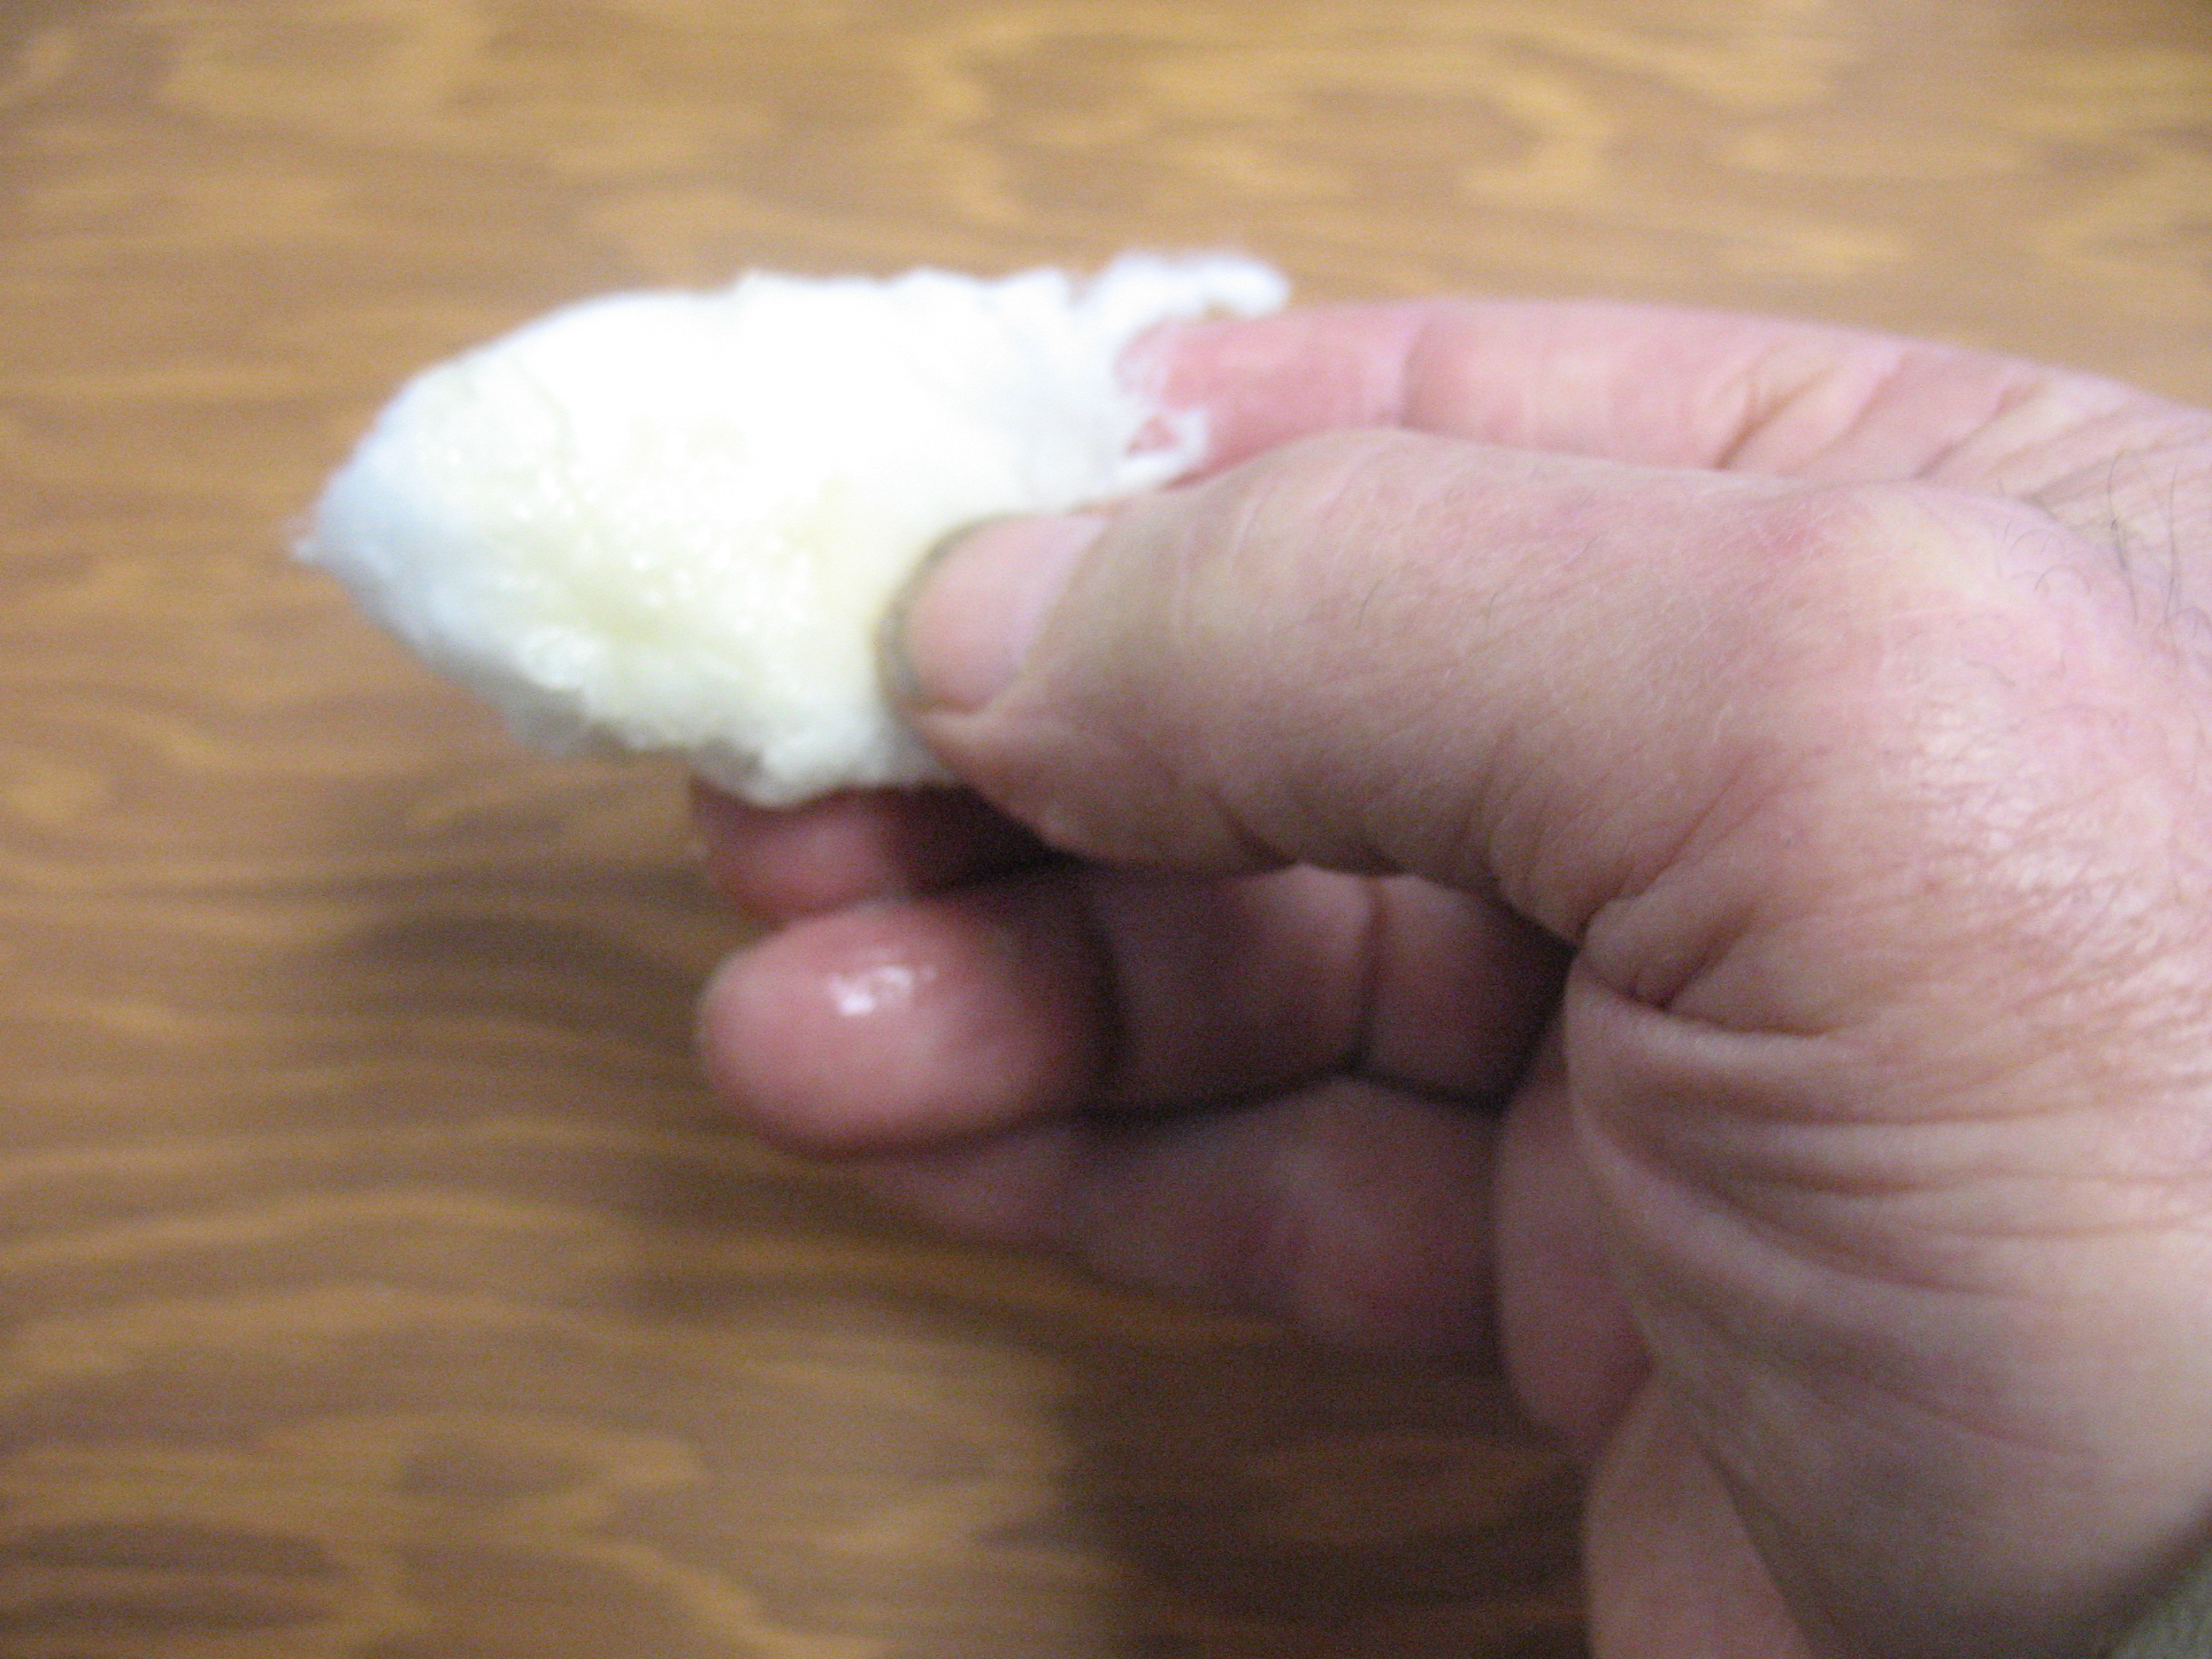
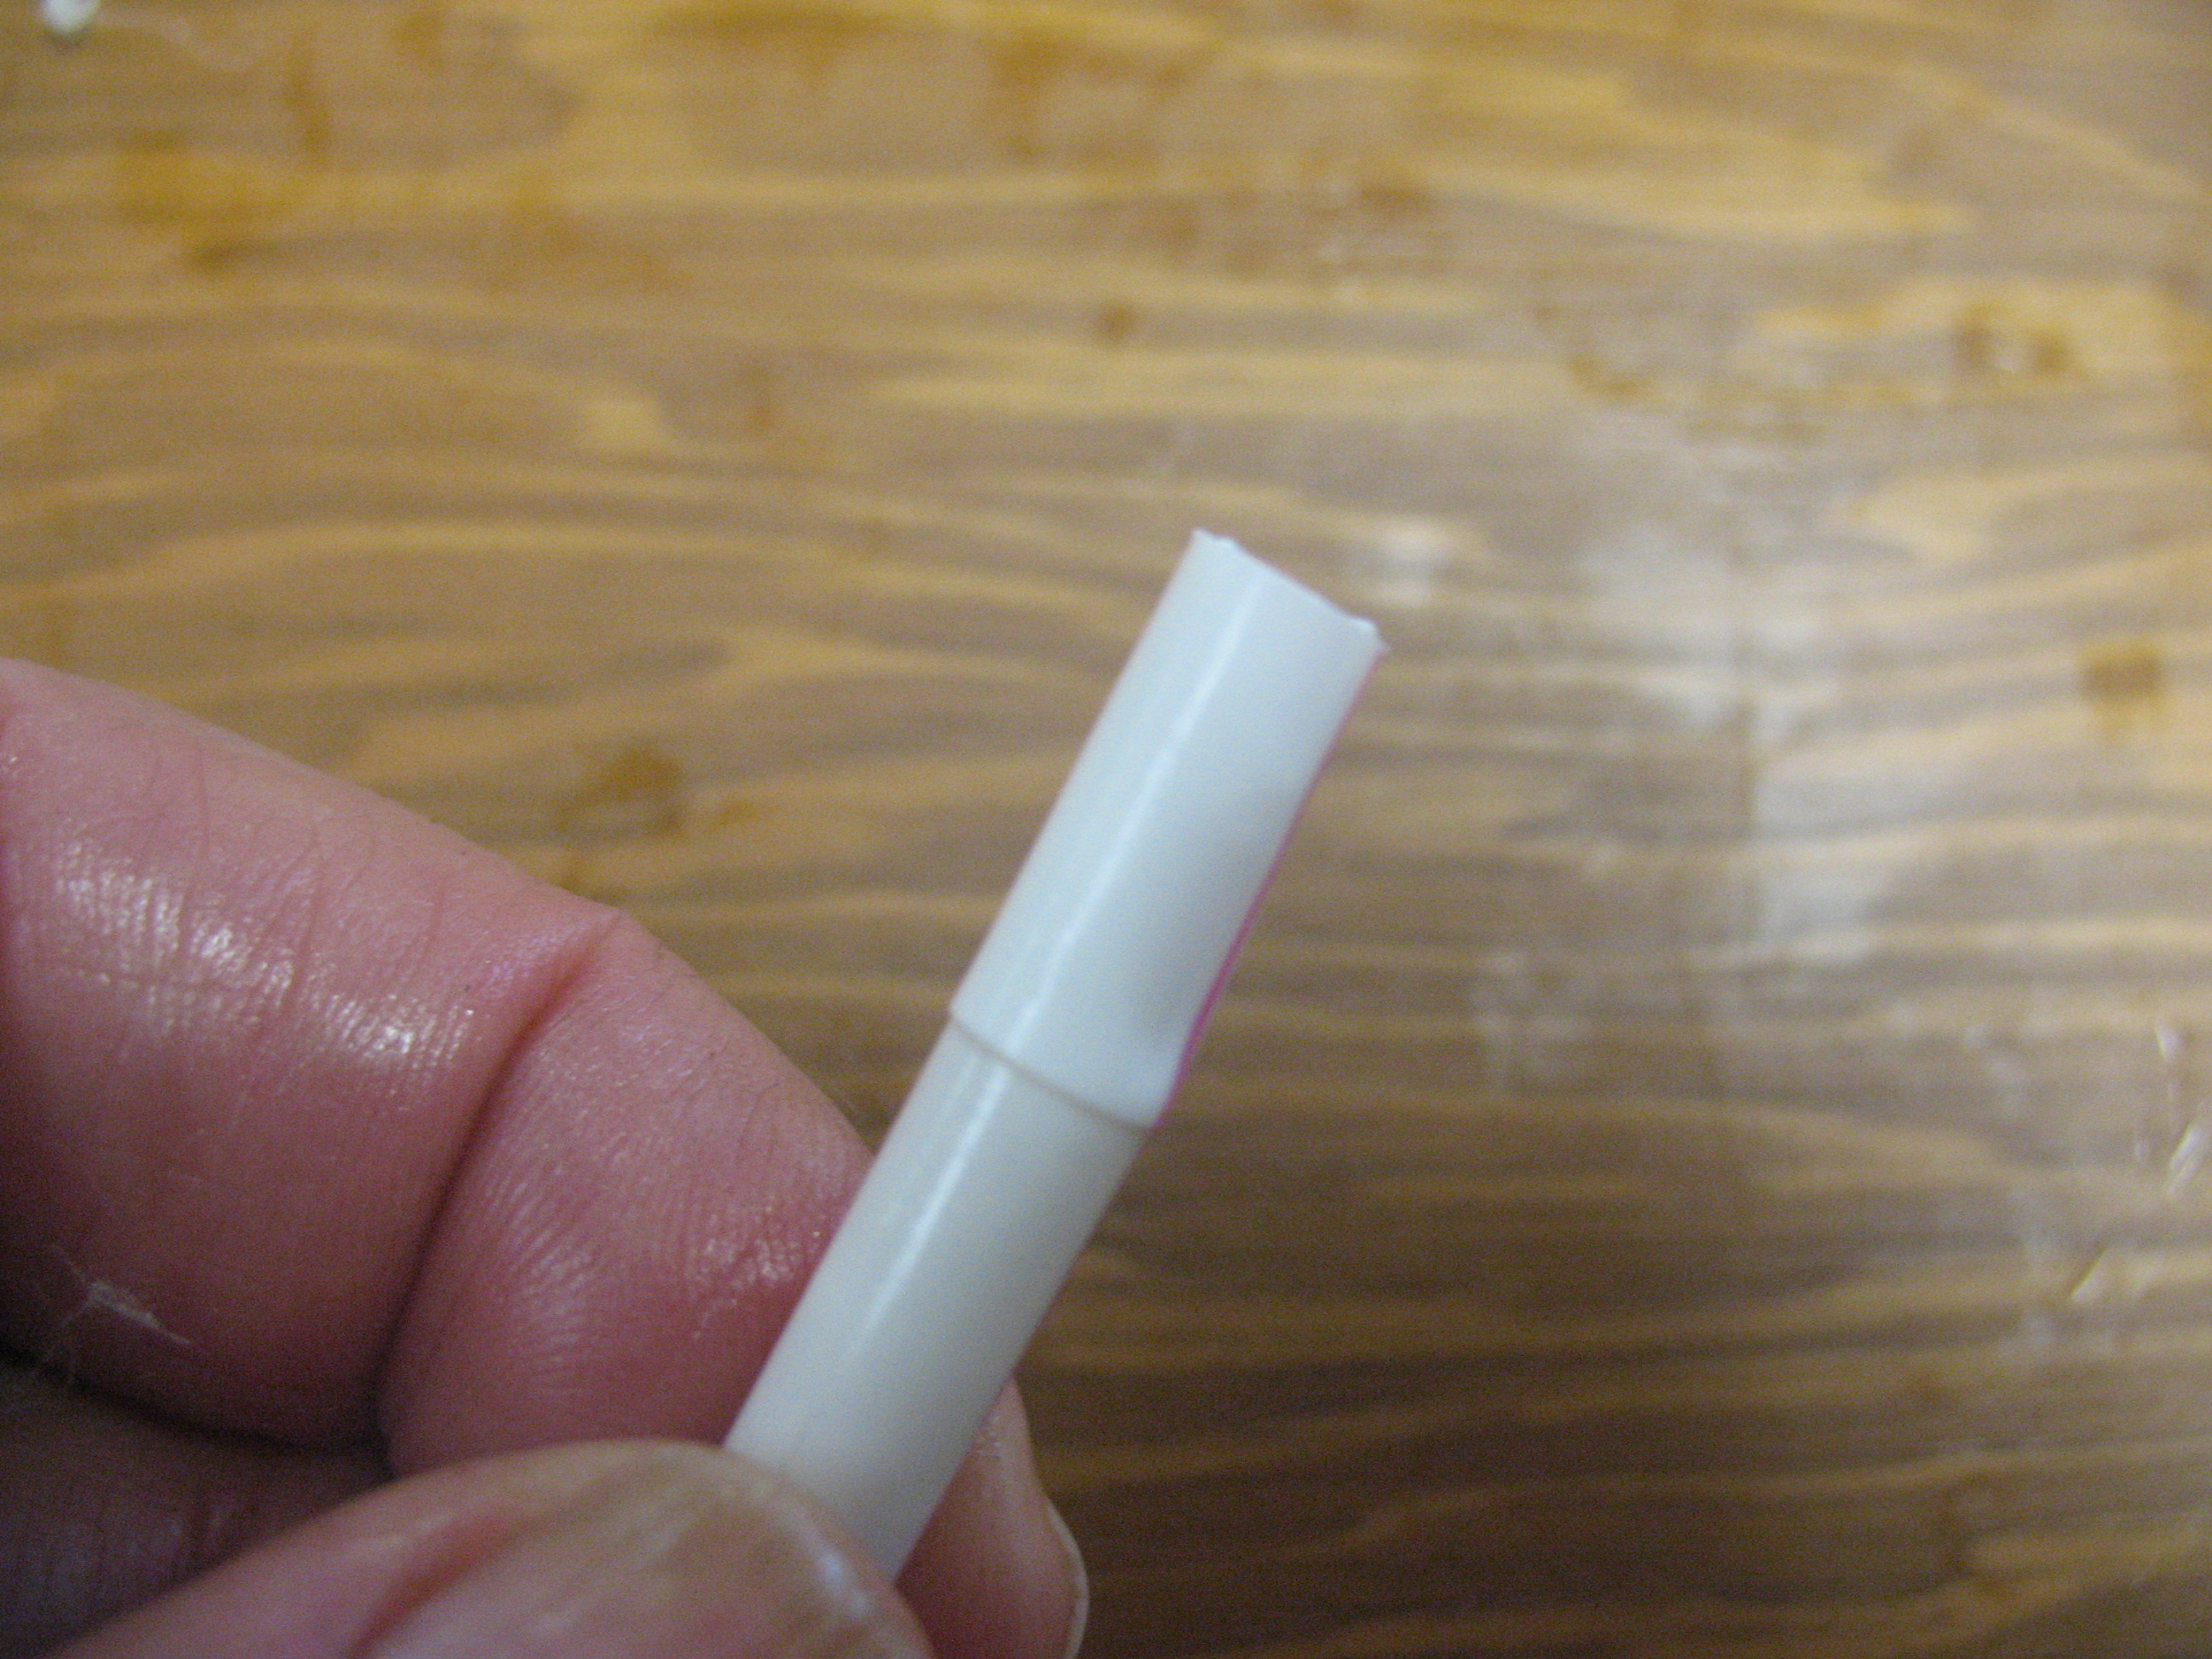
Now take the drinking straw and cut it into two 3 inch tubes, and four ½ inch tubes. Pictured below: Cut up drinking straw 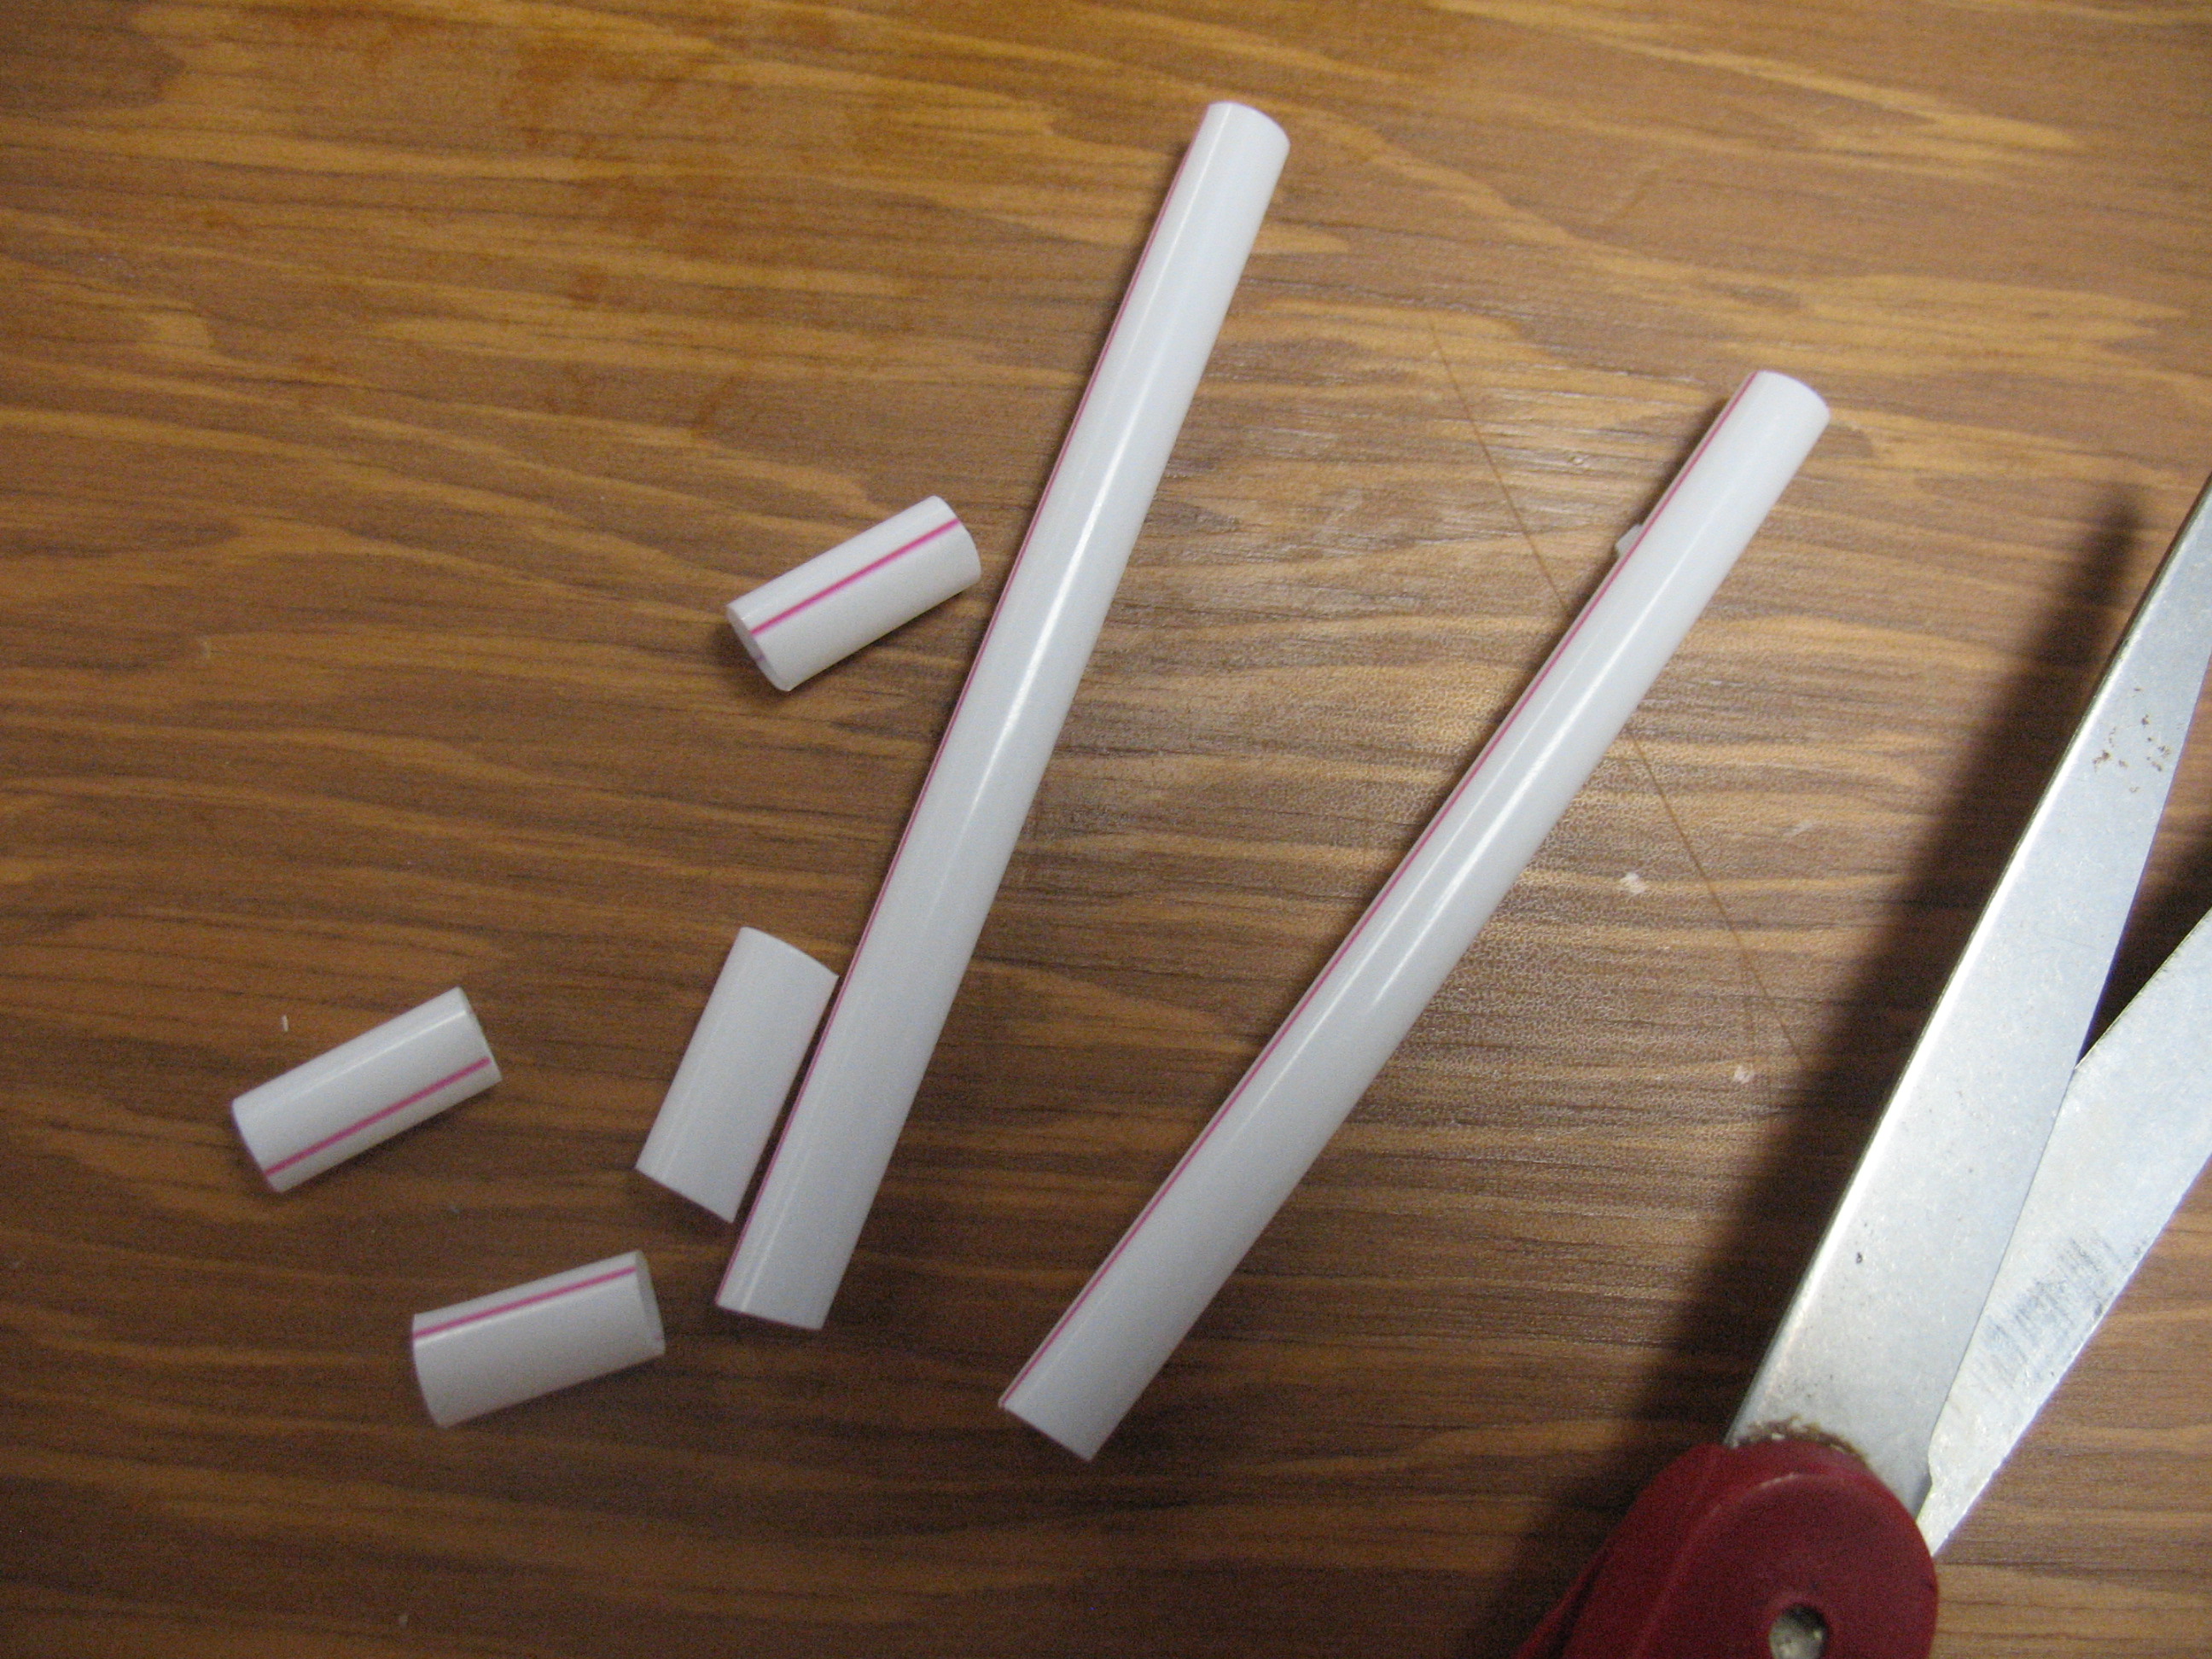
The next part is a little hard to describe, but the pictures should make it easier to understand.
1. Use your thumbnail to crimp across the straw about ¼ inch from one end, then fold that end down. 

2. Now use your thumbnail to make a length-wise crease in the part that you folded down. Then pinch the end together. 
3. Now take one of the ½ inch pieces of straw and slip it down over the end to hold it closed. 

4. Turn up the open end of the straw and start stuffing it with the soaked cotton. I find that it is easier if I kind of roll the cotton between thumb and fingers to make a string out of it. 
5. Use the stick to tamp the cotton down tight in the straw.
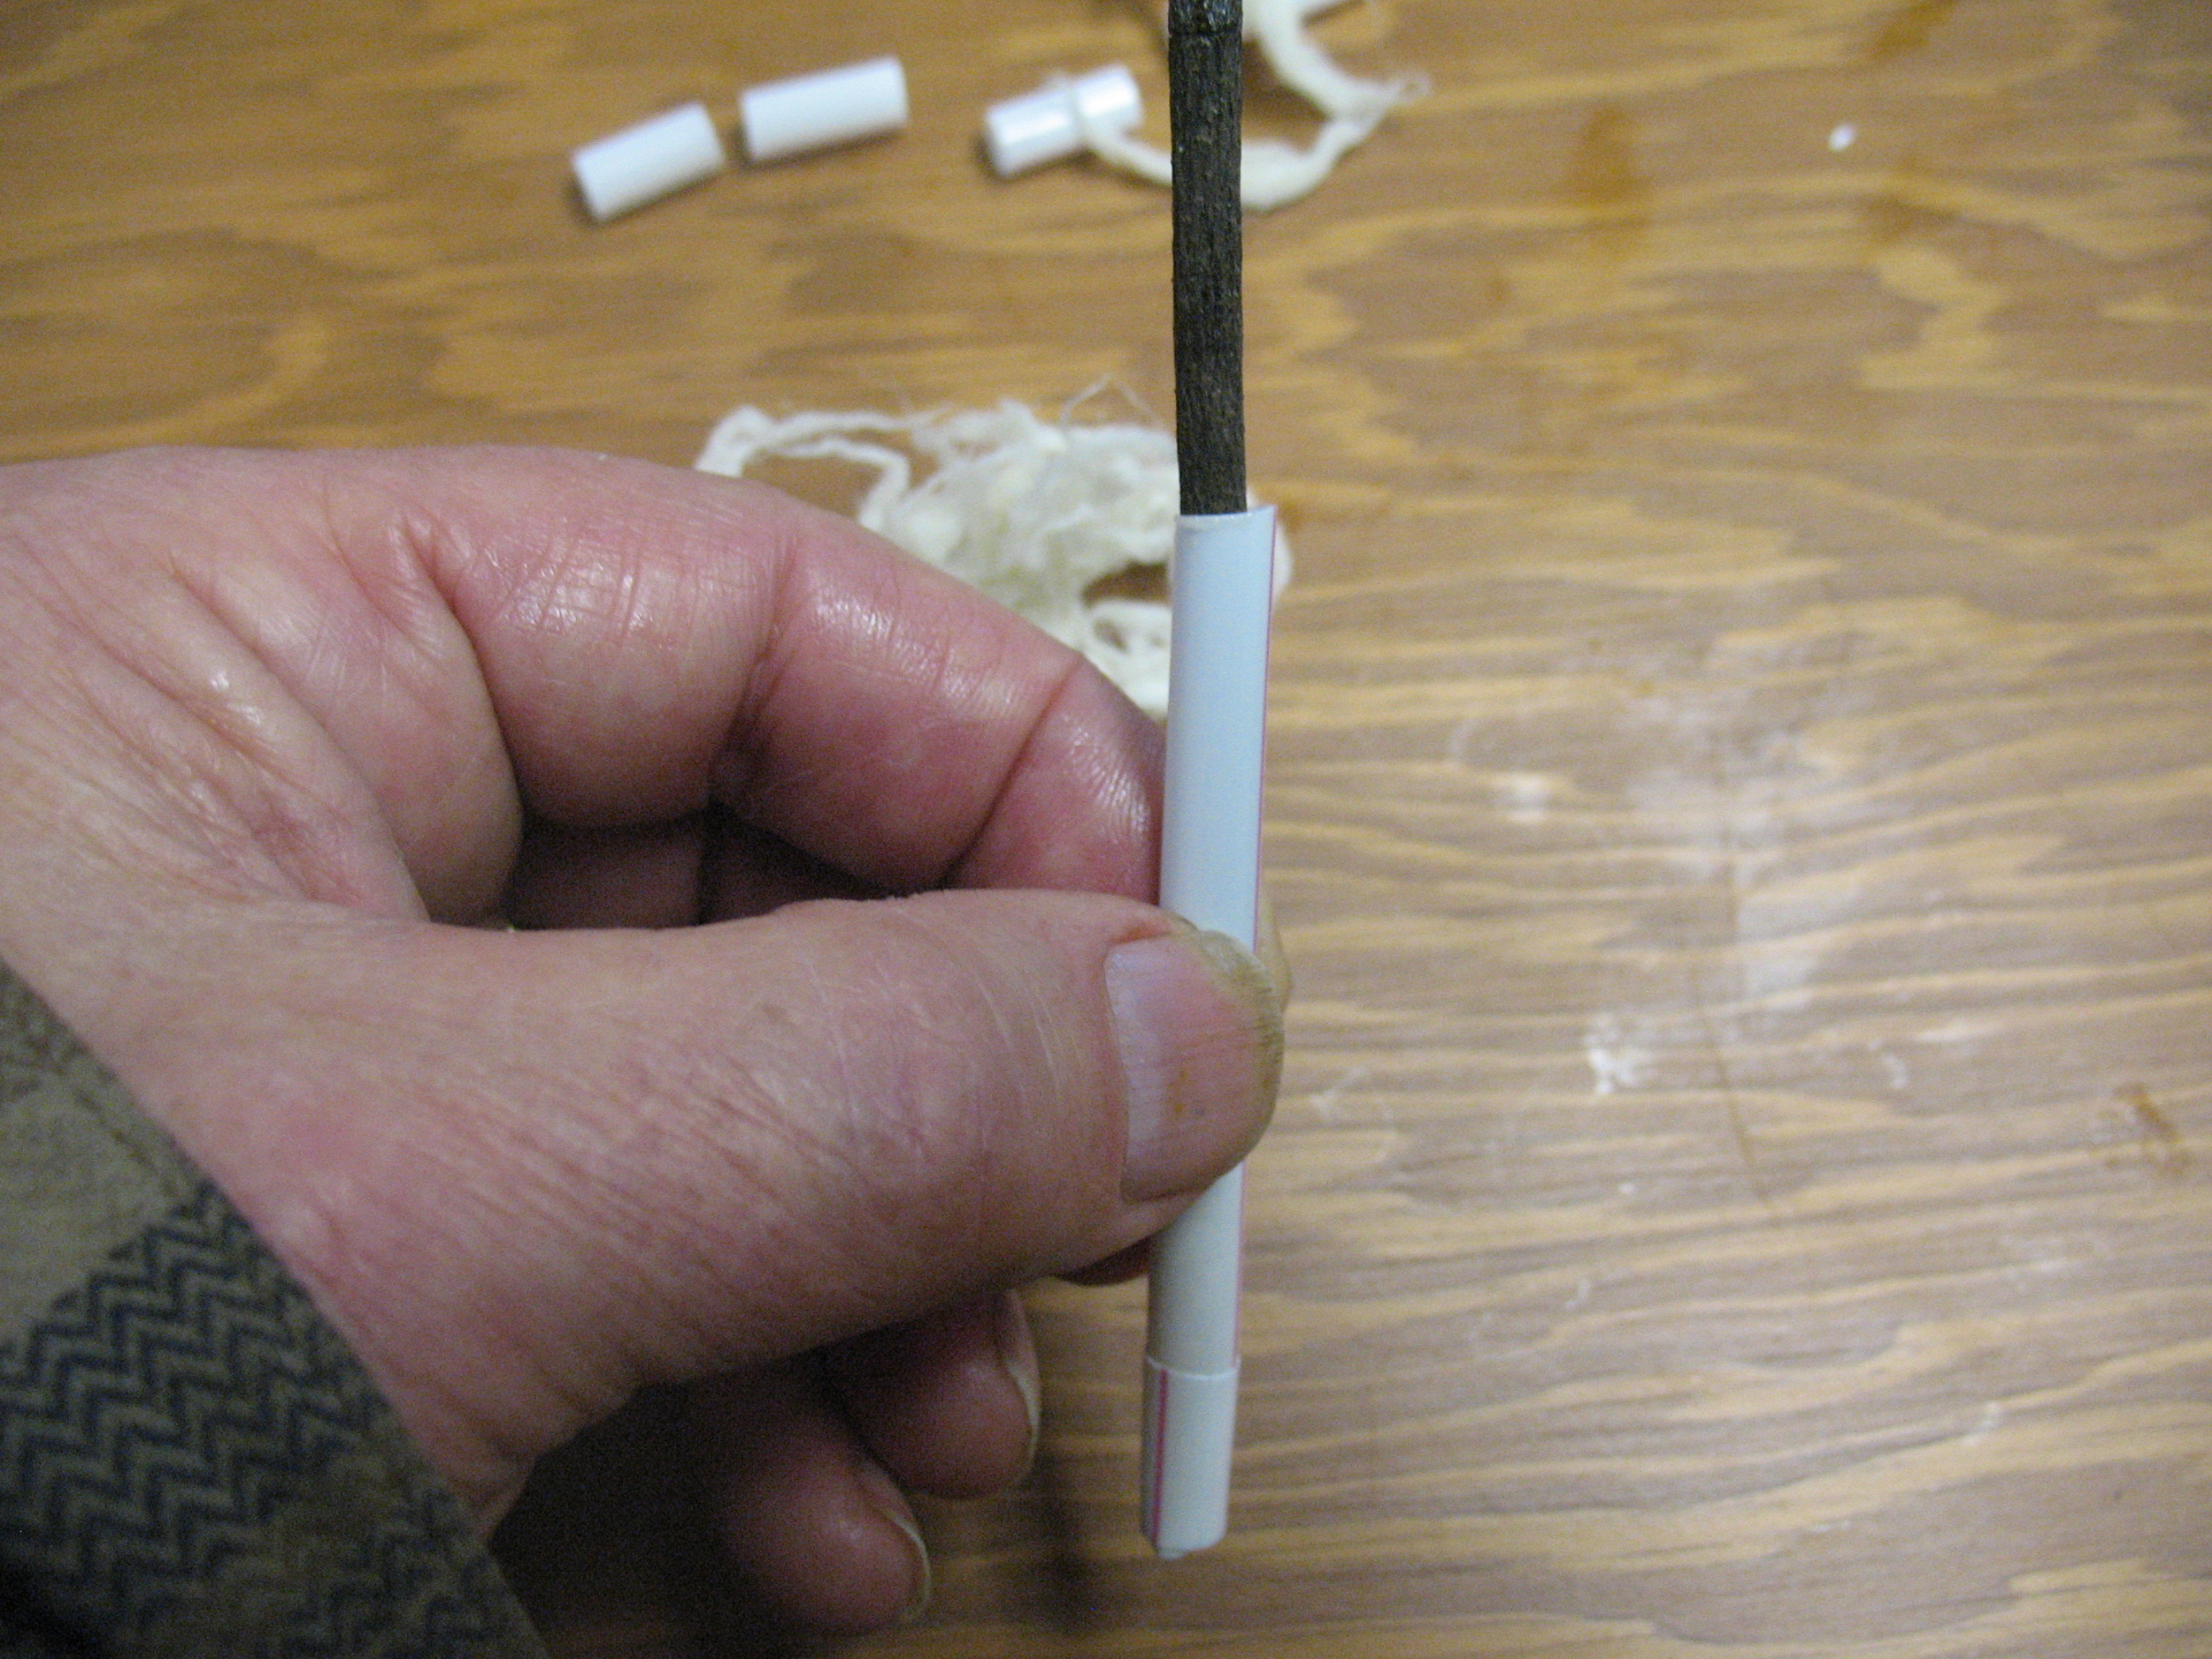
6. Fill the straw to about ½ inch from the top, then fold the top end down the same way you did the bottom. Crimp it, put a ½” collar on it, and you’re finished. 
Wipe off any petroleum jelly that you got on the outside, and you now have a leak proof, waterproof, convenient fire starter that you can add to a survival kit, put in your glove box, or drop in your pocket. To use the fire starter just cut it open, fluff up the cotton and light it up. This stuff will ignite easily using a metal match type fire striker.
